1
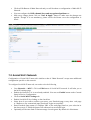
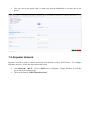
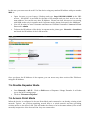
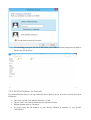
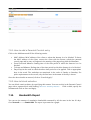
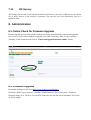
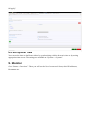
Ganga - User Manual 1. Introduction......................................................................................................................................1 2. Quick Help........................................................................................................................................1 3. Features.............................................................................................................................................2 4. Internet Access..................................................................................................................................2 5. Web UI..............................................................................................................................................2 6. IP Settings on Laptop / Desktop for Router Configuration..............................................................3 7. Configuration....................................................................................................................................3 7.1. Wi-Fi Configuration..................................................................................................................3 7.2. Social Wi-Fi Network...............................................................................................................4 7.3. Repeater Network.....................................................................................................................5 7.4. How to Access Web UI in Repeater Mode...............................................................................6 7.5. Disable Repeater Mode.............................................................................................................7 7.6. Access Point Mode....................................................................................................................7 7.7. Network Configuration.............................................................................................................8 7.7.1. LAN Settings.....................................................................................................................8 7.7.2. WAN Settings....................................................................................................................9 7.8. File Server.................................................................................................................................9 7.8.1. ES File Explorer on Android...........................................................................................11 7.8.2. How to Change Password for FileServer Access............................................................11 7.9. Parental Control......................................................................................................................12 7.9.1. How to add a Parental Control entry...............................................................................13 7.9.2. How to block websites....................................................................................................13 7.10. Bandwidth Report.................................................................................................................13 7.11. RF-Survey.............................................................................................................................14 8. Administration................................................................................................................................14 8.1. Online Check for Firmware Upgrade.....................................................................................14 8.2. Firmware Upgrade..................................................................................................................14 8.3. Change Administration Password...........................................................................................15 8.4. Set System Time.....................................................................................................................16 9. Monitor...........................................................................................................................................16 10. Connection Scenarios...................................................................................................................17 11. Support..........................................................................................................................................18 1. Introduction Thank you for choosing Nearhop's Ganga Router. You can use this Router as Wi-Fi Router, Wi-Fi Repeater / Range Extender, Access Point, Social Wi-Fi Router and File Server. In this document we will explain the configuration, administration and monitoring of the Router. For any help, write an email to [email protected] and please mention your mobile number in the mail. We will contact you almost immediately. 2. Quick Help Default SSID: Ganga Default Wi-Fi Password: nearhop123 Default IP Address to connect to the device via Ethernet Cable or WiFi : 192.168.9.1 Default Username for Web UI: root Default Password for Web UI: admin 3. Features The device has following features. Three separate networks, one for personal usage, one for guests and the other for repeater Social Network based Login access on guest network Access Point Mode Full support of WPA/WPA2 on all the networks Speeds upto 300Mbps Repeater network can be used to extend your network to cover your entire premises Set bandwidth limits on the guest network Configure the Facebook URL to redirect your guests Web Interface to configure the Router Parental Control feature to schedule access times for kids and ability to block few websites RF-Analysis feature to select the best channel to operate for the Router Bandwidth usage report for the last 30 days 4. Internet Access Connect your WAN cable (From ISP or any other Router connected to Internet) directly with the WAN port (Blue Ethernet Port) available on the Router. The Router gets the WAN IP Address dynamically and connects automatically to the Internet. You can connect your clients to the Router's Wireless Network (Default Wireless Network: Ganga, WirelessKey: nearhop123 ) and access Internet. 5. Web UI The Router offers Web UI to configure and monitor your network and the Router. From your Desktop / Laptop, you can connect to the Router using a LAN cable. The Router has 4 LAN Ports. Using any of these Ports you can configure the Router via Web UI Interface offered by the Router. Or you can configure the Router by connecting via Wireless also. Ganga can be configured using any of the popular browsers like Chrome, Internet Explorer or Firefox. However Chrome is the most preferred browser for the configuration. 6. IP Settings on Laptop / Desktop for Router Configuration Connect your PC directly to one of the Router's one of LAN ports using an Ethernet cable. LAN ports are Yellow in colour. By default the Router is accessible at 192.168.9.1. Your Laptop / Desktop's IP address should be in 192.168.9.x series. Generally your Laptop receives the IP Address in 192.168.9.x series automatically when you connect the device and Laptop using an Ethernet cable. Technology Byte: Your Laptop can receive the IP Address using DHCP or you can set static IP Address in 192.168.9.x series. In case of any difficulties, please contact us, shoot an email to [email protected] . 7. Configuration 7.1. Wi-Fi Configuration Open browser on your Laptop / Desktop and type 192.168.9.1 in the URL section You will be asked to enter Username and Password. Default Username is root and default Password is admin Goto Network--->Wi-Fi . You will see the list of networks as shown below. You will see three different networks, first one (Main Network) is for private usage, the second one is for guests (Social Wi-Fi Network) and the third one (Repeater / Range Extender) is for repeater. Click on Edit Button of Main Network and you will be taken to configuration of Main Wi-Fi Network. You can configure the SSID, channel, keys and encryption algorithms etc. With every change please click on “Save & Apply” button to make sure the changes are applied. Though it is not mandatory, please reboot the Router once the configuration is saved. 7.2. Social Wi-Fi Network Configuration of Social Wi-Fi network is similar to that of “Main Network” except some additional configuration specific to this network. To configure Social Wi-Fi network, one needs to do the following Goto Network--->Wi-Fi . Click on Edit button of Social Wi-Fi network. It will take you to the Wi-Fi settings page Enable the Network if it is not already enabled. You can see Enable button under General Setup in Device Configuration. Click on Social Wi-Fi Settings tab. Enable Social Wi-Fi by clicking on the check-box Select how do you want to redirect your users, your Facebook page or any other web page or “Redirect to my customized page (Facebook Login not required)” Enter Facebook page name (or complete URL of the web-page based on your selection in the above step) to which the guests will redirected on successful login Optionally set the time limit on Internet usage for each guest. By default it is 60 minutes. Also one can set the speed limit to make sure that the bandwidth is not eaten up by the guests. 7.3. Repeater Network Repeater network is used to connect the Router with already existing Wi-Fi Router. To configure Repeater network, follow the steps mentioned below. Goto Network--->Wi-Fi . Click on Edit button of Repeater / Range Extender. It will take you to the Wi-Fi settings page Click on the button “Select Network to Join” Select the network to join and click on the button, “Join Network” corresponding to the network that you want the Router (We call this as Main Router) to be connected with. Enter the key and Submit. You will return to the Wi-Fi settings page of the repeater Click on “Save and Apply” The Router will join the selected Wi-Fi network and will get a new dynamic IP address using DHCP On your browser you will see that “processing” wheel revolves continuously. Since your router gets a new IP Address from the Main Router, you will not come out of this “processing” wheel indefinitely. Don't worry about this and silently close the browser. We provide an approach to know the new IP Address. Please see below. If everything goes well ie You entered right key and the Main Router is up and running, then you should see Repeater's wireless network (default: Ganga) in your (Laptop / Mobile) WiFi Network list in about 20 seconds. If the network is not listed, then either the key is wrong or the Main Router has gone down. In this case (ie wrong key or Main Router is down), you have to reboot the Router and configure the key again. When you configure the device in Repeater mode, it gets a dynamic IP address. 7.4. How to Access Web UI in Repeater Mode Please note that the device (Ganga) gets a dynamic IP address from the main router when repeater is enabled and it is connected with main router successfully. If for some reason (wrong password is one reason) the repeater is not connected with the main router, the device is accessible at 192.168.9.1 after a reboot. In case of successful connection with the main router, you will not know the new IP Address directly. But nothing to worry. You may want to know the IP Address of the device to access Web UI or FileServer. Though there are multiple ways to access (specifically the web UI) the device, following is the simplest of all. In this case you can access the web UI of the device using any random IP Address with port number 9999. ie Open browser on your Laptop / Desktop and type http://192.168.9.1:9999 in the URL section . 192.168.9.1 is provided for the sake of an example and you don't need to use the same address. You can use any other IP Address. Please note that, this access ie accessing with 9999 works only in repeater mode. In Router mode, please dont specify the :9999 part. You will be asked to enter Username and Password. Default Username is root and default Password is admin To know the IP Address of the device in repeater mode, please goto Network--->Interfaces and check the IP Address of the LAN network. Once you know the IP Address of the repeater, you can access any other services like FileServer using this IP Address. 7.5. Disable Repeater Mode Goto Network--->Wi-Fi . Click on Edit button of Repeater / Range Extender. It will take you to the Wi-Fi settings page Click on “Disconnect Repeater” 7.6. Access Point Mode When the device is configured in Access Point Mode and connected to an already existing wired network. Typical use involves attaching several APs to a wired network and then providing wireless access to the office LAN. This will make the clients to be in the same subnet (of the wired network) irrespective of the Access Point they are connected to. Configuration is simple. You just need to enable / disable the Access Point Mode. Configuration of parameters like SSID, channel etc remains the same as the of Router mode as explained in above sections. Parental Control will not work in Access Point Mode. Goto Network ---> Access Point and enable / disable Access Point Mode. 7.7. Network Configuration 7.7.1.LAN Settings Goto Network--->Interfaces. Click on Edit Button corresponding to LAN You will see fields to change the IP Address, Netmask etc. You will also see the DHCP Server settings including start and end addresses to be assigned by the DHCP Server. 7.7.2.WAN Settings Goto Network--->Interfaces. Click on Edit Button corresponding to WAN 7.8. File Server You can use your Router as File Server also. Just connect a Pen Drive or any External Hard Disk into the USB drive on the Router. Thats it. You can access the files using File Explorer. There are several ways to access FileServer. Below we enumerate the steps which we think is a simple way. Connect your wireless client device (say your Windows Laptop) to the Router Make a note of the IP Address of your Router. Default IP Address of the Router is 192.168.9.1. Unless you change it or keep the device in repeater mode, the default IP Address can be used. On your client device, open windows run prompt (Windows Symbol + r ). Assuming the IP Address of the Router is 192.168.9.1, type \\192.168.9.1 in the location bar. Please make sure to use appropriate IP Address in case your Router's IP Address is different. A pop-up window will appear asking for the Username and Password. Default Username is nearhop and the default Password is nearhop. If everything goes good, the list of files from your USB-connected storage device shall be listed in the File Explorer. 7.8.1.ES File Explorer on Android On Android devices there is an app called ES File Explorer. It can be used to access files from FileServer. Tap on the top-left icon and goto Network > LAN Tap on “New” at bottom-left and enter the fileserver details Default domain name is “Nearhop” At server enter the IP Address of your Router. Default IP Address of your Router “192.168.9.1” Enter Username and Password. Default Username / Password is nearhop / nearhop Tap on OK 7.8.2.How to Change Password for FileServer Access Goto Services--->Network Shares . You can configure Password , WorkGroup etc. You can configure the WAN to fetch the IP Address dynamically using DHCP or assign a static IP Address. By default the Router fetches WAN IP Address using DHCP. 7.9. Parental Control This feature is valid only in Routing mode. It is not applicable when you configure the device as Repeater. Using Parental Control Feature, you can block access to specific hosts (probably your kids) at specific timings, say during study time. You can see Parental Control link at the top menu. Please see the mapping between Host-names and MAC addresses of the clients like computers/laptops/phone/tablet at the start of parental control page. This information will be helpful to you to know the MAC address of any client. MAC address is needed to block Internet to a specific client. Below the Hostnames-MAC address mapping you will see the list of configured MAC addresses(if already configured) and an option to “Add” new entries. 7.9.1.How to add a Parental Control entry Click on the Add button and fill the following entries. MAC Address: MAC address of the client to whom the Internet is to be blocked. To know the MAC address of the client, connect the client with the Router, refresh the parental control page and its entry will appear in the starting of the page along with the Hostname. From hours and Minutes: Starting time of the time period in which the Internet is to be blocked To hours and Minutes: Ending time of the time period in which the Internet is to be blocked Days: Days in the week in which the above time period is to be applied. Tick on appropriate days in the week. The weekdays are mentioned in the order of Sunday to Saturday. For space requirements on the screen, only the first letter in the name of the day is shown. Once the above details are entered, click on “Save & Apply”. 7.9.2.How to block websites You can block certain websites by specifying their names. You can see this in the Parental Control page with a separate block with heading “ Block the following Websites” . Click on Add, specify the sitename and click on Save and Apply. 7.10. Bandwidth Report You can see the amount of cumulative bandwidth consumed by all the users in the last 30 days. Goto Network-------->Bandwidth. The report is presented as a graph. 7.11. RF-Survey This feature can be used to find the best channel for the Router. Just click on RF-Survey tab and the list of Wi-Fi devices in the vicinity is presented. You can also view the interference level in a graphical form. 8. Administration 8.1. Online Check for Firmware Upgrade Remote upgrade gets the latest (from a remote site) image from Nearhop's website and upgrades your router. It is the easiest method to upgrade your router. In Router's Web UI, goto System-->Backup / Flash Firmware and click on “Check and Upgrade firmware online” button. 8.2. Firmware Upgrade Download the firmware file from http://www.nearhop.com/firmware/. In Router's Web UI, goto System--->Backup / Flash Firmware. There you can see “Flash new firmware image” box. Click on “Choose File” and select the file that you downloaded. Then click on “Flash image”. You will be taken to another page. Click on “Proceed”. The firmware upgrade will start. Wait for 2 to 3 minutes before the Router becomes up again. 8.3. Change Administration Password Goto System--->Administration. Enter the new password, confirm the password and click on “Save & Apply”. 8.4. Set System Time You can set the time on the Router either by synchronizing with the browser's time or by setting appropriate time server. The settings are available at “System---->System” 9. Monitor Goto “Status-->Overview”. There you will see the list of connected clients, their IP Addresses, Hostnames etc. 10. Connection Scenarios 11. Support For any support or technical help, please send an email to [email protected] or please call at,<phone number> . Customer support is available in English, Hindi and Telugu Languages.