1
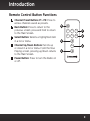
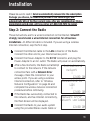
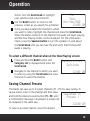
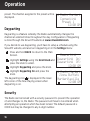
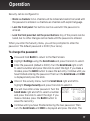
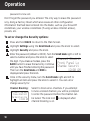
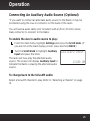
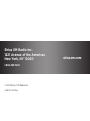
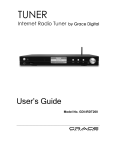
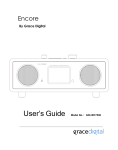
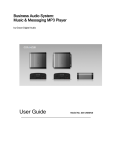
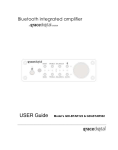
28 Radio Margari
Jimmy Buffett
Margaritaville
5:00 PM
PUSH to Select
Scroll
SPEAKER
P1
P2
P3
P4
P5
POWER
BACK
SiriusXM Music For Business Internet Radio
User Guide
Table of Contents
Introduction. . . . . . . . . . . . . . . . . . . . . . . . . . . . . . . . . . . . . . . . . . . . . . . . . . . . 4
Requirements: . . . . . . . . . . . . . . . . . . . . . . . . . . . . . . . . . . . . . . . . . . . . . . . . . . . . . . . . . . . . . .
Safety and Care Information. . . . . . . . . . . . . . . . . . . . . . . . . . . . . . . . . . . . . . . . . . . . . . . . . .
What’s in the Box? . . . . . . . . . . . . . . . . . . . . . . . . . . . . . . . . . . . . . . . . . . . . . . . . . . . . . . . . . .
Business Radio Button Functions and Connectors . . . . . . . . . . . . . . . . . . . . . . . . . . . . . .
Remote Control Button Functions. . . . . . . . . . . . . . . . . . . . . . . . . . . . . . . . . . . . . . . . . . . . .
4
4
6
7
9
Installation. . . . . . . . . . . . . . . . . . . . . . . . . . . . . . . . . . . . . . . . . . . . . . . . . . . . 10
Planning . . . . . . . . . . . . . . . . . . . . . . . . . . . . . . . . . . . . . . . . . . . . . . . . . . . . . . . . . . . . . . . . . . 10
Step 1: Subscribe to the SiriusXM Music for Business Internet Service . . . . . . . . . . . . 10
Step 2: Connect the Radio. . . . . . . . . . . . . . . . . . . . . . . . . . . . . . . . . . . . . . . . . . . . . . . . . . . .11
Step 3: Enter Your SiriusXM Credentials. . . . . . . . . . . . . . . . . . . . . . . . . . . . . . . . . . . . . . . . 12
Step 4: Set the Clock . . . . . . . . . . . . . . . . . . . . . . . . . . . . . . . . . . . . . . . . . . . . . . . . . . . . . . . . 13
Operation. . . . . . . . . . . . . . . . . . . . . . . . . . . . . . . . . . . . . . . . . . . . . . . . . . . . . 14
Now Playing Screen . . . . . . . . . . . . . . . . . . . . . . . . . . . . . . . . . . . . . . . . . . . . . . . . . . . . . . . . 14
Selecting a Channel . . . . . . . . . . . . . . . . . . . . . . . . . . . . . . . . . . . . . . . . . . . . . . . . . . . . . . . . 14
Saving Channel Presets. . . . . . . . . . . . . . . . . . . . . . . . . . . . . . . . . . . . . . . . . . . . . . . . . . . . . . 15
Dayparting . . . . . . . . . . . . . . . . . . . . . . . . . . . . . . . . . . . . . . . . . . . . . . . . . . . . . . . . . . . . . . . . . 16
Security. . . . . . . . . . . . . . . . . . . . . . . . . . . . . . . . . . . . . . . . . . . . . . . . . . . . . . . . . . . . . . . . . . . . 16
Connecting An Auxiliary Audio Source (Optional) . . . . . . . . . . . . . . . . . . . . . . . . . . . . . . 21
Wireless Network Configuration. . . . . . . . . . . . . . . . . . . . . . . . . . . . . . . . . . 24
Product Specifications. . . . . . . . . . . . . . . . . . . . . . . . . . . . . . . . . . . . . . . . . . 26
Patent and Environmental Information . . . . . . . . . . . . . . . . . . . . . . . . . . . . 27
FCC Statement . . . . . . . . . . . . . . . . . . . . . . . . . . . . . . . . . . . . . . . . . . . . . . . . 28
Copyrights and Trademarks. . . . . . . . . . . . . . . . . . . . . . . . . . . . . . . . . . . . . . 29
Licenses and Warranty. . . . . . . . . . . . . . . . . . . . . . . . . . . . . . . . . . . . . . . . . . 30
3
Introduction
Requirements:
• The SiriusXM Business Radio requires connectivity to the Internet.
The connection may be made a through a wired Ethernet connection
(recommended), or through a wireless access point connection.
• The SiriusXM Business Radio requires a SiriusXM Music for Business
Internet Service subscription. To subscribe call 1-866-345-SIRIUS
(7474).
Safety and Care Information
IMPORTANT! Self installation instructions and tips are provided for your
convenience. It is your responsibility to determine if you have the knowledge,
skills, and physical ability required to properly perform an installation.
SiriusXM shall have no liability for damage or injury resulting from the
installation or use of any SiriusXM or third party products. It is your
responsibility to ensure that all products are installed in adherence with local
laws and regulations. SiriusXM product warranties do not cover the
installation, removal or reinstallation of any product.
• Do not expose to extreme temperatures (above 95° F or below 41° F, or
above 35° C or below 5° C).
• Do not cover the unit in any material such as cloth or plastic. If the unit
is covered in this manner the temperature inside the unit and outside
the unit may rise substantially. Substantial temperature increase may
result in a malfunction, product damage or personal injury.
• Do not expose to direct sunlight for a prolonged period of time, and do
not expose to fire, flame, or other heat sources such as air ducts and
heat radiators.
• Do not expose to moisture. Do not use device near or in water. Do not
touch the device with wet hands.
4
Introduction
• Do not store in dusty or dirty areas. Do not let any foreign matter spill
into device.
• Do not expose to chemicals such as benzene and thinners. Do not use
liquid or aerosol cleaners. Clean with a soft cloth only and wipe lightly.
• Do not try to disassemble and/or repair device yourself.
• Do not drop your device or subject it to severe impact, vibration, or
electromagnetic radiation. Do not place heavy objects on the device. Do
not subject device to excessive pressure.
• If the LCD screen is damaged, do not touch the liquid crystal fluid.
Warning!
• Opening the case may result in electric shock.
• If the liquid crystal fluid comes in contact with your skin, wipe the skin
area with a cloth and then wash the skin thoroughly with soap and
running water. If the liquid crystal fluid comes into contact with your
eyes, flush the eyes with clean water for at least 15 minutes and seek
medical care. If the liquid crystal fluid is ingested, flush your mouth
thoroughly with water. Drink large quantities of water, and induce
vomiting. Seek medical care.
• Make sure that you use the Power Adapter included with the unit, and
that you insert the Power Adapter all the way into the socket.
• This product contains chemicals known to the State of California to
cause cancer and birth defects or other reproductive harm.
5
Introduction
What’s in the Box?
P1
P2
P3
P4
P5
BACK
PUSH to Select
Scroll
SPEAKER
P1
P2
P3
P4
P5
POWER
BACK
SiriusXM Business Radio
Power Adapter
6
Ethernet
Cable
SELECT
Remote Control
Stereo
Audio Cable
Mono
Audio Cable
Wireless
Antenna
Introduction
Business Radio Button Functions and Connectors
Front View
PUSH to Select
Scroll
P1
P2
P3
1
P4
P5
2
SPEAKER
POWER
4
5
6
BACK
3
Rear View
14
(L)
IMPEDANCE
7
8
STEREO
OUT
(R)
MONO
OUT
LAN
11
12
DC 5V
AUX IN
9
10
13
1. Channel Presets P1 - P5: Press and hold to save channels as presets;
press to access presets.
2. Display Screen: LCD display screen.
3. Back Button: Press to return to the previous screen; press and hold to
return to the Main Screen.
4. Speaker Button: Press in/out to turn the internal speaker on/off.
5. Power Button: Press to turn the Radio on or off.
7
Introduction
6. Scroll knob: Turn the knob to scroll through menu items. Press to
select a menu item.
7. Built-in Speaker: Speaker to monitor the audio playing.
8. Impedance Switch: Selects the appropriate impedance: 8 ohm is the
default for most audio devices and phone systems. IP based phone
systems may require the 600 ohm setting.
9. AUX In: Used to connect an alternate audio source to the Radio.
10.Stereo Out (L) (R): Used to connect the Radio to your stereo audio
system.
11. Mono Out: Used to connect the Radio to your phone system.
12. LAN: Connector for a wired Ethernet (Internet) connection.
13. DC 5V: Power connector for the supplied Power Adapter. (5 volts)
14.Antenna Connector: Connector for the wireless network antenna.
8
Introduction
Remote Control Button Functions
1. Channel Preset Buttons P1 - P5: Press to
access channels saved as presets.
2. Back Button: Press to return to the
previous screen; press and hold to return
to the Main Screen.
3. Select Button: Selects a highlighted item
in a list or menu.
4. Channel Up/Down Buttons: Scrolls up
or down in a list or menu. From the Now
Playing screen, pressing up/down returns
to the Main Screen.
5
P1
P2
P3
1
P4
P5
BACK
2
4
SELECT
3
4
5. Power Button: Press to turn the Radio on
or off.
9
Installation
Planning
Before installing your SiriusXM Business Radio, you will need to consider
the following:
• How will you connect the Radio to the Internet, wired or wireless?
SiriusXM strongly recommends a wired internet connection for all
business installations.
-- If your network requires a static IP, consult a professional installer.
-- If wireless, and if the network is secured, you will need to know the
wireless network name (SSID) and the password/key to connect to it.
• If you will be connecting the audio from the Radio to another device
such as a stereo system or a phone system, you will need to locate the
Radio in close proximity to your device so you can connect the audio
cable(s).
• If you are connecting the audio to a device, what audio impedance does
the device require? Most devices use 8 ohms, but some IP based phone
systems may require the 600 ohm setting.
The following sections provide the installation procedure.
Step 1: Subscribe to the SiriusXM Music for Business
Internet Service
To listen to the SiriusXM Music for Business Internet Service, you will need
to subscribe to the service. Call 1-866-345-SIRIUS (7474) to subscribe and
obtain your SiriusXM username and password (credentials).
Your subscription is governed by our Customer Agreement which you will
find at http://www.siriusxm.com/pdf/siriusxmbiz_customeragreement_eng.pdf.
10
Installation
Please be sure to read it. Service automatically renews into the subscription
Package you choose, for additional periods of the same length, and
automatically bills at the then current rates, after any complimentary trial or
promotional period ends, until you call us at 1-866-345-7474 to cancel.
Step 2: Connect the Radio
These instructions are for a wired connection to the Internet. SiriusXM
strongly recommends a wired internet connection for all business
installations. An Ethernet cable is included. If you are using a wireless
Internet connection, skip the first step.
1. Connect the Ethernet cable to the LAN connector of the Radio.
Connect the other end to your Internet access point.
2. Connect the Power Adapter to the DC 5V connector, and plug the
Power Adapter to an AC outlet. The Radio will power on automatically.
3. After a few moments, the Radio will attempt
to connect to the network. If the network
connection fails with a Network Error
message, check the connection to your
access point. If you are using a wireless
Internet connection, refer to “Wireless
Network Configuration” on page 24 and
complete the wireless network connection
procedure before continuing.
4. If the Radio has successfully connected to
the network, and has Internet connectivity,
the Main Screen will be displayed.
5. Connect the Radio to your audio system
using the provided Stereo Audio Cable or
Initializing
network
|
12:00 AM
Connecting to
LAN
|
12:00 AM
Network Error
Network unplugge
12:00 AM
11
Installation
Mono Audio Cable. Connect the Stereo
<Category List >
Audio cable to the Audio Out (L) (R) (white
Settings
and red) connectors, or the Mono Audio
Cable to the Mono Out connector (green).
12:00 AM
6. Set the Impedance Switch to the correct
impedance for your audio system. Most devices use the 8 ohms
setting, but some IP based phone systems may require the 600 ohm
setting.
Step 3: Enter Your SiriusXM Credentials
1. From the Main Screen, turn the Scroll knob to the right to highlight
Settings and press the knob to select.
2. Turn the Scroll knob to highlight Credentials and press the knob.
3. First enter the username that SiriusXM provided to you. The username
is case sensitive. Turn the Scroll knob right and left to select a letter
or number and press the knob to select the letter. If you make a
mistake, press the BACK button to erase the last entry.
4. Continue until you have finished entering the username. Then turn the
Scroll knob until END is displayed and press the knob.
5. The Radio will display LOADING... while
the username is being verified. Username
updated will be briefly displayed if you
entered the correct username. If you have
entered an incorrect username, Username
does not exist will be displayed. You will
need to correct the username.
6. Next you will be prompted to enter your
password. Enter your password in the
12
Enter Username
~ CNL END <AaB
ABCDEF
12:00 AM
Loading...
|
12:00 AM
Installation
same way as you entered your username. The password is also case
sensitive. Then turn the Scroll knob until END is displayed and press
the knob.
7. After your password has been entered and successfully verified, you
will be returned to the settings screen. Press BACK to return to the
main display screen.
Step 4: Set the Clock
1. If you are not in the Settings menu, then from the Main Screen turn
the Scroll knob to highlight Settings and press the knob to select.
2. Turn the Scroll knob to highlight Clock set-up and press the knob.
3. Time Zone will be highlighted. Press the Scroll knob to select and
turn it to highlight your time zone. Press the Scroll knob again to
select your time zone.
4. Next you will be prompted to set the time. The time is set
automatically, so press the Scroll knob until you are prompted to set
the date.
5. You will be prompted to set the date. The date is set automatically, so
press the Scroll knob until you receive a confirmation message that
the time and date have been set.
6. By default, Daylight Savings Time (DST) is set to on and will
automatically adjust the time. If Daylight Savings Time (DST) is not
observed in your time zone, turn the Scroll knob to highlight Daylight
Savin and press the knob.
7. Turn the Scroll knob to highlight None and press the knob. You will
receive a confirmation that DST is off.
13
Operation
Now Playing Screen
When listening to a channel, information about the channel and what is
currently playing is displayed.
Channel Number
Song Title
24 Radio Margari Channel Name
Artist Name
Jimmy Buffett
Margaritaville
12:00 AM Time
xL Channels Locked
Front Panel Locked
Dayparting On
Wireless Network Signal Strength
Selecting a Channel
The first time the Radio successfully connects to the SiriusXM Music for
Business Internet Service, no channel will have been selected to play. If you
had previously used the Radio and tuned to a channel, the last selected
channel will play when the Radio is powered on.
To initially select a channel to listen to:
1. If you are not at the main display screen,
press and hold BACK until it is displayed.
2. Highlight Category List and press the Scroll
knob. The category list will be displayed.
3. You can select All Channels to browse
through every available channel, or narrow
the category list of channels by selecting
Music, Talk & Entertainment, or Latin &
14
<Category List >
Settings
12:00 AM
< All Channels >
Music
Talk and Enterta
12:00 AM
Operation
World. Turn the Scroll knob to highlight
your selection and press the knob.
4. Use the BACK button to return to the
previous screen as you search for a channel.
<
Pop
>
Rock
Hip-Hop/R&B
12:00 AM
5. Once you have located the channel to which
you want to listen, highlight the channel and press the Scroll knob.
When the Radio connects to the channel, the audio will begin playing
and the Now Playing screen will be displayed. For the initial audio
check, press the Speaker button to turn the speaker on, and adjust
the Scroll knob until you can hear the and verify that the SiriusXM
audio is playing.
To select a different channel when at the Now Playing screen:
1. Press and hold the BACK button until
Category List is displayed and press the
Scroll knob.
2. Navigate to the channel to which you want
to listen by using the Scroll knob and press
the knob to select the channel.
<Category List >
Settings
12:00 AM
Saving Channel Presets
The Radio can save up to 5 preset channels (P1 - P5) for easy tuning. To
save a preset, tune to the channel and then press
Assigned To
and hold the desired preset button (P1 - P5) until
Preset 1
a confirmation message is displayed. A preset can
be replaced in the same way.
12:00 AM
To tune to a preset channel, press the desired
15
Operation
preset. The channel assigned to the preset will be 24 Radio Margari
displayed.
Connecting
Dayparting
Preset 1
12:00 AM
Dayparting is a feature whereby the Radio automatically changes the
channel at selected times throughout the day. Configuration of Dayparting
is done through the SiriusXM website at www.siriusxm4biz.com.
If you decide to use dayparting, you’ll have to setup a schedule using the
SiriusXM website, and also turn dayparting on in the Settings menu:
1. Press and hold BACK to return to the Main
Screen.
Dayparting
2. Highlight Settings using the Scroll knob and <Dayparting
<Dayparting
press the knob to select.
3. Highlight Dayparting and press the knob.
4. Highlight Dayparting On and press the
knob.
The dayparting icon is displayed in the lower
left corner of the Now Playing screen when
dayparting is on.
On>
Of>
12:00 AM
24 Radio Margari
Jimmy Buffett
Margaritaville
12:00 AM
Security
The Radio can be locked with a security password to prevent the operation
of, and changes to, the Radio. The password will have to be entered when
attempting an operation which has been locked. The default password is
0000 but may be changed to any 4-digit number.
16
Operation
Security can be configured to:
• Block xL channels: All xL channels will be locked and cannot be tuned until
the password is entered. xL channels are channels with explicit language.
• Lock the front panel: No buttons can be used until the password is
entered.
• Lock the front panel but not the preset buttons: Any of the presets can be
tuned, but no other changes can be made until the password is entered.
When you enter the Security menu, you will be prompted to enter the
password. The default password is 0000 (four zeros).
To change the password:
1. Press and hold BACK to return to the Main Screen.
2. Highlight Settings using the Scroll knob and press the knob to select.
3. Enter the password (default is 0000). Turn the Scroll knob right or left
to select a number and press the knob to select the digit. If you make a
mistake, press the BACK button to erase the last entry. Continue until you
have finished entering the password. Then turn the Scroll knob until END
is displayed and press the knob.
4. Once in the security menu, turn the Scroll knob right and left to
highlight Change Security and press the knob to select it.
5. You will now enter a new password. Turn the Enter password
Scroll knob right and left to select a number NLEND<
0 12345
and press the knob to select the digit. If you
_
make a mistake, press the BACK button to
12:00 AM
erase the last entry.
6. Continue until you have finished entering the new password. Then
turn the Scroll knob until END is displayed and press the knob. The
17
Operation
password is now set.
Don’t forget the password you entered. The only way to erase the password
is by doing a Factory Reset which also erases all other configuration
information that had been entered into the Radio, such as your SiriusXM
credentials, your wireless credentials (if using wireless Internet access),
presets, etc.
To set or change the Security options:
1. Press and hold BACK to return to the Main Screen.
2. Highlight Settings using the Scroll knob and press the knob to select.
3. Highlight Security and press the knob.
4. Enter the password (default is 0000). Turn the Scroll knob right or left to
select a number and press the knob to select
<Channel Blocki>
the digit. If you make a mistake, press the
Front Panel Lo
BACK button to erase the last entry. Continue
Change Securit
until you have finished entering the password.
12:00 AM
Then turn the Scroll knob until END is
displayed and press the knob.
5. Once in the security menu, turn the Scroll knob right and left to
highlight an item and press the knob to select it. You can set or
change security for:
Channel Blocking:
24 Radio Margari
Jimmy Buffett
Margaritaville
12:00 AM
18
Select to block all xL channels. If you attempt
to tune a locked channel, you will be prompted
to enter the password before the channel can
be tuned. The lock icon is displayed when
channel blocking is on.
Operation
Front Panel Lock:
24 Radio Margari
Jimmy Buffett
Margaritaville
12:00 AM
Enable Presets: Select to lock the front panel,
except for the channel preset buttons. The
password will have to be entered before
the buttons are enabled. The key icon is
displayed when the front panel lock is on.
All: Select to lock all the front panel buttons
including the channel preset buttons. The
password will have to be entered before the
buttons are enabled.
Change Security:
Select to change the password.
If you want to remove the security for an item that you had previously
secured, highlight the item and press the Scroll knob. Press and hold the
BACK button to return from the Security menu and the security will have
been removed. You cannot remove the password once you have set it,
except by doing a Factory Reset which also erases all other configuration
information that had been entered into the Radio, such as your SiriusXM
credentials, your wireless credentials (if using wireless Internet access),
presets, etc.
To tune a Locked Channel:
If you attempt to tune an xL channel when Channel Lock is on, you will be
prompted to enter the password.
Enter the password by turning the Scroll knob
right or left to select a number and press the
knob to select the digit. If you make a mistake,
press the BACK button to erase the last entry.
Continue until you have finished entering the
Channel blocked.
Please enter
password.
12:00 AM
19
Operation
password. Then turn the Scroll knob until END
is displayed and press the knob. The channel will
then be tuned.
Once you have unlocked a channel, the unlocked
icon is displayed on the Now Playing screen,
and all xL channels will remain unlocked until the
Radio is tuned off and on again.
Enter password
NLEND< 0 12345
_
12:00 AM
24 Radio Margari
Jimmy Buffett
Margaritaville
12:00 AM
If you turn the Radio on, and it had been tuned
to an xL channel, you will be prompted to enter
the password. If you do not enter the password,
the display screen will show Stopped to indicate that the xL channel is not
playing.
To unlock the Front Panel:
When the front panel is locked, and you press
a button or turn the Scroll knob, you will be
prompted to enter the password.
Enter the password by turning the Scroll knob
right or left to select a number and press the
knob to select the digit. If you make a mistake,
press the BACK button to erase the last entry.
Continue until you have finished entering the
password. Then turn the Scroll knob until END is
displayed and press the knob.
Front panel
locked. Please
enter password.
12:00 AM
Enter password
NLEND< 0 12345
_
12:00 AM
The front panel will be unlocked and remain unlocked until you lock it
again. Refer to “To set or change the Security options:” on page 18 for
instructions to lock the front panel.
20
Operation
Connecting An Auxiliary Audio Source (Optional)
“If you want to connect an alternate audio source to the Radio, it may be
connected using the Aux-In connector on the back of the radio.
You will need a audio cable (not included) with a 1/8 in (3.5 mm) stereo
male connector to connect to the Radio.
To enable the Aux In audio source to play:
1. From the main menu, highlight Settings and press the Scroll knob. (If
you are not at the main display screen, press and hold BACK.)
2. Turn the Scroll knob to highlight Auxiliary
input and press the knob.
The radio will now play the alternate audio
source. The screen will display Auxiliary input to
indicate the Radio is playing the alternate audio
source.
Auxiliary input
12:00 AM
To change back to the SiriusXM audio:
Select a SiriusXM channel to play. Refer to “Selecting a Channel” on page
14.
21
Settings
The settings menu is where you can configure the Radio’s settings. The
settings menu is accessed by pressing and holding BACK until the Main Screen
is displayed. Then highlight and select Settings using the Scroll knob.
The following table describes each item in the settings menu. Use the
Scroll knob to highlight a item and press it to select the item.
Network
Configuration
Wired/Wireless: Selects whether the Radio will
connect to the network via the LAN connector with
a Ethernet cable, or connect via a wireless network
connection.
Scan for WiFi: This menu option is shown when the
Radio has been configured for a wireless network
connection. Selecting this option will cause the Radio
to scan for and display the wireless networks within
range. Refer to “Wireless Network Configuration” on
page 24 for the wireless network configuration
procedure.
Manual Network Configuration: This menu option
is shown when the radio is configured for a wireless
network connection. Consult a professional installer if
your wireless network requires manual configuration.
View Configuration: Displays details about the current
network connection. Turn the Scroll knob left or right
to view each available configuration setting.
Edit Configuration: Configure the details of the
current network connection. For a wireless network
connection, refer to “Wireless Network Configuration”
on page 24 for the wireless network configuration
procedure.
22
Settings
Clock set-up
Allows for configuration of the time zone for your
location, the time and date, and also whether Daylight
Savings Time is being observed. Refer to “Step 4: Set
the Clock” on page 13 for details.
Security
Allows configuration of a password to lock the front
panel of the Radio, and also lock xL channels. Refer to
“Security” on page 16 for details.
Dayparting
Allows for enabling or disabling Dayparting. Refer to
“Dayparting” on page 16 for details.
Radio Properties Displays the firmware version number of the Radio.
Upgrade
Firmware
Allows the firmware in the Radio to be upgraded to a
newer version, if available.
Factory Reset
Resets the Radio back to the factory settings. Use
with caution: Performing a factory reset will erase
all the configuration settings which have been saved
in the Radio such as SiriusXM credentials, wireless
network credentials, presets, security password, etc.
Auxiliary Input
Allows for enabling an alternate audio source should
the Internet connection to the Radio be lost. Refer to
“Connecting An Auxiliary Audio Source (Optional)” on
page 21 for details.
Credentials
This is where you enter the username and password
that you received when you subscribed to the
SiriusXM Music for Business Internet Service. Refer
to “Step 3: Enter Your SiriusXM Credentials” on page
12 for details.
Clear
Credentials
If you had previously entered credentials, you can
clear the saved credentials using Clear Credentials.
23
Wireless Network Configuration
SiriusXM strongly recommends a wired internet connection for all
business installations.
To connect the Radio to a wireless network, you will need to know the
wireless network name (SSID) and password/key if it is secured. For
wireless networks with a hidden SSID, or those which require manual
configuration, or those which have MAC address control, consult a
professional installer.
To connect to a wireless network:
1. Screw the Wireless Antenna onto the
Network Error
antenna connector in the rear upper right of Network unplugge
the Radio.
2. If the Radio is displaying the Network Error
message, press and hold the BACK button
to return to the Main Screen.
12:00 AM
3. Highlight Settings using the Scroll knob and <Category List >
Settings
press the knob to select.
4. Highlight Wired/Wireless using the Scroll
knob and press the knob to select.
12:00 AM
5. Highlight Wireless using the Scroll knob
and press the knob to select. The radio will
Select network
begin scanning for wireless networks within
>
range and display the list. Wireless networks <My Network
Neighbors net
which display the lock icon will require a
password/key to connect.
12:00 AM
6. From the list, highlight the wireless network
to which you are connecting using the Scroll knob and press the knob
to select.
24
Wireless Network Configuration
7. If a password/key is required, the Radio will briefly display a message
indicating the type of key (WEP, WPA, etc.), and then prompt for the
password/key.
8. Enter the password/key. The password/key
Network Key
is case sensitive. Turn the Scroll knob right NLEND<
A aBbCc
or left to select a letter or number and press
_
the knob to select the letter. If you make a
12:00 AM
mistake, press the BACK button to erase the
last entry.
9. Continue until you have finished entering
the password/key. Then turn the Scroll knob
until END is displayed and press the knob.
The radio will attempt to connect to the
wireless network.
10.If the Radio successfully connects to the
wireless network, the Radio will return to
the Main Screen and show the wireless icon
in the lower left corner of the screen. If
the password was wrong, or entered
incorrectly, the radio will display the
Network Error message. Press the BACK
button and verify the wireless password.
Connecting to
My Network
|
12:00 AM
<category list >
Settings
12:00 AM
If you encounter problems connecting to a wireless network, reconsider
using a wired network connection or consult a professional installer.
25
Product Specifications
System
Power Requirements:
Operating Temperature:
Audio Output:
5 V DC, .7 A (max)
41° F to 95° F (5° C to 35° C)
1.0 Vrms (max)
Business Radio
Dimensions: Weight:
6.5 in (W) x 6.75 in (H) x 2.75 in (D)
165 mm (W) x 171 mm (H) x 70 mm (D)
2.5 lbs (1.13 kg)
Power Adapter
Dimensions:
Weight:
Input / Output:
Cable Length:
2.25 in (W) x 1.5 in (H) x 1.0 in (D)
57 mm (W) x 38 mm (H) x 25 mm (D)
2.5 oz (71 g)
120 V AC / 5 V DC, .7 A
5 ft 11 in (1.8 m)
Ethernet Cable
Connectors:
Cable Length:
RJ45 male to RJ45 male
3 ft (0.91 m)
Stereo Audio Cable
Connectors:
Cable Length:
RCA stereo male to RCA stereo male
6 ft (1.8 m)
Mono Audio Cable
Connectors:
Cable Length:
RCA male to RCA male
6 ft (1.8 m)
26
Patent and Environmental Information
Patent Information
It is prohibited to, and you agree that you will not, copy, decompile,
disassemble, reverse engineer, hack, manipulate, or otherwise access
and/or make available any technology incorporated in this product. The
software is licensed solely for use within this product. The music, talk, news,
entertainment, data, and other content on the Services are protected by
copyright and other intellectual property laws and all ownership rights
remain with the respective content and data service providers. You are
prohibited from any export of the content and/or data (or derivative there
of ) except in compliance with applicable export laws, rules and regulations.
The user of this or any other software contained in a SiriusXM Radio is
explicitly prohibited from attempting to copy, decompile, reverse engineer,
hack, manipulate or disassemble the object code, or in any other way
convert the object code into human-readable form.
Environmental Information
Follow local guidelines for waste disposal when discarding packaging and
electronic appliances.
Perchlorate Material - special handling may apply. See www.dtsc.ca.gov/
hazardouswaste/perchlorate (Applicable to California, U.S.A.).
27
FCC Statement
The user is cautioned that changes or modifications not expressly approved by Sirius
XM Radio Inc. can void the user’s authority to operate this device.
This device complies with Part 15 of the FCC Rules. Operation is subject to the
following two conditions:
1. This device may not cause harmful interference.
2. This device must accept any interference received, including interference that
may cause undesired operation.
This equipment has been tested and found to comply with the limits for a Class B
digital device, pursuant to Part 15 of the FCC Rules. These limits are designed to
provide reasonable protection against harmful interference in a residential installation.
This equipment generates, uses, and can radiate radio frequency energy and, if
not installed and used in accordance with the installation instructions, may cause
harmful interference to radio communications. However, there is no guarantee that
interference will not occur in a particular installation. If this equipment does cause
harmful interference to radio or television reception, which can be determined
by turning the equipment off and on, the user is encouraged to try to correct the
interference by one or more of the following measures:
• Reorient or relocate the receiving antenna of the affected receiver.
• Increase the separation between the SiriusXM equipment and the affected
receiver.
• Connect the SiriusXM equipment into an outlet on a circuit different from that to
which the affected receiver is connected.
• Consult the dealer or an experienced radio/TV technician for help.
WARNING! The FCC and FAA have not certified this Satellite Radio Receiver for use in
any aircraft (neither portable nor permanent installation). Therefore, Sirius XM Radio
Inc. cannot support this type of application or installation.
28
Copyrights and Trademarks
IMPORTANT NOTICE: REQUIRED SUBSCRIPTION
Hardware and subscription sold separately, and activation fee required. Other
fees and taxes may apply. Your subscription is governed by our Customer
Agreement which you will find at http://www.siriusxm.com/pdf/siriusxmbiz_
customeragreement_eng.pdf. Prices and programming are subject to change.
Service automatically renews into the subscription Package you choose, for
additional periods of the same length, and automatically bills at the then
current rates, after any complimentary trial or promotional period ends, until
you call us at 1-866-345-7474 to cancel. Our satellite service is available only
to those at least 18 and older in the 48 contiguous USA and D.C. Our Sirius
satellite service is also available in PR (with coverage limitations). Our Internet
radio service is available throughout our satellite service area and in AK and HI.
© 2013 Sirius XM Radio Inc. “Sirius”, “XM” and all related marks and logos
are trademarks of Sirius XM Radio Inc. and its subsidiaries. “BBC” and “Radio
One” are trademarks of the British Broadcasting Corporation and are used
under license. BBC logo © BBC 1996. Radio 1 logo © BBC 2001. Cosmopolitan®
is a registered trademark of Hearst Communications, Inc. Elvis Radio logo ©
EPE Reg. U.S. Pat & TM off. IndyCar (and Design) are registered trademarks
of Brickyard Trademarks, Inc., used with permission. Major League Baseball
trademarks and copyrights are used with permission of Major League
Baseball Properties, Inc. Visit the official website at MLB.com. Games subject
to availability and change and may not include all spring training games.
All rights reserved. NASCAR® is a registered trademark of the National
Association for Stock Car Auto Racing, Inc. The NBA identifications are the
intellectual property of NBA Properties, Inc. and the respective NBA member
teams. © 2013 NBA Properties, Inc. © 2013 NFL Properties LLC. All NFLrelated trademarks are trademarks of the National Football League. NHL and
the NHL Shield are registered trademarks of the National Hockey League. ©
NHL 2013. All NHL logos and marks and NHL team logos and marks depicted
herein are the property of the NHL and the respective teams and may not
be reproduced without the prior written consent of NHL Enterprises, L.P.
The Home Ice © channel is a registered trademark of XM Satellite Radio Inc.
The Swinger Golfer logo is a registered trademark of PGA TOUR, Inc. Visit
www.siriusxm.com/channellineup for updates. All programming/channel
lineup/XM service subject to change or preemption. All other marks and
logos are the property of their respective owners. All rights reserved.
29
Licenses and Warranty
Licenses
This product contains software licensed under version 2 of the GNU Public License and
version 2.1 of the GNU Lesser Public License. This product includes technology owned
by Microsoft Corporation and under a license from Microsoft Licensing GP. Use or
distribution of such technology outside of this product is prohibited without a license
from Microsoft Corporation and/or Microsoft Licensing, GP as applicable.
Warranty
Your Radio is guaranteed against original defects in materials, manufacture and
workmanship for one year from the date of purchase.
Under this warranty, repair of any defect or, at the company’s discretion, replacement
of the faulty component(s) without charge for parts or labor, is agreed. This
warranty does not imply any acceptance by Grace Digital, retailers or its agents for
consequential loss or damage and specifically excludes fair wear and tear, accident,
misuse of unauthorized modification.
This warranty is applicable in the United States only and does not in any way limit the
customer’s legal rights. Claims and enquiries under the warranty for Grace products
purchased outside the USA should be addressed to the local importers or distributors.
If you have reason to claim under the warranty please contact your dealer in the first
instance. Please retain all original packaging materials for possible future use. We
suggest that you complete details of purchase now and keep this information in a
safe place for future reference. Grace Digital provides their Canadian, Central & South
American dealers, distributors, and retailers with a 1 year warranty.
• Your SiriusXM Business Radio (GDI-SXBR1) is supported by a limited
manufacturer’s warranty for product defects in material or workmanship that may
be evident under normal use for 1 year from date of purchase from an authorized
franchisee or dealer.
• The warranty stated herein is the only warranty applicable to this product. All
other warranties, expressed or implied are hereby disclaimed and are limited by
the written limited warranties contained herein. Except as provided herein, the
manufacturer shall have no liability or responsibility to a customer or any other
person or entity with respect to any liability, loss or damage caused directly or
indirectly by use or performance of the product or arising out of any breach of this
warranty, including, but not limited to, any damages resulting in inconvenience,
30
Licenses and Warranty
loss of time, data, property, or profit or any indirect, special, incidental, or
consequential damages, even If the manufacturer has been advised of the
possibility of such damages.
• In the event of a product defect during the warranty period, return of the product
and your sales receipt as proof of purchase date for your GDI-SXBR1 is required
and shall, at the discretions of the manufacturer, result in: (a) correction of the
defect by repair without charge for parts and labor; (b) replacement with the
same or similar design; or (c) refund for the purchase price If purchased directly
and returned within 30 days of purchase. All replaced parts and products,
and products, on which a refund may be made, become the property of the
manufacturer. New or reconditioned parts/ products should be warranted for the
remainder of the original warranty period.
• The warranty does not cover:
(a) damage or failure caused by or attributed to acts of God, abuse, accident,
misuse, improper installation or improper maintenance, alteration, lightning or
excessive voltage or current;
(b) any repairs other than those provided by a GDI-SXBR1 authorized service
facility;
(c) consumables such as fuses or batteries;
(d) cosmetic damage;
(e) transportation, shipping or insurance costs;
(f) costs of product removal, installation, set-up, service adjustment or reinstallation.
• Customers are responsible for any shipping costs related to product return, repair
and/or refund.
• Warranty terms may be revised without notification at the discretion of the
manufacturer.
Grace Digital Customer Service and Support
For questions regarding your product please visit us at: www.gracedigitalaudio.com or
contact us at: www.gracesupport.com.
31
Sirius XM Radio Inc.
1221 Avenue of the Americas
New York, NY 10020
1.866.345.7474
© 2013 Sirius XM Radio Inc.
SXBR1UG 140116a
siriusxm.com