1
Oracle® Communications
Performance Intelligence Center
Major Upgrade
Release 9.0
909-2242-01, Revision C
February 2014
Oracle Communications Performance Intelligence Center Major Upgrade, Release 9.0
Copyright © 2003, 2014, Oracle and/or its affiliates. All rights reserved.
This software and related documentation are provided under a license agreement containing restrictions on use and disclosure and
are protected by intellectual property laws. Except as expressly permitted in your license agreement or allowed by law, you may not
use, copy, reproduce, translate, broadcast, modify, license, transmit, distribute, exhibit, perform, publish, or display any part, in any
form, or by any means. Reverse engineering, disassembly, or decompilation of this software, unless required by law for
interoperability, is prohibited.
The information contained herein is subject to change without notice and is not warranted to be error-free. If you find any errors,
please report them to us in writing.
If this is software or related documentation that is delivered to the U.S. Government or anyone licensing it on behalf of the U.S.
Government, the following notice is applicable:
U.S. GOVERNMENT RIGHTS Programs, software, databases, and related documentation and technical data delivered to U.S.
Government customers are "commercial computer software" or "commercial technical data" pursuant to the applicable Federal
Acquisition Regulation and agency-specific supplemental regulations. As such, the use, duplication, disclosure, modification, and
adaptation shall be subject to the restrictions and license terms set forth in the applicable Government contract, and, to the extent
applicable by the terms of the Government contract, the additional rights set forth in FAR 52.227-19, Commercial Computer Software
License (December 2007). Oracle America, Inc., 500 Oracle Parkway, Redwood City, CA 94065.
This software or hardware is developed for general use in a variety of information management applications. It is not developed or
intended for use in any inherently dangerous applications, including applications that may create a risk of personal injury. If you use
this software or hardware in dangerous applications, then you shall be responsible to take all appropriate fail-safe, backup,
redundancy, and other measures to ensure its safe use. Oracle Corporation and its affiliates disclaim any liability for any damages
caused by use of this software or hardware in dangerous applications.
Oracle and Java are registered trademarks of Oracle and/or its affiliates. Other names may be trademarks of their respective owners.
Intel and Intel Xeon are trademarks or registered trademarks of Intel Corporation. All SPARC trademarks are used under license and
are trademarks or registered trademarks of SPARC International, Inc. AMD, Opteron, the AMD logo, and the AMD Opteron logo are
trademarks or registered trademarks of Advanced Micro Devices. UNIX is a registered trademark of The Open Group.
This software or hardware and documentation may provide access to or information on content, products, and services from third
parties. Oracle Corporation and its affiliates are not responsible for and expressly disclaim all warranties of any kind with respect to
third-party content, products, and services. Oracle Corporation and its affiliates will not be responsible for any loss, costs, or damages
incurred due to your access to or use of third-party content, products, or services.
CAUTION: Use only the Upgrade procedure included in the Upgrade Kit.
Before upgrading any system, please access Oracle’s Tekelec Customer Support site and review any
Technical Service Bulletins (TSBs) that relate to this upgrade.
Contact Oracle’s Tekelec Customer Care Center and inform them of your upgrade plans prior to beginning this or any
upgrade procedure.
Phone: 1-888-367-8552 or 919-460-2150 (international)
FAX: 919-460-2126
Major Upgrade
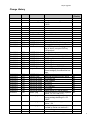
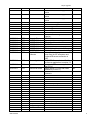
Change History
Date
Version
Author
Comments
New Document
Changes in Builder Upgrade Procedure
PR 219619 & 219627 & 219628 &
219620
Desk review
Desk review
Desk review
Update upgrade path
Desk review
Desk review
Desk review
Desk review
PR 221162, 221168, & Lab upgrade
Lab upgrade
PR #219904: Added Post-Upgrade
Step to identify corrupted ProTraq
Configurations
Lab upgrade
Add Global health check
Harmonize password config in 5.1
RAMP upgrade
RAMP upgrade
RAMP upgrade
RAMP upgrade
Add comments on TN003390
Update NSP steps descriptions to
remove ambiguity for onebox/four box
steps.
RAMP upgrade
Additional comments on NSP boxes
PR 222200 WA
RAMP upgrade
PR 223613
PR 223712
IPv6 overhead
PR 223918
Update section 5.1 (purge alarms)
PR# 222318,222273, 222241(Updated
section 3.5, 9.2.1 and 9.2.3)
Added section 9.1 regarding Roaming
Access package handling w.r.t PR
219457
Updated RSP path for upgrade in
section 1.6.4
Incorporated additional comments
provided by Sacha over section 9.1
Add PM&C upgrade section
Add comments to PM&C upgrade
17/09/2012
18/09/2012
21/09/2012
0.1
0.2
0.3
F. Cêtre
Abhinav Bajaj
HAEGELIN Sacha
09/11/2012
12/11/2012
12/11/2012
13/11/2012
13/11/2012
14/11/2012
15/11/2012
15/11/2012
19/11/2012
20/11/2012
26/11/2012
0.4
0.5
0.6
0.7
0.8
0.9
0.10
0.11
0.12
0.13
0.14
HAEGELIN Sacha
HAEGELIN Sacha
HAEGELIN Sacha
Philippe Lang
HAEGELIN Sacha
HAEGELIN Sacha
HAEGELIN Sacha
HAEGELIN Sacha
HAEGELIN Sacha
HAEGELIN Sacha
Aditi Shastri
28/11/2012
29/11/2012
30/11/2012
03/12/2012
04/12/2012
05/12/2012
07/12/2012
21/01/2012
23/01/2013
0.20
0.21
0.22
0.24
0.25
0.26
0.27
0.28
0.29
HAEGELIN Sacha
HAEGELIN Sacha
HAEGELIN Sacha
HAEGELIN Sacha
HAEGELIN Sacha
HAEGELIN Sacha
HAEGELIN Sacha
HAEGELIN Sacha
François Cêtre
23/01/2013
23/01/2013
24/01/2013
25/01/2013
29/01/2013
30/01/2013
12/02/2013
14/02/2013
19/02/2013
15/3/2013
0.30
0.31
0.32
0.34
0.35
0.36
0.37
0.38
0.40
0.41
HAEGELIN Sacha
François Cêtre
HAEGELIN Sacha
HAEGELIN Sacha
HAEGELIN Sacha
HAEGELIN Sacha
HAEGELIN Sacha
HAEGELIN Sacha
HAEGELIN Sacha
Ashish Tyagi
21/3/2013
0.42
Ashish Tyagi
22/3/2013
0.43
Ashish Tyagi
12/4/2013
0.44
Ashish Tyagi
16/4/2013
17/4/2013
0.45
0.46
HAEGELIN Sacha
HAEGELIN Sacha
909-2242-001
Approved
(Yes/No)
No
No
No
No
No
No
No
No
No
No
No
No
No
No
No
No
No
No
No
No
No
No
No
No
No
No
No
No
No
No
No
No
No
No
No
No
No
No
3
Major Upgrade
18/4/2013
0.47
HAEGELIN Sacha
19/4/2013
0.48
HAEGELIN Sacha
15/5/2013
0.49
HAEGELIN Sacha
17/5/2013
21/5/2013
4/6/2013
5/6/2013
12/6/2013
13/6/2013
14/6/2013
0.50
0.51
0.52
0.53
0.55
0.56
0.57
HAEGELIN Sacha
HAEGELIN Sacha
HAEGELIN Sacha
HAEGELIN Sacha
HAEGELIN Sacha
HAEGELIN Sacha
HAEGELIN Sacha
24/06/2013
25/06/2013
26/06/2013
26/06/2013
26/06/2013
27/06/2013
01/07/2013
05/07/2013
0.58
0.59
0.60
0.61
0.62
0.65
0.66
0.67
François Cêtre
HAEGELIN Sacha
HAEGELIN Sacha
HAEGELIN Sacha
HAEGELIN Sacha
HAEGELIN Sacha
HAEGELIN Sacha
SCHMUCK MCatherine
10/07/2013
0.68
Gaurav Agnihotri
10/07/2013
0.69
Sylvie Neveu
18/07/2013
0.70
HAEGELIN Sacha
18/07/2013
0.71
HAEGELIN Sacha
21/07/2013
22/07/2013
23/07/2013
30/07/2013
30/07/2013
05/09/2013
05/09/2013
05/09/2013
06/09/2013
10/09/2013
11/09/2013
12/09/2013
18/09/2013
19/09/2013
19/09/2013
20/09/2013
23/09/2013
24/09/2013
0.72
0.75
1.0
2.1
2.2
2.3
2.4
2.5
2.6
2.7
2.9
2.10
2.11
2.12
2.13
2.14
2.15
2.16
HAEGELIN Sacha
HAEGELIN Sacha
HAEGELIN Sacha
HAEGELIN Sacha
HAEGELIN Sacha
HAEGELIN Sacha
HAEGELIN Sacha
HAEGELIN Sacha
HAEGELIN Sacha
HAEGELIN Sacha
HAEGELIN Sacha
HAEGELIN Sacha
SPIESSER Olivier
HAEGELIN Sacha
François Cêtre
Philippe Lang
SPIESSER Olivier
SPIESSER Olivier
909-2242-001
section
Add comments to PM&C upgrade
section
Add comments to PM&C upgrade
section
Add comments to PM&C upgrade
section
Take in account Begona comments
Add TEKII IMF migration in 9.0.3
Add IXP upgrade for 9.0.3
Add IXP upgrade for 9.0.3
PV feedback
replace ivi by irem in section 7.1
Add the backend bridge while PM&C
migration
PR 229224
Typo correction
Add datafeeds in section 5.1
PR 229178
Typo correction
Add Healthcheck in section 2.6
Add Analytics Manual in section 1.2
Add information in chapter remove xDR
server from the IXP subsystem and
Finalize xDR servers conversion in
DWS
PR#229750: Screen shot modified for
the discover applications in section 6.3
Remove old TSB no more applicable
after PIC9.0
update section 7.1 & 4.4 with RAMP
comments (PR 230117)
update section 5.1 with RAMP
comments
TAC comments from desk review
PV comments from desk review
PV comments from desk review
PV comments
use consolas policy in section 11.6
fix procedure number in section 11.6
fix in section 11.6
fix in section 11.6
fix in section 11.6
PR 232006
PR 232042
PR 232069
PR 232301
replace IxpManage by IxpChekLicense
PR 232121
PR 232017
PR 232366
PR 232464
No
No
No
No
No
No
No
No
No
No
No
No
No
No
No
No
No
No
No
No
No
No
No
No
Yes
No
No
No
No
No
No
No
No
No
No
No
No
No
No
No
4
Major Upgrade
28/11/2013
07-jan-2014
30-Jan-2014
2.17
2.19
2.20
Ashish Tyagi
JF Muller
B. Chappell
20-Feb-2014
21-Feb-2014
21-Feb-2014
2.21
2.22
3.0
C. Stoeckel
HAEGELIN Sacha
B. Chappell
909-2242-001
PR 233914
PR 235500
Oracle re-branding of title & legal
pages.
PR 237386
PR 237169
Accepted all changes and published as
Rev C
No
No
No
No
No
No
5
Major Upgrade
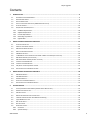
Contents
1
INTRODUCTION ................................................................................................................................................. 9
1.1
DOCUMENTATION ADMONISHMENTS ........................................................................................................................9
1.2
REFERENCE DOCUMENTS ........................................................................................................................................9
1.3
RELATED PUBLICATIONS .........................................................................................................................................9
1.4
ACCESS THE CUSTOMER SUPPORT SITE (ESWD DOWNLOAD CENTER) .................................................................................9
1.5
SCOPE AND AUDIENCE ...........................................................................................................................................10
1.6
REQUIREMENTS AND PREREQUISITES .........................................................................................................................10
1.6.1 Hardware Requirements..............................................................................................................................10
1.6.2 Software Requirements ...............................................................................................................................10
1.6.3 Licenses Requirements .................................................................................................................................11
1.6.4 Networking requirements .............................................................................................................................12
1.6.5 Upgrade Path ..............................................................................................................................................12
2
MAJOR UPGRADE OVERVIEW FLOWCHARTS ................................................................................................... 13
2.1
2.2
2.3
2.4
2.5
2.6
2.7
2.8
2.9
2.10
2.11
2.12
3
MAJOR BACKOUT OVERVIEW FLOWCHARTS ................................................................................................... 30
3.1
3.2
3.3
3.4
3.5
4
FLOWCHART DESCRIPTION......................................................................................................................................13
PIC HIGH-LEVEL MAJOR UPGRADE .........................................................................................................................14
NSP ONE-BOX MAJOR UPGRADE ............................................................................................................................16
NSP FOUR-BOX MAJOR UPGRADE ...........................................................................................................................17
PMF MAJOR UPGRADE ........................................................................................................................................19
T1100 IMF SUB-SYSTEM MIGRATION FROM TPD3 TO TPD5 IN PIC 9.0.3 (WITH DATA LOSS) ............................................19
IMF MAJOR UPGRADE (WITH DATA LOSS) ................................................................................................................21
IMF SERIAL MAJOR UPGRADE (WITHOUT DATA LOSS) ................................................................................................22
UPGRADE TO IXP 9.0.0 & 9.0.1 ............................................................................................................................24
UPGRADE TO IXP 9.0.2 & 9.0.3 ............................................................................................................................25
EFS (EXPORT FILE SERVER) MAJOR UPGRADE ............................................................................................................27
REPORT SERVER PLATFORM MAJOR UPGRADE............................................................................................................28
NSP MAJOR BACKOUT .........................................................................................................................................30
XMF MAJOR BACKOUT .........................................................................................................................................31
IXP MAJOR BACKOUT ...........................................................................................................................................31
EXPORT FILE SERVER MAJOR BACKOUT .....................................................................................................................31
REPORT SERVER PLATFORM MAJOR BACKOUT ............................................................................................................31
PIC HEALTHCHECK ........................................................................................................................................... 31
4.1
INSTALL/UPGRADE PICHEALTHREPORT (COMPREHENSIVE HEALTHCHECK) ......................................................................31
4.2
IXP SUBSYSTEM HEALTHCHECK ................................................................................................................................33
4.3
XMF HEALTHCHECK ..............................................................................................................................................35
4.4
NSP PRE-UPGRADE HEALTHCHECK AND SETTINGS.........................................................................................................39
4.5
UPGRADE CONFIGURATIONS USING DEPRECATED FIELD(S) .....................................................................................41
4.6
CHECK NSP BACKUP IS VALID ..................................................................................................................................42
4.7
IXP LICENSE UPDATE ...........................................................................................................................................43
4.8
EFS HEALTHCHECK ...............................................................................................................................................44
4.9
GLOBAL HEALTHCHECK...........................................................................................................................................45
4.9.1 iLO Access ..................................................................................................................................................45
4.9.2 System Cleanup ..........................................................................................................................................45
909-2242-001
6
Major Upgrade
4.9.3
4.9.4
4.9.5
4.9.6
4.9.7
4.9.8
4.9.9
4.9.10
4.9.11
4.9.12
4.9.13
4.9.14
5
NSP MAJOR UPGRADE ..................................................................................................................................... 48
5.1
5.2
5.3
5.4
5.5
5.6
5.7
5.8
5.9
5.10
5.11
5.12
6
REMOVE XDR SERVER FROM THE IXP SUBSYSTEM ........................................................................................................70
IXP SUBSYSTEM MAJOR UPGRADE ...........................................................................................................................71
UPGRADE DTO PACKAGE .......................................................................................................................................73
CENTRALIZED XDR BUILDERS UPGRADE.....................................................................................................................74
FINALIZE XDR SERVERS CONVERSION IN DWS ..............................................................................................................77
IXP SUBSYSTEM HEALTHCHECK ................................................................................................................................77
EFS MAJOR UPGRADE ....................................................................................................................................... 78
8.1
8.2
8.3
9
DISABLE SYNCHRONIZATION ON IMF SUBSYSTEM......................................................................................................65
XMF UPGRADE ...................................................................................................................................................65
SYNC NSP WITH XMF ...........................................................................................................................................66
XMF HEALTHCHECK ..............................................................................................................................................68
MAKE 1A IMF SERVER SPARE ................................................................................................................................68
MAKE NON-1A IMF SERVER SPARE ........................................................................................................................68
VIP RE-CONFIGURATION .......................................................................................................................................69
IXP MAJOR UPGRADE ....................................................................................................................................... 70
7.1
7.2
7.3
7.4
7.5
7.6
8
NSP PRE-UPGRADE CHECK (ONEBOX AND FOUR BOX) ...................................................................................................48
MAJOR UPGRADE APACHE (FOUR BOX ONLY) ..............................................................................................................53
MAJOR UPGRADE ORACLE (FOUR BOX ONLY) ..............................................................................................................54
UPGRADE WEBLOGIC APPLICATION (ONEBOX AND FOUR BOX) ........................................................................................55
CHANGE WEBLOGIC PASSWORD (ONEBOX AND FOUR BOX) .............................................................................................56
UPGRADE NSP ON SECONDARY WEBLOGIC (FOUR BOX ONLY) .........................................................................................57
UPGRADE NSP ON ONEBOX/PRIMARY WEBLOGIC (ONEBOX AND FOUR BOX) ....................................................................57
UPGRADE A-NODE (ONEBOX AND FOUR BOX) ............................................................................................................58
POST-UPGRADE SETTINGS (ONEBOX AND FOUR BOX) .....................................................................................................58
NSP POST-UPGRADE CHECK (ONEBOX AND FOUR BOX) .................................................................................................61
NSP BACKUP (ONEBOX AND FOUR BOX) ...................................................................................................................62
UPLOAD XDR BUILDER ISO TO NSP (ONEBOX AND FOUR BOX) .....................................................................................62
XMF MAJOR UPGRADE .................................................................................................................................... 65
6.1
6.2
6.3
6.4
6.5
6.6
6.7
7
Engineering Document...............................................................................................................................45
Disp status .................................................................................................................................................46
Monica .......................................................................................................................................................46
ProTrace Session Status .............................................................................................................................46
Systems Alarms ..........................................................................................................................................47
Alarm Forwarding ......................................................................................................................................47
ProTraq ......................................................................................................................................................47
ProPerf ...................................................................................................................................................47
DataFeed ...............................................................................................................................................47
Scheduler ...............................................................................................................................................47
Diagnostic Utility ...................................................................................................................................47
IPv6 Overhead .......................................................................................................................................47
EFS UPGRADE ....................................................................................................................................................78
INTEGRATE STANDALONE EFS WITH IXP SUBSYSTEM .....................................................................................................79
DISCOVER EFS APPLICATION IN CCM .......................................................................................................................80
RSP MAJOR UPGRADE PROCEDURE ................................................................................................................... 81
909-2242-001
7
Major Upgrade
9.1
ROAMING ACCESS PACKAGE HANDLING ...................................................................................................................81
9.2
UPGRADE IXP APPLICATION FOR RSP .......................................................................................................................89
9.3
REPORT SERVER APPLICATION UPGRADE ....................................................................................................................93
9.3.1 Report Server Pre-upgrade Configuration .....................................................................................................93
9.3.2 Upgrade Report Server Software ..................................................................................................................95
9.3.3 Upgrade SAP BOE software on Report Server ...............................................................................................98
9.3.4 Verify the SAP BOE Upgrade .....................................................................................................................100
9.3.5 Install SAP BusinessObjects 3.1 Fix Pack 3.6 .................................................................................................100
9.3.6 Verify RSP host entries in the /etc/hosts file on NSP ....................................................................................102
9.4
PPS APPLICATION UPGRADE .................................................................................................................................103
9.5
ANALYTICS REPORT PACKAGE UPGRADE .................................................................................................................104
9.6
DISCOVER REPORT SERVER APPLICATION IN CCM .....................................................................................................104
10
XMF MAJOR BACKOUT ................................................................................................................................... 106
10.1
11
XMF BACKOUT ..................................................................................................................................................106
APPENDIX : KNOWLEDGE BASE PROCEDURES ............................................................................................... 107
11.1
11.2
11.3
11.4
11.5
11.6
HOW TO MOUNT THE ISO FILE VIA ILO2 ................................................................................................................107
HOW TO MOUNT THE ISO FILE FROM PM&C ISO REPOSITORY ................................................................................107
ADDING ISO IMAGES TO THE PM&C IMAGE REPOSITORY ..........................................................................................108
HOW TO CONNECT TO THE CONSOLE VIA THE MRV ....................................................................................................110
HOW TO CONNECT A SERVER CONSOLE USING IL0 SSH CONNECTION ................................................................................111
PM&C 4.0 TO 5.0 MAJOR UPGRADE ......................................................................................................................112
909-2242-001
8
Major Upgrade
1 Introduction
1.1 Documentation Admonishments
Admonishments are icons and text throughout this manual that alert the reader to assure personal
safety, to minimize possible service interruptions, and to warn of the potential for equipment damage.
Table 1: Admonishments
DANGER:
(This icon and text indicate the possibility of personal injury.)
WARNING:
(This icon and text indicate the possibility of equipment damage.)
CAUTION:
(This icon and text indicate the possibility of service interruption.)
1.2 Reference Documents
HP Solutions Firmware Upgrade Pack 2.2 909-2234-001 Revision A, September 2012
PM&C Migration 4.0 to 5.0 909-2208-001 Revision E, July 2013
EAGLE SW Compatibility Matrix SS005887 V15
MSU Accounting Installation/Upgrade Manual UP006240
Roaming Access Installation/Upgrade Manual UP006241
Roaming SMS Installation/Upgrade Manual UP006242
Sigtran Transport Analytics Installation/Upgrade Manual UP006243
UM MSU Accounting Installation/Upgrade Manual UP006244
TDM Voice Analytics Installation/Upgrade Manual UP006245
1.3 Related Publications
For information about additional publications that are related to this document, refer to the Release
Notice document. The Release Notice document is published as a part of the Release Documentation.
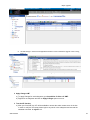
1.4 Access the Customer Support Site (ESWD Download Center)
Access to Tekelec's Customer Support site is restricted to current Tekelec customers only. This section
describes how to log into the Tekelec Customer Support site and locate a software. Viewing the
document requires Adobe Acrobat Reader, which can be downloaded at www.adobe.com.
1. Log into the Tekelec Customer Support site (http://support.tekelec.com/ or
https://secure.tekelec.com/OA_HTML/ibuhpage.jsp within Tekelec network).
Note: If you have not registered for this new site, click the Register Here link. Have your customer
number available. The response time for registration requests is 24 to 48 hours.
2. Click the Download Center tab to access the software iso file.
3. Firmawares are available faor all customers under the name A-Tekelec Firmware Releases
4. The PIC product is availbale under the customer name.
909-2242-001
9
Major Upgrade
5. To download a file to your location, right-click the file name and select Save Target As.
1.5 Scope and Audience
This document describes the major upgrade procedures for the PIC system at Release 9.0.
This document is intended for use by internal Tekelec manufacturing, PSE, SWOPS, and many
times partners trained in software upgrade on both rackmount and c-class blades system. A
working-level understanding of Linux and command line interface is expected to successfully use
this document.
It is strongly recommended that prior to performing an upgrade of the operating system and
applications software, on a rackmount or c-class blades system, the user read through this
document.
Note: The procedures in this document are not necessarily in a sequential order. There are flow
diagrams in the Incremental Upgrade Overview chapter that provide the sequence of the procedures
for each component of this PIC system. Each procedure describes a discrete action. It is expected that
the individuals responsible for upgrading the PIC system should reference these flow diagrams during
this upgrade process.
1.6 Requirements and Prerequisites
1.6.1 Hardware Requirements
PIC release 9.0 don’t supports anymore TEK1 server.
For detailed information on the hardware supported refer to PIC 9.0 planning guide
http://signal.tekelec.com/Depts/salesmktg/ProductInformationLibrary/Forms/FeaturePlanningGuides.asp
x
PM&C 5.x requires at least 2x142G disk
•
Tekelec PN
804-2982-G01 HP 507127-B21_HDD_2.5 IN SAS_10K 6G_ DP_300GB_ROHS
•
HP PN
507127-B21
HP 300GB 6G SAS 10K SFF DP ENT HDD
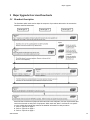
1.6.2 Software Requirements
The following software is required for the PIC 9.0 upgrade.
Take in consideration you might need also the software from the current release in case
you would have to proceed a disaster recovery. Refer to PIC 7.x maintenance guide for
detailed instruction.
Note: For specific versions and part numbers, see the PIC 9.0 Release Notice.
IXP 9.0.0-x.x.x
Oracle DVD in BOM for 12 disk config
Oracle DVD in BOM for 24/25 disk config (fresh install or migration only)
NSP 9.0.0-x.x.x
Oracle 10.2.0.5 in BOM
Weblogic 10.3.5.0 in BOM
909-2242-001
10
Major Upgrade
xMF 9.0.0 –x.x.x (TPD3)
xMF 9.0.0 –x.x.x (TPD5)
xDR Builder 9.0.0–x.x.x
TADAPT
MSW
ATM 155
SM – used with MSW
Report Server
Oracle DVD in BOM for 12 disk config
Oracle DVD in BOM for 24/25 disk config (fresh install or migration only)
BOE Fresh Install
BOE Upgrade
PPS
TDM Voice Analytics
Roaming Access
Roaming Data
Mobile Data
Sigtran Transport
SS7 Transport
Firmwares
HP SOLUTIONS FIRMWARE 2.2.1 or more
TPD Versions
TPD Linux XMF TEK1/TEK2
TPD Linux HP G5&G6&TEK3 (RMS&Blade)
PM&C
PM&C
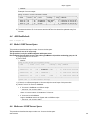
1.6.3 Licenses Requirements
Licenses required for software installation of PIC 9.0 are embedded licenses and do not require an
explicit license key be applied. The exception to this is the license for Business Objects for the Report
Server Platform.
The following license is required for this installation (in case of Disaster recovery):
• BOE License
In case one of the following obsolete builders are used, a new IXP license would be required to use the
replacement builder. Use the form WI005536.xlsx to request the new license.
RTU PN
Oracle Description
License
Key
Interfaces
PIC
7.0
PIC
7.1
PIC
7.5
PIC
9.0
PIC
10.0
Replaced by
Rep
Key
950-0065-01
950-0066-01
950-0121-01
950-0175-01
950-0176-01
950-0177-01
950-0178-01
950-0179-01
950-0228-01
950-0255-01
LICENSE_XB_UMTS IUCS CONTROL_IAS
LICENSE_XB_UMTS IUPS CONTROL_IAS
LICENSE_XB_GN/GP/GI I-MODE IPDR_IAS
LICENSE_UMTS LU-PS RAB XDR_RIGHT TO USE_IAS
LICENSE_UMTS LU-CS CC XDR_RIGHT TO USE_IAS
LICENSE_UMTS LU-CS MM XDR_RIGHT TO USE_IAS
LICENSE_UMTS LU-CM RAB XDR_RIGHT TO USE_IAS
LICENSE_GSX XDR_RIGHT TO USE_IAS
LICENSE_ISUP ANSI SENTINEL FEED_RIGHT TO USE_IAS
LICENSE_MAP SUDR_RIGHT TO USE_IAS
032
023
043
053
049
048
062
068
066
083
Iu
Iu
Gn Gp Gi
Iu
Iu
Iu
Iu
GA
GA
GA
GA
GA
GA
GA
GA
GA
GA
GA
GA
GA
GA
EOL
EOL
GA
GA
GA
GA
MD
MD
MD
MD
EOL
EOL
MD
MD
EOL
GA
EOL
EOL
EOL
EOL
EOL
EOL
EOL
EOL
EOL
EOL
EOL
EOL
EOL
EOL
EOL
EOL
EOL
EOL
EOL
EOL
950-0681-01
950-0682-01
imode obsolete
950-0682-01
950-0382-01
950-0383-01
950-0681-01
128
129
909-2242-001
Sentinel EOL
950-0425-01
129
095
094
128
090
11
Major Upgrade
950-0382-01
950-0383-01
950-0425-01
950-0681-01
RTU_XDR BUILDER_6.2.0_BSSAP_RANCC
RTU_XDR BUILDER_6.2.0_BSSAP_RAN
LICENSE_MAP SM TDR_RIGHT TO USE_IAS
PIC_XB_UMTS IUCS CONTROL_RTU_INVOICE_ONLY
095
094
090
128
950-0682-01
PIC_XB_UMTS IUPS CONTROL_RTU_INVOICE_ONLY
129
GA
GA
GA
GA
GA
GA
Iu
GA
GA
GA
GA
GA
GA
GA
GA
GA
GA
GA
GA
Iu
GA
GA
GA
1.6.4 Networking requirements
For Blade setup one more IP address is required in the management vlan for the TVOE server
1.6.5 Upgrade Path
909-2242-001
12
Major Upgrade
2 Major Upgrade Overview Flowcharts
2.1 Flowchart Description
The flowcharts within each section depict the sequence of procedures that need to be executed to
install the specified subsystem.
Each flowchart contains the equipment associated with each subsystem, and the required tasks that
need to be executed on each piece of equipment. Within each task, there is a reference to a specific
procedure within this manual that contains the detailed information for that procedure.
1. Refer to Topic title on page n.
2. Refer to Topic title on page n.
3. Refer to Topic title on page n.
909-2242-001
13
Major Upgrade
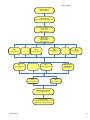
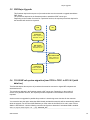
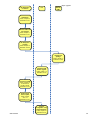
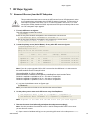
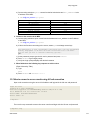
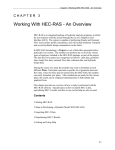
2.2 PIC High-level Major Upgrade
This flowchart describes the PIC high-level major upgrade overview. Referring to the graphic below
the applicable order of each component is depicted and for each component the applicable flowchart
is identified by section of this document where it is located.
Described PIC major upgrade procedures are applicable to PIC systems installed in 7.x releases
(7.1.0/7.1.2/7.5). Following this procedure, the PIC system will be upgraded to 9.0 releases
Prior to starting upgrade the firmware needs to be at the latest Tekelec supported levels for all hardware
components. The system on the source release also need to have installed all necessary patches
applicable to source release prior the major upgrade.
If running the PIC Major Upgrade on HP C-Class Blade platform the PM&C application must be
upgraded first prior to PIC applications upgrade. Follow section 11.6 and document 909-2208-001
PM&C Migration 4.0 to 5.0 for PM&C upgrade procedure.
The general upgrade strategy is as follows:
1.
2.
3.
4.
5.
6.
7.
8.
9.
Initial health check at least 2 weeks before the planned operation in order to have time to replace defective
hardware
Optional Firmware upgrade to the latest release available on the ESWD
Latest 7.x TSB installations, PM&C Platform upgrade and legacy windows based software (MSW) in case
they are not in the latest release.
NSP upgrade (four-box or one-box configuration)
xMF subsystems upgrade (IMFs and PMFs)
IXP subsystems upgrade
Export File Servers upgrade
Report Server Platform upgrade
Final Health check
Note: Export File Server and Report Server Platform can be upgraded in parallel. NSP, xMF and IXP upgrade
must precede RSP and EFS upgrade.
Note: The latest Technical Service Bulletin (TSB) are available on Design Support web page
http://signal.tekelec.com/Depts/custservice/gtac/dessupportias/TSB/Forms/Display%20View.aspx?InitialTabId=Ribbo
n%2EDocument&VisibilityContext=WSSTabPersistence&View={1bc6aebb-22d8-402e-b21f6f71de5b8720}&SortField=IAS_x0020_Release&SortDir=Desc
At the time this Manual is updated the following TSB must be applied
TN003403 [IXP - Oracle 11g shared memory errors]
TN003438 [Flash Player for Reference Data application]
only if Analytics Packages has been added.
TN003439 [PIC7.1 - IXP_ACTIVE_PURGE is not working, the xDRs are not purged at night]
TN003494 [PIC7.x – Low Memory alarm is not representative of the health of the system]
Note: The latest workaround are available on PIC DS wiki.
http://cqweb/wiki/index.php/Category:PIC_Upgrade
909-2242-001
14
Major Upgrade
Initial Health Check
Follow: chapter 4
Firmware upgrade
Follow: 909-6230-001 & 909-1927-001
TSB ,PM&C and MSW upgrade
Follow: TSB &
chapter 11.6 &
MSW install guide
NSP One-Box
Follow: chapter 2.3
NSP Four-Box
Follow: chapter 2.4
PMF 1
Follow: chapter 2.5
PMF n
Follow: chapter 2.5
IMF 1
Follow: chapter 2.6 or
2.7 or 2.8
IXP n
Follow: chapter 2.9 or
2.10
IXP 1
Follow: chapter 2.9 or
2.10
EFS
Follow: chapter 2.11
IMF n
Follow: chapter 2.6 or
2.7 or 2.8
DWS / External
DataWarehouse
Follow: chapter 7.3
RSP
Follow: chapter 2.12
Final Health Check and TSB
Follow: chapter 4 & TSB
System re-config
If needed to remove Expert mode on the
PMF or take in account new features
909-2242-001
15
Major Upgrade
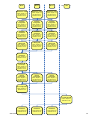
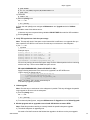
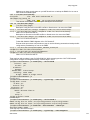
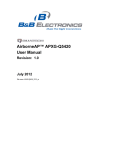
2.3 NSP One-box Major Upgrade
This flowchart depicts the sequence of procedures that
must be executed to upgrade NSP One-box setup.
Install/Upgrade picHealthReport
Follow: chapter 4.1
Estimation 10 min
Healthcheck
Follow: chapter 4.4 & 4.5
Estimation 10 min
Backup is Valid
Follow: chapter 4.6
Estimation 5 min
Pre-Upgrade Check
Follow: chapter 5.1
Estimation 10 min
Upgrade Weblogic Application
Follow: chapter 5.4
Estimation 5 min
Change Weblogic password
Follow: chapter 5.5
Estimation 5 min
Upgrade NSP on Weblogic
Follow: chapter 5.7
Estimation 15 min
Upgrade A-Node
Follow: chapter 5.8
Estimation 10 min
Post-Upgrade Settings
Follow: chapter 5.9
Estimation 10 min
Install/Upgrade picHealthReport
Follow: chapter 4.1
Estimation 10 min
Post-Upgrade Check
Follow: chapter 5.10
Estimation 10 min
Backup
Follow: chapter 5.11
Estimation 20 min
909-2242-001
Upload xDR Builders
Follow: chapter 5.12
Estimation 10 min
16
Major Upgrade
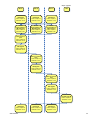
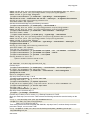
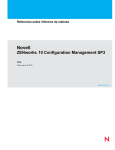
2.4 NSP Four-box Major Upgrade
This flowchart depicts the sequence of procedures that must be
executed to upgrade the NSP Four-box setup.
909-2242-001
17
Primary
Oracle
Secondary
Install/Upgrade
picHealthReport
Follow: chapter 4.1
Estimation 10 min
NSP
Apache
Major Upgrade
Healthcheck
Follow: chapter 4.4 & 4.5
Estimation 10 min
Backup is Valid
Follow: chapter 4.6
Estimation 5 min
Pre-Upgrade Check
Follow: chapter 5.1
Estimation 15 min
(depends on Nb of
Alarms to purge)
Major Upgrade
Apache
Follow: chapter 5.2
Estimation 25 min
Major Upgrade Oracle
Follow: chapter 5.3
Estimation 30 min
Upgrade Weblogic
Application
Follow: chapter 5.4
Estimation 5 min
Upgrade Weblogic
Application
Follow: chapter 5.4
Estimation 5 min
Change Weblogic
password
Follow: chapter 5.5
Estimation 5 min
Upgrade NSP on
Weblogic Secondary
Follow: chapter 5.6
Estimation 30 min
Upgrade NSP on
Weblogic Primary
Follow: chapter 5.7
Estimation 55 min
Upgrade A-Node
Follow: chapter 5.8
Estimation 10 min
Post-Upgrade
Settings
Follow: chapter 5.9
Estimation 10 min
Install/Upgrade
picHealthReport
Follow: chapter 4.1
Estimation 10 min
Post-Upgrade Check
Follow: chapter 5.10
Estimation 10 min
Backup
Follow: chapter 5.11
Estimation 20 min
Upload xDR Builders
Follow: chapter 5.12
Estimation 10 min
909-2242-001
18
Major Upgrade
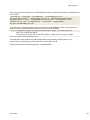
2.5 PMF Major Upgrade
This flowchart depicts the sequence of procedures that must be executed to upgrade standalone
PMF Server.
The procedures depicted in the flowchart pertain to standalone PMF server type.
Depending on the number of servers for a particular function, the required procedures depicted in
the flowchart will need to be repeated.
PMF
NSP
Healthcheck
Follow: chapter 4.3
Estimation 10 min
xMF Upgrade
Follow: chapter 6.2
Estimation 20 min
Sync NSP with xMF
Follow: chapter 6.3
Estimation 10 min
Healthcheck
Follow: chapter 6.4
Estimation 10 min
2.6 T1100 IMF sub-system migration from TPD3 to TPD5 in PIC 9.0.3 (with
data loss)
This flowchart depicts the sequence of procedures that must be executed to migrate IMF subsystem and
associated servers.
The procedures depicted in the flowchart pertain to IMF server type. Depending on the number of
servers for a particular function, the required procedures depicted in the flowchart will need to be
repeated.
As the servers are upgraded in parallel this procedure is introducing some data loss for the customer
You must also have the option redundant WAN already activated because this will be automatically enabled
while the upgrade. For the Cisco 2950 Switches you must order the kit 840-0181-01 and in case of Cisco
4948 it is 840-0180-01. Use the following command as cfguser to determine if redundant WAN is enabled.
Tek3-1b:/export/home/cfguser set | grep REDUNDANT_WAN
909-2242-001
19
IMF 1A
IMF 1B
IMF 1C/...
Install OS on T1100
Follow: chapter 13.5
from 909-2247-01
Estimation 30 min
Install OS on T1100
Follow: chapter 13.5
from 909-2247-01
Estimation 30 min
Install OS on T1100
Follow: chapter 13.5
from 909-2247-01
Estimation 30 min
Pre-Install
Configuration
Follow: chapter 3.4
from 909-2247-01
Estimation 20 min
Pre-Install
Configuration
Follow: chapter 3.4
from 909-2247-01
Estimation 20 min
Pre-Install
Configuration
Follow: chapter 3.4
from 909-2247-01
Estimation 20 min
Pre-Install
Healthcheck
Follow: chapter 3.5
from 909-2247-01
Estimation 10 min
Pre-Install
Healthcheck
Follow: chapter 3.5
from 909-2247-01
Estimation 10 min
Pre-Install
Healthcheck
Follow: chapter 3.5
from 909-2247-01
Estimation 10 min
xMF Upgrade
Follow: chapter 6.2
from this document
Estimation 10 min
xMF Upgrade
Follow: chapter 6.2
from this document
Estimation 10 min
xMF Upgrade
Follow: chapter 6.2
from this document
Estimation 10 min
TPD5 Customer
Network
Configuration
Follow: chapter 3.11
from 909-2247-01
Estimation 10 min
TPD5 Customer
Network
Configuration
Follow: chapter 3.11
from 909-2247-01
Estimation 10 min
NSP
Major Upgrade
Healthcheck
Follow: chapter 6.4
Estimation 10 min
Exchange xMF
servers keys
Follow: chapter 3.8
from 909-2247-01
Estimation 10 min
TPD5 Customer
Network
Configuration
Follow: chapter 3.11
from 909-2247-01
Estimation 10 min
VIP re-configuration
Follow: chapter 6.7
Estimation 5 min
Sync NSP with xMF
Follow: chapter 6.3
Estimation 10 min
Healthcheck
Follow: chapter 6.4
Estimation 10 min
909-2242-001
Healthcheck
Follow: chapter 6.4
Estimation 10 min
Healthcheck
Follow: chapter 6.4
Estimation 10 min
20
Major Upgrade
2.7 IMF Major Upgrade (with data loss)
This flowchart depicts the sequence of procedures that must be executed to upgrade IMF subsystem and
associated servers.
The procedures depicted in the flowchart pertain to IMF server type. Depending on the number of
servers for a particular function, the required procedures depicted in the flowchart will need to be
repeated.
As the servers are upgraded in parallel this procedure is introducing some data loss for the customer
You must also have the option redundant WAN already activated because this will be automatically enabled
while the upgrade. For the Cisco 2950 Switches you must order the kit 840-0181-01 and in case of Cisco
4948 it is 840-0180-01 Use the following command as cfguser to determine if redundant WAN is enabled.
Tek3-1b:/export/home/cfguser set | grep REDUNDANT_WAN
Note: For T1200 this procedure applies only in case the IMF is running on TPD4, in case it is
running under TPD3 you must proceed with a fresh install using the PIC 9.0 manufacturing
installation 909-2193-001, because the upgrade from TPD 3 to TPD 5 is not supported.
http://cqweb/wiki/index.php/TekServer_3_upgrade_to_PIC_7.5
IMF 1A
IMF 1B
IMF 1C/...
Healthcheck
Follow: chapter 4.3
Estimation 10 min
Healthcheck
Follow: chapter 4.3
Estimation 10 min
Healthcheck
Follow: chapter 4.3
Estimation 10 min
Disable
Synchronization on
IMF Subsystem
Follow: chapter 6.1
Estimation 5 min
Disable
Synchronization on
IMF Subsystem
Follow: chapter 6.1
Estimation 5 min
Disable
Synchronization on
IMF Subsystem
Follow: chapter 6.1
Estimation 5 min
xMF Upgrade
Follow: chapter 6.2
Estimation 10 min
xMF Upgrade
Follow: chapter 6.2
Estimation 10 min
xMF Upgrade
Follow: chapter 6.2
Estimation 10 min
NSP
Sync NSP with xMF
Follow: chapter 6.3
Estimation 10 min
Healthcheck
Follow: chapter 6.4
Estimation 10 min
909-2242-001
Healthcheck
Follow: chapter 6.4
Estimation 10 min
Healthcheck
Follow: chapter 6.4
Estimation 10 min
21
Major Upgrade
2.8 IMF Serial Major Upgrade (without data loss)
This flowchart depicts the sequence of procedures that must be executed to upgrade the IMF
Sub-system with minimum data lost.
Note: Only for upgrade of IMF subsystem with spare server.
Note: the HA will be stopped during the upgrade since the HA messages are not compatible between 7.1 or
7.1.2 and 9.0. Before the subsystem upgrade completion, incorrect failover information expected at iFoStat
display. IXP should catch up after the subsystem upgrade completed.
Depending on the number of servers for particular function, the required procedures depicted in the
flowchart will need to be repeated.
You must also have the option redundant WAN already activated because this will be automatically enabled
while the upgrade. For the Cisco 2950 Switches you must order the kit 840-0181-01 and in case of Cisco
4948 it is 840-0180-01. Use the following command as cfguser to determine if redundant WAN is enabled.
Tek3-1b:/export/home/cfguser set | grep REDUNDANT_WAN
Note: For T1200 this procedure applies only in case the IMF is running on TPD4, in case it is
running under TPD3 you must first migrate the server on TPD 4 because the upgrade from
TPD 3 to TPD 5 is not supported. http://cqweb/wiki/index.php/TekServer_3_upgrade_to_PIC_7.5
Refer to PIC 7.1 manufacturing installation 909-2122-001 in order to fresh install each server one after
the other with the redundant WAN enabled and starting by the spare one. After each server switch the traffic
on the spare server and then continue with the next one.
909-2242-001
22
Major Upgrade
IMF 1A
IMF 1B
IMF 1C/...
Healthcheck
Follow: chapter 4.3
Estimation 10 min
Healthcheck
Follow: chapter 4.3
Estimation 10 min
Healthcheck
Follow: chapter 4.3
Estimation 10 min
Disable
Synchronization on
IMF Subsystem
Follow: chapter 6.1
Estimation 5 min
Disable
Synchronization on
IMF Subsystem
Follow: chapter 6.1
Estimation 5 min
Disable
Synchronization on
IMF Subsystem
Follow: chapter 6.1
Estimation 5 min
NSP
Make 1A Server
spare
Follow: chapter 6.5
Estimation 10 min
xMF Upgrade
Follow: chapter 6.2
Estimation 10 min
Make non 1A Server
spare
Follow: chapter 6.6
Estimation 10 min
xMF Upgrade
Follow: chapter 6.2
Estimation 10 min
Make non 1A Server
spare
Follow: chapter 6.6
Estimation 10 min
xMF Upgrade
Follow: chapter 6.2
Estimation 10 min
Sync NSP with xMF
Follow: chapter 6.3
Estimation 10 min
Healthcheck
Follow: chapter 6.4
Estimation 10 min
909-2242-001
Healthcheck
Follow: chapter 6.4
Estimation 10 min
Healthcheck
Follow: chapter 6.4
Estimation 10 min
23
Major Upgrade
2.9 Upgrade to IXP 9.0.0 & 9.0.1
This flowchart depicts the sequence of procedures that must be executed to upgrade the IXP subsystem
and associated server functions.
The IXP subsystem consists of the following types of servers:
•
•
•
•
IXP xDR storage server
IXP PDU storage server
IXP Base server
Export Server
IXP subsystem major upgrade procedure is triggered from each server in the subsystem manually but
runs in parallel on all servers in the subsystem.
Note: Some of the xDR/KPI sessions are stored on different servers in the xDR Storage pool, or even
Report Servers. As Centralized xDR Builder upgrade is analyzing all session that are configured on
particular IXP subsystem, all Oracle servers where those sessions are stored must be accessible.
Otherwise Centralized xDR Builder upgrade will fail.
IXP Subsystem
xDR/PDU/BM/ES
NSP
External
DWH
Healthcheck
Follow: chapter 4.2
Estimation 15 min
IXP Subsystem
Upgrade
Follow: chapter 7.2
Estimation 120 min
Upgrade DTO
package on external
DWH
Follow: chapter 7.3
Estimation 10 min
Centralized xDR
Builder upgrade
Follow: chapter 7.4
Estimation 20 min
Healthcheck &
license update
Follow: chapter
4.2 & 4.7
Estimation 15 min
909-2242-001
Upgrade
Configuration using
Deprecated Fields
Follow: chapter 4.5
Estimation 20 min
24
Major Upgrade
2.10 Upgrade to IXP 9.0.2 & 9.0.3
This flowchart depicts the sequence of procedures that must be executed to upgrade the IXP subsystem
and associated server functions.
The IXP subsystem consists of the following types of servers at the beginning of the procedure:
•
•
•
•
IXP xDR storage server
IXP PDU storage server
IXP Base server
Export Server
IXP subsystem major upgrade procedure is triggered from each server in the subsystem manually but
runs in parallel on all servers in the subsystem.
While the upgrade xDR storage server will be migrated in DWS outside of of the subsystem. As a
result IXP subsystem will consists of the following types of servers at the end of the procedure:
• IXP PDU storage server
• IXP Base server
• Export Server
Note: Some of the xDR/KPI sessions are stored on different servers in the xDR Storage pool, or even
Report Servers. As Centralized xDR Builder upgrade is analyzing all session that are configured on
particular IXP subsystem, all Oracle servers where those sessions are stored must be accessible.
Otherwise Centralized xDR Builder upgrade will fail.
Note: xDR/DWS server must not be upgraded with the new IXP software. The software will
be removed while the migration in DWS. The TPD version must remain the same as before
upgrade as a Fix of PR 226265.
909-2242-001
25
IXP Subsystem
PDU/BM/ES
NSP
DWS &
External
DWH
Major Upgrade
Healthcheck
Follow: chapter 4.2
Estimation 15 min
Remove xDR from
the sybsytem
Follow: chapter 7.1
Estimation 15 min
IXP Subsystem
Upgrade
Follow: chapter 7.2
Estimation 120 min
Upgrade DTO
package
Follow: chapter 7.3
Estimation 10 min
Centralized xDR
Builder upgrade
Follow: chapter 7.4
Estimation 20 min
Finalize xDR servers
conversion in DWS
Follow: chapter 7.5
or 909-2247-01
for DR in 64 bits
Estimation 15 min
Healthcheck &
license update
Follow: chapter
4.2 & 4.7
Estimation 15 min
909-2242-001
Upgrade
Configuration using
Deprecated Fields
Follow: chapter 4.5
Estimation 20 min
26
Major Upgrade
2.11 EFS (Export File Server) Major Upgrade
This flowchart depicts the sequence of procedures that must be executed to upgrade the Export File
Server (EFS).
EFS
IXP Subsystem
xDR/PDU/BM/ES
NSP
Healthcheck
Follow: chapter 4.8
Estimation 5 min
EFS Upgrade
Follow: chapter 8.1
Estimation 40 min
Healthcheck
Follow: chapter 4.8
Estimation 5 min
Integrate EFS with
IXP Subsystem
Follow: chapter 8.2
Estimation 15 min
Discover EFS
Application in CCM
Follow: chapter 8.3
Estimation 10 min
909-2242-001
27
Major Upgrade
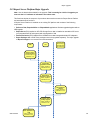
2.12 Report Server Platform Major Upgrade
Note: Use the latest build available for the upgrade. This is meaning for 9.0.2/9.0.3 upgrade you
must use the 9.0.1 software as indicated in the release note.
This flowchart depicts the sequence of procedures that must be executed to Report Server Platform
and associated server functions.
A Report Server Platform is installed on an existing PIC platform and consists of the following
components:
• Reference Data, ReportInfoView and ReportAdmin applications. Both are upgraded together with an
NSP upgrade.
• Report Server (RS) installed on IXP xDR Storage Server that is installed as standalone IXP server
(not integrated with IXP subsystem) with a designation of 1A.
• Post Process Service (PPS) installed on the IXP Base Server that is integrated with the IXP subsystem.
• Report Packages v2.0 or v3.0. These packages need to be upgraded separately. The major upgrade
of Report Packages is not covered in this documentation.
NSP
RSP
PPS on IXP
base server(s)
intergrated with
IXP subsystem
Roaming Access
package handling
Follow: chapter 9.1
Estimation ? min
Upgrade IXP
Application for RSP
Follow: chapter 9.2
Estimation 60 min
Report Server
Application Upgrade
Follow: chapter 9.3
Estimation 60 min
PPS Appliaction
upgrade
Follow: chapter 9.4
Estimation 15 min
Analytics report
package upgrade
Follow: chapter 9.5
Estimation ? min
909-2242-001
Discover Report
Server Application in
CCM
Follow: chapter 9.6
Estimation 15 min
28
Major Upgrade
Note: Even if the Report Server is installed as standalone IXP server with 1A designation the major
upgrade of the IXP is done by the script that is also used for IXP subsystem upgrade. The only difference is
that all operations you need to execute are executed on a single server. You can skip xDR builder
upgrade step. This is not necessary for Report Server
1. Refer to Roaming Access package handling
2. Refer to Upgrade IXP Application for RSP
3. Refer to Report Server Application Upgrade
4. Refer to PPS Application Upgrade
5. Refer to Analytics report package upgrade
Take care to the Analytics package obsolescence announced in the Product Bulletin 000694
2.13 6.
Refer to Analytics
report package upgrade
Refer to the following manuals according the packages you have installed:
MSU Accounting Installation/Upgrade Manual UP006240
Roaming Access Installation/Upgrade Manual UP006241
Roaming SMS Installation/Upgrade Manual UP006242
Sigtran Transport Analytics Installation/Upgrade Manual UP006243
UM MSU Accounting Installation/Upgrade Manual UP006244
TDM Voice Analytics Installation/Upgrade Manual UP006245
Discover Report Server Application in CCM
Legacy Part
MDA Phase
Start Date
MD Phase
Start Date
EOL Date
Replacement
Part
Replacement
Available
950-0508-01 and
950-0606-01 to 950-0609-01
Jan, 2013
Feb. 2013
Analytics-Roaming Voice
950-0506-01 and
950-0596-01 to 950-0599-01
Jan, 2013
Feb. 2013
According
EOL of PIC
7.1 Rel.
PIC KPI
Services for
Mobile Data
PIC 9.0
Feb. 2013
According
EOL of PIC
7.1 Rel.
PIC KPI
Services for
TDM Transport
PIC 9.0
950-0502-01 and
909-2242-001
PIC 9.0
Feb. 2013
Analytics- Mobile Data
Analytics- TDM Transport
PIC KPI
Services for
Roaming
PIC 9.0
Jan, 2013
950-0532-01 and
950-0576-01 to 950-0579-01
PIC KPI
Services for
Roaming
According
EOL of PIC
7.1 Rel.
Analytics-Roaming Data
950-0616-01 to 950-0619-01
According
EOL of PIC
7.1 Rel.
Jan, 2013
29
Major Upgrade
3 Major Backout Overview Flowcharts
The backout is design to come back to the previous release and is applicable only in case of
successful upgrade. The backout sequence would be similar to the upgrade sequence starting
with NSP, than XMF, than IXP and finally RSP.
In case of issue while the upgrade you must use the Disaster recovery procedure.
3.1 NSP Major Backout
NSP application major backout is implemented as a Disaster Recovery procedure. Follow installation
document of the source release to find a Disaster Recovery Procedure.
Refer to the Document 909-2197-001 PIC 7.5 Maintenance Guide or 909-2127-001 PIC 7.1
Maintenance Guide.
Note : It is advice to use the PIC 7.5 Maintenance Guide even to restore a PIC 7.1 because it
include some correction.
909-2242-001
30
Major Upgrade
3.2 xMF Major Backout
This flowchart depicts the sequence of procedures that must be executed to backout the xMF subsystem
or standalone server.
1. Refer to xMF Backout.
2. Refer to xMF Pre-Upgrade Healthcheck.
3.3 IXP Major Backout
IXP application major backout is implemented as a Disaster Recovery procedure. Follow installation
document of the source release to find a Disaster Recovery Procedure.
Refer to the Document 909-2197-001 PIC 7.5 Maintenance Guide
3.4 Export File Server Major Backout
Export File Server major backout is implemented as a Disaster Recovery procedure. Follow installation
documentation of a source release for a Disaster Recovery Procedure.
Refer to the Document 909-2197-001 PIC 7.5 Maintenance Guide
3.5 Report Server Platform Major Backout
Report Server Platform major backout is implemented as a Disaster Recovery procedure. Follow
installation documentation of a source release for a Disaster Recovery Procedure.
Refer to the Document 909-2197-001 PIC 7.5 Maintenance Guide
4 PIC Healthcheck
4.1 Install/Upgrade picHealthReport (Comprehensive Healthcheck)
Beginning with the PIC 6.6.4 release, a PIC comprehensive health check script is provided that collects
and reports on a comprehensive set of system components across all the PIC servers. The script collects
hardware and software inventory, performance of key components, and health of key aspects of the
system. Other previously implemented health checks for individual system components may still exist
and be relevant. Review each instance of those health checks individually for the need to be executed
909-2242-001
31
Major Upgrade
in light of this new comprehensive picHealthReport script.
The script is packaged in an RPM package which allows for easy installation and management of
package components. Upon installation of the package on the NSP Oracle server (NSP server for a
1-box implementation) the server will be updated with the script and other supporting files. The RPM
package contains the following components:
• picHealthReport the script which is the main component for collection and reporting
• custinfo script which prompts one time for user input of customer name and system serial number
for inclusion in all report files
• picHealthReport_cron crontab entry for automatic daily execution of script with storage of
timestamped output file
Note: Perform the following procedure steps to install the picHealthReport rpm package on the
NSP Oracle server and provide Customer Name and serial number information.
Note: Once installed, daily timestamped picHealthReport output files will be generated automatically
via crontab in /var/log/nsp/picHealthReport directory.
1. Download the latest healthcheck script on the following link
http://cqweb/wiki/index.php/Healthcheck_script
2. Install the picHealthReport rpm.
a) Open a terminal window and log in as root to NSP One-box server or NSP Oracle server (NSP
Four-box).
b) As root c opy the rpm file in /var/TKLC/upgrade
c) Install the picHealthReport*.rpm. As root run:
# rpm -qa | grep picHealthReport
picHealthReport-Old
# rpm -e picHealthReport
# rpm -i /var/TKLC/upgrade/picHealthReport-New
Where picHealthReport-Old is the full name of the current healthcheck script version and
picHealthReport-New is the full name of the new healthcheck script version to install.
3. Manual run of picHealthReport script (Optional)
Note: Once installed, one daily picHealthReport output file will be generated automatically in
directory /var/log/nsp/picHealthReport. If immediate execution of picHealthReport is
desired (to verify picHealthReport functionality), you may manually execute the picHealthReport
script to produce an output file stored at a predetermined path and filename by entering the
following procedure:
a) As tekelec run:
$ picHealthReport_cron
Output will be produced to the terminal window, and an output file is generated and saved in
/var/log/nsp/picHealthReport directory and the filename will have the current
date and timestamp and the customer name. Additionally, if any errors occur in execution of
the script an ERROR file will be produced in the same directory with the appropriate
timestamp in the filename. For any other custom executions of picHealthReport as user
tekelec run picHealthReport --help for a list of options.
b) Log out from the server.
$ logout
# logout
Note: backup the last available result file before in a safe place like your laptop to make sure
it will not be lost in case of disaster recovery.
909-2242-001
32
Major Upgrade
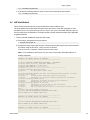
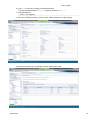
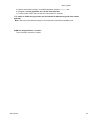
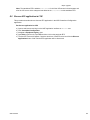
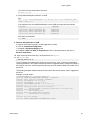
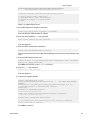
4.2 IXP Subsystem Healthcheck
This procedure describes how to run the automatic healthcheck of the IXP subsystem.
1. Open a terminal window and log in on any IXP server in the IXP subsystem (but not a DWS server)
you want to analyze.
2. As cfguser, run:
$ analyze_subsystem.sh
The script gathers the healthcheck information from all the configured servers in the subsystem.
A list of checks and associated results is generated. There might be steps that contain a suggested
solution. Analyze the output of the script for any errors. Issues reported by this script must be
resolved before any further use of this server.
The following examples show the structure of the output, with various checks, values, suggestions,
and errors.
Example of overall output:
[cfguser@ixp2222-1a ~]$ analyze_subsystem.sh
----------------------------------------------------- ANALYSIS OF SERVER
ixp2222-1a STARTED
----------------------------------------------------10:16:05: STARTING HEALTHCHECK PROCEDURE - SYSCHECK=0
10:16:05: date: 05-20-11, hostname: ixp2222-1a
10:16:05: TPD VERSION: 4.2.3-70.86.0
10:16:05: IXP VERSION: [7.1.0-54.1.0]
10:16:05: XDR BUILDERS VERSION: [7.1.0-36.1.0]
10:16:05: ------------------------------------------------10:16:05: Analyzing server record in /etc/hosts
10:16:05:
Server ixp2222-1b properly reflected in /etc/hosts file
10:16:05: Analyzing IDB state
10:16:05:
IDB in START state
...
12:21:48: Analyzing disk usage
...
10:24:09: ENDING HEALTHCHECK PROCEDURE WITH CODE 0
END OF ANALYSIS OF SERVER ixp2222-1b
ixp2222-1a TPD:[ 4.2.3-70.86.0 ] IXP:[ 7.1.0-54.1.0 ] XB:[ 7.1.0-36.1.0 ]
test(s) failed
ixp2222-1b TPD:[ 4.2.3-70.86.0 ] IXP:[ 7.1.0-54.1.0 ] XB:[ 7.1.0-36.1.0 ]
909-2242-001
0
0
33
Major Upgrade
test(s) failed
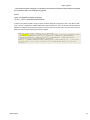
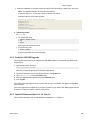
Example of a successful test:
10:24:08: Analyzing DaqServer table in IDB
10:24:08:
Server ixp2222-1b reflected in DaqServer table
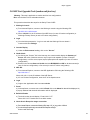
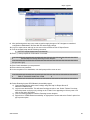
Example of a failed test:
12:21:48: Analyzing IDB state
12:21:48: >>> Error: IDB is not in started state (current state X)
12:21:48: >>> Suggestion: Verify system stability and use 'prod.start' to start
the product
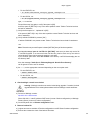
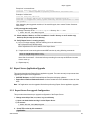
Note: if you get the error bellow after PIC 9 upgrade you may use the WA of PR 222200 in
order to increase the 80 threashold to 85 for the system having been installed originally with
old TPD releases and the / partition is only 500M instead of the 1G allocated on the fresh
installed system
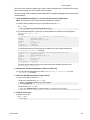
[root@SPB-NSP-APACHE ~]# syscheck
Running modules in class net...
OK
Running modules in class hardware...
OK
Running modules in class disk...
* fs: FAILURE:: MINOR::5000000000000001 -- Server Disk Space Shortage W arning
* fs: FAILURE:: Space used in "/" exceeds the recommended limit 80%. 84 % used.
[root@SPB-NSP-APACHE ~]# df -h
Filesystem
Size Used Avail Use% Mounted on
/dev/mapper/vgroot-plat_root
496M 398M
73M 85% /
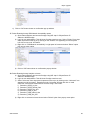
Log on the server as root and get the current config:
# syscheckAdm --get disk fs
FS_MOUNT_LIST=/, -, -, 80, 5000000000000001, 90, 3000000000001000, 80,
5000000000000001, 90, 3000000000001000,
/boot, -, -, 80, 5000000000000001,
90, 3000000000001000, 80, 5000000000000001, 90, 3000000000001000,
/usr, -,
-, 80, 5000000000000001, 90, 3000000000001000, 80, 5000000000000001, 90,
3000000000001000,
/var, -, -, 80, 5000000000000001, 90, 3000000000001000,
80, 5000000000000001, 90, 3000000000001000,
/var/TKLC, -, -, 80,
5000000000000001, 90, 3000000000001000, 80, 5000000000000001, 90,
3000000000001000,
/tmp, -, -, 80, 5000000000000001, 90, 3000000000001000,
80, 5000000000000001, 90, 3000000000001000
Than set the new warning threshold value for "/" directory to 85, replace the first "80" in the
value string following "/, -, -, " (note you have to copy all the variable value above and paste it
between single quotes):
# syscheckAdm --set disk fs --var='FS_MOUNT_LIST' --val='/, -, -, 85,
5000000000000001, 90, 3000000000001000, 80, 5000000000000001, 90,
3000000000001000,
/boot, -, -, 80, 5000000000000001, 90, 3000000000001000,
80, 5000000000000001, 90, 3000000000001000,
/usr, -, -, 80,
5000000000000001, 90, 3000000000001000, 80, 5000000000000001, 90,
3000000000001000,
/var, -, -, 80, 5000000000000001, 90, 3000000000001000,
80, 5000000000000001, 90, 3000000000001000,
/var/TKLC, -, -, 80,
5000000000000001, 90, 3000000000001000, 80, 5000000000000001, 90,
3000000000001000,
/tmp, -, -, 80, 5000000000000001, 90, 3000000000001000,
80, 5000000000000001, 90, 3000000000001000'
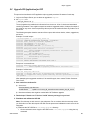
3. Remove backout file
a) Login as root user on each server
b) Execute the command to check if the backout file exists
909-2242-001
34
Major Upgrade
#ls /var/TKLC/run/backout
c) If the above command returns a result, run the below command to delete the file
#rm /var/TKLC/run/backout
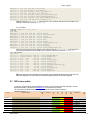
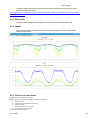
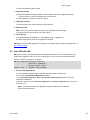
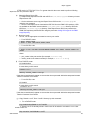
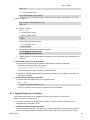
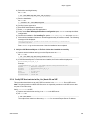
4.3 xMF Healthcheck
This procedure describes how to run the health check script on xMF servers.
The script gathers the health check information from each server in the xMF subsystem or from
standalone server. The script should be run from only on one server of the XMF subsystem (the 1A
server is preferred) or on stand-alone. The output consists of a list of checks and results, and, if applicable,
suggested solutions.
1. Run the automatic healthcheck script and verify output
a) Run analyze_subsystem.sh script as cfguser:
$ analyze_subsystem.sh
b) Analyze the output of the script for errors. Issues reported by this script must be resolved before
any further usage of this server. Verify no errors are present.
If the error occurs, contact the Tekelec Customer Care Center.
Note: For a standalone, there will be only one server in the output. Example output for a
healthy subsystem:
----------------------------------------------------ANALYSIS OF SERVER IMF0502-1A STARTED
----------------------------------------------------11:28:59: STARTING HEALTHCHECK PROCEDURE - SYSCHECK=0
11:28:59: date: 02-07-11, hostname: IMF0502-1A
11:28:59: TPD VERSION: 3.3.8-63.25.0
11:28:59: XMF VERSION: [ 60.6.7-2.1.0 ]
11:28:59: ------------------------------------------------11:28:59: Checking disk free space
11:28:59:
No disk space issues found
...
11:29:08: Checking whether ssh keys are exchanged among machines in frame this can take a while
11:29:08:
3 mates found: yellow-1B yellow-1C yellow-1D
11:29:26:
Connection to all mates without password was successful
11:29:26: Checking A-Node server
11:29:29:
Connection to A-Node 10.240.9.4 was successful
11:29:29:
A-Node version is: 60.6.7-2.1.0
11:29:29: Checking version of the nsp
11:29:32:
Connection to nsp 10.240.9.3 was successful
11:29:32:
nsp version is: 6.6.4-7.1.0
11:29:32:
nsp was installed on: 2011-01-13 05:09:26 (25 days 6 hours
ago)
11:29:32: All tests passed. Good job!
11:29:32: ENDING HEALTHCHECK PROCEDURE WITH CODE 0
END OF ANALYSIS OF SERVER IMF0502-1A
----------------------------------------------------ANALYSIS OF SERVER IMF0502-1B STARTED
----------------------------------------------------...
...
11:30:04: ENDING HEALTHCHECK PROCEDURE WITH CODE 0
END OF ANALYSIS OF SERVER IMF0502-1B
----------------------------------------------------ANALYSIS OF SERVER IMF0502-1C STARTED
----------------------------------------------------...
...
909-2242-001
35
Major Upgrade
11:30:36: ENDING HEALTHCHECK PROCEDURE WITH CODE 0
END OF ANALYSIS OF SERVER IMF0502-1C
IMF0502-1A
IMF0502-1B
IMF0502-1C
TPD: 3.3.8-63.25.0
TPD: 3.3.8-63.25.0
TPD: 3.3.8-63.25.0
XMF: 60.6.7-2.1.0
XMF: 60.6.7-2.1.0
XMF: 60.6.7-2.1.0
0 test(s) failed
0 test(s) failed
0 test(s) failed
Example output for a subsystem with errors:
...
...
END OF ANALYSIS OF SERVER IMF0502-1D
IMF0502-1A TPD: 3.3.8-63.25.0 XMF: 60.6.7-2.1.0
1 test(s) failed IMF05021B TPD: 3.3.8-63.24.0 XMF: 60.6.7-1.0.0
3 test(s) failed server on
interface yellow-1c is not accessible (ping)
IMF0502-1D TPD: 3.3.8-63.25.0 XMF: 60.6.7-2.1.0
0 test(s) failed
Differences between tpd platform versions found!
Differences between message feeder application versions found!
Note: if you get the error bellow after PIC 9 upgrade you may use the WA of PR 222200 in
order to increase the 80 threashold to 85 for the system having been installed originally with
old TPD releases and the / partition is only 500M instead of the 1G allocated on the fresh
installed system
[root@SPB-NSP-APACHE ~]# syscheck
Running modules in class net...
OK
Running modules in class hardware...
OK
Running modules in class disk...
* fs: FAILURE:: MINOR::5000000000000001 -- Server Disk Space Shortage W arning
* fs: FAILURE:: Space used in "/" exceeds the recommended limit 80%. 84 % used.
[root@SPB-NSP-APACHE ~]# df -h
Filesystem
Size Used Avail Use% Mounted on
/dev/mapper/vgroot-plat_root
496M 398M
73M 85% /
Log on the server as root and get the current config:
# syscheckAdm --get disk fs
FS_MOUNT_LIST=/, -, -, 80, 5000000000000001, 90, 3000000000001000, 80,
5000000000000001, 90, 3000000000001000,
/boot, -, -, 80, 5000000000000001,
90, 3000000000001000, 80, 5000000000000001, 90, 3000000000001000,
/usr, -,
-, 80, 5000000000000001, 90, 3000000000001000, 80, 5000000000000001, 90,
3000000000001000,
/var, -, -, 80, 5000000000000001, 90, 3000000000001000,
80, 5000000000000001, 90, 3000000000001000,
/var/TKLC, -, -, 80,
5000000000000001, 90, 3000000000001000, 80, 5000000000000001, 90,
3000000000001000,
/tmp, -, -, 80, 5000000000000001, 90, 3000000000001000,
80, 5000000000000001, 90, 3000000000001000
Than set the new warning threshold value for "/" directory to 85, replace the first "80" in the
value string following "/, -, -, " (note you have to copy all the variable value above and paste it
between single quotes):
# syscheckAdm --set disk fs --var='FS_MOUNT_LIST' --val='/, -, -, 85,
5000000000000001, 90, 3000000000001000, 80, 5000000000000001, 90,
3000000000001000,
/boot, -, -, 80, 5000000000000001, 90, 3000000000001000,
80, 5000000000000001, 90, 3000000000001000,
/usr, -, -, 80,
5000000000000001, 90, 3000000000001000, 80, 5000000000000001, 90,
3000000000001000,
/var, -, -, 80, 5000000000000001, 90, 3000000000001000,
80, 5000000000000001, 90, 3000000000001000,
/var/TKLC, -, -, 80,
5000000000000001, 90, 3000000000001000, 80, 5000000000000001, 90,
3000000000001000,
/tmp, -, -, 80, 5000000000000001, 90, 3000000000001000,
80, 5000000000000001, 90, 3000000000001000'
2. Duplicate Suppression settings when coming from 7.1
909-2242-001
36
Major Upgrade
If this feature has been configured, it is important to write down the information before starting the upgrade
and to add them again in the CCM after the upgrade
For this:
- igrep -p DupIpPktTimeoutMs LongParam
- iqt -pz -f_name -f_dupIpPktEnabled DbIpLink
3. Check in the CCM if the PMF is using an expert mode file. Navigate to Acquisition > Sites > Site Name > PMF
name > Servers > PMF Name > PMIA Configurations and check if a file is active. In this case this file superceed
whatever is configured in the CCM, but requires to keep the same TC id used. That’s why you need to ensure it
remain the same using the following command as cfguser
PMF1-0A:/export/home/cfguser iqt -p DbIpLink
_id _filterId _policy _applicationType _filterType _mfGroupId _pduTblId _name
_shortName _msgFeederId _protocol _preFilter _advFilter _ipSessTimeout
_ipSessForcedTimeout _ipSessTruncation _ipSessFwdCnt _ipSessCntInterim
_ipSessDirection _dupIpPktEnabled _lastTime
16932 0 -1 GENERIC PKT PMF1:XMF 0 PMF1-0A_All 16932 PMF1-0A 127 ( port 2152
or port 3386 or port 2123) 0 864000 0 No 0 SESSION_WAY_BOTH No 11/19/2012
15:23:29
909-2242-001
37
Major Upgrade
909-2242-001
38
Major Upgrade
4.4 NSP Pre-Upgrade Healthcheck and Settings
This procedure describes pre-upgrade sanity test NSP together with a few configuration settings.
1. Log in and either insert the DVD/CD or distribute the NSP ISO file
a) Log in as root on the NSP server (In case of Onebox configuration) or Primary Weblogic server
(In case of Fourbox configuration) .
b) Distribute the media:
• On the rackmount server insert the NSP DVD/CD or mount the NSP ISO file via iLO (see
How to mount the ISO file via iLO).
• On the c-class blade server download the NSP ISO from the PM&C ISO repository. ISOs
are available on the PM&C server under the /var/TKLC/smac/image directory. Store the
NSP ISO file to /var/TKLC/upgrade directory.If the NSP ISO is not present in the PM&C
ISO repository add the ISO file using the procedure Adding ISO Images to the PM&C Image
Repository
2. Mount the media
As root, run the appropriate command to mount the media:
• For the DVD/CD, run:
# mount /media/cdrom
• For the ISO file, run:
# mount –o loop iso_path /mnt/upgrade
where iso_path is the absolute path of the ISO image, which includes the name of the image (for
example, /var/TKLC/upgrade/iso_file_name.iso).
3. Pre-Upgrade Verification
a) Run healthcheck:
• For the DVD/CD, run:
# sh /media/cdrom/health_check/health_check_common.sh
• For the ISO file, run:
# sh /mnt/upgrade/health_check/health_check_common.sh
b) The logs are available at /var/log/nsp/install/nsp_install.log
Note: take care the logs keep the history from all previous installation, so make sure to start from
the end of the file.
c) Check the message on terminal console.
State and Health should be RUNNING and OK for all three servers (In case of Onebox
configuration) or All five servers (In case of Fourbox configuration).
d) Verify the build number should be 9.x.x-X.Y.Z where X.Y.Z is the build number.
e) Verify the RAM Size is [OK]
Verify the space in /opt ,/tmp, /var/TKLC is [OK]
If the space is [NOT OK] in any of the above partition,execute the following command to create
some default space.
909-2242-001
39
Major Upgrade
• For the DVD/CD, run:
# sh /media/cdrom/health_check/pre_upgrade_createspace.sh
• For the ISO file, run:
# sh /mnt/upgrade/health_check/pre_upgrade_createspace.sh
type yes to continue
Please follow step 3(a) again to verify if the space is [OK]
and If the space is [NOT OK] in any of the above partition contact Tekelec Technical services
and ask for assistance.
f) Verify the free space in / , /opt/oracle is [OK].
If the space is [NOT OK] in any of the above partition contact Tekelec Technical services and
ask for assistance.
g) Verify /tekelec SYMLINK is present [ OK ].
If /tekelec SYMLINK is not present contact Tekelec Technical services and ask for assistance.
/mnt
Note: Please do not proceed if space is shown [NOT OK] in any of the above partition.
If you have the message “space in /var/TKLC is [NOT OK]” make sure you have only one iso file
in /var/TKLC/upgrade. If not remove all other file files they must be used one by one and not
copied all at the same time because the partition is too small.
If you still have space issue erase the content of the directory /var/TKLC/backout/pkg but not
the directory itself.
Also, the message "-bash: line 2: ./DictionaryUsage.sh: No such file or directory"
can be ignored for 6.6.x and 7.0 releases.
h) As root, run the appropriate command depending on the mount point used:
• For the DVD/CD, run:
# umount /media/cdrom
• For the ISO file, run:
# umount /mnt/upgrade
4. Check weblogic console is not locked
warning: Weblogic console must not be locked during upgrade. If console is locked
upgrade will abort. If it is locked, please release lock from Weblogic console as follows:
a) Connect to Weblogic console.
http://192.168.1.1:8001/console
Where 192.168.1.1 is the IP address of NSP server (In case of Onebox configuration) or Weblogic
Primary Server (In case of Fourbox configuration)
b) On the left panel click on Release configuration button.
5. Remove backout file
a) Login as root user on each box of Fourbox configuration or on NSP Server if onebox configuration
b) Execute the command to check if the backout file exists
909-2242-001
40
Major Upgrade
#ls /var/TKLC/run/backout
c) If the above command returns a result, run the below command to delete the file
#rm /var/TKLC/run/backout
6. check the pkg directory exist
a) Login as root user on each box of Fourbox configuration or on NSP Server if onebox configuration
b) Execute the command to check if the backout file exists
#ls /var/TKLC/backout/pkg
c) If the above command does not returns a result, run the below command to create the directory
#mkdir /var/TKLC/backout/pkg
7. Move all DFP from xDRs servers to BM or PDU server
Go to the CCM and navigate on each IXP subsystem distribution and make sure all DFP are
assigned on a BM or a PDU.
Note: For the upgrade to PIC 9.0.2 or 9.0.3 it is mandatory to not have any DFP
on the xDR servers as they will be removed from the IXP subsystem while the
upgrade. This is also including the IXP monitor store DFPs.
8. Move all DataFeeds from xDRs servers to BM or PDU server
Go to the DataFeeds and check each feed configuration and make sure all DataFeeds are
assigned on a BM or a PDU.
Note: For the upgrade to PIC 9.0.2 or 9.0.3 it is mandatory to not have any
datafeeds on the xDR servers as they will be removed from the IXP subsystem
while the upgrade.
4.5 Upgrade Configurations using Deprecated Field(s)
This step is to be performed to upgrade configurations which are using Deprecated field(s) so as
to make sure none of the configuration will use Deprecated field which may get removed in later
releases.
a) Login to NSP application interface as TklcSrv user.
b) Click Upgrade Utility
c) Click Dictionaries with Deprecated Field(s) link on home page, this will a list of dictionaries
having deprecated field(s).
d) Select any one of the dictionaries and choose View Dependant Configurations icon from tool
bar.
This will display list of Protraqs, Queries and Filters using deprecated fields. You can also export
this list by clicking on Export button given on that popup. If there are no dependant
configurations then this list will be empty.
warning: Take care to check each Tab and not Only the default one ProTraq.
The Screen shot bellow shows an example where the job has not been done at the
end of the previous upgrade.
909-2242-001
41
Major Upgrade
4.6 Check NSP Backup is valid
This procedure describes different steps to be followed for checking the backup of NSP is valid. It is useful
to have this backup in case of restoring the setup need arising from upgrade failure.
You can find detailed information on the backup in PIC Maintenance Guide 909-2197-001 section
9.3 NSP Backup Procedures
a) Login as a root user on NSP Server (In case of Onebox configuration ) or Oracle server (In case
of fourbox configuration).
b) Check the content of /opt/oracle/backup
There must be one directory for the last seven days and it is recomanded to copy in a safe place the
full content of at least the last of this directory
# cd /opt/oracle/backup
# ls -lh
drwxrwxrwx 9 root
root
drwxrwxrwx 9 root
root
drwxrwxrwx 9 root
root
drwxrwxrwx 9 root
root
drwxrwxrwx 9 root
root
drwxrwxrwx 9 root
root
drwxrwxrwx 9 root
root
4096
4096
4096
4096
4096
4096
4096
Jun 28 22:01 NSP_BACKUP_06_28_12_22_00_01
Jun 29 22:01 NSP_BACKUP_06_29_12_22_00_02
Jun 30 22:01 NSP_BACKUP_06_30_12_22_00_01
Jul 1 22:01 NSP_BACKUP_07_01_12_22_00_01
Jul 2 22:01 NSP_BACKUP_07_02_12_22_00_01
Jul 3 22:01 NSP_BACKUP_07_03_12_22_00_01
Jul 4 22:01 NSP_BACKUP_07_04_12_22_00_01
c) Check the content of the last backup directory
For a One Box
[root@DEMO-NSP NSP_BACKUP_02_04_13_22_00_01]# ls -lh
total 456M
-rw-r--r-- 1 root root 480K Feb 4 22:03 apache-conf.tgz
-rw-r--r-- 1 root root 169 Feb 4 22:03 backup.log
-rwxr-xr-x 1 root root 114 Feb 4 22:00 boot.properties
drwxr-xr-x 11 root root 4.0K Feb 4 22:00 config
-rw-r----- 1 oracle oinstall 397M Feb 4 22:02 ExpNSP.dmp.gz
-rw-r--r-- 1 oracle oinstall 64K Feb 4 22:02 ExpNSP.log
drwxr-xr-x 2 root root 4.0K Feb 4 22:00 exportrealm
-rw-r--r-- 1 root root 445 Feb 4 22:03 hosts
-rw-r--r-- 1 root root 167 Feb 4 22:03 ifcfg-eth01
-rw-r--r-- 1 root root 23 Feb 4 22:03 ifcfg-eth02
-rw-r--r-- 1 root root 39K Feb 4 22:03 install.log
-rw-r--r-- 1 root root 59M Feb 4 22:03 jmxagentproperties.tgz
909-2242-001
42
Major Upgrade
drwxr-xr-x
-rw-r--r--rw-r--r--rw-r--r--rw-r--r--rw-r--r--rwxr-xr-x
-rw-r--r--
7
1
1
1
1
1
1
1
root
root
root
root
root
root
root
root
root
root
root
root
root
root
root
root
4.0K Feb 4 22:00 ldap
66 Feb 4 22:03 network
318 Feb 4 22:03 nsp_setenv.sh
1.9K Feb 4 22:03 ntp.conf
301 Feb 4 22:03 optional_modules_list
320 Feb 4 22:00 preBackupTests.log
39 Feb 4 22:00 SerializedSystemIni.dat
1.4K Feb 4 22:03 snmpd.conf
Make sure the file ExpNSP.dmp.gz exist and have a size coherent with the amount of data of your
customer. Check the content of ExpNSP.log
For a Four Box
# cd NSP_BACKUP_07_04_12_22_00_01
# ls -lh
total 40K
drwxr-xr-x 2 root root 4.0K Jul
-rwxr-xr-x 1 root root 187 Jul
drwxr-xr-x 10 root root 4.0K Jul
drwxrwxrwx 2 root root 4.0K Jul
drwxr-xr-x 7 root root 4.0K Jul
drwxrwxrwx 2 root root 4.0K Jul
-rw-r--r-- 1 root root 320 Jul
drwxr-xr-x 2 root root 4.0K Jul
drwxr-xr-x 2 root root 4.0K Jul
-rwxr-xr-x 1 root root
64 Jul
4
4
4
4
4
4
4
4
4
4
22:02
22:01
22:01
22:01
22:01
22:02
22:01
22:02
22:02
22:01
apache
boot.properties
config
exportrealm
ldap
oracle
preBackupTests.log
primary
secondary
SerializedSystemIni.dat
Check the content of the oracle directory and make sure the file ExpNSP.dmp.gz exist and have a
size coherent with the amount of data of your customer. Check the content of ExpNSP.log
# ls -lh oracle/
total 56M
-rw-r----- 1 oracle
-rw-r--r-- 1 oracle
-rw-r--r-- 1 root
-rw-r--r-- 1 root
-rw-r--r-- 1 root
-rw-r--r-- 1 root
-rw-r--r-- 1 root
-rw-r--r-- 1 root
-rw-r--r-- 1 root
-rw-r--r-- 1 root
-rw-r--r-- 1 root
oinstall 5.9M Jul
oinstall 55K Jul
root
371 Jul
root
163 Jul
root
99 Jul
root
39K Jul
root
50M Jul
root
76 Jul
root
62 Jul
root
1.6K Jul
root
2.5K Jul
4
4
4
4
4
4
4
4
4
4
4
22:02
22:02
22:02
22:02
22:02
22:02
22:02
22:02
22:02
22:02
22:02
ExpNSP.dmp.gz
ExpNSP.log
hosts
ifcfg-bond0.3
ifcfg-eth02
install.log
jmxagentproperties.tgz
network
nsp_setenv.sh
ntp.conf
snmpd.conf
Note: the backup is automatically executed each night at 22H00 and depending on the time you
start NSP upgrade you may execute a manual backup just before to start the upgrade.
4.7 IXP License update
In case one of the following obsolete builders are used, a new IXP license would be required to use the
replacement builder. Use the form WI005536.xlsx to request the new license.
You can use the following command as cfguser to get the current license information
IxpCheckLicense -p
RTU PN
Oracle Description
950-0065-01
950-0066-01
950-0121-01
950-0175-01
950-0176-01
950-0177-01
950-0178-01
950-0179-01
LICENSE_XB_UMTS IUCS CONTROL_IAS
LICENSE_XB_UMTS IUPS CONTROL_IAS
LICENSE_XB_GN/GP/GI I-MODE IPDR_IAS
LICENSE_UMTS LU-PS RAB XDR_RIGHT TO USE_IAS
LICENSE_UMTS LU-CS CC XDR_RIGHT TO USE_IAS
LICENSE_UMTS LU-CS MM XDR_RIGHT TO USE_IAS
LICENSE_UMTS LU-CM RAB XDR_RIGHT TO USE_IAS
LICENSE_GSX XDR_RIGHT TO USE_IAS
909-2242-001
License
Key
Interfaces
PIC
7.0
PIC
7.1
PIC
7.5
PIC
9.0
PIC
10.0
Replaced by
Rep
Key
032
023
043
053
049
048
062
068
Iu
Iu
Gn Gp Gi
Iu
Iu
Iu
Iu
GA
GA
GA
GA
GA
GA
GA
GA
GA
GA
GA
GA
EOL
EOL
GA
GA
MD
MD
MD
MD
EOL
EOL
MD
MD
EOL
EOL
EOL
EOL
EOL
EOL
EOL
EOL
EOL
EOL
EOL
EOL
EOL
EOL
EOL
EOL
950-0681-01
950-0682-01
imode obsolete
950-0682-01
950-0382-01
950-0383-01
950-0681-01
128
129
129
095
094
128
43
Major Upgrade
950-0228-01
950-0255-01
950-0382-01
950-0383-01
950-0425-01
950-0681-01
LICENSE_ISUP ANSI SENTINEL FEED_RIGHT TO USE_IAS
LICENSE_MAP SUDR_RIGHT TO USE_IAS
RTU_XDR BUILDER_6.2.0_BSSAP_RANCC
RTU_XDR BUILDER_6.2.0_BSSAP_RAN
LICENSE_MAP SM TDR_RIGHT TO USE_IAS
PIC_XB_UMTS IUCS CONTROL_RTU_INVOICE_ONLY
066
083
095
094
090
128
950-0682-01
PIC_XB_UMTS IUPS CONTROL_RTU_INVOICE_ONLY
129
GA
GA
GA
GA
GA
GA
GA
GA
GA
GA
Iu
EOL
GA
GA
GA
GA
GA
EOL
EOL
GA
GA
GA
GA
EOL
EOL
GA
GA
GA
GA
Iu
GA
GA
GA
Sentinel EOL
950-0425-01
090
4.8 EFS Healthcheck
This procedure describes how to run the automatic healthcheck of the EFS.
1. Open a terminal window and log in as cfguser on the EFS server you want to analyze.
2. As cfguser, run:
$ analyze_subsystem.sh
The script gathers the healthcheck information from all the configured servers in the subsystem.
A list of checks and associated results is generated. There might be steps that contain a suggested
solution. Analyze the output of the script for any errors. Issues reported by this script must be
resolved before any further use of this server.
The following examples show the structure of the output, with various checks, values, suggestions,
and errors.
Example of overall output:
[cfguser@ixp2222-1a ~]$ analyze_subsystem.sh
----------------------------------------------------ANALYSIS OF SERVER ixp2222-1a STARTED
----------------------------------------------------10:16:05: STARTING HEALTHCHECK PROCEDURE - SYSCHECK=0
10:16:05: date: 05-20-11, hostname: ixp2222-1a
10:16:05: TPD VERSION: 4.2.3-70.86.0
10:16:05: IXP VERSION: [ 7.1.0-54.1.0 ]
10:16:05: XDR BUILDERS VERSION: [ 7.1.0-36.1.0 ]
10:16:05: ------------------------------------------------10:16:05: Analyzing server record in /etc/hosts
10:16:05:
Server ixp2222-1b properly reflected in /etc/hosts file
10:16:05:
Analyzing IDB state
10:16:05:
IDB in START state
...
12:21:48: Analyzing disk usage
...
10:24:09: ENDING HEALTHCHECK PROCEDURE WITH CODE 0
END OF ANALYSIS OF SERVER ixp2222-1b
ixp2222-1a TPD:[ 4.2.3-70.86.0 ] IXP:[ 7.1.0-54.1.0 ] XB:[ 7.1.0-36.1.0 ]
test(s) failed
ixp2222-1b TPD:[ 4.2.3-70.86.0 ] IXP:[ 7.1.0-54.1.0 ] XB:[ 7.1.0-36.1.0 ]
test(s) failed
0
0
Example of a successful test:
10:24:08: Analyzing DaqServer table in IDB
10:24:08: Server ixp2222-1b reflected in DaqServer table
Example of a failed test:
12:21:48: Analyzing IDB state
12:21:48: >>> Error: IDB is not in started state (current state X)
909-2242-001
44
Major Upgrade
12:21:48: >>> Suggestion: Verify system stability and use 'prod.start' to start
the product
Note: if you get the error bellow after PIC 9 upgrade you may use the WA of PR 222200 in
order to increase the 80 threashold to 85 for the system having been installed originally with
old TPD releases and the / partition is only 500M instead of the 1G allocated on the fresh
installed system
[root@SPB-NSP-APACHE ~]# syscheck
Running modules in class net...
OK
Running modules in class hardware...
OK
Running modules in class disk...
* fs: FAILURE:: MINOR::5000000000000001 -- Server Disk Space Shortage W arning
* fs: FAILURE:: Space used in "/" exceeds the recommended limit 80%. 84 % used.
[root@SPB-NSP-APACHE ~]# df -h
Filesystem
Size Used Avail Use% Mounted on
/dev/mapper/vgroot-plat_root
496M 398M
73M 85% /
Log on the server as root and get the current config:
# syscheckAdm --get disk fs
FS_MOUNT_LIST=/, -, -, 80, 5000000000000001, 90, 3000000000001000, 80,
5000000000000001, 90, 3000000000001000,
/boot, -, -, 80, 5000000000000001,
90, 3000000000001000, 80, 5000000000000001, 90, 3000000000001000,
/usr, -,
-, 80, 5000000000000001, 90, 3000000000001000, 80, 5000000000000001, 90,
3000000000001000,
/var, -, -, 80, 5000000000000001, 90, 3000000000001000,
80, 5000000000000001, 90, 3000000000001000,
/var/TKLC, -, -, 80,
5000000000000001, 90, 3000000000001000, 80, 5000000000000001, 90,
3000000000001000,
/tmp, -, -, 80, 5000000000000001, 90, 3000000000001000,
80, 5000000000000001, 90, 3000000000001000
Than set the new warning threshold value for "/" directory to 85, replace the first "80" in the
value string following "/, -, -, " (note you have to copy all the variable value above and paste it
between single quotes):
# syscheckAdm --set disk fs --var='FS_MOUNT_LIST' --val='/, -, -, 85,
5000000000000001, 90, 3000000000001000, 80, 5000000000000001, 90,
3000000000001000,
/boot, -, -, 80, 5000000000000001, 90, 3000000000001000,
80, 5000000000000001, 90, 3000000000001000,
/usr, -, -, 80,
5000000000000001, 90, 3000000000001000, 80, 5000000000000001, 90,
3000000000001000,
/var, -, -, 80, 5000000000000001, 90, 3000000000001000,
80, 5000000000000001, 90, 3000000000001000,
/var/TKLC, -, -, 80,
5000000000000001, 90, 3000000000001000, 80, 5000000000000001, 90,
3000000000001000,
/tmp, -, -, 80, 5000000000000001, 90, 3000000000001000,
80, 5000000000000001, 90, 3000000000001000'
4.9 Global Healthcheck
4.9.1 iLO Access
Make sure you can access the iLO interface of all servers and you can open the remote console
for each server
4.9.2 System Cleanup
Discuss with the customer to clean up the system as much as possible in order to reduce the
risk and avoid any issue due to some objects that would no more be used.
4.9.3 Engineering Document
Make sure you get the latest available engineering document and it is up to date.
909-2242-001
45
Major Upgrade
The latest version should be documented on the Customer Info Portal, as well as the current
password for the admin users
http://signal.tekelec.com/Depts/custservice/New%20Product%20Engineering/IAS/Cust_Info/Lists/System
%20Info/AllItems.aspx
4.9.4 Disp status
LinkDisp and RouteDisp status are captured in the result of the picHealthCheck script
4.9.5 Monica
Make sure Monica KPI are applied on each session and displayed in a ProPerf Dash board.
Like the sample bellow.
4.9.6 ProTrace Session Status
Navigate from the home screen to ProTrace
NOTE: Look for any sessions that are lagging behind the current time.
1. View All records
2. Obtain session period and time (clock icon)
3. Filter by end date
4. End date must be the correct time
5. Screen capture the information
Verify which sessions are lagging.
909-2242-001
46
Major Upgrade
Statistics sessions must also be considered but take in consideration records are periodically generated.
Try to access the session it-self and check the session content and especially make sure the PDU are properly recorded.
4.9.7 Systems Alarms
Access the system alarm and fix all alarms on the system. In case some alarms can’t be fixed
due to overloaded system for example, the remaining alarms before the upgrade must be
captured in order to compare with the alarms we would get at the end of the upgrade.
4.9.8 Alarm Forwarding
Connect on NSP Primary and Navigate in platcfg menu to check the SNMP and SMTP
configuration.
Make sure the SNMP and SMTP configuration are up to date in the Engineering Document.
4.9.9 ProTraq
Access to ProTraq configuration and check which configuration are NOT-SYNC
4.9.10
ProPerf
Access to ProPerf configuration and check each dashboard is working fine
4.9.11
DataFeed
Access to the DataFeed configuration and capture the Feed Status
Make sure each Feed configuration is Documented in the Engineering Document
4.9.12
Scheduler
Access to the Scheduler and check the scheduled tasks configured are working as expected.
Make sure each task is documented in the Engineering Document.
4.9.13
Diagnostic Utility
Access to Diagnostic utility and navigate to each system to make sure the system is healthy.
4.9.14
IPv6 Overhead
Use the following Excel sheet to calculate the additional disk space required due to the IPv6
overhead in the new builder. xDR IPv6 overhead 7.5 and 9.xlsx
This would allow you to give the customer an estimate of the session duration required to avoid
going to urgent purge after the upgrade
909-2242-001
47
Major Upgrade
5 NSP Major Upgrade
5.1 NSP Pre-Upgrade Check (onebox and four box)
1.
Make sure you executed the sections:
a. 4.4 NSP Pre-Upgrade Health check and settings
b. 4.5 Upgrade configuration using deprecated fields
c. 4.6 Check NSP Backup is Valid
2. Verify the password for “tekelec” and “TklcSrv” user and set password to default password if
modified. Verify the password of tekelec user. Password should be default value defined in
TR006061 for . If password is modified (other than default), follow the following steps to change
the password for “tekelec” or TklcSrv” user
a) Connect to Weblogic console.
http://192.168.1.1:8001/console
Where 192.168.1.1 is the IP address of NSP server (In case of Onebox configuration) or
WeblogicPrimary Server (In case of Fourbox configuration)
b)
c)
d)
e)
f)
g)
h)
i)
Login with User name weblogic
Click on Security Realms in left panel of console window
Click on myrealm in right Panel of console window.
Click on Users& Groups Tab
Click on users Tab.
Select tekelec user
Select Password Tab
Change the password to Default Password
Note: If password of tekelec user is not set to default prior to upgrade then upgrade might fail
3. Pause JMS and Purge terminated alarm
This procedure does the following tasks:
• Pauses JMS consumption
• Purges Alarm
• Corrects /tekelec symlink path
• Reconfigures Enterprise manager if it is not correctly configured
a) Login as root user on NSP Server (In case of Onebox configuration) or Primary weblogic server
(In case of Fourbox configuration)
b) Execute the following command to mount NSP ISO
• For the ISO file, run:
# mount –o loop iso_path /mnt/upgrade
where iso_path is the absolute path of the ISO image, which includes the name of the image
(for example, /var/TKLC/upgrade/iso_file_name.iso).
c) Run pre-upgrade config:
# sh /mnt/upgrade/health_check/pre_upgrade_config.sh
Note: If you get the message below just answer “y” in order to unlock weblogic console
***************** Purge Terminated Alarms
************************************
Purging Terminated Alarms
Number of Terminated Alarms: 92456
Number of All Alarms: 92639
Do you want to purge Alarms prior to backing up oracle db [y/n]?
909-2242-001
48
Major Upgrade
d) Type “y” to continue for purging of terminated alarms.
To purge terminated Alarms enter 1 or to purge All Alarms enter 2
e) Unmount NSP ISO
# umount /mnt/upgrade
f) Connect to Weblogic console in order to check JMS consumption is really stopped.
In the Services section go to messaging and then JMS Servers menu
909-2242-001
49
Major Upgrade
For Each JMS servers (2 in case on OneBox, and 4 if it is a FourBox), click on the name of the
server and then to the menu Control
If the value in consumption paused is true, this server is paused and you can return to previous
step in order to check the status of the next JMS server.
If the value is false like of the screenshot, select the checkbox in order to activate the menu
consumption, and then select pause. When asked to confirm if you Are sure you want to pause
consumption for this JMS server?, answer Yes.
The value in consumption paused is true now as expected, so you can return to the JMS server
909-2242-001
50
Major Upgrade
list in order to check the status of the next one, or continue next step if this was the last one.
4. Check minimum free disk space in /usr/TKLC/oracle/backup
Note: This step needs to be followed on NSP One-box or Oracle Server only
a) As root run:
# df -kh /usr/TKLC/oracle/backup
Example output:
Filesystem
Size
/dev/cciss/c0d2p1 67G
Used
11G
Avail
57G
Use%
16%
Mounted on
/usr/TKLC/oracle/backup
b) Check the space available under Avail column of this table. This should be at least 15-20 GB
approx e.g.
in above table shown total space available is 57GB .
Note: If total available space is less than 2 GB, then do not continue with upgrade. Contact
Tekelec Technical services and ask for assistance.
5. Generate the “Bulk Export Configurations” and “Create Configuration Report”
Go to the CCM home page and click on the link to generate this files.
Keep it in a safe place on your laptop in the worst case where even a disaster recovery would not
work with would help you to get in information, in order to re-create the configuration.
6. Synchronize the IMF
Go to the CCM and synchronize the IMF in the acquisition part before to start any operation in
order to avoid to discover new links while the upgrade.
warning: Take care if the Custom Name Override feature is enable on the linkset,
the names would be replaced by the one used on the Eagle
The function is available on the Linksets list page tool bar.
909-2242-001
51
Major Upgrade
7. Move all DFP from xDRs servers to BM or PDU server
Go to the CCM and navigate on each IXP subsystem distribution and make sure all DFP are
assigned on a BM or a PDU.
Note: For the upgrade to PIC 9.0.2 or 9.0.3 it is mandatory to not have any DFP
on the xDR servers as they will be removed from the IXP subsystem while the
upgrade. This is also including the IXP monitor store DFPs.
8. Move all DataFeeds from xDRs servers to BM or PDU server
Go to the DataFeeds and check each feed configuration and make sure all DataFeeds are
assigned on a BM or a PDU.
Note: For the upgrade to PIC 9.0.2 or 9.0.3 it is mandatory to not have any
datafeeds on the xDR servers as they will be removed from the IXP subsystem
while the upgrade.
909-2242-001
52
Major Upgrade
5.2 Major Upgrade Apache (four box only)
Warning: This step is applicable to four box configuration only. Skip it for onebox config.
Box: Apache box
This procedure describes the upgrade of Apache from 7.x ( 7.1.0, 7.1.2 and 7.5) releases to 9.0 in
four box setup in c-class blades or rackmount servers.
1. Mount PM&C repository
Note: This step has to be followed only for c-class blades
a) NSP ISO must be mounted on NSP server. Refer How To Mount the ISO file from PM&C ISO
Repository .
2. Upgrade Apache Box
a) Login as root user on the Apache Box.
b) Insert NSP DVD into DVD ROM or copy the NSP Software ISO at path /var/TKLC/upgrade
Note: Step (b) is only applicable for rackmount servers.
c) Enter the platcfg menu. As root, run:
# su - platcfg
d) Select Maintenance Upgrade Initiate
Upgrade. e) Select the upgrade media and press Enter.
The upgrade process launches. Server will be restarted automatically if upgrade ends without
errors.
f) The install logs are available at /var/log/nsp/install/nsp_install.log
Note: take care the logs keep the history from all previous installation, so make sure to start from
the end of the file.
g) TPD logs are available at /var/TKLC/log/upgrade/upgrade.log
909-2242-001
53
Major Upgrade
5.3 Major Upgrade Oracle (four box only)
Warning: This step is applicable to four box configuration only. Skip it for one box config.
Box: Oracle box
This procedure describes the upgrade of Oracle from 7.x (7.1.0, 7.1.2 and 7.5) to 9.0 in four box
setup in c-class blades or rackmount servers.
Following the order of installation mentioned below is mandatory.
1. Mount PM&C repository
Note: This step has to be followed only for c-class blades
a) NSP ISO must be mounted on NSP server Refer How To Mount the ISO file from PM&C ISO
Repository .
2. Upgrade Oracle Box
a) Login as root user on the Oracle Box.
b) Insert NSP DVD into DVD ROM or copy the NSP Software ISO at path /var/TKLC/upgrade
Note: Step (b) is only applicable for rackmount servers
c) Enter the platcfg menu. As root, run:
# su - platcfg
d) Select Maintenance Upgrade Initiate
Upgrade. e) Select the upgrade media and press Enter.
The upgrade process launches. Server will be restarted automatically if upgrade ends without
errors.
f) The install logs are available at /var/log/nsp/install/nsp_install.log
Note: take care the logs keep the history from all previous installation, so make sure to start from
the end of the file.
g) TPD logs at / var/TKLC/log/upgrade/upgrade.log
909-2242-001
54
Major Upgrade
5.4 Upgrade WebLogic Application (onebox and four box)
Warning: This step is applicable to one box and four box configurations.
Box: Onebox or Secondary and Primary WebLogic boxes
This procedure describes the upgrade of Weblogic from 7.x to 9.0. In case of a 7.5 upgrade this step is
not necessary an can be skipped. To check weblogic version installed execute the following command as root
on each weblogic server
# grep "wlserver_10.3" /opt/nsp/bea/wlserver_10.3/inventory/ContentsXML/comps.xml
<COMP NAME="WebLogic Server" VER="10.3.3.0" RELEASE="Production" BUILD_NUMBER="0"
REP_VER="0.0.0.0.0" INST_LOC="/opt/nsp/bea/wlserver_10.3">
If the version is 10.3.3.0 like in this sample than apply this procedure in case you are already in
10.3.5.0 you can skip it and go direct to the next step “Change Weblogic Password”
Note: These steps are applicable for both Secondary and Primary weblogic servers in case of a 4
Box NSP.
1. Mount PM&C repository
Note: This step has to be followed only for c-class blades
a) NSP ISO must be mounted on NSP server Refer How To Mount the ISO file from PM&C ISO
Repository .
2. Weblogic Installation/Upgrade
a) Login as root user on terminal console of Weblogic server
b) Copy the Weblogic ISO on server or insert the DVD
c) Execute the following command to mount the media
As root, run the appropriate command to mount the media:
• For a DVD/CD, run:
# mount /media/cdrom
• For an ISO file, run:
# mount –o loop iso_path /mnt/upgrade
where iso_path is the absolute path of the ISO image, which includes the name of the image
(for example, /var/TKLC/upgrade/iso_file_name.iso).
d) As root, run the appropriate command depending on the mount point used:
• For a DVD/CD, run:
# /media/cdrom/install_weblogic.sh
• For an ISO file, run:
# /mnt/upgrade/install_weblogic.sh
e) Wait until the installation process is complete.
f) As root, run the appropriate command to unmount the media depending on the mount point
used:
• For a DVD/CD, run:
# umount /media/cdrom
909-2242-001
55
Major Upgrade
• For an ISO file, run:
# umount /mnt/upgrade
g) As root, run the following commands to reset right files ownership:
# chown -R cfguser:cfg /usr/TKLC/nsp/tekelec/TKLCmf
And in case of onebox configuration
# chown -R oracle:oinstall /usr/TKLC/nsp/scripts/oracle
5.5 Change WebLogic Password (onebox and four box)
Warning: This step is applicable to one box and four box configurations.
Box: Onebox or Secondary and Primary WebLogic boxes
This procedure is applicable only for one box or primary box in case the password was changed
from the default value.
Warning: This procedure Needs to be run only if current weblogic password is different from default
weblogic password defined in TR006061 for “Weblogic console”
To verify the current weblogic password using browser open the URL http://192.168.1.1/console, where
192.168.1.1 is the IP address of Apache ( In case of Fourbox setup) or onebox server ( In case of One box
setup) and enter login details on weblogic console.
1. Weblogic password change
a) Login as a root user on Primary Weblogic box
b) Enter platcfg menu:
#su - platcfg
c) Navigate to NSP configuration NSP Password Configuration Weblogic Password
Configuration
Note: Under NSP Password Configuration menu there are two submenus
• NSP Password Configuration (for update/upgrade)
• Weblogic Password Configuration (for startup and deploy)
Note: To change the weblogic password during upgrade, second option must be used.
d) Change the weblogic password to the default value defined in TR006061 for “Weblogic
console”.
Note: The password must be set to the default value , otherwise upgrade
will fail.
Note: This step can take a while to complete. Wait for Platcfg menu to
return back and do not run any outside procedure in between.
e) Exit platcfg menu.
2. Verification of successful password change
a) Using browser open the URL http://192.168.1.1/console, where 192.168.1.1 is the IP address of
Apache ( In case of Fourbox setup) or onebox server ( In case of One box setup)
b) Enter the new Weblogic password to login to console.
c) If login is successful, weblogic password has been updated successfully.
909-2242-001
56
Major Upgrade
d) If login is unsuccessful, please contact Tekelec Customer Support and do not proceed with
upgrade.
5.6 Upgrade NSP on Secondary WebLogic (four box only)
Warning: This step is applicable to four box configuration only. Skip it for onebox config.
Box: Secondary WebLogic boxes
This procedure describes the upgradation of weblogic server from 7.x to 9.0.
1. Mount PM&C repository
Note: This step has to be followed only for c-class blades
a) NSP ISO must be mounted on NSP server Refer How To Mount the ISO file from PM&C ISO
Repository .
2. Upgrade NSP on Weblogic Box
a) Login as root user on the weblogic Box.
b) Insert NSP DVD into DVD ROM or copy the NSP Software ISO at path /var/TKLC/upgrade
Note: Step (b) is only applicable for rackmount servers.
c) Enter the platcfg menu. As root, run:
# su - platcfg
d) Select Maintenance Upgrade Initiate
Upgrade.
e) Select the upgrade media and press Enter.
The upgrade process launches. Server will be restarted automatically if upgrade ends without
errors.
f) The install logs are available at /var/log/nsp/install/nsp_install.log
Note: take care the logs keep the history from all previous installation, so make sure to start from
the end of the file.
g) TPD logs are available at /var/TKLC/log/upgrade/upgrade.log
5.7 Upgrade NSP on OneBox/Primary WebLogic (onebox and four box)
Warning: This step is applicable to one box and four box configurations.
Box: Onebox or Primary WebLogic boxes
This procedure describes the upgrade of weblogic primary or one box server from 7.x to 9.0.
1. Mount PM&C repository
Note: This step has to be followed only for c-class blades
a) NSP ISO must be mounted on NSP server Refer How To Mount the ISO file from PM&C ISO
Repository .
2. Upgrade NSP on Weblogic Box
a) Login as root user on the weblogic Box.
b) Insert NSP DVD into DVD ROM or copy the NSP Software ISO at path /var/TKLC/upgrade
Note: Step (b) is only applicable for rackmount servers.
c) Enter the platcfg menu. As root, run:
909-2242-001
57
Major Upgrade
# su - platcfg
d) Select Maintenance Upgrade Initiate
Upgrade.
e) Select the upgrade media and press Enter.
The upgrade process launches. Server will be restarted automatically if upgrade ends without
errors.
f) The install logs are available at /var/log/nsp/install/nsp_install.log
Note: take care the logs keep the history from all previous installation, so make sure to start from
the end of the file.
g) TPD logs are available at /var/TKLC/log/upgrade/upgrade.log
5.8 Upgrade A-Node (onebox and four box)
Warning: This step is applicable to one box and four box configurations.
Box: Onebox or Primary WebLogic boxes
1. Upgrade Node A on One box or Four BoxCluster
The following steps would install A-node on NSP OneBox or Weblogic Primary Box
a) Login as root user on the on NSP One Box server or WebLogic Primary server.
b) Insert the XMF DVD to the cdrom. XMF DVD or ISO must contain part number as 872-2541-XXX
.
Note: However you are using the xMF iso for TEKI&II for the XMF upgrade you will need to use
the xMF iso for HP server for this procedure
c) If ISO is available copy the ISO to NSPOne Box or Weblogic Primary server at some location.
d) Execute as root user the following command.
As root run:
# /opt/nsp/scripts/procs/install_nodeA.sh
e) When asked for ISO, provide the complete ISO path /var/TKLC/upgrade/<isoname.iso>
f) Type yes to confirm
g) No reboot needed
2. NTP restart After Node A configuration
Note: This step must be executed After Node A installation only
a) Perform step below on NSP One Box or all boxes i.e Apache box, Oracle box, Secondary Weblogic
box and Primary weblogic box
b) Login as root user and issue following command.
As root run:
# service ntpd restart
5.9 Post-Upgrade Settings (onebox and four box)
Warning: This step is applicable to onebox and four box configurations.
Box: Onebox or Primary WebLogic boxes
1. Resume JMS Consumption
a) Open a terminal console and Login as a root user on NSP One-Box server or NSP Primary
WebLogic server server (Four-Box)
b) Execute the command below to resume JMS consumption
909-2242-001
58
Major Upgrade
# sh /opt/nsp/scripts/procs/post_upgrade_config.sh
2. Configure Apache HTTPS Certificate (Optional)
a) Copy the files server.crt and server.key that are provided by the customer to /root
b) From platcfg root menu navigate to NSPConfiguration Configure Apache HTTPS Certificate
This would install certificate provided by customer
3. Restrict access of NSP frontend to HTTPS (Optional)
Disable access to HTTP
a) Open a terminal console and Login as a root user on NSP One-Box server or NSP Primary
WebLogic server server (Four-Box)
b) Enter the plactf menu
# su – platcfg
c) Navigate to NSP Configuration Enable HTTP Port Edit
d) Select NO and press Ok to enable access again to HTTP
e) Open a terminal console and Login as a root user on NSP One-Box server or NSP Primary
WebLogic server server (Four-Box)
f) Enter the platcfg menu. As root run:
# su – platcfg
g) Navigate to NSPConfiguration Enable HTTP Port Edit
h) Select YESYES and press Ok
4. NSP Applications Documentation
Note: Document for application is automatically installed along with NSP application installation
To verify document installation login into NSP application interface and navigate to Help User
Manual Index page for that application opens. (Each application should be tested and also the
link to the PDF should be tested to see if the printable PDF file opens.)
In case you have problems to access some appliactions such ProTrace, ProTraq or CCM try to
empty you browser cache.
5. Configure host file for Mail Server (Optional)
Note: This configuration is optional and required for Security (password initialization set to
AUTOMATIC) and Forwarding (forwarding by mail filter defined and no server address override
defined by app)
Note: Apply following steps on Primary server and Secondary server in case of Four box
configuration
a) Open a terminal window and log in as root user on NSP server .
b) Enter the platcfg menu. As root run:
# su – platcfg
c) Navigate to Network Configuration Modify host file Edit and press
enter
d) Select Add Alias menu and press enter
e) Select line with machine <ip> and press enter
f) Enter new alias as mail.server in the text field press OK
g) Repetitive exit to exit Platcfg menu
6. Transfer Ownership of TklcSrv object
Note: Follow the steps only if some object bellowing to TklSrv were created in previous version
909-2242-001
59
Major Upgrade
a) Open a web browser and log in to the NSP application interface TklcSrv user.
b) Navigate to security application Transfer ownership value
c) Transfer all the TklcSrv object to and other user (tekelec for example)
7. To enable or disable the legacy feeds refer the 909-2247-01 Maintenance guide when needed.
(Optional)
Note: Refer also to the maintenance guide to convert the feeds in backaward compatible mode.
8. MIB has changed between 7.1 and 9.0
To be provided to customer if needed.
909-2242-001
60
Major Upgrade
5.10 NSP Post-Upgrade Check (onebox and four box)
Warning: This step is applicable to onebox and four box configurations.
Box: must be done from a workstation browser
This procedure describes the steps for the Sanity Tests of NSP.
1. WebLogic Console
a) From Internet Explorer, connect to the WebLogic console using the following URL:
http://192.168.1.1:8001/console
b) Where 192.168.1.1 is the IP address of the NSP Server (In case of Onebox configuration) or
WebLogic Primary Server (In case of Fourbox configuration).
2. Login
a) You should be prompted to “Log in to work with the WebLogic Server domain “.
Connect with User weblogic
3. Console Display
a) Under the Environment heading, click on the “Servers”.
4. Health Check
a) On clicking the “Servers” link in the last step, the console would display the Summary of
Servers, with a list of the three servers, nsp1a, nsp1b and nspadmin (In case of One box
configuration) or all five server,nsp1a,nsp1b,nsp2a,nsp2b and nspadmin (In case of Fourbox
configuration) .
b) Entries in the columns State and Health should be RUNNING and OK for all three servers(In
case of One box configuration) or five servers(In case of Fourbox configuration).
5. NSP GUI
a) From Internet Explorer, connect to the NSP Application GUI using the following URL:
http://192.168.1.1/
Where 192.168.1.1 is the IP address of the NSP Server.
b) If it is a Fourbox Configuration, enter the IP of the Apache server.
6. Login
a) Login to the Application with User name tekelec
7. Portal
a) In the top frame, on mouse-over on the link Portal, click on the About link that will be displayed. b)
A pop-up window with the build information will be displayed.
8. Build Verification
a) The build version should display “Portal 9.0.0-X.Y.Z”.
Where 9.0.0-X.Y.Z should be the new build number.
9. Check Oracle Enterprise manger connection
a) From Internet Explorer, connect to the following URL: https ://<IP_of_nsp_oracle>:1158/em/
b) You should be prompted to log in to work with the Enterprise manager.
Connect with User nsp.
909-2242-001
61
Major Upgrade
10. Verify ProTraq Configurations
This step is only for Information in order to get the log in case of troubles while the Centralized xDR
Builder upgrade. The ProTraq config identified with issues here would be automatically modified
while this step.
a) Login to NSP Primary using tekelec user
b) Change Directory: cd /opt/nsp/nsp-package/protraq
c) Execute ant dryrun
d) Enter Password for Tekelec Service User(TklcSrv)
e) The target will complete with following output
i)
ProTraq Configurations having Field Value Columns with IP V4 Attribute Type would
be displayed under “Following Configurations have Field Value Columns with IP V4
Data Type.”
ii)
ProTraq Configurations Field Value Columns with IP V4 Attribute Type with invalid line
names would be listed under “Following Configurations have Line Names exceeding
permissible length. Please modify the configurations to correct the line names.”
f) Open NSP GUI ProTraq, Modify ProTraq Configurations listed in step e(ii) to correct the Line
Names
g) Execute ant target: ant dryrun; No configurations with invalid line names should be listed now
h) Verify ./LineDryRun*.log; there should be no errors
5.11 NSP Backup (onebox and four box)
Warning: This step is applicable to onebox and four box configurations.
Box: Onebox or Primary WebLogic box
This procedure describes how to perform a backup from a NSP successfully upgraded in order to
avoid restore the backup from previous release in case you would face in issue while the xMF and
IXP upgrade.
As root run on Weblogic Primary server:
# . $HOME/.bash_profile; cd /opt/nsp/scripts/oracle/cmd; sh
./LaunchExpNSPdp.sh >../trc/cronNSP.log 2>&1
This command might take a long time depending on the size of the backup. Refer to the section 4.6
Check NSP backup is Valid in order to make sure everything went fine.
Note:This only one command line. You might use the command crontab –l to display the command
lanched each night and just copy it.
# crontab -l
00 22 * * * . $HOME/.bash_profile; cd /opt/nsp/scripts/oracle/cmd; sh
./LaunchExpNSPdp.sh >../trc/cronNSP.log 2>&1
01 00 * * * rm -rf /tekelec/backup`date
\+\%u`;/usr/TKLC/TKLCmf/bin/backup_config backup`date \+\%u` >
/tekelec/TKLCmf/runtime/run/log/backup`date \+\%u`.log
5.12 Upload xDR Builder ISO to NSP (onebox and four box)
Warning: This step is applicable to onebox and four box configurations.
Box: Onebox or Primary WebLogic box + workstation browser
This procedure describes how to trigger the xDR builder installation on the IXP subsystem from the
CCM.
Note 1: In case of failure in this step this is not blocking for the xMF upgrade but only for the IXP.
909-2242-001
62
Major Upgrade
This will give some time to Design Support to investigate the reason of this over the day.
Note 2: PIC supports IXP subsystems with 32 and 64 bit platform architecture. For an IXP
subsystem of particular platform architecture, xDR builder ISO supporting corresponding platform
architecture will be required.
1. Install Builder ISO on NSP
a) Copy the xDR builder ISO to the NSP primary Weblogic server or insert xDR Builder CD-ROM.
b) Login to the NSP primary Weblogic server or NSP One-box server.
As root run:
# cd /opt/nsp/scripts/oracle/cmd
# ./install_builder.sh
c) You will be prompted:
Please enter path to Builder CDROM or ISO [/media/cdrom]
d) Choose one of the following:
• If you have used ISO file enter the exact path including the ISO name
• If you have used CDROM press <ENTER>
e) Wait until installation finishes.
2. Verification of ISO installation on NSP.
a) Login to the NSP application interface as TklcSrv user.
b) Click Upgrade Utility
c) Click on Manage Builder Rpm on the left tree.
It will display the list of the xDR builder rpm. One of them is the one that belongs to the ISO
file installed in the previous step. The state will be Not Uploaded.
The list will also display the supported platform of the builder ISO file. The supported platform can be “32
bit”, “64 bit” or “32,64 bit”. The supported platform “32,64 bit” means that same version of builder ISO has
been installed twice, one that supports 32 bit and the other that supports 64bit.
3. Dry run
a) Login to the NSP GUI as TklcSrv user.
b) Launch Upgrade Utility
c) Click on Manage Builder Rpm on the left tree.
It will display the list of the xDR builder rpm. Select the RPM which you want to upgrade and
choose Dry Run option from the tool bar.
d) Dry Report will be generated for each dictionary indicating changes done on the new
dictionaries (Added/Removed/Deprecated field(s)) and you will have to take in account at the
end of upgrade (after section 7.3 Centralized xDR Builder upgrade is completed)
.
This report is just an information at this time but will be very useful to finalize the
upgrade and to prepare in advance what would be required to be done. It will also display
the name of the configuration which are using deprecated field and configurations which will
become incompatible after removal of field.
If there are configurations (Query/Protraq/xDR filter) on the removed field, then modify those
configurations to remove the use of removed field. Otherwise those configurations will be
removed from the NSP when you upload the builder RPM.
The dry run can’t anymore be executed once the new package would be installed on the
IXP subsystem but you would have access to similar information on the deprecated fields
menu you can access from the utility home page.
4. Upload Builder RPM
909-2242-001
63
Major Upgrade
a) Mark the requested builder RPM with the Not Uploaded state and press Upload in the toolbar.
b) A dialog box will appear. Click on Continue to continue the RPM upload.
c) After the successful upload the RPM state will change to Uploaded
d) In case the RPM upload fails, then the state of will change back to “Not Uploaded” or “Query/Filter
Upgrade Failed”.
If the builder RPM upload fails in creating new builder and dictionaries then the state is “Not
Uploaded”, after failure. At this state, this step can be repeated once the failure issues are
resolved.
If the builder RPM upload fails in upgrading the configurations (Query/xDR filter) then the state is
“Query/Filter Upgrade Failed” after failure.
5. Upgrade Queries and Filters
In case the state of the RPM is “Query/Filter Upgrade Failed”, then only configurations (Query/xDR filter)
are required to be upgraded. Below are steps for the same
a) Mark the requested builder RPM with the “Query/Filter Upgrade Failed” state and press
"Upgrade Queries and Filters” button in the toolbar.
b) A dialog box will appear. Click on Continue to continue the upgrade.
c) After the successful upload the RPM state will change to Uploaded
6. View Dictionary Upgrade Status
In case the state of the RPM is “Query/Filter Upgrade Failed”, then the status of upgrade of queries and
filters for the dictionaries can be viewed. Below are the steps for the same
a) Mark the requested builder RPM with the “Query/Filter Upgrade Failed” state and press
"Display Dictionary Upgrade Status” button in the toolbar.
b) Dictionary Upgrade Status will be generated for each upgraded/new dictionary indicating
whether the Queries and filters have been upgraded or not for this dictionary.
909-2242-001
64
Major Upgrade
6 xMF Major Upgrade
6.1 Disable Synchronization on IMF Subsystem
This procedure describes the steps to update excludeTables in NodeInfo table.
This procedure is run on 1A server only.
There is no need to perform this procedure on standalone machine.
Mount xMF CD or iso and run updateNodeInfo script
a) Login as root on 1A server
b) Mount xMF CD or iso file
• Copy xMF iso to 1A machine:
$ mount -o loop <iso_file_path/isoname.iso> /mnt/upgrade
• or insert and mount xMF CD
$ mount /dev/cdrom /mnt/upgrade
c) In cfguser, run updateNodeInfo.sh script to disable synchronization between xMF and verify
records were changed.
$ /mnt/upgrade/upgrade/updateNodeInfo.sh
Example of correct output:
Connecting to the primary server (VIP 10.236.2.94) and updating excludeTables
in NodeInfo
Warning: Permanently added '10.236.2.94' (RSA) to the list of known hosts.
=== changed 4 records ===
Number of changed records should correspond to number of servers in the subsystem.
d) Change back to the root user to unmount xMF CD/iso
$ umount /mnt/upgrade
6.2 xMF Upgrade
If you want to minimize the downtime due to the MSU buffer migration you may apply the following
procedure before to launch the upgrade. As cfguser
$ prod.dbdown
$ rm -rf /tekelec/TKLCmf/runtime/run/db/MsuPart.0*
$ prod.start
If upgrading a provisioned system, notify potential users to not start the provision using the software
during the duration of the upgrade.
1. Insert Application CD into the server or copy ISO image to the server
a) Insert the application software CD or copy ISO image to the /var/TKLC/upgrade directory
of the server.
2. Upgrade the server
a) As root on the xMF server
b) Enter platcfg configuration menu
# su – platcfg
c) Navigate to Maintenance ➤ Upgrade
d) Select Initiate Upgrade
909-2242-001
65
Major Upgrade
e) Select the desired upgrade media
3. Upgrade proceeds
a) Many informational messages appear on the terminal screen as the upgrade proceeds.
To make it easier to read, the messages are not shown here.
b) When upgrade is complete, the server reboots.
4. Upgrade completed
a) After the reboot, the screen displays the login prompt.
5. Remove the CD.
Note: There is no need to perform this step if you upgraded from ISO image.
a) Remove the CD from the drive if it is still in there.
6. Check the log
a) In platcfg navigate to Diagnostics > View Upgrade Logs > Upgrade Log
b) Check on the bottom of the file the upgrade is complete
Warning: In case of T1100 upgrade, don’t forget to reconfigure the VIP before executing step 6.3:
VIP re-configuration.
6.3 Sync NSP with xMF
Note: make sure the xMF started before to proceed with this step. In case the disk buffering is
enable while upgrade in 9.0.2 or 9.0.3 it can takes up to 2 hours to have the software started
because of some file migration. As cfguser
PMF1-0A:/export/home/cfguser prod.state
...prod.state (RUNID=00)...
...getting current state...
Current state: A (product under procmgr)
1. Discover xMF Applications
a) From supported browser login to the NSP Application GUI as admin user
b) Go to the Centralized Configuration application
c) Select Equipment Registry ► Sites ► Site ► XMF ► XMF subsystem. (Not the one from
Acquisition Perspective)
d) Select a XMF server and click Discover Applications. The Discover Applications must be done for
each XMF server.
Note: This action includes only Application synchronization and not Network
Element synchronization
909-2242-001
66
Major Upgrade
a. set PMF settings in CCM named DupIpPktTimeoutMs to value noted before upgrade when coming
from 7.1
b. enable "Duplicate Suppression" in CCM TC according to iqt command output
2. Apply Changes xMF
a) To Apply Changes for each subsystem go to Acquisition Sites XMF.
b) Right click on subsystem and click on Apply Changes option on menu.
3. Test the VIP function.
a) After sync from NSP, the VIP will be available to access the active master server in the site.
In order to verify the VIP setup please login to any server in the subsystem and execute the
iFoStat command. As cfguser run:
909-2242-001
67
Major Upgrade
$ iFoStat
Example of correct output:
query 10.236.2.79 for failover status
+---------+-------+-----+-----------+----------+------+---------------------+
| name
| state | loc | role
| mGroup
| assg | HbTime
|
+---------+-------+-----+-----------+----------+------+---------------------+
| tek3-1a | IS
| 1A | ActMaster | sde_m2pa |
8 | 2009-06-19 23:14:08 |
| tek3-1b | IS
| 1B | StbMaster | sde_stc |
6 | 2009-06-19 23:14:06 |
| tek3-1c | IS
| 1C | Slave
|
|
0 | 2009-06-19 23:14:06 |
+---------+-------+-----+-----------+----------+------+---------------------+
b) The state should be ‘IS’ for all servers and the HbTime time should be updated every few
seconds.
6.4 xMF Healthcheck
Refer to chapter 4.3
6.5 Make 1A IMF Server Spare
This procedure describes the steps to make 1A server be the spare .
This procedure is run on 1A server only.
This procedure is only for an IMF subsystem with spare server.
Run iFoStat to find out which server is the primary (ActMaster role) and the monitoring group on 1A
a) Login as cfguser on 1A server
b) Run iFoStat
$ iFoStat
query 10.250.40.126 for failover status
+------------+-------+-----+-----------+--------+------+---------------------+
| name
| state | loc | role
| mGroup | assg | HbTime
|
+------------+-------+-----+-----------+--------+------+---------------------+
| dilbert-1a | IS
| 1A | ActMaster | MG1
|
3 | 2011-01-21 03:51:41
|
| dilbert-1b | IS
| 1B | StbMaster |
|
0 | 2011-01-21 03:51:41
|
| dilbert-1c | IS
| 1C | Slave
| MG2
|
0 | 2011-01-21 03:51:41
|
+------------+-------+-----+-----------+--------+------+---------------------+
(press Ctrl + c to exit iFoStat utility)
c) If there is no mGroup assigned to 1A server skip the rest of steps of this procedure.
d) Check if role of 1A server is ActMaster
• If 1A server is ActMaster run failover script:
$ failOver <1A server name>
where <1A server name> is hostanem of 1A server.
• If 1A server is not ActMaster
Login to ActMaster server as cfguser and run failOver script:
$ failOver <1A server name>
6.6 Make non-1A IMF Server Spare
This procedure describes the steps to make non-1A server be the spare .
909-2242-001
68
Major Upgrade
This procedure is only for an IMF subsystem with spare server.
Run foStat on current server (non-upgraded) to figure out the name of the Monitoring Group.
a) Login as cfguser on current server
b) Run foStat
$ foStat
Server State
dilbert-1a
OOS
dilbert-1b
IS
dilbert-1c
IS
Group
-1
MG1
MG2
Role
HeartBeatTime
StbMaster 01/21/2011 03:51:41
ActMaster 01/21/2011 17:53:56
Slave
01/21/2011 17:53:56
Note: The OOS state for upgraded server is normal. It is due to the incompatible HB message
between 6.x and 7.x. it will be back to normal after all servers are upgraded.
c) If there is no mGroup assigned to 1A server skip the rest of steps of this procedure.
d) Run failover script from the Active Master Server:
$ failOver -f <name of the current server> <name of the last upgraded server>
Example:
$ failover dilbert-1b dilbert-1a
This will shift monitoring group from current server to diltbert-1a
6.7 VIP re-configuration
Note: This is run on the primary server only.
a) Login to primary server as cfguser
b) Run setSSVIP script
If the xMF server is standalone PMF server then execute following command:
setSSVIP -s
If the xMF server is primary server of xMF sub-system then execute following
command:
setSSVIP <VIP>
Where:
<VIP>… is VIP address of the xMF sub-system
Example of output:
LABIMF-1A:/export/home/cfguser setSSVIP 172.16.74.62
setSSVIP 172.16.74.62 Set 172.16.74.62 as a temporary VIP, as the subsystem is not yet configured.
909-2242-001
69
Major Upgrade
7 IXP Major Upgrade
7.1 Remove xDR server from the IXP Subsystem
This procedure describes how to remove the xDR servers from an IXP subsystem in order
to not upgrade them and migrate them in DWS. Be aware of each step. This procedure is
used only for upgrade to PIC 9.0.2 or 9.0.3. In case of upgrade in 9.0.0 or 9.0.1, or if the
servers were already installed as DWS, skip this section and proceed directly with the next
one “IXP subsystem major upgrade”
1. For each xDR server as cfguser:
Stop IXP software keeping idb running.
$ prod.dbup
Erase all entry from NodeInfo excepted the one related to the current server
$ irem NodeInfo where "nodeName!='`hostname`'"
Erase all entry from DaqServer excepted the one related to the current server
$ irem DaqServer where "_name!='`hostname`'"
2. Locate the primary server (Active Master). On any other IXP server as cfguser:
[cfguser@ixp0000-1b ~]$ iFoStat
connecting 10.31.5.9...
query 10.31.5.9 for failover status
+------------+-------+-----+-----------+--------+---------------------+
| name
| state | loc | role
| mGroup | HbTime
|
+------------+-------+-----+-----------+--------+---------------------+
| ixp0000-1a | OOS
| 1A | Slave
|
| 2013-06-04 17:12:46 |
| ixp0000-1b | IS
| 1B | ActMaster |
| 2013-06-04 17:38:25 |
| ixp0000-1c | IS
| 1C | StbMaster |
| 2013-06-04 17:38:24 |
+------------+-------+-----+-----------+--------+---------------------+
Note: if you do a major upgrade 9.0.2 to 9.0.3 ensure that the xDR Server is in Active state in
the table NodeInfo how the example below.
[cfguser@ixp0008-1b ~]$ iqt -p NodeInfo
nodeId nodeName hostName nodeCapability inhibitRepPlans siteId excludeTables
C2368.011 ixp0000-1a ixp0000-1a,10.31.1.143 Active Unspecified
C2368.012 ixp0000-1b ixp0000-1b,10.31.1.182 Active Unspecified
C2368.013 ixp0000-1c ixp0000-1c,10.31.1.187 Obsrvr Unspecified
a) Log into the ActMaster server as cfguser type
$ ivi NodeInfo
Note: you must have two Active servers and the other servers Obsrvr
3. On the primary server erase each xDR server entry from DaqServer
$ irem DaqServer where "_name in ('<ixpname1>','<ixpname2>')"
$ irem NodeInfo where "nodeName in ('<ixpname1>',<ixpname2>’)"
Note: <ixpname> is the name from the xDR server that you would suppress
4. Remove the server from bulkconfig and adjust the subsystem accordingly
Note: Run this procedure from ANY IXP server in the IXP subsystem BUT NOT from a server
you are about to remove.
a) Open a terminal window and log in to any remaining IXP server in the subsystem as root.
909-2242-001
70
Major Upgrade
b) From the bulkconfig file remove host line with the IXP server you want to remove from the
IXP subsystem.
c) As root run:
# bc_adjust_subsystem.sh
d) Run analysis to see if the subsystem has been adjusted properly. As root run:
# bc_diag_bulkconfig -a
5. From the CCM execute the split procedure.
As admin user like Tekelec in the Equipment Registry push the button “Make storage
independent of IXP subsystem”
Note: This will be working only if you removed all DFP assigned on the xDR server as requested
while at the end of the NSP pre-upgrade steps.
7.2 IXP Subsystem Major Upgrade
This procedure describes the IXP application major upgrade procedure. Be aware of each step. The
IXP major upgrade is executed on each server in the subsystem in parallel. Upgrade is triggered from
each server manually.
1. Distribute and validate the IXP ISO
Note: Run this step on each server in the subsystem. Do not continue with the next step unless
you finish this one. After this step the IXP ISO must be present and validated on each server in the
subsystem.
a) Distribute the IXP ISO file to /var/TKLC/upgrade directory.
• On the rackmount server copy the IXP ISO into the /var/TKLC/upgrade using the scp
command.
• On the c-class blade server download the IXP ISO from the PM&C ISO repository. ISOs are
available on the PM&C server under the /var/TKLC/smac/image directory. Store the ISO
file to /var/TKLC/upgrade directory. If the IXP ISO is not present in the PM&C ISO
repository add the ISO file using the procedure Adding ISO Images to the PM&C Image
Repository
b) Remove DtsBlockPart :
This procedure describes how to remove DTS buffers, there will data loss for sessions with
delay (xDR and KPI).
909-2242-001
71
Major Upgrade
# prod.dbdown
# rm -rf /var/TKLC/ixp/run/db/DtsBlockPart.0*
# prod.start
c) Check IDB:
# iaudit -ef
d) Enter the platcfg menu.
As root run:
# su – platfg
e) From the main platcfg menu navigate to Maintenance ➤ Upgrade and select Validate
Media.
f) Validation must finish without errors.
If there are any errors reported during validation DO NOT USE this media for IXP installation.
g) Exit the platcfg menu.
2. Verify TPD syscheck to check the space usage
Note: This step will check if the space on the internal disk is sufficient to run upgrade after you
have copied the IXP ISO file on the server. Run this step on each server in the subsystem.
a) As root run:
# syscheck
Example output:
Running modules in class proc ...
OK
Running modules in class system ...
OK
Running modules in class services ... OK
Running modules in class disk ...
OK
Running modules in class hardware ... OK
LOG LOCATION: /var/TKLC/log/syscheck/fail_log
If there is any warning about the disk space usage clear the affected partition before continuing
with the next step. There must be 800M free space at least.
PR 212843 WORKAROUND ( Disable IXP NIGHTLY JOB )
Apply Following workaround if the server to be upgraded is an IXP-XDR server
Login to server as cfguser and run:
$ cd /opt/TKLCixp/prod/db/tuning/sql
$ sqlplus ixp/ixp@localhost/ixp
SQL> @DisableJob.sql IXP_NIGHTLY_JOB;
$ exit
Note: The Nightly JOB should automatically be
re enabled by upgrade procedure.
3. Initiate upgrade
Note: Run this step on each server in the subsystem in parallel. This step will trigger the parallel
major upgrade on all servers in the subsystem.
a) Enter the platcfg menu.
As rootrun:
# su - platcfg
b) From the main platcfg menu, navigate to Maintenance Upgrade and select Initiate Upgrade.
4. Monitor progress and on upgraded servers install xDR builders to restore DFPs
Note: Read this procedure carefully to correctly handle the parallel subsystem upgrade.
a) The whole subsystem is upgrading now.
We need to find the first server that finished the upgrade to be able to run the post-upgrade
909-2242-001
72
Major Upgrade
operations. Try to log into such server as root.
b) Check the IXP installation log /var/TKLC/log/upgrade/upgrade.log for any errors first.
d) Start monitoring script.
As root run:
# misc_upgrade_subsystem.sh –-postsync
e) You will see the regular monitoring of the upgrade progress. Keep this script running and look
for successfully upgraded servers. Do not interrupt the script. Wait until the results of upgrade
are show and synchronization is restored. Monitor the script output for any errors. If any error
appears contact the Tekelec Customer Care Center. The script will finish only once all servers
from the subsystem have finished the upgrade.
5.
Discover IXP application in CCM
This procedure describes how to discover IXP application in the NSP Centralized Configuration
application.
Discover all IXP servers in Centralized Configuration application.
a)
b)
c)
d)
e)
Open a web browser and go to the NSP application interface main page.
Click Centralized Configuration.
Navigate to Equipment reqistry view.
Open Sites, open the site, open IXP and then click on the particular IXP subsystem.
The list of all IXP servers in the IXP subsystem will appear. Check the check box of the first
server and click the Discover Applications button. Wait until the IXP application will be
discovered. Then repeat this step for all servers in the subsystem.
f) Navigate to Mediation and Apply the changes on the IXP subsystem.
6. Generate the bulkconfig file for the IXP subsystem
Note: For a future use generate the bulkconfig file from the subsystem settings. The file is
generated on a single server and then automatically distributed to all servers in the subsystem.
a) Login to any server in the IXP subsystem as root and run:
# bc_diag_bulkconfig.sh --save
b) Enter the root password once you will be asked.
c) The bulkconfig file is automatically generated and distributed to all servers in the subsystem.
7.3 Upgrade DTO Package
Whenever you will install or upgrade IXP server to a new version you need to keep DataWarehouse
compatible. You need to upgrade the DTO package there. DataWarehouse is being used as an
external xDR Storage.
The DataWarehouse is expected to have installed Oracle database and database instance with
created login, password, data tablespace with name DATA_CDR and index tablespace with name
DATA_IND. Such server must be already installed with DTO schema and package.
Such DataWarehouse need to be already added to NSP Centralized Configuration and configured.
This procedure describes how to upgrade DTO package on the DataWarehouse. This procedure
doesn’t describe how to install the DataWarehouse.
Note: If the customer refuses to provide you the SYS user password, you can provide him the files
CreateDTOPkgS.sql and CreateDTOPkgB.sql to the customer DBA in order for him to proceed with
909-2242-001
73
Major Upgrade
the upgrade himself.
1. Check DTO package version
Note: Check the previous DTO package version that is installed on the DataWarehouse.
a) Open a terminal window and log in to ActMaster server of the IXP subsystem from which this
DataWarehouse server is reachable.
As cfguser run:
$ iqt –L DatawareHouse
Note down Login, Password, Host IP address and Instance name of the DataWarehouse.
b) Connect to the DataWarehouse.
As cfguser run:
$ sqlplus user/password@ip_address/instance
Where user, password, ip_address and instance are the values received in previous step.
c) Check the DTO package version:
SQL> select pkg_dto.getversion from dual;
If the DTO package upgrade is needed continue with the next step. Quit the SQL console.
SQL> quit
2.
Upgrade DTO package
a) As cfguser from any server of the IXP subsystem run:
$ cd_oracle_utils
$ UpgradeDTOPkg.sh DWH_connection SYS_connection DWH_user
where:
• DWH_connection is the Oracle DWH connection string (user/password@ip_address/instance)
• SYS_connection is the Oracle SYS connection string (SYS/SYS_password@ip_address/instance)
Note: refer to TR006061 for the default value for the SYS password.
• DWH_user is the DWH user name (optional, default value: 'IXP')
3. Verify DTO package upgrade
Note: Check External DataWarehouse if the DTO package has been successfully upgraded.
a) Connect to the DataWarehouse.
As cfguser run:
$ $sqlplus user/password@ip_address/instance
where user, password, ip_address and instance are the values received in the first step.
b) Check the DTO package version :
SQL> select pkg_dto.getversion from dual;
Check if version of DTO package increased after upgrade. Quit the SQL console.
SQL> quit
7.4 Centralized xDR Builders Upgrade
This procedure describes how to trigger the xDR builder installation on the IXP subsystem from the
CCM. Login in the CCM as TklcSrv user and go to the upgrade utility. It is recommended to
proceed with this step after each IXP subsystem upgrade, and not to wait all subsystem are
upgraded to install all at the same time
Note: In order to avoid installation issues login on each IXP server as cfguser and execute the
command
$ iaudit -cvf
1. Associate xDR builders RPM with the IXP subsystem
909-2242-001
74
Major Upgrade
a) Click on View Builder RPM Status link on the left tree.
This will display a list of all IXP subsystems.
b) Before initiating the builder association, make sure the supported platform of the Builder
RPM is in accord with the platform architecture of the IXP subsystem you want to associate it
with.
c) Choose one or more IXP subsystems and click on Associate RPM Package icon in the tool bar.
This will show a popup containing the list of builder RPMs that are uploaded in NSP.
d) Select required xDR builders RPM and click on the Associate button.
e) After the successful association the list of the subsystems will be updated.
The RPM Name column will contain the new RPM package name and Association Status will
be marked as OK.
2. Apply the configuration to the IXP subsystem
a) Go to the NSP application interface main page.
b) Click Centralized Configuration.
c) Navigate to the Mediation view.
d) Open Sites, open the site, open IXP.
e) Right-click on the subsystem and click on Apply changes… from popup menu.
f) Click Next button
g) Click Apply Changes button. h) Wait until changes are applied and check
there’s no error.
3.
Install Builder RPM on IXP
a) Login to the NSP application interface as the TklcSrv user.
b) Click Upgrade Utility.
c) Click on View Builder RPM Status from the left tree.
This will display all the available IXP subsystem with their respective RPM Associate Status
and Install Status.
d) Before initiating the builder installation make sure the Builder RPM that you want to install
on the IXP subsystem is associated with the IXP subsystem as indicated by RPM Name column
and Association Status should be OK and Install Status should be either - or Not Started.
e) Select one or more IXP subsystem and choose Install RPM Package from the tool bar.
f) After the successful installation the Install status will change to OK.
4. Session Upgrade
a) Go back to NSP application interface main page.
b) Click Upgrade Utility.
c) Click Upgrade Session link on left tree, this display all the sessions to be upgraded due to
upgrade of associated dictionary.
d) Select one or more session(s) (use ctrl key for selecting multiple sessions) with Session Upgrade
Status as either Need Upgrade or Error and choose Upgrade icon from tool bar.
You may use available quick filter options on this list page to filter out sessions which you want
to upgrade in one go.
Caution: Do not choose more than 5 sessions to be upgraded in one go.
Once upgrade is initiated for a session, its Upgrade Status will become Upgrade Intiated.
e) Once session is upgraded its Upgrade Status will become Upgraded Successfully.
5. Exceptions
909-2242-001
75
Major Upgrade
After successful completion of xDR Builder Upgrade procedure:
a) Datafeed should be verified to check if they are using either Deprecated or Removed Field and
should be upgraded separately.
b) Protraq based reports should be verified to check if they are using either Deprecated or Removed
Field and should be upgraded separately.
c) PPS based reports should be verified to check if they are using either Deprecated or Removed
Field and should be upgraded separately.
d) Static enrichment if any configured should be verified to check if they are using either Deprecated or
Removed Field and should be upgraded separately.
e) Update the IXP license if needed and recreate the IXP session for the obsolete builders
909-2242-001
76
Major Upgrade
7.5 Finalize xDR servers conversion in DWS
This procedure is used only for upgrade to PIC 9.0.2 or 9.0.3. In case of upgrade in 9.0.0
or 9.0.1, or if the servers were already installed as DWS, skip this section and proceed
directly with the next one “IXP subsystem healthcheck”
Adjust the server from bulkconfig
Note: Run this procedure from on each xDR server.
a) Open a terminal window and log in to the server as cfguser.
# prod.start
b) Open a terminal window and log in to the server as root.
c) From the bulkconfig file remove all host line except the one from the current server.
d) As root run:
# bc_adjust_subsystem.sh
e) Run analysis to see if the subsystem has been adjusted properly. As root run:
# bc_diag_bulkconfig -a
Note: At this step, the formerly existing IXP xDR server is turned into a DWS (avoiding it to be recognized
from the NSP as an IXP xDR server).
To convert the XDR server to a DWS you need to connect to one of the server in the subsystem that was
just upgraded to 9.0.2/3 and run the following command as cfguser:
$ makeDWH.sh –r 192.168.0.6
Where 192.168.0.6 is the xDR server IP address.
This command will execute the conversion remotely, and must be repeated for each xDR server.
A prompt for the root password will appear: type in the root password.
A prompt for the NSP Primary IP address may appear: enter the correct IP address (not a host name) of
the NSP Primary (in case of a 4 box NSP) or of the NSP server (in case of a 1 box NSP).
Expected output:
Type YES to confirm the change of this server to xDR storage: YES
== Wed Sep 18 09:44:48 VET 2013 == Moving IXP xDR server to DWH ==
Root password is needed for some tasks to complete.
Password:
Setting up IDB... done
Setting up TNS...done
Setting Oracle urgent purge... done
Deactivating useless IXP processes... done
Updating logrotate settings... done
Setting NMS configuration... done
shmall system parameter does not need to be changed on 32 bits system
SGA target and maximum sizes do not need to be changed on 32 bits system
7.6 IXP Subsystem Healthcheck
Refer to chapter 4.2
909-2242-001
77
Major Upgrade
8 EFS Major Upgrade
8.1 EFS Upgrade
This procedure describes the Export File Server upgrade. This procedure is applicable to Export File
Server (EFS) only. This procedure is applicable to major upgrade and incremental upgrade.
1. Upload and validate the IXP ISO
a) Distribute the IXP ISO file to /var/TKLC/upgrade directory.
• On the rackmount server copy the IXP ISO into the /var/TKLC/upgrade using the scp
command.
• On the c-class blade server download the IXP ISO from the PM&C ISO repository. ISOs are
available on the PM&C server under the /var/TKLC/smac/image directory. Store the ISO
file to /var/TKLC/upgrade directory. If the IXP ISO is not present in the PM&C ISO
repository add the ISO file using the procedure Adding ISO Images to the PM&C Image
Repository
b) Enter the platcfg menu.
As root run:
# su – platfg
c) From the main platcfg menu navigate to Maintenance Upgrade and select Validate Media.
d) Validation must finish without errors.
If there are any errors reported during validation DO NOT USE this media for IXP installation.
e) Exit the platcfg menu.
2. Verify TPD syscheck to check the space usage
Note: This step will check if the space on the internal disk is sufficient to run upgrade after you
have copied the IXP ISO file on the server. Run this step on each server in the subsystem.
a) As root run:
# syscheck
Example output:
Running modules in class proc ...
OK
Running modules in class system ...
OK
Running modules in class services ... OK
Running modules in class disk ...
OK
Running modules in class hardware ... OK
LOG LOCATION: /var/TKLC/log/syscheck/fail_log
If there is any warning about the disk space usage clear the affected partition before continuing
with the next step.
3. Initiate upgrade
Note: Run this step on each server in the subsystem in parallel. This step will trigger the parallel
major upgrade on all servers in the subsystem.
a) Enter the platcfg menu.
As rootrun:
# su - platcfg
909-2242-001
78
Major Upgrade
b) From the main platcfg menu, navigate to Maintenance Upgrade and select Initiate Upgrade.
c) Wait until the upgrade finishes.
4. Run post-upgrade configuration
a) Run post-upgrade configuration script.
As root run:
# misc_upgrade_subsystem.sh –-postsync
In case of any errors in the script outputs contact the Tekelec Customer Care
Center.
5. Generate the bulkconfig file
Note: For the future use generate the bulkconfig file from the server settings.
a) As root run:
# bc_diag_bulkconfig.sh --save
You may be asked for a root password.
6. Clean up the system to precede unnecessary IXP processes to crash.
a) As root run:
# bc_customer_integration.sh --post
You may be asked for a root password.
8.2 Integrate Standalone EFS with IXP Subsystem
This procedure describes how to integrate the standalone EFS with the IXP subsystem.
The standalone EFS is not part of the IXP subsystem. This procedure is applicable to an IXP subsystem
with DataExport hosts. Run this procedure on a single server per IXP subsystem.
1. Log in on the IXP server and add standalone EFS to the bulkconfig file
a) Log in as root on any IXP server in the IXP subsystem with DataExport hosts that are supposed
to export data to requested EFS.
b) Update the IXP subsytem /root/bulkconfig file.
Add the following line:
efs,hostname_of_EFS,IP_address_of_EFS
where:
• hostname_of_EFS is the hostname of the standalone EFS
• IP_address_of_EFS is the IP address of the standalone EFS
For example:
efs,ixp7777-1e,10.236.0.33
2. Adjust the IXP subsystem
As root, run:
# bc_adjust_subsystem.sh
Verify commandline output for eny errors. If an error occurs contact the Tekelec Customer Care
Center.
909-2242-001
79
Major Upgrade
Note: The standalone EFS is added to /etc/hosts for all of the IXP servers in the subsystem and
all of the IXP servers in the subsystem are added to the /etc/hosts on the standalone EFS.
8.3 Discover EFS application in CCM
This procedure describes how to discover EFS application in the NSP Centralized Configuration
application.
Re-discover application in CCM
a) Open a web browser and log in to the NSP application interface as TklcSrv user
b) Click Centralized Configuration.
c) Navigate to Equipment registry view.
d) Open Sites, open the site, open EFS and then click on the particular EFS.
e) The list of EFS server will appear. Check the check box of the EFS server and click the Discover
Applications button. Wait until the EFS application will be discovered.
909-2242-001
80
Major Upgrade
9 RSP Major Upgrade Procedure
Analytics are released only in 9.0.1
Circuit Core Packages
TDM Voice (PPS!) GA
MSU Accounting (LA for France Telecom IBNF. Designed to replace their legacy product
ProAccount) LA
- A derivative version will be installed in other customers
UM-MSU Accounting LA
Roaming Packages
Roaming Voice MD
Roaming SMS LA
Roaming Access LA
Roaming Data MD
Packet Core Package
Mobile Data MD
Transport Package
SIGTRAN Transport LA
SS7 Transport MD
The following product bulletins have been shipped to announce the Analytics Lifecycle PB000713 &
PB000694.
9.1 Roaming Access package handling
If roaming access package is not installed then user needs not to perform below steps. But if roaming
access 7.5.0-x.x.x release is installed then user is required to perform following steps before performing any
upgrade operation:
1. In order to avoid loss of already configured CCNDC reference data and other reference data, user first
required to take backup of all reference data. When attempting the fresh installation of package user
can use this backed up reference data. User may require to update reference data as per the reference
data chapter available in roaming access user manual. Please refer pic_Roaming_Access_Guide for
reference data management .
2. If required by user, then Roaming Access default reports and scheduled instances of reports can be
backed up. For backup and restore please refer section 6.2 and 6.4 of PIC Maintenance Guide (9092197-001).
3. Login to the NSP application, open a web browser and point to the address below.
http://192.168.1.1/nsp
Note: Replace 192.168.1.1 with the IP address of the NSP server for a one box setup or the Apache
NSP server on a four box setup.
909-2242-001
81
Major Upgrade
4. Open “Report Administrator” application and click on the icon for the “Report Administrator” option.
5. Select the network view containing current input xDR sessions. This will show “Roaming Access
Analytics” package on right panel of screen. Click on the roaming access package row, It will display the
sessions on the child panel on which report package is activated.
6. Select the checkboxes for currently active KPI sessions and click on “Deactivate” button.
7. Repeat step 3, 4 and 5 for all the session view containing active MAP sessions.
8. Remove “Reporting Sessions” from ReportAdmin Navigate to “Session Reporting Sessions”. This
will display a list of reporting sessions on right panel of screen. Select the Roaming Access KPI
sessions and select “Permanently Remove”
909-2242-001
82
Major Upgrade
9. After performing above step, user needs to perform apply change on IXP. Navigate to centralized
configuration Mediation Sites IXP and do apply change.
10. Log on to report server and login as root user on the terminal console of Report Server.
11. Run the uninstall script with the following command:
/var/TKLC/ rsp/packages/roamacc/uninstall.sh
12. Enter “y” when prompted for confirmation of un-install.
################################################################################
#
Uninstall Report Package Roaming Access Analytics
#
################################################################################
Are you sure? [y/n]
13. Enter Oracle database sys user password:
14. Enter tekelec user password:
15. At the completion of un-installation, unix shell prompt will be return to user.
################################################################################
#
END OF PACKAGE UNINSTALLATION
#
################################################################################
16. Delete Roaming Access GPRS Network Accessibility reports.
a) Open Internet Explorer and access CmcApp using URL http://<<Report Server IP
address>>:8080/CmcApp
b) Login as user administrator. This will show CmcApp console to user. Select “Folders” from dropdown list present on the top or by clicking on the “Folders” icon appearing on left icon panel. Left
click on tree node “All Folders”
c) Click on Roaming Analytics Portfolio->Roaming Access Analytics
d) Right click on “GPRS Network accessibility” on right panel of screen and select “Delete” option from
pop-up menu option.
909-2242-001
83
Major Upgrade
e) Click on “OK” button shown on confirmation pop-up window.
17. Delete Roaming Access GSM Network Accessibility reports
a) Open Internet Explorer and access CmcApp using URL http://<<Report Server IP
address>>:8080/CmcApp
b) Login as user administrator. This will show CmcApp console to user. Select “Folders” from dropdown list present on the top or by clicking on the “Folders” icon appearing on left icon panel.
Left click on tree node “All Folders”
c) Right click on “GSM Network accessibility” on right panel of screen and select “Delete” option
from pop-up menu option.
d) Click on “OK” button shown on confirmation pop-up window.
18. Delete Roaming Access Analytics universe.
a) Open Internet Explorer and access CmcApp using URL http://<<Report Server IP
address>>:8080/CmcApp
b) Login as user administrator. This will show CmcApp console to user.
c) Select “Universes” from drop-down list present on the top or by clicking on the “Universes” icon
appearing on left icon panel. Expend tree node “Universes” and then left click on “webi
universes”. Select below mentioned six Universe using CTRL button.
i) RoamAcc_GPRS_In_Qos
ii) RoamAcc_GPRS_Internal_Qos
iii) RoamAcc_GPRS_Out_Qos
iv) RoamAcc_GSM_In_Qos
v) RoamAcc_GSM_Internal_Qos
vi) RoamAcc_GSM_Out_Qos
d) Right click on selected universe list and select “Delete” option from pop-up menu option.
909-2242-001
84
Major Upgrade
e) Click on “OK” button shown on confirmation pop-up window.
19. Login to NSP application, open a web browser and point to the address below.
http://192.168.1.1/nsp
Note: Replace 192.168.1.1 with the IP address of the NSP server for a one box setup or the Apache
NSP server on a four box setup.
20. Click the centralized configuration icon in the configuration group and navigate to Mediation Sites
NOC Report Server.
21. Discover the package, Report server should show roaming access package in the list of removed
packages.
22. Navigate to Mediation Sites IXP.
23. Delete the store, operate, build dfp and streams associated with roaming access package. Do apply
change after removal of every process. Following order need to be followed for deleting store, operate
and build dfp`s.
a) Delete all the store processes.
b) Delete all the operate processes.
c) Delete all the build processes.
d) Delete all the streams.
909-2242-001
85
Major Upgrade
24. Navigate to Network Views tab in CCM and delete all network views associated with roaming access
package.
25. Navigate to Mediation Sites IXP Sessions.
26. Delete all the session associated with roaming access package and do apply change.
27. Navigate to Mediation Sessions.
28. Remove all the sessions associated with roaming access package.
909-2242-001
86
Major Upgrade
29. Login to NSP oracle putty through root user and then do sql login by command ‘sqlplus
nsp/nsp@localhost/nsp’
30. Run following command after login:
“select name from cfg_dictionary where name like 'ROAMACC%';”
It should return this result:
Result: NAME
-------------------------------------------------------------------------------ROAMACC_GPRS_IN
ROAMACC_GPRS_INTERNAL
ROAMACC_GPRS_OUT
ROAMACC_GSM_IN
ROAMACC_GSM_INTERNAL
ROAMACC_GSM_OUT
31. Run following commands to update the dictionary names.
a) SQL> update cfg_dictionary set name='ROAMACCGPRSIN' where name
='ROAMACC_GPRS_IN';
1 row updated.
b) SQL> update cfg_dictionary set name='ROAMACCGPRSINTERNAL' where name
='ROAMACC_GPRS_INTERNAL';
1 row updated.
c) SQL> update cfg_dictionary set name='ROAMACCGPRSOUT' where name
='ROAMACC_GPRS_OUT';
1 row updated.
d) SQL> update cfg_dictionary set name='ROAMACCGSMIN' where name
='ROAMACC_GSM_IN';
1 row updated.
e) SQL> update cfg_dictionary set name='ROAMACCGSMINTERNAL' where name
='ROAMACC_GSM_INTERNAL';
1 row updated.
f)
SQL> update cfg_dictionary set name='ROAMACCGSMOUT' where name
='ROAMACC_GSM_OUT';
1 row updated.
g) SQL> commit;
Commit complete.
909-2242-001
87
Major Upgrade
32. Verify the above operations by running this command:
SQL> select name from cfg_dictionary where name like 'ROAMACC%';
It should return this result:
NAME
-------------------------------------------------------------------------------ROAMACCGPRSIN
ROAMACCGPRSINTERNAL
ROAMACCGPRSOUT
ROAMACCGSMIN
ROAMACCGSMINTERNAL
ROAMACCGSMOUT
6 rows selected.
33. Navigate to Mediation Dictionary.
34. Remove all the roaming access dictionaries(ROAMACCGPRSIN, ROAMACCGPRSINTERNAL,
ROAMACCGPRSOUT, ROAMACCGSMIN, ROAMACCGSMINTERNAL and ROAMACCGSMOUT).
35. Navigate to Mediation Enrichment files tab.
36. Delete static enrichment files “1-Calling-MCCMNC.fse “ and “2-Called-MCCMNC.fse” associated with
Roaming Access package.
The steps mentioned above will uninstall roaming access package. After uninstalling roaming access
package, user can then proceed for below mentioned upgrade steps.
In case of any errors please contact Tekelec Customer Care Center.
909-2242-001
88
Major Upgrade
9.2 Upgrade IXP Application for RSP
This procedure describes the IXP application major upgrade procedure. Be aware of each step.
1. Login to the Report Server you are about to upgrade as cfguser.
2. As cfguser, run:
$ analyze_server.sh –p
The script gathers the healthcheck information from the server. A list of checks and associated
results is generated. There might be steps that contain a suggested solution. Analyze the output of
the script for any errors. Issues reported by this script must be resolved before any further use of
this server.
The following examples show the structure of the output, with various checks, values, suggestions,
and errors.
Example of overall output:
[cfguser@ixp8888-1a ~]$ analyze_server.sh
12:40:30: STARTING HEALTHCHECK PROCEDURE - SYSCHECK=0
12:40:30: date: 08-22-11, hostname: ixp8888-1a
12:40:30: TPD VERSION: 4.2.4-70.90.0
12:40:30: IXP VERSION: [ 7.1.0-64.2.0 ]
12:40:30: XDR BUILDERS VERSION: [ 7.1.0-37.1.0 ]
12:40:30: ------------------------------------------------12:40:31: Analyzing server record in /etc/hosts
12:40:31:
Server ixp8888-1a properly reflected in /etc/hosts file
12:40:31: Analyzing IDB state
12:40:31:
IDB in START state
12:40:31: Analyzing shared memory settings
12:40:31:
Shared memory set properly
.....
12:43:02: All tests passed!
12:43:02: ENDING HEALTHCHECK PROCEDURE WITH CODE 2
Example of a successful test:
12:40:31: Analyzing server record in /etc/hosts
12:40:31:
Server ixp8888-1a properly reflected in /etc/hosts file
Example of a failed test:
12:21:48: Analyzing IDB state
12:21:48: >>> Error: IDB is not in started state (current state X)
12:21:48: >>> Suggestion: Verify system stability and use 'prod.start' to start
the product
After attempting the suggested resolution, if the test fails again, then contact Tekelec Customer
Care Center.
3. Note entries from /etc/hosts file
a) As root run:
# cat /etc/hosts | grep boe-cms
10.240.254.46
ixp0001-1a 1a cms_db_server boe-cms roamacc_rds_db_server
b) Note down aliases, that might be needed after IXP Software upgrade.
4. Take backup of “libstdc++.so.5” file from “/usr/lib” directory and copy it to your local.
5. Distribute and validate the IXP ISO
Note: Run this step on each server in the subsystem. Do not continue with the next step unless
you finish this one. After this step the IXP ISO must be present and validated on each server in the
subsystem.
a) Distribute the IXP ISO file to /var/TKLC/upgrade directory.
• On the rackmount server copy the IXP ISO into the /var/TKLC/upgrade using the scp
command.
909-2242-001
89
Major Upgrade
• On the c-class blade server download the IXP ISO from the PM&C ISO repository. ISOs are
available on the PM&C server under the /var/TKLC/smac/image directory. Store the ISO
file to /var/TKLC/upgrade directory. If the IXP ISO is not present in the PM&C ISO
repository add the ISO file using the procedure Adding ISO Images to the PM&C Image
Repository
b) Enter the platcfg menu.
As root run:
# su – platfg
c) From the main platcfg menu navigate to Maintenance Upgrade and select Validate Media.
d) Validation must finish without errors.
If there are any errors reported during validation DO NOT USE this media for IXP installation.
e) Exit the platcfg menu.
6. Verify TPD syscheck to check the space usage
Note: This step will check if the space on the internal disk is sufficient to run upgrade after you
have copied the IXP ISO file on the server. Run this step on each server in the subsystem.
a) As root run:
# syscheck
Example output:
Running modules in class proc ...
OK
Running modules in class system ...
OK
Running modules in class services ... OK
Running modules in class disk ...
OK
Running modules in class hardware ... OK
LOG LOCATION: /var/TKLC/log/syscheck/fail_log
If there is any warning about the disk space usage clear the affected partition before continuing
with the next step. There must be 800M free space at least.
7. Initiate upgrade
Note: Run this step on each server in the subsystem in parallel. This step will trigger the parallel
major upgrade on all servers in the subsystem.
a) Enter the platcfg menu.
As rootrun:
# su - platcfg
b) From the main platcfg menu, navigate to Maintenance Upgrade and select Initiate Upgrade.
c) Wait until upgrade finishes. Check the IXP installation log
/var/TKLC/log/upgrade/upgrade.log for any errors first.
d) Verify entries in /etc/hosts file. Run
# cat /etc/hosts | grep boe-cms
10.240.254.46
ixp0001-1a 1a cms_db_server boe-cms roamacc_rds_db_server
If entries as noted before upgrade are not found, add entries for aliases using platcfg menu.
e) Run post-upgrade configuration.
As root run:
# misc_upgrade_subsystem.sh –-postsync
Wait until the results of upgrade are show and synchronization is restored. Monitor the script
output for any errors. If any error appears contact the Tekelec Customer Care Center.
8. Increase the maximum size of the UNDO tablespace.
909-2242-001
90
Major Upgrade
Note: This step is applicable to IXP xDR Storage running Oracle 10g with 12 disks only. Performance
issues has been discovered with Oracle 10g running on PIC 9.0 release when the UNDO tablespace
is 8GB size. This step will increase the UNDO tablespace to 16GB.
a) Open a terminal window and log in on IXP xDR Storage server server running Oracle 10g you
are about to add to the IXP subsystem as oracle .
b) Verify Oracle version. As oracle run:
$ sqlplus / as sysdba
If the SQL*Plus banner reads the following, DO NOT run this procedure:
Connected to:
Oracle Database 11g Enterprise Edition Release 11.2.0.3.0 – Production
If the SQL*Plus banner reads similar to the following:
Connected to:
Oracle Database 10g Enterprise Edition Release 10.2.0.x.0 - Production
proceed to the next step.
c) Verify current size of UNDO tablespace.
Run:
SQL> set linesize 150
SQL> column file_name format a40
SQL> select FILE_NAME,MAXBYTES from dba_data_files where TABLESPACE_NAME =
'UNDO' order by 1;
If the maximum size of the UNDO tablespace is currently 8GB, the output will be as follows:
FILE_NAME
---------------------------------------/opt/oracle/oradata/IXP/undo01.dbf
/opt/oracle/oradata/IXP/undo02.dbf
/opt/oracle/oradata/IXP/undo03.dbf
/opt/oracle/oradata/IXP/undo04.dbf
MAXBYTES
---------2147483648
2147483648
2147483648
2147483648
If so, please proceed to the next substep. If the maximum size of the UNDO tablespace is already
16GB, the output will be as follows and you DO NOT need to run the rest of this step:
FILE_NAME
---------------------------------------/opt/oracle/oradata/IXP/undo01.dbf
/opt/oracle/oradata/IXP/undo02.dbf
/opt/oracle/oradata/IXP/undo03.dbf
/opt/oracle/oradata/IXP/undo04.dbf
MAXBYTES
---------4294967296
4294967296
4294967296
4294967296
proceed to the next step.
d) Update the maximum size of UNDO tablespace to 16GB
Run:
SQL> ALTER
ON MAXSIZE
SQL> ALTER
ON MAXSIZE
SQL> ALTER
ON MAXSIZE
SQL> ALTER
ON MAXSIZE
909-2242-001
DATABASE
4G;
DATABASE
4G;
DATABASE
4G;
DATABASE
4G;
DATAFILE '/opt/oracle/oradata/IXP/undo01.dbf' AUTOEXTEND
DATAFILE '/opt/oracle/oradata/IXP/undo02.dbf' AUTOEXTEND
DATAFILE '/opt/oracle/oradata/IXP/undo03.dbf' AUTOEXTEND
DATAFILE '/opt/oracle/oradata/IXP/undo04.dbf' AUTOEXTEND
91
Major Upgrade
The result of all commands above should be:
Database altered
e) Verify UNDO tablespace maximum of 16GB
Run:
SQL> select FILE_NAME,MAXBYTES from dba_data_files where TABLESPACE_NAME =
'UNDO' order by 1;
If the maximum size of theUNDO tablespace is now 16GB, the output will be as follows:
FILE_NAME
---------------------------------------/opt/oracle/oradata/IXP/undo01.dbf
/opt/oracle/oradata/IXP/undo02.dbf
/opt/oracle/oradata/IXP/undo03.dbf
/opt/oracle/oradata/IXP/undo04.dbf
MAXBYTES
---------4294967296
4294967296
4294967296
4294967296
Exit Oracle commandline:
SQL> exit
9. Discover IXP Application in CCM
a) Open a web browser and log in to NSP application interface.
b) Click on Centralized Configuration.
c) Navigate to Equipment Registry view.
d) Navigate to Sites NOC Report Server. Click on the Report Server and click on
Discover Applications
10. Open a terminal window and log in to Report Server as cfguser.
11. As cfguser, run:
$ analyze_server.sh –p
The script gathers the healthcheck information from the server. A list of checks and associated
results is generated. There might be steps that contain a suggested solution. Analyze the output of
the script for any errors. Issues reported by this script must be resolved before any further use of
this server.
The following examples show the structure of the output, with various checks, values, suggestions,
and errors.
Example of overall output:
[cfguser@ixp8888-1a ~]$ analyze_server.sh
12:40:30: STARTING HEALTHCHECK PROCEDURE - SYSCHECK=0
12:40:30: date: 08-22-11, hostname: ixp8888-1a
12:40:30: TPD VERSION: 4.2.4-70.90.0
12:40:30: IXP VERSION: [ 9.0.0-64.2.0 ]
12:40:30: XDR BUILDERS VERSION: [ 9.0.0-37.1.0 ]
12:40:30: ------------------------------------------------12:40:31: Analyzing server record in /etc/hosts
12:40:31:
Server ixp8888-1a properly reflected in /etc/hosts file
12:40:31: Analyzing IDB state
12:40:31:
IDB in START state
12:40:31: Analyzing shared memory settings
12:40:31:
Shared memory set properly
.....
12:43:02: All tests passed!
12:43:02: ENDING HEALTHCHECK PROCEDURE WITH CODE 2
909-2242-001
92
Major Upgrade
Example of a successful test:
12:40:31: Analyzing server record in /etc/hosts
12:40:31:
Server ixp8888-1a properly reflected in /etc/hosts file
Example of a failed test:
12:21:48: Analyzing IDB state
12:21:48: >>> Error: IDB is not in started state (current state X)
12:21:48: >>> Suggestion: Verify system stability and use 'prod.start' to start
the product
After attempting the suggested resolution, if the test fails again, then contact Tekelec Customer
Care Center.
12. IXP post-upgrade configuration
a) Change ownership of the /var/TKLC/ixp/boe directory. As root run:
# chown –RL boe /var/TKLC/ixp/boe
13. Check whether “libstdc++.so.5” file is available in “/usr/lib” directory or not. If not then copy
backed up file (from step 4) to this directory.
14. Verify Report Server is running properly
a) Log in to CmcApp web page. Enter the following link to the web browser:
http://<ReportServerIP>:8080/CmcApp
where ReportServerIP is the IP address of the Report Server.
b) If report server is not running then restart BOE services by using following commands:
service BobjEnterprise120 stop
service BobjEnterprise120 start
Note: Wait for at least 5 -10 minutes before proceeding for next step as BOE services take
time to come up.
c) Repeat step a).
9.3 Report Server Application Upgrade
This section describes the Report Server application upgrade. There are two major components when
upgrading the Report Server application:
• SAP BOE Software: the SAP BusinessObjects Enterprise third-party software.
• Report Server Platform Database Schema: a schema created in the IXP database to store all of the
KPIs.
Note: IXP application must be upgraded first before performing Report Server application upgrade.
9.3.1 Report Server Pre-upgrade Configuration
This procedure describes the pre-upgrade configuration of the Report Server.
1. Change ownership of the/var/TKLC/ixp/boe directory
a) Open a terminal window and log in on the Report Server.
b) As root run:
# chown -RL boe /var/TKLC/ixp/boe
2.
Check TPD version by this command :
# getPlatRev
909-2242-001
93
Major Upgrade
If TPD version is “TPD 5.0.0-72.31.0” or greater than this then user needs to perform following
steps else user can proceed to step 3.
d)
Upload the Report Server ISO
1) Distribute the Report Server ISO and md5 file to /var/TKLC/upgrade directory or insert
Report Server CD.
• On the rackmount server copy the Report Server ISO into the /var/TKLC/upgrade
using the scp command.
• On the c-class blade server download the RSP ISO from the PM&C ISO repository. ISOs
are available on the PM&C server under the /var/TKLC/smac/image directory. Store the
ISO file to /var/TKLC/upgrade directory. If the Report Server ISO is not present in the
PM&C ISO repository add the ISO file using the procedure Adding ISO Images to the PM&C
Image Repository
e)
Mount the media
As root, run the appropriate command to mount your media:
• For a DVD/CD, enter:
# mkdir /media/cdrom
# mount –t auto /dev/cdrom /media/cdrom
• For an ISO file, enter:
# mount –o loop /var/TKLC/upgrade/REPORT_SERVER_part_number_release_number.iso
/media
where:
• part_number is the part number (for example, 872-2121-101)
• release_number is the release number (for example, 9.0.0-7.1.0.3163)
f)
For a DVD/CD, enter
# ll /media/cdrom
It must show you this result:
libstdc++.so.5
TKLCrsp-release_number.i386.rpm
If the above result doesn’t appear on screen then do not proceed with below steps and contact
Tekelec Customer Care Center.
• For an ISO file, enter:
# ll /media/
It must show you this result:
libstdc++.so.5
TKLCrsp-release_number.i386.rpm
If the above result doesn’t appear on screen then do not proceed with below steps and contact
Tekelec Customer Care Center.
g) Copy “libstdc++.so.5” file to “/usr/lib” directory by this command:
For a DVD/CD enter:
# cp /media/cdrom/libstdc++.so.5 /usr/lib/
If “libstdc++so.5” file already exists in folder user will be asked to overwrite it or not. User
needs to enter ‘no’
#cp: overwrite `/usr/lib/libstdc++.so.5'?
909-2242-001
94
Major Upgrade
Enter “no”
For an ISO file, enter:
# cp /media/libstdc++.so.5 /usr/lib/
If “libstdc++so.5” file already exists in folder user will be asked to overwrite it or not. User
needs to enter ‘no’
#cp: overwrite `/usr/lib/libstdc++.so.5'?
Enter “no”
h) Unmount the media
As root, run:
• For a DVD/CD, enter:
# umount /media/cdrom
# cd
# eject
and remove the media from drive.
• For an ISO file, enter:
# umount /media
i)
Stop and start boe services by these commands:
service BobjEnterprise120 stop
service BobjEnterprise120 start
j)
Wait for atleast 5 -10 minutes before proceeding for next step as boe services takes time to
come up.
3. Verify Report Server is running properly
a) Log in to CmcApp web page to confirm the Report Server is started successfully.
Enter the following link to the web browser:
http://ReportServerIP:8080/CmcApp
where ReportServerIP is the IP address of the Report Server.
b) Make sure CMCApp Administrator's password is not empty. It it is navigate to properties and
change the password.
4. Verify that Oracle database is accessible
a) Open a terminal window and log in to the Report Server.
As root run:
# sqlplus ixp/ixp@localhost/ixp
Verify you are able to login to Oracle. The SQL prompt should appear.
9.3.2 Upgrade Report Server Software
This procedure describes how to upgrade the Report Server software on an IXP server.
Before you perform this procedure:
• The server must have an IXP application upgraded. This server must be a single-server IXP
subsystem with a designation of 1A.
1. Upload and validate the Report Server ISO
a) If user has performed step 2 from section 9.3.1, then below step b) is not required as ISO and
md5 file is already available in respective directory. But if step 2 is not performed from section
909-2242-001
95
Major Upgrade
9.3.1, then user is required to performed below step b).
b) Distribute the Report Server ISO and md5 file to /var/TKLC/upgrade directory or insert
Report Server CD.
• On the rackmount server copy the Report Server ISO into the /var/TKLC/upgrade using
the scp command.
• On the c-class blade server download the RSP ISO from the PM&C ISO repository. ISOs
are available on the PM&C server under the /var/TKLC/smac/image directory. Store the
ISO file to /var/TKLC/upgrade directory. If the Report Server ISO is not present in the
PM&C ISO repository add the ISO file using the procedure Adding ISO Images to the PM&C
Image Repository
c) Login to terminal
console as root and
run:
# cd /var/TKLC/upgrade
# md5sum --check <iso.md5>
Where <iso.md5> is the md5 file corresponding to report server iso.
d) Validation must finish without errors.
If there are any errors reported during validation DO NOT USE this media for RSP
installation.
2. Verify the BOE server is running
Open a terminal window and login to the Report Server. As root run:
# ps -ef | grep bobje
Verify that there are more than 10 processes in the list.
3. Mount the media
As root, run the appropriate command to mount your media:
• For a DVD/CD, enter:
# mkdir /media/cdrom
# mount –t auto /dev/cdrom /media/cdrom
• For an ISO file, enter:
# mount –o loop /var/TKLC/upgrade/REPORT_SERVER_part_number_release_number.iso
/media
where:
• part_number is the part number (for example, 872-2121-101)
• release_number is the release number (for example, 9.0.0-7.1.0.3163)
4. Upgrade Report Server package
a) Upgrade the rpm package. As root, run:
• For a DVD/CD, enter:
# rpm -hUv /media/cdrom/TKLCrsp-release_number.i386.rpm
where release_number is the release number (for example, 9.0.0-7.1.0.3163)
• For an ISO file, enter:
# rpm -hUv /media/TKLCrsp-release_number.i386.rpm
where release_number is the release number (for example, 9.0.0-7.1.0.3163)
909-2242-001
96
Major Upgrade
5. Unmount the media
As root, run:
• For a DVD/CD, enter:
# umount /media/cdrom
# cd
# eject
and remove the media from drive.
• For an ISO file, enter:
# umount /media
and remove the ISO file to save disk space.
909-2242-001
97
Major Upgrade
9.3.3 Upgrade SAP BOE software on Report Server
This procedure describes how to upgrade the SAP BOE application on an IXP server.
Before you perform this procedure:
• The server must have the Report Server application upgraded.
1. Remove source release BOE software copy
a) Log in as root on the Report Server.
As root run:
# rm -f /var/TkLC/ixp/boe_inst_cds_31
2. Upload and validate the SAP BOE ISO
a) Distribute the SAP BOE ISO (for example boe31_sp3_upgrade.iso) file to
/var/TKLC/upgrade directory or insert SAP BOE CD.
• On the rackmount server copy the SAP BOE ISO into the /var/TKLC/upgrade using the
scp command.
• On the c-class blade server download the ISO from the PM&C ISO repository. ISOs are
available on the PM&C server under the /var/TKLC/smac/image directory. Store the ISO
file to /var/TKLC/upgrade directory. If the SAP BOE ISO is not present in the PM&C ISO
repository add the ISO file using the procedure Adding ISO Images to the PM&C Image
Repository
b) Verify the media.
As root run
# md5sum -c boe31_sp3_upgrade.iso.md5
c) Validation must finish without errors and it must show this result:
boe31_sp3_upgrade.iso: OK
If there are any errors reported during validation DO NOT USE this media for boe installation/
upgrade.
3. Mount the media
As root, run the appropriate command to mount your media:
• For a DVD/CD, enter:
# mount –t auto /dev/cdrom /media/cdrom
• For an ISO file, enter:
# mount –o loop /var/TKLC/upgrade/boe31_sp3_upgrade.iso /media
4. Upgrade BOE
a) As root, run:
# /var/TKLC/rsp/install.sh
b) Choose the server to upgrade:
909-2242-001
98
Major Upgrade
#########################################################
#
Installing Report Server Platform 9.0.0-8.1.0
#########################################################
1)
2)
3)
4)
>
Primary Report Server (Primary RS)
Clustered Report Server (Secondary RS)
Upgrade Data Aging on all RDS servers.
Exit.
Select 1 to upgrade Report Server.
c) Enter CMS Database IP address or hostname:
Please enter CMS Database IP address or hostname:
Enter the SAP BOE CMS Database IP address.
d) Enter the Oracle database sys user password:
Enter Oracle database sys user password:
Enter the password.
e) Enter the CMC Administrator's password:
Please enter CMC Administrator's password:
Enter the password that is set for CMC (Central Management Console) GUI administrator user
login.
f) Enter the BOE software mount point.
Please hit Enter to mount BusinessObject-SP3 CD/DVD ROM or enter a different
mount point [/media/cdrecorder]
Press Enter for DVD/CD or type /media for ISO file.
g) Enter the root user password.
Enter root os user password:
Enter the password.
h) Continue the upgrade process.
Product: BusinessObjects_31_SP3
Installing BusinessObjects Enterprise Server ...
THIS MAKE TAKE SEVERAL
MINUTES!
Check log file /var/TKLC/ixp/boe/setup/logs/BusinessObjects.12.3.log
for internal progress of the BOE server installer.
Please wait...
Checking for recommended patches...
******************************
Linux: Your system is missing required components (STU00120):
******************************
Missing patch: unsupported.linux.release
If you continue your installation may not work correctly. (STU00109)
Please press Enter to continue...
Press Enter to continue.
909-2242-001
99
Major Upgrade
i) When the installation is complete, check the log file /var/TKLC/rsp/rsp_install.log for any errors.
Note: The upgrade may take 30-45 minutes to complete.
If there are any errors, contact the Tekelec Customer Care Center.
Example output of a successful upgrade:
Installing Crystal Report Server system service
Restarting all...
Stopping all...
Stopping sian...
Starting all servers...
Starting sian...
Installation Completed Successfully!
5. Unmount the media
As root, run:
• For a DVD/CD, enter:
# umount /media/cdrom
# cd
# eject
and remove the media from drive.
• For an ISO file, enter:
# umount /media
and remove the ISO file to save disk space.
9.3.4 Verify the SAP BOE Upgrade
This procedure describes how to verify that the SAP BOE software is successfully upgraded on the
Report Server.
1. Open a web browser and go to:
http://RS_IP:8080/CmcApp
where RS_IP is the IP address of the Primary Report Server.
2. Type the IP address of the Primary Report Server in the System field.
3. Type administrator in the User Name field.
4. Enter the administrator's password into the Password field.
5. Click Log On.
If the CMC home page appears, then you were able to log in successfully; the upgrade of SAP BOE
was successful.
If the home page does not appear, then you were not able to log in and the SAP BOE upgrade was not
successful. Contact the Tekelec Customer Care Center.
9.3.5 Install SAP BusinessObjects 3.1 Fix Pack 3.6
This procedure describes how to install SAP BusinessObjects 3.1 Fix Pack 3.6.
909-2242-001
100
Major Upgrade
This service pack must be installed only if it had not been installed before. Verification if the service
pack must be installed is in the first step of the procedure.
This service pack must be installed only after Report Server installation/upgrade has been successfully
completed before.
1. Verify the SAP BusinessObjects 3.1 Fix Pack 3.6 had not been installed before
Note: This step will verify if the service pack installation is needed.
a) Open a terminal window and log in on the Report server as root.
As root run:
$ cat /var/TKLC/ixp/boe/setup/ProductID.txt
b) If SAP BusinessObjects Fix Pack has not been installed, the Product will be displayed as
BusinessObjects_31_SP3.
Example:
[root@ixp1000-1a ~]# cat /var/TKLC/ixp/boe/setup/ProductID.txt
Vendor
: Business Objects
Product
: BusinessObjects_31_SP3
Version
: 12 3
Date
: 22 Apr 2010
Platform
: Linux 32
SoftwarePath : linux x86
If SAP BusinessObjects Fix Pack has been installed, the Product will be displayed as
BusinessObjects_FP_3_6. Example:
[root@ixp1000-1a ~]# cat /var/TKLC/ixp/boe/setup/ProductID.txt
Vendor
: Business Objects
Product
: BusinessObjects_FP_3_6
Version
: 12 3
Date
: 30 May 2011
Platform
: Linux 32
SoftwarePath : linux x86
Continue this procedure only if service pack has not been installed (Product is not
BusinessObjects_FP_3_6).
2. Distribute the SAP BusinessObjects Fix Pack to /var/TKLC/ixp
a) Copy the SAP BusinessObjects Fix Pack (ENTERPRISE3P_6-10007478.TGZ) to the
/var/TKLC/ixp directory.
3. Extract the SAP BusinessObjects Fix Pack archive
a) Log in on the Report Server as root.
Create the extract directory. As root run:
# mkdir /var/TKLC/ixp/boe_inst_cds_31_fp3_6
# cd /var/TKLC/ixp
Extract the file. As root run:
# gtar zxf ENTERPRISE03P_6-10007478.TGZ -C boe_inst_cds_31_fp3_6
4. Install the service pack
a) Switch to boe user.
As root run:
# su - boe
909-2242-001
101
Major Upgrade
b) Switch the working directory.
As boe run:
$ cd
/var/TKLC/ixp/boe_inst_cds_31_fp3_6
c) Run the installation:
As boe run:
$ ./install.sh
/var/TKLC/ixp/boe
d)
e)
f)
g)
Confirm license agreement.
Enter BOE Administrator's password.
Select yes to redeploy the web applications.
On the screen Enter Web Application Server configuration press <ENTER>to accept the default
configuration.
h) Confirm the installation. Set Installing To: path to /var/TKLC/ixp/boe and press <ENTER>.
i) Wait until the installation finishes. It will take approximately 30 minutes at least. The following
message will be displayed:
SAP BusinessObjects products have been successfully installed in:
/var/TKLC/ixp/boe
Press <ENTER> to go to the next screen. Now the installation has completed.
5. Verify the SAP BusinessObjects 3.1 Fix Pack 3.6 has been installed successfully
a) Open a terminal window and log in on the Report server as root.
As root run:
$ cat /var/TKLC/ixp/boe/setup/ProductID.txt
b) If SAP BusinessObjects Fix Pack has been installed, the Product will be displayed as
BusinessObjects_FP_3_6.
Example:
[root@ixp1000-1a ~]# cat /var/TKLC/ixp/boe/setup/ProductID.txt
Vendor
: Business Objects
Product
: BusinessObjects_FP_3_6
Version
: 12 3
Date
: 30 May 2011
Platform
: Linux 32
SoftwarePath : linux x86
9.3.6 Verify RSP host entries in the /etc/hosts file on NSP
This procedure describes how to verify RSP host entries in the /etc/hosts file on NSP server.
Note: Run this procedure on NSP One-Box server or repeat this procedure on all NSP servers that
are part of Four-Box setup.
Verify /etc/hosts on NSP
a) Open a terminal window and log in as root on the NSP server.
b) As root run:
# cat /etc/hosts
The output must contain an alias entry boe-cms for recovered Report Server IP address.
909-2242-001
102
Major Upgrade
c) If the boe-cms alias is missing update the /etc/hosts file via platcfg and add this alias for
recovered Report Server IP address.
9.4 PPS Application Upgrade
PPS application is installed on any IXP Base Server that is part of the IXP subsystem. This section
describes how to upgrade PPS application.
Note: IXP Base Server needs to be upgraded first before upgrading the PPS application.
1. Upload and validate the PPS ISO
a) Distribute the PPS ISO file to /var/TKLC/upgrade directory or insert PPS CD.
• On the rackmount server copy the PPS ISO into the /var/TKLC/upgrade using the scp
command.
• On the c-class blade server download the PPS ISO from the PM&C ISO repository. ISOs
are available on the PM&C server under the /var/TKLC/smac/image directory. Store the
ISO file to /var/TKLC/upgrade directory. If the PPS ISO is not present in the PM&C ISO
repository add the ISO file using the procedure Adding ISO Images to the PM&C Image
Repository
b) Login to terminal
console as root and
run:
# cd /var/TKLC/upgrade
# md5sum --check <iso.md5>
Where <iso.md5> is the md5 file corresponding to pps iso.
c) Validation must finish without errors.
If there are any errors reported during validation DO NOT USE this media for PPS installation.
2. Mount the media
As root, run the appropriate command to mount your media:
• For a DVD/CD, enter:
# mkdir /media/cdrom
# mount –t auto /dev/cdrom /media/cdrom
• For an ISO file, enter:
# mount –o loop /var/TKLC/upgrade/RS-PPSpart_number_release_number.iso /media
where:
• part_number is the part number (for example, 872-2121-101)
• release_number is the release number (for example, 9.0.0-7.1.0.3163)
3. Upgrade the PPS package
909-2242-001
103
Major Upgrade
As root, run the appropriate command to upgrade the PPS package:
• For a DVD/CD, enter:
#
rpm -Uvh /media/cdrom/TKLCpps-release_number.rpm
where release_number is the release number (for example, 9.0.0-7.1.0.3163)
• For an ISO file, enter:
# rpm -Uvh /media/TKLCpps-release_number.rpm
where release_number is the release number (for example, 9.0.0-7.1.0.3163)
4. Unmount the media
As root, run:
• For a DVD/CD, enter:
# umount /media/cdrom
# cd
# eject
and remove the media from drive.
• For an ISO file, enter:
# umount /media
and remove the ISO file to save disk space.
9.5 Analytics report package upgrade
Refer to the following manuals according the packages you have installed:
MSU Accounting Installation/Upgrade Manual UP006240
Roaming Access Installation/Upgrade Manual UP006241
Roaming SMS Installation/Upgrade Manual UP006242
Sigtran Transport Analytics Installation/Upgrade Manual UP006243
UM MSU Accounting Installation/Upgrade Manual UP006244
TDM Voice Analytics Installation/Upgrade Manual UP006245
9.6 Discover Report Server Application in CCM
This procedure describes how to discover the RDS, RS, and CMS servers on NSP.
In the 9.0 Report Server Platform architecture, there can be a Primary, Cluster, and multiple RDS
machines that comprise the Report Server Platform. After the Report Server 9.0 upgrade, all of these
servers contained in the Report Server Platform need to be discovered on the NSP.
The discovery of Report Server components needs to be accomplished in a specific order; consequently,
the procedure must be run in this order:
• Any RDS (Report Data Server, database only) component—application type is RDS.
• Cluster Report Server—application type is RS.
• Primary Report Server—application type is RS.
• CMS (SAP Change Management System), if different from the Primary—application type is CMS.
Once all of the Report Server components and Report Packages have been discovered, the ReportAdmin
application can be used to configure and work with the Report Packages. The configuration of the
ReportAdmin with each ReportPackage will be documented with the Install Manual that is released
with each Report Package.
1. Open a web browser and log in to the NSP application interface.
2. Open the Centralized Configuration application.
909-2242-001
104
Major Upgrade
3. Select Equipment Registry Sites NOC Report Server rs_subsystem_name.
4. Discover the Report Server application. Click on Discover Applications. Wait until the Report
Server application is discovered.
909-2242-001
105
Major Upgrade
10 xMF Major Backout
10.1 xMF Backout
No matter the initial cause of the upgrade problem, once all necessary corrective steps have been taken
to prepare for the backout/rollback, then the following procedure can be executed to perform a
backout/rollback.
Backout/rollback only supports backing out/rolling back 1 release.
Execute this procedure if the XMF server has been upgraded or partially upgraded using any non-live
procedure.
Backout of xMF
a) Login as root on the xMF server
b) Change to the backout directory:
# cd /var/TKLC/backout
c) Execute the backout/rollback using the backout_server script:
# ./backout_server
Many informational messages appear on the terminal screen during backout/rollback.
d) When backout/rollback is complete, manually reboot the server.
# reboot
e) After the reboot, the screen displays the login prompt.
f) Change to the cfguser id:
# su - cfguser
g) Execute following command to set on NTPDeamon process after backout procedure:
$ pm.set on NTPDeamon
h) Exit back to root user:
$ exit
909-2242-01
106
Major Upgrade
11 Appendix : Knowledge Base Procedures
11.1 How to mount the ISO file via iLO2
1. Store the ISO file to the local disk.
2. Open a web browser and enter the IP address of server iLO. After security exception a login page
will appear. Log in as root.
3. Navigate to the Remote Console tab.
4. Click on Integrated Remote Console .
An Integrated Remote Console window appears.
5. Click on Virtual Media which is visible in blue bar at the top of the Integrated Remote Console
window.
6. Navigate to Image with a small CD-ROM picture on the left side. Click on Mount .
A window will pop up asking for the ISO path. Navigate to the ISO file and click Open.
7. Now the ISO file is mounted on a target server as a virtual CD-ROM. Such new device will appear
under /dev/ directory.
To find the new virtual CD-ROM media run on a target server as root:
# getCDROMmedia
This will list a virtual CD-ROM media devices with the exact device name. Example output:
[root@ixp1977-1a ~]# getCDROMmedia
HP Virtual DVD-ROM:scd0
this record denotes virtual CD-ROM device /dev/scd0 ready for any other operation.
11.2 How To Mount the ISO file from PM&C ISO Repository
This procedure describes different steps to follow to mount ISO’s in PM&C repository from a blade
server.
1. Add ISO in PM&C repository
a) Distribute the media:
• For physical media insert the application CD/DVD into drive of PM&C server
• For the ISO file check that iso is present under
/var/TKLC/smac/image/isoimages/home/smacftpusr/ directory. If no copy the
ISO.
2. Add iso into PM&C repository
a) On the PM&C gui navigate to Main Menu Software Software Configuration
ManageSoftware Images
b) On the next screen choose image, put description and press Add New Image.
c) Wait till the adding of image is completed.
3. Record the path of the ISO
909-2242-01
107
Major Upgrade
a) On the command line of the management server running PM&C, run the exportfs command
to list the paths of the exported ISOs.
# exportfs
b) In the sample output below, there are 5 ISOs exported, the PM&C application, TPD, NSP package,
Oracle and WebLogic You will need record the path of the ISO that you want to mount on a
blade, as this path will be required in the mount command.
# exportfs
/usr/TKLC/smac/html/TPD/PMAC--2.2.0_22.4.0--872-1818-01
usr/TKLC/smac/html/TPD/TPD--3.2.0_62.12.0—TPD
/usr/TKLC/smac/html/TPD/NSP--7.0.0-3.5.0--872-2128-101
/usr/TKLC/smac/html/TPD/Oracle--10.2.0.3-8--872-2115-01
/usr/TKLC/smac/html/TPD/Weblogic--10.3-1.2.0--872-2114-101
169.254.102.0/24
169.254.102.0/24
169.254.102.0/24
169.254.102.0/24
169.254.102.0/24
4. Login to blade server
a) Login as root user on the blade server where you want to mount the ISO
5. Start portmap service
a) As root run:
# service portmap start
6. Start nfslock service
a) As root run:
# service nfslock start
7. Create ISO mount point
a) As root run:
# mkdir /mnt/local_mount_point
where local_mount_point is the ISO mount point on the local blade server. Example:
# mkdir /mnt/oracle_iso
8. Mount ISO
a) As root run:
# mount
management_server_ip:export_path
local_mount_point
where management_server_ip is the control network IP address of the PM&C server, export_pathis
the export path you received in step 3 and local_mount_point is the mount point you have created
in step 7. Example:
# mount 169.254.102.4:/usr/TKLC/smac/html/TPD/oracle_10_1_0_2 /mnt/oracle_iso
11.3 Adding ISO Images to the PM&C Image Repository
This procedure will provide the steps how add ISO images to PM&C repository.
IF THIS PROCEDURE FAILS, CONTACT TEKELEC TECHNICAL SERVICES AND ASK FOR
ASSISTANCE.
909-2242-01
108
Major Upgrade
1. Make the image available to PM&C
There are two ways to make an image available to PM&C:
Insert the CD containing an iso image into the removable media drive of the PM&C server.
Use sftp to transfer the iso image to the PM&C server in the
/var/TKLC/smac/image/isoimages/home/smacftpusr/ directory as pmacftpusr user:
a) cd into the directory where your ISO image is located (not on the PM&C server)
b) Using sftp, connect to the PM&C management server
> sftp pmacftpusr@<PM&C_management_network_IP>
> put <image>.iso
c) After the image transfer is 100% complete, close the connection
> quit
2. PM&C GUI: Login
Open web browser and enter:
http://<management_network_ip>/gui
Login as pmacadmin user.
3. PM&C GUI: Navigate to Manage Software Images
Navigate to Main Menu Software Software Configuration Manage Software
Images
4. PM&C GUI:Add image
Press the Add Image button .
909-2242-01
109
Major Upgrade
Use the dropdown to select the image you want to add to the repository.
Note: Optical media device appears as device ://dev/hdc
Add appropriate image description and press Add New Image button.
You may check the progress using the Task Monitoring link. Observe the green bar indicating
success.
11.4 How to connect to the console via the MRV
1. Telnet to the console via the MRV
909-2242-01
110
Major Upgrade
a) Connect using ssh where <port> comes from the list below below and <mrv_address> is the
IP address of the MRV.
# ssh tklc@<mrv_address> -p <port>
Target Designation
xA (server1)
xB (server2)
xC (server3)
xD (server4)
xE (server5)
Yellow switch
Blue switch
MRV Port
2122
2222
2322
2422
2522
2722
2822
2. Connect to the console via the MRV
a) Connect using ssh where <port> comes from the list below and <mrv_address> is the IP address
of the MRV.
# ssh tklc@<mrv_address> -p <port>
b) If this is the first time connecting to the server, answer yes to exchange secure keys.
The authenticity of host 'earthoobm1a (192.168.62.200)' can't be established.
RSA key fingerprint is 38:9f:5c:31:6c:e6:7a:a9:43:9f:a7:0a:77:7d:42:da.
Are you sure you want to continue connecting (yes/no)?
yes
c) At the password prompt type the tklc user’s password and press <enter>
d) Press <enter> to get a login prompt.
e) Verify the Login prompt displays the desired hostname
3. When finished use the following key sequence to exit the oobm.
(Enter followed by Tilde).
a) Type
exit
b) Press <enter> and <shift>+<~>+<.>
11.5 How to connect a server console using iL0 ssh connection
Open a ssh connection using the server iLO IP address and login with the iLO user and password
login as: root
[email protected]'s password:
User:root logged-in to ILOUSE921N4VQ.tekelec.com(10.31.5.100)
iLO 2 Advanced 2.05 at 13:38:05 Dec 16 2010
Server Name: hostname1368545964
Server Power: On
</>hpiLO->
Than use the vsp command to access the server console and login with the OS user and password
</>hpiLO-> vsp
909-2242-01
111
Major Upgrade
Starting virtual serial port.
Press 'ESC (' to return to the CLI Session.
</>hpiLO-> Virtual Serial Port active: IO=0x03F8 INT=4
CentOS release 6.3 (Final)
Kernel 2.6.32-279.5.2.el6prerel6.0.1_80.32.0.x86_64 on an x86_64
hostname1368545964 login:
CentOS release 6.3 (Final)
Kernel 2.6.32-279.5.2.el6prerel6.0.1_80.32.0.x86_64 on an x86_64
hostname1368545964 login:
CentOS release 6.3 (Final)
Kernel 2.6.32-279.5.2.el6prerel6.0.1_80.32.0.x86_64 on an x86_64
hostname1368545964 login: root
Password:
11.6 PM&C 4.0 to 5.0 major upgrade
Note: before to start make sure to take in account the new networking requirements. Refer to
section 1.6.4 of this document.
In case the current PM&C is still using version 3.0, refer to
http://kb.ssz.tekelec.com/kbp/index.php?View=entry&EntryID=268
Using the iLO for the TVOE server, boot and enter the BIOS and navigate to the "Advanced
Processor Options" menu and enable the "Intel Virtualization Technology" support option. Reboot.
No re-IPM is required.
If this is not the case you would face the following issue
http://kb.ssz.tekelec.com/kbp/index.php?View=entry&EntryID=112
909-2242-01
112
Major Upgrade
All sample commands listed below are based on the following Lab IP assignment
Custom er Netw ork Inform ationAddress / ID
Com m ent
Demarcation Netw ork Address
10.31.5.0
Customer Demarcation VIP
10.31.5.1
Tekelec Demarcation VIP
10.31.5.4
Customer Sw itch A Router IP Address
Customer Sw itch B Router IP Address
Tekelec Sw itch A Router IP Address10.31.5.5
Tekelec Sw itch B Router IP Address10.31.5.6
PM&C iLO DL360
10.31.5.100
Customer VRRP ID
10
Customer VLAN ID
10
Customer NTP Primary
10.31.5.1
Customer NTP Secondary
10.31.1.208
Customer NTP Tertiary
95.142.165.40
Class C Netw ork /25 (it is in fact the RMS Lab subnet)
Gatew ay
Control PM&C
Managem ent
Backend
VLAN 0
VLAN 2
VLAN 3
VLAN 4
DHCP (PM&C) Internal
Static Custom er Provisioned
Static Custom er Provisioned
Static Custom er Provisioned
169.254.100.0 255.255.255.0
IP
169.254.100.1
169.254.100.2
169.254.100.3
169.254.100.4
169.254.100.5
169.254.100.6
169.254.100.7
169.254.100.8
169.254.100.9
169.254.100.10
169.254.100.11
169.254.100.12
169.254.100.13
169.254.100.14
169.254.100.15
169.254.100.16
169.254.100.17
169.254.100.18
169.254.100.19
169.254.100.20
169.254.100.21
169.254.100.22
169.254.100.23
169.254.100.24
169.254.100.25
169.254.100.26
169.254.100.27
169.254.100.28
169.254.100.29
169.254.100.30
169.254.100.31
169.254.100.32
169.254.100.33
169.254.100.34
169.254.100.35
169.254.100.36
Location/Host
PM&C bond0
DHCP (bond0)
DHCP (bond0)
DHCP (bond0)
DHCP (bond0)
DHCP (bond0)
DHCP (bond0)
DHCP (bond0)
DHCP (bond0)
DHCP (bond0)
DHCP (bond0)
DHCP (bond0)
DHCP (bond0)
DHCP (bond0)
DHCP (bond0)
DHCP (bond0)
DHCP (bond0)
DHCP (bond0)
DHCP (bond0)
DHCP (bond0)
DHCP (bond0)
DHCP (bond0)
DHCP (bond0)
DHCP (bond0)
DHCP (bond0)
DHCP (bond0)
DHCP (bond0)
DHCP (bond0)
909-2242-01
10.31.5.128 255.255.255.192
Frontend
10.31.5.192 255.255.255.224
IP
10.31.5.129
10.31.5.130
10.31.5.131
10.31.5.132
Location/Host
VLAN2-VIP
Sw itch1A-VLAN2
Sw itch1B-VLAN2
PM&C bond0.2
IP
10.31.5.193
10.31.5.194
10.31.5.195
10.31.5.196
10.31.5.133
10.31.5.134
10.31.5.135
10.31.5.136
10.31.5.137
10.31.5.138
10.31.5.139
10.31.5.140
10.31.5.141
10.31.5.142
10.31.5.143
10.31.5.144
10.31.5.145
10.31.5.146
10.31.5.147
10.31.5.148
Cab1-Enclosure1-bay1 (iLO)
Cab1-Enclosure1-bay2 (iLO)
Cab1-Enclosure1-bay3 (iLO)
Cab1-Enclosure1-bay4(iLO)
Cab1-Enclosure1-bay5 (iLO)
Cab1-Enclosure1-bay6 (iLO)
Cab1-Enclosure1-bay7 (iLO)
Cab1-Enclosure1-bay8 (iLO)
Cab1-Enclosure1-bay9 (iLO)
Cab1-Enclosure1-bay10 (iLO)
Cab1-Enclosure1-bay11 (iLO)
Cab1-Enclosure1-bay12 (iLO)
Cab1-Enclosure1-bay13 (iLO)
Cab1-Enclosure1-bay14 (iLO)
Cab1-Enclosure1-bay15(iLO)
Cab1-Enclosure1-bay16 (iLO)
10.31.5.197
10.31.5.198
10.31.5.199
10.31.5.200
10.31.5.150
10.31.5.151
10.31.5.152
10.31.5.153
10.31.5.154
10.31.5.155
10.31.5.156
10.31.5.157
10.31.5.158
10.31.5.159
10.31.5.160
10.31.5.161
10.31.5.162
10.31.5.163
Cab1-Enclosure1-OA
SA1-top_controller (NSP)
SA1-bottom_controller (NSP)
SA2-top_controller (GP1)
SA2-bottom_controller (GP1)
Cab1-Enclosure1-fibre_sw itchA
Cab1-Enclosure1-fibre_sw itchB
Cab1-Enclosure1-sw itchA
Cab1-Enclosure1-sw itchB
DL360 DataExport ILO
DL360 ReportServer ILO
DL380 PMF ILO
DL380 PMF
TVOE
10.31.5.201
10.31.5.202
10.31.5.209
10.31.5.210
10.31.5.211
10.31.5.212
10.31.5.213
10.31.5.214
10.31.5.215
Location/Host
VLAN3-VIP
Sw itch1A-VLAN3
Sw itch1B-VLAN3
PM&C bond0.3
Cab1-Enc1-Bay1 (bond0.3) ixp0100-1a
Cab1-Enc1-Bay2 (bond0.3) ixp0100-1b
Cab1-Enc1-Bay3 (bond0.3) ixp0100-1c
Cab1-Enc1-Bay4 (bond0.3) ixp0100-1d
Cab1-Enc1-Bay5 (bond0.3)
Cab1-Enc1-Bay6 (bond0.3)
Cab1-Enc1-Bay7 (bond0.3)
Cab1-Enc1-Bay8 (bond0.3)
Cab1-Enc1-Bay9 (bond0.3)
Cab1-Enc1-Bay10 (bond0.3)
Cab1-Enc1-Bay11 (bond0.3) ixp0100-1e
Cab1-Enc1-Bay12 (bond0.3) ixp0100-1f
Cab1-Enc1-Bay13 (bond0.3) NSP Oracle
Cab1-Enc1-Bay14 (bond0.3) NSP Apache
Cab1-Enc1-Bay15 (bond0.3) Weblogic 1
Cab1-Enc1-Bay16 (bond0.3) Weblogic 2
10.31.5.224 255.255.255.248
IP
10.31.5.225
10.31.5.226
10.31.5.227
Location/Host
VLAN4-VIP
Sw itch1A-VLAN4
Sw itch1B-VLAN4
10.31.5.228
Cab1-Enc1-Bay14 (bond0.4) NSP Apache
DL360 DataExport
DL360 ReportServer
113
Major Upgrade
Make sure you have enough space on you NSP Oracle box to backup the PM&C info. As root on
NSP check the available space
# df -h /usr/TKLC/oracle/backup
Filesystem
Size Used Avail Use% Mounted on
/dev/mapper/nsp_backup_vol
138G 1.9G 136G
2% /usr/TKLC/oracle/backup
Then as root on the PM&C check the space used by the current iso files.
# du -hs /var/TKLC/smac/image/
19G
/var/TKLC/smac/image/
Backup the config file used on the NSP one Box or Oracle server. As root on the PM&C
# scp -r /usr/TKLC/smac/etc/storage/ [email protected]:/usr/TKLC/oracle/backup/
# scp -r /usr/TKLC/smac/etc/switch/ [email protected]:/usr/TKLC/oracle/backup/
Where 10.31.5.209 is the NSP IP
Backup the iso file used on the NSP one Box or Oracle server. As root on the PM&C
# scp -r /var/TKLC/smac/image/*.iso [email protected]:/usr/TKLC/oracle/oradata/
Where 10.31.5.209 is the NSP IP
Follow 909-2208-001 PM&C Migration 4.0 to 5.0 Revision E
Execute all the procedures until procedure 4 step 6, use the following commands to backup the OA
config and the pmacbackup. As root on the PM&C.
# scp -r /var/TKLC/smac/backup/backupPmac_20130417_151716.pef
[email protected]:/usr/TKLC/oracle/backup/
# scp -r /usr/TKLC/smac/etc/OA_backups/OABackup/
[email protected]:/usr/TKLC/oracle/backup/
Where 10.31.5.209 is the NSP IP
Than continue until procedure 6 step 5 of 909-2208-001, While executing section 3.8.3 TVOE network
configuration configure a management bridge, execute steps 1 and 2
[root@hostname1368545964 ~]# netAdm query --device=bond0
Protocol: none
On Boot: yes
IP Address:
Netmask:
Bonded Mode: active-backup
Enslaving: eth01 eth02
Bridge: Member of bridge control
[root@hostname1368545964 ~]#
Execute step 3
[root@hostname1368545964 ~]# netAdm query --type=Bridge --name=control
Bridge Name: control
On Boot: yes
Protocol: dhcp
Persistent: yes
Promiscuous: no
Hwaddr: 00:24:81:ff:01:c6
MTU:
Delay: 4
Bridge Interface: bond0
Execute step 4
[root@hostname1368545964 ~]# netAdm query --device=bond0.2
ERROR: Config file not found: /etc/sysconfig/network-scripts/ifcfg-bond0.2
ERROR: Config file not found: /etc/sysconfig/network-scripts/ifcfg-bond0.2
[root@hostname1368545964 ~]# netAdm add --device=bond0.2 --onboot=yes
Interface bond0.2 added
Than skip step 5 and execute step 6
[root@hostname1368545964 ~]# netAdm query --type=Bridge --name=management
909-2242-01
114
Major Upgrade
ERROR: Config file /etc/sysconfig/network-scripts/ifcfg-management does not exist!
ERROR: Could not parse /etc/sysconfig/network-scripts/ifcfg-management!
ERROR: Failed to get bridge management
[root@hostname1368545964 ~]# netAdm add --type=Bridge --name=management -address=10.31.5.163 --netmask=255.255.255.192 --onboot=yes --bridgeInterfaces=bond0.2
Setting up the bridge and unsetting network info
Interface bond0.2 was updated.
Add also the backend bridge using the following commands
[root@hostname1368545964 ~]# netAdm query --device=bond0.3
ERROR: Config file not found: /etc/sysconfig/network-scripts/ifcfg-bond0.3
ERROR: Config file not found: /etc/sysconfig/network-scripts/ifcfg-bond0.3
[root@hostname1368545964 ~]# netAdm add --device=bond0.3 --onboot=yes
Interface bond0.3 added
[root@hostname1368545964 ~]# netAdm query --type=Bridge --name=backend
ERROR: Config file /etc/sysconfig/network-scripts/ifcfg-backend does not exist!
ERROR: Could not parse /etc/sysconfig/network-scripts/ifcfg-backend!
ERROR: Failed to get bridge backend
[root@hostname1368545964 ~]# netAdm add --type=Bridge --name=backend --onboot=yes -bridgeInterfaces=bond0.3
Setting up the bridge and unsetting network info
Interface bond0.3 was updated.
Then skip step 7 and execute step 8
[root@hostname1368545964 ~]# syscheckAdm net ipbond --set --var=DEVICES --val=bond0
[root@hostname1368545964 ~]# syscheckAdm net ipbond --enable
[root@hostname1368545964 ~]# syscheck -v net ipbond
Running modules in class net...
ipbond: Bonded interface bond0 is OK
OK
LOG LOCATION: /var/TKLC/log/syscheck/fail_log
Execute step 9
[root@hostname1368545964 ~]# netAdm query --route=default --device=management
No routes for management and table main found
[root@hostname1368545964 ~]# netAdm add --route=default --device=management -gateway=10.31.5.129
Route to management added
Skip step 10 and execute step 11 to 14
[root@hostname1368545964 ~]# service ntpd stop
Shutting down ntpd: [ OK ]
[root@hostname1368545964 ~]# ntpdate ntpserver1
15 May 10:27:32 ntpdate[2335]: step time server 10.31.5.1 offset 40.088554 sec
[root@hostname1368545964 ~]# service ntpd start
Starting ntpd: [ OK ]
[root@hostname1368545964 ~]# init 6
Skip step 15 and 16 execute step 17.
[root@pmac ~]# alarmMgr -alarmStatus
Execute step 18 which in fact is section 3.11.1 Backup Procedure for TVOE.
Once you reach step 5, as root on the TVOE execute the following command to save the backup on the
NSP.
# scp -r /var/TKLC/bkp/tvoe-plat-app-201304171759.iso
[email protected]:/usr/TKLC/oracle/backup/
Where 10.31.5.209 is the NSP IP
Then coming back to the main document 909-2208-001, skip step 6 and 7, continue directly to execute
procedure 6 step 8 , as root on the TVOE.
# scp [email protected]:/usr/TKLC/oracle/backup/backupPmac_20130417_151716.pef
/tmp/PMAC40migrate.pef
909-2242-01
115
Major Upgrade
Then execute procedure 6 step 9 to 14 of 909-2208-001, where you will use the following command as root
on the TVOE.
./pmac-deploy --guest=pmac --hostname=pmac --controlBridge=control -controlIP=169.254.100.4 --controlNM=255.255.255.0 --managementBridge=management -managementIP=10.31.5.132 --managementNM=255.255.255.192 --routeGW=10.31.5.129 -ntpserver=10.31.5.163 --bridge=backend --nic=backend --imageSizeGB=57 -migrate=/tmp/PMAC40migrate.pef
Then continue to execute procedure 6 step 15 until step 20 of 909-2208-001, where you will restore the
config file used from the NSP one Box or Oracle server. As root on the PM&C
# scp -r [email protected]:/usr/TKLC/oracle/backup/storage/ /usr/TKLC/smac/etc/
Where 10.31.5.209 is the NSP IP
Then Remove the iso file used on the NSP one Box or Oracle server. As root on the NSP
# rm /usr/TKLC/oracle/oradata/*.iso
Then skip all the steps related to the switch configuration using netconfig meaning step 21 to 31.
Execute step 32, then skip step 33 and continue to execute step 34 to 36.
Finally continue with the remaining procedure 7 of 909-2208-001.
909-2242-01
116