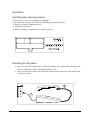
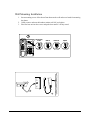
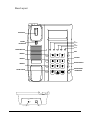
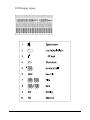
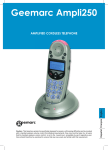
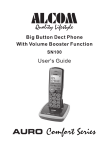
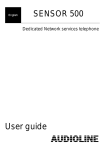
1
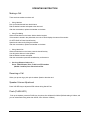
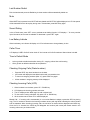
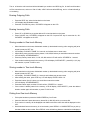
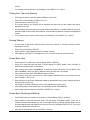
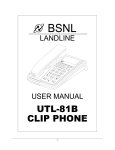
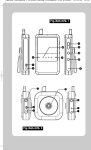
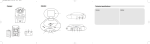
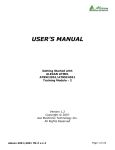
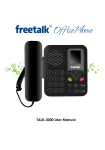
BSNL LANDLINE R IN G UP D O WN SET STR M1 K MU T M2 E FL A SH M3 V OL B OO R D /P /D E L USER MANUAL UTL-81A CLIP PHONE -1- I. INTRODUCTION UTL-81A – is extremely reliable integrated telephone system. It has three line 16 digit display with instruction to take you through all the operating procedures. It has wide range of functions, including phone book, caller ID, back light and speaker phone with enhanced voice clarity. II. FEATURES FSK/DTMF Dual Mode Caller ID LCD with Backlight Function. 99 Incoming calls Memory 10 Outgoing Calls Memory 50 Phone book Memory 3 One touch Memory 10 Two touch Memory 16 Digit LCD Display for Name and Number Real Time Clock, Date, Month and year. Two way speaker phone with volume adjustment Flash, Mute and redial function. Local area code setting. Long distance code setting. Low battery indication Intelligent back light. Displays Incoming number, new call, total calls, repeat calls. Wall mountable Visual Ringer lamp. Parts Checklist BSNL UP DOWN MENU PICK UP BOOK LAND LINE RING MUTE M1 ABC 3 DEF FLASH/EXIT M2 GHI JKL MNO M3 RD/P/OUT PQRS TUV WXYZ SPK VOL/DEL TONE 1 2 -2- 4 USER M ANUAL 5 Installation Installing and replacing batteries UTL-81A requires three AA size batteries for backlight. Disconnect the telephone line cord before Installing and replacing batteries. Remove the battery compartment cover. Insert three AA batteries. Replace the battery compartment cover and press to lock. Installing the Telephone 1. Insert one end of the telephone line cord into the telephone line socket and the other end to the phone socket marked ‘LINE’ at the bottom of the base unit. 2. Insert one end of the handset coil cord into the handset and the other end to the modular jack side of the base unit. 2 1 -3- Wall Mounting Installation 1. Insert mounting screw. Allow about 5mm between the wall and screw heads for mounting the phone. 2. Gently remove and turn the handset retainer tab 180° and replace. 3. Place the base unit on the screws and push down until it’s firmly seated. 1 Wall mounting location UP DOWN MENU PICK UP Rotate 180° Slide out BOOK RING M1 MUTE ABC DEF GHI JKL MNO PQRS TUV WXYZ M2 FLASH/EXIT M3 RD/P/OUT SPK VOL/DEL TONE 2 3 -4- Replace Base Layout HOOK SWITCH UP DOWN SET STORE BOOK HANDSET RETAINER TAB RINGER INDICATOR MUTE MEMORY 1 ABC DEF FLASH/EXIT MEMORY 2 GHI JKL MNO REDIAL/PAUSE/OUT MEMORY 3 PQRS TUV WXYZ SPEAKER PHONE/ LOUDSPEAKER VOLUME / DELETE TONE LINE RINGER H M Ringer volume control L LINE jack -5- LCD Display layout -6- 1. SET Settings Key Operation Press ”SET” Key Press ‘SET’ Key key once Press ‘SET’ Key key twice Press ‘SET’ Key key three times Press ‘SET’ Key key four times Press ‘SET’ Key key five times Press ‘SET’ Key key six times Press ‘SET’ Key key seven times Press ‘SET’ Key key Eight times Press ‘SET’ Key key Nine times Display on LCD SET CLOCK? & ‘UP’ SET AREA CODE? & ‘UP’ SET LONG CODE? & ‘UP’ SET FLASH TIME? & ‘UP’ SET PASSWORD? & ‘UP’ SET RESTRICT? & ‘UP’ SET BABY CALL? & ‘UP’ SET LCD CONT.? Description Used to set the time/date/ month/year Used to set the local area code Used to set the long distance code Used to program the flash time Used for call restrict function Used to lock dialing of ‘0’ & ‘95’ Used to set the baby call & ‘UP’ SET ALARM? Used to set the required level of contrast for the LCD Used to set Alarm. & ‘UP’ SET TONE / PULSE? Used to switch Tone / Pulse Characters Key Characters 1 2 3 4 5 6 7 8 9 * 0 # *,#,+,1 ABC2 DEF3 GHI4 JKL5 MNO6 PQRS7 TUV8 WXYZ9 * 0, Space # -7- OPERATING INSTRUCTION Making a Call There are three modes to make a call. 1. Using Handset Pick up the handset and hear the dial tone. Dial the desired number and speak to the other end. After the conversation, replace the handset on the base. 2. Using Pre-dialing When the handset is on the base, dial the desired number. If the number is stored in the phonebook, then the LCD will display the name of the number. Go OFF HOOK or Press Hands free key. Speak to the other end by lifting the handset. After the conversation, replace the handset on the base. 3. Using Hands free When the handset is on the base, press the hands free key. You will get the dial tone in the speaker. Dial the desired number and speak. After the conversation press the handsfree key to disconnect. 4. Set Long Distance Code to ‘0----‘ Press ‘ Redial’ Button Twice To dial out STD numbers (Mobile / Landline) from ‘Received call list. Receiving a Call When your phone rings, pick up the handset. Speak to the other end. Speaker Volume Adjustment Press VOL/DEL key to adjust the SPK volume during Hands Free. Flash (FLASH KEY) . Pick up the handset, press the FLASH key, the phone line will break for 300ms*(Default setting is 300ms, and you can select flash timing other than 300ms, from 100ms to 1000ms) -8- Last Number Redial Pick the handset and press the Redial key, the last number will be automatically dialed out. Mute When MUTE key is pressed once, MUTE will be activated and ‘MUTE ON’ will be displayed on LCD. No speech will be transmitted to the other party during mute. To deactivate, press MUTE key again. Secret Dialing In the off-hook state, press ‘SET‘ once to activate secret dialing function. LCD displays “-” for every number input. Not stored, and cannot be redialed. To deactivate it, press ‘SET” again. Low Battery Indicate When low battery, an indicator will display on LCD to indicate user to change battery in time. Caller Timer LCD displays ‘USED: 00:00:00’ when hook off. And counter to 59:59:59 maximum. Manual timer is invalid. Time to Default Mode 1. 1min to go back to default mode after viewing CLI, outgoing calls or New call incoming 2. 15s to go back to default mode after other operations. Checking Outgoing Calls (Dialed number) 1. 2. 3. 4. Press the ‘RD/P’ key when handset is on the base. LCD screen will display the last dialed number with conversation time. To view more outgoing numbers (Max. 10), press ‘RD/P’ key again. All the numbers in outgoing memory will be displayed. Checking Incoming Calls (LIFO) 1. When handset is on the base, press ‘UP’ / ‘DOWN’ key. 2. LCD displays the incoming number and name. 3. The CLI displayed with ‘NEW’ tag if the call is missed call*. 4. To view more incoming calls (Max. 99), press ‘UP’ or ‘DOWN’ key. 5. All the numbers and names of CLI will be displayed. Missed Call * : If incoming call is not attended (i.e. no one has lifted the handset or press the ‘SPK’ key during ring). The CLI number is stored in the incoming numbers memory with tag ‘NEW’ indicating the calls is missed and not attended. When checking incoming calls, the call which is missed will be displayed with ‘NEW’ tag. Once the CLI is checked, the ‘NEW’ tag will disappear and number (with name) will remain stored in the incoming call memory as received calls. -9- The no. of times the call is received will be indicated by a number near ‘NEW’ tag. So, for the first will be taken as Zero, second as one, and so on. After 10 calls, suffix P will come after NEW tag, and no. of total calls will go on increasing. Erasing Outgoing Calls 1. Press the ‘RD/P’ key, when the handset is on the base. 2. LCD displays the last dialed number. 3. Press the ‘VOL/DEL’ key twice, ‘CLEARED!’ will appear on the LCD. Erasing Incoming Calls 1. Press ‘UP’ or ‘DOWN’ key to get the desired CLI when handset is on the base. 2. Press ‘VOL/DEL’ key, ‘CLEARED!’ will appear on the LCD. Or press ‘DEL’ key for more than 3s, ‘ALL CLEARED!’’ will appear on the LCD. Storing number in One-touch Memory 1. When handset is on the base, dial desired number (or the desired incoming call or outgoing call) to be stored & press the ‘SET’ key 2. LCD displays ‘PLS INPUT NAME’ for 1 second, and indicate user to enter name 3. After entering name, press the memory button, i.e.M1,M2,M3 where you would like to store the number. 4. LCD will display ‘STORE MEMORY?’ 5. Press any memory button twice, i.e. M1, M2, M3 and the LCD will confirm ‘STORED’ for 1 second. 6. If the number is already stored in the memory, LCD will display ‘OVER WRITE?’, press Mi (i=1,2,3) key will overwrite, or press ‘FLASH’ to exit. Storing number in Two-touch Memory 1. When handset is on the base, dial desired number (or the desired incoming call or outgoing call) to be stored & press the ‘SET’ key 2. LCD display ‘PLS INPUT NAME’ for 1 second, and indicate user to enter name 3. After entering the name, press ‘STR’ key, LCD will display ‘ENTER LOCA. 0-9’ 4. Press the location from 0-9 where you would like to store the number. 5. LCD will display ‘STORE MEMORY?’ 6. Press the location again, and the LCD will confirm ‘STORED’ for 1 second. 7. If the number is already stored in the memory, LCD will display ‘OVER WRITE?’, press the desired location number again will overwrite, or press ‘FLASH’ to exit. Dialing from One-touch Memory 1. Pick up the handset or press the ‘HANDS FREE’ key for off-hook. 2. Listen the dial tone & press the memory button M1 (or M2, M3) which you want to dial. 3. Then number in memory will be displayed and dialed out and the name also will be displayed on the LCD. 4. Get the desired One-touch memory in on-hook mode, press ‘REDIAL’ or ‘HANDS FREE’ key or pick up handset will dial out the number. Press ‘REDIAL’ twice will dial long distance code before the displayed - 10 - number. 5. If no number stored in memory, LCD will display ‘CALL EMPTY!’ for 1 second. Dialing from Two-touch Memory Pick up the handset or press the ‘HANDS FREE’ key for off-hook. Press ‘STR’, LCD will display ‘ENTER LOCA. 0-9’ Press any memory desired from 0-9 The number stored in the memory will be displayed and dialed out and the duration time will be displayed on the LCD. 5. Get the desired Two-touch memory in on-hook mode, press ‘REDIAL’ or ‘HANDS FREE’ key or pick up handset will dial out the number. Press ‘REDIAL’ twice will dial long distance code before the displayed number. 6. If no number stored in memory, when dialing, LCD will display ‘CALL EMPTY!’ for 1 second. 1. 2. 3. 4. Erasing Memory 1. In the on-hook mode, get the desired memory (One-touch memory or Two-touch memory) number displayed on the LCD. 2. Press ‘once, LCD displays ‘DELETE?’ 3. Press ‘VOL/DEL’ again; delete the memory (number & name). 4. After deleting, ‘CALL EMPTY!’ will displayed on LCD for 1 second, then go to the idle mode. Phone Book Input 1. Press ‘BOOK’ in on-hook mode, LCD will display ‘INPUT↑ SEARCH↓’. 2. Press ‘UP’ to enter the name edit mode, LCD will display ‘PLS INPUT NAME’, Using ‘VOL/DEL’ to delete wrong character. Max. 16 characters. 3. After entering name, press ‘PHONEBOOK’ to enter the number edit mode, LCD will display ‘PLS INPUT NUMBER’, Using ‘VOL/DEL’ to delete the wrong number. Max. 16 numbers. 4. After entering number, press ‘PHONEBOOK’ twice to confirm. 5. If the memory is full, when store a memory, LCD will display ‘MEMORY FULL’. Press ‘BOOK’ twice or press ‘FLASH’ or ‘SPK’ to exit. 6. When handset is on the base, dial desired number (or the desired incoming call or outgoing call) to be stored & press the ‘SET’ key 7. LCD display ‘PLS INPUT NAME’ for 1 second, and indicate user to enter name 8. After entering name, press ‘BOOK’ key, LCD will display ‘STORE PHONEBOOK?’ 9. Press ‘BOOK’ again and the LCD will confirm ‘STORED’ for 1 second. Phone Book Checking and Editing: 1. Press ‘BOOK’ either in off-hook or on-hook mode, LCD will display ‘INPUT↑ SEARCH↓’. 2. Press ‘DOWN’ to enter the searching mode. LCD will display ‘PLS INPUT NAME’. Press ‘UP’ or ‘DOWN’ to view the book items one by one. Or entering the name by pressing character button. If there is no item beginning with the character you enter, then the LCD will display ‘END OF LIST!’. You can go on pressing button for the desired one. 3. When get the desired book item, press ‘BOOK’ to modify it. - 11 - 4. Modify the name if necessary. Then press ‘UP’ to modify the number. 5. After modification, Press ‘BOOK’, LCD will display ‘STORE PHONEBOOK?’, press ‘BOOK’ again, LCD will display ‘OVER WRITED?’. 6. Press ‘BOOK’ again to confirm, then LCD will display ‘STORED!’ Dialing from Phone Book 1. Get the desired phone book number in the on-hook mode, and the name also will be displayed on the LCD. 2. press ‘REDIAL’ or ‘HANDS FREE’ key or pick up handset will dial out the number. Press ‘REDIAL’ twice will dial long distance code before the displayed number. Erasing Phone Book 1. Get the desired phone book number in the on-hook mode, and the name also will be displayed on the LCD. 2. Press ‘VOL/DEL’, LCD will display ‘CLEAR THE CALL?’ 3. Press ‘VOL/DEL’ again to delete the item, LCD will display ‘CLEARED!’ Procedure for ‘SET’ Functions Set Clock 1. 2. 3. 4. 5. 6. Press ‘SET’ key once in the on-hook mode, LCD will display ‘SET CLOCK?’ Press ‘SET’ again, the year number will blink on the LCD. Press Number keys to change the year number. Press ‘SET’ to confirm, and the month number will blink Repeat the operation above to complete the date and time settings. Set AM/PM or 24Hour Mode by # Key and press ‘SET’ to confirm. Set Local Area Code 1. Press ‘SET’ key and then press ‘UP’ key once or press ‘DOWN’ nine times in the on-hook mode, LCD will display ‘SET LOCAL CODE?’ 2. Press ‘SET’ key again, LCD will display 5 ‘ - ’s on the segment area. 3. To Enter Area Code use Number keys Eg. For Bangalore 80. 4. Press ‘SET’ to confirm Set Long Distance Code 1. Press ‘SET’ key and then press ‘UP’ key twice or press ‘DOWN’ eight times in the on-hook mode, LCD will display ‘SET LONG CODE?’ 2. Press ‘SET’ key again, LCD will display ‘0 - - ’ on the segment area. 3. To Enter Long Dist code Use Number keys Eg. Enter 0. 4. Press ‘SET’ to confirm. - 12 - Set Flash Time 1. Press ‘SET’ key and then press ‘UP’ key three times or press ‘DOWN’ seven times in the on-hook mode, LCD will display ‘SET FLASH TIME?’ 2. Press ‘SET’ key again, LCD will display ‘FLASH TIME 300ms’ as the default flash time, and the number is blinking. 3. Press ‘UP’ or ’DOWN’ to select the desired time from 100ms to 1000ms. 4. Press ‘SET’ key to confirm. Set Password 1. Press ‘SET’ key and then press ‘UP’ key four times or press ‘DOWN’ six times in the on-hook mode, LCD will display ‘SET PASSWORD?’ 2. Press ‘SET’ key again, LCD will display ‘NEW PASSWORD’ 3. Press Number keys to set the new Password up to 4 digits 4. Press ‘VOL/DEL’ to delete the wrong number. 5. Press ‘SET’ again to confirm. 6. If you want to change your Password, after the step 1, and press ‘SET’ , LCD will display ‘CURRENT PASSWORD’ 7. Enter the current Password by pressing the digital button 0-9. 8. Press ‘SET’ to confirm. 9. If the entered Password is wrong, LCD will display ‘ERROR’ for 1s, and then display ‘CURRENT PASSWORD’ again. 10. If the Password is correct, then LCD will display ‘NEW PASSWORD’ 11. Press the new 4-digit Password and confirm it by ‘SET’ 12. If you forget the Password, press “*#0000#” in the on-hook mode to clear the Password. Set Restrict No. 1. Press ‘SET’ key and then press ‘UP’ key five times or press ‘DOWN’ five times in the on-hook mode, LCD will display ‘SET RESTRICT?’ 2. Press ‘SET’ key again, LCD will display ‘ENTER PASSWORD’ 3. Press Number keys to enter the Password up to 4 digits 4. Press ‘SET’ key again to set the restrict no. 5. LCD will display ‘RESTRICT OFF’, press ‘UP’ or ‘DOWN’ to be ON. 6. Press ‘SET’ key again to set the no. up to 16 digits, 0 & 95 are the default restrict no. 7. Press ‘RD/P’ to enter P between two restrict numbers. 8. Press ‘SET’ key to confirm. 9. After setting the restrict ON, and setting the restrict numbers, the number you try to dial out which beginning with the restrict numbers will not be able to dialed out. At this moment, you need to enter the Password. Only when the Password is correct the numbers displayed will be dialed out. Set Baby Call 1. Press ‘SET’ key and then press ‘UP’ key six times or press ‘DOWN’ four times in the on-hook mode, LCD will display ‘SET BABYCALL?’ - 13 - 2. 3. 4. 5. 6. 7. 8. Press ‘SET’ key again, LCD will display the state of this function. ‘BABYCALL OFF’. Press ‘UP’ or ‘DOWN’ to be baby call ON. Press ‘SET’ key to confirm. LCD will display ‘PLS INPUT NUMBER’ in the dot-matrix area. Press Number keys to enter the baby call number, up to 16 digits. Press ‘SET’ key to confirm. After setting and exit the SET mode, press any key except ‘SET’ or pick up the handset will dial out the baby call number directly. Set LCD Contrast 1. Press ‘SET’ key and then press ‘UP’ key seven times or press ‘DOWN’ three times in the on-hook mode, LCD will display ‘SET LCD CONT.?’ 2. Press ‘SET’ key again, LCD will display ‘LCD CONTRAST 3’ in the dot-matrix area, with the number blinking. 3. Press ‘UP’ or ‘DOWN’ to select the desired contrast level. There are 5 levels, Level 3 is the default. 4. Press ‘SET’ key to confirm. Set Alarm Clock 1. Press ‘SET’ key and then press ‘UP’ key eight times or press ‘DOWN’ two times in the on-hook mode, LCD will display ‘SET ALARM?’ 2. Press ‘SET’ key again, LCD will display ‘ALARM 1 OFF’ with the number ‘1’ blinking. 3. Press ‘UP’ or ‘DOWN’ to change to other groups, up to 5 groups. 4. After selecting the desired alarm, press ‘SET’ again, then the ‘OFF’ will blink. 5. Press ‘UP’ or ‘DOWN’ to change to ON. 6. If change to OFF state, then press ‘SET’ will confirm and exit. 7. If change to ON state, then press ‘SET’ will confirm and set the alarm time. LCD will display ‘SET ALARM 1 TIME’ in the dot-matrix area. The default alarm time is 12:00. 8. The hour and Minutes will be blinking, Press Number keys to modify the number. 9. Press ‘SET’ to confirm. Set TONE / PULSE 1. Press ‘SET’ key and then press ‘UP’ key nine times or press ‘DOWN’ one time in the on-hook mode, LCD will display ‘SET TONE/PULSE.?’ 2. Press ‘SET’ key again, LCD will display ‘TONE’ in the dot-matrix area, . 3. Press ‘UP’ or ‘DOWN’ to select to select Tone / Pulse. 4. Press ‘SET’ key to confirm. - 14 - UNITED TELECOMS LIMITED 18A/19, Doddenekundi Industrial Area, Mahadevapura Post, Bangalore, PIN: 560048 Ph: 080 – 28524032/50 Fax: 080 – 28524191 - 15 -