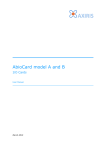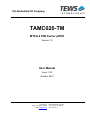
1
The Embedded I/O Company TAMC020-TM MTCA.4 PIM-Carrier µRTM Version 1.0 User Manual Issue 1.0.0 October 2013 TEWS TECHNOLOGIES GmbH Am Bahnhof 7 25469 Halstenbek, Germany Phone: +49 (0) 4101 4058 0 Fax: +49 (0) 4101 4058 19 e-mail: [email protected] www.tews.com TAMC020-TM-10R MTCA.4 PIM-Carrier µRTM, Mid-Size front panel TAMC020-TM-11R MTCA.4 PIM-Carrier µRTM, Full-Size front panel This document contains information, which is proprietary to TEWS TECHNOLOGIES GmbH. Any reproduction without written permission is forbidden. TEWS TECHNOLOGIES GmbH has made any effort to ensure that this manual is accurate and complete. However TEWS TECHNOLOGIES GmbH reserves the right to change the product described in this document at any time without notice. TEWS TECHNOLOGIES GmbH is not liable for any damage arising out of the application or use of the device described herein. Style Conventions Hexadecimal characters are specified with prefix 0x, i.e. 0x029E (that means hexadecimal value 029E). For signals on hardware products, an ‚Active Low’ is represented by the signal name with # following, i.e. IP_RESET#. Access terms are described as: W Write Only R Read Only R/W Read/Write R/C Read/Clear R/S Read/Set 2013 by TEWS TECHNOLOGIES GmbH All trademarks mentioned are property of their respective owners. TAMC020-TM User Manual Issue 1.0.0. Page 2 of 21 Issue Description Date 1.0.0 Initial Issue October 2013 TAMC020-TM User Manual Issue 1.0.0. Page 3 of 21 Table of Contents 1 2 3 PRODUCT DESCRIPTION ........................................................................................... 6 TECHNICAL SPECIFICATION ..................................................................................... 7 HANDLING AND OPERATING INSTRUCTIONS ......................................................... 8 3.1 3.2 3.3 4 ESD Protection ................................................................................................................................ 8 Thermal Considerations ................................................................................................................. 8 Mid-size Option Usage Restrictions.............................................................................................. 8 IPMI SUPPORT ............................................................................................................. 9 4.1 Temperature and Voltage Sensors................................................................................................ 9 4.2 FRU Information .............................................................................................................................. 9 4.2.1 Board Info Area ....................................................................................................................... 10 4.2.2 Product Info Area .................................................................................................................... 10 4.2.3 Multi Record Area ................................................................................................................... 10 5 FUNCTIONAL DESCRIPTION .................................................................................... 12 5.1 5.2 5.3 6 JTAG ............................................................................................................................................... 12 I2C Bus ........................................................................................................................................... 12 I2C I/O Extender ............................................................................................................................ 12 INSTALLATION .......................................................................................................... 14 6.1 PMC Interface Module (PIM) Installation..................................................................................... 14 6.1.1 Using PIMs with Mid-size faceplates ...................................................................................... 14 6.1.2 Component Height Violation on TAMC020-TM-10R .......................................................... 14 6.1.3 Voltage Limits on PIM Modules .............................................................................................. 15 6.2 µRTM Installation .......................................................................................................................... 15 6.2.1 Insertion .................................................................................................................................. 16 6.2.2 Extraction ................................................................................................................................ 16 6.3 Zone 3 Keying................................................................................................................................ 16 7 INDICATORS .............................................................................................................. 17 7.1 LED Indicators ............................................................................................................................... 17 7.1.1 Front Panel LEDs.................................................................................................................... 17 8 I/O CONNECTORS ..................................................................................................... 18 8.1 Overview ........................................................................................................................................ 18 8.2 Board Connectors ......................................................................................................................... 18 8.2.1 Zone 3 Connectors ................................................................................................................. 18 8.2.2 PIM Slot Connectors ............................................................................................................... 19 TAMC020-TM User Manual Issue 1.0.0. Page 4 of 21 List of Figures FIGURE 1-1 : BLOCK DIAGRAM ...................................................................................................................... 6 FIGURE 6-1 : USING PIMS WITH MID-SIZE FACEPLATES ......................................................................... 14 FIGURE 6-2 : COMPONENT HEIGHT VIOLATION ACCORDING TO MTCA.4 ............................................14 FIGURE 6-3 : HOT-SWAP STATES ................................................................................................................ 15 FIGURE 7-1 : FRONT PANEL LED VIEW ...................................................................................................... 17 FIGURE 8-1 : CONNECTOR OVERVIEW ...................................................................................................... 18 List of Tables TABLE 2-1 : TECHNICAL SPECIFICATION ..................................................................................................... 7 TABLE 4-1 : TEMPERATURE AND VOLTAGE SENSORS ............................................................................. 9 TABLE 4-2 : FRU INFORMATION .................................................................................................................... 9 TABLE 4-3 : BOARD AND PRODUCT INFO AREA ....................................................................................... 10 TABLE 4-4 : BOARD AND PRODUCT INFO AREA ....................................................................................... 10 TABLE 4-5 : ZONE 3 INTERFACE COMPATIBILITY RECORD .................................................................... 10 TABLE 5-1 : µRTM I2C DEVICES.................................................................................................................. 12 TABLE 5-2 : µRTM I2C I/O EXTENDER PORT ASSIGNMENT ..................................................................... 13 TABLE 6-1 : VOLTAGE LIMITS ON PIM MODULES ..................................................................................... 15 TABLE 7-1 : FRONT PANEL LEDS ................................................................................................................ 17 TABLE 8-1: ZONE 3 RP30 CONNECTOR PIN ASSIGNMENT...................................................................... 19 TABLE 8-2: ZONE 3 RP31 CONNECTOR PIN ASSIGNMENT...................................................................... 19 TABLE 8-3 : PIN ASSIGNMENT J10 CONNECTOR ...................................................................................... 20 TABLE 8-4 : PIN ASSIGNMENT J14 PIM CONNECTOR .............................................................................. 21 TAMC020-TM User Manual Issue 1.0.0. Page 5 of 21 1 Product Description The TAMC020-TM is a standard Mid-Size/Full-Size MTCA.4 compliant Micro Rear Transition Module for the TAMC261. It distributes all P14 I/O lines of a PMC residing on the TAMC261 from the zone 3 interface connectors to a PIM module slot. Additional lines are connected to the M-LVDS control and data lines of a TAMC261-2xR. These are distributed to normally unused pins of the J10 PIM slot connector so that a special PIM can be used to connect the M-LVDS control and data lines to the PMC back I/O signals. According to MTCA.4, the TAMC020-TM provides an I2C EEPROM, an I2C temperature sensor and an I2C I/O Extender device. The I/O Extender is used to provide various management signals on the µRTM, with the management being handled by the MMC of the TAMC261. Figure 1-1 : Block Diagram TAMC020-TM User Manual Issue 1.0.0. Page 6 of 21 2 Technical Specification AMC Interface Mechanical Interface Rear Transition Module conforming to MTCA.4 Module Type: Double Mid-Size Module (-10R) Module Type: Double Full-Size Module (-11R) IPMI Support IPMI Version 1.5 Front Panel LEDs Blue Hot-Swap LED Red Failure Indication LED (LED1) Green Board OK (LED2) Main On-Board Devices I2C I/O Extender PCA9534 (Texas Instruments) I2C EEPROM M24C32 (ST Microelectronics) I2C Temperature Sensor LM75 (National Semiconductor) I/O Interface I/O Connector PIM I/O slot Physical Data Management Power: 15mA typical @ +3.3V DC Power Requirements Temperature Range Payload Power: Depends on mounted PIM. With a passive PIM: 0A @ +12V DC Operating -40°C to +85°C Storage -40°C to +85°C 865.000 h MTBF MTBF values shown are based on calculation according to MIL-HDBK-217F and MIL-HDBK-217F Notice 2; Environment: GB 20°C. The MTBF calculation is based on component FIT rates provided by the component suppliers. If FIT rates are not available, MIL-HDBK-217F and MIL-HDBK-217F Notice 2 formulas are used for FIT rate calculation. Humidity 5 – 95 % non-condensing Weight 214 g Table 2-1 : Technical Specification TAMC020-TM User Manual Issue 1.0.0. Page 7 of 21 3 Handling and Operating Instructions 3.1 ESD Protection The AMC module is sensitive to static electricity. Packing, unpacking and all other module handling has to be done in an ESD/EOS protected Area. 3.2 Thermal Considerations Forced air cooling is recommended during operation. Without forced air cooling, damage to the device can occur. 3.3 Mid-size Option Usage Restrictions Please note that the mid-size module has restrictions to its usage because of a component height violation. It is within the responsibility of the user to carefully check if the mid-size module with its component height violation can be used in the system. Otherwise, damage to the TAMC020-TM or the slot it is used in may occur! Refer to the chapter “Component Height Violation on TAMC020-TM10R” for details. TAMC020-TM User Manual Issue 1.0.0. Page 8 of 21 4 IPMI Support The Front-AMC module provides a Module Management Controller (MMC) that performs health monitoring, hot-swap functionality and stores the Field Replaceable Unit (FRU) information. The MMC communicates via an Intelligent Platform Management Interface (IPMI) with superordinated IPMI controllers. The TAMC020-TM is controlled by the Front-AMCs MMC and provides a temperature sensor, FRU information and management signals for hot swap handle status and LED control. 4.1 Temperature and Voltage Sensors The MMC on the Front-AMC module monitors sensors on-board the TAMC020-TM and signals sensor events to the superordinated IPMI controller / shelf manager. Available sensors are listed in the table below. Sensor Number Signal Type Thresholds Signal Monitored 0 Event - Hot-swap switch 1 Temperature lnr lcr lnc unc ucr unr LM75 unr: upper non-recoverable, ucr: upper critical, unc: upper non-critical lnr: lower non-recoverable, lcr: lower critical, lnc: lower non-critical Table 4-1 : Temperature and Voltage Sensors 4.2 FRU Information The TAMC020-TM stores the module FRU information in a non-volatile EEPROM. The actual FRU information data is shown below. Area Size (in Bytes) Writeable Common Header 8 no Internal Use Area 0 no Chassis Info Area 0 no Board Info Area variable no Product Info Area variable no Multi Record Area Zone 3 Interface Compatibility Record variable yes Table 4-2 : FRU Information TAMC020-TM User Manual Issue 1.0.0. Page 9 of 21 4.2.1 Board Info Area Product Information Value Version 1 Language Code 0x00 - English Manufacturer date/time determined at manufacturing Board manufacturer TEWS TECHNOLOGIES GmbH Board product name TAMC020-TM Board serial number determined at manufacturing (see board label) Board part number TAMC020-TM-xxR -xx = -10 / -11 Table 4-3 : Board and Product Info Area 4.2.2 Product Info Area Product Information Value Version 1 Language Code 0x00 - English Product manufacturer TEWS TECHNOLOGIES GmbH Product name TAMC020-TM Board part/model number TAMC020-TM-xxR -xx = -10 / -11 Product version V1.0 Rev. A (see board label) Product serial number determined at manufacturing (see board label) Asset tag = Product serial Number Table 4-4 : Board and Product Info Area 4.2.3 Multi Record Area 4.2.3.1 Zone 3 Interface Compatibility Record Product Information Value Version 1 Type of Interface Identifier 0x03 - OEM Interface Identifier Manufacturer ID (IANA) of the OEM 0x0071E3 (TEWS TECHNOLOGIES GmbH) OEM-defined interface designator 0x81050000 (0x8 = TAMC, 0x105 = 261) Table 4-5 : Zone 3 Interface Compatibility Record If the Zone 3 Interface Compatibility record matches the Zone 3 Interface Compatibility record in the TAMC261, the TAMC261 considers the µRTM to be compatible. Otherwise, the TAMC261 considers the µRTM to be incompatible. TAMC020-TM User Manual Issue 1.0.0. Page 10 of 21 The Zone 3 Interface Compatibility records are considered as matching if the records are the same length and are identical from offset 9 to the end of the record. Otherwise the record is considered as not matching. 4.2.3.2 Module Current Requirements As per µTCA.4 specification the TAMC020-TM current requirement must be included into the Front-AMC module’s Module Current Requirement record. The TAMC020-TM current requirements depend on the used PIM module: If a passive PIM does not use of any of the PIM supplies, the TAMC020-TM current requirement is 0 A. If an active PIM is used, the TAMC020-TM is able to supply up to 1 A on the +5 V and 1 A on the +3.3 V power rail. The ±12 V supply is capable of sourcing 100 mA each. TAMC020-TM User Manual Issue 1.0.0. Page 11 of 21 5 Functional Description 5.1 JTAG The TAMC020-TM has no JTAG capable devices on-board; it just connects TDI with TDO, so that it does not break the Front-AMC’s JTAG chain. TCK and TMS are left unconnected. 5.2 I2C Bus The TAMC020-TM implements the following I2C devices / addresses on the µRTM I2C management bus: Device Type Device EEPROM Temperature Sensor 8-Bit I2C I/O Port I2C Address AT24C32 50h 1010000b LM75 48h 1001000b PCA9534 20h 0100000b Table 5-1 : µRTM I2C Devices 5.3 I2C I/O Extender The µRTM provides an 8-Bit I2C I/O Extender device on the I2C management bus that is used for controlling certain management signals on the µRTM. The TAMC020-TM implements the following pin/signal assignment for the µRTM I2C I/O Extender device: I/O Port Bit I/O Direction Description I Payload Power Supply Status 0 = Payload Power Supply status is not Good 1 = Payload Power Supply status is Good 6 O Payload (Zone 3) Enable Control 0 = Payload Enable signal not active 1 = Payload Enable signal active Enables PIM power supplies 5 O Payload Reset Control Not used on the TAMC020-TM 4 O EEPROM Write Protect Control 0 = EEPROM write protection not active 1 = EEPROM write protection active 3 O LED2 (Green) Control 0 = LED off 1 = LED on O LED1 (Red) Control 0 = LED off 1 = LED on O Hot Swap LED (Blue) Control 0 = LED off 1 = LED on 7 2 1 TAMC020-TM User Manual Issue 1.0.0. Page 12 of 21 0 I Handle Status 0 = Handle/Switch closed 1 = Handle/Switch open Table 5-2 : µRTM I2C I/O Extender Port Assignment TAMC020-TM User Manual Issue 1.0.0. Page 13 of 21 6 Installation This chapter contains general notes regarding installing the µRTM into a system. 6.1 PMC Interface Module (PIM) Installation Before installing a PIM, be sure that the power supply for the TAMC020-TM is turned off. The components are Electrostatic Sensitive Devices (ESD). Use an anti-static mat connected to a wristband when handling or installing the components. 6.1.1 Using PIMs with Mid-size faceplates The TAMC020-TM places the PIM directly at the AMC faceplate. A TAMC020-TM Mid-size faceplate provides a cut-out to ease the PIM installation. Pins of PIM I/O-connectors that protrude on PIM Side 2 may still contact the RTM front panel. This is a potential hazardous electrical problem, depending on the I/O circuitry used. Figure 6-1 : Using PIMs with Mid-size faceplates It is within the responsibility of the user to carefully check if a specific PIM can be used on a mid-size TAMC020-TM. If you are not sure that the available spacing to conductive parts of the PIM is sufficient, it is strongly recommended to use a TAMC020-TM with full-size front panel. 6.1.2 Component Height Violation on TAMC020-TM-10R With a mounted standard PIM the Mid-Size TAMC261-x0 violates the µRTM component envelope defined in MTCA.4. The picture shows the violation of the hatched µRTM component envelope in red. 0,64 mm 0,29 mm Figure 6-2 : Component Height Violation according to MTCA.4 TAMC020-TM User Manual Issue 1.0.0. Page 14 of 21 In µTCA systems the adjacent AMC module provides enough spacing for the protruding PIM module. Despite the fact that the µRTM component envelope is violated by the PIM, the PIM does not cross the interboard separation plane, and a minimum distance between the PIM and the adjacent µRTM is guaranteed. This allows improving the density of the µTCA system. If you are not sure that the available spacing is sufficient, it is strongly recommended to use the Full-Size TAMC020-TM-11R. It is within the responsibility of the user to carefully check if the Mid-Size module with its component height violation can be used in his system. Otherwise damage of the TAMC020-TM or the µRTM slot may occur! 6.1.3 Voltage Limits on PIM Modules The AMC.0 specification limits the voltages on AMC modules to following thresholds: DC voltage AC voltage Positive +27V +27V peak Negative -15V -15V peak Table 6-1 : Voltage Limits on PIM Modules For PIM modules using voltages (including I/O voltages) that exceed these thresholds, an additional insulation to adjacent modules or carrier boards becomes necessary. 6.2 µRTM Installation During insertion and extraction, the operational state of the AMC is visible via the blue LED in the AMCs front panel. The following table lists all valid combinations of Hot-swap handle position and blue LED status, including a short description of what’s going on. Blue LED On Off Long Blink Short Blink Open (Pulled out) Extraction: Module can be extracted Insertion: Module is waiting for closed Handle Module is waiting for hot swap negotiation - Hot swap negotiation in progress (Extraction) Closed (Pushed all way in) Module is waiting for hot swap negotiation Module is active (operating) Hot swap negotiation in progress (Insertion) - Handle Figure 6-3 : Hot-Swap states TAMC020-TM User Manual Issue 1.0.0. Page 15 of 21 6.2.1 Insertion Typical insertion sequence: 1. Insert the µRTM module into its slot, with the board edges aligned to the card guides 2. Fasten the screws of the front plate, so the module cannot be pushed out by the Front-AMC if it is inserted afterwards 3. Make sure that the module handle is pushed into the inserted position a. Blue LED turns “ON.” (Module is ready to attempt activation by the system) b. Blue LED starts “Long Blink” (Hot Swap Negotiation / Module activation in progress) c. Blue LED turns “OFF”, and green LED turns “ON” (Module is ready and powered) When the Blue LED does not go off but returns to the “ON” state, the µRTM FRU information is incompatible to the Front-AMC. 6.2.2 Extraction Typical Extraction sequence: 1. Pull the module handle out ½ way a. Blue LED starts “Short Blink” (Hot Swap Negotiation in progress) b. Blue LED turns “ON” (Module is ready to be extracted) 2. Loosen the screws of the front plate 3. Pull the module handle out completely and extract the µRTM from the slot. 6.3 Zone 3 Keying The TAMC020-TM provides the following male keying pin: N A Rotation 5 180 View Voltage Levels Dependent on PMC Modules, but >±10V white = clearance TAMC020-TM User Manual Issue 1.0.0. Page 16 of 21 7 Indicators This chapter describes board indicators such as LEDs. 7.1 LED Indicators 7.1.1 Front Panel LEDs OK FAIL For a quick visual inspection, the AMC module provides the following front panel LEDs. TAMC020-TM Figure 7-1 : Front Panel LED View LED Color State Off HS Blue FAIL Red OK Green Description No Power or µRTM is ready for normal operation Short Blink Hot-Swap negotiation (extraction) Long Blink Hot-Swap negotiation (insertion) On µRTM is ready to attempt activation by the system or µRTM is ready to be extracted Off No fault On Failure or out of service status Off µRTM is not powered up On µRTM is powered and OK Table 7-1 : Front Panel LEDs TAMC020-TM User Manual Issue 1.0.0. Page 17 of 21 8 I/O Connectors This chapter provides information about user accessible on-board connectors 3 1 4 2 3 1 4 2 8.1 Overview J10 RP30 J14 RP31 Figure 8-1 : Connector Overview 8.2 Board Connectors 8.2.1 Zone 3 Connectors The TAMC020-TM provides two 30-pair ADF connectors (RP30 and RP31) at the Zone 3 Interface. Pin-Count 30 contact pairs (60 signal contacts) + 30 GND pins Connector Type Advanced Differential Fabric (ADF) connector Source & Order Info Erni 204781 or compatible TAMC020-TM User Manual Issue 1.0.0. Page 18 of 21 8.2.1.1 RP30 ADF connector ground pins are not shown. F E D C B A 10 IO_48 IO_47 IO_46 IO_45 IO_44 IO_43 9 IO_42 IO_41 IO_40 IO_39 IO_38 IO_37 8 IO_36 IO_35 IO_34 IO_33 IO_32 IO_31 7 IO_30 IO_29 IO_28 IO_27 IO_26 IO_25 6 IO_24 IO_23 IO_22 IO_21 IO_20 IO_19 5 IO_18 IO_17 IO_16 IO_15 IO_14 IO_13 4 IO_12 IO_11 IO_10 IO_9 IO_8 IO_7 3 IO_6 IO_5 IO_4 IO_3 IO_2 IO_1 2 µRTM_TMS µRTM_TDI µRTM_SCL µRTM_MP µRTM_PWR µRTM_PWR 1 µRTM_TDO µRTM_TCK µRTM_SDA µRTM_PS# µRTM_PWR µRTM_PWR Table 8-1: Zone 3 RP30 Connector Pin Assignment 8.2.1.2 RP31 F E D C B A 10 - - Tx_20 DIR_Tx_20 Rx_20 DIR_Rx_20 9 Tx_19 DIR_Tx_19 Rx_19 DIR_Rx_19 Tx_18 DIR_Tx_18 8 Rx_18 DIR_Rx_18 Tx_17 DIR_Tx_17 Rx_17 DIR_Rx_17 7 TCLKD DIR_TCLKD TCLKC DIR_TCLKC TCLKB DIR_TCLKB 6 TCLKA DIR_TCLKA Tx_15 DIR_Tx_15 Rx_15 DIR_Rx_15 5 Tx_14 DIR_Tx_14 Rx_14 DIR_Rx_14 Tx_13 DIR_Tx_13 4 Rx_13 DIR_Rx_13 Tx_12 DIR_Tx_12 Rx_12 DIR_Rx_12 3 - - IO_64 IO_63 IO_62 IO_61 2 IO_60 IO_59 IO_58 IO_57 IO_56 IO_55 1 IO_54 IO_53 IO_52 IO_51 IO_50 IO_49 Table 8-2: Zone 3 RP31 Connector Pin Assignment 8.2.2 PIM Slot Connectors The I/O lines to PIM connector J14 are routed as 50Ohm single-ended length matched signals, but not as differential pairs. This approach may support differential signaling (e.g. for Ethernet etc.) but does not cause cross-talk when used with cards that provide single-ended I/O. Pin-Count 64 Connector Type PMC Connector Source & Order Info Molex 71436-2864 or compatible TAMC020-TM User Manual Issue 1.0.0. Page 19 of 21 8.2.2.1 J10 Pin Signal Pin Signal 1 - 2 +12V 3 - 4 - 5 +5V 6 - 7 - 8 - 9 DIR_Rx_12 10 +3.3V 11 DIR_Tx_12 12 Rx_12 13 GND 14 Tx_12 15 DIR_Rx_13 16 Rx_13 17 DIR_Tx_13 18 GND 19 DIR_Rx_14 20 Tx_13 21 +5V 22 Rx_14 23 DIR_Tx_14 24 Tx_14 25 DIR_Rx_15 26 +3.3V 27 DIR_Tx_15 28 Rx_15 29 GND 30 Tx_15 31 DIR_TCLKA 32 TCLKA 33 DIR_TCLKB 34 GND 35 DIR_TCLKC 36 TCLKA 37 +5V 38 TCLKA 39 DIR_TCLKD 40 TCLKA 41 DIR_Rx_17 42 +3.3V 43 DIR_Tx_17 44 Rx_17 45 GND 46 Tx_17 47 DIR_Rx_18 48 Rx_18 49 DIR_Tx_18 50 GND 51 DIR_Rx_19 52 Tx_18 53 +5V 54 Rx_19 55 DIR_Tx_19 56 Tx_19 57 DIR_Rx_20 58 +3.3V 59 DIR_Tx_20 60 Rx_20 61 -12V 62 Tx_20 63 - 64 - Table 8-3 : Pin Assignment J10 Connector TAMC020-TM User Manual Issue 1.0.0. Page 20 of 21 8.2.2.2 J14 Pin Signal Pin Signal 1 IO_1 2 IO_2 3 IO_3 4 IO_4 5 IO_5 6 IO_6 7 IO_7 8 IO_8 9 IO_9 10 IO_10 11 IO_11 12 IO_12 13 IO_13 14 IO_14 15 IO_15 16 IO_16 17 IO_17 18 IO_18 19 IO_19 20 IO_20 21 IO_21 22 IO_22 23 IO_23 24 IO_24 25 IO_25 26 IO_26 27 IO_27 28 IO_28 29 IO_29 30 IO_30 31 IO_31 32 IO_32 33 IO_33 34 IO_34 35 IO_35 36 IO_36 37 IO_37 38 IO_38 39 IO_39 40 IO_40 41 IO_41 42 IO_42 43 IO_43 44 IO_44 45 IO_45 46 IO_46 47 IO_47 48 IO_48 49 IO_49 50 IO_50 51 IO_51 52 IO_52 53 IO_53 54 IO_54 55 IO_55 56 IO_56 57 IO_57 58 IO_58 59 IO_59 60 IO_60 61 IO_61 62 IO_62 63 IO_63 64 IO_64 Table 8-4 : Pin Assignment J14 PIM Connector TAMC020-TM User Manual Issue 1.0.0. Page 21 of 21