1
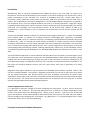
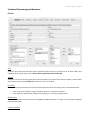
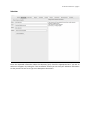
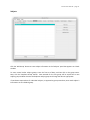
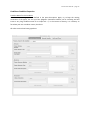
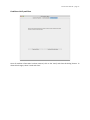
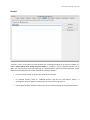
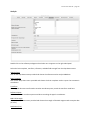
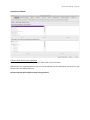
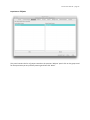
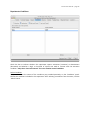
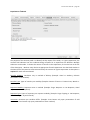
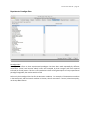
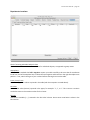
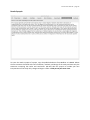
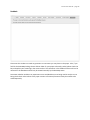
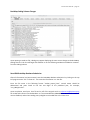
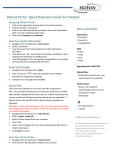
User Manual for Scribe 3.0 Research Imaging Institute UT Health Science Center San Antonio http://brainmap.org BrainMap Development Team: Peter T. Fox, M.D. Angela R. Laird, Ph.D. Simon B. Eickhoff, M.D. Jack L. Lancaster, Ph.D. Mick Fox, Programmer Analyst Angela M. Uecker, Programmer Analyst Michaela Robertson, Research Scientist Iliana Sanchez, Research Assistant Updated February 2015 Scribe User Manual – page 2 Introduction BrainMap has been in step-‐wise development since 1988 and actively in use since 1992. Its purpose is to facilitate the retrieval and understanding of the literature on functional mapping of the human brain, and to enable meta-‐analysis of this literature. The structure of BrainMap data entry involves three levels of information: paper, experiment, and locations (coordinates). Paper-‐level information contains fields such as authors, year of publication, and subject demographics. In the BrainMap database, experiments are defined as the comparison of two (or more) imaged conditions that result in a statistical parametric image (SPI). Papers containing multiple experiments require information for each experiment to be entered separately; this includes fields such as the paradigm class and behavioral domain. At the location level, Talairach or MNI (x,y,z) coordinates (i.e., centers-‐of-‐mass of sites of activation) are extracted from the SPIs and are entered into the database. Initially, the BrainMap database archived only functional neuroimaging experiments. In 2007, the BrainMap team initiated efforts to expand into archiving structural neuroimaging data. Specifically, voxel-‐based morphometry (VBM), which is a statistical analysis for investigating structural differences between two groups of subjects (e.g., areas of increased gray matter density for patients vs. healthy controls), had also achieved community standardization such that results reported in the form of stereotactic coordinates in the same form as for functional neuroimaging data had become the norm. Formal integration by meta-‐analyses on structural neuroimaging findings thus become possible. Following multiple years of data entry, as well as database, servlet, and software programming and development, the BrainMap VBM database was released to the public in June 2011. The Scribe software application is used to code data and meta-‐data from a functional or structural paper so that this information can be submitted and inserted into the BrainMap database. When Scribe is launched, a dialog window asks users to select which type of paper they wish to code, functional or structural. Following this, the main application window is configured to match the user’s selection. Functional submissions are created as .ent files while the structural database archives .vbm files, which allows each type of submission to be easily identified. Regardless of the type of submission, the first panel of the BrainMap Scribe interface is entitled ‘Citation,’ and the last is entitled ‘Feedback.’ The interface is designed to enter data from the left to right. Some entry panels will not accept information until previous panels have been completed. Furthermore, all panels except 'Experiment' require paper-‐level information. Some fields provide drop-‐down menus and some provide windows for free-‐form entry. The words from the drop-‐down menus are all keywords that users may use to conduct searches using BrainMap Sleuth (www.brainmap.org/sleuth). Save BrainMap Database Submission: It is a good idea to save your changes to file after completing each major panel. To do so, click on the top left program menu: 'File' à 'Save As'. This saves the information in an *.ent file (or a *.vbm file, depending on your choice). Enter the file name in the following format: "Author_Journal_Year.ent". If you are on a PC, be sure and type in file extension. Journal names should be abbreviated if they are more than one word and years listed as the last two digits of the published year, for example, "Lee_HBM_02.ent” or “Lee_NeuroImage_02.vbm”. Please save the PDF file this way as well when submitting. Functional or Structural Database Submissions Scribe User Manual – page 3 When Scribe is launched, you will see the following dialog window: Selecting “Structural” takes you to the interface for a VBM submission, while selecting “Functional” will take you to the interface for an ENT submission. In this manual, we will describe how to generate a sparsely coded submission for the BrainMap functional neuroimaging database. You can find an additional manual online for our full functional and structural coding methods. Scribe User Manual – page 4 Functional Neuroimaging Submissions Citation Title Capitalize the initial word and those used to capitalize proper names; use lowercase for all other words. Also, capitalize the first letter after a colon. Do not leave a period at the end of the title. Journal Select the journal name from the pull-‐down menu provided. If the journal name does not appear, choose ‘Other’ and enter the journal name without abbreviations. Do not list sections. Institution List the name of the institution where the data was acquired. Enter the university name, not the department. • Enter Institute of Psychiatry, King’s College of London as: University of London. • Enter Wellcome Department of Cognitive Neurology as: University College London. Medline Num. The Medline Number can be located at the PubMed or Medline website. If a paper is not archived in PubMed, leave this field blank. Citation Keywords Scribe User Manual – page 5 Click on the desired keywords (from the list published with the paper), and then click the ‘Select’ button. The chosen keyword will appear in the box to the right. Use the ‘Up/Down’ buttons to reorganize the keywords as needed. If the appropriate keywords used in your paper are not included in the list provided, click the ‘Other’ button and type in the keyword in the window provided. • Enter the exact keyword listed, for example, fMRI and functional MRI are two different keywords. • Do not use capital letters except for proper names/nouns. • Enter only the keywords published with the paper. If there are no keywords listed, leave this field blank. Authors Enter all authors listed on the paper. • Format should be last name followed by first name initials with no punctuation included. • Do not add another version of an author’s name that already appears in the database, e.g., Friston K and Friston K J. • List authors in the order of appearance on the paper. • Do not hyphenate first names of authors. Example: Marie-‐Claude Antoinette should be entered as “Antoinette M C”, not as “Antoinette M-‐C”. Scribe User Manual – page 6 Submitter Enter the requested information about the submitter (you). Check the appropriate box if you are an author on the paper. By clicking the “Save as Defaults” button you can save your submitter information so that you will not have to re-‐type it on subsequent submissions. Prose Description Scribe User Manual – page 7 When entering a paper into BrainMap, special care should be taken when writing the Prose Description. The new format for prose entry differs from what has been previously documented in previous versions of Scribe. The prose description should: • Describe only the purpose of the study as well as the experimental design (no background, results or discussion should be included) • Be illustrative, but as succinct as possible • Be written in third person, past tense format • Include sufficient, specific information for each condition and experiment so that a reader will fully understand the experimental design of the study The prose section should be broken down into the following sections: PURPOSE HYPOTHESIS SESSIONS METHODS CONDITIONS EXPERIMENTS According to BrainMap's system of describing a paper, functional studies are broken down into Conditions and Experiments. Conditions: Subjects perform tasks under certain conditions and these conditions are contrasted in an experiment. Each condition used in a BrainMap-‐defined experiment should be briefly described and named by simple terms such as “Read”, “Finger Tapping”, “Rest”, or “Word Generation”. Experiments: An experiment is the result of comparing two or more conditions. Each experiment name should indicate which conditions were contrasted. In the preceding example, the experiment would be named: “Finger Tapping – Rest”. The names used here should be entered on the Experiments panel. Experiments should be listed here and in the order in which they were published. Do not enter conditions that do not result in activations or were not used in experiments. But please document in the ‘Feedback’ panel that there were in fact conditions or experiments that did not fit the BrainMap coding criteria and why (i.e., no reported coordinates; experiments were ROI seeded). Most information needed for the sections can be found directly from the original article. Do not include any bias or personal input if information is not found in the text. Findings should strictly reflect the author’s work/opinions. Because the hypothesis is not always clearly stated in an article, this header can be omitted if the author does not explicitly state the expectations. The sessions header should only be included if multiple scanning sessions were done, otherwise it can be omitted as well. • • • • • • • • • • • • Scribe User Manual – page 8 The PURPOSE section is usually taken directly from the Introduction, and the majority of the time you can find it in the last paragraph Define any abbreviations used The main points we want to capture in the METHODS section is the experimental design being used, the response being observed (if any), and the instructions given to the subjects. Any relevant or important details such as training or follow-‐up information can also be included. Details will vary per submission. To keep the prose description as concise as possible, do not repeat information in both the METHODS and CONDITIONS sections. This can be done in one of two ways: The CONDTIONS can be defined in the METHODS section then only listed under the CONDITIONS header, or they can be stated in the METHODS, then defined in more detail under the CONDITIONS header. Describe the conditions in a chronological sense. For example, “subjects viewed a series of letters; after a delay, subjects viewed a probe letter and recalled if the probe letter had been one of the encoded letters”. Capitalize the first letter in all words in the names of conditions and the names of experiments. The names of experiments should be taken directly from the coordinate tables or figures in the papers. Some experiment names explicitly state the conditions in them: “Finger Tapping – Rest” or “Finger Tapping vs. Rest” or “Finger Tapping > Rest”, and some do not: “Motor Directed Attention” or “Conjunction Analysis”. Use the convention of naming adopted in the paper. For conjunction and disjunction analyses, normally all conditions are used in all experiments unless the experiment indicates which conditions were used in each experiment. (See Thierry_HBM_03.ent for an example.) Abbreviations are acceptable but the first use must be defined then the subsequent references can just be entered in the abbreviated form. Do not include region-‐of-‐interest (ROI) experiments, but document this in the feedback panel. Avoid use of the word “task” in the condition (and experiment) name. For example, “Finger Tapping Task” should be named “Finger Tapping”. If “Rest” is used as a control condition, list it last. The conditions “Rest” and “Fixation” do not require a description. Some papers report increases and decreases in activation. Be sure to inspect the coordinate tables carefully, as authors frequently present each in the same table. Increases and decreases should be coded and named as separate experiments. For example, a study may investigate motor function and acquire data on two conditions, Finger Tapping and Rest. The coordinate table may be titled “Increases” and “Decreases” and the paper should be coded with two experiments, not one. Scribe User Manual – page 9 Scribe User Manual – page 10 Scribe User Manual – page 11 Subjects Click the ‘Add Group’ button to enter subject information in the ‘Subjects’ panel that appears as a blank window. To enter several similar subject groups, enter the first set of data, and then click on the group name. Next, click the 'Duplicate Group' button. Data entered for the first group will be copied into a new subject group window. Rename the duplicate subject group and change the data as appropriate. If coordinates reported are for individual subjects, as opposed to group mean data, enter each subject’s information as an individual group. Subjects: Subject Group Scribe User Manual – page 12 Name of Subject Group Provide a brief name for the subject group. Normal subjects groups should be referred to as “Healthy Controls”. In the case of subgroups used from a larger group population, please enter the subgroup in the following matter: “Subgroup of [Main Group], unique feature of the subgroup”, (e.g., Subgroup of Healthy Controls, Males Only). Provide Diagnosis Select from the list any medical or psychological conditions. ICD Code Most diseases are listed in the International Classification of Diseases (ICD). If the ICD number is not known (usually the case), then leave this blank. Provide Short Description Enter the ratio of male to female subjects (e.g. 4 women, 5 men). Also, enter the ratio of right-‐handed and left-‐handed subjects (e.g., 6 right-‐handed, 4 left-‐handed). Include inclusion or exclusion criteria, as well as any relevant subject-‐group specific information. Total Subjects Enter a number into the space provided. Only integers are allowed. Scribe User Manual – page 13 Gender Select the gender from the pull-‐down menu. If “Mixed” gender is selected, indicate the number of male and female subjects in the short description. Handedness Choose one option from the menu to describe the handedness of the subject group. Use the ‘Mixed’ option if the subjects had different handedness. Native Language Choose the native language or languages of the subjects, or add a new language to the list by choosing ‘Other’ and typing into the window that appears. Ages of Subjects Fill in ‘Min Age,’ ‘Max Age,’ and ‘Mean Age’, if reported. Only integers are allowed. Scribe User Manual – page 14 Conditions Enter only conditions used in the experiments, including the control conditions, e.g., Rest or Baseline. To change the order listed to better reflect the order used in the experiment, click the ‘Shift Up’ or ‘Shift Down’ button at the bottom of the window. Scribe User Manual – page 15 Conditions: Condition Properties Provide a Name for this Condition Use the same naming system as defined in the prose description. Again, try to keep the naming convention of the paper, but use your best judgment. Sometimes authors can be confusing and will invent a very long condition name for a simple task. If, in the interest of brevity, it is necessary to formulate your own condition names, then do so. All other sections have been grayed out. Scribe User Manual – page 16 Conditions: External Variable This menu is primarily intended for studies wherein an external variable was correlated with brain activity. If a correlation included an external variable, enter the variable here. After selecting the desired option from the menu, click the ‘Select’ button. The external variable is any measurement taken during the scan, e.g., eye movement, heart rate, accuracy, temperature, etc. In order to be listed here, the external variable must be specifically stated in the study. When there is no external variable, select “None”. Many studies record accuracy and response time. Do not forget to include these external variables. Provide Short Description: In most instances one of the following scenarios will pertain: 1. EV was measured, but not in fact used (i.e., often EEG measured to ensure activation is task-‐related). 2. EV was measured and used to drive analysis (i.e., correlating performance, response rate, etc. with an image). 3. EV was measured and used to clarify results (i.e., behavioral analysis used to clarify neuroimaging findings). Scribe User Manual – page 17 Conditions: Verify and Close Once all condition information has been entered, click on the ‘Verify and Close this dialog’ button. To discard the changes, select 'Cancel and Close'. Scribe User Manual – page 18 Sessions ‘Sessions’ refers to the period of time between the scanning/recording set-‐up and the release of a subject. Most studies occur during only one session. If a subject is set up, released and then set up again, the second set-‐up marks the beginning of a second session. Before-‐and-‐after-‐treatment studies and before-‐and-‐after-‐practice studies would involve multiple sessions. • For one-‐session studies, no entries are required on this panel. • For multiple sessions, check on ‘Multiple Sessions’ and click the ‘Add Session’ button. A message box will then appear prompting you to enter at least two sessions. • If your paper includes multiple sessions, be sure to include this design in the prose description. Sessions: Session Name Scribe User Manual – page 19 Give the session a brief name, for example “Before Treatment” or “After Therapy”. Description of this Session: Describe the session, including sufficient detail to distinguish this session from other sessions and to give a firm understanding of the study. Please use a complete sentence to describe the session. Scribe User Manual – page 20 Analysis Double click on the software package used and make sure it appears on the right-‐sided panel. Select the brain template, transform, reference, and MRI field strength from the drop-‐down menus. VBM Software Click on the drop-‐down menu provided and choose the software used to analyze VBM data. Brain Template Click on the drop-‐down menu provided and choose the brain template used to report the stereotactic coordinates. Transform If the aligned data was transformed to another coordinate space, record the transform used here. Reference Space Select the standard coordinate space used when recording the paper's coordinates. MRI Field Strength Click on the drop-‐down menu provided and choose the strength of the MRI magnet used to acquire data (in Tesla). Resolution (mm) Scribe User Manual – page 21 Provide the final voxel size/resolution in mm (e.g., 1x1x1). If this parameter is not provided in the paper, provide the Field of View (FOV) and the slice thickness in mm. Smoothing Kernel (mm) Provide the Gaussian smoothing kernel used in mm. If anything is unclear or information is missing, please enter it in the short description box. If MNI coordinates are reported in Talairach form and the transform is not specified in the text, please indicate this in the short description. All MNI coordinates will be automatically converted to Talairach space using the icbm2tal transform (Lancaster et al., 2007). All MNI coordinates converted to Talairach space via the Brett transform in the original publication will be subject to 2 transforms: (1) reverse-‐Brett to convert back to MNI space and (2) icbm2tal for correct transformation from MNI to Talairach space. Scribe User Manual – page 22 Experiments Enter experiments according to the names and order entered in the ‘Prose’ panel. To enter several similar experiments, enter the information for the first experiment and verify and close it. Then click on its name and click the 'Duplicate Experiment' button. The experiment data will be copied into a new experiment. Enter a new name for the new experiment, making changes to the existing data as needed. Shortcut: Many experiments are very similar within a paper, so it can save time if you enter in all the information for the first experiment EXCEPT for the coordinates. Then save the experiment, duplicate it, and edit the duplication(s) for the additional experiment(s). The final step is to go back and enter in the coordinates for all the experiments once they have been created. Scribe User Manual – page 23 Experiments: Context Provide a brief name for the experiment The names entered here must be the same as those used in the Prose Panel. Abbreviations are acceptable but the first use must be defined then the subsequent references can just be entered in the abbreviated form. Context selection and Drug Effects have been grayed out. Scribe User Manual – page 24 Experiments: Functional Imaging Select the functional modality from the pull-‐down menu. Please provide the magnet strength if available, along with any other imaging relevant information. Scribe User Manual – page 25 Experiments: Subjects This panel contains the list of groups entered on the previous ‘Subjects’ panel. Click on the group used for the experiment you are presently entering and then click ‘Select’. Scribe User Manual – page 26 Experiments: Conditions Check the box to indicate whether this experiment reports activations (increases) or deactivations (decreases) and whether a high-‐ or low-‐level of control was used to contrast with the activation condition. Only select ‘Low-‐Level Control’ for rest or fixation control conditions. Select Conditions This panel contains the names of the conditions you provided previously on the ‘Conditions’ panel. Choose the conditions included in this experiment. After selecting a condition from the menu, click the ‘Select’ button. Scribe User Manual – page 27 Experiments: Sessions Select Sessions This panel contains the names of the sessions previously provided on the ‘Sessions’ panel. If the paper included more than one session, choose the session used in this experiment. If not, ignore this panel. Scribe User Manual – page 28 Experiments: Contrast The purpose of the contrast panel is to identify the key aspect of the study. In a given experiment, the contrast field indicates how the conditions being compared in an experiment are different. Multiple selections can be made. To choose the source of contrast in the experiment, click on the box to the left of the description. Make as many choices as appropriate for each experiment. Use the blank window in the lower half of this panel to summarize and clarify the contrast of a given experiment. A description is required for each contrast selected. Stimulus Modality: Conditions vary in method of delivery (Example: Visual vs. Auditory; Galvanic Stimulation vs. No Stimulus). Stimulus Type: Types of stimulus per modality (Example: Pictures of Faces vs. Fixation Cross; Words vs. Numbers). Response Modality: Response varies in method (Example: Finger Response vs. No Response; Visual Response vs. Hand Response). Response Type: Types of responses per response modality (Example: Finger Tapping vs. No Response; Visual Tracking vs. Joystick Control). Instruction: Directions per condition differ. (Example: Press button only upon presentation of odd numbers vs. Press button only upon presentation of even numbers). Scribe User Manual – page 29 External Variable: Non-‐imaging variable correlated with brain activity, where this external variable is the means or purpose for cultivating the brain image (Example: Accuracy positively correlating with activation; Clinical Dementia Rating negatively correlating with activation). Experience-‐Dependent Change: Experimental results could have been affected by experience (Example: learning, order, priming, repetition, training). Group: Conditions of an experiment are identical, but were endured by two different subject groups (Example: PTSD Patients vs. Healthy Controls). Session: Conditions of an experiment were identical, and were endured by only one group, but during more than one session (Example: Post-‐Treatment Session vs. Baseline, PTSD Patients). Example 1: For the Contrast field, you have the opportunity to indicate which aspects of the conditions differed in a specific experiment. For instance, an experiment might involve the following: Condition 1: the subject focused on a fixation point while a checkerboard wedge stimulated one part of the visual field. There was no response. Condition 2: the subject focused on a fixation point while a checkerboard wedge stimulated a more peripheral part of the visual field. There was no response. You notice that both are described as Stimulus Modality: Visual; Response Modality: None; Response Type: None; Instruction: Attend. The point of interest of this experiment is the different areas stimulated by the checkerboard. In this experiment, the choice of contrast selected would be Stimulus Type because it was the stimulus that differed between conditions. All other fields would remain unchecked. Example 2: If the experiment involved Condition 1: subject viewed nouns on a screen and was asked to generate verbs aloud which pertain to the nouns on the screen, and Condition 2: subject viewed nouns on a screen and was asked to read the words aloud, the only difference here is in the instructions. For both conditions, the stimulus is visual words, and the response is speech. In this case, the instructions for Condition 1 would be ‘Generate’ and the instructions for Condition 2 would be ‘Read'. It is implied that during Condition 1 the subject had to read the nouns first in order to generate verbs. Therefore, the contrast between the conditions is only in 'Instructions'. All other fields would remain unchecked. Example 3: If the experiment involved Condition 1: subject listened to nouns presented aurally one at a time with instructions to generate verbs which pertain to the nouns, and Condition 2: subject listened to nouns presented one at a time and was instructed to generate words that rhyme with the nouns, then in this case, all three fields (stimulus, response, instructions) would be entered identically for the two conditions. However, the generation performed in each condition was indeed different. Therefore, enter again the contrast as 'Instructions'. All other fields would remain unchecked. Example 4: Group Contrast: If the conditions of an experiment are identical, but were endured by two different groups, this would be considered a Group contrast. In this case, click the box to the left of ‘Group’ and all other boxes would remain unchecked. Example 5: Session Contrast: If all of the conditions of an experiment were identical, and were endured by only one group, but during more than one session, this would be considered a Session contrast. Select the ‘Session’ box and all other boxes would remain unchecked. Example 6: External Variable Contrast: If an experiment included an external variable with which to conduct a correlation with brain activity, and this was the means for cultivating brain images, choose the Scribe User Manual – page 30 box for ‘External Variable’. This contrast type must be selected for all experiments that investigated the accuracy of the responses. Example 7: Experience-‐Dependent Change: If the experimental results could have been affected by experience, for example, learning, order, priming, repetition, or training, select the box for 'Experience-‐ Dependent Change'. Scribe User Manual – page 31 Experiments: Paradigm Class Paradigm Class Paradigm Class refers to those experimental paradigms that have been used repeatedly by different researchers. Some have become widely known and accepted by brain imagers and have acquired informal (or formal) names. This list is not intended to include a fitting description of every experimental paradigm imaginable, but evolves with the field. Select only the Paradigm Class that fits the Activation condition. For example, if the Activation condition is the Stroop task, and the Control condition is Fixation, then for Activation – Control, select Stroop only, not Stroop AND Fixation. Experiments: Behavioral Domain Scribe User Manual – page 32 Behavioral Domain is no longer required for entry. Section should appear grayed out. Experiments: Locations Scribe User Manual – page 33 Check if entering individual subject’s data Check this box if the coordinates entered are for individual subjects, as opposed to group means. Hemisphere Adhere to the standard that left is negative. Inspect your table carefully to be sure that all coordinates listed from the left hemisphere have x-‐values that are negative and those from the right hemisphere are positive. If not, switch the signs of your x-‐values before entering them into the table. X mm, Y mm, Z mm Enter the x-‐, y-‐, and z-‐values as printed in the table (with the exception as noted above). SPI Value Enter the SPI value (statistic) reported in the paper, for example: ‘z’, ‘t’, or ‘r’. The z-‐score or t-‐statistic can be the mean or the maximum value for the cluster. SPI Unit Indicate the variable (z, t, r) entered in the ‘SPI Value’ column. Do not enter voxel-‐wise P values in the SPI columns. Scribe User Manual – page 34 Extent (mm3) Report the extent (also referred to as volume or size) of the activation recorded in cubic millimeters. This number usually ranges from the low hundreds to 1000 or 2000. Do not record the number of voxels (not in units of mm3). • 1 ml = 1 cc = 1 cm3 = 1000 mm3 • 1 µl = 1 mm3 For other conversions, please see: http://www.onlineconversion.com/volume.htm. Scribe User Manual – page 35 Results Synopsis To enter the results synopsis of a paper, copy the published abstract from Medline or PubMed. Delete the first sentences that deal with the introduction, methods, and design of the study and leave only the sentences concerning the results and conclusions. DO NOT edit the synopsis to include your own interpretation of the study. Only change verbiage to reflect a third person past tense view. Scribe User Manual – page 36 Feedback Please use this window to record any questions or comments you may have on the paper. Also, if you feel like the BrainMap Coding scheme did not allow for your paper to be easily coded, please check the box and explain your reasoning in the comment box. The comments in the feedback section will not be reflected in the database and will only be viewed internally by the BrainMap team. Document whether conditions or experiments were excluded due to not being used in analysis or not being whole-‐brain. Also indicate if the paper contains a functional/structural study that needs to be coded separately. Scribe User Manual – page 37 BrainMap Coding Scheme Changes Upon opening a saved ent file, a dialog may appear displaying the most recent changes to the BrainMap Coding scheme. Each line will begin with whether or not the following attribute was added or removed from the Coding Scheme Save VBM BrainMap Database Submission After all information has been entered, save the BrainMap database submission by clicking on the top left program menu: 'File' à 'Save As'. This saves the information in a .vbm file. Enter the file name in the following format: "Author_Journal_Year". Journal names should be abbreviated and years listed as the last two digits of the published year, for example, "Lee_HBM_02.vbm”. Upon completion, email your .vbm file and a .pdf of the original article to [email protected] for review and insertion into the database. It is recommended that 1-‐2 articles be sent first for review to receive feedback, rather than sending many ineligible or miscoded files at the same time. Scribe User Manual – page 38 Troubleshooting “Scribe says that I’m missing an essential file.” This can indicate one of two things. First, the BrainMap web server may be down for maintenance. In this case, try restarting Scribe in an hour or so. Alternatively, there may be a firewall blocking communication to the BrainMap web server. If a successful connection to BrainMap has been made previously, then please contact BrainMap technical support to check the web server. If you are behind a restrictive firewall and have a known proxy server, Scribe can use it to access our BrainMap web server. Under File:Options, there is a menu item called “Proxy Settings”. You will need to know the IP and valid port of the proxy server.