1
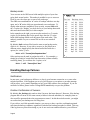
CottageDATA Inc. Information Technology Consulting 3-644 Portland St., Suite 250 Dartmouth, NS B2W 6C4 [email protected] 902-835-4994 Off-site Backup Solution (OBS) for Linux User Manual IMPORTANT: Although you don’t need to be a guru to restore files or customize your OBS configuration, you do need to be familiar with Linux directory structures and entering commands at the shell prompt. If you are not comfortable with this, please seek assistance from a qualified professional since errors in restoring data can have serious consequences. Given the technical nature of system backups, this user manual is aimed at a trained and technical audience. Your OBS software When your system is initially set up, CottageDATA installs the following utilities and configuration file in /home/bin on your Linux system: obs_backup: The program which uploads your data to the OBS server. fetch: A simple utility to restore files when needed or to list files you currently have stored on the off-site backup server. Note that a link named fetch is also created as a synonym for this program. obs.conf: A configuration file used by the above programs to specify settings customized for your site (such as which directories to back up, where to send error logs, etc.). OBS For Linux – User Manual ©2014 Page 1 The obs_backup program is customized to back up only the relevant directory structures on your system such as your correspondence and database data, and avoids wasting valuable resources backing up programs and system files which never change and could be restored from their respective distribution media if needed. As part of your initial installation, we have configured your system to invoke obs_backup automatically at night with all appropriate command options. You should never have to run this program manually. The fetch program is your tool to restore files to your system. You can use this utility to restore a single file or a set of files matching a “wild-card” pattern (like “/home/sales/Feb*”). The next sections cover both of these utilities in detail. Our Backup Technology OBS maintains a mirror image of the directory structures you have specified in your configuration file on the remote server. There is no concept of “full backup” versus “incremental backup” in OBS because every backup updates this mirror image to be a true reflection of your system, including removing files which you have deleted on your system, without having to actually copy all the files or guessing which files should get updated based on the date of your last backup. To accomplish this, we use a combination of utilities such as rsync and ssh, and we compress the data before it is uploaded in order to maximize efficiency. Doing a Backup Manual backup Simply invoking the command obs_backup as the superuser (“root”) will trigger a system backup. Normally, however, this is done automatically through a crontab entry (“crontab” is the Linux task scheduler). This will have been set up by CottageDATA when the software was initially installed, so you should never need to manually do a backup except for testing or maintenance purposes. Scheduling backups The following crontab entry will invoke obs_backup at 3 AM every day and will redirect any output to a file in /home/save for reference purposes: 0 3 * * * /home/bin/obs_backup > /home/save/obs.cron 2>&1 NOTE: If your OBS software was installed by CottageDATA when you subscribed to the service, a suitable crontab entry has already been created for you, so there is no further action required on your part. Page 2 Checking logs The obs_backup program maintains logs on the Linux system in the directory specified in the configuration file obs.conf (typically, this directory will be /home/save/backups). The file Day.log (ex: Thu.log for Thursday’s log) contains a summary of the backup process and is the file printed by the obs_backup program when configured to generate a status print-out. Customizing your backups It is possible for qualified system administrators to customize the backup process by editing the configuration file obs.conf located in the same directory as obs_backup (typically in /home/bin). For instance, by setting the variable PRINT_ON_SUCCESS to either “yes” or “no”, you can get the program to print a confirmation report each time it is run, or upon failure only, respectively. Another variable you might want to modify is DIR_LIST, which specifies the directory structures to back up. NOTE: Keep in mind that only user-created files, such as documents, database data and email correspondence need to be backed up regularly. It is wasteful to back up programs and static files which never change or can be restored from distribution media. Backing up unwarranted directory structures may cause you to require a higher disk quota than you really need. The file obs.conf also contains parameters to specify certain directory structures to be excluded from the backup. For example, you could specify that you want to back up the entire /home structure except for /home/tmp and /home/junk. If you would like to receive an email message upon a backup failure, simply edit the variable EMAIL to the desired address. Of course, this will only work if your server is configured as an email server, which is something CottageDATA can set up for you upon request. Note that by default, backup failures will generate a hard-copy report on your system printer to notify the staff to report the problem. The file obs.conf features other parameters you can tweak if desired; please read the ample comments in that file if you wish to learn more. Restoring files with fetch Restoring one file To restore files, simply login as root (the system administrator) on your Linux system, then enter the command fetch with the full pathname of the file you wish to restore. For example, to restore the file /home/mary/stuff, enter: fetch /home/mary/stuff Page 3 The program will then present you with the following prompts: Preparing to restore file /home/mary/stuff Where would you like to restore to? 1) 2) 3) Q) Original location In /tmp Current directory (/root) Quit and do nothing Your choice: __ If you select “Original location”, the restored files will replace the existing file of the same name, overwriting its contents. If you would like to examine the restored file before overwriting the existing one with it, it is best to restore that file to a separate location, such as /tmp or your current directory. Important: Files are always restored with full pathnames under the location you selected. For example, if you are restoring the file /home/mary/stuff to /tmp, the software will create the file as /tmp/home/mary/stuff, not /tmp/stuff. Restoring multiple files If you wish to restore a group of files, such as the entire contents of a directory, simply use the “*” wild-card character (always in quotes) as in this example: fetch “/apps/data/*” In this example, everything below the directory /apps/data, including all subdirectories and their contents, will be restored. Important: Whenever you use wild-card expressions, you must quote the expression as we have done in the above example to protect it against interpretation by the shell (either single or double quotes will do). If you don’t quote the expression, you will either get an error message from fetch or get the wrong results, depending on how the shell matches the wild-card expression on your system. Also note that fetch accepts only one parameter, so you cannot specify multiple files in a single invocation. For example, the following command is not supported: fetch /home/john/memo /apps/data/myfile (Won’t work!) Page 4 If you need to restore two or more files that cannot be matched with a single wild-card expression, just issue the command twice, as in this example: fetch /home/john/memo fetch /apps/data/myfile Options to the fetch command The fetch command supports the following options: l d s Obtain a list of files Display dates of backups series on the server Specify which series to retrieve from (default is latest) These options are described in detail below. Obtaining a listing of files You can use fetch with the -l option to obtain a listing of the files contained on the backup server, without actually restoring them. For instance, to see a list of all files from /home/bin on the backup server, issue this command: fetch -l “/home/bin/*” Again, when using wild-card characters, you must quote the expression or you may not get accurate results. To view all the files ending with “.log” that have been backed up from /home/save, use: fetch -l “/home/save/*.log” Page 5 Backup series Your account on the OBS server holds multiple copies of your data going back several weeks. This makes it possible for you to restore a file as it was a few days ago or even a few weeks ago. The OBS server maintains an “a” series of backups which are one day apart, and a “b” series which are approximately one week apart. To display what series are available in your account, execute fetch with the - d option (for “display”) to show the list of your backup dates with their associated series label, as in this example: In the example on the right, you can see that series a0 to a7 contain copies of your backup data for the past 8 days, then the “b” series holds older backups which are 8 days apart from each-other. This makes it possible for you to restore files as old as two months if needed. By default, fetch retrieves files from the most recent backup series, which is a0. However, if you wish to restore (or list) files from a different series, simply specify the desired series label with the -s option (for “series”), as in: fetch -s b3 “/home/john/important.doc” Other options may be used in conjunction with -s. For example, to simply get a listing of certain files from that series (without actually extracting them), you could use the -l option, as in: # fetch -d Series -----a0: a1: a2: a3: a4: a5: a6: a7: b0: b1: b2: b3: b4: b5: b6: b7: Backup date -----------Jul 04, 2014 Jul 03, 2014 Jul 02, 2014 Jul 01, 2014 Jun 30, 2014 Jun 29, 2014 Jun 28, 2014 Jun 27, 2014 Jun 26, 2014 Jun 18, 2014 Jun 10, 2014 Jun 02, 2014 May 25, 2014 May 17, 2014 May 09, 2014 Apr 29, 2014 # _ fetch -l -s b3 “/home/john/*.doc” Handling Backup Failures Notifications In rare cases, your backup may fail due to a drop in your Internet connection or to some other technical problem. If this happens, an error log will be sent to your printer or an alert message will be sent to you by email, depending on how your OBS software was configured. If you are notified of a failure, please contact CottageDATA immediately to report the problem. Positive Confirmation of Success By default, obs_backup only sends an alert if an error has been detected. However, if the backup program did not run at all for some reason (a failure in the task scheduler, for example), then no alert would be generated since the program never started. In this theoretical scenario, you might not realize that your backups are not being done. If you wish to avoid this potential situation, you can opt to have a positive confirmation printed each time the backup completes, regardless of whether the backup succeeded or failed. This way, if the log does not print one morning or you do not receive an email notification, you will know Page 6 that something has gone wrong and you can notify CottageDATA immediately to have the matter investigated. To have a notification generated every time obs_backup runs, regardless of success or failure, simply edit the file obs.conf to set the variable PRINT_ON_SUCCESS to “yes” or contact CottageDATA to have this done for you. If you need help... If you need to restore files or perform maintenance on your OBS account but are not comfortable enough with Linux to do the job yourself, you would be wise to hire competent help rather than risk damaging your system. If you need help in managing your system, please consider getting expert assistance from CottageDATA. Please remember, however, that your OBS subscription fees cover only the automated use of the service through the programs provided to you as part of your OBS subscription, and not additional technical services which would have to be charged separately. Page 7