1
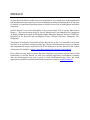
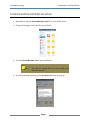
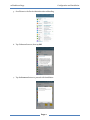
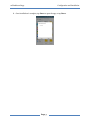
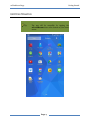
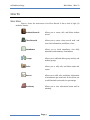
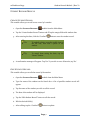
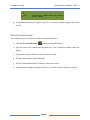
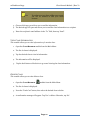
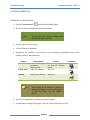
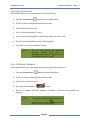
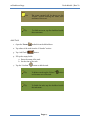
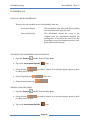
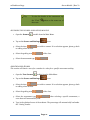
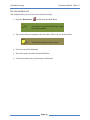
PREFACE m-Class Record stands for mobile class record application. It is a stand-alone mobile application that automates the manual process of class information recording and management. It only runs to Android, a Linux-based operating system for mobile devices such as Smartphones and tablet computers. m-Class Record is one of the deliverables of the research titled “ICT in Teacher Education in Region 7”. The research authored by Dr. Dave E. Marcial and it was funded by the Commission on Higher Education through the Philippine Higher Education Research Network (PHERNet), facilitated by the Research and Development Center, Silliman University, Dumaguete City, Philippines. This manual is designed to help make m-Class Record easy to use. It is intended for new users with little or no experience using any mobile app. The goal of this document is to give a complete and comprehensive step-by-step instruction of the functions of m-Class Record. A PDF version of this manual is available at http://www.davemarcial.net/phernet-ict4ted.html. Every effort has been made to ensure that this document is an accurate representation of the functionality of m-Class Record. As with every software application, development continues after the documentation has gone to press so small inconsistencies may occur. We would appreciate any feedback on this manual. Send comments via email to [email protected]. mClassRecord App Configuration and Installation CONFIGURATION AND INSTALLATION 1. Download or copy the MCLASSRECORD.APK file to your mobile device 2. Using a file manager. locate the file on your device 3. Tap the MCLASSRECORD.APK to start installation. Note You may be warned that you can’t install from unknown sources. 4. If warning message appears, tap the SETTINGS button in the pop-up. Page 1 mClassRecord App Configuration and Installation 5. Scroll down to the Device Administration subheading. 6. Tap Unknown Sources, then tap OK 7. Tap the INSTALL button to proceed with installation. Page 2 mClassRecord App Configuration and Installation 8. Once installation is complete, tap OPEN to open the app, or tap DONE. Page 3 mClassRecord App Getting Started GETTING STARTED Tip The app will be accessible by tapping the MCLASSRECORD icon at the bottom of your home screen. Page 4 mClassRecord App Main Menu | How To HOW TO MAIN MENU Figure 1 shows the main menu of m-Class Record. It has a total of eight (8) modules, namely, Student Records Allows you to create, edit, and delete student record Class Records Allows you to create a class record, send and view class information, and delete a class. Attendance Allows you to check attendance, view daily attendance and summary of attendance Groups Allows you to add and delete group activity and student groups. Tasks Allows you to add, edit, and delete tasks and events. Scores Allows you to add, edit, and delete information of assessments per term basis. It also allows you to add obtained scores and view percentage. Dictionary Allows you to view educational terms and its meaning. Page 5 mClassRecord App Main Menu | How To HOW TO OPEN A MODULE Press the assigned icon of the module you wish to open. Page 6 mClassRecord App Student Records Module | How To STUDENT RECORDS MODULE CREATE STUDENT RECORD This module allows you to add a new record of a student. 1. Open the STUDENT RECORDS module from the Main Menu. 2. Tap the “Create Student Record” button and fill up the empty fields with student data. 3. After entering the data, click the “Confirm” button to save the student record. Tip To upload a photo, press the profile icon on the left side, then take a photo of the student. Tip To cancel from saving the data, tap the “Cancel” button. 4. A confirmation message will appear. Tap ‘Yes’ if you wish to save. Otherwise, tap ‘No’. EDIT STUDENT RECORD This module allows you to edit the record of the student. 1. Open the STUDENT RECORDS module from the Main Menu. 2. Type the name of the student on the Search box. A list of possible student record will appear. 3. Tap the name of the student you wish to edit its record. 4. The data of the student will be displayed. 5. Tap the “Edit Student Record” button to edit the record. 6. Edit the desired field(s). 7. After editing, tap the “Confirm” button to update. Page 7 mClassRecord App Student Records Module | How To Tip To cancel from updating the record, tap the “Cancel” button. 8. A confirmation message will appear. Tap ‘Yes’ if you wish to update changes. Otherwise, tap ‘No’. DELETE STUDENT RECORD This module allows you to delete or erase a record of the student. 1. Open the STUDENT RECORDS module from the Main Menu. 2. Type the name of the student on the Search box. A list of possible student record will appear. 3. Tap the name of the student you wish to delete its record. 4. The data of the student will be displayed. 5. Tap the “Delete Student Record” button to delete the record. 6. A confirmation message will appear. Tap ‘Yes’ if you wish to delete. Otherwise, tap ‘No’. Page 8 mClassRecord App Class Records Module | How To CLASS RECORDS MODULE CREATE CLASS RECORD This module allows you to create a class with information and list of students enrolled. 1. Open the CLASS RECORDS Note module from the Main Menu. Upon its initial run, a message will appear to inform you that there are no class records available. Create a class to proceed. 2. Tap “Create Class Record” button. A Class Record screen will appear. 3. Fill up the empty fields: Class Name Section Room Type Time Day Description Choose Students 4. Tap the “Confirm” This is the name of the course you are handling. The section of the course you are handling. The room of the course assigned to. The type of course you are handling. Choices are: Lecture, Laboratory , or Lec-Lab (a combination of Lecture and Laboratory) Assigned time of the course. There are two fields for time: Start and End Time Assigned days of the course. A description of the course. When you tap its field, it allows you to choose the students who are enrolled in the course. button found at the upper right corner to save. SEND CLASS INFORMATION TO EMAIL This module allows you to send a copy of the Class Information through email. 1. Open the CLASS RECORDS module from the Main Menu. 2. Tap “Send Class Info to Email” button. Page 9 mClassRecord App Class Records Module | How To Note If you have not yet done adding an account, you will be assisted to add your email account. 3. Choose which app you wish to use to send the information 4. The desired app will open and allows you to send the class information to a recipient. 5. Enter the recipient’s email address in the “To” field, then tap “Send”. VIEW CLASS INFORMATION This module allows you to view information of a certain class. 1. Open the CLASS RECORDS module from the Main Menu. 2. The list of classes is displayed. 3. Tap the desired class to view its information. 4. The information will be displayed. 5. Tap the back button of the device to go cancel viewing the class information. DELETE CLASS This module allows you to view delete a class. 1. Open the CLASS RECORDS module from the Main Menu. 2. The list of classes is displayed. 3. Press the “Trash Can” button, then select the desired class to delete. 4. A confirmation message will appear. Tap ‘Yes’ to delete. Otherwise, tap ‘No’. Page 10 mClassRecord App Attendance Module | How To ATTENDANCE MODULE CHECKING OF ATTENDANCE 1. Open the ATTENDANCE module from the Main Menu. 2. The list of classes is displayed in horizontal format. Tip To view more class, swipe your finger on the list from the right to the left. 3. Tap the class you wish to open. 4. A list of students is displayed. 5. Tapping on the “Student” icon will allow you to change the attendance status of the student. Status of the student are: Status Present Tardy/Late Description Indicates the present attendance Default status Indicates tardiness Action Tap three (3) times to set back to “Present status” Tap once. Absent Indicates the absence Tap twice. Note Indicator If the status of the student is “Absent”, a message will appear on screen, allowing you to enter the reason why the student is absent. 6. Tap the “Save Attendance” button to save the changes. 7. A confirmation message will appear. Tap ‘Yes’ to save. Otherwise, tap ‘No’. Page 11 mClassRecord App Attendance Module | How To VIEW DAILY ATTENDANCE This module allows you to view attendance record of the class. 1. Open the ATTENDANCE module from the Main Menu. 2. The list of classes is displayed in horizontal format. 3. Tap the class you wish to open. 4. Tap “View Daily Attendance” button. 5. A list of dates will be displayed. Tap the desired date you wish to view. 6. The list of students with their status will be displayed. 7. To go back, tap “Check Attendance” button Tip You can view directly the attendance summary without going back to ATTENDANCE module, by tapping on the “Attendance Summary” button. VIEW ATTENDANCE SUMMARY This module allows you to view attendance summary of records of the class. 1. Open the ATTENDANCE module from the Main Menu. 2. The list of classes is displayed in horizontal format. 3. Tap the class you wish to open. 4. Tap “Attendance Summary” button. 5. The list of students with their summary of number of absences and tardiness are displayed. Tip To open the student attendance details of a student, tap the “View” button on the same row of the student record. Page 12 mClassRecord App Attendance Module | How To 6. After viewing, tap ‘Ok’. 7. To go back, tap “Check Attendance” button Tip You can view directly the daily attendance of the class without going back to VIEW DAILY ATTENDANCE module, by tapping on the “View Daily Attendance” Page 13 button. mClassRecord App Groups Module | How To GROUPS MODULE PARTS OF THE GROUPS MODULE There are three sections, these are: Class This section contains the list of classes available. Activity List This section contains the list of activities created in the class selected. Activity Details This section contains the details of the activities selected. It shows the description, classes involved, and the groups created. ADD GROUP ACTIVITY This module allows you to create an activity in a class. It can contain groups per activity. 1. Open the GROUPS module from the Main Menu. 2. Tap a class found on the “Class” section. 3. Tap “Add Group Activity” button. 4. Fill in the empty fields. 5. Tap the “Confirm” button to create activity. DELETE GROUP ACTIVITY This module allows you to delete an activity in a class. 1. Open the GROUPS module from the Main Menu. 2. Tap a class found on the “Class” section. 3. Tap “Delete Group Activity” button 4. Select the activity to delete from the list. 5. Tap the “Confirm” button to delete the activity. Page 14 mClassRecord App Groups Module | How To ADD GROUP This module allows you to create group(s) of student per activity of the class. 1. Open the GROUPS module from the Main Menu. 2. Tap a class found on the “Class” section. 3. Tap an activity found on the “Activity List” section. 4. Tap “Create Group” button 5. Fill in the empty fields. Set the group name. Add the student members by clicking the checkbox beside the student’s name. 6. Tap the “Confirm” button to create the group. DISBAND GROUP This module allows you to remove/disband group(s) of student in an activity of the class. 1. Open the GROUPS module from the Main Menu. 2. Tap a class found on the “Class” section. 3. Tap an activity found on the “Activity List” section. 4. Tap “Disband Group” button 5. Select the group to delete from the list. 6. Tap the “Confirm” button to remove the group. Page 15 mClassRecord App Tasks Module | How To TASKS MODULE PARTS OF THE TASKS MODULE There are four sections, these are: Events This section displays the list of events in a class. Tasks This section displays the list of tasks to be done. Class Activities This section contains the list of classes available. Calendar This section displays the calendar. ADD EVENT 1. Open the TASKS module from the Main Menu. 2. Tap a date of the event from the “Calendar” section. 3. Tap “Add Event” button. 4. Fill up the empty fields: a. Enter the event title on the “Event Title” field. b. Enter the venue of the event on the “Venue” field. c. Enter the description of the event on the “Description” field. d. Set the time of the event. 5. Tap the “Confirm” button to add the event. Tip To view event details, tap the “View” button on the same row of the event. Tip To delete event, tap the “Delete” on the same row of the event. Page 16 button mClassRecord App Tasks Module | How To Note The event created will be shown on the “Events” section showing the name, date and time of the event. Tip To finish an event, tap the checkbox beside the event name. ADD TASK 1. Open the TASKS module from the Main Menu. 2. Tap a date of the task from the “Calendar” section. 3. Tap “Add Task” button. 4. Fill up the empty fields: a. Enter the name of the task. b. Set the time of the task. 7. Tap the “Confirm” button to add the task. Tip To delete a task, tap the “Delete” on the same row of the task. Tip To finish the task, tap the checkbox beside the task name. Page 17 button mClassRecord App Scores Module | How To SCORES MODULE PARTS OF THE SCORES MODULE There are two sub-modules in the Scores Module, these are: Assessment Details This sub-module adds, edits, and deletes grading term and assessment types per class. Scores and Ratings This sub-module obtains the scores of the students from the assessments specified per grading term. It also allows the user to view the percentage scores of the students per term, class, grade criteria and exam type. ACCESSING THE ASSESSMENT DETAILS MODULE 1. Open the SCORES module from the Main Menu. 2. Tap on the Assessment Details 3. Select the class to adding a class section. icon. you wish to connect. If no selection appears, please go back 4. Select the grading term of the class. 5. Select the assessment type . ADDING A GRADING TERM 1. Open the SCORES module from the Main Menu. 2. Select the class to adding a class section. you wish to connect. If no selection appears, please go back 3. Tap on the Assessment Details icon. Page 18 mClassRecord App Scores Module | How To 4. To add a grading term, tap on the add icon. 5. Enter necessary term information and tap to confirm or Tip You can add, edit, delete a grading term by tapping on the spinner . The app is set to “Add term” by default. Tip You can add additional grading term by doing again step 3 and 4. to cancel. ADDING AN ASSESSMENT TYPE 1. Open the SCORES module from the Main Menu. 2. Tap on the Assessment Details 3. Select the class to adding a class section. icon. you wish to connect. If no selection appears, please go back 4. To add the assessment type, tap on the icon. 5. Enter necessary assessment information and tap by to confirm or Tip You can add, edit, delete a assessment types tapping on the spinner to “Add Category” by default. . The app is set Tip You can add additional scoring category by doing again step 3 and 4. Page 19 to cancel. mClassRecord App Scores Module | How To DELETE AN ASSESSMENT This module allows you to delete an assessment type information. 1. Open the TEST SCORES module from the Main Menu. 2. Tap on the Assessment Details 3. Select the class icon. you wish to connect. 4. Select the grading term of the class. 5. On the “Class Works” section, tap the “Delete” to be deleted. button on the row of the assessment 6. A confirmation message will appear. Tap ‘Yes’ to delete. Otherwise, tap ‘No’. EDIT AN ASSESSMENT This module allows you to edit an assessment type information. 1. Open the TEST SCORES module from the Main Menu. 2. Tap on the Assessment Details 3. Select the class 4. Select the grading term icon. you wish to connect. of the class. 5. On the “Class Works” section, tap the “Edit” be deleted. button on the row of the assessment to 6. A confirmation message will appear. Tap ‘Yes’ to delete. Otherwise, tap ‘No’. Page 20 mClassRecord App Scores Module | How To Tip To view the details of the assessment, tap the “View” the event. button on the same row of ACCESSING THE SCORES AND RATINGS MODULE 1. Open the SCORES module from the Main Menu. 2. Tap on the Scores and Ratings 3. Select the class to adding a class section. icon. you wish to connect. If no selection appears, please go back 4. Select the grading term of the class. 5. Select the assessment type . ADD OBTAINED SCORES This section will obtain a score for a student in a class for a specific assessment activity. 1. Open the TEST SCORES module from the Main Menu. 2. Tap on the Scores and Ratings 3. Select the class to adding a class section. icon. you wish to connect. If no selection appears, please go back 4. Select the grading term of the class. 5. Select the assessment type score sheet will automatically load. . After selecting a specific assessment, a 6. Type in the obtained scores of the students. The percentage will automatically load under the “ Rating” header . Page 21 mClassRecord App Scores Module | How To Note No score sheet will be shown if an assessment has not been created. Page 22 mClassRecord App Dictionary Module | How To DICTIONARY MODULE This module allows you to browse terms and its meaning. 1. Open the DICTIONARY Tip module from the Main Menu. On its initial run, press the dictionary image to load the contents. 2. Tap a letter which corresponds to the first letter of the word you wish to search. Note Not all letters contain words or terms. 3. A list of terms will be displayed. 4. Tap on the term you wish to show its definition. 5. To choose another term, perform step 2 and beyond. Page 23 mClassRecord App Glossary of Terms and Acronyms GLOSSARY OF TERMS AND ACRONYMS PBT.........................................Performance-Based Test Press .......................................The action performed on the device to execute a command. To perform, touch surface for extended period of time. Tap .........................................The action performed on the device to execute a command. To perform, briefly touch surface with fingertip. Page 24 mClassRecord App FAQ FAQ 1) Where can I download the mMobileClassRecord app? Currently the release of the application is only available via file transfer. Proper requirements for the upload and will be available soon in google playstore after all the formal requirements have been met. 2) What is the maximum class I can create per semester? The mClassRecord can accept at most 10 classes per semester. 3) What is the maximum number of students I can add to the class? The mClassRecord can accommodate up to 80 students per class. 4) If I happen to forget record of the class attendance in a particular day, can I still record the attendance on a later date? Yes, just change the date and time setting of your device to the date matching the attendance you wish to check, this will tell the application that you wish to record attendance for that day. Since the application will base attendance checking on device system date and time, please do make sure that the current date and time is set back to the actual date and time after doing so. 5) How can I make a back-up of the class I created ? Backup of your class record in .csv format will be sent to your email address if the send email button is tapped. 6) Can I copy the database in the mClassRecord app and transfer it to my computer? No. 7) How do I uninstall the app? Uninstalling the app follows the standard Android uninstall process. Page 25 mClassRecord App Index INDEX Attendance, 11 Checking, 11 View Attendance Summary, 12 View Daily Attendance, 12 Class Records, 9 Create, 9 Delete, 10 Send Class Information to Email, 9 View, 10 Configuration, 1 Dictionary, 23 Event Add Event, 16 Delete Event, 16 Finish Event, 17 View Event, 16, 21 Groups, 14 Add Group, 15 Add Group Activity, 14 Delete Group Activity, 14 Disband Group, 15 Parts of the Groups Module, 14 Installation, 1 Main Menu, 5, 6 Student Records Create, 7 Delete, 8 Edit, 7 Tasks, 16 Add Event, 16 Add Task, 17 Delete Event, 16 Delete Task, 17 Finish Event, 17 Finish Task, 17 Parts of the Tasks Module, 16 View Event, 16 Test Scores, 18 Add Obtained Scores, 21 Add Written Exam, 18, 21 Delete Written Exam, 20 Parts of the Groups Module, 18 Page 26