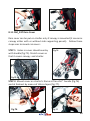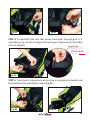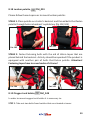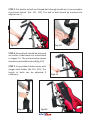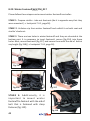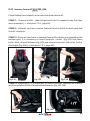
1
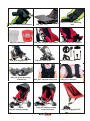
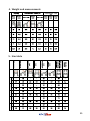
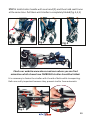
REHABILITATION STROLLER
OMBRELO
™
USER MANUAL AND MAINTENANCE GUIDELINES
R
CAUTION! Manufacturer takes responsibility for proper
usage of the device only when the product was purchased
from qualified Akces-Med employee or at specialized
medical store.
!
Medical product first class according to the Regulation 93/42/EWG
of European Parliament and Council regarding medical products.
For this product the producer issued relevant declaration of conformity.
Producer's identification number in the Registration Department of Healing Products,
Medical Products and Biocide Products:
PL/CA01 04088/W
QUALITY
MANAGEMENT
SYSTEM
13485
Akces-Med Sp. z o.o. Company introduced quality management system
ISO 13485 regarding production, sales and service.
The system is certified by Det Norske Veritas..
R
CONTENT:
1. The purpose of instruction manual................................................................6
2.Guidelines for using Ombrelo stroller............................................6
3. General characteristics of Ombrelo stroller..................................................7
3.1. Standard equipment..............................................................7
3.2. Additional equipment...................................................9
4.Weight and measurements of Ombrelo stroller...........................................11
5.Size table.........................................................................................10
6.Detailed description of assembly..................................................12
7. Detailed description how to operate Ombrelo stroller.................................12
7.1 How to fold stroller.............................................................................12
7.2 How to unfold stroller ........................................................................14
7.3 Brake..................................................................................................15
7.4 Foot rest ..........................................................................................16
7.5 Headrest.............................................................................................20
7.6 Headrest.............................................................................................21
7.7 Seat....................................................................................................21
7.8 H-shaped padded belts .....................................................................22
7.9 Upholstery..........................................................................................24
8. Assembly of elements from additional equipment...............................25
8.1 OM_002 Sunshade..........................................................................25
8.2 OM_038 Basket under seat..............................................................26
8.3 OM_006 Lady bag ............................................................................26
8.4 OM_045 DeLux bag..........................................................................27
8.5 OM_069 Men bag............................................................................27
8.6 OM_026 Trunk belt..........................................................................28
8.7 OM_028 Abduction block...............................................................28
8.8 OM_005 Canopy without side supporting panels .......................29
R
3
8.9 OM_020 Canopy with side supporting panels..............................30
8.10 OM_011 Cup holder........................................................................32
8.11 OM_037 Rain Cover........................................................................33
8.12 OM_013 Trunk stabilizing belt.........................................................34
8.13 OM_021 Headrest .........................................................................36
8.14 OM_015 Calf belt............................................................................36
8.15 OM_039 Saddle bags.......................................................................36
8.16 OM_003 Tray...................................................................................37
8.17 OM_012 Elastico cushion seat/backrest..........................................38
8.18 OM_024 Loins support....................................................................39
8.19 OM_048 Oxygen tank holder...........................................................39
8.20 OM_017 Winter footmuff................................................................42
8.21 OM_016 Summer footmuff.............................................................45
8.22 OM_035 Side seat supports............................................................48
9. How to use Ombrelo stroller........................................................................49
9.1. The preparation of the patient.......................................................49
9.2. Instructions......................................................................................50
10. Safety rules .............................................................................................51
11.Maintenance and cleaning........................................................................54
4
R
INTRODUCTION
Ombrelo rehabilitation stroller is designed for daily rehabilitation for
people who have locomotor deficits. Its solid design perfectly stabilizes as well
as secures while using the product. A vast array of adjustments makes it
possible to adjust equipment to the patient, and, moreover it has a beneficial
impact on patient's comfort. Furthermore, transportation of stroller is possible
thanks to folded design.
Remember to read this user manual carefully. You will find not only
useful information but also guidelines regarding safe and effective use of the
product.
If you have any questions or remarks, do not hesitate to contact our medical
consultant (ph. 508 382 509) or directly AKCES-MED Sp. Z o.o. (ph. 17 864 04
70).
Thank you for purchasing our product.
!
CAUTION! Before using the product, user is obliged to
familiarize himself/herself with user manual. Remember that
complying with guidelines is highly important. It assures safety
and extends durability as well as aesthetics of the device.
R
5
1.The purpose of instruction manual
The present instruction manual contains basic information which is
essential for proper usage, preparation, maintenance, cleaning and guarantee
conditions regarding Ombrelo stroller.
Instruction manual should be kept in easily accessible place. It is
designed for people who look after disabled, and for both doctors as well as
physiotherapists who operate the device.
Remember that complying with guidelines is highly important. It assures safety
and extends durability as well as aesthetics of the device.
!
CAUTION! Before using the product, user is obliged to
familiarize himself/herself with user manual.
2. Guidelines for using Ombrelo stroller
The product is recommended for people diagnosed with:
Cerebral palsy – different types.
Myelomeningocele.
Brain and cord injuries– different etymology.
Muscle disorders connected with paresis and paralysis.
Genetic diseases connected with paresis.
Other diseases connected with paresis, paralysis and damages of the
locomotor system which make it impossible to move single-handedly.
Ř After brain and spine injuries (spine injuries: spinal cord and lower
limbs injuries)
Ř
Ř
Ř
Ř
Ř
Ř
Ř
6
R
3. General characteristics of Ombrelo stroller
3.1. Standard equipment
1. Frame which can be folded in umbrella shape
2. Front PU swivel wheels made of fiberglass material
3. Rear wheels made of fiberglass material; wheels are equipped with
inflatable TT tyres.
4. FlipFlap™ footplates with the adjustment of height and 2 way foot
stabilizing belts
5. 5 points belts
6. Adjustable headrest
7. Backrest with adjustment of height
8. Seat with adjustment of depth
9. Stroller handle
10 Head support
11. Brake
10
6
9
7
5
1
11
8
3
4
2
R
7
Upper strut
Lower strut
FOOTPLATE
footplate pipe
footplate runner
bolt
fastening
footer plate
footer pipe
8
R
3.2. Additional equipment
OM_002 Umbrella
OM_006 Lady's Bag
OM_038 Under seat storage
basket
OM_069 Men's bag
OM_042 Bag DeLux
OM_026 Trunk belt
OM_028 Abduction block
OM_011 Cup holder
OM_024 Loins support
OM_012 Elastico cushion
seat/backrest
OM_015 Calf belt
OM_039 Saddle bags
OM_017 Winter footmuff
OM_016 Summer footmuff
R
OM_037 Rain cover
9
OM_021 Head-neck support
OM_074 LED lamps
OM_072 Buggypod IO
OM_076 Extra Mounting
Bracket Set
OM_005 Folding canopy
10
OM_013 Trunk stabilizing
belt
OM_003 Tray
OM_048 Oxygen tank holder OM_035 Side seat supports
OM_075 Rain cover
OM_025 6 points safety vest
OM_020 Folding canopy
with side covers
R
OM_077 Convert fit
OM_014 H Harness
OM_073 Buggypod LITE
4. Weight and measurements
5. Size table
R
11
6. DETAILED DESCRIPTION HOW TO ASSEMBLE OMBRELLO STROLLER
Remember that stroller needs to be assembled. Manufacturer
cannot assemble this stroller due to transportation issues.
In order to use the stroller please follow these steps:
STEP 1. Assemble head support (10) ® look point 7.5.1, page 20;
STEP 2. Assemble footplates (4) ® look point 7.4.1, page 16.
7. DETAILED DESCRIPTION HOW TO USE OMBRELLO STROLLER
7.1. How to fold stroller
In order to fold stroller it is necessary to :
STEP 1. Remove head support (10) look point 7.5.1, page 20;;
STEP 2. Fold footplates (4) by pulling
them as long as possible (fig.1);
Fot.1
STEP 3. Move upper strut upwards;
strut is situated at wheels. Upper
strut (regarding size 2 and 5) which is
situated behind backrest should be
moved anticlockwise (fig.2).
Fig.2
12
R
STEP 4. Hold stroller handle with one hand (9) and then hold seat frame
at the same time. Pull them until stroller is completely folded (fig. 3,4,5)
Fig.4
Fig.3
Fig.5
Fig.6
Check our website www.akces-med.com where you can find
animation which shows how OMBRELO stroller should be folded.
It is necessary to fasten the stroller with the aid of belts while transporting.
Belts are really important because they prevent stroller from automatic
Fig.7
R
13
!
CAUTION! Please be careful while both folding and
unfolding the stroller. Use caution so as not to press
fingers between stroller frame.
7.2. Unfolding
In order to unfold stroller it is necessary to follow these steps:
STEP 1. Unfasten clamp which prevents from automatic unfolding (fig.8);
STEP 2. Put wheels on even ground and then push firmly seat frame and
backrest frame until stroller is completely infolded (fig.9);
STEP 3. Press lower strut down; strut is situated at wheels. Upper strut
(regarding size 2 and 5) which is situated behind backrest should be moved
clockwise (fig.10);
STEP 4. Unfold footplates (4) by pulling them towards stroller as long as
possible (fig.11).
Fig.8
Fig.9
14
R
Fig.11
Fig.10
!
CAUTION! Remember to make sure that all struts which
prevent from automatic folding are situated in correct
places!
7.3. Brake (11)
Stroller is equipped with blockage for each rear wheel
7.3.1. In order to activate brake it is
necessary to pull red lever which is
situated at the back of wheel (fig.12)
Activity should be repeated for the
second wheel.
Fig.12
R
15
7.3.2. Wheels are unlocked by pulling
red levers forwards (fig.13).
7.3.3. It is possible to increase the
pressure of brake lever on wheel. For this
activity it is necessary to regulate nut with
the aid of spanner (fig.14).
Fig.13
Fot.14
Fig.14
7.4. Footplate (4)
7.4.1 In order to assembly footplate it is necessary to insert footplate pipe into
runner and then secure it with the aid of bolt at chosen height (fig.15,16)
Fig.15
16
Fig.16
Fot.16
R
7.4.2 In order to fold footplates it is necessary to follow the rules in point 7.1,
step 2.
się za pomocą klamer znajdujących się na paskach (fot. 14 i 15).
7.4.3 In order to unfold footplate it is necessary to follow the rules in point 7.2,
step 4.
7.4.4. Adjustment of footplate length.
There are three different ways which can be used while adjusting the
length of footplate. Everything depends on user's needs.
1st CONFIGURATION
In order to regulate the length of footplate it
is necessary to remove bolt, adjust the
length at your discretion and insert bolt into
proper hole in footplate bolt (fig.17).
Fig.17
2nd
CONFIGURATION
ożliwiające
stabilizacje
stopy pacjenta. Paski stabilizujące stopy zapinane są „na krzyż”. Dłu
znajdujących się na paskach (fot. 14 i 15).
When the adjustment of footplate is not enough, it is necessary to :
STEP 1. Press button situated on footplate pipe and them remove footer from
fastening (fig.18)
.
Fig.18
ie z tyłu i wyjąć zagłówek (fot. 18). Zagłówek można zamontować na oparciu wózka na dow
R
17
STEP 2. Remove footplate pipe, fix it on footer runner the other way around (in
a way that fastening is situated on the top) and secure it with the aid of bolt at
chosen height (fig.19).
STEP 3. Mount footers by pressing the button situated at footer pipe. Next,
place footer in fastening on footplate pipe.
Fig.19
Fig.20
3rd CONFIGURATION
It is also possible to raise footplate completely when adjustment in points 1 and
2 is not sufficient. So as to do that it is necessary to undo screws fastening
footplate runner (footplate pipe is situated in that runner (fig.21). Next, mount
it again in opposite position which is shown on picture (fig.22). Follow the rules
described in point 7.4.4 2nd CONFIGURATION, STEP 1-3, page 17.
Fig.21
18
Fig.22
R
7.4.5. It is possible to adjust footer plate.
So as to make adjustments it is necessary
to unscrew screws situated under footer.
Next, change the position of footer plate
and tighten screws (fig.23).
Fig.23
7.4.6. Footplate is equipped with belts which stabilize feet. Stabilizing belts are
fastened criss-crossed (fig.24, fig.25) or around ankle (fig.26)
Fig.24
Fig.25
Fig.26
R
19
7.5. Head support (10)
7.5.1. In order to mount head support it is necessary to insert its frames into
backrest pipes. Backrest pipes are situated at the back of backrest (fig.27)
Fig.27
7.5.2. The height of head support is regulated with the aid of rubber washers
situated on frame (fig. 28,29).
rubber wash
Fig.28
Fig.29
7.5.3. The height of headrest can be
regulated with the aid of belts with
Velcro tapes which are fastened at the
back of head support (fig.30).
Fig.30
20
R
7.6. Headrest (6)
Headrest can be mounted either on backrest or head support.
7.6.1. In order to mount headrest on
backrest it is necessary to remove
head support, unlace binding from the
back and remove headrest (fig.31).
Headrest can be mounted on backrest
at any height with the aid of belts with
Velcro tapes which are fastened at the
back of backrest.
Fig.31
Fig.33
Fig.32
7.7. Seat (8)
7.7.1. It is possible to regulate the depth of seat. Follow these steps:
STEP 1. Release stroller struts (-> look point 7.1, step 3, page 12) and slightly
fold stroller frames (-> look point 7.1, step 4, page 13) which makes the
adjustment of seat depth easier.
STEP 2. Press simultaneously buttons situated on both sides of seat frame
(fig.34);
R
21
Fig.34
STEP 3. Take out seat frame and insert
it into proper holes (fig. 35);
It is really important to make
sure that seat frame is inserted
evenly in stroller frame
Fig.35
STEP 4. Unfold stroller and press lower strut down. Next, move upper strut until
stroller is unfolded (-> look point 7.2, step 2,3, page 14).
7.8. 5 points belts (5)
Stroller is equipped with 5 points belts which stabilize patient and
protect him from falling out of the stroller
7.8.1. Follow these steps in order to fasten 5 points belts:
STEP 1. Connect belt fasteners (fig.36);
STEP 2. Insert belts' fastenings into clamp that is mounted by the seat
(fig.37)
22
R
Fig.26
Fot.36
Fig.37
Fot.27
Picture 38 shows how belts should be fastened (fig. 38).
Fig.38
R
23
7.8.2. It is possible to adjust the height of belts fastenings from backrest.
Unscrew knobs situated at the back of backrest, adjust belts at your discretion
and tighten knobs (fig.39).
Fig.39
7.8.3. It is possible to dismantle 5 points belts. It is necessary to unscrew knobs
from the back of backrest and remove belts from clamps and from grip which is
placed on seat upholstery.
7.9. Upholstery
7.9.1. It is possible to regulate the depth of backrest as well as seat upholstery
with the aid of Velcro tapes which are situated at the back of backrest
upholstery (fig.40, fig.41) This adjustment is beneficial due to the fact that the
shape of upholstery adjusts to patient's body. In other words, we prepare the
best position for patients.
Fig.40
24
Fig.41
R
8. ASSEMBLY OF ELEMENTS FROM ADDITIONAL
8.1 Sunshade,
OM_002
So as to mount sunshade it is necessary to
loosen clip and place it on handle's frame.
Next, adjust proper position and tighten
knob (fig.43). The adjustment of sunshade
can be regulated with the aid of button
which is situated next to clip (fig.44).
Fig.42
Fig.43
Fig.44
R
25
8.2 Basket under seat,
OM_038
Basket is mounted on frame under
seat with the aid of belts with buttons
(fig.45). It is recommended to mount
basket above TransFix™ grips (fig.46).
Fig.45
Fig.46
8.3 Lady bag,
OM_006
Lady bag can be hung up on stroller's handle
with the aid of belt or by means of catches
which are situated at the back of backrest.
Fig.47
Fig.48
26
R
8.4 DeLux bag,
OM_045
DeLux bag can be hung up on stroller's
handle with the aid of belt or by means
of catches which are situated at the back
of backrest.
Fig.49
Fig.50
8.5 Men bag,
OM_069
Men bag can be hung up on stroller's
handle with the aid of belt or by means
of catches which are situated at the back
of backrest.
Fig.51
Fig.52
R
27
8.6 Torso belt,
OM_026
Torso belt is mounted behind
backrest by means of Velcro tapes
(fig.53). It is highly important for a
patient to wear vest while using trunk
belt!
Fig.53
8.7 Abduction block,
OM_028
Follow these steps in order to mount abduction block:
STEP 1. Dismantle 5 points belts from standard equipment. ( ® look point
7.8.3, page 24);
STEP 2. Insert abduction block's
batten into handle which is situated
on seat upholstery (fig.54).
STEP 3. Batten should be mounted
to seat with the aid of screw; screw
should be tightened by means of
Allen wrench (fig.55).
Fig.53
Fig.53
28
Fig.53
R
8.8 Canopy without side supporting
panels,
OM_005
Follow these steps so as to mount
canopy without side supporting
panels:
STEP 1.H o l e s f r o m c a n o p y ' s
upholstery should overlay with handle
(fig.57)
Fig.57
STEP 2.Place canopy catches on stroller's frame (fig.58,59)
Fig.58
Fot.59
Fig.59
R
29
STEP 3. Unfold canopy and block
stretchers which are situated on
both sides of canopy (fig.60).
STEP 4.Canopy is equipped with
window which can be opened so as to
observe child. So as to do that, undo
zip situated on canopy and put fabric
on canopy (fig.61,62).
Fig.60
Fig.61
Fig.62
8.9 Canopy with side supporting
panels,
OM_020
Canopy with side supporting panels is
mounted in the same way as canopy
without side supporting panels.
Concerning canopy with supporting
panels, it is necessary to mount these
panels by means of clips. Clips should
be placed on stroller's frame at the
back wheel (fig. 63,64).
Fig.63
30
R
Fig.64
Undo zip if you wish to take out side
supporting panels (fig. 65).
Fig.65
There is a possibility to roll exterior
panels so as to have airy netting on
sides.
STEP 1. Unfasten catch situated at
the bottom of netting so as to do
that (fig.66).
Fig.66
STEP 2. Next, roll exterior panel (fig. 67).
STEP 3. Mount it at canopy (fig. 68).
R
31
Fig.67
Fig.68
Fig.
Canopy is equipped with pocket
which is fastened with the aid of
Velcro tapes (fig.69).
Fig.69
8.10 OM_011 Cup holder
So as to mount cup holder it is necessary to :
1) loosen clip and place it on handle's frame (fig.70);
2) Tighten knob (fig.71);
3) Adjust proper position with the aid of button (fig.72).
Fig.70
32
Fig.71
R
Fig.72
Fig.73
8.11 OM_037 Rain Cover
Rain cover can be put on stroller only if canopy is mounted (it concerns
canopy either with or without side supporting panels). Follow these
steps so as to mount rain cover:
STEP 1. Holes in cover should overlay
with handle (fig.75). Stretch cover so
that it covers canopy and stroller.
Fig.74
Fig.75
STEP 2. Mount cover on stroller's frame at TransFix™ handle (fig.76)
and at footrest by means of Velcro tapes (fig.77).
Fig.76
Fig.77
R
33
8.12 OM_013 Trunk stabilizing belt
So as to mount trunk stabilizing belt on stroller it is necessary to:
STEP 1. Insert straps into holes in backrest upholstery (fig. 78,79). It is
possible to adjust the height of trunk belt by inserting straps into proper
holes in upholstery.
Fig.78
Fig.79
STEP 2. Fasten belts with the aid of Velcro tapes at the back of the
backrest (fig.80)
Fig.80
STEP 3. Thread side belts through stroller frame (fig. 81) and then insert
them into regulator (fi.82). Belt should be adjusted according to the
width of patient's trunk. Activity should be repeated for the second side
of stroller.
34
R
Fig.81
Fig.82
STEP 4. Thread belt (the one that closes trunk belt) through grip. It is
possible to use shorter or longer belt with grip, it depends on the width
of trunk (fig.83).
longer belt
shorter belt
Fig.83
STEP 5. Trunk belt is closed only when strap is inserted into handle and
fastened with the aid of Velcro tapes (fig.84).
Fig.84
Fig.85
R
35
8.13 Headrest,
OM_021
Headrest is mounted on stroller's
backrest by means of belts with Velcro
tapes. Headrest belts should cover
stroller's handles and, moreover, they Fig.86
should be fastened behind backrest
(fig.86).
8.14 Calf belt
OM_015
Calf belt is mounted on footrest above
footers (fig.87). Fasten belts with Velcro
tapes so as to mount calf belt.
Remember to fasten them in a way that
they also cover footrest's runner (fig.88,
fig.89). Moreover, it is possible to mount
calf belt when footer is adjusted in 1st
configuration ( ® look point 7.4.4, I
KONFIGURATION, page 17)
Fig.88
8.15 Side bags,
Fig.88
OM_039
Side bags are mounted on stroller's
frame next to the seat. Take bag's belts
and thread them through frame (fig.91)
and then fasten two fasteners (fig.92).
Small pocket, situated at the front of
stroller, is made of airy netting and,
moreover, it is equipped with reflective
elements.
Fig.87
Fig.89
Fig.90
36
R
Fig.92
Fig.91
8.16 Tray,
OM_003
Please follow these steps so as to mount tray:
STAGE 1. Place catches on elements that are situated on stroller's
backrest (fig.93,94)
Fig.94
Fig.93
STAGE 2. Raise backrest's upholstery and at the same time put tray's
handles on backrest and press (fig. 95,96).
Fig.96
Fig.95
R
37
STAGE 3. It is possible to adjust the depth of tray : loosen knob, adjust
depth at your discretion and tighten knob firmly (fig. 97,98).
Fig.98
Fig.97
8.17 Elastico seat cushion,
OM_012
Please follow these steps so as to mount Elastico seat cushion:
STAGE 1. Place cushion on stroller's seat
STAGE 2. Thread belts that fasten
cushion through seat's frame
(fig.99,100) and fasten Velcro tapes
that are situated under stroller's
seat (fig.101).
Activity should be repeated if the
product is equipped with another
pair of belts!
Fig.99
Fig.101
Fig.100
38
R
8.18 Lumbar pelotte,
OM_024
Please follow these steps so as to mount lumbar pelotte:
STAGE 1. Place pelotte on stroller's backrest and thread belts that fasten
pelotte through holes in backrest's upholstery (fig.102,103)
Fot.103
Fot.102
STAGE 2. Fasten fastening belts with the aid of Velcro tapes that are
placed behind the backrest. Activity should be repeated if the product is
equipped with another pair of belts that fasten pelotte. Attention!
Fastening tapes have to cover backrest's frame!
Fot.105
Fot.104
8.19 Oxygen tank holder,
OM_048
In order to mount oxygen tank holder it is necessary to:
STEP 1. Take out two belts from buckles that are situated at cover.
R
39
STEP 2. Take out adjuster no.2 and buckle from
belt. It is important to leave adjuster no.1 on
the belt (fot.106,107).
adjuster no.1
adjuster no.2
buckle
fig.106
Fig.107
STEP 3. Thread one of the belts through stroller's handle (fig.108) and then
thread the end of belt through adjuster no. 1 (fig.109).
Fig.108
Fig.109
STEP 4. Thread belt through adjuster
no.2 (fot. 110).
Fig .110
40
R
STEP 5. Put buckle on belt and thread belt through buckle as it is presented in
the picture below (fot. 111, 112). The end of belt should be inserted into
adjuster no. 2.
Fig.111
Fig.112
STEP 6. Second belt should be fastened
on stroller's side frame as it is described
in stages 2-5. The picture below shows
how belts should be fastened (fig.113)
STEP 7. It is possible to fasten cover with
oxygen tank holder (fot.114, 115). The
length of belts can be adjusted if
necessary.
Fig.114
Fig.113
Fig.115
R
41
8.20 Winter Footmuff
OM_017
Please follow these steps so as to mount winter footmuff on stroller:
STAGE 1. Prepare stroller - take out footrests (do it in opposite way that they
were mounted (® look point 7.4.1, page 16).
STAGE 2. Unfasten zip from winter footmuff and unfold it on both seat and
stroller's backrest.
STAGE 3. There are two holes in winter footmuff and they are situated at the
bottom part. It is necessary to insert footrests' runner (fig.116) into these
holes. Next, mount footrests (fig.117) and secure them with the aid of bolt at
any height (fig.118)(® look point 7.4.1, page 16).
Fig.116
Fig.117
Fig.118
STAGE 4. Additionally, it is
important to mount winter
footmuff to footrest with the aid of
belt that is fastened with clasp
fastener (fig.119)
Fig.119
42
R
STAGE 5. Winter footmuff is equipped
with special hole designed for 5 points
belts and abduction block. Firstly,
unfasten 5 points belts and take out
completely two bottom belts (they are a
part of 5 points belts). Take them out from
triangular fastening that is placed by Fig.120
stroller's frame (fig,120).
STAGE 6. Place winter footmuff on stroller's backrest and thread 5 points belts
through hole which is created in the centre of seat (fig.121) Two bottom belts
that are a part of 5 points belts should be threaded through holes situated at
the side of winter footmuff (fig.122).
Fig.121
Fig.122
STAGE 7. Both belts should be mounted
to stroller. Thread belt through triangular
fastening that is situated by stroller's
frame (fig.123) and then insert belt's
ending into regulator (fig.124,125).
Fig.123
Fig.125
Fig.124
R
43
STAGE 8. Pull belts so as to make sure that belts are mounted correctly.
Fig.126
Fig.127
STAGE 9. Last thing to do is to mount winter footmuff on backrest. Thread belts
fastening winter footmuff through holes in upholstery (fig.128,129,130). These
belts are situated at the upper part of winter footmuff. Next, fasten belts
behind backrest by means of Velcro tapes (fig.131). ATTENTION! Belts should
cover frames of stroller's backrest.
44
Fig.128
Fot.128
Fig.129
Fig.130
Fig.131
R
8.21 Summer footmuff,
OM_016
Please follow these steps so as to mount summer footmuff:
STAGE 1. Prepare stroller - take out footrests (do it in opposite way that they
were mounted (® look point 7.4.1, page 16).
STAGE 2. Unfasten zip from summer footmuff and unfold it on both seat and
stroller's backrest.
STAGE 3. There are two holes in summer footmuff and they are situated at the
bottom part. It is necessary to insert footrests' runner (fig.132) into these
holes. Next, mount footrests (fig.133) and secure them with the aid of bolt at
any height (fig.134) (® look point 7.4.1, page 16).
Fig.132
Fig.134
Fig.133
STAGE 4. Additionally, it is important to mount summer footmuff to footrest
with the aid of belt that is fastened with fastener (fig.135,136)
Fig.135
Fig.136
R
45
STAGE 5. Summer footmuff is equipped
with special hole designed for 5 points
belts and abduction block. Firstly,
unfasten 5 points belts and take out
completely two bottom belts (they are a
part of 5 points belts). Take them out from
triangular fastening that is placed by
stroller's frame (fig.137).
STAGE 6. Place summer footmuff on
stroller's backrest and thread 5 points
belts through hole which is created in the
centre of seat (fig.121). Two bottom belts
that are a part of 5 points belts should be
threaded through holes situated at the
side of summer footmuff (fig.138).
Fot.137
Fig.138
STAGE 7. Both belts should be mounted
to stroller. Thread belt through triangular
fastening that is situated by stroller's
frame (fig.139) and then insert belt's
ending into regulator (fig.140,141).
Fig.139
Fig.141
Fig.140
46
R
STAGE 8. Pull belts so as to make sure
that belts are mounted correctly.
STAGE 9. Last thing to do is to mount
summer footmuff on backrest. Thread
belts fastening winter footmuff
through holes in upholstery (fig.143147). These belts are situated at the
upper part of summer footmuff. Next,
fasten belts behind backrest by means
of Velcro tapes (fig.148) ATTENTION!
Belts should cover frames of stroller's
backrest!
Fig.142
Fig.143
Fig.144
Fig.145
Fig.146
Fig.147
Fig.148
R
47
8.22 Side rigid pelottes,
OM_035
Please follow these rules so as to mount
side rigid pelottes:
STAGE 1. Place upholstery on pelottes.
Remember to take markings into
account: upholstery with label 'right'
should be placed on right pelotte and
upholstery with label 'left' should be
placed on left pelotte. Please make sure
that upholstery is placed on pelotte as it
is shown on the picture (fig.149)
Fig.150
Fig.149
Side with protective foam
STAGE 2. Assembly of pelottes: unfasten
Velcro tapes from backrest's upholstery
(fig.150) and place pelottes on
backrest's frame above seat with the aid
of two catches (fig. 151) and then fasten
upholstery. Pelotte should be mounted
in a way that its curve is placed towards
the outer part of stroller. Right pelotte
should be mounted on right side of
stroller and left pelotte on left side of
stroller. Please check picture so as to see
how pelotte should be mounted.
(fig.152)
Side with
protective foam
Fig.151
48
Fig.152
R
9. THE USE OF OMBRELLO STROLLER
!
CAUTION! Ombrelo stroller has to be used with compliance
to guidelines included in this user manual. Remember to use
the product only with someone who is trained and
knowledgeable. Do not forget to prepare both product as
well as patient before using Ombrelo stroller!
9.1. Preparation of the patient
Before using the product, it is essential to make sure that:
·
patient's outfit is light and comfortable sporty clothes are advisable;
·
shoes should be comfortable and, moreover, they should stabilize
ankle;
·
due to hygienic reason and to avoid abrasion it is advisable for the
patient to always wear clothes when using the device, skin must not
be naked especially in places of regular contact with upholstery;
·
drains, bags, catheters etc. if applied, have to be secured to function
properly and not to disturb during using the product;
·
if it is necessary for a patient to wear orthopedic supply (collar,
corset, orthesis, shoes) if it is recommended by doctor.
!
CAUTION! Outfit should protect patient's skin from direct
contact with upholstery as well as other parts of equipment.
!
CAUTION! Only doctor can make a decision concerning using
any kind of orthopedic supply!
R
49
9.2. How to use Ombrelo stroller
1. Before use it is necessary to:
· Unfold the device;
· Place the device on even ground;
· Make sure that all parts are serviceable, correctly mounted and stable;
· Block brakes;
· Adjust the device to patient's measurements;
· Undo vest, trunk belts etc so as to place easily the patient is the device;
· Place patient in the device;
· Fasten all elements which stabilize patient e.g. vest, trunk belts, feet
stabilizing belts etc.;
· Mount additional equipment e.g. tray.
2. In case of patients who have problem with bladder, it is necessary to put
special cloth on seat. This cloth can be purchased in pharmacy or medical
shops.
3. It is essential to hold stroller with the aid of handle during using it otherwise
stroller can roll.
4. Remember to place stroller forwards
5. In case of any obstacles such as step or curb, it is necessary to raise front
wheels by pressing the handle down . Next, place front wheels on step and
then raise back part of stroller with the aid of handle.
!
50
CAUTION! Remember to makes sure that all belts and
locking and correctly adjusted and fastened. Check also if
fastenings from adjustable elements are firmly tightened.
R
Equipment works correctly only when the device is adjusted according
to patient's height as well as weight. Remember to take all these
measurements into account while purchasing the product. Correct adjustment
is the most important due to the fact that only then the product is safe. It is
forbidden to force child to keep specific position because he/she will feel
uncomfortable and it may lead to wrong posture.
10. SAFETY RULES
!
CAUTION! Ombrelo stroller has to be used in compliance
with guidelines in this user manual.
It is highly important to consult either doctor or physiotherapist in
order to make right decision concerning the choice of stroller and its size. It is
also essential to familiarize with the guidelines described in user manual before
using the device.
1. Before use it is necessary to:
· make sure that there are no damages or different faults which could
endanger patient's life; check if all parts are working and are correctly
mounted and, moreover, check if they are not broken;
· check if all screws, knobs and all glued, sewed or tapped parts are
tightened;
· check if brakes are operating correctly;
· check if buckles are operating correctly;
· always use safety belts, Velcro tapes should overlap min. 8cm;
· adjust the device according to patient's measurements and needs e.g.
the adjustment of pelottes , footplate etc.;
· make sure that all movable parts and knobs for adjustments are stable
and locked;
· secure patient with the aid of elements such as vest, foot stabilizing belts,
pelottes, abduction block, headrest. It is highly important to secure
patient because it safeguards him/her from falling out. If abduction
contracture occurs, it is recommended to use abduction block in order to
prevent ulcers between knees.
R
51
2.
3.
4.
5.
It is forbidden to use stroller for different purposes that it is intended to.
It is forbidden to use stroller when it is damaged or any part is missing.
It is forbidden to leave the patient unattended.
Stroller should be used only when there is someone who is trained and
knowledgeable.
6. It is forbidden to leave stroller and the patient on unstable ground
unattended, even if the brake is engaged.
7. It is forbidden to either go up or down the stairs; it doesn't matter if the
patient is placed in the device or not.
8. It is important to engage brake during getting into and getting out the
stroller.
9.Make sure that all limbs are not close to spokes or other adjustable elements.
10.Although the device and the upholstery are made of fire-resistant materials,
please pay your attention when approaching to sources of fire or sources of
high temperature during using the device. Moreover, stroller shouldn't be
stored in rooms with high humidity.
11. Secure stroller during transportation in order to avoid any possible
damages. Manufacturer doesn't take responsibility for damages which
appeared due to improper preparation of the device during transportation.
52
R
!
CAUTION! It is forbidden to place the patient in the device
while being in car, bus or train.
!
CAUTION! The product contains small parts which children
may swallow.
!
CAUTION! It is forbidden to make any changes concerning
stroller's structure due to the fact that it is dangerous and
it results in loosing warranty.
!
CAUTION! The weight of user should not be bigger than
maximal weight described on page 11 where you will find
information regarding this issue.
1) AKCES-MED Sp. z. o. o sells products free from manufacturing defects or
faults.
2) Manufacturer gives the purchaser 24-month guarantee from the date of
purchase. All defects revealed during warranty period will be repaired free
of charge.
3) All defects which appear after warranty period can be repaired only when
the user will pay for it. This rule doesn't apply to refunded products - user
can ask National Health Refund for refund.
4) Manufacturer claims that the product can be used for 48 months. User can
use this product after this period only when he/she will send the device to
manufacturer so as to service it. Next, manufacturer determines again
how long the product can be used and, moreover, the date of the next
service will be determined.
5) If product is damaged, please contact our dealer or AKCES-MED customer
service (ph. 17/864 04 70)
R
53
11. MAINTENANCE AND CLEANING
Stroller should be kept clean and used in compliance with the
manufacturer's recommendations. The device should be kept in clean, dry and
ventilated room. Maintenance as well as cleaning have to be performed at least
once a month. Regular cleaning and maintenance of stroller are indispensable
to maintain its correct functionality as well as safety.
It is highly advisable to remember about proper maintenance in order
to extend product's aesthetics. So as to do that, it is essential to comply with
these guidelines:
1. It is recommended to clean upholstery with the aid of cleaning product, soft
sponge and warm water. If you use sponge which is too wet, stain may get
bigger, upholstery may be destroyed. It is necessary to remember that the
excess of dampness should be removed from fabric before next cleaning.
Please rinse upholstery with warm water and clean white cloth once stain is
removed.
2. It is forbidden to soak upholstery!
3. It is forbidden to clean upholstery with the aid of hard brushes.
4. It is forbidden to clean upholstery with strong chemical agents such as
solvent or caustic chemicals.
!
CAUTION! Akces-MED. Sp z o. o takes no responsibility
for damages caused by use of wrong clearing agent.
5. It is forbidden to soak upholstery during cleaning. Remember that
upholstery has to be always dry before using.
6. It is forbidden to clean, make any changes and maintain stroller during using
it.
7. All metal as well as plastic elements should be cleaned by hand with the aid
of general cleaning products. Remember to familiarize yourself with
cleaning product's leaflet.
54
R
!
CAUTION! Remember that upholstery has to be always
dry before using!
Before using it is necessary to:
· clean wheels;
· check if base as well as wheels are correctly mounted; check if brake
stops turning wheel;
· make sure that all wooden parts e.g. tray don't have splinters;
· check if stroller construction is free of breaks or any kinds of
deformities;
· check if all movable parts are working and all screws, nuts, knobs etc.
are correctly tightened;
· check if belts, vests, trunk belts, feet stabilizing belts etc are not frayed;
check if buckles and clamps work correctly.
!
!
CAUTION! Manufacturer takes responsibility only for hidden
faults or damages which appeared despite the fact that user
complied with the guidelines.
CAUTION! In case of any damages, it is essential to contact
the person who sold you the product.
CL
R
55
R
ORTHOPAEDIC DEVICES MANUFACTURER
Akces-MED... Sp. z o.o.
ul. Leszka Czarnego 3
35-615 Rzeszów
tel. (17) 864 04 70
www.akces-med.com
e-mail: [email protected]
Authorised Dealer
Date of issue: 25.11.2013
The last update: 08.01.2015
AKCES-MED Ltd. reserve the right to introduce technical and trading changes
in the content of the instruction without warning.