1
Introduction
INTRODUCTION
The DATASMITH Payroll System does all the commonly required payroll data entry,
updating, calculating, and report printing functions. This program has been field proven
in general business environments servicing from one to over 60 payrolls containing
from four to over 30,000 employees each. The system uses logical, straightforward
processing sequences with preview-and-redo at each stage. It prompts the user for each
information item so that an operator will quickly learn to use the system to efficiently
do all payroll functions.
The system calculates pay for hourly, salaried, commission, and mixed-method
employees, independent contractors, and computes federal, state, local, FICA, and
Medicare taxes. It provides automatic paycheck and tax liability adjustments for Earned
Income Credit for both "Single" and "Spouse Also Eligible" cases. Other taxes such as
School District taxes, SDI, and SUI contributions are also calculated for any one or all
50 States. The user can "customize" his payroll to include provisions for Vacation time,
Loans and Loan repayment, Imputed pay (Vehicle Use, Allocated Tips, Excess Group
Term Life Insurance), 401(K) or 403(B) or other Pension Plan contributions,
multiple-component S-125 Cafeteria Plans, and other situations using the powerful
built-in, User-Defined Tax Treatment and Handling features of the system.
System output includes over 23 Standard Reports, including the Employee Master List,
the periodic Payroll Report, Paychecks, Quarterly and other reports for any period;
Year-end reports, Employee Labels (pin feed and laser versions with Postnet codes),
and utility reports.
The system uses a structured, modular design so that system functions can be altered
and added as required. This design assures that the system will not become obsolete as
company and government requirements change. The original structure is still intact
after over eighteen years of field use: attesting to the viability of this concept.
Brief power interruptions, static electricity, and other common office hazards can
"crash" your computer. DATASMITH programs reduce the effects of these hazards on
your business operations by keeping data constantly updated on disk, preserving source
data, and automatically making periodic backups. An elaborate multi-level error
handling & reporting system makes most problems easily recoverable by the operator.
Exceptions and human errors are "Normal" with any people-intensive process such as
payroll. DATASMITH Payroll incorporates "Preview and Re-Do," and "Warn, but
don't roadblock" operating philosophies throughout to handle exceptions as easily as
possible.
Familiarity comes with practice, so it we recommend that you read the manual
completely and then "play" with the system (sample data is provided for this purpose)
until you are familiar with its functions. You will then have the confidence to use the
system for your own payroll needs. Once you are familiar with its operation, you will
© 1990-2005 LPI Information Systems
Revised 11/2005
1-1
Introduction
find that the menu descriptions and built-in helpful reminders are adequate to lead you
through every program and process.
EQUIPMENT AND SOFTWARE REQUIREMENTS
COMPUTER
“IBM compatible” or an “industry standard” 386, 486, Pentium, 686,
or compatible microcomputer.
OPERATING DOS: PCDOS/MSDOS 5.0+, DR-DOS 6.0+, or Novell DOS 7+.
OS/2: OS/2 version 2.1+ or "WARP" (version 3+)
SYSTEM
WINDOWS: Windows 3.1x, Windows 95/98/NT/2000/XP
LINUX:
Red Hat 6.x+ or later
...or an operating environment compatible with one of the above.
MEMORY
At least 420KB or 430,080 bytes of available "Conventional
Memory" is required: 520KB is recommended. The relevant
“available memory” is labeled "Largest Executable Program" in the
display produced by the MEM command and other utilities. Optional
features may increase this requirement.
DISK
STORAGE
At least one 3.5" or 5.25" diskette drive plus a hard disk is required.
Fully-implemented Custom Payroll requires approximately 10 MB
for program and system file storage plus 256 KB per hundred
employees and 15 KB per pay period for each pay period required
"on-line" (minimum two periods). Custom Payroll's W-2 programs
work with any DOS-supported diskette, but SSA regulations require
that W-2 diskettes be submitted on DSDD or DSHD 5.25" or 3.5"
media at this writing.
DATASMITH Payroll is normally distributed on CDROM or 3.5"
DSHD (1.4 MB) diskettes. Upon special request, DATASMITH
Payroll can also be shipped on 5.25" DSHD (1.2MB) diskettes, or on
100 MB Iomega Zip (tm) disks.
Approximate disk space required for payroll data:
Minimum (2 periods)
Maximum, Monthly
Maximum, Semimonthly
Maximum, Biweekly
Maximum, Weekly
10 employees 100 employees
82 KB
543 KB
532 KB
3.5 MB
1.0 MB
6.8 MB
1.1 MB
7.3 MB
2.2 MB
14.4 MB
1000 employees
5.2 MB
33.5 MB
64.4 MB
69.5 MB
136.5 MB
NO TE: Some Payroll options and certain Payroll versions require expanded
Company and/or Employee file space! If disk space is tight, check with LPI
Information Systems for an accurate determination of your file space
require ments.
1-2
© 1990-2005 LPI Information Systems
Revised 11/2005
Introduction
DISPLAY
Custo m Payroll automatically ada pts to any IBM-compatible standard d isplay,
monochrome or color, with 80 columns and 24 lines capacity. The operator can
change P ayroll's default choice of display colo rs.
PRINTER
The system requires at least one, and supports up to four printers, each of which
may be any of the following types:
DOT MATRIX:
An "Epson compatible" printer with at least 80 column
capacity (at 10 Characters/inch) and a tractor feed
mechanism. Dot matrix printers intended for W-2 form
production sho uld be rated for at least four co pies. A
botto m feed or a "straight thro ugh" paper path is
recommended. T he tractors sho uld be adjustable to
accom mod ate 8.5"-9.5" wide forms.
LASER:
Hewlett-Packard Laserjet Series II, III, IV, V, VI, or later
100 % comp atibles suppo rting PCL 3 , PCL 4, or PC L 5.
DAT ASM ITH Payroll handles either local or network
printers, including PJL printers.
INK JET:
Hewlett-Pa ckard Deskjet or 100% com patible
supporting PCL 3 o r later, including network
configurations using PJL printers. The pap er positioning
mechanism on some inkjet mo dels m ay not b e accurate
enough for certain densely-printed standard forms, such
as 4-up W-2's and 1099's. “Windows only” printer
models will not print standard government forms
correctly.
Both Laser and dot matrix printers should be able to print at 10 characters per inch
pitch and six lines per inch vertical spacing. Custom Payroll supports compressed
printing of wide reports, and landscape orientation. When using standard 11" long
forms, these settings yield 66 lines per page on dot matrix printer, 60 lines per page
on a laser or ink jet printer using portrait orientation, or 45 lines per page on a laser
or ink jet printer using landscape orientation.
MOUSE
A Microsoft Mouse, "PC-Mouse," or a compatible mouse may be used, but is not
required, with Version 9.5+. All selections can be made using the keyboard.
INSTALLATION
The program CDROM or diskette set delivered with your system is your master and should never be
used for actual processing. Be sure to file the originals in a safe place. Unless otherwise noted in the
acco mpa nying paperwork, each new C DR OM or diskette set co ntains all the programs necessary to
update your existing installation or to create a new installation.
© 1990-2005 LPI Information Systems
Revised 11/2005
1-3
Introduction
QUICK-START INSTALLATION INSTRUCTIONS
! WINDOW S:
From the D esktop, selec t File (or START in Win 95/98/NT/00/XP)
On the File menu, select Run.
In the Run window, Enter the Comm and line: A:SETUP
NOTE: If your program or update is on CDROM and you are using Win 95/98/NT/00/XP, the
SETU P program will start autom atically (AU TO RU N) when you insert the CD RO M w ith
norma l operating system settings.
SETUP will survey your system and will ask you for appropriate choices. The first question
asked is the location of your Program Master Disk. Unless you are installing over a network,
this will be your CDROM or your diskette drive.
After a successful Install or Update, the SETUP program will ask the operator for permission to
install the DATASMITH Payroll Icon.
! MS-DOS, DOS shell under LINUX:
To update your programs from the source drive, type:
{source drive}:INSTALL
EXAMPLE: If your floppy drive is A:, type:
A:INSTALL
INSTALL will survey your system and will ask you for appropriate choices.
! INSTALLATION ACROSS A NETWORK:
1. Copy the files from each diskette into a temporary Network Directory or Drive. If your
Master Disks contain subdirectories, create corresponding subdirectories (keep the same
subdirectory name) in your Network Directory. All diskettes should be copied into a single
Network Directory.
2. At each workstation, follow the instructions above appropriate for your desktop environment.
When asked to identify the location of the Master Disk #1 files, specify the data path to the
temporary Network Directory as seen from your workstation.
1-4
© 1990-2005 LPI Information Systems
Revised 11/2005
Introduction
Notes on Using the INSTALL utility
A program nam ed INST ALL.EX E (the W indows version is SETUP .EXE ) has been included on your
master diskette #1, or on a separate IN ST ALL diskette. With INS TA LL, all yo u have to do to install
program revisions into your system is to start INSTALL from any floppy disk drive (called the 'source
drive'). The INS TAL L utility will "know" the contents of each diskette, and will know whether the
diskettes are primarily intended for an initial Installation or an Update. When it needs another Master
Disk, it will ask for it.
The INSTALL utility will survey your system to determine if there is already a \PAYRO LL directory on
any drive. If so, the program will suggest that directory as the destination for the new Installation. There
should normally be only one \PAYROLL program directory in your system. In order for us to provide
proper telephone support, we strongly urge that the startup directory always be named {any
drive:}\PAYR OL L. Present and future DAT ASM ITH P ayroll utilities will always assu me b y default
that your payroll startup directory (called the USER directory in Version 9.x) is located in \PAYRO LL.
Setu p O ptions : After yo u estab lish the de stination d ata paths, INST ALL will ask the o perator to
specify the Install or Upda te optio n. "U pda te" replace s program files, but do es not disturb existing data
files. "Install" will replace program files and put test data in your default data directory. W ith either
option choice, the INSTALL program will check the result against a list of required program modules
and data files and will report any erro rs found .
The sample data permits you to immediately try out all the features of the system.
NO TE: The passw ords for th e Sample Da ta files a re 'PW 1' an d 'PW 2'.
W hen you are re ady to put you r "rea l" data into the system, you can simply T erminate the sample
employees (change Status to “Terminated” on the Employee Data Entry and Changes screen) and run
Year End Update (on the Initialize and Utilities menu) to remove them from the file. Then you can
mod ify the Compa ny Da ta and add your o wn em ployees to the file.
The sample data may also be permanently removed by erasing all files of the form “PR{date}.PAY”,
“JF{date}.PAY”, and the file “MASTER .PAY”. If you erase “MA STER .PAY”, you must then use Set
Company Data (from the Main Menu: CO-SE) to build your own payroll master file "from scratch".
HO W PA YR OL L U SE S Y OU R H AR D D ISK .....
From your Computer's point of view, hard disks are divided into several lettered disk "d rives"; and these
are further subdivided into "directories". These "drives" are like the Volumes in a set of books, and the
directories are like chapters within one volume. If you are running only one payroll on a single PC, you
can put all the payroll files in a single directory, if you wish. However, even on a single-user system,
most people find it easier to manage their system when each different type of file is kept in a distinct
directory.
1. DURING INSTALLATION
On DAT ASM ITH Payroll versio ns thro ug h 8.x , the startup directory contains user setup
files, program files, and test data (which may be overwritten with "real" data by the
operator after initial installation). There is only one data path sp ecified by the operator,
and the default data path is:
{any drive:}\PAYROLL
© 1990-2005 LPI Information Systems
Revised 11/2005
1-5
Introduction
On DAT ASM ITH Payroll Versio n 9.x and later systems , the operator may be asked to
identify additional directories as follows:
USE R directory
This is the directory from which the program is started on a given
workstation. Each workstation on a network will have its own
US ER directory. Th e de fault path fo r the U SER directory is:
{any drive:}\PAYROLL
PRO GR AM directory
This directory contains shareable program m odules. On a
network, this directory can be located on a network drive to allow
all users simultaneous access. The default path for programs
will is:
{any drive:}\PAYROLL\PROG
HEL P directory
This dire cto ry contain s shareable H EL P files. On a netwo rk, this
directory can be located on a netwo rk drive to allow all users
simultaneous access. The default path for the HELP directory is:
{any drive:}\PAYROLL\HELP
DAT A directory
This directory, identified only when the Install option is chosen,
will contain the Tes t Data files. Other da ta directories are
established later by the operator, and need not be identified
during IN ST AL L. In general, to a void the possibility tha t "real"
data m ight be over-written with test data, the operator should not
identify "live" data directories as "DATA" directories during
INSTALL. The default path for the DATA directory is:
{any drive:}\PAYROLL\DATA
2. AFTER INSTALLATION
Your payroll system allows you to put your data in a different directo ry an d/o r dis k d rive . This
featu re allows you to select a nd run several different payrolls fo r on e or m ore C om panies while
using on ly a single c opy of DA TA SM ITH Payro ll on your h ard d isk. W hen you se lect a p ayroll to
work with, your program s "find" the correct data by us ing the data path you sp ecify. T his da ta path
is displayed above the Main Menu after the legend "Progra m e xpects data in: ...". O the r pa yroll
data files are created during operation of the system, but all payroll data file names end in ".PAY"
so that you c an e asily recogn ize them .
Additional DATA directories are created for each payroll by using the Data Path selection on the
Main Menu to establish the directory, and then using Set Company Data (from the Main Menu:
CO -SE ) to cre ate a new payroll Mas ter File.
Ad ditional specific info rm atio n on creatin g and m anaging dire cto ries in your syste m is contain ed in
your DOS, W INDOW S, O S/2 , or LIN UX operatin g syste m user's m anual.
1-6
© 1990-2005 LPI Information Systems
Revised 11/2005
Introduction
NOTE TO SYSTEM ADMINISTRATORS
INST ALLAT ION AC RO SS A NE TW OR K:
1. Copy the files from each diskette into a temporary Network Directory or Drive. If your
Master Disks contain subdirectories, create corresponding subdirectories (keep the same
subdirecto ry na m e) in your Ne two rk Directory. All disk ette s should be copied into a single
Netw ork D irecto ry.
2. At each workstation, follow the instructions above appropriate for your desktop
environment. When asked to identify the location of the Master Disk #1 files, specify the
data path to the te m pora ry Network D irectory as seen from your work station .
Presetting Data P aths: W hen DATASM ITH Payroll is started, the program reads a file named
CT RL .PAY (wh ich is a com m a-de limited text file) in the USER directory to dete rm ine the data path
and the video settings to be used upon initial entry into the program. If this file is not present, the
program will look in the USER directory for payroll data, and will use its built-in default settings for
the screen colors. You can cause payroll to start up using a particular data path by copying an
appropriate C TRL.P AY file in to th e U SE R dire cto ry be fore sta rting payroll. T he pro gram will
create a new CTRL.PAY each time the operator uses the DP (Data Path & Video Changes)
selection on the Main Menu, so you can use the program to create appropriate CTRL.PAY files.
Spec ial Term ination Pro cedu res: W hen the operator exits from D ATASM ITH Payroll, the
prog ram will exec ute a batch file nam ed P AYE XIT .BAT if it finds this file in the US ER directory.
You m ay use this fe ature to perform any "cleanu p" or o ther p rocedu res whe n the ope rator exits
from payroll.
Data file Bac kup: All payroll data files are of the form "*.PAY". The program files are contained
on your master diskettes, and you should mak e one backup copy of the programs. If your backup
program has a compression feature, you will find that it works very well on payroll data files:
compressions of 5:1 to 10:1 are comm on. If you need to restore data files, always check with the
payroll operato r be fore res toring the file M AS TER .PA Y: th is file conta ins all of the m ost recentlyentered data, a nd res toring an old copy will have the effect of "turning back the clock " to the tim e
the backup was made...and thus erasing the operator's most recent work. The other data files do
not change once they are named, and may be safely restored at any time.
RUN NING M ULTIPLE PA YRO LLS
If you calculate payroll for multiple years at the same time, several clients, multiple companies, or
multiple pay periods the fo llowing setup pro ced ure is reco m m end ed:
1. Fro m the M ain M enu , choose "Data Pa th & V ideo Chang es" m enu (DP ), and then “Select pa th
from library” (SL). Add your data path to the list if it does not already appear: enter the
com plete data path for the payroll, a distinctive display name, and a two-letter select code.
2. From the Select Data Path Menu, highlight your payroll and choose "Select Item” to activate.
3. From the Main Menu, choose "SET company data" on the COM PANY data entry & changes
menu (CO - SE). If the data path does not already exist, the program will create it and copy
the Tax Table file (TAX TBL .PA Y) from the pro gram dire cto ry (\P AYROLL or the default
directory) into the new data directo ry.
It is good practice to mak e additional directories within the payroll program directory for each
client or payroll. For example:
! If you have a single payroll but are finishing up year 2005 and simultaneously beginning
year 2006, you could name the new data directories \PAYROLL\2005\ and \PAYROLL\2006\.
© 1990-2005 LPI Information Systems
Revised 11/2005
1-7
Introduction
! If you have a client named Sm ith Com pany and another client named Jones Manufacturing,
you could name the new data directories \PAYROLL\SMITH\ and \PAYROLL\JONES\.
Payroll can deal with disks, directories, or sub-directories of any nam e in any locatio n in
your system. Keeping all subdirectories within the Payroll program directory is simply our
suggestion to help you find and identify all of the pa yroll-related files in your system . If
you have reason to locate payroll files elsewhere, this will not affect operation of your
payroll system.
Each data directory must have a copy of the tax table "TAXT BL.PAY", and will also contain the
major data files MASTE R.PAY, KEYFILE.PAY, ALTKEYS.PAY, plus payroll backup files once you
start entering data. W hen the operator establishes a new payroll, the program will create a new
directory, if nec ess ary, and will cop y the tax table file (T AX TB L.PA Y) from the program directory to
the new data path. W hen the operator uses "Set Company Data" (from the Main Menu: CO, then
SE), the program crea tes a new payroll ma ster file nam ed M ASTE R.P AY.
IM PO RT ANT : M ake s ure th e Ta x Ta bles in each client o r othe r Payro ll subd irectory
are updated at the appropriate time w hen tax rates change! If you create new
payrolls frequently, make sure the Tax Table in your default drive (the \PAYROLL
directory) is kept current: this tax table will be automatically copied into any new
payroll directories you create.
From the Payroll Main Menu, you activate the desired client's Payroll data by using "Se lect payroll
path from library" on the DAT A PAT H & V IDEO change s m enu (DP - SL).
SHARING PAYROLL PROGRAMS ON A LAN
If you do NOT need to support more than one Payroll user, you may skip this section.
Payroll is inherently a batch process. For this reason, only the primary user will know when the
data in a given payroll record and/or file is valid, and two users must not share the sam e payroll
data file simultaneously when the file is being updated during Periodic Entry, Manual Check,
Calculation, Company Data Entry, or Employee Data Entry. However, for purposes of the LAN
software, all Payroll data files should be flagged "Sharable Read/W rite" or the equivalent in the
language of your LAN, as Payroll uses mixed-language "Child Processes". For your convenience
in identifying them, all Payroll data files end in the extension ".PAY". Two or more users can
share the sam e payroll data file simultaneously when the file is only being read in order to produce
reports during any of the Reports menu, Master Reports menu, Com parative Reports menu, or
W -2 menu selections.
Two or more users can share the payroll programs to allow working on two different payrolls
simultaneously. Each user must have a directory unique to that user for Payroll's working files and
the C TR L.PA Y file wh ich de fines which pa yroll that us er is work ing with. Under no
circumstances should payroll working files be shared among users! To set up this
configuration:
1. Put all Payroll programs in a single directory (\PAYROLL). If this is a network directory to be
shared by multiple users, add the following to AUTO EXEC.BAT on each workstation:
SET PAYPAT H = {drive}:\PAYROLL
2. Modify AUTO EXEC.BAT or use another means to guarantee that the \PAYROLL program
directory is in the PATH for each user when Payroll is activated.
3. Ma ke a wo rking directory fo r eac h us er (\U SER1 \, \USER 2\, etc.). Copy PA YROL L.BA T into
each working dire cto ry. If yo u wish to have a special procedure run upon exit fro m Payroll,
1-8
© 1990-2005 LPI Information Systems
Revised 11/2005
Introduction
create a file named PAYEXIT.BAT which contains the procedure and copy it into each working
directory.
4. To start up Payroll for a given user, change the default directory to the user's unique working
directory, and type PAYROLL. Exam ple for User #1:
CD \USER1
PAYROLL
PAYR OL L US ER F ILES: Payroll USER files keep track of what a particular operator is working
on, such as the current Data Path, screen colors selected, etc. On a network, each workstation
must have its own USER directory to allow each operator to do work without interfering with the
other workstations. If you use the INSTALL program, it will suggest that the payroll programs be
placed in a directory named \PAYROLL on your lowest lettered hard disk drive. When operating
from only one workstation, we recomm end keeping Payroll USER files in a directory named
\PA YR OLL, wh ich will be the Payroll Program Directory for pre -Version 9 installation s. T he payroll
program refers to the \PAYROLL program directory as the "default drive", and this was the
location of all the payroll program files in versions 8.x and earlier. In order to enable us to provide
you with pro per telephone support, you should always write down the locatio n (d rive and directo ry)
assigned to the USER files in your installation. This location is specified by the operator during
the IN ST ALL pro ces s, and is co ntaine d in the environm ent va riable P AYU SER.
PAYR OL L PR OG RAM FILES : W ith Version 9.x, most payroll program files are shareable, and
should be installed in a directory on a network drive so that a single copy of the program files can
be shared by all the users on a network. If you use the INSTALL program, it will suggest that the
payroll programs be placed in a directory named \PAYROLL\USER , on the same drive you use for
your USER files. After installation, you can determine the location of your PROGR AM files by
pres sing the {F 5} key: the P RO GR AM directory will be identified on the System Statu s Repo rt.
PAYR OL L HE LP F ILES: Payroll Vers ion 9.x introdu ces HE LP files, wh ich conta in inform ation to
guide the operator in the operation of the system. Payroll HELP files [*.HLP] are shareable, and
should be installed in a directory on a network drive so that a single copy of the HELP files can be
shared by all the users on a network. If you use the INSTALL program, it will suggest that the
payroll programs be placed in a directory named \PAYROLL\HELP, on the same drive you use for
your USER files. After installation, you can determine the location of your HELP files by pressing
the {F5} ke y: the HE LP dire cto ry will be identified on the Sys tem Sta tus Re port. All payroll He lp
file names end in ".HLP" so that you c an e asily recogn ize them .
On Payroll Version 9.5x and later, the operato r can pre ss the {F5} ke y from the Main Menu in
order to obtain the Master File Status Report window. In the center of this window, the locations
of the USER FILES, the PROG RAM F ILES, and the HELP FILES are listed. On Payroll Version
7.x and later, the location of the Data files currently in use will be listed below the Main Menu.
MULTIPLE PRINTER SUPPORT
If your printer is a laser printer connected to port "LPT1:", no printer setup is necessary: choose
PR INTER 1 (the default) for prin ted outpu t. If your prin ter is a dot m atrix or ink jet p rinter, or is
connected to another port, or if you need to operate more than one printer, or if you otherwise
need to adapt to your printer, see the section on Multiple Printer Support in Appendix A.
© 1990-2005 LPI Information Systems
Revised 11/2005
1-9
Introduction
REAL HELP™
The REA L HE LP system for DAT ASM ITH P ayroll offers four different context-sensitive
mechanisms to get you the help you need by pressing one of the following function keys:
{F1}
{F2}
{F3}
{F4}
Help - Current Menu Item
General HELP
Specialized HELP (S tate T ax N otes , etc.)
Local Practice (User-defined HELP)
The REAL HE LP system is NOT simply another copy of the manual: it is up-to-date supplemental
information designed to supplement the printed manual. At this writing, there are well over 100
pages of additional HELP information included with each DATASM ITH Payroll system.
{F1}: CURRENT M ENU ITEM HELP:
The description of the current or last menu item highlighted appears. This selection can be
used by the operator to ans wer the ques tion “W hat does this selection do?”
{F2}: GENERAL HELP:
A "General Help Overview" appears. This selection contains general instructions for
navigating throu gh the system and for us ing the other HE LP selec tions.
{F3}: SPECIALIZED HELP:
So m e operation s, s uch as com pleting Sta te T ax Tables, require an in-d epth explanatio n. T his
selection fetches the appropriate background material to allow the user to operate the
program properly. Included with the various kinds of specialized Help are State Tax Notes for
each of the 50 states.
{F4}: LOCAL PRACTICE/USER-DEFINED HELP:
To allow third-party payroll preparers to put their own operating procedures for each client “on
line”, DATASM ITH Payroll will display the text file named "-LOCAL.HLP" located in the current
data directory. Local Help preparation instructions are available on request from LPI
Information Systems.
HELP SCREEN PUSHBUTTONS: W hen you activate HELP with {F1}-{F4}, the following
pushbuttons are displayed at the top of the Help Screen below the Screen Title:
CONTENTS (“C”)
Jum ps b ack to the T opic "Conten ts".
SEARCH (“S”)
Displays all of the Topics in an alphabetized list for selection by the
operator.
BACK (“B”)
Jumps back to the previously-selected Topic.
HISTORY (“H”)
1 - 10
Displays the last several Topics in the order they were viewed and allows
the operato r to select the m from the display.
© 1990-2005 LPI Information Systems
Revised 11/2005
Introduction
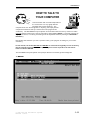
HOW TO TALK TO
YOUR COMPUTER
Com munication with a machine depends on
the correct use of a very rigidly defined
language with precise meaning. The
computer does not "second guess" on anything, but simply mak es
comparisons between what you enter and its own programm ed
vocabulary. The DA TAS MITH Payroll System com m unicates with the user by m eans of c ertain
prom pts and then waits for the user to respond by clicking OK, CANCEL, or another response on
a graphical screen; or entering something from the keyboard and then pressing the RETURN or
ENTER key.
Rem ember that whenever you see a question mark (?) the program is waiting for you to enter
som ething .
In this manual, the terms RETURN and ENTER are used interchangeably to refer to the key
that is pressed to terminate a line of input. Payroll will also respond to the left mouse
button instead of ENTER.
Th e DAT ASMIT H P ayroll Syste m use s pro m pts that fit one of these g ene ral catego ries:
1. MENUS
© 1990-2005 LPI Information Systems
Revised 11/2005
1 - 11
Introduction
Menus display the available selections next to a two letter code. You can make m enu selections
by ANY of the following methods:
1. Enter the two-letter code next to your choice. The Payroll system will react imm ediately upon
your entry of the second character: it will not wait for you to hit ENTER.
2. Use the arrow keys to highlight your selection, then hit ENTER.
3. Use a m ouse to click your selection on the menu.
4. Use the pull-down menus via mouse or keyboard:
a. Using a mouse, click on one of the selections on the menu bar at the top of the screen.
W hen the subm enu fo r that ite m appears, c lick on your choice.
b. Using your keyboard, hold down the ALT key to highlight the "Hot Keys" for each
selection and then depress that key. This will expose the sub-menu for that selection.
Use the arrow ke ys to highlight your selection and hit EN TER , or depress th e "H ot K ey"
shown.
Pressing ES C w hile in a m enu screen return s you to the n ext higher level sc reen .
2. PROMPTS THAT REQUIRE A "YES" OR "NO" ANSWER
These prompts are questions that can be
answered "Yes" or "No" and in no other
way. Exam ples are "Are there any errors
?" or "More Changes ?" W hen
respon ding to this type of qu estion , a
simple Y or N response is sufficient. The
program checks only the first letter of your
answ er. In m any cases a default
response will appear for you . The default
will be highlighted or a ppe ar in brack ets
(like this: <Y>), or it will be filled in on a blank for your approval. To use the default, simply press
ENTER . If 'Yes' or 'No' choices appear on comm and buttons, you may also click on your choice.
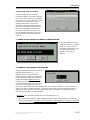
3. MULTIPLE CHOICE PROMPTS
These questions may appear as a set of
option buttons (a s illustrate d to the right)
or a list of numbered choices. In either
case, you are expected to pick one
choice by either clicking it with a mouse,
or typing the highlighted letter or number
associated with the choice. W hen the choices appear beside Option Buttons, you can use a
mouse to click on your choice. You can select Option Buttons from the keyboard by using the tab
key to select the Op tion are a, then us e the arrow keys to m ake your cho ice, the n hit EN TE R.
So m etim es "sh ortcu t keys" m ay appear in c hoices as highlighted lette rs. If so, you can sim ply
enter the letter to m ake your selection. If the screen also contains text input areas, you m ay have
to press the ALT key while entering the "shortcut key" to allow the computer to distinguish
betwe en tex t entry and the shortcu t key.
1 - 12
© 1990-2005 LPI Information Systems
Revised 11/2005
Introduction
4. Choosing from a List Box:
From the ke yboard, you can scroll
through the items in a List Box using the
up arrow or down arrow keys to highlight
your choice, or you can click your choice
in the list if you a re us ing a m ous e.
Typing the first letter of one of the
selections in the list box will cause that
item (or the first item to begin with that
letter) to be highlighted. Hit ENTER or
click OK to mak e your selection if you
have completed all items on the screen,
or follow the on-s creen ins tructions to
continue.
4. PROMPTS THAT EXPECT A NAME OR DESCRIPTION
These are questions such as
"Company Nam e ?" or "Enter
name of ?" and a name or
description is expected. Type
in the inform atio n and hit
EN TER or c lick OK (if
present).
5. PROMPTS THAT EXPECT AN AMOUNT
Typical questions that require an amount
might be "Enter amount of .... ?" or
"Regular Hours ?" and indicate the
system exp ects a num ber a s a re spo nse .
If anything but a number is entered, the
system will display a Redo from start
message and you should re-enter. The
only valid characte rs that m ay be used in
an amount are the digits 0-9, a plus or
m inus sign, a nd the de cim al point. Do Not enter any com m as in n um bers . You d o no t have to
ente r a plus sign for po sitive nu m bers , as num bers with no sign a re as sum ed to be positive. In
addition, you do not nee d to enter any leading zeros before a num ber or trailing zeros after a
decim al point (just like a po cket calculator).
Exam ples: 45 is equiva lent to 0045 and 6.7 is equivalent to 6.70.
Rem ember that computers mak e a distinction between letters and numbers, even though
they m ay look sim ilar. The letter "L" key may NOT be substituted for the number one and the
letter "O" key may NOT be substituted for the number zero.
© 1990-2005 LPI Information Systems
Revised 11/2005
1 - 13
Introduction
If you press ENTER in response to a prompt that expects an amount, the value is assumed to be
zero. If you enter text when the computer is expecting a number, the computer may ask you to reenter the value.
6.
PROMPTS THAT EXPECT A D ATE
Dates may be entered in many different
formats. In all cases a date consists of
the number of the month (1-12), the day
of the month (01-31), and either the last
two digits of the year (00-99) or the full 4digit year (1 950-204 9). You m ay separa te
m onth, day, and year by dashes (-),
slashes (/), or leave the separator out
altogether. If you leave out the separator,
the day must always contain two digits (use a leading zero for numbers less than ten), and the
year m ust be eithe r two o r four digits. In all cases, the m onth m ay be e ither on e or tw o digits
(while your system clock indicates “20xx”, two-digit entries between 00 and 49 will be interpreted
as 2 000 -204 9). No m atter w hich entry form at you u se, P ayroll will neve r have a problem with
“year 2 000 " or an y other year. Exam ple: May 7, 2005 may be written 5/7/05, 5-07-05, 05/07/05,
05-0 7-05 , 50705, 5/7/2005 , 5-7-20 05 o r 507 200 5.
7.
E NT ER ING AN EM PL OY EE ID
If you know the ID for the
desired employee, you can
simply type in the employee
ID and hitting ENTER (or
Clicking ‘Ok’). If you know
the physical position of the
employee record in the file,
you can enter a vertical bar
(‘|’ or ‘Shift-\’) followed by the
record num ber: ‘|10 ' would
select the tenth em ployee in
the Master file.
If you do not know the employee ID or record number, you can search the selected Master file for
the employee by changing the Employee Identification Mode to Browse by typing ‘Alt-B’ or clicking
‘Brow se’.
The Browse screen allows you to select
any of seven Search Key orders and then
brow se throug h the em ployee s listed. On
a given screenful of employees, you can
jump to a selection by typing the first letter
(or number) of the selection. To get
another screenful, use the Page Down
and Page Up keys or click “Page Down”
or “Page Up” on the Browse screen.
1 - 14
© 1990-2005 LPI Information Systems
Revised 11/2005
Introduction
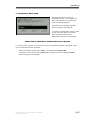
8. ENTERING A DATA PATH
The DA TA P AT H entry screen is
illustrated to th e left. T he pro gram will
allow you to Browse your system and
select an existing da ta path.
Som e parts of the program will either
allow o r require a new data path.
To create a new data path , enter it on this
screen: if the path does not cu rrently
exist, the program will ask your
permission to create a new data path.
OPERATING A GRAPHICAL SCREEN WITHOUT A MOUSE
If you do not have a mouse, or if you prefer to use your keyboard to operate a graphical screen,
you can operate the screen as follows:
! Move from field to field with the TAB key, or backwards with Shift-T AB.
! Close the current window using Alt-F4 (many windows can also be closed with ESC).
! Exit the program using Ctrl-X.
© 1990-2005 LPI Information Systems
Revised 11/2005
1 - 15
Introduction
STARTING THE SYSTEM
MS-DOS, DR-DOS, Novell DOS, PC-DOS:
Sta rt your com puter in the usual way and select the dire cto ry or drive that c ontain s your payroll
prog ram s. If you have crea ted a directory nam ed "P AYR OL L", the com m and wou ld be:
CD \PAYROLL
Once you have selected the proper directory, enter the comm and:
PAYROLL
OS/2:
1. On the O S/2 Des ktop, Dou ble-Click the appropriate Folder.
2. In the folder, Double-Click the PAYROLL Icon.
WINDO WS 3.x:
DATASMITH
Payroll
1. On the W indows Desktop, Double-Click the appropriate Folder or Group.
2. In the folder or group, Double-Click the PAYROLL Icon.
WINDOWS 95/98/NT/2000/XP:
1. O n the W indows D esktop, Click ST AR T, the n PROGRAM S, then D AT AS MITH Payroll.
2. You can also righ t-click DA TAS MITH Payroll and then click “Se nd To D esktop.” T his will
install the Payroll Icon on the Desktop so that you can simply Double-Click the PAYROLL
Icon to sta rt Payroll.
The disk drive should select and the DATAS MITH Payroll System MAIN MENU should appear
within a few seconds. If not, check to make sure a program nam ed "PAY0.EXE" appears in your
Payroll Program directory, and a file named PAYROLL.BAT appears in your USER directory. The
PAYROLL.BAT file is the startup program.
NOTE : The Passwords for the Sample Data files are "PW1" and "PW 2".
1 - 16
© 1990-2005 LPI Information Systems
Revised 11/2005