1
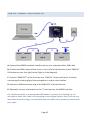
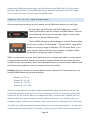
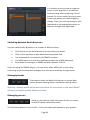
Lighting Control System for Mac OS X and PC Windows User Manual - 1.0.3 Hardware Design © 2009 ENTTEC Pty Ltd Software © 2009 DB AUDIOWARE LTD Page 1 Page 2 CONTENTS DMXIS Software License Agreement .................................................................................... 6 Acknowledgements .......................................................................................................... 7 Welcome! ............................................................................................................................. 9 About this manual ............................................................................................................ 9 Installing the DMXIS software ............................................................................................ 10 Mac OS X ........................................................................................................................ 10 PC Windows ................................................................................................................... 10 Unlocking the Product.................................................................................................... 10 Need help with DMXIS?...................................................................................................... 11 Software Updates ........................................................................................................... 11 Support........................................................................................................................... 11 Missing a Fixture? .......................................................................................................... 11 DMX Primer ........................................................................................................................ 12 What is DMX? ................................................................................................................. 12 Are my lights DMX capable? .......................................................................................... 12 Will my “XYZ-DMX1300ti LaserRite” work with DMXIS? ................................................ 12 How do I connect everything up? .................................................................................. 13 How do I set up the “DMX addressing”? ........................................................................ 14 DMXIS Hardware Interface ................................................................................................. 16 Firmware Upgrades ........................................................................................................ 16 USB Power requirements ............................................................................................... 16 DMX Output Connections .............................................................................................. 17 LED States ....................................................................................................................... 17 Supported Footswitches ................................................................................................ 18 DMXIS Software Reference ................................................................................................ 19 The Faders ...................................................................................................................... 19 Selecting faders .............................................................................................................. 19 A note about context sensitive controls ........................................................................ 20 Page 3 XY Controller .................................................................................................................. 20 Channel Invert ................................................................................................................ 20 Sound Tracker ................................................................................................................ 21 Oscillator ........................................................................................................................ 21 Master controls .............................................................................................................. 22 Loading fixtures .............................................................................................................. 22 MIDI Learn ...................................................................................................................... 23 A note on MIDI resolution ......................................................................................... 23 PRESET Manager ............................................................................................................ 23 Switching between banks & presets ......................................................................... 24 Managing banks ........................................................................................................ 24 Managing presets ...................................................................................................... 24 Sorting the presets .................................................................................................... 25 Smooth cross fading between presets ...................................................................... 25 Setting the bank master tempo ................................................................................ 26 Auto-run a bank of presets ....................................................................................... 26 Footswitch preferences .................................................................................................. 27 Switch type ................................................................................................................ 27 Single click ................................................................................................................. 27 Double click ............................................................................................................... 27 Click & hold ............................................................................................................... 28 Audio/MIDI Preferences................................................................................................. 28 Audio Hardware ........................................................................................................ 28 MIDI Hardware .......................................................................................................... 29 VST and Audio Units plug-in support ............................................................................. 29 Revision History .................................................................................................................. 31 Release 1.0.2 .................................................................................................................. 31 Release 1.0.3 .................................................................................................................. 31 Page 4 Bug fixes .................................................................................................................... 31 Enhancements........................................................................................................... 31 Page 5 DMXIS SOFTWARE LICENSE AGREEMENT Before installing the DXMIS software, please carefully read and agree to the following legal agreement. From here on the "Software" refers to the DMXIS Lighting Control Software product in whole or in part, including all files, data and documentation. By installing the Software, you are consenting to be bound by and become a party to this agreement. If you do not agree to all of the terms of this agreement do not install the Software. DMXIS Lighting Control Software END USER LICENSE AGREEMENT 1. Copyright Notice The Software is © Copyright 2009 DB AUDIOWARE LIMITED, all rights reserved, and is protected by United Kingdom copyright laws, international treaties and all other applicable national or international laws. The sole owner of this software product is DB AUDIOWARE LIMITED. 2. License Agreement GRANT. With respect to each DMXIS hardware interface owned by you, DB AUDIOWARE LIMITED grants you a non-exclusive right to install and use the Software on multiple computers for use with said DMXIS hardware interface. You may copy the Software for personal archival purposes only. TITLE. Title, ownership rights, and intellectual property rights in and to the Software shall remain in DB AUDIOWARE LIMITED. This agreement does not include the right to copy or sublicense the Software and is personal to you. DISCLAIMER OF WARRANTY. The Software is provided on an "AS IS" basis, without warranty of any kind, including without limitation the warranties of merchantability, fitness for a particular purpose and noninfringement. The entire risk as to the quality and performance of the Software is borne by you. Should the Software prove defective in any respect, you and not DB AUDIOWARE LIMITED assume the entire cost of any service and repair. HIGH RISK ACTIVITIES. The Software is not fault-tolerant and is not designed or intended for use in environments requiring fail-safe performance. DB AUDIOWARE LIMITED expressly disclaims any express or implied warranty of fitness where the Software is used in any such environments. LIMITATION OF LIABILITY. UNDER NO CIRCUMSTANCES AND UNDER NO LEGAL THEORY, TORT, CONTRACT, OR OTHERWISE, SHALL DB AUDIOWARE LIMITED OR ITS SUPPLIERS OR RESELLERS BE LIABLE TO YOU OR ANY OTHER PERSON FOR ANY INDIRECT, SPECIAL, INCIDENTAL, OR CONSEQUENTIAL DAMAGES OF ANY CHARACTER INCLUDING, WITHOUT LIMITATION, DAMAGES FOR LOSS OF GOODWILL, WORK STOPPAGE, COMPUTER FAILURE OR MALFUNCTION, OR ANY AND ALL OTHER COMMERCIAL DAMAGES OR LOSSES. IN NO EVENT WILL DB AUDIOWARE LIMITED BE LIABLE FOR ANY DAMAGES IN EXCESS OF THE PURCHASE PRICE OF THE PRODUCT, EVEN IF DB AUDIOWARE LIMITED OR ANY IF ITS AUTHORIZED RESELLERS SHALL HAVE BEEN INFORMED OF THE POSSIBILITY OF SUCH DAMAGES, OR FOR ANY CLAIM BY ANY OTHER PARTY. LIMITATIONS ON USE. You may not use, copy, modify, translate, sell, or transfer the Software or any copy except as expressly defined in this agreement. You may not attempt to unlock or bypass any copyprotection or authentication algorithm utilized by the Software. You may not modify, translate, reverse Page 6 engineer, decompile or disassemble the software (except and solely to the extent an applicable statute expressly and specifically prohibits such restrictions), or create derivative works based on the Software. You may not redistribute the Software without the prior consent of DB AUDIOWARE LIMITED. TERMINATION. Either party may terminate this agreement immediately in the event of default by the other party. Upon any termination of this agreement, you shall immediately discontinue the use of the Software and shall uninstall the Software and Documentation and all copies thereof. GOVERNING LAW. The laws of Scotland govern this Agreement, and shall govern any dispute relating to this Agreement. The application of the United Nations Convention on Contracts for the International Sale of Goods is expressly excluded. MISCELLANEOUS. This agreement represents the complete and exclusive statement of the agreements concerning this license between the parties and supersedes all prior agreements and representations between them. It may be amended only by a writing executed by both parties. If any provision of this agreement is held to be unenforceable for any reason, such provision shall be reformed only to the extent necessary to make it enforceable, and such decision shall not affect the enforceability (i) of such provision under other circumstances or (ii) of the remaining provisions hereof under all circumstances. Headings shall not be considered in interpreting this agreement. DMXIS EULA Rev.270309 ACKNOWLEDGEMENTS DMXIS hardware design is copyright © 2009 Enttec Pty Ltd. DMXIS software (including all component programs, plug-ins, graphics and this documentation) is copyright © 2009 DB AUDIOWARE LTD. db audioware and DMXIS are trademarks of DB AUDIOWARE LTD. VST is a trademark of Steinberg Media Technologies GmbH Apple, the Apple logo and Mac are trademarks of Apple Computer, Inc., registered in the U.S. and other countries. The Audio Units logo and the Audio Units symbol are trademarks of Apple Computer, Inc. Windows is a registered trademark of Microsoft Corporation in the United States and other countries. All other product and company names are trademarks or registered trademarks of their respective holders. Page 7 Page 8 WELCOME! DMXIS is a flexible, easy to use lighting control package, specifically designed for live performers. Most lighting controllers assume that an operator is available to manually control the show. They are often packed with features that are of little use to the live performer who just wants a nice looking light show with a minimum of fuss. DMXIS was designed specifically for live performers who want to run an automated light show while performing on stage. The hardware is incredibly easy to connect up, and the software extremely simple to learn and operate, while being flexible enough to control modern intelligent light fixtures. With DMXIS, you pre-program your entire light show in advance, letting you concentrate on your live performance. You can then manually step through the light show using a simple footswitch plugged into the DMXIS hardware interface. Or, if you use audio software such as Logic, Ableton Live, Cubase or Mixmeister in your live show, you can use the DMXIS plug-in (VST or Audio Unit) to run your lights directly from your audio software! This is incredibly effective, as your light show automatically synchronizes to the performance, even if you change tempo live. ABOUT THIS MANUAL This manual is a quick introduction and reference guide for DMXIS. For a more comprehensive introduction to DMXIS and its features, please watch the tutorial videos located on your original software CD. They are much more fun than reading a manual! Page 9 INSTALLING THE DMXIS SOFTWARE INSTALL THE SOFTWARE BEFORE CONNECTING YOUR DMXIS HARDWARE INTERFACE. DMXIS must be unlocked before it can transmit DMX data. For this, you need an internet connection with a web browser, and a valid email address. MAC OS X Insert the DMXIS software CD. Double-click on the setup.pkg icon. PC WINDOWS Insert the DMXIS software CD. Double-click on the setup.exe icon. UNLOCKING THE PRODUCT Connect the DMXIS hardware interface to a USB port on your computer Start the DMXIS standalone program (located in your main OS X Applications folder, or your Windows desktop). Note down your Hardware ID. Go to http://www.enttec.com/unlock_dmxis Fill in the short form. You will immediately receive an unlock code. Enter the unlock code into DMXIS Your software is now permanently unlocked! DMXIS does not use restrictive challenge/response copy protection, and is not tied to a particular computer. The unlock code is unique to your DMXIS hardware interface. You can use the same unlock code on any computer, as long as that computer is using the same DMXIS hardware. If you do not unlock the software, or if the DMXIS hardware is not connected, the software will continue in demo mode - no DMX data will be transmitted, but the software will otherwise be fully functional. Page 10 NEED HELP WITH DMXIS? SOFTWARE UPDATES Before getting stuck into the DMXIS software, please visit the DMXIS support site to check if any new software updates are available: www.enttec.com/dmxis The latest version of the DMXIS software and its fixture library will always be available for download from this location. SUPPORT If you have any questions about DMXIS, check out the ENTTEC support centre: www.enttec.com/support-center/ If you can’t find the answer to your question, just raise a new support ticket and we’ll get back to you promptly. DMXIS is constantly being improved and upgraded, so don’t be shy to ask us for help! MISSING A FIXTURE? DMXIS ships with support for a selection of popular lighting fixtures. However, hundreds of new light fixtures flood the market each year, and chances are that by the time you read this, a new fixture library will be available for download from our support site. So, please go to www.enttec.com/dmxis and see what’s currently available! If you own a fixture which is NOT supported by DMXIS, don’t worry! Just raise a new support ticket, we will write a new fixture file for you - quickly, and for free! Remember, DMXIS can support ANY light fixture which has a DMX input. Page 11 DMX PRIMER First, let’s look at what DMX actually is. Rather than getting too technical, we will just cover the basics of setting up a simple lighting rig for a band or DJ. For more stuff like this, watch the training videos on your original DMXIS CD. WHAT IS DMX? DMX is a standard for connecting up stage lighting. It has been the standard in professional lighting for many years, and nowadays most affordable light fixtures support DMX. (For the musically inclined, think of DMX as the “MIDI of the lighting world”) ARE MY LIGHTS DMX CA PABLE? A DMX-capable light fixture will have at least two XLR connectors (probably marked DMX IN / OUT) and some way of setting the DMX address (either a row of small switches or a control panel). The XLR connectors could have 3 or 5 pins, depending on the manufacturer. The fixture manual will tell you how many DMX channels that light uses, and what features the light has. Traditional parcans with halogen lamps (which were standard issue kit for lighting bands before the arrival of modern LED fixtures) usually plug into a dimmer pack, which in turn can be DMX controlled. If your light fixture is “sound activated” and has no XLR connectors, it cannot be controlled by DMXIS. WILL MY “XYZ-DMX1300TI LASERRITE” WORK WITH DMXIS? If your light fixture supports DMX, you can control it with DMXIS. It doesn’t matter whether it is a dimmer pack, LED spot, scanner, moonflower, moving head or a laser. DMXIS can control ANY light if that light has DMX connectors. Page 12 HOW DO I CONNECT EVE RYTHING UP? A: Connect the DMXIS hardware interface box to your computer with a USB cable. B: Connect the DMX output (either 3 pin or 5 pin) of the interface box to the “DMX IN” XLR socket on your first light fixture (Light A in the diagram). C: Connect “DMX OUT” of the first fixture to “DMX IN” of the next fixture. Continue connecting all remaining light fixtures together in a daisy-chain fashion. D: Connect a DMX terminator plug to the DMX OUT of the last fixture. E: Optionally connect a footswitch to the ¼” jack input on the DMXIS interface. For reliable operation, use data-grade DMX cables to connect your lighting rig, not microphone cable. Mic cable is not designed to carry digital signals, and if you run very long cables around a stage, you could find that mic cables cause random problems with your lights. Page 13 Always use a DMX terminator plug in the last fixture of the DMX chain. The terminator prevents “ghost echoes” of the DMX signal from bouncing up & down the chain. Again, this is more of an issue if you run very long DMX cables. HOW DO I SET UP THE “DMX ADDRESSING”? After connecting everything up, you need to set the DMX start address for each light. On each light, you will find a row of DIP switches or a small control panel which you use to enter the DMX address. Consult the addressing instructions for your own lights, as every light can work in a slightly different way! Think of DMX addressing like buildings on a street. Each building has its own number (“3 Smith Road”, “4 Smith Road”). Large office blocks can occupy a range of numbers (“22-35 Smith Road”). You never see two houses with the same number, or adjacent office blocks with overlapping ranges of numbers. DMX is pretty much the same. Each light fixture has a unique start address, and occupies a range of channels from that point onwards. Complex fixtures use more channels than simple fixtures. You normally* don’t have multiple fixtures on the same start address, and two fixtures using adjacent channel numbers must not overlap! Example: Say you have two 4-channel dimmer packs, and two 13-channel scanners. The simplest DMX addressing scheme would be: Dimmer A = Ch 1-4 Dimmer B = Ch 5-8 Scanner A = Ch 9-21 Scanner B = Ch 22-34 A fixture’s start address does NOT need to immediately follow the previous fixture. You could have a dimmer pack on Ch 1-4, then a scanner on Ch 18-25. It doesn’t matter that channels 5-17 are unused. Why is this important? Well, it means that in DMXIS you can address a fixture so that it begins on the first fader of a row, or on a specific page. For example, Page 1 could be your dimmers, page 2 your scanners, and page 3 your LED spots. *Actually, you CAN put multiple identical fixtures on the same start address – but they will all do exactly the same thing! For example, if you set all your LED parcans to channels 10Page 14 13, then they will ALL respond identically when you move sliders 10-13 in DMXIS. This can be handy if you want to increase the light output of your rig for a big show, without needing to reprogram your presets. (But it absolutely does NOT make sense to put different types of fixture on the same start address!) Page 15 DMXIS HARDWARE INTERFACE The DMXIS hardware interface is a professional standard USB-DMX converter, capable of transmitting a full universe (512 channels) of DMX-512 data at full 40 Hz frame rate. An on-board microprocessor performs all the DMX frame buffering – in other words, the interface itself is responsible for generating a steady and reliable DMX data stream. This is far more reliable than some cheaper USB-DMX devices which rely on your computer to generate the data. To protect your computer from unintentional electrical surges (for example, if someone were to foolishly plug a phantom-powered mic cable into your interface) the DMXIS interface has full 1500V data and power isolation. FIRMWARE UPGRADES The interface firmware can easily be upgraded should any bug fixes or enhancements be introduced. (If you gave us permission to contact you by email when you unlocked your DMXIS software, you will automatically receive an email notification any time a new firmware release becomes available). USB POWER REQUIREMEN TS The DMXIS hardware interface is powered directly from your computer’s USB port. If you find that your computer cannot provide sufficient power to the interface, we recommend you connect the DMXIS interface via an external powered USB hub. Page 16 DMX OUTPUT CONNECTIO NS For your convenience the interface has two DMX output sockets, a 3-pin XLR and a 5-pin XLR. This allows you to connect your lighting rig using either 5pin or 3-pin XLR cables. (Although the official DMX standard specifies 5-pin connections, many lighting manufacturers routinely use 3-pin connections on their most popular lighting fixtures). Important: do not attempt to connect lights to BOTH the 3-pin and 5-pin output sockets simultaneously. Use EITHER the 3-pin OR the 5-pin output. LED STATES There are four LEDs on the interface. The two LEDs on the USB connector side should always be on. These indicate that the interface is receiving power from the USB connection, and that the isolation circuit within the interface is working correctly. On the other side of the box, the LED between the XLR sockets should blink at a constant rate whenever the DMXIS software (standalone or plug-in) is running. This indicates that the interface is being controlled successfully by the software. The remaining LED, next to the footswitch socket, gives you visual confirmation whenever a footswitch press is detected. Page 17 SUPPORTED FOOTSWITCHES The footswitch input on the DMXIS interface is a standard ¼” stereo jack socket. Into this, you can plug any standard non-latching footswitch - for example, a sustain pedal from a MIDI keyboard, or a non-latching foot pedal from a guitar amp. You can use both normally-open and normallyclosed types of switch. Only use passive pedals that simply short-out the tip & sleeve (Switch A) or ring & sleeve (Switch B) of the ¼” jack. Do NOT use any proprietary type pedals which do not a standard mono/stereo ¼” jack connections, or which transmit any additional power or control signals along the cable. This diagram shows the wiring for a dual switch. It is also quite safe to plug in a single switch using a simple mono ¼” jack plug (with no “ring” connection). See Footswitch preferences on page 27 for more information about using footswitches with DMXIS. Page 18 DMXIS SOFTWARE REFERENCE We will now describe every feature of the DMXIS software in detail. Let’s start with the main screen... THE FADERS The 32 vertical faders are used to directly manipulate individual DMX channels. The channel number is shown above the fader, and the channel type & value is shown below. To adjust a channel value, click & drag the handle on the fader. To make fine adjustments, press the <shift> key while dragging. You can click on the values under the faders and type in settings directly. When you open DMXIS, the faders control DMX channels 1-32. To access higher channels, use the Prev and Next buttons in the top-right corner. For example, click once on Next to access channels 33-64. SELECTING FADERS Selected channels are highlighted in blue. Clicking on a fader once will select that channel. To select a range of channels, click on the first fader then <shift>click on the last fader. You can select multiple individual channels by <ctrl>clicking on each fader. Double-clicking on any named channel (e.g. “Red”) will automatically select ALL channels with that name on identical fixtures. This is a very handy short-cut when you need to make identical changes to a group of lights. To deselect all the faders, click once on the DMXIS logo on the top left. Page 19 A NOTE ABOUT CONTEXT SENSITIVE CONTROLS Most of the remaining controls (XY controller, Channel Invert, Sound Tracker and Oscillator) are context sensitive - they automatically show the values for the currently selected faders only. Equally, when you move a context-sensitive control, you change the value for all selected faders. The important thing to realise is that every DMX channel (1-512) has its own settings for XY, Channel Invert, Sound Tracker and Oscillator. That’s a LOT of values! But the context sensitive mechanism lets you make complex changes to these DMX settings very quickly. Context-sensitive controls are greyed-out if no faders are selected, or when the multiple selected faders have different values for that control. For example, if Ch1 Band=Sub and Ch2 Band=Mid... Select Ch1: the Band control shows Sub. Select Ch2: the Band control shows Mid. Select BOTH channels: Band greys out, indicating that the selected channels have different values. Change Band to Hi while both channels are selected. This will change the value of BOTH Ch1 AND Ch2 to Hi. XY CONTROLLER This control is normally disabled. It automatically enables when you select any channel in a light fixture with Pan/Tilt capabilities (for example, a scanner or moving head). Simply drag your mouse around to quickly position the fixture. You can <shift>drag for fine control. CHANNEL INVERT This control inverts the logical direction of all selected channels. For example, if you have a t-bar stand with four scanners, try inverting the Pan on scanners 3 & 4, and then move all four Pan controls at once. You’ll see the scanner beams cross in the middle. Page 20 SOUND TRACKER The sound tracker lets you “sound activate” selected channels to track the input audio. There are 5 controls to play with... Level: controls the amount of sound tracking. Band: the range of frequencies to track (Sub | Lo | Mid | Hi). Attack & Release: controls how quickly the tracker responds to the audio. Dir: controls the direction in which the fader moves in response to the audio. Sound tracking is the quickest way to get some dynamic movement into your light show. BUT, it is not the most effective way in DMXIS! Sound tracking as a technique can be rather unpredictable - the results will vary wildly depending upon the level and type of the music. A MUCH better way to add excitement and movement to your light show is the DMXIS Oscillator, coming up next! OSCILLATOR The oscillator lets you automatically sweep channel values up & down with a wide variety of “shapes”. Although consisting of only 5 simple controls, the oscillator is the secret weapon in creating exciting moving visuals with DMXIS. This is the feature that lets you quickly create time-synced chases across any number of LED parcans, or trace complex synchronised patterns in the air with a bank of scanners! Type: choose from Sine, Square, Triangle, Saw Up & Saw Down shapes. Amount: how much the fader should move by. Chase: when multiple channels are selected, this spreads the oscillators to create smooth chase effects. This is the most powerful feature of the oscillator! Speed: the time taken (in musical bars) for a full sweep of the oscillator. Shape: morphs the basic waveform into more interesting shapes. Check out the training videos for some real Oscillator examples, and trust us when we say that this is probably the most useful feature in DMXIS! Page 21 MASTER CONTROLS The Speed control sets the song tempo. Use this in conjunction with the Oscillator Speed control to create presets that move in time with your music. The Level control allows you to dim & blackout your entire rig from one control. If NO fixtures are loaded, Level will proportionately decrease all 512 faders as it is turned down. If some fixtures are loaded, Level will intelligently dim only those channels which are dimmable. (For example, Pan/Tilt controls on scanners will not be affected by Level). Note that the master controls are NOT context sensitive - there is only one global value for Speed and Level. Also note that with the DMXIS plug-in, the host tempo overrides the Speed control. LOADING FIXTURES To allocate a fixture to a range of faders, right-click on the start fader and navigate the Fixture Library menu to locate your light. To unload a fixture, right-click on any channel and select Fixture Library > No fixture Once a fixture is loaded, you have several benefits: You see sensible names & values under each fader, rather than basic numbers. The DMXIS Master Level control now works properly for that fixture (i.e. control channels are not dimmed). The XY controller will enable for that fixture (if it has Pan/Tilt parameters) You can double-click on faders, and any similarly named faders will be automatically selected. (Handy for making quick changes to a group of lights) You can use DMXIS without loading any fixtures, but you will find it a much more pleasant experience if you do use them! Page 22 MIDI LEARN To associate a fader, dial or other DMXIS control with an external MIDI keyboard, right-click on the control and select Learn. When you see the MIDI LEARN message appear, move any controller or key on your MIDI keyboard. Now, that DMXIS control can be remote-controlled from your MIDI keyboard. DMXIS can respond to MIDI CC messages, NRPN messages and Note On / Note Off messages Any MIDI Learn associations will be remembered when you quit DMXIS. The same associations are also shared between the DMXIS standalone program and the DMXIS plug-ins. A note on MIDI resolution MIDI CC and Note messages have a resolution of 7 bits, (0-127). The resolution of a single DMX channel is 8 bits (0-255). Therefore, if you control DMXIS using MIDI CCs or Notes, you will not get the full resolution available. This could manifest itself as jerky movements of scanners & moving heads, for example. The solution (if available on your MIDI controller) is to use high resolution 14-bit MIDI NRPN messages to control DMXIS. PRESET MANAGER Click on the Preset Manager button at the top of the screen to switch in & out of the Preset Manager screen. You can create any number of banks, and each bank contains any number of presets. To create a new preset, adjust the channel faders to their desired positions, set up any sound activation or oscillators, and then click on “New” under the preset list. Page 23 It is entirely up to you how to organize banks. A nice approach is to have one bank per song, each containing a list of presets (in correct order) for every point in the song where you need a lighting change. Then, you can simply tap on your footswitch at the appropriate points to advance through your light show. Switching between banks & presets You can switch banks & presets in a number of different ways: Click directly on the bank/preset on screen with your mouse Click on the up/down arrows above the bank/preset lists Use a footswitch connected to the DMXIS interface Use MIDI Learn to control the up/down arrows from a MIDI keyboard Send Note On messages to DMXIS on MIDI channels 15 & 16 If you are using the DMXIS plug-in, you can easily add a MIDI track to your song containing all your bank/preset changes, thus entirely automating the light show. Managing banks The buttons under the bank list allow you to create New banks, Rename existing banks, and Delete existing banks. Warning – deleting a bank will permanently delete ALL the presets in that bank! DMXIS will warn you before actually deleting the bank. Managing presets Similarly, the buttons under the preset list let you create, rename & delete individual presets. The Overwrite button is very useful – it lets you make quick tweaks to your presets: Page 24 Load a preset Switch back to the main screen and modify the settings Switch to the preset screen and click on Overwrite Click Yes in the confirmation dialog. Sorting the presets The Sort button above the preset list allows you to change the order of the presets. This is essential if you want to step through a song using your footswitch. Click on the Sort button to activate sort mode. To move a preset, click on it then use the up/down buttons above the list. Repeat for other presets as necessary Click on the Sort button to deactivate sort mode Smooth cross fading between presets By default, when you switch from one preset to another, the change happens immediately. But often, it is nicer if your lights smoothly fade from one preset to the next. The Fade To Next dial allows you to do this. Say you have two presets A and B, and you want A (a static blue look) to smoothly morph into B (a warm amber look). Select preset A in the preset list Increase the Fade To Next dial to read 2.00 (2 seconds) Now click on preset B. You will see blue gradually fade to amber over 2 seconds. The Fade To Next control is also context-sensitive. Each preset has its own Fade To Next value, and the control displays the value for the currently selected preset. The fade times are remembered when you quit DMXIS. If you are using the DMXIS fixture library (as you should be!) cross fading becomes intelligent – that is, DMXIS will only cross fade channels for which cross-fading makes sense! For example, RGB levels and pan/tilt settings will smoothly cross fade, so you will see your scanners & moving head fixtures gently glide from one preset to another. However, colour and gobo wheels, will cleanly snap from their old settings to their new settings halfway through the cross fade. Page 25 Setting the bank master tempo Each bank can be assigned a different tempo, and every preset in a bank will run at the bank tempo. (The tempo sets the DMXIS oscillators to run in sync with your song) Assuming you store each song in a separate bank, this basically lets you define the song tempos for your live set. You can still tweak the overall tempo (to match the actual tempo your band is playing at!) from Master Speed on the main page. If you have a MIDI foot pedal, a good solution is to control Master Speed from an expression pedal (using MIDI Learn). Then, each bank will switch to the correct tempo for that song (via Bank Tempo) but you can tweak the tempo up & down using the expression pedal. This feature is only useful with the DMXIS standalone program. In the VST/Audio Unit plug-in, bank tempo is always overridden by the current host tempo. Auto-run a bank of presets This is a neat feature for running a hands-off show in a loop, for example, to keep your audience amused before the start of your show. The Autorun Bank dial (right of the preset list) automatically advances through the presets in the currently selected bank, at a predetermined rate. Once the end of the bank is reached, it will loop back to the start of the bank. This is really only useful in the DMXIS standalone program. If you are using the DMXIS plug-in, you have much more scope and control when creating interesting automatic shows. More later... Page 26 FOOTSWITCH PREFERENCES This window is accessed from the standalone DMXIS program (Footswitch - Footswitch Settings menu on OS X, File - Footswitch Settings menu on Windows). The settings applied here will also be used for the DMXIS plug-in. Single or dual footswitches can be used with DMXIS (see LED States There are four LEDs on the interface. The two LEDs on the USB connector side should always be on. These indicate that the interface is receiving power from the USB connection, and that the isolation circuit within the interface is working correctly. On the other side of the box, the LED between the XLR sockets should blink at a constant rate whenever the DMXIS software (standalone or plug-in) is running. This indicates that the interface is being controlled successfully by the software. The remaining LED, next to the footswitch socket, gives you visual confirmation whenever a footswitch press is detected. Page 27 Supported Footswitches on page 17 for more information). This dialog box lets you configure up to three different actions for each switch. Switch type Change to match the type of switch connected. (Note: sustain pedals for Roland, Yamaha or Kawai keyboards are usually normally-closed.) Single click Sets the action performed when you click once on the pedal. You can choose to cycle through the presets or banks, or load a random preset/bank. Double click Sets the action performed if you click twice on the pedal in quick succession. The double click time fader defines the time during which two clicks must occur. A value of 200-250ms is a good starting point. If you configure both single AND double click actions, there will be delay equal to the double click time before single clicks are activated. If you want single clicks to activate immediately (for precise switching of presets), set Double click to “no action”. Click & hold Sets the action performed when the pedal is pressed and held for a minimum time (set by the Click & hold time fader). Click & hold also has a unique action called Last preset (while held). This temporarily loads the last preset in the current bank while the pedal is held down. When the pedal is released, the original preset is then loaded back in. You can use this to trigger a special effect (such as a crowd blinder or a fast strobe) on demand at multiple points in a song. Page 28 AUDIO/MIDI PREFERENCES This window is accessed from the standalone DMXIS program (DMXIS - Preferences menu on OS X, File - Preferences menu on Windows). Note that the audio & MIDI settings specified here only apply to the DMXIS standalone program! The VST & Audio Unit plug-ins get their audio & MIDI settings from the host program. Audio Hardware Here you specify the audio driver and audio latency used by the DMXIS standalone program. For accurate DMXIS operation, you should ideally specify a latency of approximately 25ms / 1024 samples or lower. On OS X, a list of available Core Audio devices will be shown. Simply select the one you need and click OK. Core Audio is inherently low latency (usually 512 samples or better) and all Core Audio drivers work well with DMXIS. On PC Windows, you might see “MME”, “DirectX” and “ASIO” devices in the lists. Always use the highest quality (lowest latency) driver available. In general, ASIO drivers are the best choice, DirectX drivers are acceptable, and MME drivers are only to be used as a last resort! If you choose an ASIO driver, the “Edit ASIO Settings...” button will be enabled. The actual ASIO settings available depend on the audio hardware, but there is always an option to change the desired latency. If you choose an MME or DirectX device, you can change the latency by typing a number into the “Latency (milliseconds)” field. Page 29 MIDI Hardware You can control DMXIS from any MIDI keyboard (or other MIDI control device) connected to your computer. Simply select the desired MIDI device from the list, and press OK. You can then use MIDI Learn (see page 23) to remote control any DMXIS fader or control, and you can trigger Bank & Program changes using Note On messages on MIDI channels 15 & 16. VST AND AUDIO UNITS PLUG-IN SUPPORT OK, we have saved the best feature until last! You can run DMXIS inside any audio host which supports VST or Audio Unit plug-ins. This has simply huge possibilities if you are interested in creating a tightly synchronised, automated light show. It is no longer necessary to mess about with MTC (MIDI time code), SMPTE, or other arcane techniques for syncing light shows to audio. You can now run your whole light show directly inside your favourite sequencer! Operation of the VST/AU plug-in is pretty much identical to the standalone DMXIS program, with the exception that the main menus are missing. You can access all of your banks & presets – so you can use the standalone to create the lighting looks you need, and then quickly stitch together the final show in your audio sequencer. In the plug-in, the oscillators automatically track your host tempo and song position. Thus, any moving chases or scanner movements will automatically track your music, with sample accuracy, and no additional work on your part. If you change the tempo of the song, the lighting automatically changes to match. This is incredibly powerful if you are performing live mixes using a program like Ableton Live or Logic Audio. The easiest way to create a fully automated light show with the plug-in is as follows: Create a number of banks & presets for all the looks you want in the show. Adjust Fade To Next for those presets where you need smooth cross fades. Create an empty MIDI track in your host (to contain all your lighting cues) Add MIDI Notes to the MIDI track to trigger bank changes (on MIDI Ch 15) and preset changes (on MIDI Ch 16) exactly where you need them. You can create these events manually in your host, or record them manually from a MIDI keyboard. Page 30 The plug-in also gives you very fine-grained control over your light show if you need it. Every single control and fader in DMXIS can be automated using standard VST & audio Unit plug-in automation. For example, in Cubase you could draw automation curves to control the Pan & Tilt of your scanners. This approach is arguably a lot more work than the simple technique outlined above, but it gives you full control over the whole lighting rig, and you are not limited by the shapes that the DMXIS oscillator can produce. As before, we recommend you watch the training videos for more information. Have fun using DMXIS, and please let us know if you have any comments of requests for new features! Page 31 REVISION HISTORY RELEASE 1.0.2 Initial public release RELEASE 1.0.3 Bug fixes Increased reliability of transmitted DMX data when used with certain low cost fixtures. MIDI assignments cleared with the “Forget” were not being stored on exit. Enhancements Added “Bank Tempo” control to the Preset Manager page. (See page 26) MIDI Learn now supports 7 & 14 bit NRPN messages. (See page 23) DMXIS now displays all 16 MIDI input channels in Ableton Live. (In the previous release, only MIDI Ch 1 was available). You can switch DMXIS banks/presets by routing Ableton clips containing Notes to Ch 15/16 (as described on page 24) When the VST/Audio Unit plug-in is loaded or deleted, it does not clear the DMX channel values. The most recent DMX values will be held by the DMXIS hardware until a new preset is explicitly loaded into DMXIS. This allows you to change between songs in your audio host without plunging the audience into darkness! On the Footswitch Settings window, the “Click & hold time” range can now be set to 0mS. Useful if you are using a footswitch for the “Last Preset (while held)” feature, and want immediate response to the switch being pressed. Fixtures pop-up menu now uses subcategories within each manufacturer if necessary (i.e. if there are too many fixtures to fit on the screen). - end of document Page 32