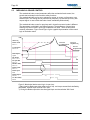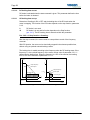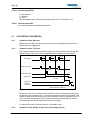
1
VACON LIFT
USER’S MANUAL
APSPFF29V144
(APSPFF29_RV9_EN_BM)
Page 2
Vacon Lift Application
(Software APSPFF29)
INDEX
INTRODUCTION ................................................................................................................3
PROGRAMMING PRINCIPLE OF THE INPUT SIGNALS IN THE LIFT APPLICATION ........................4
CONTROL I/O ..................................................................................................................4
LIFT APPLICATION – PARAMETER LISTS .............................................................................6
4.1 Monitoring values (Control keypad: menu M1) ..................................................... 6
4.2 Basic parameters (Control keypad: Menu M2 Æ G2.1) ........................................ 7
4.3 Speed Control Parameters (Control keypad: Menu M2 Æ G2.2) ......................... 8
4.4 Mechanical Brake control parameters (Control keypad: Menu M2 Æ G2.3) ........ 9
4.5 Drive control parameters (Control keypad: Menu M2 Æ G2.4) ............................ 9
4.6 Motor control parameters (Control keypad: Menu M2 Æ G2.5).......................... 10
4.7 Input signals (Control keypad: Menu M2 Æ G2.6).............................................. 10
4.8 Output signals (Control keypad: Menu M2 Æ G2.7) ........................................... 11
4.9 Protections (Control keypad: Menu M2 Æ G2.8) ................................................ 12
4.10 Autorestart parameters (Control keypad: Menu M2 Æ G2.9) ........................... 13
4.11 Evacuation parameters (Control keypad: Menu M2 Æ G2.10) ……………….. 14
4.12 Closed loop parameters (Control keypad: Menu M2 Æ G2.11)........................ 14
4.13 Open loop parameters (Control keypad: Menu M2 Æ G2.12) .......................... 14
4.14 Permanent Magnet Synchronous Motors (Ctrl.K Menu M2 Æ G2.13)............. 15
4.15 AutoCurve Compensation (Control keypad: Menu M2 Æ G2.14) ..................... 15
4.16 Keypad control (Control keypad: Menu M3)...................................................... 17
4.17 System menu (Control keypad: M6) .................................................................. 17
4.18 Expander boards (Control keypad: Menu M7) .................................................. 17
4.19 Easy Start Up (Control keypad: Menu M8)........................................................ 17
4.20 Photo Monitor (Control keypad: Menu M9) ....................................................... 17
5- DESCRIPTION OF PARAMETERS .......................................................................................19
5.1
BASIC PARAMETERS ...................................................................................... 19
5.2
SPEED CONTROL ............................................................................................ 20
5.3
MECHANICAL BRAKE CONTROL ................................................................... 24
5.4
DRIVE CONTROL ............................................................................................. 32
5.5
MOTOR CONTROL........................................................................................... 33
5.6
INPUT SIGNALS ............................................................................................... 36
5.7
OUTPUT SIGNALS ........................................................................................... 36
5.8
PROTECTIONS ................................................................................................. 37
5.9
AUTO RESTART PARAMETERS ..................................................................... 40
5.10 EVACUATION PARAMETERS ......................................................................... 42
5.11 CLOSED LOOP PARAMETERS ....................................................................... 43
5.12 OPEN LOOP PARAMETERS............................................................................ 45
5.13 PERMANENT MAGNET SYNCHRONOUS MOTORS ..................................... 46
5.14 AUTOCURVE COMPENSATION...................................................................... 47
5.15 KEYPAD CONTROL PARAMETERS................................................................ 48
6. CONTROL SIGNAL LOGIC IN LIFT APPLICATION ....................................................................49
7. FAULT TRACING .............................................................................................................50
1.
2.
3.
4.
Vacon Drives Ibérica S.A.
Teléfono: +34 93 877 45 06
Fax: +34 93 877 00 09
E-mail: [email protected]
Page 3
Lift Application
1.
Introduction
Lifts Application is specially designed to achieve the best performances on Permanent Magnet
Motors, along the start, travel and stop, talking about confort and noises. Moreover this application
could control induction motors too.
In the application, constant speeds are presented in [m/s] and also in [Hz], acceleration and
deceleration are presented in [m/s2] and jerks are presented in [s].
All outputs are freely programmable. Digital input functions are freely programmable to any digital
input. Start forward and reverse signals are fixed to input DIN1 and DIN2 (see next page). If more
number of inputssignals are needed, we can installed optional boards to extend (NXOPTB1).
With Auto Curve Compesation function, the application can be used in high speed lift systems. The
converter knows all the time where the lift is, thanks to the encoder information, and which is the
next floor to landing. This function enable to have floors with differents heights, and ensure the
correct deceleration process to stop in the distance available, improving the cicle time having always
the same time in levelling speed the lift. The feature can be used in close loop installations.
The hardware will be always the Vacon NXP converter. If you we want to control an induction motor
in Close Loop, will need Encoder Boards NXOPTA4 or NXOPTA5. If motor to control is Permanent
Magnets, then wil be necessary to use NXOPTBB if the Encoder used is an EnDat (Heidenhein
ECN 413 or 1313), or NXOPTAK if the Encoder is Sin/Cos.
Page 4
2.
Control I/O
NXOPTA1
1
2
READY
mA
Terminal
+10Vref
AI1+
Signal
Reference output
Analogue input, voltage range
0—10V DC
Description
Voltage for potentiometer, etc.
Voltage input frequency reference
3
4
5
AI1AI2+
AI2-
I/O Ground
Analogue input, current range
0—20mA
Ground for reference and controls
Current input frequency reference
6
7
8
+24V
GND
DIN1
Voltage for switches, etc. max 0.1 A
Ground for reference and controls
Contact closed = start forward
9
DIN2
10
DIN3
11
CMA
Control voltage output
I/O ground
Start forward
(programmable)
Start reverse
(programmable)
Emergency Stop FEdg
(programmable)
Common for DIN 1—DIN 3
12
13
14
+24V
GND
DIN4
15
DIN5
16
DIN6
Free programable
17
18
19
20
CMB
AO1+
AO1DO1
Common for DIN4—DIN6
Output frequency
Analogue output
Digital output
RUN
Control voltage output
I/O ground
Speed reference selection
(FULL SPEED)
Speed reference selection
(INSPECTION SPEED)
Contact closed = start reverse
Contact open = no action
Contact closed = stop by coasting
Connect to GND or +24V
Voltage for switches (see #6)
Ground for reference and controls
Programmable speed reference for
Inputs DIN4, DIN5, and DIN6:
Activity reference
Activity reference with direction
Binary Reference
Connect to GND or +24V
Programmable
Range 0—20 mA/RL, max. 500Ω
Programmable
Open collector, I≤50mA, U≤48 VDC
NXOPTA2
RUN
220
VAC
21
22
23
RO1
RO1
RO1
Relay output 1
RUN
Programmable
24
25
26
RO2
RO2
RO2
Relay output 2
MECHANICAL BRAKE
Programmable
Table 1. Standard application default I/O configuration.
Note: See jumper selections below.
More information in Vacon NX User's
Manual, Chapter 6.2.2.2.
Jumper block X 3 :
CM A a nd CM B grounding
CMB connected to GN D
CMA connected to GN D
CMB isolated from GN D
CMA isolated from GN D
CMB and CMA
internally connected together,
isolated from GN D
= Factory default
Vacon Drives Ibérica S.A.
Teléfono: +34 93 877 45 06
Fax: +34 93 877 00 09
E-mail: [email protected]
Page 5
3.
EASY START UP (M8)
The application has a special Menu for Easy Start Up (M8)
In this Menu there are the basic parameters needs in a normal commisioning.
Depending on this parameters tuning, the menú will show us the parameters related with this motor
control or motor.
In the following box we can see the parameters list that we can find depending on the control which
we want to make:
P8.1 – Motor Model
P8.2 – Motor Nominal Voltage
P8.3 – Motor Nominal Frequency
P8.4 – Motor Nominal Speed
P8.5 – Motor Nominal Current
P8.6 – Motor Cos phi
P8.7 – Motor Type
P8.8 – Motor Control Mode
P8.28 – Nominal Linear Speed (Installation)
P8.29 – Levelling Speed
P8.30 – Full Speed
P8.31 – Inspection Speed
P8.32 – Acceleration 1
P8.33 – Deceleration 1
P8.34 – Acceleration Increment (Jerk S1)
P8.35 – Aceleración Decrement (Jerk S2)
P8.36 – Deceleration Increment (Jerk S3)
P8.37 – Deceleration Decrement (Jerk S4)
P8.38 – Speed Control Kp1
P8.39 – Speed Control Kp2
P8.40 – Speed Control Ti1
P8.41 – Speed Control Ti2
P8.42 – Motor Direction
P8.43 – Password
Some parameters only appears depending from the Control Mode and the Motor:
P8.9 – Encoder Type
P8.10 – Invert Direction
P8.13 – Enable Angle Com
P8.14 – 0 Pos Angle LoWo
P8.18 – Load Cell
P8.19 – Tune Load Cell
P8.20 – RollBack Controller
P8.21 – Brake Previous Time
P8.22 – Alter Brake open time
P8.23 – Kp Initial
P8.24 – Ti Initial
P8.25 – High RollBack Gain
P8.26 – High RollBack Time
P8.27 – High RollBack Sens.
P8.11 – Encoger Pulse
P8.12 – Magnetizing Current
P8.15 – Identification
P8.16 – U/f Ratio Select
P8.17 – U/f Optimization
Activate the Start Control with a Load Cell.
Load Cell Auto Tune, if it’s in use.
Rollback controller Activation, from the software.
Rollback tuning parameters, from the software controllers.
Page 6
If we need more adjustments, then we will go to the M2 menu (Parameters), where we can find all
the parameters to can tune the drive.
4.
Lift Application – Parameter lists
On the next pages you will find the lists of parameters within the respective parameter groups. The
parameter descriptions are given on pages 19 to 48.
Column explanations:
Code
Parameter
Min
Max
Unit
Default
Cust
ID
4.1
=
=
=
=
=
=
=
=
=
Location indication on the keypad; Shows the operator the present parameter number
Name of parameter
Minimum value of parameter
Maximum value of parameter
Unit of parameter value; Given if available
Value preset by factory
Customer’s own setting
ID number of the parameter (used with PC tools)
Apply the Terminal to Function method (TTF) to these parameters. See Chapter
Error! Reference source not found..
= On parameter code: Parameter value can only be changed after the frequency
converter has been stopped.
Monitoring values (Control keypad: menu M1)
The monitoring values are the actual values of parameters and signals as well as statuses and
measurements. Monitoring values cannot be edited.
See Vacon NX User's Manual, Chapter 7 for more information.
Code
V1.1
V1.2
V1.3
V1.4
V1.5
V1.6
V1.7
V1.8
V1.9
Parameter
Output frequency
Frequency reference
Motor speed
Motor current
Motor torque
Motor power
Motor voltage
DC link voltage
Unit temperature
V1.10
Terminal 8 State
1820
Function of this terminal and state
V1.11
Terminal 9 State
1821
Function of this terminal and state
V1.12
V1.13
V1.14
V1.15
V1.16
V1.17
V1.18
Terminal 10 State
DIN1, DIN2, DIN3
Terminal 14 State
Terminal 15 State
Terminal 16 State
DIN4, DIN5, DIN6
Terminal 20 State
1819
15
1821
1822
1823
16
1824
Function of this terminal and state
Digital input statuses
Function of this terminal and state
Function of this terminal and state
Function of this terminal and state
Digital input statuses
Function of this terminal and state
V1.19
Terminals 22-23 State
1825
Function of this relay and state
V1.20
V1.21
V1.22
V1.23
V1.24
V1.25
V1.26
V1.27
Terminals 25-26 State
DO1, RO1, RO2
Voltage input
Current input
Lift Speed
Encoder Speed
Speed State
Working as
1826
17
13
14
1630
1631
1833
1834
Function of this relay and state
Digital and relay output statuses
AI1
AI2
Lift speed in m/s
Lift speed measured from encoder
At speed, accelerating, decelerating or stop
Stopped, Motor or Generator
Vacon Drives Ibérica S.A.
Unit
Hz
Hz
rpm
A
%
%
V
V
°C
V
mA
m/s
Hz
ID
1
25
2
3
4
5
6
7
8
Description
Output frequency to motor
Frequency reference to motor control
Motor speed in rpm
In % of the nominal motor torque
Motor shaft power
Heatsink temperature
Teléfono: +34 93 877 45 06
Fax: +34 93 877 00 09
E-mail: [email protected]
Page 7
V1.28
Lift in floor
1805
Number of floor that lift is stopped (only with ACC)
V1.29
Actual Height
m
1847
Actual Height in cm from ground floor (only ACC)
V1.30
Total Height
m
1848
Total height of bulding
V1.31
Ramp Down Distance
m
1634
V1.32
V1.33
Number of Calibrations
Number of Starts
/day
/day
1877
1878
V1.34
End RampDown Time
s
1908
V1.35
Change Distance
cm
1961
V1.36
Evacuation Speed
m/s
1999
G1.37
Multimonitor
Distance when decelerated from any speed to
levelling speed (or zero speed).
Number of calibrations per day
Number of starts per day
Time between Run signals disappears and Stop
Cicle finish.
Show the distance between the speed change
detector.
Show the elevator speed in mode evacuation.
Three different value can be monitored at the
same time
Table 2. Monitoring values
4.2
Basic parameters (Control keypad: Menu M2 Æ G2.1)
Code
Parameter
Min
Max
Unit
P2.1.1
Nominal voltage of
the motor
180
690
V
30,00
320,00
Hz
50,00
111
300
20 000
rpm
1440
112
1 x IL
2,5 x IL
A
IL
113
0,85
120
1,5 x IL
107
2.1.2
P2.1.3
P2.1.4
Nominal frequency
of the motor
Nominal speed of
the motor
Nominal current of
the motor
Default
Cust
NX2: 230V
NX5: 400V
NX6: 690V
ID
110
P2.1.5
Motor cosϕ
0,30
1,00
P2.1.6
Current limit
0,1 x IL
2,5 x IL
P2.1.7
Motor Type
0
1
0
1650
P2.1.8
Motor Model
0
3
0
1935
Table 3. Basic parameters G2.1
A
Note
Check the rating plate of
the motor
Check the rating plate of
the motor
Check the rating plate of
the motor
Check the rating plate of
the motor
Maximum Current Enable
0 = Inductive
Asynchronous Motor
1 = Permanent Magnet
Synchronous Motor
0 = Without data
Page 8
4.3
Speed Control Parameters (Control keypad: Menu M2 Æ G2.2)
Code
P2.2.1
P2.2.2
P2.2.3.x
P2.2.3.1
P2.2.3.2
P2.2.3.3
P2.2.3.4
P2.2.3.5
P2.2.3.6
P2.2.3.7
P2.2.3.8
P2.2.3.9
Code
P2.2.5.x
P2.2.5.1
P2.2.5.2
P2.2.5.3
P2.2.5.4
P2.2.5.5
P2.2.5.6
P2.9.10
Parameter
Nominal Linear
Speed
Speed Reference
Selection
Min
Max
Unit
Default
0,20
5,00
m/s
1,00
0
Speed Reference [m/s]
Levelling Speed
0,00
Full Speed
0,00
Limited Speed
0,00
Inspection Speed
0,00
Speed Reference 4
0,00
Speed Reference 5
0,00
Speed Reference 6
0,00
Speed Reference 7
0,00
Override speed
0,00
Cust
ID
1500
6
s
0
117
par2.2.1
par2.2.1
par2.2.1
1,5xP2.2.1
m/s
m/s
m/s
m/s
m/s
m/s
m/s
m/s
m/s
0,10
1,00
0,25
0,50
0,10
1,00
0,25
0,50
0,10
1501
1502
1503
1504
1505
1506
1507
1508
1613
1,5xP2.2.1
par2.2.1
par2.2.1
par2.2.1
par2.2.1
Note
Parameter
SPEED CURVE 1
Acceleration
Deceleration
Acceleration increase
jerk 1
Acceleration
Decrease jerk 1
Deceleration increase
jerk 1
Deceleration
decrease jerk 1
Min
Max
Unit
Default
Cust
ID
0,20
0,20
2,00
2,00
m/s2
m/s2
0,50
0,65
103
104
0,01
1,00
S
1,00
1540
0,01
1,00
S
1,00
1541
0,01
1,00
S
0,40
1542
0,01
1,00
S
1,0h0
1543
Lineal Speed Source
0
1
0
1897
0=Activity Reference
1=Activ ref. With direction
2=Binary reference
3=AI1 (Voltage input)
4=AI2 (Current input)
5=Fieldbus
6=Keypad
Parameters correspond
to parameters in group
2.2.4. They will be
updated automatically if
parameters are changed.
These parametres are
also updated when
P2.2.1 is changed.
Note
0=from parameter
1=from mechanics
Table 4. Speed control parameters G2.1
Vacon Drives Ibérica S.A.
Teléfono: +34 93 877 45 06
Fax: +34 93 877 00 09
E-mail: [email protected]
Page 9
4.4
Mechanical Brake control parameters (Control keypad: Menu M2 Æ G2.3)
Code
P2.3.1.x
P2.3.1.1
P2.3.1.4
P2.3.1.5
P2.3.1.6
P2.3.1.9
P2.3.1.10
P2.3.1.11
P2.3.1.12
P2.3.2.x
P2.3.2.4
P2.3.2.5
P2.3.2.6
P2.3.2.8
P2.3.2.9
P2.3.210
P2.3.2.11
P2.3.2.14
Parameter
Min
OPEN LOOP PARAMETERS
Max
Unit
Default
1,5 x In
A
0,0
1551
Brake open delay
0
1,00
Freq. Limit close
0
20,00
Brake close delay
0
5,00
DC braking current 0,15 x In 1,5 x In
DC braking time
0,00
60,00
at start
DC braking time
0,00
60,00
at stop
Frequency to start
DC braking during
0,10
10,00
ramp stop
CLOSED LOOP PARAMETERS
Brake open delay
0
1,00
Freq. Limit close
0
20,00
Brake close delay
0
5,00
0Hz time at start
0
2,000
0Hz time at stop
0
2,000
Smooth start time
0
1,00
Smooth start freq.
0
5,00
Torque RampDown
0,00
1,00
Time
s
Hz
s
A
0,50
0,50
0,30
In motor
1554
1555
1556
507
s
0,510
1559
0=DC brake is off at start
s
1,000
1560
0=DC brake is off at stop
Hz
0,50
515
s
Hz
s
s
s
s
Hz
0,30
0,01
0,50
0,700
0,800
0,70
0,05
1564
1565
1566
615
616
1568
1569
s
0
1898
Torque Rampdown
1
1963
Auto Start
StopCalculation
0.2
1601
0.2
1602
1,00
1603
0
1902
Current limit
P2.3.2.15
Auto Start StopTime
P2.3.3.x
P2.3.3.1
DIGITAL INPUTS
Ext. brake control
P2.3.3.2
Ext. brake
supervision
P2.3.4.x
P2.3.4.1
P2.3.4.2
0
0
BRAKE SUPERVISION
External brake
0,00
supervision time
External brake
0
supervision inversion
1
5,00
s
1
Cust
ID
Note
Value is changed when
parameter 2.1.4 is set.
See page Error!
Bookmark not
defined..
Table 5. Mechanical brake control parameters, G2.4
4.5
Drive control parameters (Control keypad: Menu M2 Æ G2.4)
Code
Parameter
Min
Max
P2.4.2
Stop function
0
1
P2.4.3
Frequency limit
0
MaxFreq
P2.4.7
Half Floor Function
0
2
0,00
5,00
0
1
P2.4.8
P2.4.9
Half Floor
Sensibility
Inspection Stop
Mode
Table 6. Drive control parameters, G2.5
Unit
Hz
Hz
Default
Cust
ID
2
506
7,00
1624
0
1801
0,10
1905
0
1903
Note
0=Coasting
1=Ramping
2=Stop by Freq. Limit
Used only if par 2.4.2=2
0 = Normal
1 = Capture Floors
2 = AutoCurve
Compensation
Frrequncy offset to detect
half floor
0 = Like P2.4.2
1 = Stop by ramping
Page 10
4.6
Motor control parameters (Control keypad: Menu M2 Æ G2.5)
Code
Parameter
Min
Max
P2.5.1
Motor control mode
0
1
P2.5.2.x
Unit
Default
Cust
1
ID
1572
Note
0=Frequency control
1=Speed control, (OL)
2=Speed control, (CL)
U/f CURVE POINTS FOR OPEN LOOP
P2.5.2.1
U/f ratio selection
0
3
P2.5.2.2
U/f curve midpoint
frequency
0,00
P2.6.4
P2.5.2.3
U/f curve midpoint
voltage
10,00
P2.5.2.4
Output voltage at zero
frequency
P2.5.2.5
U/f optimisation
0=Linear
1=Squared
2=Programmable
3=Linear with flux optim.
0
1574
Hz
5,00
1575
200,00
%
10,00
603
n% x Unmot
Parameter max. value =
par. 2.6.7
0,00
40,00
%
2,00
1577
n% x Unmot
0
1
0
1573
0=Not used
1=Automatic torque
boost
Table 7. Motor control parameters, G2.6
4.7
Input signals (Control keypad: Menu M2 Æ G2.6)
Code
P2.6.7.x
P2.6.7.1
P2.6.7.2
P2.6.7.3
P2.6.7.4
P2.6.7.5
P2.6.7.6
P2.6.7.7
P2.6.7.8
P2.6.7.9
P2.6.7.10
P2.6.7.11
P2.6.7.12
P2.6.7.13
P2.6.7.14
P2.6.7.15
P2.6.7.16
P2.6.7.17
Parameter
DIGITAL INPUTS
External Fault,
closing contact
External fault,
opening contact
Fault reset
Run enable
Acceleration/Decel
time selection
Stop by coast,
closing contact
Stop by coast,
opening contact
Override speed
Forced I/O control
Speed selection
input 1
Speed selection
input 2
Speed selection
input 3
Calibration
Stop Coasting
Falling Edge
PhotoMonitor
Shortcircuit C
Shortcircuit O
Min
Max
Unit
Default
Cust
ID
0.1
1513
0.2
1514
0.1
0.2
1515
1516
0.1
1517
A.3
1518
0.2
1519
0.1
0.1
1520
1521
A.4
1521
A.5
1522
A.6
1523
0.1
1698
0.1
1812
0.1
0.1
0.2
1829
1950
1951
Note
See
page
Bookmark
defined..
Error!
not
Table 8. Input signals, G2.2
Vacon Drives Ibérica S.A.
Teléfono: +34 93 877 45 06
Fax: +34 93 877 00 09
E-mail: [email protected]
Page 11
4.8
Output signals (Control keypad: Menu M2 Æ G2.7)
Code
P2.7.6
P2.7.10
P2.7.14
P2.7.21
B2.7.24.x
Parameter
Digital output 1
function
Min
Max
0
20
3
312
14
2
313
As parameter 2.7.6
14
19
314
As parameter 2.7.6
0,30
1815
Relay output 1
0
function
Relay output 2
0
function
Speed Open Doors
0,00
MANUAL TEST OUTPUTS
B2.7.24.1
Test DO1
B2.7.24.2
Test RO1
B2.7.24.3
Test RO2
Table 9. Output signals, G2.7
0,50
Unit
m/s
Default
Cust
ID
Note
0=Not used
1=Ready
2=Run
3=Fault
4=Fault inverted
5=FC overheat warning
6=Ext. fault or warning
7=Ref. Fault or warning
8=Warning
9=Reversed
10=Preset speed
11=At speed
12=Mot. Regulator active
13=OP freq. Limit
superv.
14=Control place: IO
15=ThermalFlt/Wrn
16=FB DigInput1
17=Speed below limit
18=Torque above limit
19=Mech. Brake ctrl
20=Mech. Brake ctrl inv.
21=Open Doors
22=AutoCalibration
Pressing Enter test
Digital Output
Pressing Enter test Relay
1
Pressing Enter test Relay
2
Page 12
4.9
Protections (Control keypad: Menu M2 Æ G2.8)
Code
P2.8.4.x
Parameter
LIFT SUPERVISION
P2.8.4.2
Shaft speed fault
P2.8.4.3
P2.8.4.4.x
P2.8.4.4.1
P2.8.4.4.2
Min
Max
0
2
Shaft speed
0
supervision time
SHAFT SPEED SUPERV. LIMIT
Shaft speed superv.
0
Limit[m/s]
Shaft speed superv.
0
Limit [Hz]
Unit
Default
Cust
ID
0
1581
s
0,40
1582
P2.2.1
m/s
0,30
1583
P2.1.2
Hz
15,00
1584
2
1587
0=No action
1=Warning
2=Fault
0=No action
Response to control
conflict
0
2
P2.8.4.8
Minimum current
0
P1.1.4
A
0,05%
Inmotor
1588
P2.8.4.9
Sensibility Minimum
Current
0
5,00
s
0,50
1839
P2.8.4.10
0 Hz speed
response
0
3
0
1589
P2.8.4.11
Encoder Fault
0
2
2
1803
P2.8.4.12
Brake Mode
Warning
0
1
1
1804
P2.8.4.13
Start-Stop
Sequence Faullt
0
2
2
1810
0
9,00
2,00
1811
0
1
1
1885
2
1899
1,20
1900
P2.8.4.15
Sensibility StartStop Sequence
Encoder Direction
AutoInversion
0=No action
1=Warning
2=Fault
1,00
P2.8.4.7
P2.8.4.14
Note
P2.8.4.16
Absolute Speed
Fault
0
2
P2.8.4.17
Absolute Speed
Limit
NomSpd
5,00
s
m/s
Same parameters with
different units
Delay to detect minimum
current
0=Not used
1=Warning
2=Warning+Stop
3=Fault
0=Fault
1=No Action
0=No response
1=Warning
0=No response
1=Warning
2= Fault,stop by coasting
Delay to detect fault in
Start-Stop sequence
0 = Disable
1 = Enable
0=No response
1=Warning
2= Fault,stop by coasting
Table 10. Protections, G2.8
Vacon Drives Ibérica S.A.
Teléfono: +34 93 877 45 06
Fax: +34 93 877 00 09
E-mail: [email protected]
Page 13
4.10
Autorestart parameters (Control keypad: Menu M2 Æ G2.9)
Code
P2.9.1
P2.9.2
Parameter
Wait time
Trial time
Number of tries after
undervoltage trip
Number of tries StartStop Sequence trip
P2.9.4
P2.9.11
Min
0,10
0,00
Max
10,00
60,00
Unit
s
s
Default
0,50
30,00
Cust
ID
717
718
0
10
0
720
0
10
5
1809
Note
Table 11. Autorestart parameters, G2.9
4.11
Evacuation parameters (Control keypad: Menu M2 Æ G2.10)
Code
P2.10.3
P2.10.4
P2.10.5
P2.10.6
P2.10.11.x
P2.10.11.1
P2.10.11.2
P2.10.x
P2.10.13
P2.10.15
P2.10.16
Parameter
Control mode
Min
Max
0
3
Direction change
0
20,00
delay
Test time
0
20,00
Current read delay
0
20,00
MAX SPEED IN EVACUATION
0.4 x
Max speed in
0
P2.2.1
evacuation [m/s]
0.4 x
Max speed in
0
P2.1.2
evacuation [Hz]
EVACUATION PARAMETERS
Motor Limit
0
100%
Evacuation Start
0
20,00
Delay
Evacuation Stop
0
20,00
delay
Table 12. Evacuation parameters, G2.10
Unit
Default
Cust
ID
0
1592
s
5,00
1593
s
s
3,00
1,50
1594
1595
m/s
0,10
1616
Hz
5,00
1617
30
1911
s
3,00
1913
s
1,00
1914
Note
0=Frequency control
1=Speed control
Same parameters with
different units. Max value
is 40% of nom. Value.
Page 14
4.12
Closed loop parameters (Control keypad: Menu M2 Æ G2.11)
Code
P2.11.1
Parameter
Min
Max
Unit
Magnetisation current
0
In
A
0
5000
P/R
0
0
Encoder
Pulses/Revolution
Invert Encoder
Direction
P2.11.2
P2.11.3
P2.11.4
Speed control limit 1
P2.11.5
Speed control limit 2
P2.11.6
P2.11.7
P2.11.8
P2.11.9
P2.11.10
P2.11.11
P2.11.12
P2.11.13
P2.11.14
P2.11.15
Speed control Kp 1
Speed control Kp 2
Speed control Ti 1
Speed control Ti2
Current control Kp
Current control Ti
Flux Current Kp
Flux Current Ti
Encoder 1 filter time
Slip adjust
Acceleration
Compensation
P2.11.16
P2.11.17
Fixed End Ramp
P2.11.18.X
P2.11.18.1
FIXED EN RAMP
Deceleration
Deceleration increase
jerk
Deceleration decrease
jerk
P2.11.18.2
P2.11.18.3
Default
40%
Inmotor
Cust
ID
Note
612
1024
1884
1
0
1886
Par.
2.11.5
5,00
1618
0.01Hz
10,00
1619
1000
1000
500
500
300,00
100,0
32000
1000
100.0
1000
ms
ms
%
30
30
30,0
30,0
40,00
1,5
5000
25
0.0
100
1620
1621
1622
1623
617
1627
1628
1629
618
619
0
300,00
s
0
626
0
1
1
1835
0,20
2,00
m/s2
0,80
1836
0,01
3,00
s
1,50
1837
0,01
3,00
s
2,50
1838
Par.
2.11.4
0
0
0
0
0
0
0
0
0
0
ms
ms
ms
0 = No
1 = Yes
0 = Not Active
1 = Active
Table 13. Closed loop parameters, G2.11
4.13
Open loop parameters (Control keypad: Menu M2 Æ G2.12)
Code
Parameter
Min
Max
Unit
Default
P2.12.1
Identification
0
1
P2.12.3
IrAddGenScale
0
200
%
0
P2.12.4
IrAddMotorScale
0
200
%
100
P2.12.8
Soft Start
0
1
0
0
Cust
ID
Note
Motor Identification in
631
(OL), Motor Standstill
Only active if
665
P2.5.2.5 = 1
Only active if
667
P2.5.2.5 = 1
0 = Active
1889
1 = Inactive
Table 14. Open loop parameters, G2.12
Vacon Drives Ibérica S.A.
Teléfono: +34 93 877 45 06
Fax: +34 93 877 00 09
E-mail: [email protected]
Page 15
4.14
Permanent Magnet Synchronous Motors (Ctrl.K Menu M2 Æ G2.13)
Code
Parameter
Min
P2.13.1
Enable Angle Com
0
1
0
1695
P2.13.3
P2.13.4
0 Pos Angle LoWo0
0 Pos Angle HiWo0
0
0
65535
65535
0
0
1696
1697
P2.13.5
Load Cell
0
1
0
1893
0 = Inactive
1 = Active
1969
0 = No action
1 = Slow Roll Back
2 = High RoolBack
3 = Full Rollback
P2.13.8
Roll Back Controller
0
Max
Unit
3
Default
Cust
0
ID
Note
Find position 0 of
encoder
Table 15. Permanent Magnet Synchronous Motors parameters, G2.13
4.15
AutoCurve Compensation (Control keypad: Menu M2 Æ G2.14)
Code
Parameter
Min
Max
B2.14.1
Capture Height
0
1
P2.14.2
Calibration Sensor
Position
0
2
P2.14.3
Distance at Levelling
Speed
0
99
P2.14.5
Offset Compensation
-90
P2.14.6.X
P2.14.6.1
P2.14.6.2
P2.14.7.X
MECHANICAL DATAS
Gear Box Relation
Pulley Diameter
CAPTURE FLOORS
Unit
Default
Cust
ID
0
1881
cm
15
1802
90
%
10
1808
1
1
500
1000
mm
1
1
1754
1755
P2.14.7.1
Ground Floor
0
0
m
0
1846
P2.14.7.3
Floor 1
0
655,35
m
0
1757
P2.14.7.4
Floor 2
0
655,35
m
0
1758
P2.14.7.5
P2.14.7.6
P2.14.7.7
P2.14.7.8
P2.14.7.9
P2.14.7.10
P2.14.7.11
P2.14.7.12
P2.14.7.13
P2.14.7.14
P2.14.7.15
P2.14.7.16
P2.14.7.17
P2.14.7.18
P2.14.7.19
P2.14.7.20
P2.14.7.21
P2.14.7.22
P2.14.7.23
P2.14.7.24
P2.14.7.25
Floor 3
Floor 4
Floor 5
Floor 6
Floor 7
Floor 8
Floor 9
Floor 10
Floor 11
Floor 12
Floor 13
Floor 14
Floor 15
Floor 16
Floor 17
Floor 18
Floor 19
Floor 20
Floor 21
Floor 22
Floor 23
0
0
0
0
0
0
0
0
0
0
0
0
0
0
0
0
0
0
0
0
0
655,35
655,35
655,35
655,35
655,35
655,35
655,35
655,35
655,35
655,35
655,35
655,35
655,35
655,35
655,35
655,35
655,35
655,35
655,35
655,35
655,35
m
m
m
m
m
m
m
m
m
m
m
m
m
m
m
m
m
m
m
m
m
0
0
0
0
0
0
0
0
0
0
0
0
0
0
0
0
0
0
0
0
0
1759
1760
1761
1762
1763
1764
1765
1766
1767
1768
1769
1770
1771
1772
1773
1774
1775
1776
1777
1778
1779
Note
Capture total height of
bulding
0=?
1 = Ground Floor
2 = Top Floor
Distance to being in
levelling speed before
landing
Offset in speed
corrections
Appears if calibration
sensor is in ground
floor
First floor from sensor
floor
Second floor from
sensor floor
Page 16
P2.14.7.26
P2.14.7.27
P2.14.7.28
P2.14.7.29
P2.14.7.30
P2.14.7.31
P2.14.7.32
P2.14.7.33
P2.14.7.34
P2.14.9.X
Floor 24
Floor 25
Floor 26
Floor 27
Floor 28
Floor 29
Floor 30
Floor 31
Floor 32
SKIIP FLOORS
0
0
0
0
0
0
0
0
0
655,35
655,35
655,35
655,35
655,35
655,35
655,35
655,35
655,35
m
m
m
m
m
m
m
m
m
0
0
0
0
0
0
0
0
0
1780
1781
1782
1783
1784
1785
1786
1787
1788
P2.14.9.1
Change distance
0
5
cm
1,40
1959
P2.14.9.2
Skiip frequency
0
10
Hz
3,00
1960
0
1962
P2.14.8.X
P2.14.10
Distance between the
Speed change
“pantalles” distance.
At this frequency the
elevator has to skip
the floor.
AUTOMATIC CURVE COMPENSATION
Aut. Curve
Compensation
0
1
Make the Aut. Curve
Compensation in all
the floors.
Table 6. AutoCurve Compensation parameters, G2.14
Vacon Drives Ibérica S.A.
Teléfono: +34 93 877 45 06
Fax: +34 93 877 00 09
E-mail: [email protected]
Page 17
4.16
Keypad control (Control keypad: Menu M3)
The parameters for the selection of control place and direction on the keypad are listed below. See
the Keypad control menu in the Vacon NX User's Manual.
Code
Parameter
Min
Max
Unit
Default
Cust
ID
P3.5
Programming Level
0
2
0
1806
P3.6
PhotoMonitor Trigger
0
4
0
1827
B3.7
Reset Counters
0
1
Note
0 = Basic
1 = Medium
2 = High
0 = Fault
1 = Digital Input
(Programmable
P2.6.7.15)
2 = DO1
3 = RO1
4 = RO2
Pressing Enter resets the
starts/day and
calibrations/day
counters
Table 16. Keypad control parameters, M3
4.17
System menu (Control keypad: M6)
For parameters and functions related to the general use of the frequency converter, such as
application and language selection, customised parameter sets or information about the hardware
and software, see Chapter 7.3.6 in the Vacon NX User's Manual.
4.18
Expander boards (Control keypad: Menu M7)
The M7 menu shows the expander and option boards attached to the control board and boardrelated information. For more information, see Chapter 7.3.7 in the Vacon NX User's Manual.
4.19
Easy Start Up (Control keypad: Menu M8)
This Menu helps to make an easy commissioning, showing only the more basic parameters needed
to start up the system.
4.20
Photo Monitor (Control keypad: Menu M9)
This menu have all the information related with system, captured by trigger signal. The trigger has
two different ways to be executed (working at same time):
1- from selection P3.6
2- Pressing “Enter” in Monitor menu. That’s help us to capture all the information while we
are viewing some of the variables of monitor menu.
Page 18
The information that Photo Monitor captures in every trigger are:
Code
V9.1
V9.2
V9.3
V9.4
V9.5
V9.6
V9.7
V9.8
V9.9
Parameter
Output frequency
Frequency reference
Motor speed
Motor current
Motor torque
Motor power
Motor voltage
DC link voltage
Terminal 8 State
V9.10
Unit
Hz
Hz
rpm
A
%
%
V
V
ID
1851
1873
1852
1850
1849
1853
1876
1854
1855
Description
Output frequency to motor
Frequency reference to motor control
Motor speed in rpm
Terminal 9 State
1856
Function of this terminal and state
V9.11
V9.12
V9.13
V9.14
V9.15
V9.16
V9.17
Terminal 10 State
DIN1, DIN2, DIN3
Terminal 14 State
Terminal 15 State
Terminal 16 State
DIN4, DIN5, DIN6
Terminal 20 State
1857
1858
1859
1860
1861
1862
1863
Function of this terminal and state
Digital input statuses
Function of this terminal and state
Function of this terminal and state
Function of this terminal and state
Digital input statuses
Function of this terminal and state
V9.18
Terminals 22-23 State
1864
Function of this relay and state
V9.19
V9.20
V9.21
V9.22
V9.23
V9.24
Terminals 25-26 State
DO1, RO1, RO2
Lift Speed
Encoder Speed
Speed State
Working as
1865
1866
1867
1868
1869
1870
Function of this relay and state
Digital and relay output statuses
Lift speed in m/s
Lift speed measured from encoder
At speed, accelerating, decelerating or stop
Stopped, Motor or Generator
V9.25
Lift in floor
1871
Number of floor that lift is stopped (only with ACC)
V9.26
Actual Height
m/s
Hz
m
1872
V9.27
Fault triggered
1874
V9.28
Trigger Fault Code
1875
In % of the nominal motor torque
Motor shaft power
Function of this terminal and state
Actual Height in cm from ground floor (only ACC)
0 = No
1 = Yes
If the Photo Monitor has been triggered by fault
Fault code that triggered the Photo Monitor
Table 178. Photo Monitor Menu, M9
Vacon Drives Ibérica S.A.
Teléfono: +34 93 877 45 06
Fax: +34 93 877 00 09
E-mail: [email protected]
Page 19
5- Description of parameters
5.1
2.1.1
BASIC PARAMETERS
Nominal voltage of the motor
Find this value Un on the rating plate of the motor. This parameter sets the voltage at the
field weakening point (parameter 2.5.5) to 100% x Unmotor.
2.1.2
Nominal frequency of the motor
Find this value fn on the rating plate of the motor. This parameter sets the field
weakening point (parameter 2.5.4) to the same value.
Nominal frequency of the motor correspond the nominal lift speed (parameter 2.2.1)
2.1.3
Nominal speed of the motor
Find this value nn on the rating plate of the motor.
2.1.4
Nominal current of the motor
Find this value In on the rating plate of the motor.
2.1.5
Motor cos phi
Find this value “cos phi” on the rating plate of the motor.
2.1.6
Current limit
This parameter determines the maximum motor current from the frequency converter. To
avoid motor overload, set this parameter according to the rated current of the motor. The
current limit is 1.5 times the rated current (IL) by default.
2.1.7
Motor Type
Select the motor type AC inductive Asynchronous motor or Permanet Magnet
Synchronous motor.
2.1.8
Motor data
This parameter is only used if we are working with a Permanent Magnet Synchronous
motor and it tune automatically some parameters.
0 = Without Data.
Page 20
5.2
2.2.1
SPEED CONTROL
Nominal Linear Speed
Nominal linear speed corresponds to the lift speed at nominal frequency of the motor
(parameter 2.1.2)
Speed parameters in group 2.2.3 are entered in linear magnitudes and parameters in
group 2.2.4 are entered in Hz. There is an internal scaling between linear speeds and
frequencies. Parameters in both groups correspond to each other. If the value of the
nominal linear speed is changed the parameters in group 2.2.3 are recalculated
accordingly.
2.2.2
Speed reference selection
Defines which frequency reference source is selected when controlled from the I/O
control place. Default value is 0.
0 = Activity coding
1 = Activity coding with direction
2 = Binary coding
3 = Voltage Input (AI1)
4 = Current Input (AI2)
5 = Fieldbus
6 = Keypad
Speed reference can be determined in three different ways with digital inputs. Digital
inputs are programmable (see page Error! Bookmark not defined.).
The first column contains the state of the digital inputs (marked as default values DIN4,
DIN5 and DIN6). The correct input signal can be programmed with parameters 2.6.7.10,
2.6.7.11 and 2.6.7.12.
The second column contains the parameter and the next column the corresponding
speed reference. The priority column defines which speed is activated if more than one
digital input is activated. If Speed reference is different when running to different
direction the direction is defined in direction column.
0 = Activity coding
Four different constant speeds can be selected.
DIN
[4,5,6]
Parameters
SpeedRef
Priority
Direction
[0;0;0]
[1;0;0]
[0;1;0]
[0;0;1]
2.2.3.1/2.2.4.1
2.2.3.2/2.2.4.2
2.2.3.3/2.2.4.3
2.2.3.4/2.2.4.4
(levelling speed)
(full speed)
(limited speed)
(inspection speed)
0 low
1 medium
2 high
3 highest
irrelevant
irrelevant
irrelevant
irrelevant
Table 18. Activity reference.
Vacon Drives Ibérica S.A.
Teléfono: +34 93 877 45 06
Fax: +34 93 877 00 09
E-mail: [email protected]
Page 21
1 = Activity coding with direction
The constant speeds are selected according to the state of digital inputs and motor
direction. Four different speeds per direction are available.
DIN
[4,5,6]
[0;0;0]
[1;0;0]
[0;1;0]
[0;0;1]
[0;0;0]
[1;0;0]
[0;1;0]
[0;0;1]
Parameters
SpeedRef
Priority
Direction
2.2.3.1/2.2.4.1
2.2.3.2/2.2.4.2
2.2.3.3/2.2.4.3
2.2.3.4/2.2.4.4
2.2.3.5/2.2.4.5
2.2.3.6/2.2.4.6
2.2.3.7/2.2.4.7
2.2.3.8/2.2.4.8
(levelling speed)
(full speed)
(limited speed)
(inspection speed)
(preset speed 4)
(preset speed 5)
(preset speed 6)
(preset speed 7)
0 low
1 medium
2 high
3 highest
0 low
1 medium
2 high
3 highest
forward
forward
forward
forward
reverse
reverse
reverse
reverse
Table 19. Activity reference with direction.
2 = Binary coding
Eight different constant speeds are selected according to binary word formed through
digital inputs.
DIN
[4,5,6]
[0;0;0]
[1;0;0]
[1;1;0]
[0;1;0]
[0;0;1]
[1;0;1]
[0;1;1]
[1;1;1]
Parameters
SpeedRef
Priority
Direction
2.2.3.1/2.2.4.1
2.2.3.2/2.2.4.2
2.2.3.3/2.2.4.3
2.2.3.4/2.2.4.4
2.2.3.5/2.2.4.5
2.2.3.6/2.2.4.6
2.2.3.7/2.2.4.7
2.2.3.8/2.2.4.8
(levelling speed)
(full speed)
(limited speed)
(inspection speed)
(preset speed 4)
(preset speed 5)
(preset speed 6)
(preset speed 7)
-
irrelevant
irrelevant
irrelevant
irrelevant
irrelevant
irrelevant
irrelevant
irrelevant
Table 20. Binary reference.
Speed reference [m/s] parameters (M2 -> G2.2.3)
Parameters in group 2.2.3 define the speed reference in linear magnitudes [m/s].
Parameters correspond to the parameters of group 2.2.4 and they will be updated
automatically if values are changed in the other group. They will also be updated if the
value of parameter 2.2.1 is changed.
2.2.3.1
2.2.3.2
2.2.3.3
2.2.3.4
2.2.3.5
2.2.3.6
2.2.3.7
2.2.3.8
2.2.3.9
Levelling Speed
Full Speed
Limited Speed
Inspection Speed
Speed reference 4
Speed reference 5
Speed reference 6
Speed reference 7
Override Speed
Page 22
Speed Curve 1 parameters (M2 -> G2.2.5)
Speed curve 1 is used as the default values for acceleration and deceleration and jerks.
2.2.5.1
Acceleration time 1
2.2.5.2
Deceleration time 1
Acceleration and deceleration of the lift car are presented in [m/s2]. Acceleration and
deceleration curves are affected by the jerk time settings, too.
2.2.5.3
Acc inc jerk 1
Acceleration increase jerk1.
Jerk times are presented in
[ms].
2.2.5.4
S pe e d [m /s ]
Acc dec jerk 1
Acceleration decrease jerk 1.
2.2.5.5
Dec inc jerk 1
t [s ]
Deceleration increase jerk 1.
2.2.5.6
a c c ele ra tio n
[m /s 2 ]
P 2.2 .5 .3
Dec dec jerk 1
Deceleration decrease jerk 1.
P 2.2 .5 .4
P 2.2 .5 .1
t [s ]
Figure 1. Jerks related to speed and acceleration
Vacon Drives Ibérica S.A.
Teléfono: +34 93 877 45 06
Fax: +34 93 877 00 09
E-mail: [email protected]
Page 23
Speed Curve 1 parameters (M2 -> G2.2.6)
Parameters in group Speed curve 2 are used when internal ramp switch function is
activated (see parameter P2.2.6.1). Then the Speed curve 1 parameters will be replaced
by Speed curve 2 parameters.
2.2.10
Lineal Speed Source
0 = from parameter P2.2.1 (O.L and C.L)
1 = from mechanics P2.14.6.1 and P2.14.6.2 (L.C)
The monitoring of lineal lift speed (V1.24) takes the calculation source from P2.2.1
introduced, or from real speed from encoder and mechanic relation.
Page 24
5.3
MECHANICAL BRAKE CONTROL
The mechanical brake control parameters affect the mechanical brake control, the
smooth start and stop function and the safety functions.
The mechanical brake can be set to release on current, on torque, on frequency or on
external input. The closing can be performed by frequency, by external input or by Run
request signal. In case of fault the brake closes immediately without delay.
The mechanical brake control in open loop and in closed loop control mode is different.
The parameters are divided in two different groups. The parameters of closed loop
control group are not valid in open loop mode and vice versa. There are also some
common parameters. Figure 2 and Figure 3 give a graphical presentation of the control
logic of the brake control
f/Hz
Max Freq
Brake closed
P2.3.1.7
Cur/Freq lim
P2.3.2.1-3
P2.2.3/4.1
Levelling Speed
*)
Run Request
signal
DC- Brake
P2.3.1.10-11
Br Open Del
P2.3.1.4
BR Mec Delay
P2.3.1.8
Brake Cl Del
P2.3.1.6
Brake Open
R02
Brake SuperV
P2.3.4.1
1/2 Floor Delay
P2.2.8
P2.3.1.12
StopDC Freq
P2.3.1.5
FreqCloseLim
**)
Figure 2. Mechanical brake control logic in open loop.
*) Start signal to Brake open delay when current, freq. and torque exceed limits defined by
parameters. External input must be ON if used.
**) During the Brake supervision time the digital input must be switched ON if used.
Vacon Drives Ibérica S.A.
Teléfono: +34 93 877 45 06
Fax: +34 93 877 00 09
E-mail: [email protected]
Page 25
f/Hz
*)
FreqCurTorq Limits
P2.3.2.(1-3)
P2.2.3.1Leveling Speed
P2.3.2.11 SmoothStFreq
P2.3.2.5
FreqCloseLim
Run Request
DIN 1/2
0 Hz Start/Stop
P2.3.2.8-9
Smooth Start
P2.3.2.10
Br Open Del
P2.3.2.4
Brake Cl Del
P2.3.2.6
Brake Open
Relay Output
Brake SuperV
P2.3..4.1
1/2 Floor Delay
P2.2.8
Figure 3. Mechanical brake control logic in closed loop.
*) Start signal to Brake open delay when current, freq. and torque exceed limits defined by
parameters. External input must be ON if used.
**) During the Brake supervision time the digital input must be switched ON if used
Page 26
Mechanical Brake Control Logic
BRA K E O PEN IN G LO G IC
P 2 . 3 . 1 / 2 . 4 BRA K E O PEN D ELA Y
SET
To n
RESET
M O TO R C U RREN T
AN D
P2 .3 .1 / 2 .1
C U RREN T LIM IT
P2 .7 .6 or
P2 .7 .9 or
P2 .7 .1 2
M EC . BRA KE
C O N TRO L SIG N A L
M O TO R TO RQ U E
P2 .3 .1 / 2 .2
TO RQ U E LIM IT
M O TO R FREQ
P2 .3 .1 / 2 .3
FREQ LIM IT
P 2 . 3 . 3 . 1 EXT. BR IN PU T SIG N A L
M O TO R RU N N IN G
BRA K E C LO SIN G LO G IC
P 2 . 3 . 1 / 2 . 6 BRA K E C LO SE D ELA Y
To n
V 1 .1
O U TPU T FREQ
OR
AN D
P2 .3 .1 / 2 .5
FREQ C LO SE LIM IT
FA U LT A C TIV E
RU N REQ U EST
M O TO R RU N N IN G
P 2 . 3 . 4 . 1 BRA K E SU PERV ISIO N
Figure 4. Mechanical brake control logic in open loop.
Mechanical brake control signal can be selected to any digital or relay output to control the external
mechanical brake.
In the upper section of Figure 4 you can find the mechanical brake opening logic. Five signals and
the delay are required for the mechanical brake to open. If current, torque or frequency signal is not
needed for brake opening, then these parameters can be set to zero. The external brake input signal
is programmable and any digital input can be used for that purpose.
In the lower section of Figure 4 you can find the mechanical brake closing logic. The brake close
circuit has higher priority than the open circuit. So if closing signal is active the mechanical brake will
be closed.
The brake will be closed immediately in case of fault or an external supervision signal or when the
motor is stopped.
In normal operation the brake will be closed when frequency falls below the Frequency close limit
(P2.3.1.5 or P2.3.2.5) and the Run Request signal is switched OFF. If the Frequency close limit
signal is not needed for the closing logic it can be set to zero. After the conditions are true there is a
brake close delay (P2.3.1.6/P2.3.2.6) after which the brake will be closed.
Vacon Drives Ibérica S.A.
Teléfono: +34 93 877 45 06
Fax: +34 93 877 00 09
E-mail: [email protected]
Page 27
Open Loop Parameters (M2 -> G2.3.1)
Parameters in group 2.3.1.x are valid in open loop control mode only.
(parameter 2.5.1= 0 or 1).
2.3.1.1
Current Limit
Parameter defines the actual current limit that has to be exceeded for a brake release. If
set to zero this condition is excluded. The value is updated always when the nominal
current of the motor (parameter 2.1.4) is set (see Figure 4).
2.3.1.4
Opening delay
Delay which starts when the opening conditions (see parameters 2.3.1.1-2.3.1.3) are
TRUE (see Figure 4).
2.3.1.5
Frequency limit closing
The output frequency limit for the brake closing. The run request signal needs to be
disabled to allow the signal to affect.
2.3.1.6
Closing delay
The brake closing is delayed with defined time. If set to zero there is no delay between
the brake closing condition and the actual brake closing.
2.3.1.9
DC-brake current
Defines the current injected into the motor during DC-braking.
Page 28
2.3.1.10
DC-braking time at start
DC-brake is activated when the start command is given. This parameter defines the time
before the brake is released.
2.3.1.11
DC-braking time at stop
Determines if braking is ON or OFF and the braking time of the DC-brake when the
motor is stopping. The function of the DC-brake depends on the stop function, parameter
2.4.2.
0
>0
DC-brake is not used
DC-brake is in use and its function depends on the Stop function,
(par. 2.4.2). The DC-braking time is determined with this parameter
Par. 2.4.2 = 0; Stop function = Coasting:
After the stop command, the motor coasts to a stop without control of the frequency
converter.
With DC-injection, the motor can be electrically stopped in the shortest possible time,
without using an optional external-braking resistor.
The braking time is scaled according to the frequency when the DC-braking starts. If the
frequency is ≥ the nominal frequency of the motor, the set value of parameter 2.3.1.11
determines the braking time. When the frequency is ≤10% of the nominal, the braking
time is 10% of the set value of parameter 2.3.1.11.
fout
fout
fn
fn
Output frequency
Motor speed
Output frequency
0,1 x fn
DC-braking ON
Motor speed
DC-braking ON
t
t = 1 x par. 2.3.1.11
t
t = 1 x par. 2.3.1.11
RUN
RUN
STOP
STOP
NX12K21
Figure 5. DC-braking time when Stop mode = Coasting.
Vacon Drives Ibérica S.A.
Teléfono: +34 93 877 45 06
Fax: +34 93 877 00 09
E-mail: [email protected]
Page 29
Par. 2.4.2 = 1; Stop function = Ramp
After the Stop command, the speed of
the motor is reduced according to the
set deceleration parameters, as fast
as possible, to the speed defined with
parameter 2.3.1.12, where the DCbraking starts.
The braking time is defined with
parameter 2.3.1.11. If high inertia
exists, it is recommended to use an
external braking resistor for faster
deceleration. See Figure 6.
fout
Motor speed
Output frequency
DC-braking
P2.3.1.12
t
t=1 x par. 2.3.1.11
RUN
STOP
NX12K23
Figure 6. DC-braking time when Stop mode =
Ramp
Par. 2.4.2 = 2; Stop function = Stop by frequency. limit
Stop mode depends on the actual frequency of the motor. If frequency is above the
frequency limit (par. 2.4.3) then the stop mode is coasting (see Figure 5). If frequency is
even or below the frequency limit then the stop mode is ramp (see Figure 6).
2.3.1.12
DC-braking frequency at stop
The output frequency which the DC-braking is applied. See Figure 6
Page 30
Closed Loop Parameters (M2 -> G2.3.2)
Parameters in group 2.3.2.x are valid in closed loop motor control mode
(parameter 2.5.1 =2) only.
2.3.2.4
Opening delay
Delay which starts when the opening conditions (see parameters 2.3.2.1-2.3.2.3) are
TRUE (See Figure 4).
2.3.2.5
Frequency limit closing
The output frequency limit for the brake closing. The run request signal needs to be
disabled to allow the signal to affect.
2.3.2.6
Closing delay
The brake closing is delayed with defined time. If set to zero there is no delay between
the brake closing condition and the actual brake closing.
2.3.2.8
Zero Hz time at start
2.3.2.9
Zero Hz time at stop
Zero hertz time during start and stop. Motor can be magnetised and torque generated
during that time. In closed loop mode, this time should be used. Smooth start time (par
2.3.2.10) will commence straight after zero hertz time. The mechanical brake should be
set to release when this change takes place (see Figure 3).
2.3.2.10
Smooth start time
The smooth start time function is used in closed loop mode. It cannot be used in open
loop. After the start command has been given the drive is rotating the motor shaft with a
very low frequency (par 2.3.2.11) to overcome the static friction.
Smooth start time will commence straight after zero hertz time (par 2.3.2.8). The
mechanical brake should be set to release when this change takes place. This is
achieved through setting the same value for the frequency limit (par 2.3.2.3) and the
smooth start frequency (par 2.3.2.11).
When smooth start time has elapsed the frequency will be released.
2.3.2.11
Smooth start frequency
Smooth start frequency is a reference frequency that is used with the smooth start time
operation. Value should be set very low.
2.3.2.14
Torque Rampdown time
Active when the valule is different from 0 and working with external brake supervision
(P2.3.3.2). In stop process, when converter get the closed brake feedback, the torque
rampdown is generated.
2.3.2.15
Auto Start Time
If we select this function, the drive calculates automatically the Start Sequence.
Vacon Drives Ibérica S.A.
Teléfono: +34 93 877 45 06
Fax: +34 93 877 00 09
E-mail: [email protected]
Page 31
Digital Inputs (M2 -> G2.3.3)
All digital inputs (except DIN1 and DIN2) are programmable. See instructions on page
Error! Bookmark not defined..
2.3.3.1
External brake control
Programmable digital input for external brake control. If digital input is selected it must be
ON before brake can be opened. If input is not used set it to default value (=0.2).
2.3.3.2
External brake supervision
Programmable digital input for external brake supervision. After the mechanical brake is
released, the selected input can be used to verify the brake open state. If the input is not
used, set it to default value (=0.2).
If the digital input is used it must be activated during the defined time (parameter 2.3.4.1)
from the brake release. If it is not activated, external brake fault is generated.
The response to external brake fault can be set with parameter 2.8.4.1.
Brake Supervision Parameters (M2 -> G2.3.4)
2.3.4.1
External brake supervision time
A time window within which the external brake supervision input (par2.3.3.2) has to be
activated after the brake is released.
2.3.4.2
External brake supervision inversion
Makes the invertion of external brake supervision.
Invert logic: brake opened = 0
brake close = 1
Page 32
5.4
2.4.2
DRIVE CONTROL
Stop function
Coasting:
0
The motor coasts to a halt without any control from the frequency converter,
after the Stop command.
Ramp:
1
After the Stop command, the speed of the motor is decelerated according to
the set deceleration parameters.
If the regenerated energy is high it may be necessary to use an external
braking resistor for faster deceleration.
Frequency limit
2
Coasting Stop if the motor frequency is above the frequency limit (par. 2.4.3)
when stop request is given. Stop by ramp if the motor frequency is the same
or below this parameter when stop request is given.
2.4.3
Frequency limit
Defines the frequency limit for the stop function if selected as the frequency limit (par.
2.4.2=2). This value is always automatically changed when levelling speed is changed,
with 2Hz over the levelling speed.
If the motor frequency is above the frequency limit the motor costs to stop and if it is
below or the same as the frequency limit the stop function is ramp.
2.4.7
Half Floor Function
0 = Normal
When detect a half floor, make the necessary corrections on speed to ensure that lift will
stop correctly at next landing, stopping at correct floor level.
1 = Capture Floors
This option is selected when we want to use the AutoCurve Compensation function.
This is the first step to start to configure this special function, when we select this
parameter to 1, automatically starts a Wizard that guides us through the parameters and
actions that we have to do. While we have this paremter in 1, in panel is blinking
.
Steps to configure the AutoCurve Compensation function:
1) Program Mechanical Datas of machine in P2.14.6.1 (Gear Box Relation), P2.14.6.2
(Pulley Diameter).
2) Program situation of calibration sensor in P2.14.2
3) Send lift to sensor floor
4) Make a trip to the extreme floor (If sensor is ground floor, move the lift to top floor).
5) Capture the total height of bulding pressing “Enter” in B2.14.1
6) Check in Monitoring V1.30 the total height
7) Send lift to sensor floor again
8) Move lift to first floor from sensor
9) Capture height of this floor with P2.14.7.3 (Editing and Pressign “Enter”)
10) Move lift to the next floor (second floor from sensor).
11) Capture height of this floor with P2.14.7.4 (Editing and Pressign “Enter”)
12) Repeat steps 10-11 capturing all the floors, in correct parameter P2.14.7.X
Vacon Drives Ibérica S.A.
Teléfono: +34 93 877 45 06
Fax: +34 93 877 00 09
E-mail: [email protected]
Page 33
13) When last floor will be captured, go to P2.4.7 = 2, then blinking
will be stop,
remaining in panel remembering you are working with AutoCurve Compensation
function.
2 = AutoCurve Compensation. (Explained in step 13)
2.4.8
Half Floor Sensibility
Limit under nominal speed, to dectect a half floor.
2.4.9
Inspection Stop mode
0 = Stop like P2.4.2
1 = Ramping Stop
5.5
2.5.1
2.5.2.1
MOTOR CONTROL
Motor control mode
0
Frequency control:
The I/O terminal and keypad references are frequency
references and the frequency converter controls the output
frequency (output frequency resolution = 0.01 Hz)
1
Speed control:
The I/O terminal and keypad references are speed references
and the frequency converter controls the motor speed
(accuracy ± 0,5%).
2
Speed control CL
Closed loop speed control mode. The I/O terminal and keypad
references are speed references and the frequency converter
controls the motor speed. Encoder is required. Closed loop
parameters in group G2.11must be set accordingly
U/f ratio selection
Linear:
0
The voltage of the motor changes linearly with the frequency in the constant
flux area from 0 Hz to the field weakening point where the nominal voltage is
supplied to the motor. Linear U/f ratio should be used in constant torque
applications. This default setting should be used if there is no special need for
another setting.
Squared: The voltage of the motor changes following a squared curve form
1
with the frequency in the area from 0 Hz to the field weakening point where
the nominal voltage is also supplied to the motor. The motor runs under
magnetised below the field weakening point and produces less torque and
electromechanical noise. Squared U/f ratio can be used in applications
where torque demand of the load is proportional to the square of the speed,
e.g in centrifugal fans and pumps.
Page 34
U[V]
Un
P a r 2 . 5 .5
Default: Nominal
voltage of the motor
Field weakening point
P ar. 2.5 .2.3
( D e f. 1 0 % )
Default: Nominal
frequency of the motor
f[Hz]
P ar. 2.5 .2.4
( D e f. 1 . 3% )
Par. 2.5.4
Par. 2.5.2.2
(Def. 5 Hz)
NX12K08
Figure 7. Linear and squared change of motor voltage
Programmable U/f curve:
2
The U/f curve can be programmed with three different points. Programmable
U/f curve can be used if the other settings do not satisfy the needs of the
application.
Figure 8. Programmable U/f curve.
Linear with flux optimisation:
3
The frequency converter starts to search for the minimum motor current in
order to save energy, lower the disturbance level and the noise. This function
can be used in applications with constant motor load, such as fans, pumps
etc.
U[V]
Un
Nominal
par.2.5.5 Default:
voltage of the motor
Field weakening
point
Linear
Squared
Default: Nominal
frequency of the
motor
f[Hz]
NX12K07
2.5.2.2
U/f curve, middle point frequency
If the programmable U/f curve has been selected with the parameter 2.5.2.1 this
parameter defines the middle point frequency of the curve. See Figure 8.
2.5.2.3
U/f curve, middle point voltage
If the programmable U/f curve has been selected with the parameter 2.5.2.1 this
parameter defines the middle point voltage of the curve. See Figure 8.
Vacon Drives Ibérica S.A.
Teléfono: +34 93 877 45 06
Fax: +34 93 877 00 09
E-mail: [email protected]
Page 35
2.5.2.4
Output voltage at zero frequency
If the programmable U/f curve has been selected with the parameter 2.5.2.1 this
parameter defines the zero frequency voltage of the curve. See Figure 8.
2.5.2.5
U/f optimisation
Automatic
torque boost
The voltage to the motor changes automatically which makes the
motor produce sufficient torque to start and run at low
frequencies. The voltage increase depends on the motor type and
power. Automatic torque boost can be used in applications where
starting torque due to starting friction is high, e.g. in conveyors.
NOTE!
In high torque - low speed applications - it is likely that the motor will
overheat. If the motor has to run a prolonged time under these
conditions, special attention must be paid to cooling the motor. Use
external cooling for the motor if the temperature tends to rise too
high.
Digital Inputs (M2 -> G2.6.7)
All digital inputs (except DIN1 and DIN2) are programmable. See instructions on page
Error! Bookmark not defined..
2.6.7.1
2.6.7.2
2.6.7.3
2.6.7.4
2.6.7.5
2.6.7.6
2.6.7.7
2.6.7.8
2.6.7.9
2.6.7.10
2.6.7.11
2.6.7.12
External Fault closing contact
External Fault opening contact
Fault Reset
Run Enable
Acc/Dec time selection
Stop by coast, closing contact
Stop by coast, opening contact
Override Speed
Forced I/O control
Speed selection input 1
Speed selection input 2
Speed selection input 3
2.6.7.13
Parameters 2.6.7.10-2.6.7.12 are speed reference selection inputs (see also parameter
2.2.2).
Calibration
If we want to use the AutoCurve Compensation, we have to program one digital Input as
calibration of position, to make reset of encoder counter.
The sensor must be in reset lift floor (floor where the lift is sent after some malfunction,
or logic control reset)
After switch on the converter, the first trip must be to calibration sensor, to start to work
with AutoCurve Compensation function.
2.6.7.14
Stop by coast, Falling Edge
Page 36
2.6.7.15
Photo Monitor
If P3.6=1, then in this parameter we decide what of digital inputs trigger the Photo
Monitor
2.6.7.16
Shortcircuit C.
When the motor is shortcircuited below the contactors, then the drive can give a
signal from a close contact.
2.6.7.17
Shortcircuit O.
When the motor is shortcircuited below the contactors, then the drive can give a
signal from an open contact.
5.7
2.7.6
OUTPUT SIGNALS
Digital output function
Setting value
0 = Not used
Signal content
Out of operation
1 = Ready
The frequency converter is ready to operate
2 = Run
The frequency converter operates (motor is running)
3 = Fault
A fault trip has occurred
4 = Fault inverted
A fault trip not occurred
5 = Vacon overheat warning
The heat-sink temperature exceeds +85°C
6 = External fault or warning
Fault or warning depending on par. 2.7.3
Fault or warning depending on par. 2.7.1
7 = Reference fault or warning
- if analogue reference is 4—20 mA and signal is <4mA
8 = Warning
Always if a warning exists
9 = Reversed
The reverse command has been selected
10 = Preset speed
The preset speed has been selected with digital input
11 = At speed
The output frequency has reached the set reference
12 = Motor regulator activated
14 = Control from I/O terminals
Overvoltage or overcurrent regulator was activated
The output frequency goes outside the set low limit/high
limit (see parameters 2.7.19 and 2.7.20)
I/O control mode selected (in menu M3)
15 = Thermal fault/warning
Thermal fault/warning active
13 = Output frequency supervision
16 = Fieldbus DIN1
17 = Speed below limit
18 = Torque limit supervision
19 = Mechanical brake control
20 = Mech. brake control inverted
21 = Open Doors
22 = AutoCalibration
Lift speed goes below limit (par 2.7.16)
Motor torque goes beyond the set supervision low
limit/high limit (see par. 2.7.17 and 2.7.18)Error!
Reference source not found.Error! Reference
source not found.
External brake ON/OFF control
(see parameter Group G2.3)
External brake ON/OFF control (see parameter Group
G2.3). Output active when brake control is OFF.
Signal to open doors when stopping under the speed
programmed in P2.7.21
If we make 5 stops with more than 5 cm of error this
signal activates to force the lift to go to calibration
Table 21. Output signals via DO1 and output relays RO1 and RO2.
Vacon Drives Ibérica S.A.
Teléfono: +34 93 877 45 06
Fax: +34 93 877 00 09
E-mail: [email protected]
Page 37
2.7.10
Relay output 1 function
See parameter 2.7.6.
2.7.14
Relay output 2 function
See parameter 2.7.6.
2.7.21
Speed Open Doors
When stopping and speed is under this parameter, the output is activated to open doors.
This signal remains active up to we make the next start.
B2.7.24.1–3 Manual Test Outputs
Pressing “Enter” in the every parameter we can active the different outputs. If we remain
pressing the Enter key, the output is only activated one second (for safety).
5.8
PROTECTIONS
I/O Faults parameters (M2 -> G2.8.1)
Lift Supervision parameters (M2 -> G2.8.4)
2.8.4.2
Shaft speed fault
0 = No response
1 = Warning
2 = Fault, stop mode after fault always by coasting
Actual shaft speed according to encoder and calculated shaft speed from motor control
are compared and in case the speed
SPEED [m/s]
difference is more than the set limit
vCALC
(parameter 2.8.4.4) per a defined time
(parameter 2.8.4.3) the set action is
Supervision time P2.8.4.3
taken.
vENC
This fault is generated only when the
Speed diffrence between
mechanical brake is open. i.e. if runvCALC and vENC
ning against mechanical brake this
greater than set limit in P2.8.4.4
fault is not generated.
t[s]
vCALC=actual speed according to motor
control
vENC =actual speed fromencoder
In open loop motor control mode this fault is not
generated. See
Figure 9.
Figure 9. Stall time count
Page 38
2.8.4.3
Shaft speed supervision time
If the speed difference in shaft speed
supervision is greater than the set limit
(parameter 2.8.4.2) for a defined supervision
time the shaft speed warning or fault is
generated. See
Figure 9.
2.8.4.4
Shaft speed supervision limit
The speed difference between the actual and
the calculated lift speed, which will cause
tripping. See
Figure 9.
Parameter 2.8.4.4.1 is the Shaft speed supervision limit in [m/s] and
Parameter 2.8.4.4.2 is the Shaft speed supervision limit in [Hz].
2.8.4.7
Response to control conflict
0 = No response
1 = Warning
2 = Fault, stop mode after fault always by coasting
Status of the DIN1 and DIN2 switches is supervised by the application. If they are active
at the same time a control conflict fault will be generated. The response to fault is given
with this parameter.
2.8.4.8
Minimum current
If actual current of the motor is below the minimum current limit fault (F58) is activated.
The fault is activated only when the mechanical brake is open. 100% correspond to
frequency converter nominal current.
2.8.4.9
Sensibility minimum current
Adjusting this time we can control de sensibility to appear the fault F58.
2.8.4.10
0Hz Speed response
0= Not used
1= Warning
2= Warning + Stop
3= Fault
0 Hz speed supervision is active two seconds after the start command. During that time
frequency reference must increase over 0 Hz otherwise fault is activated. Response to
fault is given with this parameter.
Vacon Drives Ibérica S.A.
Teléfono: +34 93 877 45 06
Fax: +34 93 877 00 09
E-mail: [email protected]
Page 39
2.8.4.11
Encoder Fault
0 = Fault
1 = No Action
If the Encoder has some problem when controlling the Motor, then the defined action is
taken.
2.8.4.12 Brake Mode
0 = No response
1 = Warning
If something wrong happens while the lift is decelerating in stop process, we could get a
warning.
The situations that can give us a warning are:
63 → If the deceleration is very high for load in lift, and actuates the overvoltage
controller. To solve, make deceleration (P2.2.5.2) lower.
64 → If the stop signal arrive before to get the levelling speed. To solve, increase
deceleration, or decrease the S-curves (P2.2.5.5, P2.2.5.6).
2.8.4.13 Start-Stop Sequence
0 = No response
1 = Warning
2 = Fault, stop mode after fault always by coasting
This only actuates if we have programmed some input as “Stop Coasting Falling Edge”.
In this case we can make a start sequence supervision.
After start signal, the programmed input must received 24V.
After stop signal, the programmed input must received 0V.
2.8.4.14 Sensibility Start-Stop Sequence
Delay to dectect the Start-Stop sequence.
2.8.4.15 Encoder Direction AutoInversion
0 = Disable
1 = Enable
The first time that we start the motor in Close Loop, the motor and encoder directions can
be inverted. Then the converter stops the motor and autocorrect the situation, showing in
panel F87. We we start again, the problem won’t be present and the lift will run perfectly.
If this function is disable, we’ll have to change manually the encoder direction in P2.11.3
Page 40
2.8.4.16 Absolute Speed Fault
0 = No response
1 = Warning
2 = Fault
This fault appears when the lift speed is higher than P2.8.4.17 during P2.8.4.18.
2.8.4.17 Absolute speed limit
Over this limit appears the Absolute speed fault.
5.9
2.9.1
AUTO RESTART PARAMETERS
Automatic restart: Wait time
Defines the time before the frequency converter tries to automatically restart the motor
after the fault has disappeared.
2.9.2
Automatic restart: Trial time
The Automatic restart function restarts the frequency converter when the faults selected
with parameters 2.9.4 to 2.9.9 have disappeared and the waiting time has elapsed.
Wait time
Par. 2.9.1
Wait time
Par. 2.9.1
Wait time
Par. 2.9.1
Fault trigger
Motor stop signal
Restart 1
Restart 2
Motor start signal
Supervision
Trial time
Par. 2.9.2
Fault active
RESET/
Fault reset
NX12k67
Autoreset function: (Trials = 2)
Figure 10. Example of Automatic restart with two restarts.
Parameters 2.9.4 to 2.9.10 determine the maximum number of automatic restarts during
the trial time set by parameter 2.9.2. The time count starts from the first autorestart. If the
number of faults occurring during the trial time exceeds the values of parameters 2.9.4 to
2.9.10, the fault state becomes active. Otherwise the fault is cleared after the trial time
has elapsed and the next fault starts the trial time count again.
If a single fault remains during the trial time, a fault state is true.
2.9.4
Automatic restart: Number of tries after undervoltage fault trip
Vacon Drives Ibérica S.A.
Teléfono: +34 93 877 45 06
Fax: +34 93 877 00 09
E-mail: [email protected]
Page 41
This parameter determines how many automatic restarts can be made during the trial
time set by parameter 2.9.2 after an undervoltage trip.
0
= No automatic restart after undervoltage fault trip
>0
= Number of automatic restarts after undervoltage fault. The fault is
reset and the drive is started automatically after the DC-link voltage
has returned to the normal level.
Page 42
2.9.11
5.10
Automatic restart: Number of tries after Start-Stop Sequence fault trip
This parameter determines how many automatic restarts can be made during the trial
time set by parameter 2.9.2.
0
= No automatic restart after start-stop sequence fault trip
>0
= Number of automatic restarts after start-stop sequence fault trip
EVACUATION PARAMETERS
Evacuation is specially designed for power down situations. When there is power down
situation then the 3-phase Mains supply must be disconnected and the 1-phase supply
must be connected to Terminals L1-L2. Supply Voltage must be 1-phase 220VAC
(±10%). If DC- batteries are used DC-link voltage must reamain at least 250 VDC,
otherwise under voltage fault will occur.
The Elevator Car can be moved to nearest floor. The maximum Lift speed during the
Evacuation is 40% of the Nominal Linear Speed. If Evacuation is activated then Mains
supply must be correct, otherwise the Evacuation fault will occur.
2.10.3
Motor control mode
0 = Frequency control:
1 = Speed control:
2 = Speed control CL:
2.10.4
The I/O terminal and panel references are frequency
references and the frequency converter controls the output
frequency.
The I/O terminal and panel references are speed references
and the frequency converter controls the motor speed
(regulation accuracy ± 1%).
Closed loop speed control mode. The I/O terminal and keypad
references are speed references and the frequency converter
controls the motor speed. Encoder is required. Closed loop
parameters in group G2.11must be set accordingly.
Direction change delay
Time delay between forward and reverse direction test.
2.10.5
Testing time forward and backward
Motor current is measured for both running directions of the elevator during automatic
evacuation process. This parameter determine the test time for each direction.
Vacon Drives Ibérica S.A.
Teléfono: +34 93 877 45 06
Fax: +34 93 877 00 09
E-mail: [email protected]
Page 43
2.10.6
Current read delay
Motor current is measured for both running directions of the elevator during automatic
evacuation process. This parameter determines the point of time when current is read.
Time starts simultaneously with test time.
2.10.11
Maximum speed in evacuation
Maximum speed during the evacuation is limited with this parameter.
Parameter 2.10.11.1 maximum speed in [m/s].
Parameter 2.10.11.2 maximum frequency in [Hz].
2.10.13
Motor Limit (3)
Is the input motor current tendency supervision related with the motor magnetizing
current (P2.11.1).
2.10.15
Evacuation Start Delay
When the drive receive the evacuation signal from the EVACDRIVE, the evacuation
function is delayed this time.
2.10.16
Evacuation Stop Delay (2 and 3)
When the drive receive the stop evacuation signal coming from the lift maneuver. Then
the drive delay the stop output signal by DO4.4 (Slot D) to EVACDRIVE.
5.11
2.11.1
CLOSED LOOP PARAMETERS
Magnetisation Current
Rated magnetising current for the motor. It is used to adjust the motor voltage in no-load
situation.
2.11.2
Encoder Pulses/Revolution
2.11.3
Invert Encoder Direction
If we get F43, we can try to change the encoder direction to solve the fault.
2.11.4
2.11.5
Speed Control Limit 1
Speed Control Limit 2
Change limits for speed controller gain and integral time constant. When the output
frequency is below the change point 1 (par 2.11.4) the gain value is the same as
parameter 2.11.6. If the output frequency is greater than change point 2 (par 2.11.5)
then the gain value is the same as parameter 2.11.7. Between these two points the
change is linear. See Figure 11.
Page 44
2.11.6
2.11.7
Speed Control Kp1
Speed Control Kp 2
Active Speed control gain value (%/ Hz) is P2.11.6 if the output frequency if less than
P2.11.4. Active Speed control gain value is P2.11.7 if the output frequency if more than
P2.11.5.
Figure 11. Proportional Speed Control Kp Curve
2.11.8
2.11.9
Speed Control Ti 1
Speed Control Ti 2
Figure 12. Proportional Speed Control Ti Curve
Active Integral time constant value for the speed controller is P2.11.8 if the output
frequency if less than P2.11.4. If the output frequency is more than P2.11.5 the value is
P2.11.9.
2.11.17
Fixed en Ramp
If is activated, the ramp after stop signal actuates with parameters P2.11.18.1 – 3
If is not activated, the ramp after stop signal actuates with parameters P2.2.5.2, P2.2.5.5,
P2.2.5.6
2.11.18.1 – 3 See explanation on P2.2.5.2, P2.2.5.5, P2.2.5.6
Vacon Drives Ibérica S.A.
Teléfono: +34 93 877 45 06
Fax: +34 93 877 00 09
E-mail: [email protected]
Page 45
5.12
2.12.1
OPEN LOOP PARAMETERS
Identification
Motor Identification in Open Loop. U/f Curve and RS Voltage Drop is included. When
parameter is set to 1 motor must be started within 20 seconds. Identification is
performed in standstill. The Mechanical Brake remains closed.
2.12.3
Ir Add Generator Scale
Scaling factor for generator side IR-compensation (0 ... 200%)
2.12.4
Ir Add Motor Scale
Scaling factor for Motor side IR-compensation (0 ... 200%)
2.12.8
Soft Start
0 = Active
1 = Inactive
Enable to Open Loop control start with a very soft start.
Page 46
5.13
PERMANENT MAGNET SYNCHRONOUS MOTORS
SELF COMMISSION (parameters 2.13.1-2.13.3)
Before the very first run, the encoder absolute zero position angle with respect to the
motor stator winding magnetizing direction must be found. This is done by running a
shaft angle self commissioning test sequence i.e. calibration. The motor shaft should be
able to turn (unloaded machine) during the test.
2.13.1
Enable Angle Com
This parameter enables the encoder zero position calibration sequence if the parameter
is set to Yes. Then the calibration is made after the next motor start command.
2.13.3
0 Pos Angle LoWo
This is the shaft absolute angle lowest 16-bit reading found during the calibration
sequence.
2.13.4
0 Pos Angle HiWo
This is the shaft absolute angle highest 16-bit reading found during the calibration
sequence.
Proceeding the self commission:
After the motor parameters are set, the encoder zero position with respect to the stator winding
magnetizing direction must be found. The zero position can be found automatically by running the
shaft angle self commissioning procedure as explained next. It is recommended that the load is
disconnected in the motor during the commissioning.
1. Set the motor current limit “P 2.1.6 Current Limit” to a lower value.
It is usually better to set the motor current limit first to quite low value around 20 % of the motor
nominal current. This will be the current limit for the calibration test sequence current. Anyway, the
motor current is internally limited to the motor nominal current during the calibration test sequence.
2. Set the parameter “P 2.13.1 Enable Angle Com” value to Yes.
3. Give the motor a start command.
After the start command, the DC-current is driven to the motor 10 second time. After the 10 second,
the inverter stops automatically. The DC-current level depends on the motor current limit but in any
case the current is limited at the maximum to the motor nominal current. During the calibration
sequence the rotor rotates a little bit either backwards or forwards and there may be oscillatory
motion. Before the test sequence stops (10 s) the rotor movement should stop and the rotor should
stay in a stationary position without any movement. If the rotor does not stop on moving, the test
sequence must be done again.
After the successful calibration sequence the zero position value can be read in parameters P 2.13.2
and P 2.13.3. The reading should make sense and be something within the absolute angle
resolution. Set the motor current limit back to the original value.
After the calibration sequence the motor should be ready to run if all the parameters are set
correctly. Note that the encoder zero position calibration (self commission) must be done again only
if the encoder is mechanically removed.
Vacon Drives Ibérica S.A.
Teléfono: +34 93 877 45 06
Fax: +34 93 877 00 09
E-mail: [email protected]
Page 47
2.13.5
Load Cell
0 = Inactive
1 = Active
The start process is controlled by a load cell in cabine. The load cell must send to the
converter a 0-20mA or 4-20mA, and has to be connected in terminals 4-5 (AI2).
2.13.8
RollBack Controller
When the brake is open the lift can have a movement in the gravity direction due to the
lift load. To solve this effect we put the RollBack Controller on:
0 = Not Used
1 = Smoth RollBack. If we have set the external brake supervisión in P2.3.3.2, then
the function performance is higher. In this mode the parameters which have effect
are: P2.13.9, P2.13.10, P2.13.11, P2.13.12 and P2.13.13.
2 = Fast RollBack. If we have set the external brake supervisión in P2.3.3.2, then the
function performance is higher. In this mode the parameters which has effect are:
P2.13.14, P2.13.15, P2.13.16.
5.14
AUTOCURVE COMPENSATION
2.14.1
Capture Height
Pressing “Enter” in this parameter, captures the total height of trip from calibration
sensor.
2.14.2
Calibration Sensor Position
0=?
1 = Ground Floor
2 = Top Floor
Position definition of calibration sensor. The sensor must be installed
2.14.3
Distance at Levelling Speed
Distance to destiny floor to landing which we want to be at levelling speed.
2.14.5
Offset Compensation
Offset over or under the speed calculations. In next graphic you can see the effects:
Figure30. Differences between Offset sign values.
2.14.6.1
2.14.6.2
Gear Box Relation
Pulley Diameter
Lift machine’s Mechanical datas.
Page 48
2.14.7.1
Ground Floor
Only appears in panel if P2.14.2 = 1. This parameter is only for information, cannot be
modified, because always must be 0,00m the position of calibration sensor.
2.14.7.3 - 34
Floor 1 – Floor 32
Capture the height of every floor, only pressing right arrow (edit mode) and after “Enter”,
when the lift is the correct floor.
2.14.9.1 Change Distance
Is the distance between the speed change detectors. If the real distance is different than the
distance introduced in the parameter then will appear A92 “Change Distance”.
2.14.9.2 Skiip Frequency
If the real change speed is under this value, the drive will stop at this floor. If the real change
speed is above this value the drive will stop at the next floor.
2.14.10 Automatic Curve Compensation
0 = Not in use.
1 = Activated. Make the Automatic Curve Compensation in all the floors.
5.15
KEYPAD CONTROL PARAMETERS
3.5
Programming Level
0 = Basic
1 = Medium
2 = High
Depending of level selected, we have access to some parameters or anothers.
3.6
PhotoMonitor Trigger
We can program the trigger signal for PhotoMonitor function. Furthermore, always
pressing “Enter” inside of Monitor Menu, makes trigger too.
3.7
Reset Counters
Pressing “Enter” resets the start/day and calibrations/day counters in Monitor Menu.
Vacon Drives Ibérica S.A.
Teléfono: +34 93 877 45 06
Fax: +34 93 877 00 09
E-mail: [email protected]
Page 49
6. Control Signal Logic in Lift Application
DIN#
DIN#
DIN#
DIN#
Override Speed selection
Speed Selection:
Input 1
P2.6.7.8
Override Speed
Input 2
P2.2.2 Speed
Reference
Input 3
P3.1
Control Place
Speed Reference
parameters:
P2.2.(3/4).x
Internal
Frequency reference
AIA1
Fieldbus
Reference
Reset Button
Start/Stop
Buttons
Fw
Internal
Start / Stop
DIN1
Bw
DIN2
Run Enable
Programmable
Start/Stop Logic
with Run Enable
Internal
Reverse
DIN#
Start/Stop from Fieldbus
P3.3 Keypad Direction
Direction from Fieldbus
Fault Reset (Programmable)
DIN#
DIN# is Programmable input. Function can be selected to any Input.
NOTE! Two different funtion can be programmed to one Input.
This feature must be used very carefully.
Figure 13. Control signal logic of the Lift Application
1
Internal
Fault Reset
KeyPad
Page 50
7. Fault Tracing
When a fault is detected by the frequency converter control electronics, the drive is stopped and the
symbol F together with the ordinal number of the fault, the fault code and a short fault description
appear on the display. The fault can be reset with the Reset button on the control keypad or via the
I/O terminal. The faults are stored in the Fault History menu, which can be browsed. The different
fault codes you will find in the table below.
The fault codes and their possible causes are presented in the table below.
Fault
code
1
Fault
Possible cause
Overcurrent
Frequency converter has detected too high a current (>4*In) in the motor cable:
- sudden heavy load increase
- short circuit in motor cables
- unsuitable motor
The DC-link voltage has exceeded the limits defined in Table 4-1.
- too short a deceleration time
- high overvoltage spikes in utility
Current measurement has detected that the sum of motor phase current is not
zero.
insulation failure in cables or motor
The charging switch is open, when the START command has been given.
- faulty operation
- component failure
Stop signal has been given from the option board.
Defective component
The frequency converter troubleshooting system is unable to locate the fault.
DC-link voltage is under the voltage limits defined in Table 4-2 of the Vacon NX
User's Manual.
Most probable causes:
- too low a supply voltage
- frequency converter internal fault
Input line phase is missing.
2
Overvoltage
3
Earth fault
5
Charging switch
6
7
8
9
Emergency stop
Saturation trip
Unknown fault
Undervoltage
10
Input line
supervision
Output phase
supervision
Brake chopper
supervision
11
12
13
14
Frequency
converter undertemperature
Frequency
converter
overtemperature
Current measurement has detected that there is no current in one motor phase.
- no brake resistor installed
- brake resistor is broken
- brake chopper failure
Heatsink temperature is under –10°C
Heatsink temperature is over 90°C.
17
Motor stalled
Motor
overtemperature
Motor underload
Overtemperature warning is issued when the heatsink temperature exceeds
85°C.
Motor stall protection has tripped.
Motor overheating has been detected by frequency converter motor temperature
model. Motor is overloaded.
Motor underload protection has tripped.
22
EEPROM
-
15
16
Vacon Drives Ibérica S.A.
parameter save fault
Teléfono: +34 93 877 45 06
Fax: +34 93 877 00 09
E-mail: [email protected]
Page 51
Fault
code
23
24
25
Fault
Possible cause
checksum fault
- faulty operation
- component failure
Changes may have occurred in the different counter data due to mains interruption
Changed data
warning
Microprocessor
watchdog fault
29
37
Thermistor fault
Device change
38
Device added
39
Device removed
40
41
43
Device unknown
IGBT temperature
Encoder Fault
50
Analogue input Iin
< 4mA (selected
signal range 4 to
20 mA)
External fault
Keypad communication fault
Fieldbus
communication
SPI communication fault
External brake
control
Shaft speed
51
52
53
54
55
56
57
58
59
60
61
Torque
supervision
Minimum current
Direction request
Evacuation
Zero speed time
- faulty operation
- component failure
Thermistor is broken.
Option board changed.
Different power rating of drive.
Option board added.
Drive of different power rating added.
Option board removed.
Drive removed.
Unknown option board or drive.
Error in encoder signals. See subcode:
S1 = Channel A missing
S2 = Channel B missing
S3 = Channels A and B missing
S4 = Encoder wrong direction (incremental encoder only)
S5 = Encoder board not responding (incremental encoder only)
S6 = EnDat communication error (DATA+, DATA-). Equal to F86.
S7 = Sin/Cos signal error.
Current at the analogue input is < 4mA.
- control cable is broken or loose
- signal source has failed
Digital input fault.
The connection between the control keypad and the frequency converter is
broken.
The connection from the fieldbus to the frequency converter is broken.
The connection between the component board and the control board is broken.
Fault is activated by the mechanical brake control logic. Check parameters and
external brake device. See parameter 2.8.4.1
Fault is activated if calculated speed is different compared to actual speed.
See parameter 2.8.4.2.
Actual torque above torque limits. See parameter 2.8.4.5
Motor current is less than set limit parameter 2.8.4.8
Digital inputs DIN1 and DIN2 are ON at the same time. See parameter 2.8.4.7.
Fault is generated during the evacuation process.
Zero current measured later than 2 seconds from start command.
See parameter 2.8.4.10.
Evacuation active and voltage has exceeded the limit value.
Evacuation voltage 230VAC ±10%
62
Evacuation
Voltage
63
Hard Brake
The deceleration has been very hard, and the overvoltage controller has actuate
making the deceleration time longer . See parameter P2.8.4.12
64
Stop in NO
Levelling Speed
The stop signal arrives before to get the levelling speed. See parameter
P2.8.4.12
Page 52
Fault
code
Fault
65
Start-Stop
Sequence
87
Inverting Encoder
88
89
90
Over Speed
Slip
Short circuit
91
92
Brake
desconection fault
Change Distance
93
Make Identification
Possible cause
Having a digital input programmed as a emergency stop by falling edge, the
sequence of start or stop is not correct:( See parameter P2.8.4.13)
- After Start command the input selected for emergency by falling edge must
received 24V
- After Stop command the input selected for emergency by falling edge must
received 0V
If encoder direction is not the same that motor, autocorrect it. See parameter
P2.8.4.15
The lineal speed of lift cabine reach the value of P2.8.4.17
The system detects a higher cables slip than 5 cm when the CAC function is on.
If the motor short-circuit logical circuit doesn’t follow the correct start-stop
sequence, the fault appears. The related parameters are P2.6.7.16, P2.6.7.17
and P2.8.4.19.
If there is the close brake order and in the terminal nº2 there isn’t the 10Vcc the
the fault appears. The related parameters are P2.3.3.2, P2.3.4.2, P2.8.4.1.
The speed change detector distance is different than the distance introduced in
the P2.14.9.1
This fault appears if we change the encoder direction from the parameters. If this
fault appears we have to make a new identification. Until we don’t make a new
identification, the fault will be active in the drive.
Table 22. Fault codes
Vacon Drives Ibérica S.A.
Teléfono: +34 93 877 45 06
Fax: +34 93 877 00 09
E-mail: [email protected]