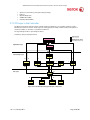
1
Xerox WorkCentre™
7525/7530/7535/7545/7556
Information Assurance Disclosure Paper
Version 1.1
Prepared by:
Larry Kovnat
Xerox Corporation
800 Phillips Road
Rochester, New York 14580
XEROX WorkCentre 7525/7530/7535/7545/7556 Information Assurance Disclosure Paper
©2011 Xerox Corporation. All rights reserved. Xerox and the sphere of connectivity design are trademarks of
Xerox Corporation in the United States and/or other counties.
Other company trademarks are also acknowledged.
Document Version: 1.00 (February 2011).
Contributors:
Michael Barrett
Steve Beers
Bob Crumrine
Bob Easterly
Mike Faraoni
Gordon Farquhar
Mirelsa Fontanes
Tim Hunter
Larry Kovnat
Tom Pierce
Roger Rhodes
Steve Sydorowicz
R. Ben Wilkie
Bob Zolla
Ralph H. Stoos Jr.
Ver. 1.1, February 2011
Page 2 of 49
XEROX WorkCentre 7525/7530/7535/7545/7556 Information Assurance Disclosure Paper
1.
INTRODUCTION...................................................................................................... 6
1.1.
Purpose ........................................................................................................................................................... 6
1.2.
Target Audience ............................................................................................................................................ 6
1.3.
Disclaimer ...................................................................................................................................................... 6
2.
DEVICE DESCRIPTION ............................................................................................ 7
2.1.
Security-relevant Subsystems ...................................................................................................................... 7
2.1.1. Physical Partitioning ....................................................................................................................................... 7
2.1.2. Security Functions allocated to Subsystems .................................................................................................... 9
2.2.
2.2.1.
2.2.2.
2.2.3.
2.2.4.
Controller ....................................................................................................................................................... 9
Purpose ............................................................................................................................................................ 9
Memory Components .................................................................................................................................... 10
External Connections .................................................................................................................................... 11
USB Ports ...................................................................................................................................................... 13
2.3.
Fax Module .................................................................................................................................................. 13
2.3.1. Purpose .......................................................................................................................................................... 13
2.3.2. Hardware ....................................................................................................................................................... 13
2.4.
Scanner ......................................................................................................................................................... 14
2.4.1. Purpose .......................................................................................................................................................... 14
2.4.2. Hardware ....................................................................................................................................................... 14
2.5.
Graphical User Interface (GUI) ................................................................................................................. 14
2.5.1. Purpose .......................................................................................................................................................... 14
2.6.
Marking Engine (also known as the Image Output Terminal or IOT)................................................... 14
2.6.1. Purpose .......................................................................................................................................................... 14
2.6.2. Hardware ....................................................................................................................................................... 14
2.7.
2.7.1.
2.7.2.
2.7.3.
System Software Structure ........................................................................................................................ 14
Open-source components .............................................................................................................................. 14
OS Layer in the Controller ............................................................................................................................ 15
Network Protocols ......................................................................................................................................... 16
2.8.
2.8.1.
2.8.2.
2.8.3.
Logical Access .............................................................................................................................................. 16
Network Protocols ......................................................................................................................................... 16
Ports............................................................................................................................................................... 17
IP Filtering .................................................................................................................................................... 22
3.
3.1.
SYSTEM ACCESS .................................................................................................... 23
Authentication Model................................................................................................................................. 23
Ver. 1.1, February 2011
Page 3 of 49
XEROX WorkCentre 7525/7530/7535/7545/7556 Information Assurance Disclosure Paper
Login and Authentication Methods .......................................................................................................... 25
3.2.
3.2.1. System Administrator Login [All product configurations]............................................................................ 25
3.2.2. User authentication ........................................................................................................................................ 25
3.3.
System Accounts ......................................................................................................................................... 27
3.3.1. Printing [Multifunction models only] ............................................................................................................ 27
3.3.2. Network Scanning [Multifunction models only] ........................................................................................... 27
3.4.
3.4.1.
3.4.2.
3.4.3.
3.4.4.
3.4.5.
4.
Diagnostics .................................................................................................................................................. 28
Service [All product configurations] ............................................................................................................. 28
Alternate Boot via Serial Port ....................................................................................................................... 28
tty Mode ........................................................................................................................................................ 28
Diagnostics via Portable Service Workstation (PSW) Port ........................................................................... 28
Summary ....................................................................................................................................................... 30
SECURITY ASPECTS OF SELECTED FEATURES ....................................................... 31
4.1.
Audit Log ...................................................................................................................................................... 31
4.2.
Xerox Standard Accounting ....................................................................................................................... 36
4.3.
4.2.1
4.2.2
4.2.3
SMart eSolutions ......................................................................................................................................... 37
Meter Assistant .............................................................................................................................................. 37
Supplies Assistant ......................................................................................................................................... 37
Summary ....................................................................................................................................................... 37
4.4.
Encrypted Partitions ................................................................................................................................... 37
4.5.
4.5.1.
4.5.2.
4.5.3.
Image Overwrite ......................................................................................................................................... 37
Algorithm ...................................................................................................................................................... 38
User Behavior ................................................................................................................................................ 38
Overwrite Timing .......................................................................................................................................... 38
4.6.
FIPS ............................................................................................................................................................... 39
4.6.1. FIPS 140-2 Compliance ................................................................................................................................ 39
4.6.2. Enabling FIPS 140 Mode .............................................................................................................................. 39
4.7.
5.
5.1.
6.
Email Signing and Encryption to Self ....................................................................................................... 40
RESPONSES TO KNOWN VULNERABILITIES ......................................................... 41
Security @ Xerox (www.xerox.com/security) ............................................................................................ 41
APPENDICES ......................................................................................................... 42
6.1.
Appendix A – Abbreviations....................................................................................................................... 42
6.2.
Appendix B – Supported MIB Objects ...................................................................................................... 44
6.3.
Appendix C –Standards .............................................................................................................................. 47
6.4.
Appendix E – References ............................................................................................................................ 49
Ver. 1.1, February 2011
Page 4 of 49
XEROX WorkCentre 7525/7530/7535/7545/7556 Information Assurance Disclosure Paper
Ver. 1.1, February 2011
Page 5 of 49
XEROX WorkCentre 7525/7530/7535/7545/7556 Information Assurance Disclosure Paper
1. Introduction
The WorkCentre 7545/7556 multifunction systems are among the latest versions of Xerox copier and
multifunction devices for the general office.
1.1. Purpose
The purpose of this document is to disclose information for the WorkCentre products with respect to device security.
Device Security, for this paper, is defined as how image data is stored and transmitted, how the product behaves in a
networked environment, and how the product may be accessed, both locally and remotely. Please note that the
customer is responsible for the security of their network and the WorkCentre products do not establish security for
any network environment.
The purpose of this document is to inform Xerox customers of the design, functions, and features of the WorkCentre
products relative to Information Assurance (IA).
This document does NOT provide tutorial level information about security, connectivity, PDLs, or WorkCentre
products features and functions. This information is readily available elsewhere. We assume that the reader has a
working knowledge of these types of topics. However, a number of references are included in the Appendix.
1.2. Target Audience
The target audience for this document is Xerox field personnel and customers concerned with IT security.
1.3. Disclaimer
The information in this document is accurate to the best knowledge of the authors, and is provided without warranty
of any kind. In no event shall Xerox Corporation be liable for any damages whatsoever resulting from user's use or
disregard of the information provided in this document including direct, indirect, incidental, consequential, loss of
business profits or special damages, even if Xerox Corporation has been advised of the possibility of such damages.
Ver. 1.1, February 2011
Page 6 of 49
XEROX WorkCentre 7525/7530/7535/7545/7556 Information Assurance Disclosure Paper
2.
Device Description
This product consists of an in put document handler and scanner, marking engine including paper path, controller,
and user interface.
Document Feeder & Scanner
(IIT)
Graphical User
Interface
(GUI)
Marking Engine (IOT)
Paper Trays
Optional office finisher
Figure 2-1 WorkCentre Multifunction System
2.1. Security-relevant Subsystems
2.1.1. Physical Partitioning
The security-relevant subsystems of the product are partitioned as shown in Figure 2-2.
Ver. 1.1, February 2011
Page 7 of 49
Di
sp
lay
Bu
tto
ns
an
d
Physical external
interface
PCI Bus
Optical
interface
Button and TOE internal wiring
(proprietary)
XEROX WorkCentre 7525/7530/7535/7545/7556 Information Assurance Disclosure Paper
Figure 2-2 System functional block diagram
Ver. 1.1, February 2011
Page 8 of 49
XEROX WorkCentre 7525/7530/7535/7545/7556 Information Assurance Disclosure Paper
2.1.2. Security Functions allocated to Subsystems
Security Function
Subsystem
Image Overwrite
Controller
Graphical User Interface
System Authentication
Controller
Graphical User Interface
Network Authentication
Controller
Graphical User Interface
Security Audit
Controller
Cryptographic Operations
Controller
User Data Protection – SSL
Controller
User Data Protection – IP Filtering
Controller
User Data Protection – IPSec
Controller
User Data Protection – Disk Encryption
Controller
Network Management Security
Controller
Fax Flow Security
Fax Module
Controller
Graphical User Interface
Security Management
Controller
Graphical User Interface
Table 1 Security Functions allocated to Subsystems
2.2. Controller
2.2.1. Purpose
The controller provides both network and direct-connect external interfaces, and enables copy, print, email, network
scan, server fax, internet FAX, and LanFAX functionality. Network scanning, server fax, internet fax, and LanFax, are
standard features. Image Overwrite, which is included as a standard feature, enables both Immediate and OnDemand overwrite of any temporary image data created on disk. The controller also incorporates an open-source
web server (Apache) that exports a Web User Interface (WebUI) through which users can submit jobs and check job
and machine status, and through which system administrators can remotely administer the machine.
The controller contains the image path, which uses proprietary hardware and algorithms to process the scanned
images into high-quality reproductions. Scanned images may be temporarily buffered in DRAM to enable electronic
pre-collation, sometimes referred to as scan-once/print-many. When producing multiple copies of a document, the
scanned image is processed and buffered in the DRAM in a proprietary format. Extended buffer space for very large
documents is provided on the network disk. The buffered bitmaps are then read from DRAM and sent to the Image
Output Terminal (IOT) for marking on hardcopy output. For long documents, the production of hardcopy may begin
before the entire original is scanned, achieving a level of concurrency between the scan and mark operations.
The controller operating system is Wind River Linux, kernel v. 2.6.27+. (Note: Consistent with Flaw Remediation, this
baseline may be updated as indicated by the ‘+’ sign. Unnecessary services such as rsh, telnet and finger are disabled
in the OS. FTP is used in client-only mode by the network scanning feature for the filing of scanned images and the
retrieval of Scan Templates; however the controller does not contain an FTP server.
The controller works with the Graphical User Interface (GUI) assembly to provide system configuration functions. A
System Administrator PIN must be entered at the GUI in order to access these functions.
Ver. 1.1, February 2011
Page 9 of 49
XEROX WorkCentre 7525/7530/7535/7545/7556 Information Assurance Disclosure Paper
2.2.2. Memory Components
Volatile Memory Description
Type (SRAM, DRAM, etc)
Size
User Modifiable
(Y/N)
Function or Use
Process to
Clear:
DDR2 SDRAM – System Memory
2GB
N
Executable code, Printer control data,
temporary storage of job data
Power Off System
DDR2 SDRAM – Image Memory
1GB
N
Image data - copy/scan/print/Fax
Power Off System
SRAM
1MB
N
JPEG image processing
Power Off System
Additional Information:
There are two main blocks of Volatile memory in the controller, System and Image memory. System memory contains a mixture of
executable code, control data and job data. Job data exists in System memory while the job is being processed. Once the job is complete
the memory is reused for the next job. Likewise Image memory holds job data in a proprietary format while the job is being processed.
Once the job is complete the image memory is reused for subsequent jobs.
Non-Volatile Memory Description
Type (Flash, EEPROM, etc)
Size
User Modifiable
(Y/N)
Function or Use
Process to
Clear:
NVM
512KB
via Diagnostics
Control setpoints, configuration
settings
Diagnostic
Flash EEPROM
32MB
via Diagnostics
Firmware
Diagnostic
Flash (MCU PWBA)
16Mbit
N
Permanent storage of program. User
image data are not stored.
Not customer
alterable.
EEPROM (LED Driver, PWBA, K)
128Kbit
N
Permanent storage of setup data.
Not customer
alterable.
EEPROM (MCU PWBA)
128Kbit
N
Permanent storage of parameters
and setup data. User image data are
not stored.
Not customer
alterable.
EEPROM (Trans PWBA)
16Kbit
N
Permanent storage of parameters
and setup data. User image data are
not stored.
Not customer
alterable.
EEPROM (UI PWBA)
1kbit x 2
N
Permanent storage of setup data.
Storage of UI error log data
Not customer
alterable.
EEPROM (DADF PWBA)
16Kbit
N
Permanent storage of DADF
configuration code. User image data
are not stored.
Not customer
alterable.
ROM (UI PWBA)
32kbyte
N
Permanent storage of UI executable
code. User image data are not stored.
Not customer
alterable.
ROM (DADF PWBA)
512kbyte
N
Permanent storage of UI
configuration code. User image data
are not stored.
Not customer
alterable.
Additional Information:
All memory listed above contains code for execution and configuration information. No user or job data is stored in these locations.
Table 2 Controller volatile and non-volatile memory components
Ver. 1.1, February 2011
Page 10 of 49
XEROX WorkCentre 7525/7530/7535/7545/7556 Information Assurance Disclosure Paper
Hard Disk Descriptions
Drive / Partition
(System, Image):
Removable
Y/N
Size:
User Modifiable:
Y/N
Function:
Process
to Clear:
System Disk / System partition
No
27GB
N with normal
operation
Operating System,
Fonts, configuration file
storage.
Diagnostic
Procedure
System Disk / Image partition
No
53GB
N with normal
operation
Job Images
Diagnostic
Procedure
Additional Information:
This System disk contains the Linux Operating System and stores executables, fonts, and settings files. During normal operation, job files
do not remain stored on this disk. One exception is “Print From”, “Saved Jobs” feature. Customer jobs saved on the machine’s hard disk
using this feature must be manually deleted by the customer. If Image Overwrite is installed and full disk overwrite is selected all saved
jobs will be erased.
The Image partition stores images in a proprietary encoded format in non-contiguous blocks. Customer image data is only stored to the
image partition if EPC memory is full. User data and image data may be completely erased if Image Overwrite kit is installed and
enabled. Using a three-pass algorithm which conforms to U.S. Department of Defense Directive 5200.28-M, the entire image disk
partition is erased and checked.
Table 3 Hard Disk Drive
2.2.3. External Connections
The controller printed wiring boards are physically mounted in a tray with external connections available at the rear
of the machine. The tray contains a single controller board. An optional fax board may also be installed. Disk(s) are
mounted on the underside of the tray.
Below the controller tray are other connectors that distribute power and communications to external options such as
a finisher or high-capacity paper tray.
Ver. 1.1, February 2011
Page 11 of 49
XEROX WorkCentre 7525/7530/7535/7545/7556 Information Assurance Disclosure Paper
USB
Target
Port
Back Right Side of Machine
Location of SBC
Right Side
View of Machine
SBC Connector
Layout
USB
Host
Ports
Gigabit
Ethernet
Port
Optional
FDI Slot
(Requires FDI option kit)
Diagnostic
Display
Optional
FAX Slot
(Requires Single or Dual line Fax option kit)
SIM
Card
Figure 2-3 Back panel connections
Interface
Description / Usage
PSW USB Target Port
Diagnostics and service; Xerox Copier Assistant
USB Host Ports
Card readers; SW upgrade; USB Printing; Scan to USB
Ethernet
Network Connectivity
FAX line 1, RJ-11
Supports FAX Modem T.30 protocol only
FAX line 2, RJ-11 (optional)
Supports FAX Modem T.30 protocol only
Foreign Device Interface (FDI)
Allows connection of optional access control hardware
(accessory not present in evaluated TOE). Allows premium
charge for Legal paper.
Ver. 1.1, February 2011
Page 12 of 49
XEROX WorkCentre 7525/7530/7535/7545/7556 Information Assurance Disclosure Paper
Scanner
Proprietary connection between the Scan Module and the Copy
Controller (Located inside machine)
UI
Video and power (Located inside machine)
SIM
Options enablement
Table 4 Controller External Connections
2.2.4. USB Ports
The WorkCentre contains a host connector for a USB flash drive, enabling upload of software upgrades and
download of network logs or machine settings files.
Autorun is disabled on this port. No executable files will be accepted by the port.
Modifying the software upgrade, network logging or saved machine settings files will make the files unusable on a
WorkCentre .
The data in the network logging file is encrypted and can only be decrypted by Xerox service.
The machine settings that can be saved and restored by a service technician are limited to controller and fax
parameters that are needed for normal operation. For example, the fax address book can be saved and restored by a
service technician.
There is no method for a user, administrator or technician to move image data from the WorkCentre to a USB device.
USB Port(s)
USB port and location
Purpose
Front panel – 1 Host port
User retrieves print ready files from Flash Media or stores scanned files on Flash Media. Physical
security of this information is the responsibility of the user or operator.
Rear panel – 2 Host ports
User retrieves print ready files from Flash Media or stores scanned files on Flash Media. Physical
security of this information is the responsibility of the user or operator.
Optional security devices, such as a CAC reader, communicate with the machine via this port. No
job data is transmitted across this interface when an optional security device is connected.
Rear panel – 1 Target port
User PC direct connection for printing, Xerox Customer Service Engineer PWS connection for
problem diagnosis.
The optional CopyAssistant kit communicates with the machine via this port. No job data
is transmitted across this interface.
Additional Information
A number of devices can be connected to the 3 USB Host ports. Once information has been copied (either as a back-up data set or as a
transfer medium, physical security of this information is the responsibility of the user or operator.)
Table 5 USB Ports
2.3. Fax Module
2.3.1. Purpose
The embedded FAX service uses the installed embedded fax card to send and receive images over the telephone
interface. The FAX card plugs into a custom interface slot on the controller.
2.3.2. Hardware
The Fax Card is a printed wiring board assembly containing a fax modem and the necessary telephone interface
logic. It connects to the controller via a serial communications interface. The Fax Card is responsible for
Ver. 1.1, February 2011
Page 13 of 49
XEROX WorkCentre 7525/7530/7535/7545/7556 Information Assurance Disclosure Paper
implementing the T.30 fax protocol. All remaining fax-specific features are implemented in software on the
controller. The fax telephone lines are connected directly to the Fax Card via RJ-11 connectors.
Name
Size
Purpose / Explanation
MODEM #1
NA
MultiTech MT9234SMI Fax modem
MODEM #2
NA
Optional additional MT9234SMI
Table 6 Fax Module components
2.4. Scanner
2.4.1. Purpose
The purpose of the scanner is to provide mechanical transport to convert hardcopy originals to electronic data.
2.4.2. Hardware
The scanner converts the image from hardcopy to electronic data. An optional document handler moves originals
into a position to be scanned. The scanner provides enough image processing for signal conditioning and
formatting. The scanner does not store scanned images. All other image processing functions are in the copy
controller.
2.5. Graphical User Interface (GUI)
2.5.1. Purpose
The GUI detects soft and hard button actuations, and provides text and graphical prompts to the user. The GUI is
sometimes referred to as the Local UI (LUI) to distinguish it from the WebUI, which is exported by the web service
that runs in theccontroller. Images are not transmitted to or stored in the GUI. The Start hard button is located on
the GUI panel.
2.6. Marking Engine (Image Output Terminal
or IOT)
2.6.1. Purpose
The Marking Engine performs copy/print paper feeding and transport, image marking and fusing, and document
finishing. Images are not stored at any point in these subsystems.
2.6.2. Hardware
The marking engine is comprised of paper supply trays and feeders, paper transport, laser scanner, xerographics, and
paper output and finishing. The marking engine contains a CPU, BIOS, RAM and Non-Volatile Memory.
2.7. System Software Structure
2.7.1. Open-source components
Open-source components in the connectivity layer implement high-level protocol services. The security-relevant
connectivity layer components are:
Ver. 1.1, February 2011
Page 14 of 49
XEROX WorkCentre 7525/7530/7535/7545/7556 Information Assurance Disclosure Paper
•
•
•
•
•
Apache 2.2.16, with mod_ssl integrated (http and https)
PHP 5.3.1
OpenSSL 0.9.8p (SSL)
SAMBA 3.0.37 (SMB)
Netsnmp 5.0.9 (SNMPv3)
2.7.2. OS Layer in the Controller
The OS layer includes the operating system, network and physical I/O drivers. The controller operating system is
Wind River Linux, kernel v. 2.6.27+. Xerox may issue security patches for the OS, in which case the Xerox portion of
the version number (i.e.. after the ‘+’ sign) will be incremented.
The crypto library for IPSec is provided by the kernel.
IP Filtering is also provided by the kernel.
Figure 2-4 Controller Operating System layer components
Ver. 1.1, February 2011
Page 15 of 49
XEROX WorkCentre 7525/7530/7535/7545/7556 Information Assurance Disclosure Paper
2.7.3. Network Protocols
Figure 2-5 and Figure 2.6 are interface diagrams depicting the IPv4 and IPv6 protocol stacks supported by the
device, annotated according to the DARPA model.
Figure 2-5 IPv4 Network Protocol Stack
Figure 2-6 IPv6 Network Protocol Stack
2.8. Logical Access
2.8.1. Network Protocols
The supported network protocols are listed in Appendix D and are implemented to industry standard specifications
(i.e. they are compliant to the appropriate RFC) and are well-behaved protocols. There are no ‘Xerox unique’
additions to these protocols.
2.8.1.1.
IPSec
The device supports IPSec tunnel mode. The print channel can be secured by establishing an IPSec association
between a client and the device. A shared secret is used to encrypt the traffic flowing through this tunnel. SSL must
be enabled in order to set up the shared secret.
Ver. 1.1, February 2011
Page 16 of 49
XEROX WorkCentre 7525/7530/7535/7545/7556 Information Assurance Disclosure Paper
When an IPSec tunnel is established between a client and the machine, the tunnel will also be active for
administration with SNMPv2 tools (HP Open View, etc.), providing security for SNMP SETs and GETS with an
otherwise insecure protocol. SNMP Traps may not be secure if either the client or the device has just been rebooted.
IP Filtering can be useful to prevent SNMP calls from non-IPSec clients.
Once an IPSec channel is established between two points, it stays open until one end reboots or goes into power
saver,. Only network clients and servers will have the ability to establish an IPSec tunnel with the machine. Thus
device-initiated operations (like scanning) cannot assume the existence of the tunnel unless a print job (or other
client initiated action) has been previously run since the last boot at either end of the connection.
2.8.2. Ports
The following table summarizes all potentially open ports and subsequent sections discuss each port in more detail.
All ports can be disabled if not needed under control of the system administrator.
Default
Port #
22
23
25
53
68
80
88
110
137
138
139
161
162
389
396
427
443
445
500
515
631
1900
1901
3003
3702
5353
5354
9100
28002
Type
TCP
UDP
TCP
UDP
UDP
TCP
UDP
TCP
UDP
UDP
TCP
TCP/UDP
TCP/UDP
UDP
TCP
UDP
TCP
TCP
TCP
TCP
TCP
TCP/UDP
UDP
TCP
TCP/UDP
TCP/UDP
TCP
TCP
TCP
53202
53303
53404
61100
61200
61400
61502
61503
TCP
TCP
TCP
TCP
TCP
TCP
TCP
TCP
Ver. 1.1, February 2011
Service name
SFTP
NTP
SMTP
DNS
DHC ACK Response to DHCP
HTTP
Kerberos
POP3 client – used for IFax
NETBIOS- Name Service
NETBIOS-Datagram Service; SMB filing and Scan template retrieval
NETBIOS Session Service - SMB Authentication, SMB filing
SNMP
SNMP trap
LDAP
Netware
SLP
SSL
Microsoft-DS
ISAKMP
LPR
IPP
SSDP
SSDP
http/SNMP reply
WSD Discovery
Multicast DNS
Multicast DNS Responder IPC
raw IP
WS: Scan Template Management, Scan Extension, Xerox Secure Access,
Authentication & Authorization Configuration, Device Configuration
WSD Transfer
WSD Print
WSD Scan
WS: XEIP Proxy Configuration
WS: User Interface Configuration
WS: Digital Certificate Management
WS: Extensible Service Registration
WS: Session Data
Page 17 of 49
XEROX WorkCentre 7525/7530/7535/7545/7556 Information Assurance Disclosure Paper
Table 7 Network Ports
Please note that there is no ftp port in this list. ftp is only used to export scanned images and to retrieve Scan Job
Templates, and will open port 21 on the remote device. An ftp port is never open on the controller itself.
2.8.2.1.
Port 22, SFTP
This port is used to securely encrypt the user name, password, and data being transferred to a network
server/repository.
2.8.2.2.
Port 23, NTP
This port is used to retrieve the time from a network server.
2.8.2.3.
Port 25, SMTP
This unidirectional port is open only when Scan to E-mail or Internet Fax (I-Fax) is exporting images to an SMTP
server, or when email alerts are being transmitted. SMTP messages & images are transmitted to the SMTP server
from the device.
2.8.2.4.
Port 53, DNS
Designating a DNS server will allow the device to resolve domain names. This can be configured via the WebUI.
2.8.2.5.
Port 68, DHCP
This port is used only when performing DHCP, and is not open all of the time. To permanently close this port, DHCP
must be explicitly disabled. This is done in User Tools via the Local User Interface or via the TCP/IP page in the
Properties tab on the WebUI.
2.8.2.6.
Port 80, HTTP
The embedded web pages communicate to the machine through a set of unique APIs and do not have direct access
to machine information:
Network Controller
request
http
server
Network
response
I
n
t
e
request
r
machine
n
information
a
l response
A
P
I
The HTTP port can only access the HTTP server residing in the controller. The embedded HTTP server is Apache. The
purpose of the HTTP server is to:
•
Give users information of the status of the device;
•
View the job queue within the device and delete jobs;
•
Allow users to download print ready files and program Scan to File Job Templates;
•
Allow remote administration of the device. Many settings that are on the Local UI are replicated in the
device’s web pages. Users may view the properties of the device but not change them without logging into the
machine with administrator privileges.
Ver. 1.1, February 2011
Page 18 of 49
XEROX WorkCentre 7525/7530/7535/7545/7556 Information Assurance Disclosure Paper
The HTTP server can only host the web pages resident on the hard disk of the device. It does not and cannot act as a
proxy server to get outside of the network the device resides on. Hence the server cannot access any networks (or
web servers) outside of the customer firewall.
When the device is configured with an IP address, it is as secure as any device inside the firewall. The web pages are
accessible only to authorized users of the network inside the firewall.
This service (and port) may be disabled in User Tools via the Local User Interface or via the TCP/IP page in the
Properties tab on the WebU. Please note that when this is disabled, IPP Port 631 is also disabled.
HTTP may be secured by enabling Secure Sockets Layer.
2.8.2.5.1.
Proxy Server
The device can be configured to communicate through a proxy server. Features that can make use of a proxy server
include the Automatic Meter Read feature, scanning to a remote repository, or retrieving scan templates from a
remote template pool.
2.8.2.7.
Kerberos
This port is only open when the device is communicating with the Kerberos server to authenticate a user, or to
request a TGT to access the LDAP server. To disable this port, authentication must be disabled, and this is
accomplished via the Local User Interface.
This version of software has Kerberos 5.1.1 with DES (Data Encryption Standard) and 64-bit encryption. The Kerberos
code is limited to user authentication, and is used to authenticate a user with a given Kerberos server as a valid user
on the network. Please note that the Kerberos server (a 3rd party device) needs to be set up for each user. Once the
user is authenticated, the Kerberos software has completed its task. This code will not and cannot be used to encrypt
or decrypt documents or other information.
This feature is based on the Kerberos program from the Massachusetts Institute of Technology (MIT). The Kerberos
network authentication protocol is publicly available on the Internet as freeware at
http://web.mit.edu/kerberos/www/. Please note:
The device ignores much of the information provided by Kerberos for authenticating. For the most part, the device
only pays attention to information that indicates whether authentication has passed. Other information that the
server may return (e.g. what services the user is authenticated for) is ignored or disabled in the Xerox
implementation. This is not an issue since the only service a user is being authenticated for is access to an e-mail
directory. No other network services are accessible from the Local UI.
Xerox has received an opinion from its legal counsel that the device software, including the implementation of a
Kerberos encryption protocol in its network authentication feature, is not subject to encryption restrictions based on
Export Administration Regulations of the United States Bureau of Export Administration (BXA). This means that it
can be exported from the United States to most destinations and purchasers without the need for previous approval
from or notification to BXA. At the time of the opinion, restricted destinations and entities included terroristsupporting states (Cuba, Iran, Libya, North Korea, Sudan and Syria), their nationals, and other sanctioned entities
such as persons listed on the Denied Parties List. Xerox provides this information for the convenience of its customers
and not as legal advice. Customers are encouraged to consult with legal counsel to assure their own compliance with
applicable export laws.
2.8.2.8.
Port 110, POP-3 Client
This unidirectional port is used when receiving an Internet Fax (I-Fax) or E-Mail. These jobs may only be printed, and
the port is only open if I-Fax is enabled and while receiving the job. It is not configurable.
2.8.2.9.
Ports 137, 138, 139, NETBIOS
For print jobs, these ports support the submission of files for printing as well as support Network Authentication
through SMB. Port 137 is the standard NetBIOS Name Service port, which is used primarily for WINS. Port 138
supports the CIFS browsing protocol. Port 139 is the standard NetBIOS Session port, which is used for printing. Ports
137, 138 and 139 may be configured in the Properties tab of the device’s web page.
For Network Scanning features, ports 138 and 139 are used for both outbound (i.e. exporting scanned images and
associated data) and inbound functionality (i.e. retrieving Scan Templates). In both instances, these ports are only
open when the files are being stored to the server or templates are being retrieved from the Template Pool. For these
features, SMB protocol is used.
Ver. 1.1, February 2011
Page 19 of 49
XEROX WorkCentre 7525/7530/7535/7545/7556 Information Assurance Disclosure Paper
2.8.2.10. Ports 161, 162, SNMP
These ports support the SNMPv1, SNMPv2c, and SNMPv3 protocols. Please note that SNMP v1 does not have any
password or community string control. SNMPv2 relies on a community string to keep unwanted people from
changing values or browsing parts of the MIB. This community string is transmitted on the network in clear text so
anyone sniffing the network can see the password. Xerox strongly recommends that the customer change the
community string upon product installation. SNMP is configurable, and may be explicitly enabled or disabled in the
Properties tab of the device’s web pages.
SNMP traffic may be secured if an IPSec tunnel has been established between the agent (the device) and the
manager (i.e. the user’s PC).
The device supports SNMPv3, which is an encrypted version of the SNMP protocol that uses a shared secret. Secure
Sockets Layer must be enabled before configuring the shared secret needed for SNMPv3.
2.8.2.11. Port 389, LDAP
This is the standard LDAP port used for address book queries in the Scan to Email feature.
2.8.2.12. Port 396, Netware
This configurable port is used when Novell Netware is enabled to run over IP.
2.8.2.13. Port 427, SLP
When activated, this port is used for service discovery and advertisement. The device will advertise itself as a printer
and also listen for SLP queries using this port. It is not configurable. This port is explicitly enabled / disabled in the
Properties tab of the device’s web pages.
2.8.2.14. Port 443, SSL
This is the default port for Secure Sockets Layer communication. This port can be configured via the device’s web
pages. SSL must be enabled before setting up either SNMPv3 or IPSec or before retrieving the audit log (see Sec.
4.1). SSL must also be enabled in order to use any of the Web Services (Scan Template Management, Automatic
Meter Reads, or Network Scanning Validation Service).
SSL should be enabled so that the device can be securely administered from the web UI. When scanning, SSL can be
used to secure the filing channel to a remote repository.
SSL uses X.509 certificates to establish trust between two ends of a communication channel. When storing scanned
images to a remote repository using an https: connection, the device must verify the certificate provided by the
remote repository. A Trusted Certificate Authority certificate should be uploaded to the device in this case.
To securely administer the device, the user’s browser must be able to verify the certificate supplied by the device. A
certificate signed by a well-known Certificate Authority (CA) can be downloaded to the device, or the device can
generate a self-signed certificate. In the first instance, the device creates a Certificate Signing Request (CSR) that
can be downloaded and forwarded to the well-known CA for signing. The signed device certificate is then uploaded
to the device. Alternatively, the device will generate a self-signed certificate. In this case, the generic Xerox root CA
certificate must be downloaded from the device and installed in the certificate store of the user’s browser.
The device supports only server authentication.
2.8.2.15. Port 445, NETBIOS (Microsoft – DS)
This port is open and used only when NETBIOS (Microsoft Networking/Active Directory) is enabled.
2.8.2.16. Port 500, ISAKMP
ISAKMP defines the procedures for authenticating a communicating peer, creation and management of Security
Associations, key generation techniques, and threat mitigation (e.g. denial of service and replay attacks). ISAKMP
defines procedures and packet formats to establish, negotiate, modify and delete Security Associations. ISAKMP can
be implemented over any transport protocol. All implementations must include send and receive capability for
ISAKMP using UDP on port 500. Port 500 will only be open on the device if the IPsec service is enabled.
Ver. 1.1, February 2011
Page 20 of 49
XEROX WorkCentre 7525/7530/7535/7545/7556 Information Assurance Disclosure Paper
2.8.2.17. Port 515, LPR
This is the standard LPR printing port, which only supports IP printing. It is a configurable port, and may be explicitly
enabled or disabled in the Properties tab of the device’s web pages.
2.8.2.18. Port 631, IPP
This port supports the Internet Printing Protocol. It is not configurable. This is disabled when the http server is
disabled.
2.8.2.19. Port 1900, SSDP
This port behaves similarly to the SLP port. When activated, this port is used for service discovery and advertisement.
The device will advertise itself as a printer and also listen for SSDP queries using this port. It is not configurable. This
port is explicitly enabled / disabled in the Properties tab of the device’s web pages.
2.8.2.20. Port 3003, http/SNMP reply
This port is used when the http server requests device information. The user displays the Web User Interface
(WebUI) and goes to a page where the http server must query the device for settings (e.g. Novell network settings).
The http server queries the machine via an internal SNMP request (hence this port can only open when the http
server is active). The machine replies back to the http server via this port. It sends the reply to the loopback address
(127.0.0.0), which is internally routed to the http server. This reply is never transmitted on the network. Only SNMP
replies are accepted by this port, and this port is active when the http server is active (i.e. if the http server is disabled,
this port will be closed). If someone attempted to send an SNMP reply to this port via the network, the reply would
have to contain the correct sequence number, which is highly unlikely, since the sequence numbers are internal to the
machine.
2.8.2.21. Port 3702, WSD Discovery, WS Discovery Multicast
This is the default port for WS-Discovery (the discovery of services in an ad hoc network with a minimum of
networking services (for example, no DNS, UDDI or other directory services). It does this by announcing or advertising
the existence of the printer and its services on the network when it becomes available, and announcing its departure
when unavailable. The default state is selected (enabled).
2.8.2.22. Port 5353 Multicast DNS, 5354 Multicast DNS Responder IPC
Multicast DNS provides the ability to address hosts using DNS-like names without the need of an existing, managed
DNS server. The Multicast DNS Responder is a client in the printer that replies to multicast DNS requests for services
on the local network. The multicast DNS requests and replies conform to RFC 1034 and RFC 2782 and are broadcast
to the destination IP address 224.0.0.251 on port 5353. The se ports will only be open if the Multicast DNS service is
enabled.
2.8.2.23. Port 9100, raw IP
This allows downloading a PDL file directly to the interpreter. This port has limited bi-directionality (via PJL back
channel) and allows printing only. This is a configurable port, and may be disabled in the Properties tab of the
device’s web pages.
2.8.2.24. Port 28002, WS
Web Service interface(s) used to programmatically configure device usage of Workflow Scanning features such as
template management.
2.8.2.25. Port 53202, 53303, 53404, WSD
Transfer Web Service (53202) and Print Web Service (53303 and 53404) for Microsoft WSD support.
2.8.2.26. Port 61100, WS
Web Service interface(s) used to get/set proxy configuration specific to Extensible Interface Platform services.
2.8.2.27. Port 61200, WS
Web Service interface(s) used to get physical UI configuration information.
Ver. 1.1, February 2011
Page 21 of 49
XEROX WorkCentre 7525/7530/7535/7545/7556 Information Assurance Disclosure Paper
2.8.2.28. Port 61400, WS
Web Service interface(s) used to get/set digital certificates.
2.8.2.29. Port 61502, WS
Web Service interface(s) used to get/set services available on the device.
2.8.2.30. Port 61503, WS
Web Service interface(s) used to get session information applicable to the current active session on the device.
2.8.3. IP Filtering
The devices contain a static host-based firewall that provides the ability to prevent unauthorized network access
based on IP address and/or port number. Filtering rules can be set by the SA using the WebUI. An authorized SA can
create rules to (Accept / Reject / Drop) for ALL or a range of IP addresses. In addition to specifying IP addresses to
filter, an authorized SA can enable/disable all traffic over a specified transport layer port.
Ver. 1.1, February 2011
Page 22 of 49
XEROX WorkCentre 7525/7530/7535/7545/7556 Information Assurance Disclosure Paper
3.
System Access
3.1. Authentication Model
The authentication model allows for both local and network authentication and authorization. In the local and
network cases, authentication and authorization take place as separate processes: a user must be authenticated
before being authorized to use the services of the device.
If the device is set for local authentication, user account information will be kept in a local accounts database (see
the discussion in Chapter 4 of Xerox Standard Accounting) and the authentication process will take place locally. The
system administrator can assign authorization privileges on a per user basis. User access to services will be provided
based on the privileges set for each user in the local accounts database. .
When the device is set for network authentication, the user’s network credentials will be used to authenticate the user
at the network domain controller.
Users can be authorized on an individual basis to access one or any combination of the following services: Copy, Fax,
Server Fax, Reprint Saved Jobs, Email, Internet Fax, Workflow Scanning Server.
Also users can be authorized to access one or any combination of the following machine pathways: Services, Job
Status, or Machine Status.
Assignment of users to the System Administrator role or the Accounting Administrator is managed by groups set up
at the LDAP or Active Directory server. Any user listed in the System Administrator group will be granted sys admin
privileges at the device. Likewise any user listed in the Accounting Administrator group will be granted the privileges
for that role. Use of network credentials for system administrator login provides more security than the legacy model
based on a sys admin PIN, allowing for better tracking of sys admin logins by individual users.
Figure 3-1 provides a schematic view of the authentication and authorization subsystem. Use of the local accounts
database or the network can be set independently for both authentication and authorization, meaning that it is
possible to enable network authentication and local authorization, or vice versa. Usually the device will be set for
both authentication and authorization to take place against the same database, either local or network.
Ver. 1.1, February 2011
Page 23 of 49
XEROX WorkCentre 7525/7530/7535/7545/7556 Information Assurance Disclosure Paper
Figure 3-1 Authentication and Authorization schematic
Ver. 1.1, February 2011
Page 24 of 49
XEROX WorkCentre 7525/7530/7535/7545/7556 Information Assurance Disclosure Paper
3.2. Login and Authentication Methods
There are a number of methods for different types of users to be authenticated. In addition, the connected versions
of the product also log into remote servers. A description of these behaviors follows.
3.2.1. System Administrator Login [All product configurations]
Users must authenticate themselves to the device. To access the User Tools via the Local UI, a numerical PIN is
required. The customer can set the PIN to anywhere from 3 to 31digits in length. This PIN is stored in the controller
NVM and is inaccessible to the user. Xerox strongly recommends that this PIN be changed from its default value
immediately upon product installation. The PIN should be set to a minimum of 8 characters in length and changed
at least once per month. Longer PINs can be changed less frequently; a 9-digit PIN would be good for a year. The
same PIN is used to access the Administration screens in the Web UI.
A Card reader is available for public sector customers so the user can authenticate to the device with a CAC/PIV card
and PIN.
3.2.2. User authentication
Users may authenticate to the device using Kerberos, LDAP, SMB Domain, or NDS authentication protocols. Once the
user is authenticated to the device, the user may proceed to use the Network Scanning features listed above.
The WebUI allows an SA to set up a default authentication domain and as many as 8 additional alternate
authentication domains. The device will attempt to authenticate the user at each domain server in turn until
authentication is successful, or the list is exhausted.
3.2.2.1.
Kerberos Authentication (Solaris or Windows 2000/Windows 2003)
This is an option that must be enabled on the device, and is used in conjunction with all Network Scanning features
(Scan to File, Scan to E-mail, internet fax, and Scan to Fax Server). The authentication steps are:
1)
A User enters a user name and password at the device in the Local UI. The device sends an authentication
request to the Kerberos Server.
2)
The Kerberos Server responds with the encrypted credentials of the user attempting to sign on.
3)
The device attempts to decrypt the credentials using the entered password. The user is authenticated if the
credentials can be decrypted.
4)
The device then logs onto and queries the LDAP server trying to match an email address against the user’s Login
Name. The user’s email address will be retrieved if the personalization option has been selected on the
Authentication Configuration page.
5)
If the LDAP Query is successful, the user’s email address is placed in the From: field. Otherwise, the user’s login
name along with the system domain is used in the From: field.
6)
The user may then add recipient addresses by accessing the Address Book on the LDAP server. Please see the
User Manual for details. Each addition is a separate session to the LDAP server.
3.2.2.2.
SMB Authentication (Windows NT 4 or Windows 2000/Windows 2003)
This is also an option that may be enabled on the device, and is used in conjunction with all Network Scanning
features (Scan to File, Scan to E-mail, internet fax, and Scan to Fax Server). The authentication steps vary somewhat,
depending on the network configuration. Listed below are 3 network configurations and the authentication steps.
Basic Network Configuration: Device and Domain Controller are on the same Subnet
Authentication Steps:
1)
The device broadcasts an authentication request that is answered by the Domain Controller.
2)
The Domain Controller responds back to the device whether or not the user was successfully
authenticated.
If (2) is successful, steps 3 – 5 proceed as described in steps 4 – 6 of the Kerberos section.
Ver. 1.1, February 2011
Page 25 of 49
XEROX WorkCentre 7525/7530/7535/7545/7556 Information Assurance Disclosure Paper
Device and Domain Controller are on different Subnets, SA defines IP Address of Domain Controller
Authentication Steps:
1)
The device sends an authentication request directly to the Domain Controller through the router using
the IP address of the Domain Controller.
2)
The Domain Controller responds back to the device through the router whether or not the user was
successfully authenticated.
If (2) is successful, steps 3 – 5 proceed as described in 4 - 6 of Kerberos section.
Router
Subnet 1
Subnet 2
1
1
2
2
WorkCentre or
WorkCentre Pro
Domain Controller
3
4
5
LDAP Server
Device and Domain Controller are on different Subnets, SA defines Hostname of Domain Controller
Authentication Steps:
1)
The device sends the Domain Controller hostname to the DNS Server.
Router
Subnet 1
Subnet 2
Domain Controller
3
3
4
4
WorkCentre or
WorkCentre Pro
1
5
6
7
LDAP Server
2
DNS Server
2)
The DNS Server returns the IP Address of the Domain Controller
3)
The device sends an authentication request directly to the Domain Controller through the router using
the IP address of the Domain Controller.
4)
The Domain Controller responds back to the device through the router whether or not the user was
successfully authenticated.
If (4) is successful, steps 5 – 7 proceed as described in steps 4 - 6 of the Kerberos section.
Ver. 1.1, February 2011
Page 26 of 49
XEROX WorkCentre 7525/7530/7535/7545/7556 Information Assurance Disclosure Paper
3.2.2.3.
Common Access Card (CAC1)
With the addition of the CAC accessory kit, the device is able to utilize .NET cards with Gemalto Version 2 as well as
the new 144K CAC and PIV cards. This includes a 2048 bit certificate key. Sending encrypted data to multiple
recipients is made possible using an organizations LDAP directory.
The user may view certificates of potential recipients to ensure they are sent to the intended parties. Controls are
also in place to prevent sending to users without encryption certificates
Audit logs record which e-mails were sent encrypted and those that were not.
In addition, Confirmation Reports detail which recipients received e-mail and if it was encrypted or not.
3.2.2.4.
Xerox Secure Access
Via Xerox Secure Access a customer can enable additional authentication methods to the device with minimal
impact on the system software. By using a Web Service and 3rd party equipment, any authentication method that
complies with the established interface into the device can be used. This includes biometric and card access.
Xerox Secure Acess is a Web Service that allows a 3rd party to use its own mechanisms, including accessing the
customers authentication servers, to authenticate a user. The device can also take in additional information about
the user to allow for two-factor authentication.
The Web Service interface allows the 3rd party to tell the device that someone was successfully logged in, who
logged in and inform the device of logon issues using error messages.
The authentication steps are:
3.2.2.5.
1)
The device presents the appropriate screens to tell the user what needs to be done to authenticate.
2)
The user follows the authentication instructions like swiping a card and/or entering a PIN or password.
3)
User is authenticated and the device will complete any Authorization and Personalization as would have
been done if the user authenticated using a system supplied solution.
DDNS
The implementation in the device does not support any security extensions.
3.3. System Accounts
3.3.1. Printing [Multifunction models only]
The device may be set up to connect to a print queue maintained on a remote print server. The login name and
password are sent to the print server in clear text. IPSec should be used to secure this channel.
3.3.2. Network Scanning [Multifunction models only]
Network Scanning may require the device to log into a server. The instances where the device logs into a server are
detailed in the following table. Users may also need to authenticate for scanning. This authentication is detailed in
subsequent sections.
3.3.2.1.
Device log on
Scanning feature
Scan to File, Public Template
Ver. 1.1, February 2011
Device behavior
The device logs in to the scan repository as set up by the SA in the
Properties tab on the WebUI.The credentials may be the user’s
credentials or system credentials.
Page 27 of 49
XEROX WorkCentre 7525/7530/7535/7545/7556 Information Assurance Disclosure Paper
Scanning feature
Scan to E-mail, I-Fax
Scan to Fax Server
Device behavior
The device logs into an LDAP Server as set up by the SA in User Tools. It
will log into the Server when a user is authenticated and the device is
configured for Remote Authorization or Personalization is enabled, and
when the user attempts to access LDAP based scan-to-email address
books. At the time the LDAP server must be accessed, the device will log
into (bind to)_ the LDAP server.
The device uses a simple bind to the LDAP server unless the device was
able to obtain a TGS for the LDAP server from the Kerberos Servier. In
this case a SASL (GSSAPI) bind is performed.. A network username and
password may be assigned to the device. The device logs in as a normal
user, with read only privileges. User credentials may be used if
configured by the SA for this authentication step.
The device logs in to the Fax Server as set up by the SA from the
Properties tab on the WebUI. The credentials may be the user’s
credentials or system credentials.
Please note that when the device logs into any server the device username and password are sent over the network in
clear text unless SSL has been enabled or IPSec has been configured to encrypt the traffic.
3.3.2.2.
Scan Template Management
This is a web service that allows the SA to manage templates stored in a remote template pool. The connection to
the remote pool can be secured with SSL.
3.4. Diagnostics
3.4.1. Service [All product configurations]
To access onboard diagnostics from the local user interface, Xerox service representatives must enter a unique 4-digit
password. This PIN is the same for all models across this product family but different from that used on other porudt
families, and cannot be changed.
3.4.2. Alternate Boot via Serial Port
Alternate Boot (Alt-boot) is a means for the Portable Service Workstation (PSW) to directly connect to the controller.
The primary purpose of Alternate Boot is to provide the capability to boot the controller in case of hard disk failure,
to perform system diagnostics, and load controller software, independent of other sub-systems.
To enter this mode a user must strike any key on the PSW within 10 seconds of power on. If the 10 seconds times
out, then the normal boot sequence occurs and the serial port acts as a typical tty (see next section). However, if this
mode is entered, a Xerox unique serial protocol is used to communicate to the alt-boot code. All commands are DOStype menu driven (i.e. type in a number to start a command). If a PSW is connected, the application on the PSW
cannot be accessed without logging on with a password (see next section).
If the PSW is used and is successfully logged on, then the Ethernet port is used to download executable files. The
serial port is used for commands and status. Again, please refer to the PSW section for details.
3.4.3. tty Mode
When the controller has completed booting a login line will be displayed. This mode is a typical tty window, and is
password protected. This password changes with each major software release. The password is stored on the
controller hard disk in an encrypted format similarly to how UNIX encrypts and stores passwords. Through this port a
user can gain information and access to any files or information stored in the controller DRAM or controller hard disk.
However, this mode is only used by a CSE if directed by a Field Engineer when all other diagnostics fail to solve a
problem. The written repair procedures that direct the CSE never employ this mode.
3.4.4. Diagnostics via Portable Service Workstation (PSW) Port
When connected to the PSW Port, the PSW provides an extensive suite of diagnostic functions for use by the Xerox
Customer Service Engineer (CSE). The over-the-wire protocol is Xerox proprietary. This port cannot process any other
Ver. 1.1, February 2011
Page 28 of 49
XEROX WorkCentre 7525/7530/7535/7545/7556 Information Assurance Disclosure Paper
protocol except this proprietary protocol used for machine diagnosis. Also, the PSW must have an application loaded
to connect to and communicate with the device.
Customer documents or files cannot be accessed during a diagnostic session, nor are network servers accessible
through this port.
3.4.4.1.
Access
The Xerox Service Technician must be authenticated twice:
1.
The first password, called the PSW Lock Facility, is obtained by calling a Xerox service location and
providing the CSE employee number and the serial number of the PSW. The password is then given to
the Xerox Service Technician, and is valid for 90 days. When the password expires, the Xerox Service
Technician must call in again. This password is unique to the client application running on that particular
PSW, and is required to log onto the PSW prior to initiating communications with the machine.
2.
Once the application is running, the PSW supplies the second password (different from the first) to
authenticate the session to the device. This embedded password is automatically passed from the
application to the machine, and is never seen by anyone. It is hardcoded in the software of the Marking
Engine and the PSW application, and is common to all products. It is not encrypted. Many of the
diagnostic routines will require this password in order to function.
3.4.4.2.
Communication Protocol
The communication process uses a Xerox proprietary protocol. Each packet passing back and forth will have a unique
identifier (session key) with it for authentication and tracking purposes. All protocols are API based – very little
information is directly transferred. For example, in order to run any given diagnostic test, the ‘Start Test XXX’
command is sent to the Marking Engine. The Marking Engine runs the test and responds with a “Test XXX passed (or
failed)’ reply. This is illustrated in the following diagram:
3.4.4.3.
Network Diagnostics executed from the PSW
Network
Controller
Marking Engine
Marking Engine information may be
retrieved; no image data may be accessed
PSW (Laptop computer)
The PSW allows the technician to execute certain Network diagnostic tests by connecting directly to the serial port on
the controller. These tests are executed with the device disconnected from the customer’s LAN.
The tests that are available are echo tests for the various protocols (e.g. IP, IPX), where the controller sends a dummy
message to itself to test the transmit and receive capabilities of its own connectivity stacks. Each protocol is tested
individually and each test must be invoked separately. The diagnostic sequence is as follows:
1)
After the PSW and Marking Engine have established a connection, the PSW must send the expected
synchronization message to the machine.
2)
The Marking Engine will respond with an acknowledge message containing its serial number.
3)
The PSW will send a request for Diagnostic service and a password.
4)
Assuming the password is authentic, the Marking Engine will either execute a Marking Engine diagnostic, or
else forward the diagnostic request to the controller. If this is a network diagnostic, the controller will
execute the diagnostic and report results back to the Marking Engine.
Ver. 1.1, February 2011
Page 29 of 49
XEROX WorkCentre 7525/7530/7535/7545/7556 Information Assurance Disclosure Paper
5)
3.4.4.4.
The Marking Engine will report diagnostic results back to the PSW.
Accessible Data
The only files that are accessible are various log files (fault log, internal event log, complete job log, configuration log
and a debug log). The customer’s network is accessible for diagnostic purposes only. However, there is one diagnostic
routine (Get Network Connectivity Data), where the device will collect data about the network it is on and transmit
the data. The CSE is expected to seek permission from the customer before connecting the device to the LAN and
performing this diagnostic.
The Novell test will only collect information for devices on the local network. It will not provide information for any
devices across a router. The following data will be stored on the controller:
•
Frame Type (local network devices only)
•
Server Name
•
Server internal network number
•
Server node (Media Access Control) address
•
Server NOS version number
•
Hop count to device (local net)
The IP test will collect data from all responding IP routers and lpd hosts. The following data will be stored on the
controller:
•
Controller Interface where host discovered (Ethernet, Token Ring, etc.)
•
Device subnet mask
•
Device IP address
•
Device Media Access Control (MAC) address
The Novell test will NOT collect:
•
Print Queue Name
•
Attached to File Server status
•
Attached to Print Queue status
The IP test will NOT collect:
•
Device Name
•
Gateway IP address
•
Destination Network number
•
Hop count to device
3.4.5. Summary
As stated above, accessibility of customer documents, files or network resources is impossible via the PSW. In the
extremely unlikely event that someone did spoof the Xerox proprietary protocols, only diagnostic activities can be
executed.
Ver. 1.1, February 2011
Page 30 of 49
XEROX WorkCentre 7525/7530/7535/7545/7556 Information Assurance Disclosure Paper
4. Security Aspects of
Selected Features
4.1. Audit Log
The device maintains a security audit log. Recording of security audit log data can be enabled or disabled by the SA.
The audit log is implemented as a circular log containing a maximum of 15000 event entries, meaning that once the
maximum number of entries is reached, the log will begin overwriting the earliest entry. Only an SA will be
authorized to download the log from the device. The log may only be exported over an https: connection, so SSL
must be set up before retrieving the log. The log is exported in MS-Excel comma-separated file format. The log does
not clear when it is disabled, and will persist through power cycles.
The following table lists the events that are recorded in the log:
Event
ID
Event description
1
System startup
2
System shutdown
3
Manual ODIO Standard started
4
Manual ODIO Standard complete
5
Print job
6
Network scan job
7
Server fax job
Ver. 1.1, February 2011
Entry Data
Device name
Device serial number
Device name
Device serial number
Device name
Device serial number
Device name
Device serial number
Overwrite Status
Job name
User Name
Completion Status
IIO status
Accounting User ID
Accounting Account ID
Job name
User Name
Completion Status
IIO status
Accounting User ID
Accounting Account ID
total-number-net-destination
net-destination.
Job name
User Name
Completion Status
IIO status
Accounting User ID
Accounting Account ID
Total-fax-recipient-phone-numbers
fax-recipient-phone-numbers
net-destination.
Page 31 of 49
XEROX WorkCentre 7525/7530/7535/7545/7556 Information Assurance Disclosure Paper
Event
ID
Event description
8
IFAX
9
Email job
10
Audit Log Disabled
11
Audit Log Enabled
12
Copy
13
Efax
14
Lan Fax Job
15
Data Encryption enabled
16
Manual ODIO Full started
17
Manual ODIO Full complete
20
Scan to Mailbox job
21
Delete File/Dir
Ver. 1.1, February 2011
Entry Data
Job name
User Name
Completion Status
IIO status
Accounting User ID
Accounting Account ID
total-number-of-smtp-recipients
smtp-recipients
Job name
User Name
Completion Status
IIO status
Accounting User ID
Accounting Account ID
total-number-of-smtp-recipients
smtp-recipients
Device name
Device serial number
Device name
Device serial number
Job name
User Name
Completion Status
IIO status
Accounting User ID
Accounting Account ID
Total-fax-recipient-phone-numbers
fax-recipient-phone-numbers
Job name
User Name
Completion Status
IIO status
Accounting User ID
Accounting Account ID
Total-fax-recipient-phone-numbers
fax-recipient-phone-numbers
Job name
User Name
Completion Status
IIO status
Accounting User ID
Accounting Account ID
Total-fax-recipient-phone-numbers
fax-recipient-phone-numbers
Device name
Device serial number
Device name
Device serial number
Device name
Device serial number
Overwrite Status
Job name or Dir name
User Name
Completion Status
IIO status
Job name or Dir name
User Name
Completion Status
IIO status
Page 32 of 49
XEROX WorkCentre 7525/7530/7535/7545/7556 Information Assurance Disclosure Paper
Event
ID
Event description
23
Scan to Home
24
Scan to Home job
25
Copy store job
26
PagePack login
27
Postscript Passwords
29
Network User Login
30
SA login
31
User Login
32
Service Login
33
Audit log download
34
IIO feature status
Ver. 1.1, February 2011
Entry Data
UserName
Device name
Device serial number
Completion Status (Enabled/Disabled)
Job name or Dir name
User Name
Completion Status (Normal/Error)
IIO status
Accounting User ID-Name
Accounting Account ID-Name
total-number-net-destination
net-destination
Job name or Dir name
User Name
Completion Status (Normal/Error)
IIO status
Device name
Device serial number
Completion Status:
Success: (if Passcode is ok)
Failed: (if Passcode is not ok)
Locked out (if Max Attempts Exceed 5)
Time Remaining:
Hrs (Remaining for next attempt)
Min (Remaining for next attempt)
Device name
Device serial number
Modes:
StartupMode (enabled/disabled)
System Params Password (changed or failed)
Start Job Password (changed or failed)
Completion Status:
Enabled/disabled
Changed (if password changed correctly)
Failed (if change attempt failed)
UsereName
Device name
Device serial number
Completion Status (Success, Failed)
UsereName
Device name
Device serial number
Completion Status (Success or Failed)
UserName
Device name
Device serial number
Completion Status (Success or Failed)
Service name
Device name
Device serial number
Completion status (Success or Failed).
UserName
Device name
Device Serial Number
Completion status (Success or Failed).
UserName
Device name
Device serial number
IIO Status (enabled or disabled)
Page 33 of 49
XEROX WorkCentre 7525/7530/7535/7545/7556 Information Assurance Disclosure Paper
Event
ID
Event description
35
SA pin changed
36
Audit log Transfer
37
SSL
38
X509 certificate
39
IP sec
40
SNMPv3
41
IP Filtering Rules
42
Network Authentication
43
Device clock
44
SW upgrade
45
Cloning
46
Scan Metadata Validation
47
Xerox Secure Access
48
Service login copy mode
49
Smartcard (CAC/PIV) access
Ver. 1.1, February 2011
Entry Data
UserName
Device name
Device serial number
Completion status
UserName
Device name
Device serial number
Completion status
UserName
Device name
Device serial number
Completion Status (Enabled/Disabled/Terminated)
UserName
Device name
Device serial number
Completion Status (Created/uploaded/Downloaded).
UserName
Device name
Device serial number
Completion Status
(Configured/enabled/disabled/Terminated)
UserName
Device name
Device serial number
Completion Status (Configured/enabled/disabled).
UserName
Device name
Device serial number
Completion Status (Configured/enabled/disabled).
UserName
Device name
Device serial number
Completion Status (Enabled/Disabled)
UserName
Device name
Device serial number
Completion Status (time changed/date changed)
Device name
Device serial number
Completion Status (Success, Failed)
Device name
Device serial number
Completion Status (Success, Failed)
Device name
Device serial number
Completion Status (Metadata Validation Success or
Failed)
Device name
Device serial number
Completion status (Configured/enabled/disabled)
Service name
Device name
Device serial number
Completion Status (Success, Failed)
UserName (if valid Card and Password are entered)
Device name
Device serial number
Process Name
Page 34 of 49
XEROX WorkCentre 7525/7530/7535/7545/7556 Information Assurance Disclosure Paper
Event
ID
Event description
50
Process terminated
51
ODIO scheduled
53
CPSR Backup
54
CPSR Restore
55
SA Tools Access Admin
57
Session Timer Logout
58
Session Timer Interval Change
59
Feature Access Control
Enable/Disable/Configure
60
Device Clock NTP Enable/Disable
61
Grant / Revoke Admin
62
Smartcard (CAC/PIV)
Enable/Disable/Configure
63
IPv6
Enable/Disable/Configure
64
802.1x
Enable/Disable/Configure
Ver. 1.1, February 2011
Entry Data
Device name
Device serial number
Process name
Device name
Device serial number
ODIO type (Full or Standard)
Scheduled time
ODIO status (Started/Completed/canceled)
Completion Status (Success/Failed/Canceled)
File Name
User Name
Completion Status (Normal / Error)
IIO Status
File Name
User Name
Completion Status (Normal / Error)
IIO Status
Device serial number
Completion Status (Locked/Unlocked)
Device Name
Device Serial Number
Interface (Web, LUI)
User Name (who was logged out)
Session IP (if available)
Device Name
Device Serial Number
Interface (Web, LUI)(Timer affected by change)
User Name (who made this change)
Session IP (if available)
Completion Status
User Name
Device Name
Device Serial Number
Completion Status (Enabled/Disabled/Configured)
Interface (Web, Local, CAC, SNMP)
Session IP address (if available)
Device Name
Device serial number
Enable/Disable NTP
NTP Server IP Address
Completion Status (Success/Failed)
Device Name
Device Serial Number
User Name (of target user)
Grant or Revoke (the admin right)
Completion Status (Success/Failed)
UserName
Device Name
Device Serial Number
Completion Status (Success/Failed)
UserName
Device Name
Device Serial Number
Completion Status (Success/Failed)
UserName
Device Name
Device Serial Number
Completion Status (Success/Failed)
Page 35 of 49
XEROX WorkCentre 7525/7530/7535/7545/7556 Information Assurance Disclosure Paper
Event
ID
Event description
65
Abnormal System Termination
66
Local Authentication
67
Web User Interface Authentication
(Enable Network or Local)
69
Xerox Secure Access Login
70
Print from USB
Enable/Disable
71
USB Port
Enable/Disable
72
Scan to USB
Enable/Disable
73
System Log Download
74
Scan to USB Job
106
SA PIN Reset
Entry Data
Device Name
Device Serial Number
UserName
Device Name
Device Serial Number
Completion Status (Enabled/Disabled)
UserName
Device Name
Device Serial Number
Authentication Method Enabled (Network/Local)
UserName
Device Name
Device Serial Number
Completion Status (Success/Failed)
User Name
Device Name
Device Serial Number
Completion Status (Enabled/Disabled)
User Name
Device Name
Device Serial Number
USB Port (Front/Rear)
Completion Status (Enabled/Disabled)
User Name
Device Name
Device Serial Number
Completion Status (Enabled/Disabled)
Username
IP of requesting device (if available)
File names downloaded
Destination (IP address or USB device)
Completion status (Success/failed)
Job Name
User Name
Completion Status
IIO Status
Accounting User ID-Name
Accounting Account ID-Name
Device serial number
Completion Status (Success/Failed)
4.2. Xerox Standard Accounting
Xerox Standard Accounting (XSA), intended primarily for use as an accounting service, can be used as an internal
1.
authorization service. XSA tracks copy, scan (including filing and email), print and fax usage by individual user The
system administrator can enable/disable the feature via the LUI or Web UI, add or delete users, and set usage limits
by service for each user. If XSA is enabled, a walk-up user must enter a valid XSA ID before being allowed access to
the device. The device will confirm that the entered XSA ID matches an authorized user, and that the usage limits for
the selected service have not been exceeded. In this sense, XSA acts as an authorization service. The system
administrator can limit access to device services by setting the usage limits on specific services to zero for users that
1
On color machines XSA can track color copy or color print usage.
Ver. 1.1, February 2011
Page 36 of 49
XEROX WorkCentre 7525/7530/7535/7545/7556 Information Assurance Disclosure Paper
should not have rights to use the feature. After each job is performed, the user’s balance is updated by the number
of impressions or scans performed. Services become unavailable to the user when the usage limits are exceeded.
When XSA is enabled in the print driver or on the Web UI, before a print job is submitted, an XSA ID must also be
entered. The ID is sent to the controller for validation. If the submitted ID is valid, the job will print, and the user’s
balance will be updated by the number of impressions performed. If the submitted ID is invalid, the job is deleted
and an error sheet is printed in its place.
The Systems Administrator can chose to track all services (Print, Copy, Scan and Fax) or can choose to permit specific
accounting IDs only for color print and copy.
On demand, the SA will be able to download a report that shows activity for all of the users. The SA can add, modify
or remove users and their allocations at any point.
An end user will be able to review their balances by entering a User ID at the LUI or web UI.
4.3. SMart eSolutions
SMart eSolutions provides the ability to automatically send data to Xerox to be used for billing (Meter Assistant) and
toner replenishment (Supplies Assistant). The Systems Administrator sets up the attributes for the service via the
web UI, including enable/disable participation in SMart eSolutions, and time of day for the daily polling to the Xerox
Communication Server. The device can be set to communicate via a proxy server on the customer's network. The
proxy server is set to auto detect proxy settings or to manually set proxy address using the WebUI.
4.2.1 Meter Assistant
Once the connection with the Xerox Communication Server has been established, the Meter Assistant service will poll
the Xerox Communication server daily over the network. The server will check whether it is time in the billing cycle to
update the meter readings. If so, the server will request reads from the device, and the device will then respond by
sending the meter reads back to the server.
4.2.2 Supplies Assistant
Once the connection with the Xerox Communication Server has been established, the Supplies Assistant service will
be automatically enabled by request from the Xerox Communication Server. The device will then automatically send
supplies data over the network to the Xerox Communication server at a regular interval.
4.2.3 Summary
The SMart eSolutions communication process means that the device initiates all communication between it and
Xerox. Only device ID, device configuration, current firmware versions, meter read and supplies information is
transferred. The information is sent encrypted using https (SSL).
4.4. Encrypted Partitions
When enabled by the customer, the controller disk is encrypted using the AES algorithm with a 256-bit key. The key
is generated dynamically on each boot, and is kept only in volatile memory.
4.5. Image Overwrite
The Image Overwrite Security feature provides both Immediate Image Overwrite (IIO) and On-Demand Image
Overwrite (ODIO) functions. Immediately before a job is considered complete, IIO will overwrite any temporary files
associated with print, network scan, internet fax, network fax, or e-mail jobs that had been created on the controller
Ver. 1.1, February 2011
Page 37 of 49
XEROX WorkCentre 7525/7530/7535/7545/7556 Information Assurance Disclosure Paper
Hard Disk. The ODIO feature can be executed at any time by the SA and will overwrite the entire document image
partitions of the controller Hard disk. ODIO may also be scheduled to run at regular times. A standard ODIO will
overwrite all image data from memory and disks except for Jobs and Folders stored in the Reprint Saved Jobs
feature; Jobs stored in the Scan to Mailbox feature (if installed); Fax Dial Directories (if fax card is installed); and Fax
Mailbox contents (if fax card is installed). A full ODIO will overwrite all image data from memory and disks as well as
the items excluded from a standard ODIO.
4.5.1. Algorithm
The overwrite mechanism for both IIO and ODIO conforms to the U.S. Department of Defense Directive 5200.28-M
(Section 7, Part 2, paragraph 7-2022.
The algorithm for the Image Overwrite feature is:
Step 1:
Step 2:
Step 3:
Step 4:
Pattern #1 is written to the sectors containing temporary files (IIO) or to the entire spooling area of the
disks (ODIO). (hex value 0x35 (ASCII “5”)).
Pattern #2 is written to the sectors containing temporary files (IIO) or to the entire spooling area of the
disks (ODIO). (hex value 0xCA (ASCII compliment of 5)).
Pattern #3 is written to the sectors containing temporary files (IIO) or to the entire spooling area of the
disks (ODIO). (hex value 0x97 (ASCII “ú”)).
10% of the overwritten area is sampled to ensure Pattern #3 was properly written. The 10% sampling is
accomplished by sampling a random 10% of the overwritten area.
4.5.2. User Behavior
IIO can be enabled at the local UI only. Once enabled, IIO is invoked automatically immediately prior to the
completion of a print, network scan, internet fax, network fax, or e-mail job. If IIO completes successfully, status is
displayed in the Job Queue. However, if IIO fails, a popup will appear on the Local UI recommending that the user
run ODIO, and a failure sheet will be printed.
ODIO may be invoked either from the Local UI in Tools Pathway or from the CentreWare Internet Services Web UI.
Network functions will be delayed until the overwrite is completed. Copying is unavailable while the overwrite itself is
underway, but copies may be made while the controller is booting.
Upon completion and verification of the ODIO process, a confirmation sheet is printed which indicates the status of
the overwrite. The completion status can be successful, failed, cancelled, or timed-out.
Please note that invocation of ODIO will cause currently processing print jobs to be aborted. However, scan jobs will
not be aborted and so ODIO might fail. The user should insure that all scan jobs have been completed before
invoking ODIO.
Please refer to the customer documentation for a description on how failures are logged.
4.5.3. Overwrite Timing
The ODIO overwrite time is dependent on the type of hard disk in the product. The overwrite and reset average time
is 10 minutes, but longer times are possible.
IIO is performed as a background operation, with no user-perceivable reduction in copy, print or scan performance.
Ver. 1.1, February 2011
Page 38 of 49
XEROX WorkCentre 7525/7530/7535/7545/7556 Information Assurance Disclosure Paper
4.6. FIPS
4.6.1. FIPS 140-2 Compliance
You can enable the printer to check its current configuration to ensure that transmitted and stored data is encrypted
as specified in FIPS 140-2 (Level 1). Once FIPS 140 mode is enabled, you can allow the printer to use a protocol or
feature that uses an encryption algorithm that is not FIPS-compliant, but you must acknowledge this in the
validation process. If FIPS mode is enabled, when you enable a non-compliant protocol such as SNMPv3 or NetWare,
a message appears to remind you that the protocol uses an encryption algorithm that is not FIPS-compliant. NOTE:
If you enable FIPS 140-2 Mode it may not be able to communicate with other network devices that use protocols
that do not employ FIPS 140-2 validated algorithms.
When you enable FIPS 140 mode, the printer validates its current configuration by performing the following checks:
•
Validates certificates for features where the printer is the server in the client-server relationship. An SSL
certificate for HTTPS is an example.
•
Validates certificates for features where the printer is the client in the client-server relationship. CA
Certificates for LDAP, Xerox Extensible Interface Platform (EIP 2.0), and Smart eSolutions are examples.
•
Validates certificates that are installed on the printer, but not used. Certificates for HTTPS, LDAP, or SNMPv3
are examples.
•
Checks features and protocols for non-compliant encryption algorithms. For example, NetWare and SNMPv3
use encryption algorithms that are not FIPS-compliant.
•
Performs CAC, PIV, and .NET card validation.
•
Digital Signing and Encrypted e-mail.
•
IPSec over IPV6
When validation is complete, information and links display in a table at the bottom of the FIPS 140-2 configuration
page of the webUI.
•
Click the appropriate link to disable a non-compliant feature, or protocol.
•
Click the appropriate link to replace any non-compliant certificates.
•
Click the appropriate link to acknowledge that you allow the printer to use non-compliant features and
protocols.
4.6.2. Enabling FIPS 140 Mode
1.
In CentreWare IS, click Properties > Security > Encryption > FIPS 140-2.
2.
Click Enable.
3.
Click Run Configuration Check and Apply. A pass or fail message appears. If the configuration check passes,
click Reboot Machine to save and restart the printer. If the configuration check fails, the reasons for the failed
test are listed in a table with links to disable the protocol, replace the certificate, or allow the printer to use the
non-compliant protocol.
Ver. 1.1, February 2011
Page 39 of 49
XEROX WorkCentre 7525/7530/7535/7545/7556 Information Assurance Disclosure Paper
NOTE: When FIPS 140 Mode is enabled, only FIPS compliant certificates can be installed on the printer.
4.7. Email Signing and Encryption to Self
The device is capable of signing and encrypting emails when the user is authenticated to the device using a CAC or
PIV smart card containing appropriate signing and encryption certificates. The device allows signing to multiple
recipients using the SHA1 hash algorithm. The device allows encryption to the authenticated user only, supporting
3DES and AES encryption.
When enabled, the configuration options allow the system administrator the flexibility for the user to choose signing
and encryption on a job by job basis, or require one or the other for all jobs.
NOTE: The crypto algorithms used for smart card authentication, signing and encryption are not FIPS validated
in the launch version of software.
Ver. 1.1, February 2011
Page 40 of 49
XEROX WorkCentre 7525/7530/7535/7545/7556 Information Assurance Disclosure Paper
5. Responses to Known
Vulnerabilities
5.1. Security @ Xerox
(www.xerox.com/security)
Xerox maintains an evergreen public web page that contains the latest security information pertaining to its
products. Please see www.xerox.com/security.
Ver. 1.1, February 2011
Page 41 of 49
XEROX WorkCentre 7525/7530/7535/7545/7556 Information Assurance Disclosure Paper
6.
APPENDICES
6.1. Appendix A – Abbreviations
API
AMR
ASIC
CAT
CSE
DADF/DADH
DHCP
DNS
DDNS
DRAM
EEPROM
EGP
GB
HP
HTTP
IBM
ICMP
IETF
IFAX
IIO
IIT
IT
IOT
IP
IPSec
IPX
LAN
LDAP
LDAP Server
LED
LPR
MAC
MIB
n/a
NDPS
NETBEUI
NETBIOS
NOS
NVRAM
Application Programming Interface
Automatic Meter Reads
Application-Specific Integrated Circuit. This is a custom integrated circuit that is
unique to a specific product.
Customer Administration Tool
Customer Service Engineer
Duplex Automatic Document Feeder/Handler
Dynamic Host Configuration Protocol
Domain Name Server. A centralized database that maps host names to static IP
addresses.
Dynamic Domain Name Server. Maps host names to dynamic static IP addresses.
Dynamic Random Access Memory
Electrically erasable programmable read only memory
Exterior Gateway Protocol
Gigabyte
Hewlett-Packard
Hypertext transfer protocol
International Business Machines
Internet Control Message Protocol
Internet Engineering Task Force
Internet Fax
Immediate Image Overwrite
Image Input Terminal (the scanner)
Information Technology
Image Output Terminal (the marking engine)
Internet Protocol
Internet Protocol Security
Internet Protocol Exchange
Local Area Network
Lightweight Directory Access Protocol
Lightweight Directory Access Protocol Server. Typically the same server that is used
for email. It contains information about users such as name, phone number, and
email address. It can also include a users login alias.
Light Emitting Diode
Line Printer Request
Media Access Control
Management Information Base
not applicable
Novell Distributed Print Services
NETBIOS Extended User Interface
Network Basic Input/Output System
Network Operating System
Non-Volatile Random Access Memory
Ver. 1.1, February 2011
Page 42 of 49
XEROX WorkCentre 7525/7530/7535/7545/7556 Information Assurance Disclosure Paper
NVM
ODIO
PCL
PDL
PIN
PSW
PWBA
PWS
RFC
SA
SFTP
SLP
SNMP
SRAM
SSDP
SSL
TCP
TIFF
UI
URL
UDP
WebUI
XCMI
XSA
Non-Volatile Memory
On-Demand Image Overwrite
Printer Control Language
Page Description Language
Personal Identification Number
Portable Service Workstation
Printed Wire Board Assembly
Common alternative for PSW
Required Functional Capability
System Administrator
Secure File Transfer Protocol
Service Location Protocol
Simple Network Management Protocol
Static Random Access Memory
Simple Service Discovery Protocol
Secure Sockets Layer
Transmission Control Protocol
Tagged Image File Format
User Interface
Uniform Resource Locator
User Datagram Protocol
Web User Interface – the web pages resident in the WorkCentre Pro. These are
accessible through any browser using the machine’s IP address as the URL.
Xerox Common Management Interface
Xerox Standard Accounting
Ver. 1.1, February 2011
Page 43 of 49
XEROX WorkCentre 7525/7530/7535/7545/7556 Information Assurance Disclosure Paper
6.2. Appendix B – Supported MIB
Objects
NOTES :
(1) The number of objects shown per MIB group represents the number of objects defined by the IETF
standard for that MIB group. It does not represent the instantiation of the MIB group which may
contain many more objects.
(2) Some MIB objects defined within Input and Output groups of the Printer MIB (RFC 1759) have a
MAX-ACCESS of RW. However, the Printer MIBv2 defines a MIB-ACCESS of RO for these MIB objects
within the Input and Output groups and all machines assessed support RO access. Therefore, RO
access to these MIB objects is considered IETF compliant.
(3) It is assumed that mandatory IETF string-related MIB objects shall contain meaningful data; not
blank strings
(4) The "(C)" notation indicates that the previously stated item is a true caveat condition. The "(I)"
notation indicates that the previous stated item should be regarded as information only.
(5) MIB objects that CANNOT be populated with meaningful data (e.g. a machine may not have paper
level sensors, hence, can only support "0" or "-3 for more than 1 sheet" for prtInputCurrentLevel) will
be considered a caveat, denoted as "(C)".
(6) The Printer MIB requires a few groups from RFC 1213 and RFC 1514 to be supported. Therefore, this
assessment will indicate that these groups are "supported" as long as the basic MIB structures have
been implemented.
Support Definitions
Term
"supported"
"supported w/ caveats"
"not supported"
"not fully supported"
"optional, *"
Definition
all MIB objects exists and are populated w/ meaningful data that is consistent w/ the
hardware installed within the machine.
all MIB objects exists, however, 2 major bugs or less may exists w/ some of the objects that
were not fixed
MIB objects do not exist/implementation was not planned
MIB objects exists, HOWEVER, are NOT populated w/ meaningful data OR provide only default
values OR contain 3 or more major bugs
optional group that is NOT required by the RFC, however, an implementation may exist; some
MIB objects may not be populated w/ meaningful data
SNMP version / Network Transport support
SNMPv1 (RFC 1157)
SNMPv2P (RFCs 140x)
SNMPv2C (RFCs 190x)
SNMPv3 (RFCs 1902, 2572, 2574)
SNMP over UDP (IP)
SNMP over IPX (Netware)
SNMP over NETBEUI (Microsoft Networking)
Ver. 1.1, February 2011
WorkCentre
supported
not supported
supported
supported
supported
supported
not supported (implemented but never delivered)
Page 44 of 49
XEROX WorkCentre 7525/7530/7535/7545/7556 Information Assurance Disclosure Paper
RFC 1759 - Printer MIB Group
RFC 1213 - System group
RFC 1213 - Interface group
RFC 1514 - Storage group
RFC 1514 - Device group
General group [7 objects]
Covers group [3 objects]
Localization group [4 objects]
Responsible Party group [2 objects] - OPTIONAL
System Resources group [4 objects]
Input group [12 objects]
Extended Input group [7 objects] - OPTIONAL
Input Media group [4 objects] - OPTIONAL
Output group [6 objects]
Extended Output group [7 objects] - OPTIONAL
Output Dimensions group [5 objects] OPTIONAL
Output Features group [6 objects] - OPTIONAL
Marker group [15 objects]
Marker Supplies group [9 objects] - OPTIONAL
Marker Colorant group [5 objects] - OPTIONAL
Media Path group [11 objects]
Channels group [8 objects]
Interpreter group [12 objects]
Console group [4 objects]
Console Display Buffer group [2 objects]
Console Display Light group [5 objects]
Alert Table group [8 objects]
Alert Time group [1 object] - OPTIONAL
WorkCentre
supported
supported
supported
supported
supported
supported
supported w/ caveats = only US English language supported
supported
supported
supported
supported
supported
supported w/ caveats = only "-3" (i.e. can accept 1 or more sheets) can
be supported for the Top Tray (C)
supported
supported
supported
supported
supported
supported
supported
supported
supported
supported w/ caveats = prtConsoleDisable is hardcoded to enabled(3),
prtConsoleLocalization hardcoded to 1
supported w/ caveats = limited local UI messaging captured within table
(C), local UI button selection messages are not captured within table
supported w/ caveats = only the Power Saver LED is supported, the other
LEDs were not implemented because they represent local UI menu
activations (I)
supported
supported
RFC 1514 – Host Resources MIB group
System group [7 objects]
Storage group [8 objects]
Devices group [6 objects]
Processor Table [2 objects]
Network Interface Table [1 object]
Printer Table [2 objects]
Disk Storage Table [4 objects]
Partition Table [5 objects]
File System Table [9 objects]
Software Running group [7 objects] – OPTIONAL
Software Running Performance group [2 objects] – OPTIONAL
Software Installed group [7 objects] – OPTIONAL
RFC 1213 - MIB-II for TCP/IP group
System group [7 objects]
Interfaces group [23 objects]
Address Translation group [3 objects]
IP group [42 objects]
ICMP group [26 objects]
TCP group [19 objects]
UDP group [6 objects]
EGP group [20 objects]
Transmission group [0 objects]
SNMP group [28 objects]
System Object Resources Table/objects per RFC 1907 [8
objects]
Ver. 1.1, February 2011
WorkCentre
supported
supported
supported
supported
supported
supported
supported
supported
supported
optional, not supported
optional, not supported
optional, not supported
WorkCentre
supported
supported w/ caveats = ifInUnknownProtos does not work
supported, but this group has been DEPRICATED by the IETF
supported
supported
supported
supported
not applicable because Exterior Gateway Protocol not supported by
machine
not applicable because the group has not yet been defined by the IETF
supported
supported
Page 45 of 49
XEROX WorkCentre 7525/7530/7535/7545/7556 Information Assurance Disclosure Paper
Additional Capabilities / Application Support
ability to change GET, SET, TRAP PDU community names
Printer MIB traps
SNMP Generic Traps
Vendor-specific Traps
set trap destination address(es) for any 3rd party Net Mgmt
apps.
polling for IETF status objects using any 3rd party Net Mgmt
apps.
walking IETF MIB tree structure using any 3rd party Net Mgmt
app. (e.g. HP OpenView, etc.) / shareware program
New type 2 enumerations from next generation Host
Resources MIB supported
New type 2 enumerations from next generation Printer MIB
supported
New Printer MIBv2 objects implemented
IETF AppleTalk MIB (RFC ?) implemented
Job monitoring via MIBs
Vendor-specific MIBs implemented
Vendor-specific MIBs provided to customer
Vendor-specific client application(s) provided
required Windows2000 MIB objects supported
Embedded Web Server support
Xerox PrinterMap application support
Xerox PrintXchange support
Novell Distributed Print Services support
Dazel Output Management Environment
HP OpenView snap-in module
CA Unicenter snap-in module
IBM/Tivoli NetView snap-in module
Ver. 1.1, February 2011
WorkCentre
supported, default values : GET="public", SET="private",
TRAP="SNMP_trap"
supported = printerV1Alert, printerV2Alert
supported = coldStart, warmStart, authenticationFailure
supported = xcmJobV1AlertNew, xcmJobV2AlertNew for job monitoring
alerts
supported via Web UI
supported
supported
optional, not support because Host Resources MIBv2 has NOT entered
the standards track
supported
optional, not support because Printer MIBv2 has NOT entered the
standards track
not supported
supported via Xerox MIBs
supported = Network Connectivity, Job Monitoring, Scan-to-File, and
Scan-to-LAN FAX features supported via Xerox MIBs
supported w/ caveat = planned support within 2 - 3Q00 via Xerox web
site, URL = www.xerox.com
CentreWare Services
supported
supported
supported
supported
supported = w/ Xerox NDPS Gateway solution w/ improved device status
supported
supported
supported
supported
Page 46 of 49
XEROX WorkCentre 7525/7530/7535/7545/7556 Information Assurance Disclosure Paper
6.3. Appendix C –Standards
Controller Hardware
PCI Specification (PCI Local Bus Specification Revision 2.1)
100 Megabit Ethernet (IEEE 802.3)
Universal Serial Bus 1.1
Parallel (IEEE 1284)
IEEE 1394a (FireWire)
Controller Software
Function
RFC/Standard
Internet Protocol
950
Internet standard subnetting procedure
919
Broadcasting internet datagrams
922
IP Version 6
2460
IP Version 6 Addressing Architecture
2373
ICMP Version 6 Protocol
2463
Transition Mechanisms for IPv6 Hosts and Routers
1933
Transmission Control Protocol (TCP)
793
User Datagram Protocol
768
Standard for the transmission of IP datagrams over Ethernet
networks
894
Standard for the transmission of IP datagrams over IEEE802
networks
1042
ICMP – ICMP Echo, ICMP Time, ICMP Echo Reply, and ICMP
Destination Unreachable message.
792
Reverse Address Resolution Protocol (RARP)
903
Bootstrap Protocol (BOOTP)
951
Clarifications and Extensions for the Bootstrap Protocol (BOOTP)
1542
X.500 Distinguished Name RFC references
1779, 2253, 2297, 2293
SLP
2608
Dynamic Host Configuration Protocol (DHCP)
2131
DHCP Options and BOOTP Vendor Extensions
X.509 Certificate RFC references
2132
2247, 2293, 2459, 2510, 2511, 3280
Hyper Text Transfer Protocol version 1.1 (HTTP)
2616
Line Printer Daemon (LPR/LPD)
1179
File Transfer Protocol (FTP)
959
SNMPv1
1157
SNMPv2
1901, 1905, 1906, 1908, 1909
SNMPv3
1902, 2572, 2574
Structure of Management Information (SMI) for SNMPv1
1155, 1212
Structure of Management Information (SMI) for SNMPv2
IETF MIBs:
MIB II
Host Resources
RFC 1759 (Printer), Printer MIB V2
1902, 1903, 1904
SNMP Traps
Ver. 1.1, February 2011
1213
1514
1759
1215
Page 47 of 49
XEROX WorkCentre 7525/7530/7535/7545/7556 Information Assurance Disclosure Paper
Function
Document Printing Application (DPA)
Appletalk
RFC/Standard
10175
Inside Appletalk, Second Edition
Printing Description Languages
Postscript Language Reference, Third Edition
PCL6 (PCL5C + PCL XL class 3.0 emulation)
TIFF 6.0
JPEG
Portable Document Format Reference Manual Version 1.3
Ver. 1.1, February 2011
Page 48 of 49
XEROX WorkCentre 7525/7530/7535/7545/7556 Information Assurance Disclosure Paper
6.4. Appendix E – References
Kerberos FAQ
faq.html
http://www.nrl.navy.mil/CCS/people/kenh/kerberos-
IP port numbers
http://www.iana.org/assignments/port-numbers
Ver. 1.1, February 2011
Page 49 of 49