1
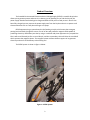
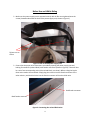
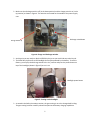
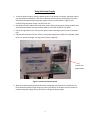
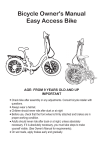
User’s Manual
Portable Environmental Electromechanical
Voltage Supply
(PEEVS)
April 27, 2010
Table of Contents
Product Overview
2
Safety Precautions
3
Before Use and While Riding
4
Using the Power Supply
7
When Not In Use
8
General Maintenance
9
1
Product Overview
The Portable Environmental Electromechanical Voltage Supply (PEEVS) is a mobile bicycle that
allows you to generate power and store it in a battery just by pedaling. As you ride the bicycle, the
power supply attached to the back gains charge and holds it until you are ready to use it. Once it has
been fully charged you may remove the power supply case from the bicycle and use it to power small
electronic devices such as a cell phone charger or a laptop.
PEEVS operates using a system based on the Faraday principle, which states that a magnet
passing back and forth through the center of a coil of wire will produce a magnetic field capable of
producing electricity. PEEVS does just that by using a crankshaft and piston apparatus. As you pedal the
bike it will travel forward just like a normal bicycle, and also a secondary chain will drive the crankshaft
which operates the magnetic piston. The magnetic piston oscillates inside a copper coil to generate
electricity and send it to the battery to be used by you!
The PEEVS system is shown in figure 1 below.
Figure 1: PEEVS System
2
Safety Precautions
Ø While riding, keep fingers and all other extremities clear of the chain and other moving parts.
Failure to do so may cause injury.
Ø Do not attempt to change the gear setting of the bicycle while riding. The gear setting has been
carefully selected to optimize the battery charging capabilities. Attempting to change the gear
setting may cause the two chains on the rear gear-set to jam and/or break.
Ø Because of the weight of the battery, the power supply case should always be supported from
the bottom when it is being carried to prevent injury.
Ø Because of all the electrical components housed in the power supply case, the bicycle should
never be ridden in the rain. Doing so may cause system malfunction or electric shock.
3
Before Use and While Riding
Ø Make sure the power supply case is mounted securely with all four nuts tightened onto the
screws (located underneath the shelf of the power supply rack, shown in figure 2).
Tighten nuts to
secure
Figure 2: How to attach power supply case
Ø Ensure that the proper wire connections are made by opening the power supply case and
looking for two wires (red and black) with female connectors (shown in figure 3). There will also
be a set of two corresponding wires (also red and black, not shown). Before riding the bicycle
these wires need to be connected. Simply plug the red wire into the female connector of the
other red wire, and the black wire into the female connector of the other black wire.
Red female connector
Black female connector
Figure 3: Connecting the red and black wires
4
Ø Make sure the discharge switch is off (in the down position) and the charge switch is on (in the
up position) as shown in figure 4. The switches are located on the outside of the power supply
case.
Discharge switch down
Charge switch up
Figure 4: Charge and discharge switches
Ø At this point you are ready to ride the PEEVS bicycle just as you would ride any other bicycle.
Ø The PEEVS bicycle features an LED headlight that may be powered by the battery. To use this
feature, you may flip the discharge switch to the ‘on’ position and press the power button on
top of the headlight (shown in figure 5) to turn it on.
Headlight power button
Figure 5: Turning on the headlight
Ø As stated in the Safety Precautions section, the gear setting is not to be changed while riding.
The gear setting has been carefully selected to optimize the battery charging capabilities.
5
Attempting to change the gear setting may cause the two chains on the rear gear-set to jam
and/or break.
Ø When the green indicator light (located below the charge switch) comes on, the battery has
been fully charged and the overcharge protection system has been activated. At this point the
charge switch may be flipped to the ‘off’ position (down) and the power supply may be removed
from the bicycle and used to power up to two small electronic devices (up to 20 Watts). You are
now ready to move on to the “Using the Power Supply” section.
6
Using the Power Supply
Ø To use the power supply to charge a device (such as a cell phone or a laptop), the power supply
case may be disconnected from the rack on the back of the bicycle by removing the nuts from
the small screws which attach the power supply case to the rack (shown in figure 2) and
carefully lifting the power supply case off of the rack.
Ø Disconnect the two visible wires inside of the power supply case by gently pulling the black wire
out of the black female connector and the red wire out of the red female connector.
Ø Flip the charge switch to the ‘off’ position (down) and the discharge switch to the ‘on’ position
(up).
Ø Plug the desired devices into the inverter in the power supply case and flip the red power switch
to the ‘on’ position to begin receiving power (shown in figure 6).
Inverter and
power switch
Figure 6: Inverter and power switch
Ø When the red discharge light (located below the discharge switch) comes on, the battery has
been drained and will no longer charge or power your device. At this point you may choose to
reattach the power supply case to the bicycle to charge the battery again.
7
When Not In Use
Ø
Ø
Ø
Ø
Keep the power supply case stored inside away from extreme temperatures.
Leave both the charge switch and the discharge switch in the ‘off’ position.
Store the bicycle in a dry place away from snow, rain, and extreme temperatures.
If the power supply case is stored on the bike, make sure the wires connecting the faraday coil
to the circuit board are disconnected (as instructed in the safety precautions).
8
General Maintenance
Ø Keep both chains clean and lubricated to extend the life of the drivetrain.
Ø Always make sure that the tires are properly inflated before riding.
Ø Check the piston periodically to ensure that it stays lubricated. If it requires lubrication, coat it
lightly with machine oil.
Ø The PEEVS battery is rated for 300 charge/discharge cycles. If at any time the battery fails to
hold a charge it can be replaced by any 12 Volt, 40 Amp-Hr, Lead-Acid rechargeable battery.
9