1
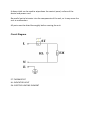
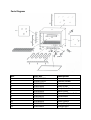
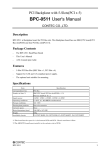
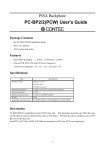
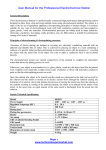
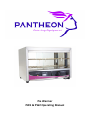
Pie Warmer
PW1 & PW2 Operating Manual
Introduction
Thank you for purchasing a Pantheon Catering Equipment product. In this
booklet you will find instructions for safe operation so please read carefully
and retain for future reference.
Warnings and Precautions
The following warnings and precautions are important and must be observed:
• Ensure voltage and frequency power requirements for the pie warmer
match that of the supply.
• The machine must be earthed when used. There is a danger of electric
shock if it is not earthed.
• In case of emergency, please turn off the power switch and unplug the
machine.
• If the electric wire becomes damaged, a qualified engineer or the
manufacturer must replace it.
Pantheon Catering Equipment is not responsible for any accidents or faults
caused by amendments made to the machine or improper use by the user.
Technical Data
Specifications:
Model:
Voltage (V)
Power (W)
Shelf Capacity
Weight (Kg)
Dimensions (mm)
PW1
220-240V 50Hz
1000
4
21
640w x 335d x 530h
PW2
220-240V 50Hz
2X 2900
2
15
482w x 365d x 355h
Installation
The installation of the unit must be performed by a qualified technician only.
Place the device on top of a solid, even, safe and stable surface that tolerates
the weight of the unit.
Ensure no flammable products are placed near the unit, as it will get hot.
Position the device appropriately so that the plug is always accessible. Also
ensure the unit isn’t placed close to any water.
Operating Instructions
1. Before first use, clean the inside chamber and the tray grids with a damp
cloth.
2. After cleaning, dry the unit thoroughly before use.
3. Connect the unit to a suitable power supply and turn the power switch
on.
4. Rotate the thermostat clockwise to your required temperature, the
yellow heating light will illuminate.
5. The inside temperature of the unit is clearly displayed on the
temperature display on the front of the unit.
6. After use ensure unit is turned off both at the power switch and at the
mains.
Maintenance
Cleaning:
It is advised that the unit should be cleaned on a weekly basis to prolong its life
and ensure it continues to run correctly. Prior to cleaning ensure the device is
switched off and unplugged from the mains. Also, allow sufficient time for the
unit to cool if cleaning the cabinet shortly after use.
A damp cloth can be used to wipe down the control panel, surface of the
device and power cord.
Be careful not to let water into the components of the unit, as it may cause the
unit to malfunction.
All parts must be dried thoroughly before reusing the unit.
Circuit Diagram
ST: THERMOSTAT
HL: INDICATOR LIGHT
EH: ELECTRIC HEATING ELEMENT
Parts Diagram
No.
Part No.
Description
1
2
3
4
5
6
7
8
9
10
11
12
20201011014
20201011012
301040035
301110046
301110010
301050008
301070078
301100015
301030002
301080008
301020006
301130005
Base
Element Holder
Element
Temp. Knob
Temp. Knob Bezel
Mains Cable
Ground-to-Mains Cable
Transformer
Thermostat
Green Switch
Temp. Display
Orange Light
13
14
15
16
17
18
19
20
21
22
23
24
25
26
303120401
302090027
302110021
20201011010
302100199
302070006
301130052
301130041
20201011017
20101011002
20201011013
302100025
301130056
301130055
Decal
Foot
Shelf
Shelf Holder
Door Glass
Knob
Bulb Holder
Bulb
Bulb Cover
Body
Glass Holder
Back Glass
Starter Holder
Starter