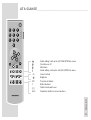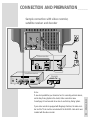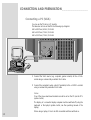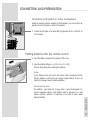
1
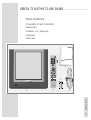
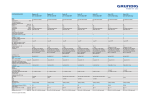
ǵ
COLOR TELEVISION
XENTIA 72
ENGLISH
21837-941.0400
FLAT MF 72-490 DOLBY
CONTENTS __________________________________________________________________________
4
XENTIA 72 Flat MF 72-490 DOLBY
Special features of your TV set
Scope of delivery
6
Installation and Safety
8
At a Glance
The front of the TV set
The back of the TV set
The remote control
13
Connection and Preparation
Sample connection with video recorder, satellite receiver and decoder
Connecting a PC
Connecting a hifi system or active loudspeakers
Putting batteries into the remote control
16
Settings
Switching the television on/off
Programming TV channels
18
Easy Dialog System
The Easy Dialog System
The Dialog Center
Operating the Easy Dialog System
2
CONTENTS __________________________________________________________________________________
20
Programming the Remote Control
Programming function levels
Reset
23
Customer Information
Technical data
Service information for the specialized dealer
Contact assignment for the EURO-AV socket
Correcting Problems Yourself
ENGLISH
26
3
XENTIA 72 FLAT MF 72-490 DOLBY __________________
Special features of your TV set
Technology
Super flat 72 cm colour picture tube (visible picture: 68 cm)
100 Hertz technology
GRUNDIG Megalogic
Megalogic possibilities:
– Perfect compatibility with the Megalogic video recorder. No troublesome
programming of channel positions.
– By starting playpack on the video recorder, the video programme position on
the TV set will be automatically selected.
Equipment
Dolby Surround *
VGA interface for connecting a PC
Megatext, level 2.5, 512-page memory
Easy Dialog System
TV-Guide
Retrofit options
PIP - Picture in picture
Satellite receiver
4
* Under license from Dolby Laboratories Licensing Corporation."DOLBY" and the double-D symbol
ij are trademarks of Dolby Laboratories Licensing Corporation.
XENTIA 72 FLAT MF 72-490 DOLBY ____________________________________
Scope of delivery
1 TV set XENTIA 72 Flat MF 72-490 DOLBY
2 Remote control
3 2 batteries, 1.5 V–, Mignon (AA)
4 User manual
5 Mains cable
ǵ
1
2
3
4
5
6
7
8
9
COLOR TELEVISION
TV
SAT
VCR
DVD
0
4
P
OK
P
TV-GUIDE
TXT
1
AUX
2
3
5
ENGLISH
PIP
5
INSTALLATION AND SAFETY _______________________________
In order to assure that this high-quality and easy-to-use TV set will be able to
provide you with good service and pleasure for a long time to come, it is important that you observe the following points when installing the set.
5x
This set has been designed for the reception and reproduction of picture and
sound signals.
Any other use is explicitly forbidden.
10
cm
10
cm
20
cm
20 cm
The ideal viewing distance from the screen is 5 times the diagonal width of the
screen.
External light shining on the screen adversely affects picture quality.
Assure that there is enough space inside a cabinet.
The TV set is designated for operation in dry rooms. Should you nevertheless
operate it outside, make absolutely sure that it is protected against dampness
(rain, water splashes). Never expose the TV set to any sort of moisture.
Do not place vessels filled with fluid (vases or similar things) on the TV set.
The vessel may tip over and the fluid may adversely affect electrical safety.
Put the TV set on an even and hard surface. Do not place objects (for example,
newspapers) on the TV set or place the set on a cloth cover, etc.
Krieg am Golf
6
Do not place the TV set close to the heating or in direct sunshine as it could
overheat.
Heat build-up can be dangerous and is detrimental to the service life of the
equipment. From time to time, have a technician come to clean the inside of the
set.
Keep the TV set away from magnetic fields (for example stereo speakers).
INSTALLATION AND SAFETY___________________________________________________
Do not open the TV set under any circumstance. The manufacturer will offer no
liability for damage resulting from unauthorized tampering.
Be sure that the mains cable is not damaged at any time.
Storms represent a danger for every type of electrical device. Even if the set is
switched off, it could be damaged by a lightning strike hitting the mains and/or
the aerial lead. Therefore, always disconnect the mains plug and aerial plug
when there is a storm.
When cleaning the screen, use only a soft, damp cloth. Use only clean water.
This TV set combines technology and ecology in a well thought-out overall concept. Only ecologically high-quality materials are used. The packaging is made
almost entirely of 100% recycled paper, and the portion of plastic has been
reduced to a minimum. The batteries supplied have no mercury or cadmium.
The number of plastic types has been reduced in order to ensure high-quality
recycling when the set is put out of use – all larger plastic parts are marked.
To facilitate maintenance work and recycling, this TV set is easy to disassemble.
ENGLISH
ICE !
V
! SER
7
AT A GLANCE ___________________________________________________________________
The front of the TV set
P
P
8
S-VIDEO VIDEO IN
S-VIDEO VIDEO IN
L AUDIO R
L AUDIO R
IO
Switches the TV set on/off.
–z +
Volume
–P+
Select channel up/down.
S-VIDEO
SVHS video input for camcorder.
VIDEO IN
Video input for camcorder.
L AUDIO R
Audio input for camcorder.
y
Headphones connector
AT A GLANCE _____________________________________________________________________________
The back of the TV set
L
AUDIO IN
R
VGA
AUDIO
L
R
AV1
ʋ
Mains cable connection socket.
VGA / L AUDIO IN R
PC connection socket.
AV 1
Euro/AV socket.
AV2
Euro/AV socket.
R AUDIO L
Output sockets for hifi system.
É
Aerial input (for house aerial).
ENGLISH
AV2
9
AT A GLANCE _____________________________________________________________________________
The remote control
You can use the TP 850 C remote control supplied not only with the TV set, but
also with a video recorder, a satellite receiver and a DVD player.
1
2
Note:
Your TV set is equipped with a programmable remote control.
Programming of the remote control is described from page 20.
3
TV
4
5
6
SAT
VCR
DVD
7
8
9
Operating the TV set
0
To operate the television, move the slide-switch »TV, SAT, VCR, DVD« into the
»TV« position.
P
OK
P
TV-GUIDE
TXT
Ǽ
Switches the TV set to standby.
1…9
0 AV
Channel selection and switch on the TV set from standby,
select AV position, enter teletext page numbers.
p, P
Switching on the TV set from standby,
select channels step by step, cursor up/down.
Volume, cursor left/right.
Changes and activates various functions.
F E
OK
i
PIP
AUX
Call up DIALOG CENTER (with »i« and »OK«).
TV-Guide, info about current broadcast.
Teletext mode /TV mode switch-over.
Sound on/off (mute).
see next page
AKT
TXT
ĭ
10
AT A GLANCE _____________________________________________________________________________
1
2
3
TV
4
5
6
SAT
VCR
DVD
7
8
9
0
P
OK
P
Ȅ
Ƿ
TXT
F
i
PIP
AUX
Picture settings, calls up the »PICTURE SETTINGS« menu.
Clock time on/off.
Still picture.
Sound settings, calls up the »SOUND SETTINGS« menu.
- +
-v+
Colour contrast.
Brightness.
PIP
TV picture in teletext.
Brief instructions
Picture format switch-over
Preselection button for various functions.
D
E
AUX
ENGLISH
z
TV-GUIDE
11
AT A GLANCE _____________________________________________________________________________
Operating a video recorder/satellite receiver/
DVD player
1
2
To control a GRUNDIG video recorder, set the slide-switch
»TV, SAT, VCR, DVD« to »VCR«.
3
TV
4
5
6
SAT
VCR
DVD
7
8
9
To control a GRUNDIG satellite receiver, set the slide-switch
»TV, SAT, VCR, DVD« to »SAT«.
To control a GRUNDIG DVD player, set the slide-switch
»TV, SAT, VCR, DVD« to »DVD«.
0
P
OK
Ǽ
Switches to standby.
1…0
Select channel positions and switch on from standby.
p, P
Select channels step by step.
●
Recording
Playback
Pause
Stop
P
TV-GUIDE
TXT
ı
ll
■
PIP
AUX
ĵķ
ĶŁ
ĵĵ
ŁŁ
Reverse picture search.
Forward picture search.
Fast reverse.
Fast forward.
Note:
Just try out which functions of your GRUNDIG device can be controlled.
Functions which cannot be controlled on your GRUNDIG device can easily
be programmed (see page 20).
12
CONNECTION AND PREPARATION _______________
Sample connection with video recorder,
satellite receiver and decoder
L
AUDIO IN
R
VGA
AUDIO
L
R
AV2
AV1
Videorecorder
SAT
2 EXTERNAL / DEC. - AV 2
L
AUDIO
TV
R
L
O
U
T
I
N
R
R
ń
1 EXTERNAL / EURO - AV 1
Satellitenreceiver
Decoder
R
AUDIO OUT
L
EURO AV TV
EURO AV DECODER
EURO AV VCR
INPUT-SAT
PAY-TV
950-2150 MHz
14/18 V 450 mA
Note:
To see what possibilities your television has for connecting external devices,
see the Easy Dialog System in the Audio/Video connections menu.
Consult page 18 and onwards to see how to use the Easy Dialog System.
If your video recorder is equipped with Megalogic functions, the video recorder and the TV set must be connected with the AV-EURO cable which was
included with the video recorder.
ENGLISH
220-240 V~
50-60 Hz
13
CONNECTION AND PREPARATION _______________________________________
Connecting a PC (VGA)
You can use the TV set as a PC monitor.
The television set can set itself to the following input signals:
640 x 480 Pixel, 60 Hz/31.5 kHz
640 x 400 Pixel, 70 Hz/31.5 kHz
640 x 350 Pixel, 70 Hz/31.5 kHz
L
AUDIO IN
R
VGA
AUDIO
L
R
AV2
AV1
1 Connect the VGA source (e.g. computer, games console) to the »VGA«
socket using a commercially available VGA cable.
2 Connect the computer’s audio output (if available) to the »AUDIO« sockets
using a commercially available Cinch cable.
Note:
One of the above-mentioned resolutions must be set on the PC (see the PC’s
system control).
The display of a connected laptop computer must be switched off (using the
keyboard or the laptop’s system control; see the operating manual of the
laptop).
When using a laptop, it has to be first connected and then switched on.
14
CONNECTION AND PREPARATION _______________________________________
Connecting a hifi system or active loudspeakers
Instead of using the television speakers as front speakers, you can use the loudspeakers of your hifi system or active front speakers.
L
AUDIO IN
R
R
AV2
AV1
1 Connect the hifi system or the active left/right speakers to the »L AUDIO R«
Cinch sockets.
Putting batteries into the remote control
1 Open the battery compartment by pulling off the cover.
2 Insert the batteries (Mignon, i.e. UM-3 or AA, 2 x 1.5 V).
Observe the polarity when inserting the batteries.
Note:
If your television does not react to the remote control commands correctly,
then the batteries could be used up. Remove empty batteries. There is no
liability for damage caused by leaking batteries.
Environmental note:
The batteries – even those free of heavy metal – cannot be disposed of in
normal household rubbish. Used batteries must be disposed of in used
battery collection containers in businesses or be taken to public waste
disposal facilities.
ENGLISH
VGA
AUDIO
L
15
SETTINGS______________________________________________________________________________
Switching the TV set on/off
An LED next to the mains switch indicates the current operating mode by a
corresponding colour.
Green
Yellow
Red
=
=
=
Operation.
Standby (EPG mode, copy mode).
Standby (energy saving mode, timer programmed).
Switching the TV set on
1 Press »IO« on the TV set.
The TV picture appears on the screen.
Switching the TV set to standby
1 Press »Ǽ« on the remote control once.
Switching the TV set off definitely
1 Press »IO« on the TV set, or
press »Ǽ« on the remote control twice.
Condition:
The ecologic switch must be activated (Dialog Centre, »Special Functions«
menu).
Note:
The ecologic switch is not activated if a timer is programmed or the copy
mode activated.
Switching on again is only possible with »IO« on the TV set.
16
SETTINGS ____________________________________________________________________________________
Programming TV channels
The TV set is equipped with the automatic tuning system “ATS euro plus” which
carries out channel position assignment for you.
1 After switching on the TV set, select he »English« dialog language and confirm with »OK«.
Note:
If the »Select dialog language« page does not appear, press »i« and then
»OK« to display the Dialog Centre menu.
,« or ».
.« to select the »AUTOMATIC PROGRAMMING« row then
Use »,
confirm with »OK«.
,« or ».
.« to select the »Complete Reprogramming when moving
Use »,
house« row then confirm with »OK«.
2 Confirm your country with »OK«.
The automatic tuning system is started. Depending on the number of
channels which can be received, the search can take one minute and more.
3 When the automatic allocation of the channel positions is completed, a table
with information about the installation menu is displayed.
4 Press »TXT« to exit this table.
The »INSTALLATION« menu is displayed.
television immediately, switch off menu with »TXT«. A menu with information on the Easy Dialog System appears.
6 Press »TXT« to switch to TV operation.
Note:
It is possible to call up all functions of the »INSTALLATION« menu also later
in the Easy Dialog Centre under »INSTALLATION«.
ENGLISH
5 Make desired settings and end setting with »TXT« or, if you want to watch
17
EASY DIALOG SYSTEM _____________________________________________
The Easy Dialog System
Your TV set is equipped with the Easy Dialog System.
That means that operating instructions are not, as is usual, in a printed manual,
but rather appear on the screen as dialog fields.
The Dialog Centre
The Dialog Centre is the control centre for your TV set.
Here you can make a variety of settings, call up information, and get specific
help for operating your television (e.g. info about the remote control, a list of
key words, tips and tricks).
Just try it out. You can’t do anything wrong.
1 Call up the Dialog Centre witht »i« and then »OK«.
P+
•
REMOTE CONTROL
INDEX
PARENTAL LOCK
TV-PROGRAMME-CHART
AUTOMATIC PROGRAMMING
ACI, Megalogic, ATS
AUDIO-/VIDEO RE-RECORDING
P- To 2nd page
OK
18
Call up
1/2
Help
TXT
TV
– At every step of operation, the dialog symbols show which buttons can be
used to carry out particular functions.
EASY DIALOG SYSTEM_____________________________________________________________
Operating the Easy Dialog System
P
OK
P
p, P
Move the yellow bar up/down.
With two-paged menus, the second page will be turned to.
F E
OK
Change settings.
Calls up or confirms selected functions.
TXT
Back to TV picture.
i
Acces to the Dialog Centre (with »i« and »OK«),
one page back.
D
Calls up brief instructions.
TV-GUIDE
TXT
AUX
ENGLISH
PIP
19
PROGRAMMING THE REMOTE CONTROL ___
You can use the TP 850 C remote control not only with the TV set, but also with a
video recorder, a satellite receiver and a DVD player.
The remote control is programmed in the factory for GRUNDIG appliances (and
those of the same construction).
The TP 850 C can “learn” the remote control commands from any infrared-controlled appliance (also from other companies). These remote control commands
are for the function levels for satellite receivers (SAT), video recorders (VCR) and
DVD players (DVD). For this, you need the other appliance’s remote control.
Note:
The TV function level is programmed only for GRUNDIG TV sets and cannot
be reprogrammed.
In exceptional cases, it could happen that the TP 850 C can not learn the
functions of an appliance made by an other company.
20
PROGRAMMING THE REMOTE CONTROL ___________________________
Programming function levels
1 Move the slide-switch to the function level (SAT, VCR, DVD) you want to
V=
SV
programme.
– The display of the selected function level lights up for about three seconds.
LP
000
DVD
VTR
2 Simultaneously press »AUX« and »3« until the display of the selected func-
5 cm
tion level lights continuously.
3 Point both remote controls at each other at a distance of about five centimeters.
1
2
3
4
5
6
TV
SAT
4 Press the button on the TP 850 C which is supposed to be programmed.
The display of the selected function level flashes once.
VCR
DVD
8
0
9
5 Press the function button which is supposed to be learned on the original
remote control until the display of the selected function level on the TP 850
flashes twice.
Note:
If the function could not be learned, all four displays on the TP 850 will flash
twice. In this case, repeat steps 3 to 5.
6 To finish the settings, simultaneously press »AUX« and »3«.
The display flashes twice.
ENGLISH
7
21
PROGRAMMING THE REMOTE CONTROL ___________________________
Reset
You can reset the remote control back to the settings it was given in the factory.
Resetting a function level
1 Move the slide-switch to the function level (SAT, VCR, DVD) which is supposed to be reset.
2 Simultaneously press »PIP« and »6« until the display of the selected function
level flashes twice.
Resetting all function levels (except TV)
1 Move the slide-switch to the TV function level.
2 Simultaneously press »PIP« and »6« until the displays of the function levels
»SAT«, »VCR«, »DVD« flash twice.
22
CUSTOMER INFORMATION __________________________________
Technical data
Power supply voltage:
220 – 240 V, 50/60 Hz (control range of the power supply unit 190 … 264 V)
Power consumption:
in operation, 135 W, in standby 5 W
Sound output stage:
2 x 20 Watt music (2 x 10 Watt sine)
Reception ranges:
ENGLISH
C01 … C99, special channels S01 … S41
23
CUSTOMER INFORMATION _____________________________________________________
Service information for the specialized dealer:
The TV set may be operated only using the mains cable set supplied.
It prevents mains interference and is an integral part of the appliance approval.
For replacement purposes, please order only the mains cable set with the
designation “GWN 9.22/part number 8290.991-316” from an approved
after-sales service.
The product meets the requirements of the following EU guidelines:
73/23/EEC guideline on electrical equipment for use with certain
voltage limits.
89/336/EEC guideline on electromagnetic compatibility.
The appliance complies with the standards:
EN 60065, EN 55013, EN 55020
24
CUSTOMER INFORMATION _____________________________________________________
Contact assignment for the EURO-AV socket
21 19
2
1
pin
11
12
13
14
15
16
17
18
19
10
11
12
13
14
15
16
17
18
19
20
21
=
=
=
=
=
=
=
=
=
=
=
=
=
=
=
=
=
=
=
=
=
signal
audio output right
audio input right
audio output left
audio ground
blue ground
audio input left
RGB blue input
switching voltage
green ground
data line (MEGALOGIC)
RGB green input
–
red ground
ground
RGB red input (S Video = Chroma)
RGB switching voltage
video ground
RGB switching voltage ground
video output
video input, (S Video = luminance)
shielding/ground
ENGLISH
20
If you want to connect an other appliance to the TV set (e.g. computer,
amplifier), your specialist dealer can establish a proper connection using the
following connection table:
25
CORRECTING PROBLEMS YOURSELF ____________
If the remedies below do not lead to a good result, contact an authorised GRUNDIG
dealer.
Please consider that problems can also be caused by external appliances, such as video
recorders and satellite receivers.
Problem
Possible cause
Remedy
no picture, no audio
no mains voltage
mains cable connected?
mains switch on?
TV set in standby
switch on with remote control
TV set is not on a
occupied AV channel position
switch to another
channel position
aerial cable
aerial cable connected?
check aerial system?
no TV channel programmed
start channel search
incorrect picture settings
change brightness, contrast, or
color settings
problem is with the broadcaster
test another channel
poor picture and/or sound
interference from other appliances
(household appliances, mobile
telephones etc.)
change the position of the
appliances
double image, reflection
channel setting
automatic or manual
channel setting/fine tuning
aerial
have aerial cable or device
checked
color intensity is on minimum
adjust color upward
TV standard setting
(if setting possibility is available)
select proper color standards
problem is with the broadcaster
test another channel
picture is bright (grainy or blue)
but no programme can be seen
picture contrast
no color
26
CORRECTING PROBLEMS YOURSELF ____________________________________
Problem
Possible cause
Remedy
colors wrong, color spots
strong magnetic field from
speakers (or other)
increase distance of speaker
to TV set
problem with terrestrial
magnetic field
change appliance position
volume at minimum or
speakers switched off
increase/switch on volume
volume regulation activated
via audio cinch socket
(if this possibility is available)
select sound output
via speaker
problem is with the broadcaster
test another channel
SAT mode
check AV cable between
TV set and receiver
sound unclear
sound setting
correct sound setting
poor or no Teletext
TV channel (has no Teletext)
or check aerial system
check with another channel,
possibly double image or
reflection or fine tuning
transmission signal too weak
(picture grainy)
check aerial system
no optical connection
point remote control at the TV set
remote control batteries
check or replace the batteries
pay attention to polarity
undefinable operating mode
switch off TV set with the main
power button for about 2 minutes
child lock is activated
enter secret number or number
combination 7038580.
picture is there, no sound
remote control does not work
After switching on,
“child lock” appears on the menu
ENGLISH
with permanent color spots,
switch off the TV set with the
mains switch and switch back
on after after 10 minutes
27
Grundig AG
•
Kurgartenstraße 37
•
D-90762 Fürth
•
http://www.grundig.de