1
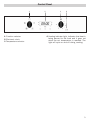
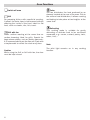
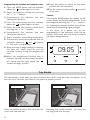
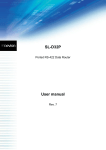
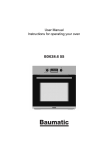
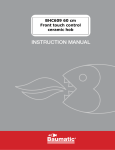
User Manual - Quick Start Quide
Instructions for operating your oven
BO616.6 SS
Note: Please refer to the Installation and Maintenance
manual which accompanies this user manual for important
instructions regarding the correct installation and
maintenance of your oven and important safety instructions.
Control Panel
1
1 Function selector.
2 Electronic clock.
3 Temperature selector.
2
3
4
4 Heating indicator light. Indicates that heat is
being passed to the food and it goes out
when the set temperature is reached. The
light will cycle on and off during cooking.
3
Oven Functions
Switch off oven
Grill
For preparing dishes with superficial roasting.
It allows the outer layer to be browned without
affecting the inside of the food. Ideal for flat
food, such as steaks, ribs, fish, toast.
Grill with fan
Allows uniform roasting at the same time as
surface browning. Ideal for grills. Special for
large volume pieces, such as poultry, game etc.
It is recommended to put the item on a rack with
a tray beneath to collect the stock and juices.
Caution
While using the Grill or Grill with fan, the door
must be kept closed.
4
Turbo
The fan distributes the heat produced by an
element located at the rear of the oven. Due to
the uniform heat distribution, it allows roasting
and baking to take place at two heights at the
same time.
Defrosting
This cooking mode is suitable for gently
defrosting of delicate food to be consumed
unwarmed, e.g.: cream, custard, pastry, tarts,
cakes, fruit,...
Note
The pilot light remains on in any cooking
function.
Use of the Oven
Setting the time on the clock
Programming the cooking time
On connecting the oven, you will notice that
12:00 appears on the clock and that a light
begins to flash above the
symbol. Pressing
the “+” and “-“ buttons the correct time can be
set on the clock, which is subsequently stored
and the flashing light goes out.
1 Press the MODE button until the indicator
above the
symbol begins to flash.
Manual use
After setting the correct time, the oven is ready
for use. Select a temperature and a cooking
function.
To switch off the oven, set the controls to the
position .
Functions of the Electronic Clock Programmer
Warning function: This function generates a
warning tone at a specified time.
Cooking time: This function allows to
programme the oven to cook for a specified
time, after which it will switch itself off.
End of cooking time: This function allows to
establish the exact hour, after which the oven
will switch itself off.
Duration and automatic stop: This function is
used to control the duration and the time at
which the oven will turn itself off. This function
allows the oven to start and stop
automatically.
Warning function
1 Press the MODE button until the signal
above the
symbol begins to flash.
2 Choose the time when you want the alarm to
sound, pressing the “+” or “-“ buttons.
3 Subsequently, the light will remain on
indicating that the alarm is programmed.
4 At the end of the programmed time, an
alarm will sound and the light will begin to
flash.
5 Press any button to turn off the alarm and
the screen shows the current time again.
2 Select the length of time, pressing the “+”
or “-“ buttons.
3 Subsequently, the indicator that was
flashing will light, indicating that the oven
will switch itself off automatically.
4 The clock will then show the current time.
5 Select a temperature and cooking function.
6 When the set time has elapsed, the oven
will disconnect, an alarm will sound and the
indicator will begin to flash.
7 Press any button to switch off the alarm,
reconnecting the oven.
8 Set the controls in the position to switch
off the oven.
Programming the end of cooking time for the oven
1 Press the MODE button until the indicator
above the
symbol begins to flash.
2 Select the time that cooking is to finish,
pressing the “+” or “-“ buttons.
3 Subsequently, the indicator that was
flashing is lit, indicating that the oven will
switch itself off automatically.
4 The clock will then show the current time.
5 Select a temperature and a cooking
function.
6 When the programmed time is reached, the
oven will disconnect, an alarm will sound
and the indicator will begin to flash.
7 Press any button to switch off the alarm and
the oven will reconnect.
8 Set the controls to the position
off the oven.
to switch
This function may be used even though you are
already cooking in your oven. To do so, follow
the instructions given except Nº 5.
5
Programming the duration and automatic stop
1 Press the MODE button until the indicator
above the
symbol begins to flash.
2 Select the length of cooking time pressing
the “+” or “-“ buttons.
3 Subsequently, the indicator that was
flashing will remain lit.
4 Press the mode button until the indicator
above the
symbol begins to flash.
5 Select the time that cooking should finish
pressing the “+” or “-“ buttons.
6 Subsequently, the indicator that was
flashing will remain lit.
7 Select a function and cooking temperature.
11 Press any button to switch off the alarm
and the oven will reconnect.
12 Set the controls to the position
of the oven.
to switch
Caution
Pressing the MODE button the display on the
screen shows any function programmed. It can
be changed by pressing the “+” or “-“ buttons.
On selecting the desired function, the indicator
above the corresponding signal will light.
In the event of a power cut, all the
programming of the electronic clock will be
erased. The correct time has to be reset and
the watch reprogrammed.
8 The oven will remain disconnected with the
indicators above the
and
symbols
lit. Your oven is programmed.
9 When the time to begin cooking is reached,
the oven will switch itself on and will
continue cooking during the programmed
time.
09:05
10 When the programmed finishing time is
reached, the oven will disconnect, an alarm
will sound and the light above the
symbol will begin to flash.
Tray Handle
The tray handle is used when you need to remove the tray to check the food. See figures. To lift
the tray out of the oven, you need to use gloves to protect yourself.
Short hook
Cake tray handle position. You must put the
short hook over the tray.
6
Long hook
Roasting tray handle position. You must put
the long hook over the tray.
BROCHURE
Manufacturer
Model
Energy
efficiency
class on a
scale of A
(more efficient)
to G (less
efficient).
BAUMATIC
BO616.6 SS
A
Heating
function.
Conventional.
Forced air
convection.
Energy
consumption.
—
Conventional.
Forced air
convection.
Usable volume
(litres).
0,79
Kwh
59
Size:
Small
Medium
Large
Time to cook
standard load.
Conventional.
—
Forced air
convection.
48 min.
Baking area.
1250 cm2
Noise (dB (A)
re 1 pW).
7
Sales Telephone
(0118) 933 6900
Sales Fax
(0118) 931 0035
Customer Care Telephone
(0118) 933 6911
Customer Care Fax
(0118) 986 9124
Spares Telephone
(01235) 437244
Advice Line Telephone
(0118) 933 6933
E-mail:
[email protected]
[email protected]
[email protected]
[email protected]
Website:
www.baumatic.co.uk
Facebook:
www.facebook.com/baumatic.uk
Czech Republic/Slovakia
Baumatic s.r.o.
Lípová 665/1
460 01 Liberec 4
Czech Republic
Panenská 34
811 03 Bratislava - Staré Mesto
Slovakia
+420 483 577 200 (CZ)
+421 255 640 618 (SK)
www.baumatic.cz
www.baumatic.sk
Germany
Kundendienst & Ersatzteile
Deutschland 0049 (0) 180-5888975
Oesterreich +43 (0) 820/420423
www.baumatic.de
Italy
Baumatic Italia S.R.L.
Via Galvani N.3
35011 Campodarsego (PD)
+3904 9920 2297
www.baumatic.it
Service Telephone
1-890 812 724
Holland
Baumatic Benelux B.V.
Dukdalfweg 15d
1332 BH ALMERE
Nederland
Spares Telephone
091 756 771
+31 (0) 36 549 1553/1555
www.baumatic.n
Republic of Ireland
Our contribution to enviromental protection: we use recycled paper.
Cod.: 3172697-001
United Kingdom
Baumatic Ltd.,
Baumatic Buildings,
6 Bennet Road,
Reading, Berkshire
RG2 0QX
United Kingdom