1
Galera Documentation
Release 3.x
Codership Oy
CONTENTS
I
Technical Description
3
1
Replication
1.1 Database Replication . . . . . . . . . . . . . . . . . . . . . . . . . . . . . . . . . . . . . . . . . . .
1.2 Certification-based Replication . . . . . . . . . . . . . . . . . . . . . . . . . . . . . . . . . . . . .
7
7
9
2
Architecture
2.1 Replication API . . . . . . . . . . . . . . . . . . . . . . . . . . . . . . . . . . . . . . . . . . . . .
2.2 Isolation Levels . . . . . . . . . . . . . . . . . . . . . . . . . . . . . . . . . . . . . . . . . . . . . .
2.3 State Transfers . . . . . . . . . . . . . . . . . . . . . . . . . . . . . . . . . . . . . . . . . . . . . .
13
13
15
16
3
Management
3.1 Flow Control . . . . . . . . . . . . . . . . . . . . . . . . . . . . . . . . . . . . . . . . . . . . . . .
3.2 Node Failure and Recovery . . . . . . . . . . . . . . . . . . . . . . . . . . . . . . . . . . . . . . .
3.3 Weighted Quorum . . . . . . . . . . . . . . . . . . . . . . . . . . . . . . . . . . . . . . . . . . . .
19
19
21
23
II
Getting Started
29
4
Node Initialization
4.1 Installation . . . . . . . . . . . . . . . . . . . . . . . . . . . . . . . . . . . . . . . . . . . . . . . .
4.2 System Configuration . . . . . . . . . . . . . . . . . . . . . . . . . . . . . . . . . . . . . . . . . .
4.3 Replication Configuration . . . . . . . . . . . . . . . . . . . . . . . . . . . . . . . . . . . . . . . .
33
33
49
52
5
Cluster Initialization
5.1 Starting the Cluster . . . . . . . . . . . . . . . . . . . . . . . . . . . . . . . . . . . . . . . . . . . .
5.2 Testing the Cluster . . . . . . . . . . . . . . . . . . . . . . . . . . . . . . . . . . . . . . . . . . . .
5.3 Restarting the Cluster . . . . . . . . . . . . . . . . . . . . . . . . . . . . . . . . . . . . . . . . . .
55
55
57
58
III
6
Using Galera Cluster
Working with the Cluster
6.1 Node Provisioning . . . . . . . . .
6.2 State Snapshot Transfers . . . . . .
6.3 Recovering the Primary Component
6.4 Resetting the Quorum . . . . . . .
6.5 Managing Flow Control . . . . . .
6.6 Auto Eviction . . . . . . . . . . . .
6.7 Schema Upgrades . . . . . . . . .
6.8 Upgrading Galera Cluster . . . . .
6.9 Scriptable State Snapshot Transfers
61
.
.
.
.
.
.
.
.
.
.
.
.
.
.
.
.
.
.
.
.
.
.
.
.
.
.
.
.
.
.
.
.
.
.
.
.
.
.
.
.
.
.
.
.
.
.
.
.
.
.
.
.
.
.
.
.
.
.
.
.
.
.
.
.
.
.
.
.
.
.
.
.
.
.
.
.
.
.
.
.
.
.
.
.
.
.
.
.
.
.
.
.
.
.
.
.
.
.
.
.
.
.
.
.
.
.
.
.
.
.
.
.
.
.
.
.
.
.
.
.
.
.
.
.
.
.
.
.
.
.
.
.
.
.
.
.
.
.
.
.
.
.
.
.
.
.
.
.
.
.
.
.
.
.
.
.
.
.
.
.
.
.
.
.
.
.
.
.
.
.
.
.
.
.
.
.
.
.
.
.
.
.
.
.
.
.
.
.
.
.
.
.
.
.
.
.
.
.
.
.
.
.
.
.
.
.
.
.
.
.
.
.
.
.
.
.
.
.
.
.
.
.
.
.
.
.
.
.
.
.
.
.
.
.
.
.
.
.
.
.
.
.
.
.
.
.
.
.
.
.
.
.
.
.
.
.
.
.
.
.
.
.
.
.
.
.
.
.
.
.
.
.
.
.
.
.
.
.
.
.
.
.
.
.
.
.
.
.
.
.
.
.
.
.
.
.
.
.
.
.
.
.
.
.
.
.
.
.
.
.
.
.
.
.
.
65
65
66
70
72
74
76
79
80
83
i
6.10 Galera Arbitrator . . . . . . . . . . . . . . . . . . . . . . . . . . . . . . . . . . . . . . . . . . . . .
6.11 Backing Up Cluster Data . . . . . . . . . . . . . . . . . . . . . . . . . . . . . . . . . . . . . . . . .
86
89
7
Deployment
7.1 Cluster Deployment Variants . . . . . . . . . . . . . . . . . . . . . . . . . . . . . . . . . . . . . . .
7.2 Load Balancing . . . . . . . . . . . . . . . . . . . . . . . . . . . . . . . . . . . . . . . . . . . . . .
7.3 Container Deployments . . . . . . . . . . . . . . . . . . . . . . . . . . . . . . . . . . . . . . . . .
91
91
95
98
8
Monitor
107
8.1 Monitoring Cluster Status . . . . . . . . . . . . . . . . . . . . . . . . . . . . . . . . . . . . . . . . 107
8.2 Database Server Logs . . . . . . . . . . . . . . . . . . . . . . . . . . . . . . . . . . . . . . . . . . 111
8.3 Notification Command . . . . . . . . . . . . . . . . . . . . . . . . . . . . . . . . . . . . . . . . . . 112
9
Security
117
9.1 Firewall Settings . . . . . . . . . . . . . . . . . . . . . . . . . . . . . . . . . . . . . . . . . . . . . 117
9.2 SSL Settings . . . . . . . . . . . . . . . . . . . . . . . . . . . . . . . . . . . . . . . . . . . . . . . 120
9.3 SELinux Configuration . . . . . . . . . . . . . . . . . . . . . . . . . . . . . . . . . . . . . . . . . . 127
10 Migration
131
10.1 Differences from a Standalone MySQL Server . . . . . . . . . . . . . . . . . . . . . . . . . . . . . 131
10.2 Migrating to Galera Cluster . . . . . . . . . . . . . . . . . . . . . . . . . . . . . . . . . . . . . . . 133
IV
Support
11 Troubleshooting
11.1 Frequently Asked Questions . . . . .
11.2 Server Error Log . . . . . . . . . . .
11.3 Unknown Command Errors . . . . .
11.4 User Changes not Replicating . . . .
11.5 Cluster Stalls on ALTER . . . . . . .
11.6 Detecting a Slow Node . . . . . . . .
11.7 Dealing with Multi-Master Conflicts .
11.8 Two-Node Clusters . . . . . . . . . .
137
.
.
.
.
.
.
.
.
.
.
.
.
.
.
.
.
.
.
.
.
.
.
.
.
.
.
.
.
.
.
.
.
.
.
.
.
.
.
.
.
.
.
.
.
.
.
.
.
.
.
.
.
.
.
.
.
.
.
.
.
.
.
.
.
.
.
.
.
.
.
.
.
.
.
.
.
.
.
.
.
.
.
.
.
.
.
.
.
.
.
.
.
.
.
.
.
.
.
.
.
.
.
.
.
.
.
.
.
.
.
.
.
.
.
.
.
.
.
.
.
.
.
.
.
.
.
.
.
.
.
.
.
.
.
.
.
.
.
.
.
.
.
.
.
.
.
.
.
.
.
.
.
.
.
.
.
.
.
.
.
.
.
.
.
.
.
.
.
.
.
.
.
.
.
.
.
.
.
.
.
.
.
.
.
.
.
.
.
.
.
.
.
.
.
.
.
.
.
.
.
.
.
.
.
.
.
.
.
.
.
.
.
.
.
.
.
.
.
.
.
.
.
.
.
.
.
.
.
.
.
.
.
.
.
.
.
.
.
.
.
.
.
.
.
.
.
.
.
.
.
.
.
.
.
.
.
.
.
.
.
.
.
.
.
.
.
.
.
.
.
.
.
139
139
141
142
143
145
145
146
148
12 Tutorials
151
12.1 Performance . . . . . . . . . . . . . . . . . . . . . . . . . . . . . . . . . . . . . . . . . . . . . . . 151
12.2 Configuration Tips . . . . . . . . . . . . . . . . . . . . . . . . . . . . . . . . . . . . . . . . . . . . 153
V
Reference
157
13 Galera Parameters
159
13.1 Setting Galera Parameters in MySQL . . . . . . . . . . . . . . . . . . . . . . . . . . . . . . . . . . 177
14 MySQL wsrep Options
179
15 Galera Status Variables
201
16 Galera Load Balancer Parameters
219
16.1 Configuration Parameters . . . . . . . . . . . . . . . . . . . . . . . . . . . . . . . . . . . . . . . . 219
16.2 Configuration Options . . . . . . . . . . . . . . . . . . . . . . . . . . . . . . . . . . . . . . . . . . 221
17 Miscellaneous Reference
229
17.1 Glossary . . . . . . . . . . . . . . . . . . . . . . . . . . . . . . . . . . . . . . . . . . . . . . . . . 229
17.2 Versioning Information . . . . . . . . . . . . . . . . . . . . . . . . . . . . . . . . . . . . . . . . . . 231
ii
17.3 Legal Notice . . . . . . . . . . . . . . . . . . . . . . . . . . . . . . . . . . . . . . . . . . . . . . . 232
Index
233
iii
iv
Galera Documentation, Release 3.x
Galera Cluster is a synchronous multi-master database cluster, based on synchronous replication and Oracle’s
MySQL/InnoDB. When Galera Cluster is in use, you can direct reads and writes to any node, and you can lose
any individual node without interruption in operations and without the need to handle complex failover procedures.
At a high level, Galera Cluster consists of a database server—that is, MySQL, MariaDB or Percona XtraDB—that then
uses the Galera Replication Plugin to manage replication. To be more specific, the MySQL replication plugin API has
been extended to provide all the information and hooks required for true multi-master, synchronous replication. This
extended API is called the Write-Set Replication API, or wsrep API.
Through the wsrep API, Galera Cluster provides certification-based replication. A transaction for replication, the
write-set, not only contains the database rows to replicate, but also includes information on all the locks that were
held by the database during the transaction. Each node then certifies the replicated write-set against other write-sets
in the applier queue. The write-set is then applied, if there are no conflicting locks. At this point, the transaction is
considered committed, after which each node continues to apply it to the tablespace.
This approach is also called virtually synchronous replication, given that while it is logically synchronous, the actual
writing and committing to the tablespace happens independently, and thus asynchronously on each node.
Benefits of Galera Cluster
Galera Cluster provides a significant improvement in high-availability for the MySQL ecosystem. The various ways to
achieve high-availability have typically provided only some of the features available through Galera Cluster, making
the choice of a high-availability solution an exercise in tradeoffs.
The following features are available through Galera Cluster:
• True Multi-master Read and write to any node at any time.
• Synchronous Replication No slave lag, no data is lost at node crash.
• Tightly Coupled All nodes hold the same state. No diverged data between nodes allowed.
• Multi-threaded Slave For better performance. For any workload.
• No Master-Slave Failover Operations or Use of VIP.
• Hot Standby No downtime during failover (since there is no failover).
• Automatic Node Provisioning No need to manually back up the database and copy it to the new node.
• Supports InnoDB.
• Transparent to Applications Required no (or minimal) changes) to the application.
• No Read and Write Splitting Needed.
The result is a high-availability solution that is both robust in terms of data integrity and high-performance with instant
failovers.
Cloud Implementations with Galera Cluster
An additional benefit of Galera Cluster is good cloud support. Automatic node provisioning makes elastic scale-out
and scale-in operations painless. Galera Cluster has been proven to perform extremely well in the cloud, such as when
using multiple small node instances, across multiple data centers—AWS zones, for example—or even over Wider
Area Networks.
CONTENTS
1
Galera Documentation, Release 3.x
2
CONTENTS
Part I
Technical Description
3
Galera Documentation, Release 3.x
To understand how Galera Cluster works you first need to understand database replication, both what it is and how it
works. That understanding in turn provides contexts for understanding what Galera does and why.
5
Galera Documentation, Release 3.x
6
CHAPTER
ONE
REPLICATION
Replication refers to the frequent copying of data from one server to another, distributing the content so that all the
servers in the cluster share the same level of information.
1.1 Database Replication
Database replication refers to the frequent copying of data from one node—a database on a server—into another.
Think of a database replication system as a distributed database, where all nodes share the same level of information.
This system is also known as a database cluster.
The database clients, such as web browsers or computer applications, do not see the database replication system, but
they benefit from close to native DBMS (Database Management System) behavior.
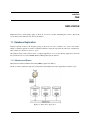
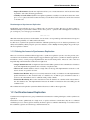
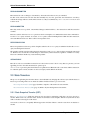
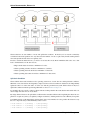
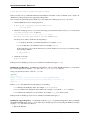
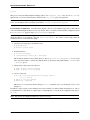
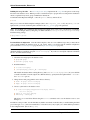
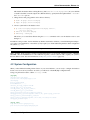
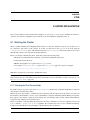
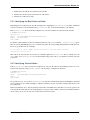
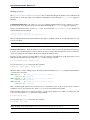
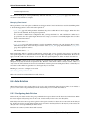
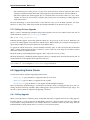
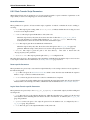
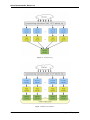
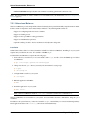
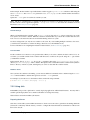
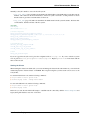
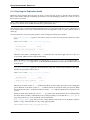
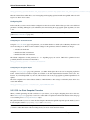
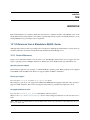
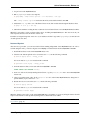
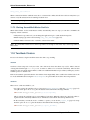
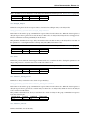
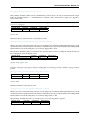
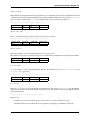
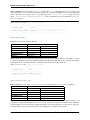
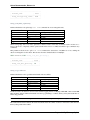
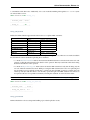
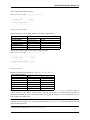
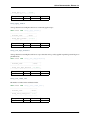
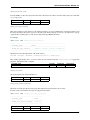
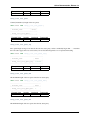
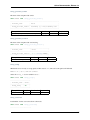
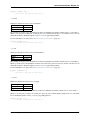
1.1.1 Masters and Slaves
Many DATABASE M ANAGEMENT S YSTEMS (DBMS) replicate the database.
The most common replication setup uses a master/slave relationship between the original data set and the copies.
Figure 1.1: Master/Slave Replication
7
Galera Documentation, Release 3.x
In this system, the master database server logs the updates to the data and propagates those logs through the network
to the slaves. The slave database servers receive a stream of updates from the master and apply those changes.
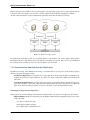
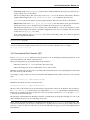
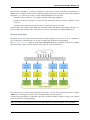
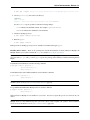
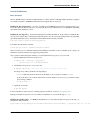
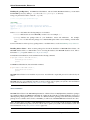
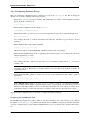
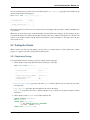
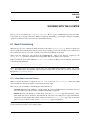
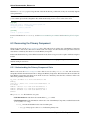
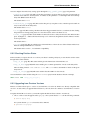
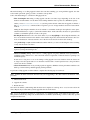
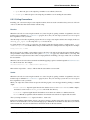
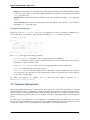
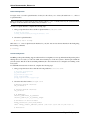
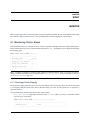
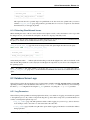
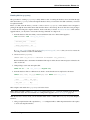
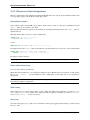
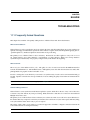
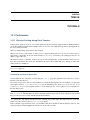
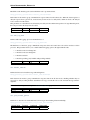
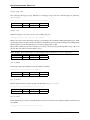
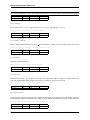
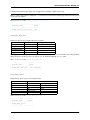
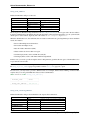
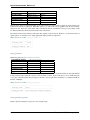
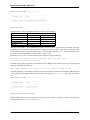
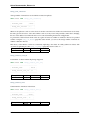
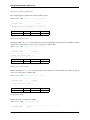
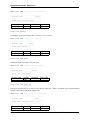
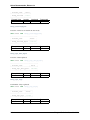
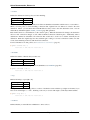
Another common replication setup uses mult-master replication, where all nodes function as masters.
Figure 1.2: Multi-master Replication
In a multi-master replication system, you can submit updates to any database node. These updates then propagate
through the network to other database nodes. All database nodes function as masters. There are no logs available and
the system provides no indicators sent to tell you if the updates were successful.
1.1.2 Asynchronous and Synchronous Replication
In addition to the setup of how different nodes relate to one another, there is also the protocol for how they propagate
database transactions through the cluster.
• Synchronous Replication Uses the approach of eager replication. Nodes keep all replicas synchronized by
updating all replicas in a single transaction. In other words, when a transaction commits, all nodes have the
same value.
• Asynchronous Replication Uses the approach of lazy replication. The master database asynchronously propagates replica updates to other nodes. After the master node propagates the replica, the transaction commits. In
other words, when a transaction commits, for at least a short time, some nodes hold different values.
Advantages of Synchronous Replication
In theory, there are several advantages that synchronous replication has over asynchronous replication. For instance:
• High Availability Synchronous replication provides highly available clusters and guarantees 24/7 service availability, given that:
– No data loss when nodes crash.
– Data replicas remain consistent.
– No complex, time-consuming failovers.
8
Chapter 1. Replication
Galera Documentation, Release 3.x
• Improved Performance Synchronous replications allows you to execute transactions on all nodes in the cluster
in parallel to each other, increasing performance.
• Causality across the Cluster Synchronous replication guarantees causality across the whole cluster. For example, a SELECT query issued after a transaction always sees the effects of the transaction, even if it were executed
on another node.
Disadvantages of Synchronous Replication
Traditionally, eager replication protocols coordinate nodes one operation at a time. They use a two phase commit, or
distributed locking. A system with 𝑛 number of nodes due to process 𝑜 operations with a throughput of 𝑡 transactions
per second gives you 𝑚 messages per second with:
𝑚=𝑛×𝑜×𝑡
What this means that any increase in the number of nodes leads to an exponential growth in the transaction response
times and in the probability of conflicts and deadlock rates.
For this reason, asynchronous replication remains the dominant replication protocol for database performance, scalability and availability. Widely adopted open source databases, such as MySQL and PostgreSQL only provide asynchronous replication solutions.
1.1.3 Solving the Issues in Synchronous Replication
There are several issues with the traditional approach to synchronous replication systems. Over the past few years,
researchers from around the world have begun to suggest alternative approaches to synchronous database replication.
In addition to theory, several prototype implementations have shown much promise. These are some of the most
important improvements that these studies have brought about:
• Group Communication This is a high-level abstraction that defines patterns for the communication of database
nodes. The implementation guarantees the consistency of replication data.
• Write-sets This bundles database writes in a single write-set message. The implementation avoids the coordination of nodes one operation at a time.
• Database State Machine This processes read-only transactions locally on a database site. The implementation
updates transactions are first executed locally on a database site, on shallow copies, and then broadcast as a
read-set to the other database sites for certification and possibly commits.
• Transaction Reordering This reorders transactions before the database site commits and broadcasts them to
the other database sites. The implementation increases the number of transactions that successfully pass the
certification test.
The certification-based replication system that Galera Cluster uses is built on these approaches.
1.2 Certification-based Replication
Certification-based replication uses group communication and transaction ordering techniques to achieve synchronous
replication.
Transactions execute optimistically in a single node, or replica, and then at commit time, they run a coordinated
certification process to enforce global consistency. It achieves global coordination with the help of a broadcast service
that establishes a global total order among concurrent transactions.
1.2. Certification-based Replication
9
Galera Documentation, Release 3.x
1.2.1 What Certification-based Replication Requires
It is not possible to implement certification-based replication for all database systems. It requires certain features of
the database in order to work.
• Transactional Database It requires that the database is transactional. Specifically, that the database can rollback
uncommitted changes.
• Atomic Changes It requires that replication events change the database atomically. Specifically, that the series
of database operations must either all occur, else nothing occurs.
• Global Ordering It requires that replication events are ordered globally. Specifically, that they are applied on
all instances in the same order.
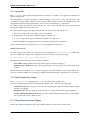
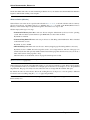
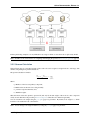
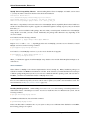
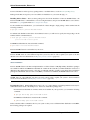
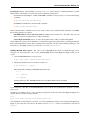
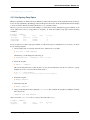
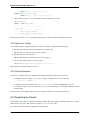
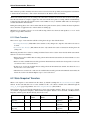
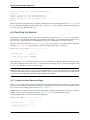
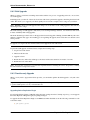
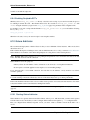
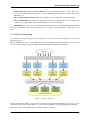
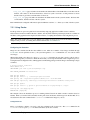
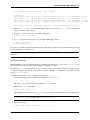
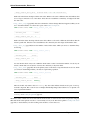
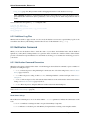
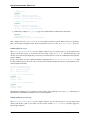
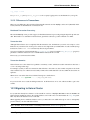
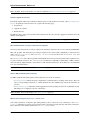
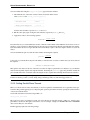
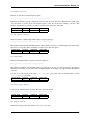
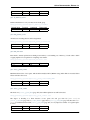
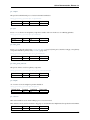
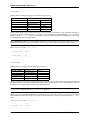
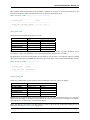
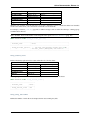
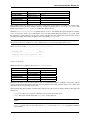
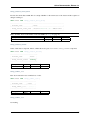
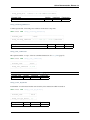
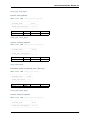
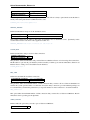
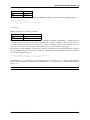
1.2.2 How Certification-based Replication Works
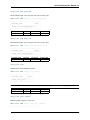
The main idea in certification-based replication is that a transaction executes conventionally until it reaches the commit
point, assuming there is no conflict. This is called optimistic execution.
Figure 1.3: Certification Based Replication
When the client issues a COMMIT command, but before the actual commit occurs, all changes made to the database
by the transaction and primary keys of the changed rows are collected into a write-set. The database then sends this
write-set to all the other nodes.
The write-set then undergoes a deterministic certification test, using the primary keys. This is done on each node in the
cluster, including the node that originates the write-set. It determines whether or not the node can apply the write-set.
If the certification test fails, the node drops the write-set and the cluster rolls back the original transaction. If the test
succeeds, the transaction commits and the write-set is applied to the rest of the cluster.
10
Chapter 1. Replication
Galera Documentation, Release 3.x
1.2.3 Certification-based Replication in Galera Cluster
The implementation of certification-based replication in Galera Cluster depends on the global ordering of transactions.
Galera Cluster assigns each transaction a global ordinal sequence number, or seqno, during replication. When a transaction reaches the commit point, the node checks the sequence number against that of the last successful transaction.
The interval between the two is the area of concern, given that transactions that occur within this interval have not seen
the effects of each other. All transactions in this interval are checked for primary key conflicts with the transaction in
question. The certification test fails if it detects a conflict.
The procedure is deterministic and all replica receive transactions in the same order. Thus, all nodes reach the same decision about the outcome of the transaction. The node that started the transaction can then notify the client application
whether or not it has committed the transaction.
1.2. Certification-based Replication
11
Galera Documentation, Release 3.x
12
Chapter 1. Replication
CHAPTER
TWO
ARCHITECTURE
How does Galera Cluster actually work? Galera uses eager replication, where the nodes keep all other nodes in sync
by updating all replicas in a single transaction. When a transaction commits, all nodes have the same value through
write-set replication over group communication.
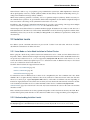
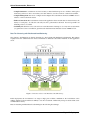
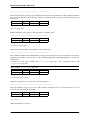
2.1 Replication API
Synchronous replication systems use eager replication. Nodes in the cluster synchronize with all other nodes by
updating the replicas through a single transaction. Meaning that, when a transaction commits, all nodes have the same
value. This process takes place using write-set replication through group communication.
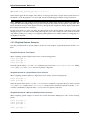
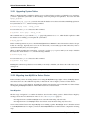
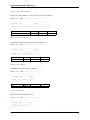
Figure 2.1: Replication API
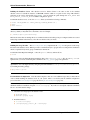
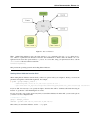
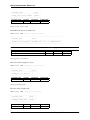
The internal architecture of Galera Cluster revolves around four components:
• Database Management System (DBMS) The database server that runs on the individual node. Galera Cluster
can use MySQL, MariaDB or Percona XtraDB.
• wsrep API The interface and the responsibilities for the database server and replication provider. It consists of:
• wsrep hooks The integration with the database server engine for write-set replication.
• dlopen() The function that makes the wsrep provider available to the wsrep hooks.
• Galera Replication Plugin The plugin that enables write-set replication service functionality.
• Group Communication plugins The various group communication systems available to Galera Cluster. For
instance, gcomm and Spread.
13
Galera Documentation, Release 3.x
2.1.1 wsrep API
The wsrep API is a generic replication plugin interface for databases. It defines a set of application callbacks and
replication plugin calls.
The wsrep API uses a replication model that considers the database server to have a state. The state refers to the
contents of the database. When a database is in use, clients modify the database content, thus changing its state. The
wsrep API represents the changes in the database state as a series of atomic changes, or transactions.
In a database cluster, all nodes always have the same state. They synchronize with each other by replicating and
applying state changes in the same serial order.
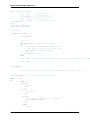
From a more technical perspective, Galera Cluster handles state changes in the following process:
1. On one node in the cluster, a state change occurs on the database.
2. In the database, the wsrep hooks translate the changes to the write-set.
3. dlopen() makes the wsrep provider functions available to the wsrep hooks.
4. The Galera Replication plugin handles write-set certification and replication to the cluster.
For each node in the cluster, the application process occurs by high-priority transaction(s).
Global Transaction ID
In order to keep the state identical across the cluster, the wsrep API uses a Global Transaction ID, or GTID. This
allows it to identify state changes and to identify the current state in relation to the last state change.
45eec521-2f34-11e0-0800-2a36050b826b:94530586304
The Global Transaction ID consists of the following components:
• State UUID A unique identifier for the state and the sequence of changes it undergoes.
• Ordinal Sequence Number The seqno, a 64-bit signed integer used to denote the position of the change in the
sequence.
The Global Transaction ID allows you to compare the application state and establish the order of state changes. You
can use it to determine whether or not a change was applied and whether the change is applicable at all to a given state.
2.1.2 Galera Replication Plugin
The Galera Replication Plugin implements the wsrep API. It operates as the wsrep Provider.
From a more technical perspective, the Galera Replication Plugin consists of the following components:
• Certification Layer This layer prepares the write-sets and performs the certification checks on them, ensuring
that they can be applied.
• Replication Layer This layer manages the replication protocol and provides the total ordering capability.
• Group Communication Framework This layer provides a plugin architecture for the various group communication systems that connect to Galera Cluster.
2.1.3 Group Communication Plugins
The Group Communication Framework provides a plugin architecture for the various gcomm systems.
14
Chapter 2. Architecture
Galera Documentation, Release 3.x
Galera Cluster is built on top of a proprietary group communication system layer, which implements a virtual synchrony Q O S (Quality of Service). Virtual synchrony unifies the data delivery and cluster membership services, providing clear formalism for message delivery semantics.
While virtual synchrony guarantees consistency, it does not guarantee temporal synchrony, which is necessary for
smooth multi-master operations. To get around this, Galera Cluster implements its own runtime-configurable temporal
flow control. Flow control keeps nodes synchronized to the faction of a second.
In addition to this, the Group Communication Framework also provides a total ordering of messages from multiple
sources. It uses this to generate Global Transaction ID‘s in a multi-master cluster.
At the transport level, Galera Cluster is a symmetric undirected graph. All database nodes connect to each other over a
TCP (Transmission Control Protocl) connection. By default TCP is used for both message replication and the cluster
membership services, but you can also use UDP (User Datagram Protocol) multicast for replication in a LAN (Local
Area Network).
2.2 Isolation Levels
In a database system, concurrent transactions are processed in “isolation” from each other. The level of isolation
determines how transactions can affect each other.
2.2.1 Intra-Node vs. Inter-Node Isolation in Galera Cluster
Before going into details about possible isolation levels which can be set for a client session in Galera Cluster it is
important to make a distinction between single node and global cluster transaction isolation. Individual cluster nodes
can provide any isolation level to the extent it is supported by MySQL/InnoDB. However isolation level between the
nodes in the cluster is affected by replication protocol, so transactions issued on different nodes may not be isolated
identically to transactions issued on the same node.
Overall isolation levels that are supported cluster-wide are
• READ-UNCOMMITTED (page 16)
• READ-COMMITTED (page 16)
• REPEATABLE-READ (page 16)
For transactions issued on different nodes, isolation is also strengthened by the “first committer wins” rule, which
eliminates the “lost update anomaly” inherent to these levels, whereas for transactions issued on the same node this
rule does not hold (as per original MySQL/InnoDB behavior). This makes for different outcomes depending on
transaction origin (transaction issued on the same node may succeed, whereas the same transaction issued on another
node would fail), but in either case it is no weaker than that isolation level on a standalone MySQL/InnoDB.
SERIALIZABLE (page 16) isolation level is honored only between transactions issued on the same node and thus
should be avoided.
Data consistency between the nodes is always guaranteed regardless of the isolation level chosen by the client. However the client logic may break if it relies on an isolation level which is not not supported in the given configuration.
2.2.2 Understanding Isolation Levels
Note: Warning: When using Galera Cluster in master-slave mode, all four levels are available to you, to the extend
that MySQL supports it. In multi-master mode, however, you can only use the REPEATABLE-READ level.
2.2. Isolation Levels
15
Galera Documentation, Release 3.x
READ-UNCOMMITTED
Here transactions can see changes to data made by other transactions that are not yet committed.
In other words, transactions can read data that eventually may not exist, given that other transactions can always
rollback the changes without commit. This is known as a dirty read. Effectively, READ-UNCOMMITTED has no real
isolation at all.
READ-COMMITTED
Here dirty reads are not possible. Uncommitted changes remain invisible to other transactions until the transaction
commits.
However, at this isolation level SELECT queries use their own snapshots of committed data, that is data committed before the SELECT query executed. As a result, SELECT queries, when run multiple times within the same transaction,
can return different result sets. This is called a non-repeatable read.
REPEATABLE-READ
Here non-repeatable reads are not possible. Snapshots taken for the SELECT query are taken the first time the SELECT
query runs during the transaction.
The snapshot remains in use throughout the entire transaction for the SELECT query. It always returns the same result
set. This level does not take into account changes to data made by other transactions, regardless of whether or not they
have been committed. IN this way, reads remain repeatable.
SERIALIZABLE
Here all records accessed within a transaction are locked. The resource locks in a way that also prevents you from
appending records to the table the transaction operates upon.
SERIALIZABLE prevents a phenomenon known as a phantom read. Phantom reads occur when, within a transaction,
two identical queries execute, and the rows the second query returns differ from the first.
2.3 State Transfers
The process of replicating data from the cluster to the individual node, bringing the node into sync with the cluster, is
known as provisioning. There are two methods available in Galera Cluster to provision nodes:
• State Snapshot Transfers (SST) (page 16) Where a snapshot of the entire node state transfers.
• Incremental State Transfers (IST) (page 17) Where only the missing transactions transfer.
2.3.1 State Snapshot Transfer (SST)
In a State Snapshot Transfer (SST), the cluster provisions nodes by transferring a full data copy from one node to
another. When a new node joins the cluster, the new node initiates a State Snapshot Transfer to synchronize its data
with a node that is already part of the cluster.
You can choose from two conceptually different approaches in Galera Cluster to transfer a state from one database to
another:
16
Chapter 2. Architecture
Galera Documentation, Release 3.x
• Logical This method uses mysqldump. It requires that you fully initialize the receiving server and ready it to
accept connections before the transfer.
This is a blocking method. The donor node becomes READ-ONLY for the duration of the transfer. The State
Snapshot Transfer applies the FLUSH TABLES WITH READ LOCK command on the donor node.
mysqldump is the slowest method for State Snapshot Transfers. This can be an issue in a loaded cluster.
• Physical This method uses rsync, rsync_wan, xtrabackup and other methods and copies the data files
directly from server to server. It requires that you initialize the receiving server after the transfer.
This method is faster than mysqldump, but they have certain limitations. You can only use them on server
startup. The receiving server requires very similar configurations to the donor, (for example, both servers must
use the same innodb_file_per_table value).
Some of these methods, such as xtrabackup can be made non-blocking on the donor. They are supported
through a scriptable SST interface.
Note: See Also: For more information on the particular methods available for State Snapshot Transfers, see the State
Snapshot Transfers (page 66).
You can set which State Snapshot Transfer method a node uses from the confirmation file. For example:
wsrep_sst_method=rsync_wan
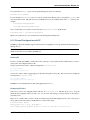
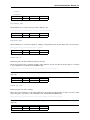
2.3.2 Incremental State Transfer (IST)
In an Incremental State Transfer (IST), the cluster provisions a node by identifying the missing transactions on the
joiner and sends them only, instead of the entire state.
This provisioning method is only available under certain conditions:
• Where the joiner node state UUID is the same as that of the group.
• Where all missing write-sets are available in the donor’s write-set cache.
When these conditions are met, the donor node transfers the missing transactions alone, replaying them in order until
the joiner catches up with the cluster.
For example, say that you have a node in your cluster that falls behind the cluster. This node carries a node state that
reads:
5a76ef62-30ec-11e1-0800-dba504cf2aab:197222
Meanwhile, the current node state on the cluster reads:
5a76ef62-30ec-11e1-0800-dba504cf2aab:201913
The donor node on the cluster receives the state transfer request from the joiner node. It checks its write-set cache for
the sequence number 197223. If that seqno is not available in the write-set cache, a State Snapshot Transfer initiates.
If that seqno is available in the write-set cache, the donor node sends the commits from 197223 through to 201913
to the joiner, instead of the full state.
The advantage of Incremental State Transfers is that they can dramatically speed up the reemerging of a node to the
cluster. Additionally, the process is non-blocking on the donor.
Note: The most important parameter for Incremental State Transfers is gcache.size on the donor node. This
controls how much space you allocate in system memory for caching write-sets. The more space available the more
write-sets you can store. The more write-sets you can store the wider the seqno gaps you can close through Incremental
State Transfers.
2.3. State Transfers
17
Galera Documentation, Release 3.x
On the other hand, if the write-set cache is much larger than the size of your database state, Incremental State Transfers
begun less efficient than sending a state snapshot.
Write-set Cache (GCache)
Galera Cluster stores write-sets in a special cache called the Write-set Cache, or GCache. GCache cache is a memory
allocator for write-sets. Its primary purpose is to minimize the write-set footprint on the RAM (Random Access
Memory). Galera Cluster improves upon this through the offload write-set storage to disk.
GCache employs three types of storage:
• Permanent In-Memory Store Here write-sets allocate using the default memory allocator for the operating
system. This is useful in systems that have spare RAM. The store has a hard size limit.
By default it is disabled.
• Permanent Ring-Buffer File Here write-sets pre-allocate to disk during cache initialization. This is intended
as the main write-set store.
By default, its size is 128Mb.
• On-Demand Page Store Here write-sets allocate to memory-mapped page files during runtime as necessary.
By default, its size is 128Mb, but can be larger if it needs to store a larger write-set. The size of the page store
is limited by the free disk space. By default, Galera Cluster deletes page files when not in use, but you can set a
limit on the total size of the page files to keep.
When all other stores are disabled, at least one page file remains present on disk.
Note: See Also: For more information on parameters that control write-set caching, see the gcache.* parameters
on Galera Parameters (page 159).
Galera Cluster uses an allocation algorithm that attempts to store write-sets in the above order. That is, first it attempts
to use permanent in-memory store. If there is not enough space for the write-set, it attempts to store to the permanent
ring-buffer file. The page store always succeeds, unless the write-set is larger than the available disk space.
By default, the write-set cache allocates files in the working directory of the process. You can specify a dedicated
location for write-set caching, using the gcache.dir (page 167) parameter.
Note: Given that all cache files are memory-mapped, the write-set caching process may appear to use more memory
than it actually does.
18
Chapter 2. Architecture
CHAPTER
THREE
MANAGEMENT
How does Galera Cluster maintain its state across many nodes?
3.1 Flow Control
Galera Cluster manages the replication process using a feedback mechanism, called Flow Control. Flow Control
allows a node to pause and resume replication according to its needs. This prevents any node from lagging too far
behind the others in applying transactions.
3.1.1 How Flow Control Works
Galera Cluster achieves synchronous replication by ensuring that transactions copy to all nodes an execute according
to a cluster-wide ordering. That said, the transaction applies and commits occur asynchronously as they replicate
through the cluster.
Nodes receive write-sets and organize them into the global ordering. Transactions that the node receives from the
cluster but which it has not applied and committed, are kept in the received queue.
When the received queue reaches a certain size the node triggers Flow Control. The node pauses replication, then
works through the received queue. When it reduces the received queue to a more manageable size, the node resumes
replication.
3.1.2 Understanding Node States
Galera Cluster implements several forms of Flow Control, depending on the node state. This ensures temporal synchrony and consistency—as opposed to logical, which virtual synchrony provides.
There are four primary kinds of Flow Control:
• No Flow Control (page 19)
• Write-set Caching (page 20)
• Catching Up (page 20)
• Cluster Sync (page 20)
No Flow Control
This Flow Control takes effect when nodes are in the OPEN or PRIMARY states.
19
Galera Documentation, Release 3.x
When nodes hold these states, they are not considered part of the cluster. These nodes are not allowed to replicate,
apply or cache any write-sets.
Write-set Caching
This Flow Control takes effect when nodes are in the JOINER and DONOR states.
Nodes cannot apply any write-sets while in this state and must cache them for later. There is no reasonable way to
keep the node synchronized with the cluster, except for stopping all replication.
It is possible to limit the replication rate, ensuring that the write-set cache does not exceed the configured size. You
can control the write-set cache with the following parameters:
• gcs.recv_q_hard_limit (page 169) Maximum write-set cache size (in bytes).
• gcs.max_throttle (page 169) Smallest fraction to the normal replication rate the node can tolerate in the cluster.
• gcs.recv_q_soft_limit (page 169) Estimate of the average replication rate for the node.
Catching Up
This Flow Control takes effect when nodes are in the JOINED state.
Nodes in this state can apply write-sets. Flow Control here ensures that the node can eventually catch up with the
cluster. It specifically ensures that its write-set cache never grows. Because of this, the cluster wide replication rate
remains limited by the rate at which a node in this state can apply write-sets. Since applying write-sets is usually
several times faster than processing a transaction, nodes in this state hardly ever effect cluster performance.
The one occasion when nodes in the JOINED state do effect cluster performance is at the very beginning, when the
buffer pool on the node in question is empty.
Note: You can significantly speed this up with parallel applying.
Cluster Sync
This Flow Control takes effect when nodes are in the SYNCED state.
When nodes enter this state Flow Control attempts to keep the slave queue to a minimum. You can configure how the
node handles this using the following parameters:
• gcs.fc_limit (page 168) Used to determine the point where Flow Control engages.
• gcs.fc_factor (page 168) Used to determine the point where Flow Control disengages.
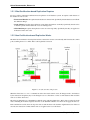
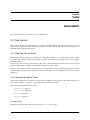
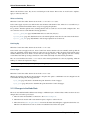
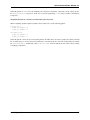
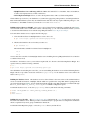
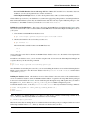
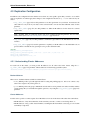
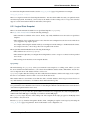
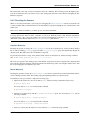
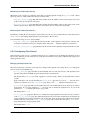
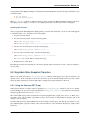
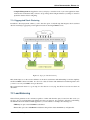
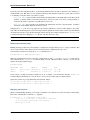
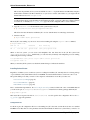
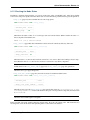
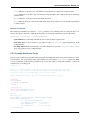
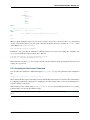
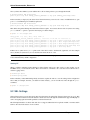
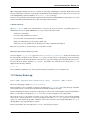
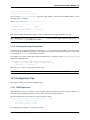
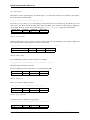
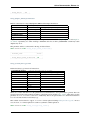
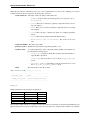
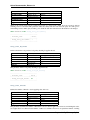
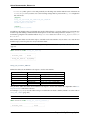
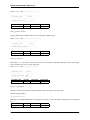
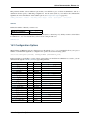
3.1.3 Changes in the Node State
The node state machine handles different state changes on different layers of Galera Cluster. These are the node state
changes that occur at the top most layer:
1. The node starts and establishes a connection to the Primary Component.
2. When the node succeeds with a state transfer request, it begins to cache write-sets.
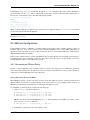
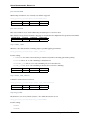
3. The node receives a State Snapshot Transfer. It now has all cluster data and begins to apply the cached write-sets.
Here the node enables Flow Control to ensure an eventual decrease in the slave queue.
20
Chapter 3. Management
Galera Documentation, Release 3.x
Figure 3.1: Galera Cluster Node State Changes
4. The node finishes catching up with the cluster. Its slave queue is now empty and it enables Flow Control to keep
it empty.
The node sets the MySQL status variable wsrep_ready (page 215) to the value 1. The node is now allowed to
process transactions.
5. The node receives a state transfer request. Flow Control relaxes to DONOR. The node caches all write-sets it
cannot apply.
6. The node completes the state transfer to joiner node.
For the sake of legibility, certain transitions were omitted from the above description. Bear in mind the following
points:
• Connectivity Cluster configuration change events can send a node in any state to PRIMARY or OPEN. For
instance, a node that is SYNCED reverts to OPEN when it loses its connection to the Primary Component due to
network partition.
• Missing Transitions In the event that the joining node does not require a state transfer, the node state changes
from the PRIMARY state directly to the JOINED state.
Note: See Also: For more information on Flow Control see Galera Flow Control in Percona XtraDB Cluster.
3.2 Node Failure and Recovery
Individual nodes fail to operate when they loose touch with the cluster. This can occur due to various reasons. For
instance, in the event of hardware failure or software crash, the loss of network connectivity or the failure of a state
transfer. Anything that prevents the node from communicating with the cluster is generalized behind the concept of
node failure. Understanding how nodes fail will help in planning for their recovery.
3.2. Node Failure and Recovery
21
Galera Documentation, Release 3.x
3.2.1 Detecting Single Node Failures
When a node fails the only sign is the loss of connection to the node processes as seen by other nodes. Thus nodes are
considered failed when they lose membership with the cluster’s Primary Component. That is, from the perspective of
the cluster when the nodes that form the Primary Component can no longer see the node, that node is failed. From
the perspective of the failed node itself, assuming that it has not crashed, it has lost its connection with the Primary
Component.
Although there are third-party tools for monitoring nodes—such as ping, Heartbeat, and Pacemaker—they can be
grossly off in their estimates on node failures. These utilities do not participate in the Galera Cluster group communications and remain unaware of the Primary Component.
If you want to monitor the Galera Cluster node status poll the wsrep_local_state (page 213) status variable or through
the Notification Command (page 112).
Note: See Also: For more information on monitoring the state of cluster nodes, see the chapter on Monitoring the
Cluster (page 107).
The cluster determines node connectivity from the last time it received a network packet from the node. You can
configure how often the cluster checks this using the evs.inactive_check_period (page 163) parameter. During the
check, if the cluster finds that the time since the last time it received a network packet from the node is greater than the
value of the evs.keepalive_period (page 165) parameter, it begins to emit heartbeat beacons. If the cluster continues to
receive no network packets from the node for the period of the evs.suspect_timeout (page 165) parameter, the node is
declared suspect. Once all members of the Primary Component see the node as suspect, it is declared inactive—that
is, failed.
If no messages were received from the node for a period greater than the evs.inactive_timeout (page 163) period, the
node is declared failed regardless of the consensus. The failed node remains non-operational until all members agree
on its membership. If the members cannot reach consensus on the liveness of a node, the network is too unstable for
cluster operations.
The relationship between these option values is:
evs.keepalive_period (page 165)
evs.inactive_check_period (page 163)
evs.suspect_timeout (page 165)
evs.inactive_timeout (page 163)
<=
<=
<=
<=
evs.inactive_check_period (page 163)
evs.suspect_timeout (page 165)
evs.inactive_timeout (page 163)
evs.consensus_timeout (page 162)
Note: Unresponsive nodes that fail to send messages or heartbeat beacons on time—for instance, in the event of
heavy swapping—may also be pronounced failed. This prevents them from locking up the operations of the rest of the
cluster. If you find this behavior undesirable, increase the timeout parameters.
3.2.2 Cluster Availability vs. Partition Tolerance
Within the CAP theorem, Galera Cluster emphasizes data safety and consistency. This leads to a trade-off between
cluster availability and partition tolerance. That is, when using unstable networks, such as WAN (Wide Area Network), low evs.suspect_timeout (page 165) and evs.inactive_timeout (page 163) values may result in false node failure
detections, while higher values on these parameters may result in longer availability outages in the event of actual
node failures.
Essentially what this means is that the evs.suspect_timeout (page 165) parameter defines the minimum time needed to
detect a failed node. During this period, the cluster is unavailable due to the consistency constraint.
22
Chapter 3. Management
Galera Documentation, Release 3.x
3.2.3 Recovering from Single Node Failures
If one node in the cluster fails, the other nodes continue to operate as usual. When the failed node comes back online,
it automatically synchronizes with the other nodes before it is allowed back into the cluster.
No data is lost in single node failures.
Note: See Also: For more information on manually recovering nodes, see Node Provisioning and Recovery (page 65).
State Transfer Failure
Single node failures can also occur when a state snapshot transfer fails. This failure renders the receiving node
unusable, as the receiving node aborts when it detects a state transfer failure.
When the node fails while using mysqldump, restarting may require you to manually restore the administrative
tables. For the rsync method in state transfers this is not an issue, given that it does not require the database server
to be in an operational state to work.
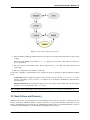
3.3 Weighted Quorum
In addition to single node failures, the cluster may split into several components due to network failure. A component
is a set of nodes that are connected to each other, but not to the nodes that form other components. In these situations,
only one component can continue to modify the database state to avoid history divergence. This component is called
the Primary Component.
Under normal operations, your Primary Component is the cluster. When cluster partitioning occurs, Galera Cluster
invokes a special quorum algorithm to select one component as the Primary Component. This guarantees that there is
never more than one Primary Component in the cluster.
Note: See Also: In addition to the individual node, quorum calculations also take into account a separate process
called garbd. For more information on its configuration and use, see Galera Arbitrator (page 86).
3.3.1 Weighted Quorum
The current number of nodes in the cluster defines the current cluster size. There is no configuration setting that allows
you to define the list of all possible cluster nodes. Every time a node joins the cluster, the total cluster size increases.
When a node leaves the cluster, gracefully, the cluster size decreases. Cluster size determines the number of votes
required to achieve quorum.
Galera Cluster takes a quorum vote whenever a node does not respond and is suspected of no longer being a part of the
cluster. You can fine tune this no response timeout using the evs.suspect_timeout (page 165) parameter. The default
setting is 5 seconds.
When the cluster takes a quorum vote, if the majority of the total nodes connected from before the disconnect remain,
that partition stays up. When network partitions occur, there are nodes active on both sides of the disconnect. The
component that has quorum alone continues to operate as the Primary Component, while those without quorum enter
the non-primary state and begin attempt to connect with the Primary Component.
Quorum requires a majority, meaning that you cannot have automatic failover in a two node cluster. This is because
the failure of one causes the remaining node automatically go into a non-primary state.
3.3. Weighted Quorum
23
Galera Documentation, Release 3.x
Clusters that have an even number of nodes risk split-brain conditions. If should you lose network connectivity
somewhere between the partitions in a way that causes the number of nodes to split exactly in half, neither partition
can retain quorum and both enter a non-primary state.
In order to enable automatic failovers, you need to use at least three nodes. Bear in mind that this scales out to other
levels of infrastructure, for the same reasons.
• Single switch clusters should use a minimum of 3 nodes.
• Clusters spanning switches should use a minimum of 3 switches.
• Clusters spanning networks should use a minimum of 3 networks.
• Clusters spanning data centers should use a minimum of 3 data centers.
Split-brain Condition
Cluster failures that result in database nodes operating autonomous of each other are called split-brain conditions.
When this occurs, data can become irreparably corrupted, such as would occur when two database nodes independently
update the same row on the same table. As is the case with any quorum-based system, Galera Cluster is subject to
split-brain conditions when the quorum algorithm fails to select a Primary Component.
For example, this can occur if you have a cluster without a backup switch in the event that the main switch fails. Or,
when a single node fails in a two node cluster.
By design, Galera Cluster avoids split-brain condition. In the event that a failure results in splitting the cluster into two
partitions of equal size, (unless you explicitly configure it otherwise), neither partition becomes a Primary Component.
To minimize the risk of this happening in clusters that do have an even number of nodes, partition the cluster in a way
that one component always forms the Primary cluster section.
4 node cluster -> 3 (Primary) + 1 (Non-primary)
6 node cluster -> 4 (Primary) + 2 (Non-primary)
6 node cluster -> 5 (Primary) + 1 (Non-primary)
24
Chapter 3. Management
Galera Documentation, Release 3.x
In these partitioning examples, it is very difficult for any outage or failure to cause the nodes to split exactly in half.
Note: See Also: For more information on configuring and managing the quorum, see Resetting the Quorum (page 72).
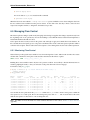
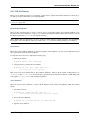
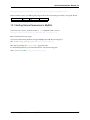
3.3.2 Quorum Calculation
Galera Cluster supports a weighted quorum, where each node can be assigned a weight in the 0 to 255 range, with
which it will participate in quorum calculations.
The quorum calculation formula is
∑︀
𝑝𝑖 ×𝑤𝑖
−
∑︀
2
𝑙𝑖 ×𝑤𝑖
<
∑︁
𝑚𝑖 ×𝑤𝑖
Where:
• 𝑝𝑖 Members of the last seen primary component;
• 𝑙𝑖 Members that are known to have left gracefully;
• 𝑚𝑖 Current component members; and,
• 𝑤𝑖 Member weights.
What this means is that the quorum is preserved if (and only if) the sum weight of the nodes in a new component
strictly exceeds half that of the preceding Primary Component, minus the nodes which left gracefully.
You can customize node weight using the pc.weight (page 173) parameter. By default, node weight is 1, which
translates to the traditional node count behavior.
Note: You can change node weight in runtime by setting the pc.weight (page 173) parameter.
3.3. Weighted Quorum
25
Galera Documentation, Release 3.x
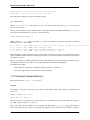
SET GLOBAL wsrep_provider_options="pc.weight=3";
Galera Cluster applies the new weight on the delivery of a message that carries a weight. At the moment, there is no
mechanism to notify the application of a new weight, but will eventually happen when the message is delivered.
Note: Warning: If a group partitions at the moment when the weight change message is delivered, all partitioned
components that deliver weight change messages in the transitional view will become non-primary components. Partitions that deliver messages in the regular view will go through quorum computation with the applied weight when
the following transitional view is delivered.
In other words, there is a corner case where the entire cluster can become non-primary component, if the weight
changing message is sent at the moment when partitioning takes place. Recovering from such a situation should be
done either by waiting for a re-merge or by inspecting which partition is most advanced and by bootstrapping it as a
new Primary Component.
3.3.3 Weighted Quorum Examples
Now that you understand how quorum weights work, here are some examples of deployment patterns and how to use
them.
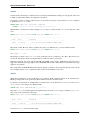
Weighted Quorum for Three Nodes
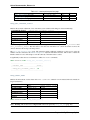
When configuring quorum weights for three nodes, use the following pattern:
node1: pc.weight = 2
node2: pc.weight = 1
node3: pc.weight = 0
Under this pattern, killing node2 and node3 simultaneously preserves the Primary Component on node1. Killing
node1 causes node2 and node3 to become non-primary components.
Weighted Quorum for a Simple Master-Slave Scenario
When configuring quorum weights for a simple master-slave scenario, use the following pattern:
node1: pc.weight = 1
node2: pc.weight = 0
Under this pattern, if the master node dies, node2 becomes a non-primary component. However, in the event that
node2 dies, node1 continues as the Primary Component. If the network connection between the nodes fails, node1
continues as the Primary Component while node2 becomes a non-primary component.
Weighted Quorum for a Master and Multiple Slaves Scenario
When configuring quorum weights for a master-slave scenario that features multiple slave nodes, use the following
pattern:
node1:
node2:
node3:
...
noden:
26
pc.weight = 1
pc.weight = 0
pc.weight = 0
pc.weight = 0
Chapter 3. Management
Galera Documentation, Release 3.x
Under this pattern, if node1 dies, all remaining nodes end up as non-primary components. If any other node dies,
the Primary Component is preserved. In the case of network partitioning, node1 always remains as the Primary
Component.
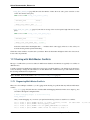
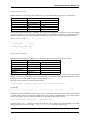
Weighted Quorum for a Primary and Secondary Site Scenario
When configuring quorum weights for primary and secondary sites, use the following pattern:
Primary Site:
node1: pc.weight = 2
node2: pc.weight = 2
Secondary Site:
node3: pc.weight = 1
node4: pc.weight = 1
Under this pattern, some nodes are located at the primary site while others are at the secondary site. In the event that
the secondary site goes down or if network connectivity is lost between the sites, the nodes at the primary site remain
the Primary Component. Additionally, either node1 or node2 can crash without the rest of the nodes becoming
non-primary components.
3.3. Weighted Quorum
27
Galera Documentation, Release 3.x
28
Chapter 3. Management
Part II
Getting Started
29
Galera Documentation, Release 3.x
Galera Cluster for MySQL is a synchronous replication solution that can improve availability and performance of
MySQL service. All Galera Cluster nodes are identical and fully representative of the cluster and allow unconstrained
transparent mysql client access, acting as a single-distributed MySQL server. It provides:
• Transparent client connections, so it’s highly compatible with existing applications;
• Synchronous data safety semantics—if a client received confirmation, transactions will be committed on every
node; and
• Automatic write conflict detection and resolution, so that nodes are always consistent.
Galera Cluster is well suited for LAN, WAN, and cloud environments. This Getting Started chapter will help you to
get started with a basic Galera Cluster. You will need root access to three Linux hosts and their IP Addresses.
How Galera Cluster Works
The primary focus is data consistency. The transactions are either applied on every node or not all. So, the databases
stay synchronized, provided that they were properly configured and synchronized at the beginning.
The Galera Replication Plugin differs from the standard MySQL Replication by addressing several issues, including
multi-master write conflicts, replication lag and slaves being out of sync with the master.
In a typical instance of a Galera Cluster, applications can write to any node in the cluster and transaction commits,
(RBR events), are then applied to all the servers, through certification-based replication.
Certification-based replication is an alternative approach to synchronous database replication, using group communication and transaction ordering techniques.
Note: For security and performance reasons, it’s recommended that you run Galera Cluster on its own subnet.
31
Galera Documentation, Release 3.x
32
CHAPTER
FOUR
NODE INITIALIZATION
Galera Cluster for MySQL is not the same as a standard standalone MySQL database server. You will need to install
and configure additional software.
This software runs on any unix-like operating system. You can choose to build from source or to install using Debianor RPM-based binary packages. Once you have the software installed on your individual server, you must also configure the server to function as a node in your cluster.
4.1 Installation
Galera Cluster requires server hardware for a minimum of three nodes.
If your cluster runs on a single switch, use three nodes. If your cluster spans switches, use three switches. If your
cluster spans networks, use three networks. If your cluster spans data centers, use three data centers. This ensures that
the cluster can maintain a Primary Component in the event of network outages.
For server hardware, each node requires at a minimum:
• 1GHz single core CPU
• 512MB RAM
• 100 Mbps network connectivity
Note: See Also: Galera Cluster may occasionally crash when run on limited hardware due to insufficient memory. To
prevent this, ensure that you have sufficient swap space available. For more information on how to create swap space,
see Configuring Swap Space (page 51).
For software, each node in the cluster requires:
• Linux or FreeBSD;
• MySQL, MariaDB or Percona XtraDB server with wsrep API patch;
• Galera Replication Plugin.
Note: Binary installation packages for Galera Cluster include the database server with the wsrep API patch. When
building from source, you must apply this patch yourself.
4.1.1 Preparing the Server
Before you begin the installation process, there are a few tasks that you need to undertake to prepare the servers for
Galera Cluster. You must perform the following steps for each node in your cluster.
33
Galera Documentation, Release 3.x
Disabling SELinux for mysqld
If you have SELinux enabled, it may block mysqld from carrying out required operations. You must either disable
SELinux for mysqld or configure it to allow mysqld to run external programs and open listen sockets on unprivileged
ports—that is, things that an unprivileged user can do.
To disable SELinux for mysql run the following command:
# semanage permissive -a mysqld_t
This command switches SELinux into permissive mode when it registers activity from the database server. While this
is fine during the installation and configuration process, it is not in general a good policy to disable applications that
improve security.
In order to use SELinux with Galera Cluster, you need to create an access policy, so that SELinux can understand and
allow normal operations from the database server. For information on how to create an access policy, see SELinux
Configuration (page 127).
Note: See Also: For more information on writing SELinux policies, see SELinux and MySQL.
Firewall Configuration
Next, you need to update the firewall settings on each node so that they can communicate with the cluster. How you
do this varies depending upon your distribution and the particular firewall software that you use.
Note: If there is a NAT (Network Address Translation) firewall between the nodes, you must configure it to allow for
direct connections between the nodes, such as through port forwarding.
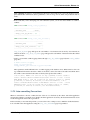
As an example, to open ports between trusted hosts using iptables the commands you run on each would look
something like this:
# iptables --append INPUT --protocol tcp \
--source 64.57.102.34 --jump ACCEPT
# iptables --apend INPUT --protocol tcp \
--source 193.166.33.20 --jump ACCEPT
# iptables --append INPUT --protocol tcp \
--source 193.125.4.10 --jump ACCEPT
This causes packet filtering on the kernel to accept TCP connections between the given IP addresses.
Note: Warning: The IP addresses in the example are for demonstration purposes only. Use the real values from your
nodes and netmask in the iptables configuration for your cluster.
The updated packet filtering rules take effect immediately, but are not persistent. When the server reboots, it reverts to
default packet filtering rules, which do not include your updates. To use these rules after rebooting, you need to save
them as defaults.
For systems that use init, run the following command:
# service save iptables
For systems that use systemd, you need to save the current packet filtering rules to the path that the iptables unit
reads when it starts. This path can vary by distribution, but you can normally find it in the /etc directory.
• /etc/sysconfig/iptables
• /etc/iptables/iptables.rules
34
Chapter 4. Node Initialization
Galera Documentation, Release 3.x
When you find the relevant file, you can save the rules using the iptables-save command, then redirecting the
output to overwrite this file.
# iptables-save > /etc/sysconfig/iptables
When iptables starts it now reads the new defaults, with your updates to the firewall.
Note: See Also: For more information on setting up the firewall for Galera Cluster and other programs for configuring
packet filtering in Linux and FreeBSD, see Firewall Settings (page 117).
Disabling AppArmor
By default, some servers—for instance, Ubuntu—include AppArmor, which may prevent mysqld from opening
additional ports or running scripts. You must disable AppArmor or configure it to allow mysqld to run external
programs and open listen sockets on unprivileged ports.
To disable AppArmor, run the following commands:
$ sudo ln -s /etc/apparmor.d/usr /etc/apparmor.d/disable/.sbin.mysqld
You will then need to restart AppArmor. If your system uses init scripts, run the following command:
$ sudo service apparmor restart
If instead, your system uses systemd, run the following command instead:
$ sudo systemctl restart apparmor
4.1.2 Installing Galera Cluster
There are three versions of Galera Cluster for MySQL: the original Codership reference implementation; Percona
XtraDB Cluster; and MariaDB Galera Cluster. For each database server, binary packages are available for Debianand RPM-based Linux distributions, or you can build them from source.
Galera Cluster for MySQL
Binary Installation
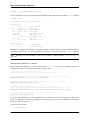
Galera Cluster for MySQL is the reference implementation from Codership Oy. Binary installation packages are available for Linux distributions using apt-get, yum and zypper package managers through the Codership repository.
Enabling the Codership repository In order to install Galera Cluster for MySQL through your package manager,
you need to first enable the Codership repository on your system. There are different ways to accomplish this, depending on which Linux distribution and package manager you use.
Enabling the apt Repository For Debian and Debian-based Linux distributions, the procedure for adding a repository requires that you first install the Software Properties. The package names vary depending on your distribution.
For Debian, in the terminal run the following command:
# apt-get install python-software-properties
For Ubuntu or a distribution that derives from Ubuntu, instead run this command:
4.1. Installation
35
Galera Documentation, Release 3.x
$ sudo apt-get install software-properties-common
In the event that you use a different Debian-based distribution and neither of these commands work, consult your
distribution’s package listings for the appropriate package name.
Once you have the Software Properties installed, you can enable the Codership repository for your system.
1. Add the GnuPG key for the Codership repository.
# apt-key adv --keyserver keyserver.ubuntu.com \
--recv BC19DDBA
2. Add the Codership repository to your sources list. Using your preferred text editor, create a galera.list file in the
/etc/apt/sources.list.d/ directory.
# Codership Repository (Galera Cluster for MySQL)
deb http://releases.galeracluster.com/DIST RELEASE main
For the repository address, make the following changes:
• DIST Indicates the name of your Linux distribution. For example, ubuntu.
• RELEASE Indicates your distribution release. For example, wheezy.
In the event that you do not know which release you have installed on your server, you can find out using
the following command:
$ lsb_release -a
3. Update the local cache.
# apt-get update
Packages in the Codership repository are now available for installation through apt-get.
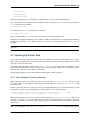
Enabling the yum Repository For RPM-based distributions, such as CentOS, Red Hat and Fedora, you can enable
the Codership repository by adding a .repo file to the /etc/yum.repos.d/ directory.
Using your preferred text editor, create the .repo file.
[galera]
name = Galera
baseurl = http://releases.galeracluster.com/DIST/RELEASE/ARCH
gpgkey = http://releases.galeracluster.com/GPG-KEY-galeracluster.com
gpgcheck = 1
In the baseurl field, make the following changes to web address:
• DIST Indicates the distribution name. For example, centos or fedora.
• RELEASE indicates the distribution release number. For example, 6 for CentOS, 20 or 21 for Fedora.
• ARCH indicates the architecture of your hardware. For example, x86_64 for 64-bit systems.
Packages in the Codership repository are now available for installation through yum.
Enabling the zypper Repository For distributions that use zypper for package management, such as openSUSE
and SUSE Linux Enterprise Server, you can enable the Codership repository by importing the GPG key and then
creating a .repo file in the local directory.
1. Import the GPG key.
36
Chapter 4. Node Initialization
Galera Documentation, Release 3.x
$ sudo rpm --import "http://releases.galeracluster.com/GPG-KEY-galeracluster.com"
2. Create a galera.repo file in the local directory.
[galera]
name = Galera
baseurl = http://releases.galeracluster.com/DIST/RELEASE
For the baseurl repository address, make the following changes:
• DIST indicates the distribution name. For example, opensuse or sles.
• RELEASE indicates the distribution version number.
3. Add the Codership repository.
$ sudo zypper addrepo galera.repo
4. Refresh zypper.
$ sudo zypper refresh
Packages in the Codership repository are now available for installation through zypper.
Installing Galera Cluster There are two packages involved in the installation of Galera Cluster for MySQL: the
MySQL database server, built to include the wsrep API; and the Galera Replication Plugin.
Note: For Debian-based distributions, you also need to include a third package, Galera Arbitrator. This is only
necessary with apt-get. The yum and zypper repositories package Galera Arbitrator with the Galera Replication
Plugin.
For Debian-based distributions, run the following command:
# apt-get install galera-3 \
galera-arbitrator-3 \
mysql-wsrep-5.6
For Red Hat, Fedora and CentOS distributions, instead run this command:
# yum install galera-3 \
mysql-wsrep-5.6
Note: On CentOS 6 and 7, this command may generate a transaction check error. For more information on this error
and how to fix it, see MySQL Shared Compatibility Libraries (page 38).
For openSUSE and SUSE Linux Enterprise Server, run this command:
# zypper install galera-3 \
mysql-wsrep-5.6
Galera Cluster for MySQL is now installed on your server. You need to repeat this process for each node in your
cluster.
Note: See Also: In the event that you installed Galera Cluster for MySQL over an existing standalone instance of
MySQL, there are some additional steps that you need to take in order to update your system to the new database
server. For more information, see Migrating to Galera Cluster (page 133).
4.1. Installation
37
Galera Documentation, Release 3.x
MySQL Shared Compatibility Libraries When installing Galera Cluster for MySQL on CentOS, versions 6 and
7, you may encounter a transaction check error that blocks the installation.
Transaction Check Error:
file /usr/share/mysql/czech/errmsg.sys from install
mysql-wsrep-server-5.6-5.6.23-25.10.e16.x86_64 conflicts
with file from package mysql-libs-5.1.73-.3.e16_5.x86_64
This relates to a dependency issue between the version of the MySQL shared compatibility libraries that CentOS uses
and the one that Galera Cluster requires. Upgrades are available through the Codership repository and you can install
them with yum.
There are two versions available for this package. The version that you need depends on which version of the MySQL
wsrep database server that you want to install. Additionally, the package names themselves vary depending on the
version of CentOS.
For CentOS 6, run the following command:
# yum upgrade -y mysql-wsrep-libs-compat-VERSION
Replace VERSION with 5.5 or 5.6, depending upon the version of MySQL you want to use. For CentOS 7, to install
MySQL version 5.6, run the following command:
# yum upgrade mysql-wsrep-shared-5.6
For CentOS 7, to install MySQL version 5.5, you also need to disable the 5.6 upgrade:
# yum upgrade -y mysql-wsrep-shared-5.5 \
-x mysql-wsrep-shared-5.6
When yum finishes the upgrade, install the MySQL wsrep database server and the Galera Replication Plugin as described above.
Source Installation
Galera Cluster for MySQL is the reference implementation from Codership Oy. Binary installation packages are
available for Debian- and RPM-based distributions of Linux. In the event that your Linux distribution is based upon
a different package management system, if your server uses a different unix-like operating system, such as Solaris or
FreeBSD, you will need to build Galera Cluster for MySQL from source.
Note: See Also: In the event that you built Galera Cluster for MySQL over an existing standalone instance of MySQL,
there are some additional steps that you need to take in order to update your system to the new database server. For
more information, see Migrating to Galera Cluster (page 133).
Installing Build Dependencies When building from source code, make cannot manage or install dependencies for
either Galera Cluster or the build process itself. You need to install these first. For Debian-based systems, run the
following command:
# apt-get build-dep mysql-server
For RPM-based distributions, instead run this command:
# yum-builddep MySQL-server
In the event that neither command works on your system or that you use a different Linux distribution or FreeBSD,
the following packages are required:
38
Chapter 4. Node Initialization
Galera Documentation, Release 3.x
• MySQL Database Server with wsrep API: Git, CMake, GCC and GCC-C++, Automake, Autoconf, and Bison,
as well as development releases of libaio and ncurses.
• Galera Replication Plugin: SCons, as well as development releases of Boost, Check and OpenSSL.
Check with the repositories for your distribution or system for the appropriate package names to use during installation.
Bear in mind that different systems may use different names and that some may require additional packages to run.
For instance, to run CMake on Fedora you need both cmake and cmake-fedora.
Building Galera Cluster for MySQL The source code for Galera Cluster for MySQL is available through GitHub.
You can download the source code from the website or directly using git. In order to build Galera Cluster, you need
to download both the database server with the wsrep API patch and the Galera Replication Plugin.
To download the database server, complete the following steps:
1. Clone the Galera Cluster for MySQL database server source code.
# git clone https://github.com/codership/mysql-wsrep
2. Checkout the branch for the version that you want to use.
# git checkout 5.6
The main branches available for Galera Cluster for MySQL are:
• 5.6
• 5.5
You now have the source files for the MySQL database server, including the wsrep API patch needed for it to function
as a Galera Cluster node.
In addition to the database server, you need the wsrep Provider, also known as the Galera Replication Plugin. In a
separator directory, run the following command:
# cd ..
# git clone https://github.com/codership/galera.git
Once Git finishes downloading the source files, you can start building the database server and the Galera Replication
Plugin. The above procedures created two directories: mysql-wsrep/ for the database server source and for the
Galera source galera/
Building the Database Server The database server for Galera Cluster is the same as that of the standard database
servers for standalone instances of MySQL, with the addition of a patch for the wsrep API, which is packaged in the
version downloaded from GitHub. You can enable the patch through the wsrep API, requires that you enable it through
the WITH_WSREP and WITH_INNODB_DISALLOW_WRITES CMake configuration options.
To build the database server, cd into the mysql-wsrep/ directory and run the following commands:
# cmake -DWITH_WSREP=ON -DWITH_INNODB_DISALLOW_WRITES=ON ./
# make
# make install
Building the wsrep Provider The Galera Replication Plugin implements the wsrep API and operates as the wsrep
Provider for the database server. What it provides is a certification layer to prepare write-sets and perform certification
checks, a replication layer and a group communication framework.
To build the Galera Replicator plugin, cd into the galera/ directory and run SCons:
4.1. Installation
39
Galera Documentation, Release 3.x
# scons
This process creates the Galera Replication Plugin, (that is, the libgalera_smm.so file). In your my.cnf configuration file, you need to define the path to this file for the wsrep_provider (page 192) parameter.
Note: For FreeBSD users, building the Galera Replicator Plugin from source raises certain Linux compatibility
issues. You can mitigate these by using the ports build at /usr/ports/databases/galera.
Post-installation Configuration After the build completes, there are some additional steps that you must take in
order to finish installing the database server on your system. This is over and beyond the standard configurations listed
in System Configuration (page 49) and Replication Configuration (page 52).
Note: Unless you defined the CMAKE_INSTALL_PREFIX configuration variable when you ran cmake above, by
default the database server installed to the path /usr/local/mysql/. If you chose a custom path, adjust the
commands below to accommodate the change.
1. Create the user and group for the database server.
# groupadd mysql
# useradd -g mysql mysql
2. Install the database.
# cd /usr/local/mysql
# ./scripts/mysql_install_db --user=mysql
This installs the database in the working directory. That is, at /usr/local/mysql/data/. If you would
like to install it elsewhere or run it from a different directory, specify the desired path with the --basedir and
--datadir options.
3. Change the user and group for the directory.
# chown -R mysql /usr/local/mysql
# chgrp -R mysql /usr/local/mysql
4. Create a system unit.
# cp /usr/local/mysql/supported-files/mysql.server \
/etc/init.d/mysql
# chmod +x /etc/init.d/mysql
# chkconfig --add mysql
This allows you to start Galera Cluster using the service command. It also sets the database server to start
during boot.
In addition to this procedure, bear in mind that any custom variables you enabled during the build process, such as
a nonstandard base or data directory, requires that you add parameters to cover this in the configuration file, (that is,
my.cnf).
Note: This tutorial omits MySQL authentication options for brevity.
40
Chapter 4. Node Initialization
Galera Documentation, Release 3.x
Percona XtraDB Cluster
Binary Installation
Percona XtraDB Cluster is the Percona implementation of Galera Cluster for MySQL. Binary installation packages
are available for Debian- and RPM-based distributions through the Percona repository.
Enabling the Percona Repository In order to install Percona XtraDB Cluster through your package manager, you
need to first enable the Percona repository on your system. There are two different ways to accomplish this, depending
upon which Linux distribution you use.
Enabling the apt Repository For Debian and Debian-based Linux distributions, the procedure for adding the Percona repository requires that you first install Software Properties on your system. The package names vary depending
upon which distribution you use. For Debian, in the terminal run the following command:
# apt-get install python-software-properties
For Ubuntu, instead run this command:
$ sudo apt-get install software-properties-common
In the event that you use a different Debian-based distribution and neither of these commands work, consult your
distribution’s package listings for the appropriate package name.
Once you have Software Properties installed, you can enable the Percona repository for your system.
1. Add the GnuPG key for the Percona repository:
# add-key adv --recv-keys --keyserver \
keyserver.ubuntu.com 1C4CBDCDCD2EFD2A
2. Add the Percona repository to your sources list:
# add-apt-repository ’deb http://repo.percona.com/apt release main’
For the repository address, make the following changes:
• release Indicates the release name for the distribution you are using. For example, wheezy.
In the event that you do not know which release you have installed on your server, you can find out using
the following command:
$ lsb_release -a
3. Update the local cache.
# apt-get update
For more information on the repository, available packages and mirrors, see the Percona apt Repository
Packages in the Percona repository are now available for installation on your server through apt-get.
Enabling the yum Repository For RPM-based distributions, you can enable the Percona repository through yum
using the following command:
# yum install http://www.percona.com/downloads/percona-release/redhat/0.1-3/percona-release-0.1-3.noa
4.1. Installation
41
Galera Documentation, Release 3.x
For more information on the repository, package names or available mirrors, see the Percona yum Repository.
Packages in the Percona repository are now available for installation on your server through yum.
Installing Galera Cluster There are three packages involved in the installation of Percona XtraDB Cluster: the
Percona XtraDB client, a command line tool for accessing the database; the percona XtraDB database server, built to
include the wsrep API patch and the Galera Replication Plugin.
For most Debian-based distributions, you can install all of these through a single package. In the terminal run the
following command:
# apt-get install percona-xtradb-cluster
For Ubuntu and distributions that derive from Ubuntu, however, you will need to specify the meta package. In the
terminal, run this command instead:
$ sudo apt-get install percona-xtradb-cluster
percona-xtradb-cluster-galera
For RPM-based distributions, instead run this command:
# yum install Percona-XtraDB-Cluster
Percona XtraDB Cluster is now installed on your server.
Note: See Also: In the event that you installed Percona XtraDB Cluster over an existing standalone instance of
Percona XtraDB, there are some additional steps that you need to take in order to update your system to the new
database server. For more information, see Migrating to Galera Cluster (page 133).
Source Installation
Percona XtraDB Cluster is the Percona implementation of Galera Cluster for MySQL. Binary installation packages
are available for Debian- and RPM-based distributions of Linux. In the event that your Linux distribution is based on a
different package management system or if it runs on a different unix-like operating system where binary installation
packages are unavailable, such as Solaris or FreeBSD, you will need to build Percona XtraDB Cluster from source.
Note: See Also: In the event that you built Percona XtraDB Cluster over an existing standalone instance of Percona
XtraDB, there are some additional steps that you need to take in order to update your system to the new database
server. For more information, see Migrating to Galera Cluster (page 133).
Preparing the Server When building from source code, make cannot manage or install dependencies necessary for
either Galera Cluster itself or the build process. You need to install these packages first.
• For Debian-based distributions of Linux, if Percona is available in your repositories, you can run the following
command:
# apt-get build-dep percona-xtradb-cluster
• For RPM-based distributions, instead run this command:
# yum-builddep percona-xtradb-cluster
In the event that neither command works for your system or that you use a different Linux distribution or FreeBSD,
the following packages are required:
42
Chapter 4. Node Initialization
Galera Documentation, Release 3.x
• Percona XtraDB Database Server with wsrep API: Git, CMake, GCC and GCC-C++, Automake, Autoconf,
and Bison, as well as development releases of libaio and ncurses.
• Galera Replication Plugin: SCons, as well as development releases of Boost, Check and OpenSSL.
Check with the repositories for your distribution or system for the appropriate package names to use during installation.
Bear in mind that different systems may use different names and that some may require additional packages to run.
For instance, to run CMake on Fedora you need both cmake and cmake-fedora.
Building Percona XtraDB Cluster The source code for Percona XtraDB Cluster is available through GitHub. Using
Git you can download the source to build both Percona XtraDB Cluster and the Galera Replication Plugin locally on
your system.
1. Clone the Percona XtraDB Cluster database server.
# git clone https://github.com/percona/percona-xtradb-cluster
2. Checkout the branch for the version that you want to use.
# git checkout 5.6
The main branches available for Percona XtraDB Cluster are:
• 5.6
• 5.5
You now have the source files for the Percona XtraDB Cluster database server, set to the branch of development that
you want to build.
In addition to the database server, you also need the wsrep Provider, also known as the Galera Replication Plugin. In
a separate directory, run the following command:
# cd ..
# git clone https://github.com/codership/galera.git
Once Git finishes downloading the source file,s you can start building the database server and the Galera Replication
Plugin. You now have the source file for the database server in a percona-xtradb-cluster/ and the Galera
source files in galera/.
Building the Database Server The database server for Galera Cluster is the same as that of the standard database
servers for standalone instances of Percona XtraDB, with the addition of a patch for the wsrep API, which is packaged
in the version downloaded from GitHub. You can enable the patch through the wsrep API, requires that you enable it
through the WITH_WSREP and WITH_INNODB_DISALLOW_WRITES CMake configuration options.
To build the database server, cd into the percona-xtradb-cluster directory and run the following commands:
# cmake -DWITH_WSREP=ON -DWITH_INNDOB_DISALLOW_WRITES=ON ./
# make
# make install
Note: In addition to compiling through cmake and make, there are also a number of build scripts available in the
BUILD/ directory, which you may find more convenient to use. For example:
# ./BUILD/compile-pentium64
This has the same effect as running the above commands with various build options pre-configured. There are several
build scripts available in the BUILD/ directory. Select the one that best suits your nees.
4.1. Installation
43
Galera Documentation, Release 3.x
Building the wsrep Provider The Galera Replication Plugin implements the wsrep API and operates as the wsrep
Provider for the database server. What it provides is a certification layer to prepare write-sets and perform certification
checks, a replication layer and a group communication framework.
To build the Galera Replication Plugin, cd into the galera/ directory and run SCons.
# scons
This process creates the Galera Replication Plugin, (that is, the libgalera_smm.so file). In your my.cnf configuration file, you need to define the path to this file for the wsrep_provider (page 192) parameter.
Note: For FreeBSD users, building the Galera Replication Plugin from sources raises certain Linux compatibility
issues. You can mitigate these by using the ports build available at /usr/ports/databases/galera or by
install the binary package:
# pkg install galera
Post-installation Configuration After the build completes, there are some additional steps that you must take in
order to finish installing the database server on your system. This is over and beyond the standard configuration
process listed in System Configuration (page 49) and Replication Configuration (page 52).
Note: Unless you defined the CMAKE_INSTALL_PREFIX configuration varaible when you ran cmake above, by
default the database is installed to the path /usr/local/mysql/. If you chose a custom path, adjust the commands
below to accommodate this change.
1. Create the user and group for the database server.
# groupadd mysql
# useradd -g mysql mysql
2. Install the database.
# cd /usr/local/mysql
# ./scripts/mysql_install_db --user=mysql
This installs the database in the working directory, (that is, at /usr/local/mysql/data). If you would like
to install it elsewhere or run the script from a different directory, specify the desired paths with the --basedir
and --datadir options.
3. Change the user and group permissions for the base directory.
# chown -R mysql /usr/local/mysql
# chgrp -R mysql /usr/local/mysql
4. Create a system unit for the database server.
# cp /usr/local/mysql/supported-files/mysql.server \
/etc/init.d/mysql
# chmod +x /etc/init.d/mysql
# chkconfig --add mysql
This allows you to start Galera Cluster using the service command. It also sets the database server to start
during boot.
In addition to this procedure, bear in mind that any further customization variables that you enabled during the build
process through cmake, (such as nonstandard base or data directories), may require you to define addition parameters
in the configuration file, (that is, the my.cnf).
44
Chapter 4. Node Initialization
Galera Documentation, Release 3.x
Note: This tutorial omits MariaDB authentication options for brevity.
MariaDB Galera Cluster
Binary Installation
MariaDB Galera Cluster is the MariaDB implementation of Galera Cluster for MySQL. Binary installation packages
are available for Debian- and RPM-based distributions of Linux through the MariaDB repository.
Enabling the MariaDB Repository In order to install MariaDB Galera Cluster through your package manager,
you need to first enable the MariaDB repository on your system. There are two different ways to accomplish this,
depending on which Linux distribution you use.
Enabling the apt Repository For Debian and Debian-based Linux distributions, the procedure for adding a repository requires that you first install the Software Properties. The package names vary depending on your distribution.
For Debian, in the terminal run the following command:
# apt-get install python-software-properties
For Ubuntu or a distribution that derives from Ubuntu, instead run this command:
$ sudo apt-get install software-properties-common
In the event that you use a different Debian-based distribution and neither of these commands work, consult your
distribution’s package listings for the appropriate package name.
Once you have the Software Properties installed, you can enable the MariaDB repository for your system.
1. Add the GnuPG key for the MariaDB repository.
# apt-key adv --recv-keys --keyserver \
keyserver.ubuntu.com 0xcbcb082a1bb943db
2. Add the MariaDB repository to your sources list.
# add-apt-repository ’deb http://mirror.jmu.edu/pub/mariadb/repo/version/distro release main’
For the repository address, make the following changes:
• version Indicates the version number of MariaDB that you want to use. For example, 5.6.
• distro Indicates the name of your Linux distribution. For example, ubuntu.
• release Indicates your distribution release. For example, wheezy.
In the event that you do not know which release you have installed on your server, you can find out using
the following command:
$ lsb_release -a
3. Update the local cache.
# apt-get update
For more information on the repository, package names or available mirrors, see the MariaDB Repository Generator.
Packages in the MariaDB repository are now available for installation through apt-get.
4.1. Installation
45
Galera Documentation, Release 3.x
Enabling the yum Repository For RPM-based distributions, such as CentOS, Red Hat and Fedora, you can enable
the MariaDB repository by adding a .repo file to the /etc/yum/repos.d/ directory.
Using your preferred text editor, create the .repo file.
# vim /etc/yum/repos.d/MariaDB.repo
[mariadb]
name = MariaDB
baseurl = http://yum.mariadb.org/version/package
gpgkey = https://yum.mariadb.org/RPM-GPG-KEY-MariaDB
gpgcheck = 1
In the baseurl field, make the following changes to web address:
• version Indicates the version of MariaDB you want to use. For example, 5.6.
• package indicates the package name for your distribution, release and architecture. For example,
rhel6-amd64 would reference packages for a Red Hat Enterprise Linux 6 server running on 64-bit hardware.
For more information on the repository, package names or available mirrors, see the MariaDB Repository Generator.
Installing Galera Cluster There are three packages involved in the installation of MariaDB Galera Cluster: the
MariaDB database client, a command line tool for accessing the database; the MariaDB database server, built to
include the wsrep API patch; and the Galera Replication Plugin.
For Debian-based distributions, in the terminal run the following command:
# apt-get install mariadb-client \
mariadb-galera-server \
galera
For RPM-based distributions, instead run this command:
# yum install MariaDB-client \
MariaDB-Galera-server \
galera
MariaDB Galera Cluster is now installed on your server. You will need to repeat this process for each node in your
cluster.
Note: See Also: In the event that you installed MariaDB Galera Cluster over an existing standalone instance of
MariaDB, there are some additional steps that you need to take in order to update your system to the new database
server. For more information, see Migrating to Galera Cluster (page 133).
Source Installation
MariaDB Galera Cluster is the MariaDB implementation of Galera Cluster for MySQL. Binary installation packages
are available for Debian- and RPM-based distributions of Linux. In the event that your Linux distribution is based on a
different package management system, or if it runs on a different unix-like operating system where binary installation
packages are not available, such as Solaris or FreeBSD, you will need to build MariaDB Galera Cluster from source.
Note: See Also: In the event that you built MariaDB Galera Cluster over an existing standalone instance of MariaDB,
there are some additional steps that you need to take in order to update your system to the new database server. For
more information, see Migrating to Galera Cluster (page 133).
46
Chapter 4. Node Initialization
Galera Documentation, Release 3.x
Preparing the Server When building from source code, make cannot manage or install dependencies for either
Galera Cluster or the build process itself. You need to install these packages first.
• For Debian-based distributions of Linux, if MariaDB is available in your repositories, you can run the following
command:
# apt-get build-dep mariadb-server
• For RPM-based distributions, instead run this command:
# yum-builddep MariaDB-server
In the event that neither command works for your system or that you use a different Linux distribution or FreeBSD,
the following packages are required:
• MariaDB Database Server with wsrep API: Git, CMake, GCC and GCC-C++, Automake, Autoconf, and
Bison, as well as development releases of libaio and ncurses.
• Galera Replication Plugin: SCons, as well as development releases of Boost, Check and OpenSSL.
Check with the repositories for your distribution or system for the appropriate package names to use during installation.
Bear in mind that different systems may use different names and that some may require additional packages to run.
For instance, to run CMake on Fedora you need both cmake and cmake-fedora.
Building MariaDB Galera Cluster The source code for MariaDB Galera Cluster is available through GitHub.
Using Git you can download the source code to build MariaDB and the Galera Replicator Plugin locally on your
system.
1. Clone the MariaDB database server repository.
# git clone https://github.com/mariadb/server
2. Checkout the branch for the version that you want to use.
# git checkout 10.0-galera
The main branches available for MariaDB Galera Cluster are:
• 10.1
• 10.0-galera
• 5.5-galera
Starting with version 10.1, MariaDB includes the wsrep API for Galera Cluster by default.
Note: Warning: MariaDB version 10.1 is still in beta.
You now have the source files for the MariaDB database server with the wsrep API needed to function as a Galera
Cluster node.
In addition to the database server, you also need the wsrep Provider, also known as the Galera Replicator Plugin. In a
separate directory run the following command:
# cd ..
# git clone https://github.com/codership/galera.git
Once Git finishes downloading the source files, you can start building the database server and the Galera Replicator
Plugin. You now have the source files for the database server in a server/ directory and the Galera source files in
galera/.
4.1. Installation
47
Galera Documentation, Release 3.x
Building the Database Server The database server for Galera Cluster is the same as that of the standard
database servers for standalone instances of MariaDB, with the addition of a patch for the wsrep API, which is
packaged in the version downloaded from GitHub. You can enable the patch through the WITH_WSREP and
WITH_INNODB_DISALLOW_WRITES CMake configuration options.
To build the database server, cd into the server/ directory and run the following commands:
# cmake -DWITH_WSREP=ON -DWITH_INNODB_DISALLOW_WRITES=ON ./
# make
# make install
Note: In addition to compiling through cmake and make, there are also a number of build scripts in the BUILD/
directory, which you may find more convenient to use. For example,
# ./BUILD/compile-pentium64-wsrep
This has the same effect as running the above commands with various build options pre-configured. There are several
build scripts available in the directory, select the one that best suits your needs.
Building the wsrep Provider The Galera Replication Plugin implements the wsrep API and operates as the wsrep
Provider for the database server. What it provides is a certification layer to prepare write-sets and perform certification
checks, a replication layer and a group communication framework.
To build the Galera Replication Plugin, cd into the galera/ directory and run SCons.
# scons
This process creates the Galera Replication Pluigin, (that is, the libgalera_smm.so file). In your my.cnf configuration file, you need to define the path to this file for the wsrep_provider (page 192) parameter.
Note: For FreeBSD users, building the Galera Replication Plugin from source raises certain issues due to Linux
dependencies. You can mitgate these by using the ports build available at /usr/ports/databases/galera or
by installing the binary package:
# pkg install galera
Post-installation Configuration After the build completes, there are some additional steps that you must take in
order to finish installing the database server on your system. This is over and beyond the standard configuration
process listed in System Configuration (page 49) and Replication Configuration (page 52).
Note: Unless you defined the CMAKE_INSTALL_PREFIX configuration variable when you ran cmake above, by
default the database is installed to the path /usr/local/mysql/. If you chose a custom path, adjust the commands
below to accommodate the change.
1. Create the user and group for the database server.
# groupadd mysql
# useradd -g mysql mysql
2. Install the database.
# cd /usr/local/mysql
# ./scripts/mysql_install_db --user=mysql
48
Chapter 4. Node Initialization
Galera Documentation, Release 3.x
This installs the database in the working directory, (that is, at /usr/local/mysql/data). If you would like
to install it elsewhere or run the script from a different directory, specify the desired paths with the --basedir
and --datadir options.
3. Change the user and group permissions for the base directory.
# chown -R mysql /usr/local/mysql
# chgrp -R mysql /usr/local/mysql
4. Create a system unit for the database server.
# cp /usr/local/mysql/supported-files/mysql.server \
/etc/init.d/mysql
# chmod +x /etc/init.d/mysql
# chkconfig --add mysql
This allows you to start Galera Cluster using the service command. It also sets the database server to start
during boot.
In addition to this procedure, bear in mind that any further customization variables you enabled during the build process, such as a nonstandard base or data directory, may require you to define additional parameters in the configuration
file, (that is, my.cnf).
Note: This tutorial omits MariaDB authentication options for brevity.
Note: See Also: In the event that you build or install Galera Cluster over an existing standalone instance of MySQL,
MariaDB or Percona XtraDB there are some additional steps that you need to take in order to update your system to
the new database server. For more information, see Migrating to Galera Cluster (page 133).
4.2 System Configuration
When you have finished installing Galera Cluster on your server hardware, you are ready to configure the database
itself to serve as a node in your cluster. To do this, you will need to edit the MySQL configuration file.
Using your preferred text editor, edit the /etc/my.cnf file.
[mysqld]
datadir=/var/lib/mysql
socket=/var/lib/mysql/mysql.sock
user=mysql
binlog_format=ROW
bind-address=0.0.0.0
default_storage_engine=innodb
innodb_autoinc_lock_mode=2
innodb_flush_log_at_trx_commit=0
innodb_buffer_pool_size=122M
wsrep_provider=/usr/lib/libgalera_smm.so
wsrep_provider_options="gcache.size=300M; gcache.page_size=1G"
wsrep_cluster_name="example_cluster"
wsrep_cluster_address="gcomm://IP.node1,IP.node2,IP.node3"
wsrep_sst_method=rsync
[mysql_safe]
log-error=/var/log/mysqld.log
pid-file=/var/run/mysqld/mysqld.pid
4.2. System Configuration
49
Galera Documentation, Release 3.x
4.2.1 Configuring Database Server
There are certain basic configurations that you will need to set up in the /etc/my.cnf file. Before starting the
database server, edit the configuration file for the following:
• Ensure that mysqld is not bound to 127.0.0.1. This is IP address for localhost. If the configuration variable
appears in the file, comment it out:
# bind-address = 127.0.0.1
• Ensure that the configuration file includes the conf.d/.
!includedir /etc/mysql/conf.d/
• Ensure that the binary log format is set to use row-level replication, as opposed to statement-level replication.
binlog_format=ROW
Do not change this value, as it affects performance and consistency. The binary log can only use row-level
replication.
• Ensure that the default storage engine is InnoDB
default_storage_engine=InnoDB
Galera Cluster will not work with MyISAM or similar nontransactional storage eninges.
• Ensure that the InnoDB locking mode for generating auto-increment values is set to interleaved lock mode,
which is designated by a 2 value.
innodb_autoinc_lock_mode=2
Do not change this value. Other modes may cause INSERT statements on tables with AUTO_INCREMENT
columns to fail.
Note: Warning: When innodb_autoinc_lock_mode is set to traditional lock mode, indicated by 0, or to
consecutive lock mode, indicated by 1, in Galera Cluster it can cause unresolved deadlocks and make the
system unresponsive.
• Ensure that the InnoDB log buffer is written to file once per second, rather than on each commit, to improve
performance.
innodb_flush_log_at_trx_commit=0
Note: Warning: While setting innodb_flush_log_at_trx_commit to a value of 0 or 2 improves performance,
it also introduces certain dangers. Operating system crashes or power outages can erase the last second of
transaction. Although normally you can recover this data from another node, it can still be lost entirely in the
event that the cluster goes down at the same time, (for instance, in the event of a data center power outage).
After you save the configuration file, you are ready to configure the database privileges.
Configuring the InnoDB Buffer Pool
The InnoDB storage engine uses a memory buffer to cache data and indexes of its tables, which you can configure
through the innodb_buffer_pool_size parameter. The default value is 128MB. To compensate for the increased memory usage of Galera Cluster over the standalone MySQL database server, you should scale your usual value back by
5%.
50
Chapter 4. Node Initialization
Galera Documentation, Release 3.x
innodb_buffer_pool_size=122M
4.2.2 Configuring Swap Space
Memory requirements for Galera Cluster are difficult to predict with any precision. The particular amount of memory
it uses can vary significantly, depending upon the load the given node receives. In the event that Galera Cluster attempts
to use more memory than the node has available, the mysqld instance crashes.
The way to protect your node from such crashing is to ensure that you have sufficient swap space available on the
server, either in the form of a swap partition or swap files. To check the available swap space, run the following
command:
$ swapon --summary
Filename
Type
/dev/sda2
partition
/swap/swap1
file
/swap/swap2
file
Size
3369980
524284
524284
Used
0
0
0
Priority
-1
-2
-3
If your system does not have swap space available or if the allotted space is insufficient for your needs, you can fix
this by creating swap files.
1. Create an empty file on your disk, set the file size to whatever size you require.
# fallocate -l 512M /swapfile
Alternatively, you can manage the same using dd.
# dd if=/dev/zero of=/swapfile bs=1M count=512
2. Secure the swap file.
# chmod 600 /swapfile
This sets the file permissions so that only the root user can read and write to the file. No other user or group
member can access it. You can view the results with ls:
$ ls -a / | grep swapfile
-rw------- 1 root root 536870912 Feb 12 23:55 swapfile
3. Format the swap file.
# mkswap /swapfile
4. Activate the swap file.
# swapon /swapfile
5. Using your preferred text editor, update the /etc/fstab file to include the swap file by adding the following
line to the bottom:
/swapfile none swap defaults 0 0
After you save the /etc/fstab file, you can see the results with swapon.
$ swapon --summary
Filename
Type
/swapfile
file
4.2. System Configuration
Size
524284
Used
0
Priority
-1
51
Galera Documentation, Release 3.x
4.3 Replication Configuration
In addition to the configuration for the database server, there are some specific options that you need to set to enable
write-set replication. You must apply these changes to the configuration file, that is my.cnf, for each node in your
cluster.
• wsrep_cluster_name (page 182) Use this parameter to set the logical name for your cluster. You must use the
same name for every node in your cluster. The connection fails on nodes that have different values for this
parameter.
• wsrep_cluster_address (page 181) Use this parameter to define the IP addresses for the cluster in a comma
separated list.
Note: See Also: There are additional schemas and options available through this parameter. For more information on the syntax, see Understanding Cluster Addresses (page 52) below.
• wsrep_node_name (page 189) Use this parameter to define the logical name for the individual node—for convenience.
• wsrep_node_address (page 188) Use this parameter to explicitly set the IP address for the individual node. It
gets used in the event that the auto-guessing does not produce desirable results.
[mysql]
wsrep_cluster_name=MyCluster
wsrep_cluster_address="gcomm://192.168.0.1,192.168.0.2,192.168.0.3"
wsrep_node_name=MyNode1
wsrep_node_address="192.168.0.1"
4.3.1 Understanding Cluster Addresses
For each node in the cluster, you must provide IP addresses for all other nodes in the cluster, using the wsrep_cluster_address (page 181) parameter. Cluster addresses are listed using a particular syntax:
<backend schema>://<cluster address>[?<option1>=<value1>[&<option2>=<value2>]]
Backend Schema
There are two backend schemas available for Galera Cluster.
• dummy Which provides a pass-through back-end for testing and profiling purposes. It does not connect to any
other nodes. It ignores any values given to it.
• gcomm Which provides the group communications back-end for use in production. It takes an address and has
several settings that you can enable through the option list, or by using the wsrep_provider_options (page 192)
parameter.
Cluster Addresses
For this section, provide a comma separate list of IP addresses for nodes in the cluster. The values here can indicate,
• The IP addresses of any current members, in the event that you want to connect to an existing cluster; or,
• The IP addresses of any possible cluster members, assuming that the list members can belong to no more than
one Primary Component;
52
Chapter 4. Node Initialization
Galera Documentation, Release 3.x
If you start the node without an IP address for this parameter, the node assumes that it is the first node of a new cluster.
It initializes a cluster as though you launched mysqld with the --wsrep-new-cluster option.
Options
You can also use the options list to set backend parameters, such as the listen address and timeout values.
Note: See Also: The wsrep_cluster_address (page 181) options list is not durable. The node must resubmit the
options on every connection to the cluster. To make these options durable, set them in the configuration file using the
wsrep_provider_options (page 192) parameter.
The options list set in the URL take precedent over parameters set elsewhere. Parameters that you can set through the
options list are prefixed by evs, pc and gmcast.
Note: See Also: For more information on the available parameters, see Galera Parameters (page 159).
You can set the options with a list of key=value pairs according to the URL standard. For example,
wsrep_cluster_address="gcomm://192.168.0.1, 192.168.0.2, 192.168.0.3 ? gmcast.segment=0 & evs.max_ins
Note: If the listen address and port are not set in the parameter list, gcomm will listen on all interfaces. The listen
port will be taken from the cluster address. If it is not specified in the cluster address, the default port is 4567.
4.3. Replication Configuration
53
Galera Documentation, Release 3.x
54
Chapter 4. Node Initialization
CHAPTER
FIVE
CLUSTER INITIALIZATION
Once you have Galera Cluster installed and configured on your servers, you are ready to initialize the cluster for
operation. You do this by starting the cluster on the first node, then adding the remaining nodes to it.
5.1 Starting the Cluster
When you finish installing and configuring Galera Cluster you have the databases ready for use, but they are not
yet connected to each other to form a cluster. To do this, you will need to start mysqld on one node, using the
--wsrep-new-cluster option. This initializes the new Primary Component for the cluster. Each node you start
after this will connect to the component and begin replication.
Before you attempt to initialize the cluster, check that you have the following ready:
• Database hosts with Galera Cluster installed, you will need a minimum of three hosts;
• No firewalls between the hosts;
• SELinux and AppArmor set to permit access to mysqld; and,
• Correct path to libgalera_smm.so given to the wsrep_provider (page 192) option. For example,
wsrep_provider=/usr/lib64/libgalera_smm.so
With the hosts prepared, you are ready to initialize the cluster.
Note: See Also: When migrating from an existing, standalone instance of MySQL, MariaDB or Percona XtraDB to
Galera Cluster, there are some additional steps that you must take. For more information on what you need to do, see
Migrating to Galera Cluster (page 133).
5.1.1 Starting the First Cluster Node
By default, nodes do not start as part of the Primary Component. Instead, they assume that the Primary Component
exists already somewhere in the cluster.
When nodes start, they attempt to establish network connectivity with the other nodes in the cluster. For each node
they find, they check whether or not it is a part of the Primary Component. When they find the Primary Component,
they request a state transfer to bring the local database into sync with the cluster. If they cannot find the Primary
Component, they remain in a nonoperational state.
There is no Primary Component when the cluster starts. In order to initialize it, you need to explicitly tell one node
to do so with the --wsrep-new-cluster argument. By convention, the node you use to initialize the Primary
Component is called the first node, given that it is the first that becomes operational.
55
Galera Documentation, Release 3.x
Note: See Also: When you start a new cluster, any node can serve as the first node, since all the databases are empty.
When you migrate from MySQL to Galera Cluster, use the original master node as the first node. When restarting the
cluster, use the most advanced node. For more information, see Migrating to Galera Cluster (page 133) and Resetting
the Quorum (page 72).
Bear in mind, the first node is only “first” in that it initializes the Primary Component. This node can fall behind and
leave the cluster without necessarily affecting the Primary Component.
To start the first node, launch the database server on your first node. For systems that use init, run the following
command:
# service mysql start --wsrep-new-cluster
For systems that use systemd, instead use this command:
# systemctl start mysql --wsrep-new-cluster
This starts mysqld on the node.
Note: Warning: Only use the --wsrep-new-cluster argument when initializing the Primary Component. Do
not use it when you want the node to connect to an existing cluster.
Once the node starts the database server, check that startup was successful by checking wsrep_cluster_size (page 204).
In the database client, run the following query:
SHOW STATUS LIKE ’wsrep_cluster_size’;
+--------------------+-------+
| Variable_name
| Value |
+--------------------+-------+
| wsrep_cluster_size | 1
|
+--------------------+-------+
This status variable tells you the number of nodes that are connected to the cluster. Since you have just started your
first node, the value is 1.
Note: Do not restart mysqld at this point.
5.1.2 Adding Additional Nodes to the Cluster
When you start the first node you initialize a new cluster. Once this is done, the procedure for adding all the other
nodes is the same.
To add a node to an existing cluster, launch mysqld as you would normally. If your system uses init, run the
following command:
# service mysql start
For systems that use systemd, instead run this command:
# systemctl start mysql
When the database server initializes as a new node, it connects to the cluster members as defined by the wsrep_cluster_address (page 181) parameter. Using this parameter, it automatically retrieves the cluster map and connects to all other available nodes.
56
Chapter 5. Cluster Initialization
Galera Documentation, Release 3.x
You can test that the node connection was successful using the wsrep_cluster_size (page 204) status variable. In the
database client, run the following query:
SHOW STATUS LIKE ’wsrep_cluster_size’;
+--------------------+-------+
| Variable_name
| Value |
+--------------------+-------+
| wsrep_cluster_size | 2
|
+--------------------+-------+
This indicates that the second node is now connected to the cluster. Repeat this procedure to add the remaining nodes
to your cluster.
When all nodes in the cluster agree on the membership state, they initiate state exchange. In state exchange, the new
node checks the cluster state. If the node state differs from the cluster state, (which is normally the case), the new node
requests a state snapshot transfer from the cluster and it installs it on the local database. After this is done, the new
node is ready for use.
5.2 Testing the Cluster
When you have your cluster up and running, you may want to test certain features to ensure that they are working
properly or to prepare yourself for actual problems that may arise.
5.2.1 Replication Testing
To test that Galera Cluster is working as expected, complete the following steps:
1. On the database client, verify that all nodes have connected to each other:
SHOW STATUS LIKE ’wsrep_%’;
+---------------------------+------------+
| Variable_name
| Value
|
+---------------------------+------------+
...
| wsrep_local_state_comment | Synced (6) |
| wsrep_cluster_size
| 3
|
| wsrep_ready
| ON
|
+---------------------------+------------+
• wsrep_local_state_comment (page 213): The value Synced indicates that the node is connected to the cluster
and operational.
• wsrep_cluster_size (page 204): The value indicates the nodes in the cluster.
• wsrep_ready (page 215): The value ON indicates that this node is connected to the cluster and able to handle
transactions.
2. On the database client of node1, create a table and insert data:
CREATE DATABASE galeratest;
USE galeratest;
CREATE TABLE test_table (
id INT PRIMARY KEY AUTO_INCREMENT,
msg TEXT ) ENGINE=InnoDB;
INSERT INTO test_table (msg)
5.2. Testing the Cluster
57
Galera Documentation, Release 3.x
VALUES ("Hello my dear cluster.");
INSERT INTO test_table (msg)
VALUES ("Hello, again, cluster dear.");
3. On the database client of node2, check that the data was replicated correctly:
USE galeratest;
SELECT * FROM test_table;
+----+-----------------------------+
| id | msg
|
+----+-----------------------------+
| 1 | Hello my dear cluster.
|
| 2 | Hello, again, cluster dear. |
+----+-----------------------------+
The results given in the SELECT query indicates that data you entered in node1 has replicated into node2.
5.2.2 Split-brain Testing
To test Galera Cluster for split-brain situations on a two node cluster, complete the following steps:
1. Disconnect the network connection between the two cluster nodes.
The quorum is lost and the nodes do not serve requests.
2. Reconnect the network connection.
The quorum remains lost, and the nodes do not serve requests.
3. On one of the database clients, reset the quorum:
SET GLOBAL wsrep_provider_options=’pc.bootstrap=1’;
The quorum is reset and the cluster recovered.
5.2.3 Failure Simulation
You can also test Galera Cluster by simulating various failure situations on three nodes as follows:
• To simulate a crash of a single mysqld process, run the command below on one of the nodes:
$ killall -9 mysqld
• To simulate a network disconnection, use iptables or netem to block all TCP/IP traffic to a node.
• To simulate an entire server crash, run each mysqld in a virtualized guest, and abrubtly terminate the entire
virtual instance.
If you have three or more Galera Cluster nodes, the cluster should be able to survive the simulations.
5.3 Restarting the Cluster
Occasionally, you may have to restart the entire Galera Cluster. This may happen, for example, in the case of a power
failure where every node is shut down and you have no mysqld process at all.
To restart an entire Galera Cluster, complete the following steps:
58
Chapter 5. Cluster Initialization
Galera Documentation, Release 3.x
1. Identify the node with the most advanced node state ID.
2. Start the most advanced node as the first node of the cluster.
3. Start the rest of the node as usual.
5.3.1 Identifying the Most Advanced Node
Identifying the most advanced node state ID is managed by comparing the Global Transaction ID values on different
nodes in your cluster. You can find this in the grastate.dat file, located in the datadir for your database.
If the grastate.dat file looks like the example below, you have found the most advanced node state ID:
# GALERA saved state
version: 2.1
uuid:
5ee99582-bb8d-11e2-b8e3-23de375c1d30
seqno:
8204503945773
cert_index:
To find the sequence number of the last committed transaction, run mysqld with the --wsrep-recover option.
This recovers the InnoDB table space to a consistent state, prints the corresponding Global Transaction ID value into
the error log, and then exits. For example:
130514 18:39:13 [Note] WSREP: Recovered position: 5ee99582-bb8d-11e2-b8e323de375c1d30:8204503945771
This value is the node state ID. You can use it to manually update the grastate.dat file, by entering it for the
seqno field, or let mysqld_safe recover automatically and pass the value to your database server the next time
you start it.
5.3.2 Identifying Crashed Nodes
If the grastate.dat file looks like the example below, the node has either crashed during execution of a nontransactional operation, (such as ALTER TABLE), or aborted due to a database inconsistency:
# GALERA saved state
version: 2.1
uuid:
5ee99582-bb8d-11e2-b8e3-23de375c1d30
seqno:
-1
cert_index:
It is possible for you to recover the Global Transaction ID of the last committed transaction from InnoDB, as described
above, but the recovery is rather meaningless. After the crash, the node state is probably corrupted and may not even
prove functional.
In the event that there are no other nodes in the cluster with a well-defined state, then there is no need to preserve the
node state ID. You must perform a thorough database recovery procedure, similar to that used on standalone database
servers. Once you recover one node, use it as the first node in a new cluster.
5.3. Restarting the Cluster
59
Galera Documentation, Release 3.x
60
Chapter 5. Cluster Initialization
Part III
Using Galera Cluster
61
Galera Documentation, Release 3.x
Once you become familiar with the basics of how Galera Cluster works, consider how it can work for you.
63
Galera Documentation, Release 3.x
64
CHAPTER
SIX
WORKING WITH THE CLUSTER
How do you recover failed nodes or a Primary Component? How to secure communications between the cluster
nodes? How do you back up cluster data? With your cluster up and running, you can begin to manage its particular
operations, monitor for and recover from issues, and maintain security.
6.1 Node Provisioning
When the state of a new or failed node differs from that of the cluster’s Primary Component, the new or failed node
must be synchronized with the cluster. Because of this, the provisioning of new nodes and the recover of failed nodes
are essentially the same process as that of joining a node to the cluster Primary Component.
Galera reads the initial node state ID from the grastate.txt file, found in the directory assigned by the
wsrep_data_dir parameter. Each time the node gracefully shuts down, Galera saves to this file.
In the event that the node crashes while in Total Order Isolation mode, its database state is unknown and its initial
node state remains undefined:
00000000-0000-0000-0000-000000000000:-1
Note: In normal transaction processing, only the seqno part of the GTID remains undefined, (that is, with a value
of -1. The UUID, (that is, the remainder of the node state), remains valid. In such cases, you can recover the node
through an Incremental State Transfer.
6.1.1 How Nodes Join the Cluster
When a node joins the cluster, it compares its own state UUID to that of the Primary Component. If the state UUID
does not match, the joining node requests a state transfer from the cluster.
There are two options available to determining the state transfer donor:
• Automatic When the node attempts to join the cluster, the group communication layer determines the state
donor it should use from those members available in the Primary Component.
• Manual When the node attempts to join the cluster, it uses the wsrep_sst_donor (page 196) parameter to determine which state donor it should use. If it finds that the state donor it is looking for is not part of the Primary
Component, the state transfer fails and the joining node aborts. For wsrep_sst_donor (page 196), use the same
name as you use on the donor node for the wsrep_node_name (page 189) parameter.
Note: A state transfer is a heavy operation. This is true not only for the joining node, but also for the donor. In fact,
a state donor may not be able to serve client requests.
65
Galera Documentation, Release 3.x
Thus, whenever possible: manually select the state donor, based on network proximity and configure the load balancer
to transfer client connections to other nodes in the cluster for the duration of the state transfer.
When a state transfer is in process, the joining node caches write-sets that it receives from other nodes in a slave queue.
Once the state transfer is complete, it applies the write-sets from the slave queue to catch up with the current Primary
Component state. Since the state snapshot carries a state UUID, it is easy to determine which write-sets the snapshot
contains and which it should discard.
During the catch-up phase, flow control ensures that the slave queue shortens, (that is, it limits the cluster replication
rates to the write-set application rate on the node that is catching up).
While there is no guarantee on how soon a node will catch up, when it does the node status updates to SYNCED and it
begins to accept client connections.
6.1.2 State Transfers
There are two types of state transfers available to bring the node up to date with the cluster:
• State Snapshot Transfer (SST) Where donor transfers to the joining node a snapshot of the entire node state as
it stands.
• Incremental State Transfer (IST) Where the donor only transfers the results of transactions missing from the
joining node.
When using automatic donor selection, starting in Galera Cluster version 3.6, the cluster decides which state transfer
method to use based on availability.
• If there are no nodes available that can safely perform an incremental state transfer, the cluster defaults to a state
snapshot transfer.
• If there are nodes available that can safely perform an incremental state transfer, the cluster prefers a local node
over remote nodes to serve as the donor.
• If there are no local nodes available that can safely perform an incremental state transfer, the cluster chooses a
remote node to serve as the donor.
• Where there are several local or remote nodes available that can safely perform an incremental state transfer, the
cluster chooses the node with the highest seqno to serve as the donor.
6.2 State Snapshot Transfers
When a node requires a state transfer from the cluster, by default it attempts the Incremental State Transfer (IST)
method. In the event that there are no nodes available for this or if it finds a manual donor defined through the
wsrep_sst_donor (page 196) parameter, uses a State Snapshot Transfer (SST) method.
Galera Cluster supports several back-end methods for use in state snapshot transfers. There are two types of methods available: Logical State Snapshots, which interface through the database server and client; and Physical State
Snapshots, which copy the data files directly from node to node.
Method
Speed
mysqldump
(page 67)
rsync (page 69)
xtrabackup
(page 69)
66
Slow
Blocks
Donor
Blocks
Available on Live
Node
Available
Fastest
Blocks
Unavailable
Fast
Briefly
Unavailable
Type
Logical
(page 67)
Physical
(page 69)
Physical
(page 69)
DB Root
Access
Donor and
Joiner
None
Donor only
Chapter 6. Working with the Cluster
Galera Documentation, Release 3.x
To set the State Snapshot Transfer method, use the wsrep_sst_method (page 197) parameter. For example:
wsrep_sst_method = rsync
There is no single best method for State Snapshot Transfers. You must decide which best suits your particular needs
and cluster deployment. Fortunately, you need only set the method on the receiving node. So long as the donor has
support, it servers the transfer in whatever method the joiner requests.
6.2.1 Logical State Snapshot
There is one back-end method available for a Logical State Snapshots: mysqldump.
The Logical State Transfer Method has the following advantages:
• These transfers are available on live servers. In fact, only a fully initialized server can receive a Logical State
Snapshot.
• These transfers do not require the receptor node to have the same configuration as the donor node. This allows
you to upgrade storage engine options.
For example, when using this transfer method you can migrate from the Antelope to the Barracuda file format,
use compression resize, or move iblog* files from one partition into another.
The Logical State Transfer Method has the following disadvantages:
• These transfers are as slow as mysqldump.
• These transfers require that you configure the receiving database server to accept root connections from potential
donor nodes.
• The receiving server must have a non-corrupted database.
mysqldump
The main advantage of mysqldump is that you can transfer a state snapshot to a working server. That is, you start
the server standalone and then instruct it to join a cluster from within the database client command line. You can also
use it to migrate from an older database format to a newer one.
mysqldump requires that the receiving node have a fully functional database, which can be empty. It also requires
the same root credentials as the donor and root access from the other nodes.
This transfer method is several times slower than the others on sizable databases, but it may prove faster in cases of
very small databases. For instance, on a database that is smaller than the log files.
Note: Warning: This transfer method is sensitive to the version of mysqldump each node uses. It is not uncommon
for a given cluster to have installed several versions. A State Snapshot Transfer can fail if the version one node uses is
older and incompatible with the newer server.
On occasion, mysqldump is the only option available. For instance, if you upgrade from a cluster using MySQL 5.1
with the built-in InnoDB support to MySQL 5.5, which uses the InnoDB plugin.
The mysqldump script only runs on the sending node. The output from the script gets piped to the MySQL client
that connects to the joiner node.
Because mysqldump interfaces through the database client, configuring it requires several steps beyond setting the
wsrep_sst_method (page 197) parameter. For more information on its configuration, see:
6.2. State Snapshot Transfers
67
Galera Documentation, Release 3.x
Enabling mysqldump
The Logical State Transfer Method mysqldump works by interfacing through the database server rather than the
physical data. As such, they require some additional configurations beyond setting the wsrep_sst_method (page 197)
parameter.
Configuring SST Privileges In order for mysqldump to interface with the database server, it requires root connections for both the donor and joiner nodes. You can enable this through the wsrep_sst_auth (page 195) parameter.
Using your preferred text editor, open wsrep.cnf file. You can find it in /etc/mysql/conf.d/), and enter the
relevant authentication information.
# wsrep SST Authentication
wsrep_sst_auth = wsrep_sst_username:password
This provides authentication information that the node requires to establish connections. Use the same values for every
node in your cluster.
Note: Warning: Use your own authentication parameters in place of wsrep_sst_user and password.
Granting SST Privileges When the database server start, it reads from the above file the authentication information
it needs to access another database server. In order for the node to accept connections from the cluster, you must also
create and configure the State Snapshot Transfer user through the database client.
In order to do this, you need to start the database server. If you have not used this node on the cluster before, start it
with replication disabled. For servers that use init, run the following command:
# service mysql start --wsrep-on=off
For servers that use systemd, instead run this command:
# systemctl start mysql --wsrep-on=OFF
When the database server is running, log into the database client and run the GRANT ALL command for the IP address
of each node in your cluster.
GRANT ALL ON *.* TO ’wsrep_sst_user’@’node1_IP_address’
IDENTIFIED BY ’password’;
GRANT ALL ON *.* TO ’wsrep_sst_user’@’node2_IP_address’
IDENTIFIED BY ’password’;
GRANT ALL ON *.* TO ’wsrep_sst_user’@’node3_IP_address’
IDENTIFIED BY ’password’;
These commands grant each node in your cluster access to the database server on this node. You need to run these
commands on every other cluster node to allow mysqldump in state transfers between them.
In the event that you have not yet created your cluster, you can stop the database server while you configure the other
nodes. For servers that use init, run the following command:
# service mysql stop
For servers that use systemd, instead run this command:
# systemctl stop mysql
Note: See Also: For more information on mysqldump, see mysqldump Documentation.
68
Chapter 6. Working with the Cluster
Galera Documentation, Release 3.x
6.2.2 Physical State Snapshot
There are two back-end methods available for Physical State Snapshots: rsync and xtrabackup.
The Physical State Transfer Method has the following advantages:
• These transfers physically copy the data from one node to the disk of the other, and as such do not need to
interact with the database server at either end.
• These transfers do not require the database to be in working condition, as the donor node overwrites what was
previously on the joining node disk.
• These transfers are faster.
The Physical State Transfer Method has the following disadvantages:
• These transfers require the joining node to have the same data directory layout and the same storage engine
configuration as the donor node. For example, you must use the same file-per-table, compression, log file size
and similar settings for InnoDB.
• These transfers are not accepted by servers with initialized storage engines.
What this means is that when your node requires a state snapshot transfer, the database server must restart to
apply the changes. The database server remains inaccessible to the client until the state snapshot transfer is
complete, since it cannot perform authentication without the storage engines.
rsync
The fastest back-end method for State Snapshot Transfers is rsync. It carries all the advantages and disadvantages
of of the Physical Snapshot Transfer. While it does block the donor node during transfer, rsync does not require
database configuration or root access, which makes it easier to configure.
When using terabyte-scale databases, rsync is considerably faster, (1.5 to 2 times faster), than xtrabackup. This
translates to a reduction in transfer times by several hours.
rsync also features the rsync-wan modification, which engages the rsync delta transfer algorithm. However, given
that this makes it more I/O intensive, you should only use it when the network throughput is the bottleneck, which is
usually the case in WAN deployments.
Note: The most common issue encountered with this method is due to incompatibilities between the various versions
of rsync on the donor and joining nodes.
The rsync script runs on both donor and joining nodes. On the joiner, it starts rsync in server-mode and waits for a
connection from the donor. On the donor, it starts rsync in client-mode and sends the contents of the data directory
to the joining node.
wsrep_sst_method = rsync
For more information about rsync, see the rsync Documentation.
xtrabackup
The most popular back-end method for State Snapshot Transfers is xtrabackup. It carries all the advantages and
disadvantages of a Physical State Snapshot, but is virtually non-blocking on the donor node.
xtrabackup only blocks the donor for the short period of time it takes to copy the MyISAM tables, (for instance,
the system tables). If these tables are small, the blocking time remains very short. However, this comes at the cost of
speed: a state snapshot transfer that uses xtrabackup can be considerably slower than one that uses rsync.
6.2. State Snapshot Transfers
69
Galera Documentation, Release 3.x
Given that xtrabackup copies a large amount of data in the shortest possible time, it may also noticeably degrade
donor performance.
Note: The most common issue encountered with this method is due to its configuration. xtrabackup requires that
you set certain options in the configuration file, which means having local root access to the donor server.
[mysqld]
wsrep_sst_auth = <wsrep_sst_user>:<password>
wsrep_sst_method = xtrabackup
datadir = /path/to/datadir
[client]
socket = /path/to/socket
For more information on xtrabackup, see the Percona XtraBackup User Manual and XtraBackup SST Configuration.
6.3 Recovering the Primary Component
Cluster nodes can store the Primary Component state to disk. The node records the state of the Primary Component
and the UUID’s of the nodes connected to it. In the event of an outage, once all nodes that were part of the last saved
state achieve connectivity, the cluster recovers the Primary Component.
In the event that the write-set position differs between the nodes, the recovery process also requires a full state snapshot
transfer.
Note: See Also: For more information on this feature, see the pc.recovery (page 171) parameter. By default, it is
enabled starting in version 3.6.
6.3.1 Understanding the Primary Component State
When a node stores the Primary Component state to disk, it saves it as the gvwstate.dat file. The node creates
and updates this file when the cluster forms or changes the Primary Component. This ensures that the node retains the
latest Primary Component state that it was in. If the node loses connectivity, it has the file to reference. If the node
shuts down gracefully, it deletes the file.
my_uuid: d3124bc8-1605-11e4-aa3d-ab44303c044a
#vwbeg
view_id: 3 0dae1307-1606-11e4-aa94-5255b1455aa0 12
bootstrap: 0
member: 0dae1307-1606-11e4-aa94-5255b1455aa0 1
member: 47bbe2e2-1606-11e4-8593-2a6d8335bc79 1
member: d3124bc8-1605-11e4-aa3d-ab44303c044a 1
#vwend
The gvwstate.dat file breaks into two parts:
• Node Information Provides the node’s UUID, in the my_uuid field.
• View Information Provides information on the node’s view of the Primary Component, contained between the
#vwbeg and #vwend tags.
– view_id Forms an identifier for the view from three parts:
* view_type Always gives a value of 3 to indicate the primary view.
70
Chapter 6. Working with the Cluster
Galera Documentation, Release 3.x
* view_uuid and view_seq together form a unique value for the identifier.
– bootstrap Displays whether or not the node is bootstrapped, but does not effect the Primary Component
recovery process.
– member Displays the UUID’s of nodes in this primary component.
6.3.2 Modifying the Saved Primary Component State
In the event that you find yourself in the unusual situation where you need to force certain nodes to join each other
specifically, you can do so by manually changing the saved Primary Component state.
Note: Warning: Under normal circumstances, for safety reasons, you should entirely avoid editing or otherwise
modifying the gvwstate.dat file. Doing so may lead to unexpected results.
When a node starts for the first time or after a graceful shutdown, it randomly generates and assigns to itself a UUID,
which serves as its identifier to the rest of the cluster. If the node finds a gvwstate.dat file in the data directory, it
reads the my_uuid field to find the value it should use.
By manually assigning arbitrary UUID values to the respective fields on each node, you force them to join each other,
forming a new Primary Component, as they start.
For example, assume that you have three nodes that you would like to start together to form a new Primary Component
for the cluster. You will need to generate three UUID values, one for each node.
SELECT UUID();
+--------------------------------------+
| UUID()
|
+--------------------------------------+
| 47bbe2e2-1606-11e4-8593-2a6d8335bc79 |
+--------------------------------------+
You would then take these values and use them to modify the gwstate.dat file on node1:
my_uuid: d3124bc8-1605-11e4-aa3d-ab44303c044a
#vwbeg
view_id: 3 0dae1307-1606-11e4-aa94-5255b1455aa0 12
bootstrap: 0
member: 0dae1307-1606-11e4-aa94-5255b1455aa0 1
member: 47bbe2e2-1606-11e4-8593-2a6d8335bc79 1
member: d3124bc8-1605-11e4-aa3d-ab44303c044a 1
#vwend
Then repeat the process for node2:
my_uuid: 47bbe2e2-1606-11e4-8593-2a6d8335bc79
#vwbeg
view_id: 3 0dae1307-1606-11e4-aa94-5255b1455aa0 12
bootstrap: 0
member: 0dae1307-1606-11e4-aa94-5255b1455aa0 1
member: 47bbe2e2-1606-11e4-8593-2a6d8335bc79 1
member: d3124bc8-1605-11e4-aa3d-ab44303c044a 1
#vwend
And, the same again for node3:
my_uuid: d3124bc8-1605-11e4-aa3d-ab44303c044a
#vwbeg
6.3. Recovering the Primary Component
71
Galera Documentation, Release 3.x
view_id: 3 0dae1307-1606-11e4-aa94-5255b1455aa0 12
bootstrap: 0
member: 0dae1307-1606-11e4-aa94-5255b1455aa0 1
member: 47bbe2e2-1606-11e4-8593-2a6d8335bc79 1
member: d3124bc8-1605-11e4-aa3d-ab44303c044a 1
#vwend
Then start all three nodes without the bootstrap flag. When they start, Galera Cluster reads the gvwstate.dat file
for each. It pulls its UUID from the file and uses those of the member field to determine which nodes it should join
in order to form a new Primary Component.
6.4 Resetting the Quorum
Occasionally, you may find your nodes no longer consider themselves part of the Primary Component. For instance,
in the event of a network failure, the failure of more than half of the cluster, or a split-brain situation. In these cases,
the node come to suspect that there is another Primary Component, to which they are no longer connected.
When this occurs, all nodes return an Unknown command error to all queries. You can check if this is happening
using the wsrep_cluster_status (page 205) status variable. Run the following query on each node:
SHOW GLOBAL STATUS LIKE ’wsrep_cluster_status’;
+----------------------+---------+
| Variable_name
| Value
|
+----------------------+---------+
| wsrep_cluster_status | Primary |
+----------------------+---------+
The return value Primary indicates that it the node is part of the Primary Component. When the query returns any
other value it indicates that the node is part of a nonoperational component. If none of the nodes return the value
Primary, it means that you need to reset the quorum.
Note: Bear in mind that situations where none of the nodes show as part of the Primary Component are very rare.
In the event that you do find one or more nodes that return the value Primary, this indicates an issue with network
connectivity rather than a need to reset the quorum. Troubleshoot the connection issue. Once the nodes regain network
connectivity they automatically resynchronize with the Primary Component.
6.4.1 Finding the Most Advanced Node
Before you can reset the quorum, you need to identify the most advanced node in the cluster. That is, you must find the
node whose local database committed the last transaction. Regardless of the method you use in resetting the quorum,
this node serves as the starting point for the new Primary Component.
Identifying the most advanced node in the cluster requires that you find the node with the most advanced sequence
number, or seqno. You can determine this using the wsrep_last_committed (page 209) status variable.
From the database client on each node, run the following query:
SHOW STATUS LIKE ’wsrep_last_committed’;
+----------------------+--------+
| Variable_name
| Value |
+----------------------+--------+
| wsrep_last_committed | 409745 |
+----------------------+--------+
72
Chapter 6. Working with the Cluster
Galera Documentation, Release 3.x
The return value is the seqno for the last transaction the node committed. The node that provides the highest seqno
is the most advanced node in your cluster. Use it as the starting point in the next section when bootstrapping the new
Primary Component.
6.4.2 Resetting the Quorum
When you reset the quorum what you are doing is bootstrapping the Primary Component on the most advanced node
you have available. This node then functions as the new Primary Component, bringing the rest of the cluster into line
with its state.
There are two methods available to you in this process: automatic and manual.
Note: The preferred method for a quorum reset is the automatic method. Unlike the manual method, automatic
bootstraps preserve the write-set cache, or GCache, on each node. What this means is that when the new Primary
Component starts, some or all of the joining nodes can provision themselves using the Incremental State Transfer
(IST) method, rather than the much slower State Snapshot Transfer (SST) method.
Automatic Bootstrap
Resetting the quorum bootstraps the Primary Component onto the most advanced node. In the automatic method
this is done by enabling pc.bootstrap (page 172) under wsrep_provider_options (page 192) dynamically through the
database client. This makes the node a new Primary Component.
To perform an automatic bootstrap, on the database client of the most advanced node, run the following command:
SET GLOBAL wsrep_provider_options=’pc.boostrap=YES’;
The node now operates as the starting node in a new Primary Component. Nodes in nonoperational components that
have network connectivity attempt to initiate incremental state transfers if possible, state snapshot transfers if not, with
this node, bringing their own databases up-to-date.
Manual Bootstrap
Resetting the quorum bootstraps the Primary Component onto the most advanced node. In the manual method this is
done by shutting down the cluster, then starting it up again beginning with the most advanced node.
To manually bootstrap your cluster, complete the following steps:
1. Shut down all cluster nodes. For servers that use init, run the following command from the console:
# service mysql stop
For servers that use systemd, instead run this command:
# systemctl stop mysql
2. Start the most advanced node with the --wsrep-new-cluster option. For servers that use init, run the
following command:
# service mysql start --wsrep-new-cluster
For servers that use systemd, instead run this command:
# systemctl start mysql --wsrep-new-cluster
3. Start every other node in the cluster. For servers that use init, run the following command:
6.4. Resetting the Quorum
73
Galera Documentation, Release 3.x
# service mysql start
For servers that use systemd, instead run this command:
# systemctl start mysql
When the first node starts with the --wsrep-new-cluster option, it initializes a new cluster using the data from
the most advanced state available from the previous cluster. As the other nodes start they connect to this node and
request state snapshot transfers, to bring their own databases up-to-date.
6.5 Managing Flow Control
The cluster replicates changes synchronously through global ordering, but applies these changes asynchronously from
the originating node out. To prevent any one node from falling too far behind the cluster, Galera Cluster implements a
feedback mechanism called Flow Control.
Nodes queue the write-sets they receive in the global order and begin to apply and commit them on the database. In
the event that the received queue grows too large, the node initiates Flow Control. The node pauses replication while it
works the received queue. Once it reduces the received queue to a more manageable size, the node resumes replication.
6.5.1 Monitoring Flow Control
Galera Cluster provides global status variables for use in monitoring Flow Control. These break down into those status
variables that count Flow Control pause events and those that measure the effects of pauses.
SHOW STATUS LIKE ’wsrep_flow_control_%’;
Running these status variables returns only the node’s present condition. You are likely to find the information more
useful by graphing the results, so that you can better see the points where Flow Control engages.
For instance, using myq_gadgets:
$ mysql -u monitor -p -e ’FLUSH TABLES WITH READ LOCK;’ \
example_database
$ myq_status wsrep
Wsrep
time
09:22:17
09:22:18
09:22:19
09:22:20
09:22:21
09:22:22
09:22:23
Cluster
name
cluster1
cluster1
cluster1
cluster1
cluster1
cluster1
cluster1
P cnf
P
3
P
3
P
3
P
3
P
3
P
3
P
3
Node
# name
3 node3
3 node3
3 node3
3 node3
3 node3
3 node3
3 node3
cmt
Sync
Sync
Sync
Sync
Sync
Sync
Sync
Queue Ops
sta Up Dn
T/T
0
0
T/T
0
0
T/T
0
4
T/T
0 18
T/T
0 27
T/T
0 29
T/T
0 29
Up
0
0
0
0
0
0
0
Bytes
Flow
Conflct
Dn
Up
Dn pau snt dst lcf bfa
9
0 13K 0.0
0 101
0
0
18
0 28K 0.0
0 108
0
0
3
0 4.3K 0.0
0 109
0
0
0
0
0 0.0
0 109
0
0
0
0
0 0.0
0 109
0
0
0
0
0 0.9
1 109
0
0
0
0
0 1.0
0 109
0
0
You can find the slave queue under the Queue Dn column and FC pau refers to Flow Control pauses. When the
slave queue rises to a certain point, Flow Control changes the pause value to 1.0. The node will hold to this value
until the slave queue is worked down to a more manageable size.
Note: See Also: For more information on status variables that relate to flow control, see Galera Status Variables
(page 201).
74
Chapter 6. Working with the Cluster
Galera Documentation, Release 3.x
Monitoring for Flow Control Pauses
When Flow Control engages, it notifies the cluster that it is pausing replication using an FC_Pause event. Galera
Cluster provides two status variables that monitor for these events.
• wsrep_flow_control_sent (page 208) This status variable shows the number of Flow Control pause events sent
by the local node since the last status query.
• wsrep_flow_control_recv (page 208) This status variable shows the number of Flow Control pause events on the
cluster, both those from other nodes and those sent by the local node, since the last status query.
Measuring the Flow Control Pauses
In addition to tracking Flow Control pauses, Galera Cluster also allows you to track the amount of time since the last
SHOW STATUS query during which replication was paused due to Flow Control.
You can find this using one of two status variables:
• wsrep_flow_control_paused (page 207) Provides the amount of time replication was paused as a fraction. Effectively, how much the slave lag is slowing the cluster. The value 1.0 indicates replication is paused now.
• wsrep_flow_control_paused_ns (page 208) Provides the amount of time replication was paused in nanoseconds.
6.5.2 Configuring Flow Control
Galera Cluster provides two sets of parameters that allow you to manage how nodes handle the replication rate and
Flow Control. The first set controls the write-set cache, the second relates to the points at which the node engages and
disengages Flow Control.
Managing the Replication Rate
These three parameters control how nodes respond to changes in the replication rate. They allow you to manage the
write-set cache on an individual node.
• gcs.recv_q_hard_limit (page 169) This sets the maximum write-set cache size (in bytes). The parameter value
depends on the amount of RAM, swap size and performance considerations.
The default value is SSIZE_MAX minus 2 gigabytes on 32-bit systems. There is no practical limit on 64-bit
systems.
In the event that a node exceeds this limit and gcs.max_throttle (page 169) is not set at 0.0, the node aborts
with an out-of-memory error. If gcs.max_throttle (page 169) is set at 0.0., replication in the cluster stops.
• gcs.max_throttle (page 169) This sets the smallest fraction to the normal replication rate the node can tolerate
in the cluster. If you set the parameter to 1.0 the node does not throttle the replication rate. If you set the
parameter for 0.0, a complete replication stop is possible.
The default value is 0.25.
• gcs.recv_q_soft_limit (page 169) This serves to estimate the average replication rate for the node. It is a fraction
of the gcs.recv_q_hard_limit (page 169). When the replication rate exceeds the soft limit, the node calculates the
average replication rate (in bytes) during this period. After that, the node decreases the replication rate linearly
with the cache size so that at the gcs.recv_q_hard_limit (page 169) it reaches the value of the gcs.max_throttle
(page 169) times the average replication rate.
The default value is 0.25.
Note:
When the node estimates the average replication rate, it can reach a value that is way off from the
6.5. Managing Flow Control
75
Galera Documentation, Release 3.x
sustained replication rate.
The write-set cache grows semi-logarithmically with time after the gcs.recv_q_soft_limit (page 169) and the time
needed for a state transfer to complete.
Managing Flow Control
These parameters control the point at which the node triggers Flow Control and the factor used in determining when
it should disengage Flow Control and resume replication.
• gcs.fc_limit (page 168) This parameter determines the point at which Flow Control engages. When the slave
queue exceeds this limit, the node pauses replication.
It is essential for multi-master configurations that you keep this limit low. The certification conflict rate is
proportional to the slave queue length. In master-save setups, you can use a considerably higher value to reduce
Flow Control intervention.
The default value is 16.
• gcs.fc_factor (page 168) This parameter is used in determining when the node can disengage Flow Control.
When the slave queue on the node drops below the value of gcs.fc_limit (page 168) times that of gcs.fc_factor
(page 168) replication resumes.
The default value is 0.5.
Bear in mind that, while it is critical for multi-master operations that you use as small a slave queue as possible, the
slave queue length is not so critical in master-slave setups. Depending on your application and hardware, the node can
apply even 1K of write-sets in a fraction of a second. The slave queue length has no effect on master-slave failover.
Note: Warning: Cluster nodes process transactions asynchronously with regards to each other. Nodes cannot
anticipate in any way the amount of replication data. Because of this, Flow Control is always reactive. That is, it
only comes into affect after the node exceeds certain limits. It cannot prevent exceeding these limits or, when they are
exceeded, it cannot make any guarantee as to the degree they are exceeded.
Meaning, if you were to configure a node with:
gcs.recv_q_hard_limit=100Mb
That node can still exceed that limit from a 1Gb write-set.
6.6 Auto Eviction
When Galera Cluster notices erratic behavior in a node, such as unusually delayed response times, it can initiate a
process to remove the node permanently from the cluster. This process is called Auto Eviction.
6.6.1 Configuring Auto Eviction
Each node in your cluster monitors the group communication response times from all other nodes in the cluster. When
the cluster registers delayed responses from a node, it adds an entry for the node to the delayed list.
If the delayed node becomes responsive again for a fixed period, entries for that node are removed from the delayed
list. If the node receives enough delayed entries and it is found on the delayed list for the majority of the cluster, the
delayed node is evicted permanently from the cluster.
Evicted nodes cannot rejoin the cluster until restarted.
76
Chapter 6. Working with the Cluster
Galera Documentation, Release 3.x
You can configure Auto Eviction by setting options through the wsrep_provider_options (page 192) parameter.
• evs.delayed_margin (page 163) This sets the time period that a node can delay its response from expectations
until the cluster adds it to the delayed list. You must set this parameter to a value higher than the round-trip
delay time (RTT) between the nodes.
The default value is PT1S.
• evs.delayed_keep_period (page 162) This sets the time period you require a node to remain responsive until one
entry is removed from the delayed list.
The default value is PT30S.
• evs.evict (page 163) This sets the point where the cluster triggers manual eviction to a certain node value. Setting
this parameter as an empty string causes it to clear the evict list on the node where it is set.
• evs.auto_evict (page 161) This sets the number of entries allowed for a delayed node before Auto Eviction takes
place. Setting this to 0 disables the Auto Eviction protocol on the node, though the node will continue to monitor
node response times.
The default value is 0.
• evs.version (page 166) This sets which version of the EVS Protocol the node uses. Galera Cluster enables Auto
Eviction starting with EVS Protocol version 1.
The default value is version 0, for backwards compatibility.
6.6.2 Checking Eviction Status
In the event that you suspect the node or a node in your cluster is entering a delayed, you can check its eviction status
through Galera status variables.
• wsrep_evs_state (page 207) This status variable gives the internal state of the EVS Protocol.
• wsrep_evs_delayed (page 206) This status variable gives a comma separated list of nodes on the delayed list.
The node listing format is uuid:address:count. The count referrs to the number of entries for the given
delayed node.
• wsrep_evs_evict_list (page 207) This status variable lists the UUID’s of evicted nodes.
You can check these status variables using the SHOW STATUS query from the database client. For example,
SHOW STATUS LIKE ’wsrep_evs_delayed’;
6.6.3 Upgrading from Previous Versions
Releases of Galera Cluster prior to version 3.8 use EVS Protocol version 0, which is not directly compatible with
version 1. As such, when you upgrade Galera Cluster for your node, the node continues to use EVS Protocol version
0.
To update the EVS Protocol version, you must first update the Galera Cluster software on each node:
1. Choose a node to start the upgrade and stop mysqld. For systems that use init, run the following command:
# service mysql stop
For systems that run systemd, instead use this command:
# systemctl stop mysql
6.6. Auto Eviction
77
Galera Documentation, Release 3.x
2. Once you stop mysqld, update the Galera Cluster software for the node. This can vary depending upon how
you installed Galera Cluster and which distribution and database server you use.
3. Using a text editor, edit your configuration file, /etc/my.cnf, setting the EVS Protocol version to 0.
wsrep_provider_options="evs.version=0"
4. Restart the node. For systems that use init, run the following command:
# service mysql start
For systems that run systemd, instead use this command:
# systemctl start mysql
5. Using the database client, check the node state.
SHOW STATUS LIKE ’wsrep_local_state_comment’;
+----------------------------+--------+
| Variable_name
| Value |
+----------------------------+--------+
| wsrep_local_state_comment | Joined |
+----------------------------+--------+
When the node state reads as Synced, the node is back in sync with the cluster.
Repeat the above procedure to update the remaining nodes in the cluster. Once this process is complete, your cluster
will have the latest version of Galera Cluster. You can then begin updating the EVS Protocol version for each node.
1. Choose a node to start on, then using a text editor, update the EVS Protocol version in the configuration file,
/etc/my.cnf.
wsrep_provider_options="evs.version=1"
2. Restart mysqld. If your system uses init, run the following command:
# service mysql restart
For system that run systemd, instead use this command:
# systemctl restart mysql
3. Using the database clinet, check that the EVS Protocol is using version 1 by running the new wsrep_evs_state
(page 207) status variable.
SHOW STATUS LIKE ’wsrep_evs_state’;
If the STATUS query returns an empty set, something went wrong and your database server is still on EVS
Protocol version 0. If it returns a set, the EVS Protocol is on the right version and you can proceed.
4. Check the node state.
SHOW STATUS LIKE ’wsrep_local_state_comment’;
+----------------------------+--------+
| Variable_name
| Value |
+----------------------------+--------+
| wsrep_local_state_comment | Joined |
+----------------------------+--------+
When the node state reads as Synced, the node is back in sync with the cluster.
78
Chapter 6. Working with the Cluster
Galera Documentation, Release 3.x
This updates the EVS Protocol version for one node in your cluster. Repeat the process on the remaining nodes, so
that they all use EVS Protocol version 1.
Note: See Also: For more information on upgrading in general, see Upgrading Galera Cluster (page 80).
6.7 Schema Upgrades
Any DDL (Data Definition Language) statement that runs for the database, such as CREATE TABLE or GRANT,
upgrades the schema. These DDL statements change the database itself and are non-transactional.
Galera Cluster processes schema upgrades in two different methods:
• Total Order Isolation (page 79) (TOI) Where the schema upgrades run on all cluster nodes in the same total
order sequence, locking affected tables for the duration of the operation.
• Rolling Schema Upgrade (page 80) (RSU) Where the schema upgrades run locally, blocking only the node on
which they are run. The changes do not replicate to the rest of the cluster.
You can set the method for online schema upgrades by using the wsrep_OSU_method parameter in the configuration
file, (my.ini or my.cnf, depending on your build) or through the MySQL client. Galera Cluster defaults to the Total
Order Isolation method.
Note: See Also: If you are using Galera Cluster for Percona XtraDB Cluster, see the the pt-online-schema-change in
the Percona Toolkit.
6.7.1 Total Order Isolation
When you want your online schema upgrades to replicate through the cluster and don’t mind the loss of high availability while the cluster processes the DDL statements, use the Total Order Isolation method.
SET GLOBAL wsrep_OSU_method=’TOI’;
In Total Order Isolation, queries that update the schema replicate as statements to all nodes in the cluster before they
execute on the master. The nodes wait for all preceding transactions to commit then, simultaneously, they execute the
schema upgrade in isolation. For the duration of the DDL processing, part of the database remains locked, causing
the cluster to function as single server.
The cluster can maintain isolation at the following levels:
• Server Level For CREATE SCHEMA, GRANT and similar queries, where the cluster cannot apply concurrently
any other transactions.
• Schema Level For CREATE TABLE and similar queries, where the cluster cannot apply concurrently any
transactions that access the schema.
• Table Level For ALTER TABLE and similar queries, where the cluster cannot apply concurrently any other
transactions that access the table.
The main advantage of Total Order Isolation is its simplicity and predictability, which guarantees data consistency.
In addition, when using Total Order Isolation you should take the following particularities into consideration:
• From the perspective of certification, schema upgrades in Total Order Isolation never conflict with preceding
transactions, given that they only execute after the cluster commits all preceding transactions. What this means
is that the certification interval for schema upgrades in this method is of zero length. The schema upgrades never
fail certification and their execution is a guarantee.
6.7. Schema Upgrades
79
Galera Documentation, Release 3.x
• The certification process takes place at a resource level. Under server-level isolation transactions that come in
during the certification interval that include schema upgrades in Total Order Isolation, will fail certification.
• The cluster replicates the schema upgrade query as a statement before its execution. There is no way to know
whether or not the nodes succeed in processing the query. This prevents error checking on schema upgrades in
Total Order Isolation.
The main disadvantage of Total Order Isolation is that while the nodes process the DDL statements, the cluster
functions as a single server, which can potentially prevent high-availability for the duration of the process.
6.7.2 Rolling Schema Upgrade
When you want to maintain high-availability during schema upgrades and can avoid conflicts between new and old
schema definitions, use the Rolling Schema Upgrade method.
SET GLOBAL wsrep_OSU_method=’RSU’;
In Rolling Schema Upgrade, queries that update the schema are only processed on the local node. While the node
processes the schema upgrade, it desynchronizes with the cluster. When it finishes processing the schema upgrade it
applies delayed replication events and synchronizes itself with the cluster.
To upgrade the schema cluster-wide, you must manually execute the query on each node in turn. Bear in mind that
during a rolling schema upgrade the cluster continues to operate, with some nodes using the old schema structure
while others use the new schema structure.
The main advantage of the Rolling Schema Upgrade is that it only blocks one node at a time.
The main disadvantage of the Rolling Schema Upgrade is that it is potentially unsafe, and may fail if the new and old
schema definitions are incompatible at the replication event level.
Note: Warning: To avoid conflicts between new and old schema definitions, execute operations such as CREATE
TABLE and DROP TABLE using the Total Order Isolation (page 79) method.
6.8 Upgrading Galera Cluster
You have three methods available in upgrading Galera Cluster:
• Rolling Upgrade (page 80) Where you upgrade each node one at a time.
• Bulk Upgrade (page 82) Where you upgrade all nodes together.
• Provider Upgrade (page 82) Where you only upgrade the Galera Replication Plugin.
There are advantages and disadvantages to each method. For instance, while a rolling upgrade may prove time consuming, the cluster remains up. Similarly, while a bulk upgrade is faster, problems can result in longer outages. You
must choose the best method to implement in upgrading your cluster.
6.8.1 Rolling Upgrade
When you need the cluster to remain live and do not mind the time it takes to upgrade each node, use rolling upgrades.
In rolling upgrades, you take each node down individually, upgrade its software and then restart the node. When the
node reconnects, it brings itself back into sync with the cluster, as it would in the event of any other outage. Once the
individual finishes syncing with the cluster, you can move to the next in the cluster.
80
Chapter 6. Working with the Cluster
Galera Documentation, Release 3.x
The main advantage of a rolling upgrade is that in the even that something goes wrong with the upgrade, the other
nodes remain operational, giving you time to troubleshoot the problem.
Some of the disadvantages to consider in rolling upgrades are:
• Time Consumption Performing a rolling upgrade can take some time, longer depending on the size of the
databases and the number of nodes in the cluster, during which the cluster operates at a diminished capacity.
Unless you use Incremental State Transfer, as you bring each node back online after an upgrade, it initiates a
full State Snapshot Transfer, which can take a long time to process on larger databases and slower state transfer
methods.
During the State Snapshot Transfer, the node continues to accumulate catch-up in the replication event queue,
which it will then have to replay to synchronize with the cluster. At the same time, the cluster is operational and
continues to add further replication events to the queue.
• Blocking Nodes When the node comes back online, if you use mysqldump for State Snapshot Transfers, the
donor node remains blocked for the duration of the transfer. In practice, this means that the cluster is short two
nodes for the duration of the state transfer, one for the donor node and one for the node in catch-up.
Using xtrabackup or rsync with the LVM state transfer methods, you can avoid blocking the donor, but doing
so may slow the donor node down.
Note: Depending on the load balancing mechanism, you may have to configure the load balancer not to direct
requests at joining and donating nodes.
• Cluster Availability Taking down nodes for a rolling upgrade can greatly diminish cluster performance or
availability, such as if there are too few nodes in the cluster to begin with or where the cluster is operating at its
maximum capacity.
In such cases, losing access to two nodes during a rolling upgrade can create situations where the cluster can
no longer serve all requests made of it or where the execution times of each request increase to the point where
services become less available.
• Cluster Performance Each node you bring up after an upgrade, diminishes cluster performance until the node
buffer pool warms back up. Parallel applying can help with this.
To perform a rolling upgrade on Galera Cluster, complete the following steps for each node:
Note: Transfer all client connections from the node you are upgrading to the other nodes for the duration of this
procedure.
1. Shut down the node.
2. Upgrade the software.
3. Restart the node.
Once the node finishes synchronizing with the cluster and completes its catch-up, move on tot he next node in the
cluster. Repeat the procedure until you have upgraded all nodes in the cluster.
Tip: If you are upgraded a node that is or will be part of a weighted quorum, set the initial node weight to zero.
This guarantees that if the joining node should fail before it finishes synchronizing, it will not affect any quorum
computations that follow.
6.8. Upgrading Galera Cluster
81
Galera Documentation, Release 3.x
6.8.2 Bulk Upgrade
When you want to avoid time-consuming state transfers and the slow process of upgrading each node, one at a time,
use a bulk upgrade.
In bulk upgrades, you take all of the nodes down in an idle cluster, perform the upgrades, then bring the cluster back
online. This allows you to upgrade your cluster quickly, but does mean a complete service outage for your cluster.
Note: Warning: Always use bulk upgrades when using a two-node cluster, as the rolling upgrade would result in a
much longer service outage.
The main advantage of bulk upgrade is that when you are working with huge databases, it is much faster and results
in better availability than rolling upgrades.
The main disadvantage is that it relies on the upgrade and restart being quick. Shutting down InnoDB may take a few
minutes as it flushes dirty pages. If something goes wrong during the upgrade, there is little time to troubleshoot and
fix the problem.
Note: To minimize any issues that might arise from an upgrade, do not upgrade all of the nodes at once. Rather, run
the upgrade on a single node first. If it runs without issue, upgrade the rest of the cluster.
To perform a bulk upgrade on Galera Cluster, complete the following steps:
1. Stop all load on the cluster
2. Shut down all the nodes
3. Upgrade software
4. Restart the nodes. The nodes will merge to the cluster without state transfers, in a matter of seconds.
5. Resume the load on the cluster
Note: You can carry out steps 2-3-4 on all nodes in parallel, therefore reducing the service outage time to virtually
the time needed for a single server restart.
6.8.3 Provider-only Upgrade
When you only need to upgrade the Galera provider, you can further optimize the bulk upgrade to only take a few
seconds.
Important: In provider-only upgrade, the warmed up InnoDB buffer pool is fully preserved and the cluster continues
to operate at full speed as soon as you resume the load.
Upgrading Galera Replication Plugin
If you installed Galera Cluster for MySQL using the binary package from the Codership repository, you can upgrade
the Galera Replication Plugin through your package manager..
To upgrade the Galera Replicator Plugin on an RPM-based Linux distribution, run the following command for each
node in the cluster:
$ yum update galera
82
Chapter 6. Working with the Cluster
Galera Documentation, Release 3.x
To upgrade the Galera Replicator Plugin on a Debian-based Linux distribution, run the following commands for each
node in the cluster:
$ apt-get update
$ apt-get upgrade galera
When apt-get or yum finish, you will have the latest version of the Galera Replicator Plugin available on the node.
Once this process is complete, you can move on to updating the cluster to use the newer version of the plugin.
Updating Galera Cluster
After you upgrade the Galera Replicator Plugin package on each node in the cluster, you need to run a bulk upgrade
to switch the cluster over to the newer version of the plugin.
1. Stop all load on the cluster.
2. For each node in the cluster, issue the following queries:
SET GLOBAL wsrep_provider=’none’;
SET GLOBAL wsrep_provider=’/usr/lib64/galera/libgalera_smm.so’;
3. One any one node in the cluster, issue the following query:
SET GLOBAL wsrep_cluster_address=’gcomm://’;
4. For every other node in the cluster, issue the following query:
SET GLOBAL wsrep_cluster_address=’gcomm://node1addr’;
For node1addr, use the address of the node in step 3.
5. Resume the load on the cluster.
Reloading the provider and connecting it to the cluster typically takes less than ten seconds, so there is virtually no
service outage.
6.9 Scriptable State Snapshot Transfers
When a node sends and receives a State Snapshot Transfer, it manage it through processes that run external to the
database server. In the event that you need more from these processes that the default behavior provides, Galera
Cluster provides an interface for custom shell scripts to manage state snapshot transfers on the node.
6.9.1 Using the Common SST Script
Galera Cluster includes a common script for managing a State Snapshot Transfer, which you can use as a starting
point in building your own custom script. The filename is wsrep_sst_common.sh. For Linux users, the package
manager typically installs it for you in /usr/bin.
The common SST script provides ready functions for parsing argument lists, logging errors, and so on. There are no
constraints on the order or number of parameters it takes. You can add to it new parameters and ignore any of the
existing as suits your needs.
It assumes that the storage engine initialization on the receiving node takes place only after the state transfer is complete. Meaning that it copies the contents of the source data directory to the destination data directory (with possible
variations).
6.9. Scriptable State Snapshot Transfers
83
Galera Documentation, Release 3.x
6.9.2 State Transfer Script Parameters
When Galera Cluster starts an external process for state snapshot transfers, it passes a number of parameters to the
script, which you can use in configuring your own state transfer script.
General Parameters
These parameters are passed to all state transfer scripts, regardless of method or whether the node is sending or
receiving:
• --role The script is given a string, either donor or joiner, to indicate whether the node is using it to send
or receive a state snapshot transfer.
• --address The script is given the IP address of the joiner node.
When the script is run by the joiner, the node uses the value of either the wsrep_sst_receive_address
(page 198) parameter or a sensible default formatted as <ip_address>:<port>. When the script
is run by the donor, the node uses the value from the state transfer request.
• --auth The script is given the node authentication information.
When the script is run by the joiner, the node uses the value given to the wsrep_sst_auth (page 195)
parameter. When the script is run by the donor, it uses the value given by the state transfer request.
• --datadir The script is given the path to the data directory.
‘‘mysql_real_data_home‘ parameter.
The value is drawn from the
• --defaults-file The script is given the path to the my.cnf configuration file.
The values the node passes to these parameters varies depending on whether the node calls the script to send or receive
a state snapshot transfer. For more information, see Calling Conventions (page 85) below.
Donor-specific Parameters
These parameters are passed only to state transfer scripts initiated by a node serving as the donor node, regardless of
the method being used:
• --gtid The node gives the Global Transaction ID, which it forms from the state UUID and the sequence
number, or seqno, of the last committed transaction.
• --socket The node gives the local server socket for communications, if required.
• --bypass The node specifies whether the script should skip the actual data transfer and only pass the Global
Transaction ID to the receiving node. That is, whether the node should initiate an Incremental State Transfer.
Logical State Transfer-specific Parameters
These parameters are passed only to the wsrep_sst_mysqldump.sh state transfer script by both the sending and
receiving nodes:
• --user The node gives to the script the database user, which the script then uses to connect to both donor and
joiner database servers. Meaning, this user must be the same on both servers, as defined by the wsrep_sst_auth
(page 195) parameter.
• --password The node gives to the script the password for the database user, as configured by the wsrep_sst_auth (page 195) paraemter.
• --host The node gives to the script the IP address of the joiner node.
84
Chapter 6. Working with the Cluster
Galera Documentation, Release 3.x
• --port The node gives to the script the port number to use with the joiner node.
• --local-port The node gives to the script the port number to use in sending the state transfer.
6.9.3 Calling Conventions
In writing your own custom script for state snapshot transfers, there are certain conventions that you need to follow in
order to accommodate how Galera Cluster calls the script.
Receiver
When the node calls for a state snapshot transfer as a joiner, it begins by passing a number of arguments to the state
transfer script, as defined in General Parameters (page 84) above. For your own script you can choose to use or ignore
these arguments as suits your needs.
After the script receives these arguments, prepare the node to accept a state snapshot transfer. For example, in the case
of wsrep_sst_rsync.sh, the script starts rsync in server mode.
To signal that the node is ready to receive the state transfer, print the following string to standard output: ready
<address>:port\n. Use the IP address and port at which the node is waiting for the state snapshot. For example:
ready 192.168.1.1:4444
The node responds by sending a state transfer request to the donor node. The node forms the request with the address
and port number of the joiner node, the values given to wsrep_sst_auth (page 195), and the name of your script. The
donor receives the request and uses these values as input parameters in running your script on that node to send back
the state transfer.
When the joiner node receives the state transfer and finishes applying it, print to standard output the Global Transaction
ID of the received state. For example:
e2c9a15e-5485-11e0-0800-6bbb637e7211:8823450456
Then exit the script with a 0 status, to indicate that the state transfer was successful.
Sender
When the node calls for a state snapshot transfer as a donor, it begins by passing a number of arguments to the state
transfer script, as defined in General Parameters (page 84) above. For your own script, you can choose to use or ignore
these arguments as suits your needs.
While your script runs, Galera Cluster accepts the following signals. You can trigger them by printing to standard
output:
• flush tables\n Optional signal that asks the database server to run FLUSH TABLES. When complete,
the database server creates a tables_flushed file in the data directory.
• continue\n Optional signal that tells the database server that it can continue to commit transactions.
• done\n Mandatory signal that tells the database server that the state transfer is complete and successful.
After your script sends the done\n signal, exit with a 0 return code.
In the event of failure, Galera Cluster expects your script to return a code that corresponds to the error it encountered.
The donor node returns this code to the joiner through group communication. Given that its data directory now holds
an inconsistent state, the joiner node then leaves the cluster and aborts the state transfer.
Note: Without the continue\n signal, your script runs in Total Order Isolation, which guarantees that no further
6.9. Scriptable State Snapshot Transfers
85
Galera Documentation, Release 3.x
commits occur until the script exits.
6.9.4 Enabling Scriptable SST’s
Whether you use wsrep_sst_common.sh directly or decide to write a script of your own from scratch, the process
for enabling it remains the same. The filename must follow the convention of wsrep_sst_<name>.sh, with
<name> being the value that you give for the wsrep_sst_method (page 197) parameter in the configuration file.
For example, if you write a script with the filename wsrep_sst_galera-sst.sh, you would add the following
line to your my.cnf:
wsrep_sst_method = galera-sst
When the node starts, it uses your custom script for state snapshot transfers.
6.10 Galera Arbitrator
The recommended deployment of Galera Cluster is that you use a minimum of three instances. Three nodes, three
datacenters and so on.
In the event that the expense of adding resources, such as a third datacenter, is too costly, you can use Galera Arbitrator.
Galera Arbitrator is a member of the cluster that participates in voting, but not in the actual replication.
Note: Warning While Galera Arbitrator does not participate in replication, it does receive the same data as all other
nodes. You must secure its network connection.
Galera Arbitrator serves two purposes:
• When you have an even number of nodes, it functions as an odd node, to avoid split-brain situations.
• It can request a consistent application state snapshot, for use in making backups.
If one datacenter fails or loses WAN connection, the node that sees the arbitrator, and by extension sees clients,
continues operation.
Note: Even though Galera Arbitrator does not store data, it must see all replication traffic. Placing Galera Arbitrator
in a location with poor network connectivity to the rest of the cluster may lead to poor cluster performance.
In the event that Galera Arbitrator fails, it does not affect cluster operation. You can attach a new instance to the cluster
at any time and there can be several instances running in the cluster.
Note: See Also: For more information on using Galera Arbitrator in making backups, see Backing Up Cluster Data
(page 89).
6.10.1 Starting Galera Arbitrator
Galera Arbitrator is a separate daemon from Galera Cluster, called garbd. This means that you must start it separate
from the cluster. It also means that you cannot configure Galera Arbitrator through the my.cnf configuration file.
How you configure Galera Arbitrator depends on how you start it. That is, whether it runs from the shell or as a
service.
86
Chapter 6. Working with the Cluster
Galera Documentation, Release 3.x
Figure 6.1: Galera Arbitrator
Note: When Galera Arbitrator starts, the script executes a sudo statement as the user nobody during its process. There is a particular issue in Fedora and some other distributions of Linux, where the default sudo configuration blocks users that operate without tty access. To correct this, using your preferred text editor, edit the
/etc/sudoers file and comment out the line
Defaults requiretty
This prevents the operating system from blocking Galera Arbitrator.
Starting Galera Arbitrator from the Shell
When starting Galera Arbitrator from the shell, you have two options in how you configure it. Firstly, you can set the
parameters through the command line arguments. For example,
$ garbd --group=example_cluster \
--address="gcomm://192.168.1.1,192.168.1.2,192.168.1.3" \
--option="socket.ssl_key=/etc/ssl/galera/server-key.pem;socket.ssl_cert=/etc/ssl/galera/server-c
If you use SSL it is necessary to also specify the cipher, otherwise there will be “terminate called after throwing an
instance of ‘gu::NotSet”’ after initializing the ssl context.
If you do not want to type out the options every time you start Galera Arbitrator from the shell, you can set the options
you want to use in a configuration file:
# arbtirator.config
group = example_cluster
address = gcomm://192.168.1.1,192.168.1.2,192.168.1.3
Then, when you start Galera Arbitrator, use the --cfg option.
6.10. Galera Arbitrator
87
Galera Documentation, Release 3.x
$ garbd --cfg /path/to/arbitrator.config
For more information on the options available to Galera Arbitrator through the shell, run it with the --help argument.
$ garbd --help
Usage: garbd [options] [group address]
Configuration:
-d [ --daemon ]
-n [ --name ] arg
-a [ --address ] arg
-g [ --group ] arg
--sst arg
--donor arg
-o [ --options ] arg
-l [ --log ] arg
-c [ --cfg ] arg
Become daemon
Node name
Group address
Group name
SST request string
SST donor name
GCS/GCOMM option list
Log file
Configuration file
Other options:
-v [ --version ]
-h [ --help ]
Print version
Show help message
In addition to the standard configurations, any parameter available to Galera Cluster also works with Galera Arbitrator,
excepting those prefixed by repl. When you start it from the shell, you can set these using the --option argument.
Note: See Also: For more information on the options available to Galera Arbitrator, see Galera Parameters
(page 159).
Starting Galera Arbitrator as a Service
When starting Galera Aribtrator as a service, whether using init or systemd, you use a different format for the
configuration file than you would use when starting it from the shell.
# Copyright (C) 2013-2015 Codership Oy
# This config file is to be sourced by garbd service script.
# A space-separated list of node addresses (address[:port]) in the cluster:
GALERA_NODES="192.168.1.1:4567 192.168.1.2:4567"
# Galera cluster name, should be the same as on the rest of the node.
GALERA_GROUP="example_wsrep_cluster"
# Optional Galera internal options string (e.g. SSL settings)
# see http://galeracluster.com/documentation-webpages/galeraparameters.html
GALERA_OPTIONS="socket.ssl_cert=/etc/galera/cert/cert.pem;socket.ssl_key=/$"
# Log file for garbd. Optional, by default logs to syslog
LOG_FILE="/var/log/garbd.log"
In order for Galera Arbitrator to use the configuration file, you must place it in a directory that your system looks to
for service configurations. There is no standard location for this directory, it varies from distribution to distribution,
though it usually somewhere in /etc.
Common locations include:
• /etc/defaults/
88
Chapter 6. Working with the Cluster
Galera Documentation, Release 3.x
• /etc/init.d/
• /etc/systemd/
• /etc/sysconfig/
Check the documentation for your distribution to determine where to place service configuration files.
Once you have the service configuration file in the right location, you can start the garb service. For systems that use
init, run the following command:
# service garb start
For systems that run systemd, instead use this command:
# systemctl start garb
This starts Galera Arbitrator as a service. It uses the parameters set in the configuration file.
In addition to the standard configurations, any parameter available to Galera Cluster also works with Galera Arbitrator,
excepting those prefixed by repl. When you start it as a service, you can set these using the GALERA_OPTIONS
parameter.
Note: See Also: For more information on the options available to Galera Arbitrator, see Galera Parameters
(page 159).
6.11 Backing Up Cluster Data
You can perform backups with Galera Cluster at the same regularity as with the standard database server, using a
backup script. Given that replication ensures that all nodes carry the same data, running the script on one node backs
up the data on all nodes in the cluster.
The problem with such backups is that they lack a Global Transaction ID. You can use backups of this kind to recover
data, but they are insufficient for use in recovering nodes to a well-defined state. Furthermore, some backup procedures
can block cluster operations for the duration of the backup.
Getting backups with the associated Global Transaction ID requires a different approach.
6.11.1 State Snapshot Transfer as Backup
Taking a full data backup is very similar to node provisioning through a State Snapshot Transfer. In both cases, the
node creates a full copy of the database contents, using the same mechanism to associate a Global Transaction ID with
the database state.
In order to enable this feature for backups, you need a script that implements both your preferred backup procedure
and the Galera Arbitrator daemon, triggering it in a manner similar to a state snapshot transfer.
$ garbd --address gcomm://192.168.1.2?gmcast.listen_addr=tcp://0.0.0.0:4444 \
--group example_cluster --donor example_donor --sst backup
This command triggers the donor node to invoke a script with the name wsrep_sst_backup.sh, which it looks
for in the PATH for the mysqld process. When the donor reaches a well-defined point, a point where no changes are
happening to the database, it runs the backup script passing the Global Transaction ID corresponding to the current
database state.
Note: In the command, ‘?gmcast.listen_addr=tcp://0.0.0.0:4444‘ is an arbitrary listen socket ad-
6.11. Backing Up Cluster Data
89
Galera Documentation, Release 3.x
dress that Galera Arbitrator opens to communicate with the cluster. You only need to specify this in the even that the
default socket address, (that is, 0.0.0.0:4567 is busy.
Invoking backups through the state snapshot transfer mechanism has the following benefits:
• The node initiates the backup at a well-defined point.
• The node associates a Global Transaction ID with the backup.
• The node desyncs from the cluster to avoid throttling performance while taking the backup, even if the backup
process is blocks the node.
• The cluster knows that the node is performing a backup and won’t choose the node as a donor for another node.
Note: See Also: You may find it useful to create your backup script using a modified version of the standard state
snapshot transfer scripts. For information on scripts of this kind, see Scriptable State Snapshot Transfers (page 83).
90
Chapter 6. Working with the Cluster
CHAPTER
SEVEN
DEPLOYMENT
7.1 Cluster Deployment Variants
An instance of Galera Cluster consists of a series of nodes, preferably three or more. Each node is an instance of
MySQL, MariaDB or Percona XtraDB that you convert to Galera Cluster, allowing you to use that node as a cluster
base.
Galera Cluster provides synchronous multi-master replication, meaning that you can think of the cluster as a single
database server that listens through many interfaces. To give you with an idea of what Galera Cluster is capable of,
consider a typical n-tier application and the various benefits that would come from deploying it with Galera Cluster.
7.1.1 No Clustering
In the typical n-tier application cluster without database clustering, there is no concern for database replication or
synchronization.
Internet traffic filters down to your application servers, all of which read and write from the same DBMS server. Given
that the upper tiers usually remain stateless, you can start up as many instances as you need to meet the demand from
the internet as each instance in turn stores its data in the data tier.
This solution is simple and easy to manage, but suffers a particular weakness in the data tier’s lack of redundancy.
For example, should for any reason the DBMS server become unavailable, your application also becomes unavailable.
This is the same whether the server crashes or if you need to take it down for maintenance.
Similarly, this deployment also introduces performance concerns. While you can start as many instances as you need
to meet the demands on your web and application servers, they can only put so much load on the DBMS server before
the load begins to slow down the experience for end users.
7.1.2 Whole Stack Clustering
In the typical n-tier application cluster you can avoid the performance bottleneck by building a whole stack cluster.
Internet traffic filters down to the application server, which stores data on its own dedicated DBMS server. Galera
Cluster then replicates the data through to the cluster, ensuring that it remains synchronous.
This solution is simple and easy to manage, especially if you can install the whole stack of each node on one physical
machine. The direct connection from the application tier to the data tier ensures low latency.
There are, however, certain disadvantages to whole stack clustering:
• Lack of Redundancy within the Stack When the database server fails the whole stack fails. This is because
the application server uses a dedicated database server, if the database server fails there’s no alternative for the
application server, so the whole stack goes down.
91
Galera Documentation, Release 3.x
Figure 7.1: No Clustering
Figure 7.2: Whole Stack Cluster
92
Chapter 7. Deployment
Galera Documentation, Release 3.x
• Inefficient Resource Usage A dedicated DBMS server for each application server is overuse. This is poor
resource consolidation. For instance, one server with a 7 GB buffer pool is much faster than two servers with 4
GB buffer pools.
• Increased Unproductive Overhead Each server reproduces the work of the other servers in the cluster.
• Increased Rollback Rate Given that each application server writes to a dedicated database server, cluster-wide
conflicts are more likely, which can increases the likelihood of corrective rollbacks.
• Inflexibility There is no way for you to limit the number of master nodes or to perform intelligent load balancing.
Despite the disadvantages, however, this setup can prove very usable for several applications. It depends on your
needs.
7.1.3 Data Tier Clustering
To compensate for the shortcomings in whole stack clusters, you can cluster the data tier separate from your web and
application servers.
Here, the DBMS servers form a cluster distinct from your n-tier application cluster. The application servers treat the
database cluster as a single virtual server, making their calls through load balancers to the data tier.
Figure 7.3: Data Tier Clustering
In a data tier cluster, the failure of one node does not effect the rest of the cluster. Furthermore, resources are consolidated better and the setup is flexible. That is, you can assign nodes different roles using intelligent load balancing.
There are, however, certain disadvantages to consider in data tier clustering:
7.1. Cluster Deployment Variants
93
Galera Documentation, Release 3.x
• Complex Structure Load balancers are involved and you must back them up in case of failures. This typical
means that you have two more servers than you would otherwise, as well as a failover solution between them.
• Complex Management You need to configure and reconfigure the load balancers whenever a DBMS server is
added to or removed from the cluster.
• Indirect Connections The load balancers between the application cluster and the data tier cluster increase the
latency for each query. As such, this can easily become a performance bottleneck. You need powerful load
balancing servers to avoid this.
• Scalability The scheme does not scale well over several datacenters. Attempts to do so may remove any benefits
you gain from resource consolidation, given that each datacenter must include at least two DBMS servers.
Data Tier Clustering with Distributed Load Balancing
One solution to the limitations of data tier clustering is to deploy them with distributed load balancing. This scheme
roughly follows the standard data tier cluster, but includes a dedicated load balancer installed on each application
server.
Figure 7.4: Data Tier Cluster with Distributed Load Balancing
In this deployment, the load balancer is no longer a single point of failure. Furthermore, the load balancer scales
with the application cluster and thus is unlikely to become a bottleneck. Additionally, it keeps down the client-server
communications latency.
Data tier clustering with distributed load balancing has the following disadvantage:
94
Chapter 7. Deployment
Galera Documentation, Release 3.x
• Complex Management Each application server you deploy to meet the needs of your n-tier application cluster
means another load balancer that you need to set up, manage and reconfigure whenever you change or otherwise
update the database cluster configuring.
7.1.4 Aggregated Stack Clustering
In addition to these deployment schemes, you also have the option of a hybrid setup that integrates whole stack and
data tier clustering by aggregating several application stacks around single DBMS servers.
Figure 7.5: Aggregated Stack Clustering
This scheme improves on the resource utilization of the whole stack cluster while maintaining it’s relative simplicity
and direct DBMS connection benefits. It is also how a data tier cluster with distributed load balancing with look if
you were to use only one DBMS server per datacenter.
The aggregated stack cluster is a good setup for sites that are not very big, but still are hosted at more than one
datacenter.
7.2 Load Balancing
Galera Cluster guarantees node consistency regardless of where and when the query is issued. In other words, you
are free to choose a load-balancing approach that best suits your purposes. If you decide to place the load balancing
mechanism between the database and the application, you can consider, for example, the following tools:
• HAProxy an open source TCP/HTTP load balancer.
• Pen another open source TCP/HTTP load balancer. Pen performs better than HAProxy on SQL traffic.
7.2. Load Balancing
95
Galera Documentation, Release 3.x
• Galera Load Balancer inspired by Pen, but is limited to balancing generic TCP connections only.
Note: For more information or ideas on where to use load balancers in your infrastructure, see Cluster Deployment
Variants (page 91).
7.2.1 Galera Load Balancer
Galera Load Balancer provides simple TCP connection balancing developed with scalability and performance in mind.
It draws on Pen for inspiration, but its functionality is limited to only balancing TCP connections.
• Support for configuring back-end servers at runtime.
• Support for draning servers.
• Support for the epoll API for routing performance.
• Support for multithreaded operations.
• Optional watchdog module to monitor destinations and adjust the routing table.
Installation
Unlike Galera Cluster, there is no binary installation available for Galera Load Balancer. Installing it on your system
requires that you build it from source. It is available on GitHub at glb.
To build Galera Load Balancer, complete the following steps:
1. From a directory convenient to you for source builds, such as /opt, use Git to clone the GitHub repo for Galera
Load Balancer.
$ git clone https://github.com/codership/glb
2. Change into the new glb/ directory created by Git, then run the bootstrap script.
$ cd glb/
$ ./bootstrap.sh
3. Configure Make to build on your system.
$ ./configure
4. Build the application with Make.
$ make
5. Install the application on your system.
# make install
Note: Galera Load Balancer installs in /usr/sbin. You need to run the above command as root.
Galera Load Balancer is now installed on your system. You can launch it from the command-line, using the glbd
command.
In addition to the system daemon, you have also installed libglb, a shared library for connection balancing with any
Linux applications that use the connect() call from the C Standard Library.
96
Chapter 7. Deployment
Galera Documentation, Release 3.x
Service Installation
The above installation procedure only installs Galera Load Balancer to be run manually from the command-line.
However, you may find it more useful to run this application as a system service.
In the source directory you cloned from GitHub, navigate into the files/ directory. Within this directory there is a
configuration file and a service script that you need to copy to their relevant locations.
• Place glbd.sh into /etc/init.d directory under a service name.
# cp glbd.sh /etc/init.d/glb
• Place glbd.cfg into either configuration directory.
For Red Hat and its derivatives, this is
/etc/sysconfig/glbd.cfg. For Debian and its derivatives, use /etc/default/glbd.cfg.
# cp glbd.cfg /etc/sysconfig/glbd.cfg
Note: The glbd.cfg configuration file used below refer to the one you have copied into /etc.
When you finish this, you can manage Galera Load Balancer through the service command. For more information
on available commands, see Using Galera Load Balancer (page 98).
Configuration
When you run Galera Load Balancer, you can configure its use through the command-line options, which you can
reference through the --help command. For users that run Galera Load Balancer as a service, you can manage it
through the glbd.cfg configuration file.
• LISTEN_ADDR (page 220) Defines the address that Galera Load Balancer monitors for incoming client connections.
• DEFAULT_TARGETS (page 220) Defines the default servers that Galera Load Balancer routes incoming client
connections to. For this parameter, use the IP addresses for the nodes in your cluster.
• OTHER_OPTIONS (page 220) Defines additional Galera Load Balancer options, such as the balancing policy
you want to use. Use the same format as they would appear on the command-line.
For instance,
# Galera Load Balancer COnfigurations
LISTEN_ADDR="8010"
DEFAULT_TARGETS="192.168.1.1 192.168.1.2 192.168.1.3"
OTHER_OPTIONS="--random --top 3"
Destination Selection Policies
Galera Load Balancer, both the system daemon and the shared library, support five destination selection policies.
When you run it from the command-line, you can define these using the command-line arguments, otherwise add the
arguments to the OTHER_OPTIONS (page 220) parameter in the glbd.cfg configuration file.
• Least Connected Directs new connections to the server using the smallest number of connections possible,
which is adjusted for the server weight. This is the default policy.
• Round Robin Directs new connections to the next destination in the circular order list. You can enable it
through the –round (page 225) option.
7.2. Load Balancing
97
Galera Documentation, Release 3.x
• Single Directs all connections to the single server with the highest weight of those available. Routing continues
to that server until it fails or a server with a higher weight becomes available. You can enable it through the
–single (page 225) option.
• Random Directs connections randomly to available servers. You can enable it through the –random (page 225)
option
• Source Tracking Directs connections originating from the same address to the same server. You can enable it
through the –source (page 226) option.
Using Galera Load Balancer
In the above section Service Installation (page 97), you configured your system to run Galera Load Balancer as a
service. This allows you to manage common operations through the service command, for instance:
# service glb getinfo
Router:
------------------------------------------Address
: weight
usage cons
192.168.1.1:4444 : 1.000
0.000
0
192.168.1.2:4444 : 1.000
0.000
0
192.168.1.3:4444 : 1.000
0.000
0
------------------------------------------Destinations: 3, total connections: 0
The service script supports the following operations:
• start/stop/restart Commands to start, stop and restart Galera Load Balancer.
• getinfo Command provides the current routing information: the servers available, their weight and usage,
the number of connections made to them.
• add/remove <IP Address> Add or remove the designated IP address from the routing table.
• getstats Command provides performance statistics.
• drain <IP Address> Sets the designated server to drain. That is, Galera Load Balancer does not allocate
new connections to the server, but also does not kill existing connections. Instead, it waits for the connections
to this server to end gracefully.
In adding IP addresses at runtime,
Address|Hostname:port:weight.
bear
in
mind
that
the
address
convention
is
IP
7.3 Container Deployments
In the standard deployment methods of Galera Cluster, the node runs on a server in the same manner as would an
individual standalone instance of MySQL. In container deployments, the node runs in a containerized virtual environment on the server. You may find these methods useful in portable deployments across numerous machines, testing
applications that depend on Galera Cluster, process isolation for security, or scripting the installation and configuration
process.
For the most part, the configuration for a node running in a containerized environment remains the same as well
the node runs in the standard manner. But, there are some parameters that draw their defaults from the base system
configurations. These you need to set manually, as the jail is unable to access the host file system.
98
Chapter 7. Deployment
Galera Documentation, Release 3.x
• wsrep_node_address (page 188) The node determines the default address from the IP address on the first network
interface. Jails cannot see the network interfaces on the host system. You need to set this parameter to ensure
that the cluster is given the correct IP address for the node.
• wsrep_node_name (page 189) The node determines the default name from the system hostname. Jails have their
own hostnames, distinct from that of the host system.
Bear in mind that the configuration file must be placed within the container /etc directory, not that of the host system.
7.3.1 Using Docker
Docker provides an open source platform for automatically deploying applications within software containers.
Galera Cluster can run from within a Docker container. You may find it useful in portable deployment across numerous
machines, testing applications that depend on Galera Cluster, or scripting the installation and configuration process.
Note: This guide assumes that you are only running one container node per server. For more information on running
multiple nodes per server, see Getting Started Galera with Docker, Part I and Part II.
Configuring the Container
Images are the containers that Docker has available to run. There are a number of base images available through
Docker Hub. You can pull these down to your system through the docker command-line tool. You can also build
new images.
When Docker builds a new image, it sources a Dockerfile to determine the steps that it needs to take in order to
generate the image that you want to use. What this means that you can script the installation and configuration process:
loading the needed configuration files, running updates and installing packages when the image is built through a single
command.
# Galera Cluster Dockerfile
FROM ubuntu:14.04
MAINTAINER your name <[email protected]>
ENV DEBIAN_FRONTEND noninteractive
RUN
RUN
RUN
RUN
apt-get update
apt-get install -y software-properties-common
apt-key adv --keyserver keyserver.ubuntu.com --recv BC19DDBA
add-apt-repository ’deb http://releases.galeracluster.com/ubuntu trusty main’
RUN apt-get update
RUN apt-get install -y galera-3 galera-arbitrator-3 mysql-wsrep-5.6 rsync
COPY my.cnf /etc/mysql/my.cnf
ENTRYPOINT ["mysqld"]
The example follows the installation process for running Galera Cluster from within a Docker container based on
Ubuntu. When you run the build command, Docker pulls down the Ubuntu 14.04 image from Docker Hub, if it’s
needed, then it runs each command in the Dockerfile to initialize the image for your use.
Configuration File
Before you build the container, you need to write the configuration file for the node. The COPY command in the
Dockerfile above copies my.cnf from the build directory into the container.
7.3. Container Deployments
99
Galera Documentation, Release 3.x
For the most part, the configuration file for a node running within Docker is the same as when the node is running on a
standard Linux server. But, there are some parameters that draw their defaults from the base system. These you need
to set manually, as Docker cannot access the host system.
• wsrep_node_address (page 188) The node determines the default address from the IP address on the first network
interface. Containers cannot see the network interfaces on the host system. You need to set this parameter to
ensure that the cluster is given the correct IP address for the node.
• wsrep_node_name (page 189) The node determines the default name from the system hostname. Containers
have their own hostnames distinct from the host system.
Changing the my.cnf file does not propagate into the container. Whenever you need to make changes to the configuration file, run the build again to create a new image with the updated file. Docker caches each step of the build and
on rebuild only runs those steps that have changed since the last run. For example, using the above Dockerfile, if
you rebuild an image after changing my.cnf, Docker only runs the last two steps.
Note: If you need Docker to rerun the entire build, use the --force-rm=true option.
Building the Container Image
Building the image reduces the node installation, configuration and deployment process to a single command. This
creates a server instance where Galera Cluster is already installed, configured and ready to start.
You can build a container node using the docker command-line tool.
# docker build -t ubuntu:galera-node1 ./
When this command runs, Docker looks in the working directory, (here ./), for the Dockerfile. It then follows
each command in the Dockerfile to build the image you want. When the build is complete, you can view the
addition among the available images:
# docker images
REPOSITORY
ubuntu
ubuntu
TAG
IMAGE ID
galera-node-1 53b97c3d7740
14.04
ded7cd95e059
CREATED
2 minutes ago
5 weeks ago
SIZE
362.7 MB
185.5 MB
You now have a working node image available for use as a container. You can launch it using the docker run
command. Repeat the build process on each server to create a node container image for Galera Cluster.
Update the container tag to help differentiate between them. That is,
[root@node2]# docker build -t ubuntu:galera-node2 ./
[root@node3]# docker build -t ubuntu:galera-node3 ./
Deploying the Container
When you finish building the image, you’re ready to launch the node container. For each node start the container using
the Docker command-line tool with the run argument.
# docker run -i -d --name Node1 --host node1 \
-p 3306:3306 -p 4567:4567 -p 4568:4568 -p 4444:4444 \
-v /var/container_data/mysql:/var/lib/mysql \
ubuntu:galera-node1
100
Chapter 7. Deployment
Galera Documentation, Release 3.x
In the example, Docker launches a pre-built Ubuntu container tagged as galera-node1, which was built using the
above Dockerfile. The ENTRYPOINT parameter is set to /bin/mysqld, so the container launches the database
server on start.
Update the --name option for each node container you start.
Note: The above command starts a container node meant to be attached to an existing cluster. If you are starting
the first node in a cluster, append the argument --wsrep-new-cluster to the end of the command. For more
information, see Starting the Cluster (page 55).
Firewall Settings
When you launch the Docker container, (with docker run above), the series of -p options connect the ports on the
host system to those in the container. When the container is launched this way, nodes in the container have the same
level of access to the network as the node would when running on the host system.
Use these settings when you only run one container to the server. If you are running multiple containers to the server,
you will need a load balancer to dole the incoming connections out to the individual nodes.
For more information on configuring the firewall for Galera Cluster, see Firewall Settings (page 117).
Persistent Data
Docker containers are not meant to carry persistent data. When you close the container, the data it carries is lost. To
avoid this, you can link volumes in the container with directories on the host file system, using the -v option when
you launch the container.
In the example, (that is, docker run above), the -v argument connects the /var/container_data/mysql/
directory to /var/lib/mysql/ in the container. This replaces the local datadir inside the container with a symbolic
link to a directory on the host system, ensuring that you don’t lose data when the container restarts.
Database Client
Once you have the container node running, you can execute additional commands on the container using the docker
exec command with the container name given above for the --name parameter.
For example, if you want access to the database client, run the following command:
# docker exec -ti Node1 /bin/mysql -u root -p
7.3.2 Using Jails
In FreeBSD, jails provides a platform for securely deploying applications within virtual instances. You may find it
useful in portable deployments across numerous machines for testing and security.
Galera Cluster can run from within a jail instance.
Preparing the Server
Jails exist as isolated file systems within, but unaware of, the host server. In order to grant the node running within the
jail network connectivity with the cluster, you need to configure the network interfaces and firewall to redirect from
the host into the jail.
7.3. Container Deployments
101
Galera Documentation, Release 3.x
Network Configuration
To begin, create a second loopback interface for the jail. this allows you to isolate jail traffic from lo0, the host
loopback interface.
Note: For the purposes of this guide, the jail loopback is called lo1, if lo1 already exists on your system, increment
the digit to create one that does not already exist, (for instance, lo2).
To create a loopback interface, complete the following steps:
1. Using your preferred text editor, add the loopback interface to /etc/rc.conf:
# Network Interface
cloned_interfaces="${cloned_interfaces} lo1"
2. Create the loopback interface:
# service netif cloneup
This creates lo1, a new loopback network interface for your jails. You can view the new interface in the listing using
the following command:
$ ifconfig
Firewall Configuration
FreeBSD provides packet filtering support at the kernel level. Using PF you can set up, maintain and inspect the packet
filtering rule sets. For jails, you can route traffic from external ports on the host system to internal ports within the
jail’s file system. This allows the node running within the jail to have network access as though it were running on the
host system.
To enable PF and create rules for the node, complete the following steps:
1. Using your preferred text editor, make the following additions to /etc/rc.conf:
# Firewall Configuration
pf_enable="YES"
pf_rules="/etc/pf.conf"
pflog_enable="YES"
pflog_logfile="/var/log/pf.log"
2. Create the rules files for PF at /etc/pf.conf
# External Network Interface
ext_if="vtnet0"
# Internal Network Interface
int_if="lo1"
# IP Addresses
external_addr="host_IP_address"
internal_addr="jail_IP_address_range"
# Variables for Galera Cluster
wsrep_ports="{3306,4567,4568,4444}"
table <wsrep_cluster_address> persist {192.168.1.1,192.168.1.2,192.168.1.3}
# Translation
102
Chapter 7. Deployment
Galera Documentation, Release 3.x
nat on $ext_if from $internal_addr to any -> ($ext_if)
# Redirects
rdr on $ext_if
rdr on $ext_if
rdr on $ext_if
rdr on $ext_if
proto
proto
proto
proto
tcp
tcp
tcp
tcp
from
from
from
from
any
any
any
any
to
to
to
to
$external_addr/32
$external_addr/32
$external_addr/32
$external_addr/32
port
port
port
port
3306
4567
4568
4444
->
->
->
->
jail_IP_address
jail_IP_address
jail_IP_address
jail_IP_address
pass in proto tcp from <wsrep_cluster_address> to any port $wsrep_ports keep state
Replace host_IP_address with the IP address of the host server and jail_IP_address with the IP
address you want to use for the jail.
3. Using pfctl, check for any typos in your PF configurations:
# pfctl -v -nf /etc/pf.conf
4. If pfctl runs without throwing any errors, start PF and PF logging services:
# service pf start
# service pflog start
The server now uses PF to manage its firewall. Network traffic directed at the four ports Galera Cluster uses is routed
to the comparable ports within the jail.
Note: See Also: For more information on firewall configurations for FreeBSD, see Firewall Configuration with PF
(page 119).
Creating the Node Jail
While FreeBSD does provide a manual interface for creating and managing jails on your server, (jail(8)), it can
prove cumbersome in the event that you have multiple jails running on a server.
The application ezjail facilitates this process by automating common tasks and using templates and symbolic links
to reduce the disk space usage per jail. It is available for installation through pkg. Alternative, you can build it through
ports at sysutils/ezjail.
To create a node jail with ezjail, complete the following steps:
1. Using your preferred text editor, add the following line to /etc/rc.conf:
ezjail_enable="YES"
This allows you to start and stop jails through the service command.
2. Initialize the ezjail environment:
# ezjail-admin install -sp
This install the base jail system at /usr/jails/. It also installs a local build of the ports tree within the jail.
Note: While the database server is not available for FreeBSD in ports or as a package binary, a port of the
Galera Replication Plugin is available at databases/galera.
3. Create the node jail.
# ezjail-admin create galera-node ’lo1|192.168.68.1’
7.3. Container Deployments
103
port
port
port
port
3306
4567
4568
4444
Galera Documentation, Release 3.x
This creates the particular jail for your node and links it to the lo1 loopback interface and IP address. Replace
the IP address with the local IP for internal use on your server. It is the same address as you assigned in the
firewall redirects above for /etc/pf.conf.
Note: Bear in mind that in the above command galera-node provides the hostname for the jail file system.
As Galera Cluster draws on the hostname for the default node name, you need to either use a unique jail name
for each node, or manually set wsrep_node_name (page 189) in the configuration file to avoid confusion.
4. Copy the resolve.conf file from the host file system into the node jail.
# cp /etc/resolv.conf /usr/jails/galera-node/etc/
This allows the network interface within the jail to resolve domain names in connecting to the internet.
5. Start the node jail.
# ezjail-admin start galera-node
The node jail is now running on your server. You can view running jails using the ezjail-admin command:
# ezjail-admin list
STA JID IP
Hostname
Root Directory
--- ---- ------------- ------------ ---------------------DR 2
192.168.68.1 galera-node /usr/jails/galera-node
While on the host system, you can access and manipulate files and directories in the jail file system from
/usr/jails/galera-node/. Additionally, you can enter the jail directly and manipulate processes running
within using the following command:
root@FreeBSDHost:/usr/jails # ezjail-admin console galera-node
root@galera-node:~ #
When you enter the jail file system, note that the hostname changes to indicate the transition.
Installing Galera Cluster
Regardless of whether you are on the host system or working from within a jail, currently, there is no binary package
or port available to fully install Galera Cluster on FreeBSD. You must build the database server from source code.
The specific build process that you need to follow depends on the database server that you want to use:
• Galera Cluster for MySQL (page 38)
• Percona XtraDB Cluster (page 42)
• MariaDB Galera Cluster (page 46)
Due to certain Linux dependencies, the Galera Replication Plugin cannot be built from source on FreeBSD. Instead
you can use the port at /usr/ports/databases/galera or install it from a binary package within the jail:
# pkg install galera
This install the wsrep Provider file in /usr/local/lib. Use this path in the configuration file for the wsrep_provider (page 192) parameter.
Configuration File
For the most part, the configuration file for a node running in a jail is the same as when the node runs on a standard
FreeBSD server. But, there are some parameters that draw their defaults from the base system. These you need to set
104
Chapter 7. Deployment
Galera Documentation, Release 3.x
manually, as the jail is unable to access the host file system.
• wsrep_node_address (page 188) The node determines the default address from the IP address on the first network
interface. Jails cannot see the network interfaces on the host system. You need to set this parameter to ensure
that the cluster is given the correct IP address for the node.
• wsrep_node_name (page 189) The node determines the default name from the system hostname. Jails have their
own hostnames, distinct from that of the host system.
[mysqld]
user=mysql
#bind-address=0.0.0.0
# Cluster Options
wsrep_provider=/usr/lib/libgalera_smm.so
wsrep_cluster_address="gcomm://192.168.1.1, 192.168.1.2, 192.16.1.3"
wsrep_node_address="192.168.1.1"
wsrep_node_name="node1"
wsrep_cluster_name="example_cluster"
# InnoDB Options
default_storage_engine=innodb
innodb_autoinc_lock_mode=2
innodb_flush_log_at_trx_commit=0
# SST
wsrep_sst_method=rsync
If you are logged into the jail console, place the configuration file at /etc/my.cnf. If you are on the host system
console, place it at /usr/jails/galera-node/etc/my.cnf. Replace galera-node in the latter with the
name of the node jail.
Starting the Cluster
When running the cluster from within jails, you create and manage the cluster in the same manner as you would in the
standard deployment of Galera Cluster on FreeBSD. The exception being that you must obtain console access to the
node jail first.
To start the initial cluster node, run the following commands:
# ezjail-admin console galera-node
# service mysql start --wsrep-new-cluster
To start each additional node, run the following commands:
# ezjail-admin console galera-node
# service mysql start
Each node you start after the initial will attempt to establish network connectivity with the Primary Component and
begin syncing their database states into one another.
7.3. Container Deployments
105
Galera Documentation, Release 3.x
106
Chapter 7. Deployment
CHAPTER
EIGHT
MONITOR
There are three approaches to monitoring cluster activity and replication health: directly off the database client, using
the notification script for Galera Cluster, or through a third-party monitoring application, such as Nagios.
8.1 Monitoring Cluster Status
From the database client, you can check the status of write-set replication throughout the cluster using standard queries.
Status variables that relate to write-set replication have the prefix wsrep_, meaning that you can display them all using
the following query:
SHOW GLOBAL STATUS LIKE ’wsrep_%’;
+------------------------+-------+
| Variable_name
| Value |
+------------------------+-------+
| wsrep_protocol_version | 5
|
| wsrep_last_committed
| 202
|
| ...
| ...
|
| wsrep_thread_count
| 2
|
+------------------------+-------+
Note: See Also: In addition to checking status variables through the database client, you can also monitor for
changes in cluster membership and node status through wsrep_notify_cmd.sh. For more information on its use,
see Notification Command (page 112).
8.1.1 Checking Cluster Integrity
The cluster has integrity when all nodes in it receive and replicate write-sets from all other nodes. The cluster begins
to lose integrity when this breaks down, such as when the cluster goes down, becomes partitioned, or experiences a
split-brain situation.
You can check cluster integrity using the following status variables:
• wsrep_cluster_state_uuid (page 205) shows the cluster state UUID, which you can use to determine whether
the node is part of the cluster.
SHOW GLOBAL STATUS LIKE ’wsrep_cluster_state_uuid’;
+--------------------------+--------------------------------------+
| Variable_name
| Value
|
+--------------------------+--------------------------------------+
107
Galera Documentation, Release 3.x
| wsrep_cluster_state_uuid | d6a51a3a-b378-11e4-924b-23b6ec126a13 |
+--------------------------+--------------------------------------+
Each node in the cluster should provide the same value. When a node carries a different value, this indicates that
it is no longer connected to rest of the cluster. Once the node reestablishes connectivity, it realigns itself with
the other nodes.
• wsrep_cluster_conf_id (page 204) shows the total number of cluster changes that have happened, which you can
use to determine whether or not the node is a part of the Primary Component.
SHOW GLOBAL STATUS LIKE ’wsrep_cluster_conf_id’;
+-----------------------+-------+
| Variable_name
| Value |
+-----------------------+-------+
| wsrep_cluster_conf_id | 32
|
+-----------------------+-------+
Each node in the cluster should provide the same value. When a node carries a different, this indicates that the
cluster is partitioned. Once the node reestablish network connectivity, the value aligns itself with the others.
• wsrep_cluster_size (page 204) shows the number of nodes in the cluster, which you can use to determine if any
are missing.
SHOW GLOBAL STATUS LIKE ’wsrep_cluster_size’;
+--------------------+-------+
| Variable_name
| Value |
+--------------------+-------+
| wsrep_cluster_size | 15
|
+--------------------+-------+
You can run this check on any node. When the check returns a value lower than the number of nodes in your
cluster, it means that some nodes have lost network connectivity or they have failed.
• wsrep_cluster_status (page 205) shows the primary status of the cluster component that the node is in, which
you can use in determining whether your cluster is experiencing a partition.
SHOW GLOBAL STATUS LIKE ’wsrep_cluster_status’;
+----------------------+---------+
| Variable_name
| Value
|
+----------------------+---------+
| wsrep_cluster_status | Primary |
+----------------------+---------+
The node should only return a value of Primary. Any other value indicates that the node is part of a nonoperational component. This occurs in cases of multiple membership changes that result in a loss of quorum or in
cases of split-brain situations.
Note: See Also: In the event that you check all nodes in your cluster and find none that return a value of
Primary, see Resetting the Quorum (page 72).
When these status variables check out and return the desired results on each node, the cluster is up and has integrity.
What this means is that replication is able to occur normally on every node. The next step then is checking node status
(page 109) to ensure that they are all in working order and able to receive write-sets.
108
Chapter 8. Monitor
Galera Documentation, Release 3.x
8.1.2 Checking the Node Status
In addition to checking cluster integrity, you can also monitor the status of individual nodes. This shows whether
nodes receive and process updates from the cluster write-sets and can indicate problems that may prevent replication.
• wsrep_ready (page 215) shows whether the node can accept queries.
SHOW GLOBAL STATUS LIKE ’wsrep_ready’;
+---------------+-------+
| Variable_name | Value |
+---------------+-------+
| wsrep_ready
| ON
|
+---------------+-------+
When the node returns a value of ON it can accept write-sets from the cluster. When it returns the value OFF,
almost all queries fail with the error:
ERROR 1047 (08501) Unknown Command
• wsrep_connected (page 206) shows whether the node has network connectivity with any other nodes.
SHOW GLOBAL STATUS LIKE ’wsrep_connected’;
+-----------------+-------+
| Variable_name
| Value |
+-----------------+-------+
| wsrep_connected | ON
|
+-----------------+-------+
When the value is ON, the node has a network connection to one or more other nodes forming a cluster component. When the value is OFF, the node does not have a connection to any cluster components.
Note: The reason for a loss of connectivity can also relate to misconfiguration. For instance, if the node uses
invalid values for the wsrep_cluster_address (page 181) or wsrep_cluster_name (page 182) parameters.
Check the error log for proper diagnostics.
• wsrep_local_state_comment (page 213) shows the node state in a human readable format.
SHOW GLOBAL STATUS LIKE ’wsrep_local_state_comment’;
+---------------------------+--------+
| Variable_name
| Value |
+---------------------------+--------+
| wsrep_local_state_comment | Joined |
+---------------------------+--------+
When the node is part of the Primary Component, the typical return values are Joining, Waiting on SST,
Joined, Synced or Donor. In the event that the node is part of a nonoperational component, the return value
is Initialized.
Note: If the node returns any value other than the one listed here, the state comment is momentary and transient.
Check the status variable again for an update.
In the event that each status variable returns the desired values, the node is in working order. This means that it is
receiving write-sets from the cluster and replicating them to tables in the local database.
8.1. Monitoring Cluster Status
109
Galera Documentation, Release 3.x
8.1.3 Checking the Replication Health
Monitoring cluster integrity and node status can show you issues that may prevent or otherwise block replication.
These status variables will help in identifying performance issues and identifying problem areas so that you can get
the most from your cluster.
Note: Unlike other the status variables, these are differential and reset on every SHOW STATUS command. Execute
the query a second time, about a minute after the first to get the current value.
Galera Cluster triggers a feedback mechanism called Flow Control to manage the replication process. When the local
received queue of write-sets exceeds a certain threshold, the node engages Flow Control to pause replication while it
catches up.
You can monitor the local received queue and Flow Control using the following status variables:
• wsrep_local_recv_queue_avg (page 211) shows the average size of the local received queue since the last status
query.
SHOW STATUS LIKE ’wsrep_local_recv_queue_avg’;
+--------------------------+----------+
| Variable_name
| Value
|
+--------------------------+----------+
| wsrep_local_recv_que_avg | 3.348452 |
+--------------------------+----------+
When the node returns a value higher than 0.0 it means that the node cannot apply write-sets as fast as it
receives them, which can lead to replication throttling.
Note: In addition to this status variable, you can also use wsrep_local_recv_queue_max (page 211) and wsrep_local_recv_queue_min (page 211) to see the maximum and minimum sizes the node recorded for the local
received queue.
• wsrep_flow_control_paused (page 207) shows the fraction of the time, since the status variable was last called,
that the node paused due to Flow Control.
SHOW STATUS LIKE ’wsrep_flow_control_paused’;
+---------------------------+----------+
| Variable_name
| Value
|
+---------------------------+----------+
| wsrep_flow_control_paused | 0.184353 |
+---------------------------+----------+
When the node returns a value of 0.0, it indicates that the node did not pause due to Flow Control during this
period. When the node returns a value of 1.0, it indicates that the node spent the entire period paused. When
the period between calls is one minute and the node returns 0.25, it indicates that the node was paused for 15
seconds.
Ideally, the return value should stay as close to 0.0 as possible, since this means the node is not falling behind
the cluster. In the event that you find that the node is pausing frequently, you can adjust the wsrep_slave_threads
(page 194) parameter or you can exclude the node from the cluster.
• wsrep_cert_deps_distance (page 203) shows the average distance between the lowest and highest sequence
number, or seqno, values that the node can possibly apply in parallel.
SHOW STATUS LIKE ’wsrep_cert_deps_distance‘;
110
Chapter 8. Monitor
Galera Documentation, Release 3.x
+--------------------------+---------+
| Variable_name
| Value
|
+--------------------------+---------+
| wsrep_cert_deps_distance | 23.8889 |
+--------------------------+---------+
This represents the node’s potential degree for parallelization. In other words, the optimal value you can use
with the wsrep_slave_threads (page 194) parameter, given that there is no reason to assign more slave threads
than transactions you can apply in parallel.
8.1.4 Detecting Slow Network Issues
While checking the status of Flow Control and the received queue can tell you how the database server copes with
incoming write-sets, you can check the send queue to monitor for outgoing connectivity issues.
Note: Unlike other the status variables, these are differential and reset on every SHOW STATUS command. Execute
the query a second time, about a minute after the first to get the current value.
wsrep_local_send_queue_avg (page 212) show an average for the send queue length since the last status query.
SHOW STATUS LIKE ’wsrep_local_send_queue_avg’;
+----------------------------+----------+
| Variable_name
| Value
|
+----------------------------+----------+
| wsrep_local_send_queue_avg | 0.145000 |
+----------------------------+----------+
Values much greater than 0.0 indicate replication throttling or network throughput issues, such as a bottleneck on the
network link. The problem can occur at any layer from the physical components of your server to the configuration of
the operating system.
Note: In addition to this status variable, you can also use wsrep_local_send_queue_max (page 213) and wsrep_local_send_queue_min (page 213) to see the maximum and minimum sizes the node recorded for the local send
queue.
8.2 Database Server Logs
Galera Cluster provides the same database server logging features available to MySQL, MariaDB and Percona XtraDB,
depending on which you use. By default, it writes errors to a <hostname>.err in the data directory. You can change
this in the my.cnf configuration file using the log_error parameter, or by using the --log-error parameter.
8.2.1 Log Parameters
Galera Cluster provides parameters and wsrep Options that allow you to enable error logging on events that are specific
to the replication process. If you have a script monitoring the logs, these entires can provide you with information on
conflicts occurring in the replication process.
• wsrep_log_conflicts (page 186) This parameter enables conflict logging for your error logs, such as when two
nodes attempt to write to the same row of the same table at the same time.
• cert.log_conflicts (page 161) This wsrep Provider option enables logging of information on certification failures
during replication.
8.2. Database Server Logs
111
Galera Documentation, Release 3.x
• wsrep_debug (page 184) This parameter enables debugging information for the database server logs.
Note: Warning: In addition to useful debugging information, this parameter also causes the database server to
print authentication information, (that is, passwords), to the error logs. Do not enable it in production environments.
You can enable these through the my.cnf configuration file.
# wsrep Log Options
wsrep_log_conflicts=ON
wsrep_provider_options="cert.log_conflicts=ON"
wsrep_debug=ON
8.2.2 Additional Log Files
Whenever the node fails to apply an event on a slave node, the database server creates a special binary log file of the
event in the data directory. The naming convention the node uses for the filename is GRA_*.log.
8.3 Notification Command
While you can use the database client to check the status of your cluster, the individual nodes and the health of
replication, you may find it counterproductive to log into the client on each node to run these checks. Galera Cluster
provides a notification script and interface for customization, allowing you to automate the monitoring process for
your cluster.
8.3.1 Notification Command Parameters
When the node registers a change in the cluster or itself that triggers the notification command, it passes a number of
parameters in calling the script.
• --status The node passes a string indicating it’s current state. For a list of the strings it uses, see Node Status
Strings (page 112) below.
• --uuid The node passes a string of either yes or no, indicating whether it considers itself part of the Primary
Component.
• --members The node passes a list of the current cluster members. For more information on the format of these
listings, see Member List Format (page 113) below.
• --index The node passes a string that indicates its index value in the membership list.
Note: Only those nodes that in the Synced state accept connections from the cluster. For more information on node
states, see Node State Changes (page 20).
Node Status Strings
The notification command passes one of six values with the --status parameter to indicate the current status of the
node:
• Undefined Indicates a starting node that is not part of the Primary Component.
• Joiner Indicates a node that is part of the Primary Component that is receiving a state snapshot transfer.
112
Chapter 8. Monitor
Galera Documentation, Release 3.x
• Donor Indicates a node that is part of the Primary Component that is sending a state snapshot transfer.
• Joined Indicates a node that is part of the Primary Component that is in a complete state and is catching up
with the cluster.
• Synced Indicates a node that is syncrhonized with the cluster.
• Error Indicates that an error has occurred. This status string may provide an error code with more information
on what occurred.
Members List Format
The notification command passes with the --member parameter a list containing entries for each node that is connected to the cluster component to which the node belongs. For each entry in the list the node uses this format:
<node UUID> / <node name> / <incoming address>
• Node UUID Refers to the unique identifier the node receives from the wsrep Provider.
• Node Name Refers to the node name, as you define it for the wsrep_node_name (page 189) parameter, in the
configuration file.
• Incoming Address Refers to the IP address for client connections, as set for the wsrep_node_incoming_address
(page 188) parameter, in the configuration file.
8.3.2 Example Notification Script
Nodes can call a notification script when changes happen in the membership of the cluster, that is when nodes join or
leave the cluster. You can specify the name of the script the node calls using the wsrep_notify_cmd (page 189). While
you can use whatever script meets the particular needs of your deployment, you may find it helpful to consider the
example below as a starting point.
#!/bin/sh -eu
#
#
#
#
#
This is a simple example of wsrep notification script (wsrep_notify_cmd).
It will create ’wsrep’ schema and two tables in it: ’membeship’ and ’status’
and fill them on every membership or node status change.
Edit parameters below to specify the address and login to server.
USER=root
PSWD=rootpass
HOST=<host_IP_address>
PORT=3306
SCHEMA="wsrep"
MEMB_TABLE="$SCHEMA.membership"
STATUS_TABLE="$SCHEMA.status"
BEGIN="
SET wsrep_on=0;
DROP SCHEMA IF EXISTS $SCHEMA; CREATE SCHEMA $SCHEMA;
CREATE TABLE $MEMB_TABLE (
idx INT UNIQUE PRIMARY KEY,
uuid CHAR(40) UNIQUE, /* node UUID */
name VARCHAR(32),
/* node name */
addr VARCHAR(256)
/* node address */
) ENGINE=MEMORY;
8.3. Notification Command
113
Galera Documentation, Release 3.x
CREATE TABLE $STATUS_TABLE (
size
INT,
idx
INT,
status CHAR(16),
uuid
CHAR(40),
prim
BOOLEAN
) ENGINE=MEMORY;
BEGIN;
DELETE FROM $MEMB_TABLE;
DELETE FROM $STATUS_TABLE;
"
END="COMMIT;"
/*
/*
/*
/*
/*
component size
*/
this node index */
this node status */
cluster UUID */
if component is primary */
configuration_change()
{
echo "$BEGIN;"
local idx=0
for NODE in $(echo $MEMBERS | sed s/,/\ /g)
do
echo "INSERT INTO $MEMB_TABLE VALUES ( $idx, "
# Don’t forget to properly quote string values
echo "’$NODE’" | sed s/\\//\’,\’/g
echo ");"
idx=$(( $idx + 1 ))
done
echo "INSERT INTO $STATUS_TABLE VALUES($idx, $INDEX, ’$STATUS’, ’$CLUSTER_UUID’, $PRIMAR
echo "$END"
}
status_update()
{
echo "SET wsrep_on=0; BEGIN; UPDATE $STATUS_TABLE SET status=’$STATUS’; COMMIT;"
}
COM=status_update # not a configuration change by default
while [ $# -gt 0 ]
do
case $1 in
--status)
STATUS=$2
shift
;;
--uuid)
CLUSTER_UUID=$2
shift
;;
--primary)
[ "$2" = "yes" ] && PRIMARY="1" || PRIMARY="0"
COM=configuration_change
shift
;;
--index)
INDEX=$2
114
Chapter 8. Monitor
Galera Documentation, Release 3.x
shift
;;
--members)
MEMBERS=$2
shift
;;
esac
shift
done
# Undefined means node is shutting down
if [ "$STATUS" != "Undefined" ]
then
$COM | mysql -B -u$USER -p$PSWD -h$HOST -P$PORT
fi
exit 0
When you finish editing the script to fit your needs, you need to move it into a directory in the $PATH environment
variable or the binaries directory for your system. On Linux, the binaries directory is typically at /usr/bin, while
on FreeBSD it is at /usr/local/bin.
# mv my-wsrep-notify.sh /usr/bin
In addition to this, given that the notification command contains your root password, change the ownership to the
mysql user and make the script executable only to that user.
# chown mysql:mysql /usr/bin/my-wsrep-notify.sh
# chmod 700 /usr/bin/my-wsrep-notify.sh.
This ensures that only the mysql user executes and can read the notification script, preventing all other users from
seeing your root password.
8.3.3 Enabling the Notification Command
You can enable the notification command through the wsrep_notify_cmd (page 189) parameter in the configuration
file.
wsrep_notify_cmd=/path/to/wsrep_notify.sh
The node then calls the script for each change in cluster membership and node status. You can use these status changes
in configuring load balancers, raising alerts or scripting for any other situation where you need your infrastructure to
respond to changes to the cluster.
Galera Cluster provides a default script, wsrep_notify.sh, for you to use in handling notifications or as a starting
point in writing your own custom notification script.
Note: You can also use Nagios for monitoring Galera Cluster. For more information, see Galera Cluster Nagios
Plugin.
8.3. Notification Command
115
Galera Documentation, Release 3.x
116
Chapter 8. Monitor
CHAPTER
NINE
SECURITY
9.1 Firewall Settings
Galera Cluster requires a number of ports in order to maintain network connectivity between the nodes. Depending on
your deployment, you may require all or some of these ports on each node in the cluster:
• 3306 For MySQL client connections and State Snapshot Transfer that use the mysqldump method.
• 4567 For Galera Cluster replication traffic, multicast replication uses both UDP transport and TCP on this port.
• 4568 For Incremental State Transfer.
• 4444 For all other State Snapshot Transfer.
How to open these ports for Galera Cluster can vary depending upon your distribution and what you use to configure
the firewall.
9.1.1 Firewall Configuration with iptables
Linux provides packet filtering support at the kernel level. Using iptables and ip6tables you can set up,
maintain and inspect tables of IPv4 and IPv6 packet filtering rules.
There are several tables that the kernel uses for packet filtering and within these tables are chains that it match specific
kinds of traffic. In order to open the relevant ports for Galera Cluster, you need to append new rules to the INPUT
chain on the filter table.
Opening Ports for Galera Cluster
Galera Cluster requires four ports for replication. There are two approaches to configuring the firewall to open these
iptables. The method you use depends on whether you deploy the cluster in a LAN environment, such as an office
network, or if you deploy the cluster in a WAN environment, such as on several cloud servers over the internet.
LAN Configuration
When configuring packet filtering rules for a LAN environment, such as on an office network, there are four ports that
you need to open to TCP for Galera Cluster and one to UDP transport to enable multicast replication. This means five
commands that you must run on each cluster node:
# iptables --append INPUT --in-interface eth0 \
--protocol tcp --match tcp --dport 3306 \
--source 192.168.0.1/24 --jump ACCEPT
# iptables --append INPUT --in-interface eth0 \
117
Galera Documentation, Release 3.x
--protocol tcp --match tcp --dport 4567 \
--source 192.168.0.1/24 --jump ACCEPT
# iptables --append INPUT --in-interface eth0 \
--protocol tcp --match tcp --dport 4568 \
--source 192.168.0.1/24 --jump ACCEPT
# iptables --append INPUT --in-interface eth0 \
--protocol tcp --match tcp --dport 4444 \
--source 192.168.0.1/24 --jump ACCEPT
# iptables --append INPUT --in-interface eth0 \
--protocol udp --match udp --dport 4567 \
--source 192.168.0.1/24 --jump ACCEPT
These commands open the relevant ports to TCP and UDP transport. It assumes that the IP addresses in your network
begin with 192.168.0.
Note: Warning: The IP addresses in the example are for demonstration purposes only. Use the real values from your
nodes and netmask in your iptables configuration.
Galera Cluster can now pass packets through the firewall to the node, but the configuration reverts to default on reboot.
In order to update the default firewall configuration, see Making Firewall Changes Persistent (page 118).
WAN Configuration
While the configuration shown above for LAN deployments offers the better security, only opening those ports necessary for cluster operation, it does not scale well into WAN deployments. The reason is that in a WAN environment the
IP addresses are not in sequence. The four commands to open the relevant ports to TCP would grow to four commands
per node on each node. That is, for ten nodes you would need to run four hundred iptables commands across the
cluster in order to set up the firewall on each node.
Without much loss in security, you can instead open a range of ports between trusted hosts. This reduces the number
of commands to one per node on each node. For example, firewall configuration in a three node cluster would look
something like:
# iptables --append INPUT
--source 64.57.102.34
# iptables --append INPUT
--source 193.166.3.20
# iptables --append INPUT
--source 193.125.4.10
--protocol tcp \
--jump ACCEPT
--protocol tcp \
--jump ACCEPT
--protocol tcp \
--jump ACCEPT
When these commands are run on each node, they set the node to accept TCP connections from the IP addresses of
the other cluster nodes.
Note: Warning: The IP addresses in the example are for demonstration purposes only. Use the real values from your
nodes and netmask in your iptables configuration.
Galera Cluster can now pass packets through the firewall to the node, but the configuration reverts to default on reboot.
In order to update the default firewall configuration, see Making Firewall Changes Persistent (page 118).
Making Firewall Changes Persistent
Whether you decide to open ports individually for LAN deployment or in a range between trusted hosts for a WAN
deployment, the tables you configure in the above sections are not persistent. When the server reboots, the firewall
reverts to its default state.
118
Chapter 9. Security
Galera Documentation, Release 3.x
For systems that use init, you can save the packet filtering state with one command:
# service save iptables
For systems that use systemd, you need to save the current packet filtering rules to the path the iptables unit
reads from when it starts. This path can vary by distribution, but you can normally find it in the /etc directory. For
example:
• /etc/sysconfig/iptables
• /etc/iptables/iptables.rules
Once you find where your system stores the rules file, use iptables-save to update the file:
# iptables-save > /etc/sysconfig/iptables
When your system reboots, it now reads this file as the default packet filtering rules.
9.1.2 Firewall Configuration with PF
FreeBSD provides packet filtering support at the kernel level. Using PF you can set up, maintain and inspect the packet
filtering rule sets.
Note: Warning: Different versions of FreeBSD use different versions of PF. Examples here are from FreeBSD 10.1,
which uses the same version of PF as OpenBSD 4.5.
Enabling PF
In order to use PF on FreeBSD, you must first set the system up to load its kernel module. Additionally, you need to
set the path to the configuration file for PF.
Using your preferred text editor, add the following lines to /etc/rc.conf:
pf_enable="YES"
pf_rules="/etc/pf.conf"
You may also want to enable logging support for PF and set the path for the log file. This can be done by adding the
following lines to /etc/rc.conf:
pflog_enable="YES"
pflog_logfile="/var/log/pflog"
FreeBSD now loads the PF kernel module with logging features at boot.
Configuring PF Rules
In the above section, the configuration file for PF was set to /etc/pf.conf. This file allows you to set up the
default firewall configuration that you want to use on your server. The settings you add to this file are the same for
each cluster node.
There are two variables that you need to define for Galera Cluster in the PF configuration file: a list for the ports it
needs open for TCP and a table for the IP addresses of nodes in the cluster.
# Galera Cluster Macros
wsrep_ports="{ 3306, 4567, 4568,4444}"
table <wsrep_cluster_address> persist {192.168.1.1 192.168.1.2 192.168.1.3}"
9.1. Firewall Settings
119
Galera Documentation, Release 3.x
Once you have these defined, you can add the rule to allow cluster packets to pass through the firewall.
# Galera Cluster TCP Filter Rule
pass in proto tcp from <wsrep_cluster_address> to any port $wsrep_ports keep state
In the event that you deployed your cluster in a LAN environment, you need to also create on additional rule to open
port 4568 to UDP transport for mutlicast replication.
# Galera Cluster UDP Filter Rule
pass in proto udp from <wsrep_cluster_address> to any port 4568 keep state
This defines the packet filtering rules that Galera Cluster requires. You can test the new rules for syntax errors using
pfctl, with the -n options to prevent it from trying to load the changes.
# pfctl -v -nf /etc/pf.conf
wsrep_ports = "{ 3306, 4567, 4568, 4444 }"
table <wsrep_cluster_address> persist { 192.168.1.1 192.168.1.2 192.168.1.3 }
pass in proto tcp from <wsrep_cluster_address> to any port = mysql flags S/A/ keep state
pass in proto tcp from <wsrep_cluster_address> to any port = 4567 flags S/SA keep state
pass in proto tcp from <wsrep_cluster_address> to any port = 4568 flags S/SA keep state
pass in proto tcp from <wsrep_cluster_address> to any port = krb524 falgs S/SA keep state
pass in proto udp from <wsrep_cluster_address> to any port = 4568 keep state
If there are no syntax errors, pfctl prints each of the rules it adds to the firewall, (expanded, as in the example
above). If there are syntax errors, it notes the line near where the errors occur.
Note: Warning: The IP addresses in the example are for demonstration purposes only. Use the real values from your
nodes and netmask in your PF configuration.
Starting PF
When you finish configuring packet filtering for Galera Cluster and for any other service you may require on your
FreeBSD server, you can start the service. This is done with two commands: one to start the service itself and one to
start the logging service.
# service pf start
# service pflog start
In the event that you have PF running already and want to update the rule set to use the settings in the configuration
file for PF, (for example, the rules you added for Galera Cluster), you can load the new rules through the pfctl
command.
# pfctl -f /etc/pf.conf
9.2 SSL Settings
Galera Cluster supports secure encrypted connections between nodes using SSL (Secure Socket Layer) protocol. This
includes both the connections between database clients and servers through the standard SSL support in MySQL as
well as encrypting replication traffic particular to Galera Cluster itself.
The SSL implementation is cluster-wide and does not support authentication for replication traffic. You must enable
SSL for all nodes in the cluster or none of them.
120
Chapter 9. Security
Galera Documentation, Release 3.x
9.2.1 SSL Certificates
Before you can enable encryption for your cluster, you first need to generate the relevant certificates for the nodes to
use. This procedure assumes that you are using OpenSSL.
Note: See Also: This chapter only covers certificate generation. For information on its use in Galera Cluster, see SSL
Configuration (page 123).
Generating Certificates
There are three certificates that you need to create in order to secure Galera Cluster: the Certificate Authority (CA)
key and cert; the server certificate, to secure mysqld activity and replication traffic; and the client certificate to secure
the database client and stunnel for state snapshot transfers.
Note: When certificates expire there is no way to update the cluster without a complete shutdown. You can minimize
the frequency of this downtime by using large values for the -days parameter when generating your certificates.
CA Certificate
The node uses the Certificate Authority to verify the signature on the certificates. As such, you need this key and cert
file to generate the server and client certificates.
To create the CA key and cert, complete the following steps:
1. Generate the CA key.
# openssl genrsa 2048 > ca-key.pem
2. Using the CA key, generate the CA certificate.
# openssl req -new -x509 -nodes -days 365000 \
-key ca-key.pem -out ca-cert.pem
This creates a key and certificate file for the Certificate Authority. They are in the current working directory as
ca-key.pem and ca-cert.pem. You need both to generate the server and client certificates. Additionally, each
node requires ca-cert.pem to verify certificate signatures.
Server Certificate
The node uses the server certificate to secure both the database server activity and replication traffic from Galera
Cluster.
1. Create the server key.
# openssl req -newkey rsa:2048 -days 365000 \
-nodes -keyout server-key.pem -out server-req.pem
2. Process the server RSA key.
# openssl rsa -in server-key.pem -out server-key.pem
3. Sign the server certificate.
9.2. SSL Settings
121
Galera Documentation, Release 3.x
# openssl x509 -req -in server-req.pem -days 365000 \
-CA ca-cert.pem -CAkey ca-key.pem -set_serial 01 \
-out server-cert.pem
This creates a key and certificate file for the server. They are in the current working directory as server-key.pem
and server-cert.pem. Each node requires both to secure database server activity and replication traffic.
Client Certificate
The node uses the client certificate to secure client-side activity. In the event that you prefer physical transfer methods
for state snapshot transfers, rsync for instance, the node also uses this key and certificate to secure stunnel.
1. Create the client key.
# openssl req -newkey rsa:2048 -days 365000 \
-nodes -keyout client-key.pem -out client-req.pem
2. Process client RSA key.
# openssl rsa -in client-key.pem -out client-key.pem
3. Sign the client certificate.
# openssl x509 -req -in client-req.pem -days 365000 \
-CA ca-cert.pem -CAkey ca-key.pem -set_serial 01 \
-out client-cert.pem
This creates a key and certificate file for the database client. They are in the current working directory as
client-key.pem and client-cert.pem. Each node requires both to secure client activity and state snapshot transfers.
Verifying the Certificates
When you finish creating the key and certificate files, use openssl to verify that they were generated correctly:
# openssl verify -CAfile ca-cert.pem \
server-cert.pem client-cert.pem
server-cert.pem: OK
client-cert.pem: OK
In the event that this verification fails, repeat the above process to generate replacement certificates.
Once the certificates pass verification, you can send them out to each node. Use a secure method, such as scp or
sftp. The node requires the following files:
• Certificate Authority: ca-cert.pem.
• Server Certificate: server-key.pem and server-cert.pem.
• Client Certificate: client-key.pem and client-cert.pem.
Place these files in the /etc/mysql/certs directory of each node, or a similar location where you can find them
later in configuring the cluster to use SSL.
122
Chapter 9. Security
Galera Documentation, Release 3.x
9.2.2 SSL Configuration
When you finish generating the SSL certificates for your cluster, you need to enable it for each node. If you have not
yet generated the SSL certificates, see SSL Certificates (page 121) for a guide on how to do so.
Note: For Gelera Cluster, SSL configurations are not dynamic. Since they must be set on every node in the cluster, if
you are enabling this feature with a running cluster you need to restart the entire cluster.
Enabling SSL
There are three vectors that you can secure through SSL: traffic between the database server and client, replication
traffic within Galera Cluster, and the State Snapshot Transfer.
Note: The configurations shown here cover the first two. The procedure for securing state snapshot transfers through
SSL varies depending on the SST method you use. For more information, see SSL for State Snapshot Transfers
(page 124).
Securing the Database
For securing database server and client connections, you can use the internal MySQL SSL support. In the event that
you use logical transfer methods for state snapshot transfer, such as mysqldump, this is the only step you need to
take in securing your state snapshot transfers.
In the configuration file, (my.cnf), add the follow parameters to each unit:
# MySQL Server
[mysqld]
ssl-ca = /path/to/ca-cert.pem
ssl-key = /path/to/server-key.pem
ssl-cert = /path/to/server-cert.pem
# MySQL Client Configuration
[mysql]
ssl-ca = /path/to/ca-cert.pem
ssl-key = /path/to/client-key.pem
ssl-cert = /path/to/client-cert.pem
These parameters tell the database server and client which files to use in encrypting and decrypting their interactions
through SSL. The node will begin to use them once it restarts.
Securing Replication Traffic
In order to enable SSL on the internal node processes, you need to define the paths to the key, certificate and certificate
authority files that you want the node to use in encrypting replication traffic.
• socket.ssl_key (page 176) The key file.
• socket.ssl_cert (page 175) The certificate file.
• socket.ssl_ca (page 175) The certificate authority file.
You can configure these options through the wsrep_provider_options (page 192) parameter in the configuration file,
(that is, my.cnf).
9.2. SSL Settings
123
Galera Documentation, Release 3.x
wsrep_provider_options="socket.ssl_key=/path/to/server-key.pem;socket.ssl_cert=/path/to/server-cert.p
This tells Galera Cluster which files to use in encrypting and decrypting replication traffic through SSL. The node will
begin to use them once it restarts.
Configuring SSL
In the event that you want or need to further configure how the node uses SSL, Galera Cluster provides some additional
parameters, including defining the cyclic redundancy check and setting the cryptographic cipher algorithm you want
to use.
Note: See Also: For a complete list of available configurations available for SSL, see the options with the socket.
prefix at Galera Parameters (page 159).
Configuring the Socket Checksum
Using the socket.checksum (page 176) parameter, you can define whether or which cyclic redundancy check the node
uses in detecting errors. There are three available settings for this parameter, which are defined by an integer:
• 0 Disables the checksum.
• 1 Enables the CRC-32 checksum.
• 2 Enables the CRC-32C checksum.
The default configuration for this parameter is 1 or 2 depending upon your version. CRC-32C is optimized for and
potentially hardware accelerated on Intel CPU’s.
wsrep_provider_options = "socket.checksum=2"
Configuring the Encryption Cipher
Using the socket.ssl_cipher (page 176) parameter, you define which cipher the node uses in encrypting replication
traffic. Galera Cluster uses whatever ciphers are available to the SSL implementation installed on the nodes. For
instance, if you install OpenSSL on your node, Galera Cluster can use any cryptographic algorithms OpenSSL uses in
ciphers.
The SSL configuration for Galera Cluster defaults to AES128-SHA, as this setting is considerably faster and no less
secure than AES256.
wsrep_provider_options = "socket.ssl_cipher=AES128-SHA"
9.2.3 SSL for State Snapshot Transfers
When you finish generating the SSL certificates for your cluster, you can begin configuring the node for their use.
Where SSL Configuration (page 123) covers how to enable SSL for replication traffic and the database client, this page
covers enabling it for State Snapshot Transfer scripts.
The particular method you use to secure the State Snapshot Transfer through SSL depends upon the method you use
in state snapshot transfers: mysqldump, rsync and xtrabackup.
Note: For Gelera Cluster, SSL configurations are not dynamic. Since they must be set on every node in the cluster, if
you want to enable this feature with an existing cluster you need to restart the entire cluster.
124
Chapter 9. Security
Galera Documentation, Release 3.x
Enabling SSL for mysqldump
The procedure for securing mysqldump is fairly similar to that of securing the database server and client through
SSL. Given that mysqldump connects through the database client, you can use the same SSL certificates you created
for replication traffic.
Before you shut down the cluster, you need to create a user for mysqldump on the database server and grant it
privileges through the cluster. This ensures that when the cluster comes back up, the nodes have the correct privileges
to execute the incoming state snapshot transfers. In the event that you use the Total Order Isolation online schema
upgrade method, you only need to execute the following commands on a single node.
1. From the database client, check that you use Total Order Isolation for online schema upgrades.
SHOW VARIABLES LIKE ’wsrep_OSU_method’;
+------------------+-------+
| Variable_name
| Value |
+------------------+-------+
| wsrep_OSU_method | TOI
|
+------------------+-------+
If wsrep_OSU_method (page 191) is set to Rolling Schema Upgrade, or ROI, then you need to execute the
following commands on each node individually.
2. Create a user for mysqldump.
CREATE USER ’sst_user’$’%’ IDENTIFIED BY PASSWORD ’sst_password’;
Bear in mind that, due to the manner in which the SST script is called, the user name and password must be the
same on all nodes.
3. Grant privileges to this user and require SSL.
GRANT ALL ON *.* TO ’sst_user’@’%’ REQUIRE SSL;
4. From the database client on a different node, check to ensure that the user has replicated to the cluster.
SELECT User, Host, ssl_type FROM mysql.user WHERE User=’sst_user’;
+----------+------+----------+
| User
| Host | ssl_type |
+----------+------+----------+
| sst_user | %
| Any
|
+----------+------+----------+
This configures and enables the mysqldump user for the cluster.
Note: In the event that you find, wsrep_OSU_method (page 191) set to ROI, you need to manually create the user on
each node in the cluster. For more information on rolling schema upgrades, see Schema Upgrades (page 79).
With the user now on every node, you can shut the cluster down to enable SSL for mysqldump State Snapshot
Transfers.
1. Using your preferred text editor, update the my.cnf configuration file to define the parameters the node requires
to secure state snapshot transfers.
9.2. SSL Settings
125
Galera Documentation, Release 3.x
# MySQL Server
[mysqld]
ssl-ca = /path/to/ca-cert.pem
ssl-key = /path/to/server-key.pem
ssl-cert = /path/to/server-cert.pem
# MySQL Client Configuration
[client]
ssl-ca = /path/to/ca-cert.pem
ssl-key = /path/to/client-key.pem
ssl-cert = /path/to/client-cert.pem
2. Additionally, configure wsrep_sst_auth (page 195) with the SST user authentication information.
[mysqld]
# mysqldump SST auth
wsrep_sst_auth = sst_user:sst_password
This configures the node to use mysqldump for state snapshot transfers over SSL. When all nodes are updated to
SSL, you can begin restarting the cluster. For more information on how to do this, see Starting the Cluster (page 55).
Enabling SSL for rsync
The Physical State Transfer Method for state snapshot transfers, uses an external script to copy the physical data
directly from the file system on one cluster node into another. In the case of rsync, this method bypasses the
database server and client, meaning that you must use an external method to secure its communications through SSL,
namely: STunnel.
Using your preferred text editor, update the Stunnel configuration file at /etc/stunnel/stunnel.conf with
the SSL certificate files for the node. You can use the same certificate files that the node uses on the database server,
client and replication traffic.
;; STunnel Configuration
CAfile = /path/to/ca.pem
cert = /path/to/cert.pem
key = /path/to/key.pem
;; ssync Server Configuration
[ssync]
accept = 4444
connect = 4444
;; rsync Client Configuration
[rsync]
accept = 4444
connect = 4444
With STunnel configured it is now available to Galera Cluster. The internal process for the rsync SST script now
automatically starts STunnel and transmits and receives through SSL.
Enabling SSL for xtrabackup
The Physical State Transfer Method for state snapshot transfers, uses an external script to copy the physical data
directly from the file system on one cluster node into another. Unlike rsync, xtrabackup includes support for
SSL encryption built in.
126
Chapter 9. Security
Galera Documentation, Release 3.x
Configurations for xtrabackup are handled through the my.cnf configuration file, in the same as the database
server and client. Use the [sst] unit to configure SSL for the script. You can use the same SSL certificate files as
the node uses on the database server, client and with replication traffic.
# xtrabackup Configuration
[sst]
encrypt = 3
tca = /path/to/ca.pem
tkey = /path/to/key.pem
tcert = /path/to/cert.pem
When you finish editing the configuration file, restart the node to apply the changes. xtrabackup now sends and
receives state snapshot transfers through SSL.
Note: In order to use SSL with xtrabackup, you need to set wsrep_sst_method (page 197) to xtrabackup-v2,
instead of xtrabackup.
9.3 SELinux Configuration
Security-Enhanced Linux, or SELinux, is a kernel module for improving security of Linux operating systems. It
integrates support for access control security policies, including mandatory access control (MAC), that limit user
applications and system daemons access to files and network resources. Some Linux distributions, such as Fedora,
ship with SELinux enabled by default.
In the context of Galera Cluster, systems with SELinux may block the database server, keeping it from starting or
preventing the node from establishing connections with other nodes in the cluster. To prevent this, you need to
configure SELinux policies to allow the node to operate.
9.3.1 Generating an SELinux Policy
In order to create an SELinux policy for Galera Cluster, you need to first open ports and set SELinux to permissive
mode. Then, after generating various replication events, state transfers and notifications, create a policy from the logs
of this activity and reset SELinux from to enforcing mode.
Setting SELinux to Permissive Mode
When SELinux registers a system event, there are three modes that define its response: enforcing, permissive and
disabled. While you can set it to permit all activity on the system, this is not a good security practice. Instead, set
SELinux to permit activity on the relevant ports and to ignore the database server.
To set SELinux to permissive mode, complete the following steps:
1. Using semanage, open the relevant ports:
# semanage port -a -t mysqld_port_t -p tcp 4567
# semanage port -a -t mysqld_port_t -p tcp 4568
# semanage port -a -t mysqld_port_t -p tcp 4444
SELinux already opens the standard MySQL port 3306. In the event that you use UDP in your cluster, you also
need to open 4567 to those connections.
# semanage port -a -t mysqld_port_t -p udp 4567
2. Set SELinux to permissive mode for the database server.
9.3. SELinux Configuration
127
Galera Documentation, Release 3.x
# semanage permissive -a mysqld_t
SELinux now permits the database server to function on the server and no longer blocks the node from network
connectivity with the cluster.
Defining the SELinux Policy
While SELinux remains in permissive mode, it continues to log activity from the database server. In order for it to
understand normal operation for the database, you need to start the database and generate routine events for SELinux
to see.
For servers that use init, start the database with the following command:
# service mysql start
For servers that use systemd, instead run this command:
# systemctl mysql start
You can now begin to create events for SELinux to log. There are many ways to go about this, including:
• Stop the node, then make changes on another node before starting it again. Not being that far behind, the node
updates itself using an Incremental State Transfer.
• Stop the node, delete the grastate.dat file in the data directory, then restart the node. This forces a State
Snapshot Transfer.
• Restart the node, to trigger the notification command as defined by wsrep_notify_cmd (page 189).
When you feel you have generated sufficient events for the log, you can begin work creating the policy and turning
SELinux back on.
Note: In order to for your policy to work you must generate both State Snapshot and Incremental State transfers.
Enabling an SELinux Policy
Generating an SELinux policy requires that you search log events for the relevant information and pipe it to the
audit2allow utility, creating a galera.te file to load into SELinux.
To generate and load an SELinux policy for Galera Cluster, complete the following steps:
1. Using fgrep and audit2allow, create a textease file with the policy information.
# fgrep "mysqld" /var/log/audit/audit.log | audit2allow -m MySQL_galera -o galera.te
This creates a galera.te file in your working directory.
2. Compile the audit logs into an SELinux policy module.
# checkmodule -M -m galera.te -o galera.mod
This creates a galera.mod file in your working directory.
3. Package the compiled policy module.
# semodule_package -m galera.mod -o galera.pp.
This creates a galera.pp file in your working directory.
128
Chapter 9. Security
Galera Documentation, Release 3.x
4. Load the package into SELinux.
semodule -i galera.pp
5. Disable permissive mode for the database server.
# semanage permissive -d mysql_t
SELinux returns to enforcement mode, now using new policies that work with Galera Cluster.
9.3. SELinux Configuration
129
Galera Documentation, Release 3.x
130
Chapter 9. Security
CHAPTER
TEN
MIGRATION
Bear in mind that there are certain key differences between how a standalone instance of the MySQL server works
and the Galera Cluster wsrep database server. This is especially important if you plan to install Galera Cluster over an
existing MySQL server, preserving its data for replication.
10.1 Differences from a Standalone MySQL Server
Although Galera Cluster is built on providing write-set replication to MySQL and related database systems, there are
certain key differences between how it handles and the standard standalone MySQL server.
10.1.1 Server Differences
Using a server with Galera Cluster is not the same as one with MySQL. Galera Cluster does not support the same
range of operating systems as MySQL, and there are differences in how it handles binary logs and character sets.
Operating System Support
Galera Cluster requires that you use Linux or a similar UNIX-like operating system. Binary packages are not supplied
for FreeBSD, Solaris and Mac OS X. There is no support available for Microsoft Windows.
Binary Log Support
Do not use the binlog-do-db and binlog-ignore-db options.
These binary log options are only supported for DML (Data Manipulation Language) statements. They provide no
support for DDL statements. This creates a discrepancy in the binary logs and will cause replication to abort.
Unsupported Character Sets
Do not use the character_set_server with UTF-16, UTF-32 or UCS-2.
When you use rsync for State Snapshot Transfer, the use of these unsupported character sets can cause the server to
crash.
Note: This is also a problem when you use automatic donor selection in your cluster, as the cluster may choose to
use rsync on its own.
131
Galera Documentation, Release 3.x
10.1.2 Differences in Table Configurations
There are certain features and configurations available in MySQL that do not work as expected in Galera Cluster, such
as storage engine support, certain queries and the query cache.
Storage Engine Support
Galera Cluster requires the InnoDB storage engine. Writes made to tables of other types, including the system
mysql-* tables, do not replicate to the cluster.
That said, DDL statements do replicate at the statement level, meaning that changes made to the mysql-* tables do
replicate that way.
What this means is that if you were to issue a statement like
CREATE USER ’stranger’@’localhost’
IDENTIFIED BY ’password’;
or, like
GRANT ALL ON strangedb.* TO ’stranger’@’localhost’;
the changes made to the mysql-* tables would replicate to the cluster. However, if you were to issue a statement like
INSERT INTO mysql.user (Host, User, Password)
VALUES (’localhost’, ’stranger’, ’password’);
the changes would not replicate.
Note: In general, non-transactional storage engines cannot be supported in multi-master replication.
Tables without Primary Keys
Do not use tables without a primary key.
When tables lack a primary key, rows can appear in different order on different nodes in your cluster. As such, queries
like SELECT...LIMIT... can return different results. Additionally, on such tables the DELETE statement is
unsupported.
Note: If you have a table without a primary key, it is always possible to add an AUTO_INCREMENT column to the
table without breaking your application.
Table Locking
Galera Cluster does not support table locking, as they conflict with multi-master replication. As such, the LOCK
TABLES and UNLOCK TABLES queries are not supported. This also applies to lock functions, such as GET_LOCK()
and RELEASE_LOCK()... for the same reason.
Query Logs
You cannot direct query logs to a table. If you would like to enable query logging in Galera Cluster, you must forward
the logs to a file.
132
Chapter 10. Migration
Galera Documentation, Release 3.x
log_output = FILE
Use general_log and general_log_file to choose query logging and to set the filename for your log file.
10.1.3 Differences in Transactions
There are some differences in how Galera Cluster handles transactions from MySQL, such as XA (eXtended Architecture) transactions and limitations on transaction size.
Distributed Transaction Processing
The standard MySQL server provides support for distributed transaction processing using the Open Group XA standard. This feature is not available for Galera Cluster, given that it can lead to possible rollbacks on commit.
Transaction Size
Although Galera Cluster does not explicitly limit the transaction size, the hardware you run it on does impose a size
limitation on your transactions. Nodes process write-sets in a single memory-resident buffer. As such, extremely large
transactions, such as LOAD DATA can adversely effect node performance.
You can avoid situations of this kind using the wsrep_max_ws_rows (page 187) and the wsrep_max_ws_size (page 187)
parameters. Limit the transaction rows to 128 KB and the transaction size to 1 GB.
If necessary, you can increase these limits.
Transaction Commits
Galera Cluster uses at the cluster-level optimistic concurrency control, which can result in transactions that issue a
COMMIT aborting at that stage.
For example, say that you have two transactions that will write to the same rows, but commit on separate nodes in the
cluster and that only one of them can successfully commit. The commit that fails is aborted, while the successful one
replicates.
When aborts occur at the cluster level, Galera Cluster gives a deadlock error.
code (Error: 1213 SQLSTATE: 40001 (ER_LOCK_DEADLOCK)
If you receive this error, restart the failing transaction. It will then issue on its own, without another to put it into
conflict.
10.2 Migrating to Galera Cluster
For systems that already have instances of the standalone versions of MySQL, MariaDB or Percona XtraDB, the
Galera Cluster installation replaces the existing database server with a new one that includes the wsrep API patch.
This only affects the database server, not the data.
When upgrading from a standalone database server, you must take some additional steps in order to subsequently
preserve and use your data with Galera Cluster.
Note: See Also: For more information on installing Galera Cluster, see Installation (page 33).
10.2. Migrating to Galera Cluster
133
Galera Documentation, Release 3.x
10.2.1 Upgrading System Tables
When you finish upgrading a standalone database server to Galera Cluster, but before you initialize your own cluster,
you need to update the system tables to take advantage of the new privileges and capabilities. You can do this with
mysql_upgrade.
In order to use mysql_upgrade, you need to first start the database server, but start it without initializing replication.
For systems that use init, run the following command:
# service mysql start --wsrep_on=OFF
For servers that use systemd, instead use this command:
# systemctl start mysql --wsrep_on=OFF
The command starts mysqld with the wsrep_on (page 190) parameter set to OFF, which disables replication. With
the database server running, you can update the system tables:
# mysql_upgrade
If this command generates any errors, check the MySQL Reference Manual for more information related to the particular error message. Typically, these errors are not critical and you can usually ignore them, unless they relate to
specific functionality that your system requires.
When you finish upgrading the system tables, you need to stop the mysqld process until you are ready to initialize
the cluster. For servers that use init, run the following command:
# service mysql stop
For servers that use systemd, instead use this command:
# systemctl stop mysql
Running this command stops database server. When you are ready to initialize your cluster, choose this server as your
starting node.
Note: See Also: For more information on initializing and adding nodes to a cluster, see Starting the Cluster (page 55).
10.2.2 Migrating from MySQL to Galera Cluster
In the event that you have an existing database server using the MyISAM storage engine or the stock MySQL masterslave cluster, there are some additional steps that you must take in order to migrate your data to Galera Cluster.
There are two stages to this migration: migrating the database state from the previous installation to Galera Cluster
and migrating the MySQL installation on the former master node to Galera Cluster.
Data Migration
The first stage of migration is to transfer the database state from the existing system to Galera Cluster. Begin by
creating a cluster. For more information on how to do so, see Getting Started (page 31).
• For migration from a standalone MySQL server, create the cluster using only new nodes.
• For migration from a stock MySQL master-slave cluster, create the cluster using only slave nodes.
You now have Galera Cluster and a single MySQL server running together. The MySQL server is hereafter referred
to as the MyISAM master. To migrate your data from the MyISAM master to Galera Cluster, complete the following
steps:
134
Chapter 10. Migration
Galera Documentation, Release 3.x
1. Stop all load on the MyISAM master.
2. Run mysqldump to create a state snapshot.
$ mysqldump --skip-create-options --all-databases > sst.sql
The --skip-create-options ensures that the newly created tables default to InnoDB.
3. Transfer the sst.sql file to one of the Galera Cluster nodes, then load the data through the database client.
$ mysql -u root -p < sst.sql
4. When the node finishes loading the data, resume the load on Galera Cluster. Leave the MyISAM master offline.
When the load resumes, it runs on Galera Cluster alone, excluding the MyISAM master. The other nodes in your
cluster replicate the data out from the first on their own.
Downtime for migration depends on the size of your database and how long it takes mysqldump to download from
one and upload to the other.
Database Migration
After the above procedure, you now have Galera Cluster running independent of the MyISAM master. In order to
continue using this node, you need to migrate it from MySQL to Galera Cluster and from MyISAM to InnoDB.
1. Install Galera Cluster on the former MyISAM master node.
2. Start the node without replication. For servers that use init, run the following command:
# service mysql start --wsrep_on=OFF
For servers that use systemd, instead run this command:
# systemctl start mysql --wsrep_on=OFF
3. From the database client, convert each table from MyISAM to InnoDB.
ALTER TABLE table ENGINE=InnoDB;
4. From one of the nodes already running Galera Cluster, copy the grastate.dat file to the former MyISAM
master node.
5. Using your preferred text editor, in the grastate.dat file on the former MyISAM master, change the sequence number (seqno) value from -1 to 0.
6. Restart the node. For servers that use init, run the following command:
# service mysql restart
For servers that use systemd, instead run this command:
# systemctl restart mysql
When the database server starts on the former MyISAM master, it launches as a node rejoining the cluster and will
request a state transfer to catch up with any changes that occurred while it was offline.
Note: See Also: For more information on the installation and basic management of Galera Cluster, see the Getting
Started Guide (page 31).
10.2. Migrating to Galera Cluster
135
Galera Documentation, Release 3.x
136
Chapter 10. Migration
Part IV
Support
137
CHAPTER
ELEVEN
TROUBLESHOOTING
11.1 Frequently Asked Questions
This chapter lists a number of frequently asked questions on Galera Cluster and other related matters.
What is Galera Cluster?
Galera Cluster is a write-set replication service provider in the form of the dlopenable library. It provides synchronous
replication and supports multi-master replication. Galera Cluster is capable of unconstrained parallel applying (that is,
“parallel replication”), multicast replication and automatic node provisioning.
The primary focus of Galera Cluster is data consistency. Transactions are either applied to every node or not at
all. Galera Cluster is not a cluster manager, a load balancer or a cluster monitor. What it does it keep databases
synchronized provided that they were properly configured and synchronized in the beginning.
What is Galera?
The word galera is the Italian word for galley. The galley is a class of naval vessel used in the Mediterranean Sea
from the 2nd millennium B.C.E. until the Renaissance. Although they used sails when the winds were favorable, their
principal method of propulsion came from banks of oars.
In order to manage the vessel effectively, rowers had to act synchronously, lest the oars become intertwined and get
blocked. Captains could scale the crew up to hundreds of rowers, making the galleys faster and more maneuverable in
combat.
Note: See Also: For more information on galleys, see Wikipedia.
How Do I Manage Failover?
Galera Cluster is a true synchronous multi-master replication system, which allows the use of any or all of the nodes
as master at any time without any extra provisioning. What this means is that there is no failover in the traditional
MySQL master-slave sense.
The primary focus of Galera Cluster is data consistency across the nodes. This does not allow for any modifications to
the database that may compromise consistency. For instance, the node blocks or rejects write requests until the joining
node syncs with the cluster and is ready to process requests.
The results of this is that you can safely use your favorite approach to distribute or migrate connections between the
nodes without the risk of causing inconsistency.
139
Galera Documentation, Release 3.x
Note: See Also: For more information on connection distribution, see Cluster Deployment Variants (page 91).
How Do I Upgrade the Cluster?
Periodically, updates will become available for Galera Cluster, (for the database server itself or the Galera Replication
Plugin). To update the software for the node, complete the following steps:
1. Stop the node.
2. Upgrade the software.
3. Restart the node.
In addition to this, you also need to transfer client connections from node you want to upgrade to another node for the
duration of the migration.
Note: See Also: For more information on upgrade process, see Upgrading Galera Cluster (page 80).
What InnoDB Isolation Levels does Galera Cluster Support?
You can use all isolation levels. Locally, in a given node, transaction isolation works as it does natively with InnoDB.
That said, globally, with transactions processing in separate nodes, Galera Cluster implements a transaction-level
called SNAPSHOT ISOLATION. The SNAPSHOT ISOLATION level is between the REPEATABLE READ and
SERIALIZABLE levels.
The SERIALIZABLE level cannot be guaranteed in the multi-master use case, because Galera Cluster replication does
not carry a transaction read set. Also, SERIALIZABLE transaction is vulnerable to multi-master conflicts. It holds
read locks and any replicated write to read locked row will cause the transaction to abort. Hence, it is recommended
not to use it in Galera Cluster.
Note: See Also: For more information, see Isolation Levels (page 15).
How are DDL’s Handled by Galera Cluster?
For DDL statements and similar queries, Galera Cluster has two modes of execution:
• Total Order Isolation Where the query is replicated in a statement before executing on the master. The node
waits for all preceding transactions to commit and then all nodes simultaneously execute the transaction in
isolation.
• Rolling Schema Upgrade Where the schema upgrades run locally, blocking only the node on which they are run.
The changes do not replicate to the rest of the cluster.
Note: See Also: For more information, see Schema Upgrades (page 79).
What if connections give an Unknown command error?
Your cluster experiences a temporary split, during which a portion of the nodes loses connectivity to the Primary
Component. When they reconnect, nodes from the former nonoperational component drop their client connections.
New connections to the database client return Unknown command errors.
140
Chapter 11. Troubleshooting
Galera Documentation, Release 3.x
What’s happening is that the node does not consider yet itself a part of the Primary Component. While it has restored
network connectivity, it still has to resynchronize itself with the cluster. MySQL does not have an error code for the
node lacking Primary status and defaults to an Unknown command message.
Nodes in a nonoperational component must regain network connectivity with the Primary Component, process a state
transfer and catch up with the cluster before they can resume normal operation.
Is GCache a Binlog?
The Write-set Cache, which is also called GCache, is a memory allocator for write-sets. Its primary purpose is to
minimize the write-set footprint in RAM. It is not a log of events, but rather a cache.
• GCache is not persistent.
• Not every entry in GCache is a write-set.
• Not every write-set in GCache will be committed.
• Write-sets in GCache are not allocated in commit order.
• Write-sets are not an optimal entry for the binlog, since they contain extra information.
That said, it is possible to construct a binlog out of the write-set cache.
What if the node crashes during rsync SST
You can configure wsrep_sst_method (page 197) to use rsync for State Snapshot Transfer. If the node crashes before
the state transfer is complete, it may cause the rsync process to hang forever, occupying the port and not allowing
you to restart the node. In the event that this occurs, the error logs for the database server show that the port is in use.
To correct the issue, kill the orphaned rsync process . For instance, if you find the process had a pid of 501, you
might run the following command:
# kill 501
Once you kill the orphaned process, it frees up the relevant ports and allows you to restart the node.
11.2 Server Error Log
Node 0 (XXX) requested state transfer from ’*any*’.
Selected 1 (XXX) as donor.
The node is attempting to initiate a State Snapshot Transfer.
In the event that you do not explicitly set the donor node through wsrep_sst_donor (page 196), the Group Communication module selects a donor based on the information available about the node states.
Group Communication monitors node states for the purposes of flow control, state transfers and quorum calculations.
That is, to ensure that a node that shows as JOINING does not count towards flow control and quorum.
The node can serve as a donor when it is in the SYNCED state. The joiner node selects a donor from the available
synced nodes. It shows preference to synced nodes that have the same gmcast.segment (page 171) wsrep Provider
option or it selects the first in the index. When the donor node is chosen its state changes immediately to DONOR,
meaning that it is no longer available for requests.
If the node can find no free nodes that show as SYNCED, the joining node reports:
11.2. Server Error Log
141
Galera Documentation, Release 3.x
Requesting state transfer failed: -11(Resource temporarily
unavailable). Will keep retrying every 1 second(s).
The joining node continues to retry the state transfer request.
SQL SYNTAX Errors
When a State Snapshot Transfer fails using mysqldump for any reason, the node writes a SQL SYNTAX message
into the server error logs.
This is a pseudo-statement. You can find the actual error message the state transfer returned within the SQL SYNTAX
entry. It provides the information you need to correct the problem.
Commit failed for reason:
3
When you have wsrep_debug (page 184) turned ON, you may occasionally see a message noting that a commit has
failed due to reason 3. For example:
110906
110906
110906
110906
17:45:01
17:45:01
17:45:01
17:45:01
[Note]
[Note]
[Note]
[Note]
WSREP:
WSREP:
WSREP:
WSREP:
BF kill (1, seqno: 16962377), victim: (140588996478720 4) trx: 3552506
Aborting query: commit
kill trx QUERY_COMMITTING for 35525064
commit failed for reason: 3, seqno: -1
When attempting to apply a replicated write-set, slave threads occasionally encounter lock conflicts with local transactions, which may already be in the commit phase. In such cases, the node aborts the local transaction, allowing the
slave thread to proceed.
This is a consequence of optimistic transaction execution. The database server executes transaction under the expectation that there will be no row conflicts. It is an expected issue in a multi-master configuration.
To mitigate such conflicts:
• Use the cluster in a master-slave configuration. Direct all writes to a single node.
• Use the same approaches as for master-slave read/write splitting.
11.3 Unknown Command Errors
Every query returns the Unknown command error.
Situation
For example, you log into a node and try to run a query from the database client. Every query you run generates the
same error:
SELECT * FROM example_table;
ERROR: Unknown command ’\\’
The reason for the error is that the node considers itself out of sync with the global state of the cluster. It is unable to
serve SQL requests except for SET and SHOW.
This occurs when you have explicitly set the wsrep Provider (through the wsrep_provider (page 192) parameter),
but the wsrep Provider rejects service. For example, this happens in cases where the node is unable to connect to
142
Chapter 11. Troubleshooting
Galera Documentation, Release 3.x
the Primary Component, such as when the wsrep_cluster_address (page 181) parameter becomes unset or due to
networking issues.
Solution
Using the wsrep_on (page 190) parameter dynamically, you can bypass the wsrep Provider check. This disables
replication.
SET wsrep_on=OFF;
This command tells mysqld to ignore the wsrep_provider (page 192) setting and behave as a standard standalone
database server. Doing this can lead to data inconsistency with the rest of the cluster, but that may be the desired result
for modifying the “local” tables.
In the event that you know or suspect that your cluster does not have a Primary Component, you need to bootstrap a
new one. On each node in the cluster, run the following queries:
1. Using the wsrep_cluster_status (page 205) status variable, confirm that the node is not part the Primary Component:
SHOW STATUS LIKE ’wsrep_cluster_status’;
+----------------------+-------------+
| Variable_name
| Value
|
+----------------------+-------------+
| wsrep_cluster_status | Non_primary |
+----------------------+-------------+
If the query returns Primary, the node is part of the Primary Component. If the query returns any other value,
it indicates that the node is part of a nonoperational component.
2. Using the wsrep_last_committed (page 209) status variable, find the sequence number of the last committed
transaction.
SHOW STATUS LIKE ’wsrep_last_committed’;
+----------------------+--------+
| Variable_name
| Value |
+----------------------+--------+
| wsrep_last_committed | 409745 |
+----------------------+--------+
In the event that none of the nodes show as the Primary Component, you need to bootstrap a new one. The node that
returns the largest sequence number is the most advanced in the cluster. On that node, run the following command:
SET GLOBAL wsrep_provider_options=’pc.bootstrap=YES’;
The node now operates as the starting point in a new Primary Component. Nodes that are part of nonoperational
components that have network connectivity attempt to initiate a state transfer to bring their own databases up-to-date
with this node. The cluster begins accepting SQL requests again.
11.4 User Changes not Replicating
User changes do not replicate to the cluster.
11.4. User Changes not Replicating
143
Galera Documentation, Release 3.x
Situation
You have made some changes to database users, but on inspection find that these changes are only present on the node
in which you made them and have not replicated to the cluster.
For instance, say that you want to add a new user to your cluster. You log into a node and use an INSERT statement
to update the mysql.user table.
INSERT INTO mysql.user (User,Host, Password)
VALUES (’user1’,’localhost’, password(’my_password’));
When finished, you check your work by running a SELECT query, to make sure that user1 does in fact exist on the
node:
SELECT User, Host, Password FROM mysql.user WHERE User=’user1’;
+-------+-------------+-------------------------------------------+
| User | Host
| Password
|
+-------+-------------+-------------------------------------------+
| user1 | localhost
| *00A60C0186D8740829671225B7F5694EA5C08EF5 |
+-------+-------------+-------------------------------------------+
This checks out fine. However, when you run the same query on a different node, you receive different results:
SELECT User, Host, Password FROM mysql.user WHERE User=’user1’;
Empty set (0.00 sec)
The changes you made to the mysql.user table on the first node do not replicate to the others. The new user you
created can only function when accessing the database on the node where you created it.
Replication currently only works with the InnoDB and XtraDB storage engines. Multi-master replication cannot
support non-transactional storage engines, such as MyISAM. Writes made to tables that use non-transactional storage
engines do not replicate.
The system tables use MyISAM. This means that any changes you make to the system tables directly, such as in the
above example with an INSERT statement, remain on the node in which they were issued.
Solution
While direct modifications to the system tables do not replicate, DDL statements replicate at the statement level.
Meaning, changes made to the system tables in this manner are made to the entire cluster.
For instance, consider the above example where you added a user to node. If instead of INSERT you used CREATE
USER or GRANT you would get very different results:
CREATE USER user1 IDENTIFIED BY ’my_password’;
This creates user1 in a way that replicates through the cluster. If you run SELECT query to check the mysql.user
table on any node, it returns the same results:
SELECT User, Host, Password FROM mysql.user WHERE User=’user1’;
+-------+-------------+-------------------------------------------+
| User | Host
| Password
|
+-------+-------------+-------------------------------------------+
| user1 | localhost
| *00A60C0186D8740829671225B7F5694EA5C08EF5 |
+-------+-------------+-------------------------------------------+
You can now user1 on any node in the cluster.
144
Chapter 11. Troubleshooting
Galera Documentation, Release 3.x
11.5 Cluster Stalls on ALTER
The cluster stalls when you run an ALTER query on an unused table.
Situation
You attempt to run an ALTER command on one node. The command takes a long time to execute. During that period
all other nodes stall leading to performance issues throughout the cluster.
What’s happening is a side effect of a multi-master cluster with several appliers. The cluster needs to control when a
DDL statement ends in relation to other transactions, in order to deterministically detect conflicts and schedule parallel
appliers. Effectively, the DDL statement must execute in isolation.
Galera Cluster has a 65K window of tolerance for transactions applied in parallel, but the cluster must wait when
ALTER commands take too long.
Solution
Given that this is a consequence of something intrinsic to how replication works in Galera Cluster, there is no direct
solution to the problem. However, you can implement a workaround.
In the event that you can guarantee that no other session will try to modify the table and that there are no other DDL
statements running, you can shift the schema upgrade method from Total Order Isolation to Rolling Schema Upgrade
for the duration of the ALTER statement. This applies the changes to each node individually, without affecting cluster
performance.
To run an ALTER statement in this manner, on each node run the following queries:
1. Change the Schema Upgrade method to Rolling Schema Upgrade.
SET wsrep_OSU_method=’RSU’;
2. Run the ALTER statement.
3. Reset the Schema Upgrade method back to Total Order Isolation.
SET wsrep_OSU_method=’TOI’;
The cluster now runs with the desired updates.
11.6 Detecting a Slow Node
By design, the performance of the cluster cannot be higher than the performance of the slowest node on the cluster.
Even if you have one node only, its performance can be considerably lower when compared with running the same
server in a standalone mode (without a wsrep Provider).
This is particularly true for big transactions even if they were within the transaction size limits. This is why it is
important to be able to detect a slow node on the cluster.
11.6.1 Finding Slow Nodes
There are two status variables used in finding slow nodes:
11.5. Cluster Stalls on ALTER
145
Galera Documentation, Release 3.x
• wsrep_flow_control_sent (page 208) Provides the number of times the node sent a pause event due to flow
control since the last status query.
SHOW STATUS LIKE ’wsrep_flow_control_sent’;
+-------------------------+-------+
| Variable_name
| Value |
+-------------------------+-------+
| wsrep_flow_control_sent | 7
|
+-------------------------+-------+
• wsrep_local_recv_queue_avg (page 211) Provides an average of the received queue length since the last status
query.
SHOW STATUS LIKE ’wsrep_local_recv_queue_avg’;
+----------------------------+---------+
| Variable_name
| Value
|
+----------------------------+---------+
| wsrep_local_recv_queue_avg | 3.34852 |
+----------------------------+---------+
Nodes that return values much higher than 0.0 inidcates that it cannot apply write-sets as fast as they are
received and can generate replication throttling.
Check these status variables on each node in your cluster. The node that returns the highest value is the slowest node.
Lower values are preferable.
11.7 Dealing with Multi-Master Conflicts
The type of conflicts that you need to address in multi-master database environments are typically row conflicts on
different nodes.
Consider a situation in a multi-master replication system. Users can submit updates to any database node. In turn two
nodes can attempt to change the same database row with different data. Galera Cluster copes with situations such as
this by using certification-based replication.
Note: See Also: For more information, see Certification-based Replication (page 9).
11.7.1 Diagnosing Multi-Master Conflicts
There are a few techniques available to you in logging and monitoring for problems that may indicate multi-master
conflicts.
• wsrep_debug (page 184) tells the node to include additional debugging information in the server output log. You
can enable it through the configuration file:
# Enable Debugging Output to Server Error Log
wsrep_debug=ON
Once you turn debugging on, you can use your preferred monitoring software to watch for row conflicts.
110906
110906
110906
110906
146
17:45:01
17:45:01
17:45:01
17:45:01
[Note]
[Note]
[Note]
[Note]
WSREP:
WSREP:
WSREP:
WSREP:
BF kill (1, seqno: 16962377), victim: (140588996478720 4) trx: 35
Aborting query: commit
kill trx QUERY_COMMITTING for 35525064
commit failed for reason: 3, seqno: -1
Chapter 11. Troubleshooting
Galera Documentation, Release 3.x
Note: Warning: In addition to useful debugging information, this parameter also causes the database server to
print authentication information, (that is, passwords), to the error logs. Do not enable it in production environments.
• In the event that you are developing your own notification system, you can use status variables to watch for
conflicts:
SHOW STATUS LIKE ’wsrep_local_bf_aborts’;
+-----------------------+-------+
| Variable_name
| Value |
+-----------------------+-------+
| wsrep_local_bf_aborts | 333
|
+-----------------------+-------+
SHOW STATUS LIKE ’wsrep_local_cert_failures’;
+---------------------------+-------+
| Variable_name
| Value |
+---------------------------+-------+
| wsrep_local_cert_failures | 333
|
+---------------------------+-------+
wsrep_local_bf_aborts (page 209) gives the total number of local transactions aborted by slave transactions
while in execution. wsrep_local_cert_failures (page 210) gives the total number of transactions that have failed
certification tests.
• Lastly, you can enable conflict logging features through wsrep_log_conflicts (page 186) and cert.log_conflicts
(page 161).
# Enable Conflict Logging
wsrep_log_conflicts=ON
wsrep_provider_options="cert.log_conflicts=YES"
These parameters enable different forms of conflict logging on the database server. When turned on, the node
logs additional information about the conflicts it encounters, such as the name of the table and schema where
the conflict occurred and the actual values for the keys that produced the conflict.
7:51:13 [Note] WSREP: trx conflict for key (1,FLAT8)056eac38 0989cb96:
source: cdeae866-d4a8-11e3-bd84-479ea1a1e941 version: 3 local: 1 state:
MUST_ABORT flags: 1 conn_id: 160285 trx_id: 29755710 seqnos (l: 643424,
g: 8749173, s: 8749171, d: 8749171, ts: 12637975935482109) <--X-->
source: 5af493da-d4ab-11e3-bfe0-16ba14bdca37 version: 3 local: 0 state:
APPLYING flags: 1 conn_id: 157852 trx_id: 26224969 seqnos (l: 643423,
g: 8749172, s: 8749171, d: 8749170, ts: 12637839897662340)
11.7.2 Auto-committing Transactions
When two transactions come into conflict, the later of the two is rolled back by the cluster. The client application
registers this rollback as a deadlock error. Ideally, the client application should retry the deadlocked transaction, but
not all client applications have this logic built in.
In the event that you encounter this problem, you can set the node to attempt to auto-commit the deadlocked transactions on behalf of the client application, using the wsrep_retry_autocommit (page 193) parameter.
11.7. Dealing with Multi-Master Conflicts
147
Galera Documentation, Release 3.x
wsrep_retry_autocommit=4
When a transaction fails the certification test due to a cluster-wide conflict, this tells the node how many times you
want it to retry the transaction before returning a deadlock error.
Note: Retrying only applies to auto-commit transactions, as retrying is not safe for multi-statement transactions.
11.7.3 Working Around Multi-Master Conflicts
While Galera Cluster resolves multi-master conflicts automatically, there are steps you can take to minimize the
frequency of their occurrence.
• Analyze the hot-spot and see if you can change the application logic to catch deadlock exceptions.
• Enable retrying logic at the node level using, wsrep_retry_autocommit (page 193).
• Limit the number of master nodes or switch to a master-slave model.
Note: If you can filter out the access to the hot-spot table, it is enough to treat writes only to the hot-spot table as
master-slave.
11.8 Two-Node Clusters
In a two-node cluster, a single-node failure causes the other to stop working.
Situation
You have a cluster composed of only two nodes. One of the nodes leaves the cluster ungracefully. That is, instead
of being shut down through init or systemd, it crashes or suffers a loss of network connectivity. The node that
remains becomes nonoperational. It remains so until some additional information is provided by a third party, such as
a human operator or another node.
If the node remained operational after the other left the cluster ungracefully, there would be the risk that each of the
two nodes will think itself as being the Primary Component. To prevent this, the node becomes nonoperational.
Solutions
There are two solutions available to you:
• You can bootstrap the surviving node to form a new Primary Component, using the pc.boostrap (page 172)
wsrep Provider option. To do so, log into the database client and run the following command:
SET GLOBAL wsrep_provider_options=’pc.bootstrap=YES’;
This bootstraps the surviving node as a new Primary Component. When the other node comes back online or
regains network connectivity with this node, it will initiate a state transfer and catch up with this node.
• In the event that you want the node to continue to operate, you can use the pc.ignore_sb (page 172) wsrep
Provider option. To do so, log into the database client and run the following command:
SET GLOBAL wsrep_provider_options=’pc.ignore_sb=TRUE’;
148
Chapter 11. Troubleshooting
Galera Documentation, Release 3.x
The node resumes processing updates and it will continue to do so, even in the event that it suspects a split-brain
situation.
Note: Warning: Enabling pc.ignore_sb (page 172) is dangerous in a multi-master setup, due to the aforementioned risk for split-brain situations. However, it does simplify things in master-slave clusters, (especially in
cases where you only use two nodes).
In addition to the solutions provided above, you can avoid the situation entirely using Galera Arbitrator. Galera
Arbitrator functions as an odd node in quorum calculations. Meaning that, if you enable Galera Arbitrator on one
node in a two-node cluster, that node remains the Primary Component, even if the other node fails or loses network
connectivity.
11.8. Two-Node Clusters
149
Galera Documentation, Release 3.x
150
Chapter 11. Troubleshooting
CHAPTER
TWELVE
TUTORIALS
12.1 Performance
12.1.1 Write-set Caching during State Transfers
Under normal operations, nodes do not consume much more memory than the regular standalone MySQL database
server. The certification index and uncommitted write-sets do cause some additional usage, but in typical applications
this is not usually noticeable.
Write-set caching during state transfers is the exception.
When a node receives a state transfer, it cannot process or apply incoming write-sets as it does not yet have a state to
apply them to. Depending on the state transfer method, (mysqldump, for instance), the sending node may also be
unable to apply write-sets.
The Write-set Cache, (or GCache), caches write-sets on memory-mapped files to disk and Galera Cluster allocates
these files as needed. In other words, the only limit for the cache is the available disk space. Writing to disk in turn
reduces memory consumption.
Note: See Also: For more information on configuring write-set caching to improve performance, see Configuring
Flow Control (page 75).
Customizing the Write-set Cache Size
You can define the size of the write-set cache using the gcache.size (page 168) parameter. The set the size to one less
than that of the data directory.
If you have storage issues, there are some guidelines to consider in adjusting this issue. For example, your preferred
state snapshot method. rsync and xtrabackup copy the InnoDB log files, while mysqldump does not. So, if
you use mysqldump for state snapshot transfers, you can subtract the size of the log files from your calculation of
the data directory size.
Note: Incremental State Transfers (IST) copies the database five times faster over mysqldump and about 50% faster
than xtrabackup. Meaning that your cluster can handle relatively large write-set caches. However, bear in mind
that you cannot provision a server with Incremental State Transfers.
As a general rule, start with the data directory size, including any possible links, then subtract the size of the ring
buffer storage file, which is called galera.cache by default.
In the event that storage remains an issue, you can further refine these calculations with the database write rate. The
write rate indicates the tail length that the cluster stores in the write-set cache.
151
Galera Documentation, Release 3.x
You can calculate this using the wsrep_received_bytes (page 216) status variable.
1. Determine the size of the write-sets the node has received from the cluster:
SHOW STATUS LIKE ’wsrep_received_bytes’;
+------------------------+-----------+
| Variable name
| Value
|
+------------------------+-----------+
| wsrep_received_bytes
| 6637093
|
+------------------------+-----------+
Note the value and time, respective as 𝑟𝑒𝑐𝑣1 and 𝑡𝑖𝑚𝑒1 .
2. Run the same query again, noting the value and time, respectively, as 𝑟𝑒𝑐𝑣2 and 𝑡𝑖𝑚𝑒2 .
3. Apply these values to the following equation:
𝑤𝑟𝑖𝑡𝑒𝑟𝑎𝑡𝑒 =
𝑟𝑒𝑐𝑣2 − 𝑟𝑒𝑐𝑣1
𝑡𝑖𝑚𝑒2 − 𝑡𝑖𝑚𝑒1
From the write rate you can determine the amount of time the cache remains valid. When the cluster shows a node as
absent for a period of time less than this interval, the node can rejoin the cluster through an incremental state transfer.
Node that remains absent for longer than this interval will likely require a full state snapshot transfer to rejoin the
cluster.
You can determine the period of time the cache remains valid using this equation:
𝑝𝑒𝑟𝑖𝑜𝑑 =
𝑐𝑎𝑐ℎ𝑒𝑠𝑖𝑧𝑒
𝑤𝑟𝑖𝑡𝑒𝑟𝑎𝑡𝑒
Conversely, if you already know the period in which you want the write-set cache to remain valid, you can use instead
this equation:
𝑐𝑎𝑐ℎ𝑒𝑠𝑖𝑧𝑒 = 𝑤𝑟𝑖𝑡𝑒𝑟𝑎𝑡𝑒 × 𝑡𝑖𝑚𝑒
This equation can show how the size of the write-set cache can improve performance. For instance, say you find that
cluster nodes frequently request state snapshot transfers. Increasing the gcache.size (page 168) parameter extends the
period in which the write-set remains valid, allowing the nodes to update instead through incremental state transfers.
Note: Consider these configuration tips as guidelines only. For example, in cases where you must avoid state snapshot
transfers as much as possible, you may end up using a much larger write-set cache than suggested above.
12.1.2 Setting Parallel Slave Threads
There is no rule about how many slave threads you need for replication. Parallel threads do not guarantee better performance. But, parallel applying does not impair regular operation performance and may speed up the synchronization
of new nodes with the cluster.
You should start with four slave threads per CPU core:
wsrep_slave_threads=4
The logic here is that, in a balanced system, four slave threads can typically saturate a CPU core. However, I/O
performance can increase this figure several times over. For example, a single-core ThinkPad R51 with a 4200 RPM
drive can use thirty-two slave threads.
Parallel applying requires the following settings:
152
Chapter 12. Tutorials
Galera Documentation, Release 3.x
innodb_autoinc_lockmode=2
innodb_locks_unsafe_For_binlog=1
You can use the wsrep_cert_deps_distance (page 203) status variable to determine the maximum number of slave
threads possible. For example:
SHOW STATUS LIKE ’wsrep_cert_deps_distance’;
+----------------------------+-----------+
| Variable name
| Value
|
+----------------------------+-----------+
| wsrep_cert_deps_distance
| 23.88889 |
+----------------------------+-----------+
This value essentially determines the number of write-sets that the node can apply in parallel on average.
Note: Warning: Do not use a value for wsrep_slave_threads (page 194) that is higher than the average given by the
wsrep_cert_deps_distance (page 203) status variable.
12.1.3 Dealing with Large Transactions
Large transactions, for instance the transaction caused by a DELETE query that removes millions of rows from a table
at once, can lead to diminished performance. If you find that you must perform frequently transactions of this scale,
consider using pt-archiver from the Percona Toolkit.
For example, if you want to delete expired tokens from their table on a database called keystone at dbhost, you
might run something like this:
$ pt-archiver --source h=dbhost,D=keystone,t=token \
--purge --where "expires < NOW()" --primary-key-only \
--sleep-coef 1.0 --txn-size 500
This allows you to delete rows efficiently from the cluster.
Note: See Also: For more information on pt-archiver, its syntax and what else it can do, see the manpage.
12.2 Configuration Tips
This chapter contains some advanced configuration tips.
12.2.1 WAN Replication
When running the cluster over WAN, you may frequently experience transient network connectivity failures. To
prevent this from partitioning the cluster, you may want to increase the keepalive timeouts.
The following parameters can tolerate 30 second connectivity outages.
wsrep_provider_options = "evs.keepalive_period = PT3S;
evs.suspect_timeout = PT30S;
evs.inactive_timeout = PT1M;
evs.install_timeout = PT1M"
In configuring these parameters, consider the following:
12.2. Configuration Tips
153
Galera Documentation, Release 3.x
• You want evs.suspect_timeout (page 165) parameter set as high as possible to help avoid partitions. Given that
partitions cause state transfers, which can effect performance.
• You must set the evs.inactive_timeout (page 163) parameter to a value higher than evs.suspect_timeout
(page 165).
• You must set the evs.install_timeout (page 164) parameter to a value higher than the evs.inactive_timeout
(page 163).
Dealing with WAN Latency
When using Galera Cluster over a WAN, bear in mind that WAN links can have exceptionally high latency. You
can correct for this by taking Round-Trip Time (RTT) measurements between cluster nodes and adjust all temporal
parameters.
To take RTT measurements, use ping on each cluster node to ping the others. For example, if you were to log in to
the node at 192.168.1.1:
$ ping -c 3 192.168.1.2
PING 192.168.1.2 (192.168.1.2) 58(84)
64 bytes from 192.168.1.2: icmp_seq=1
64 bytes from 192.168.1.2: icmp_seq=2
64 bytes from 192.168.1.2: icmp_seq=3
bytes of data.
ttl=64 time=0.736 ms
ttl=64 time=0.878 ms
ttl=64 time=12.7 ms
--- 192.168.1.2 --3 packets transmitted, 3 received, 0% packet loss, time 2002ms
rtt min/avg/max/mdev = 0.736/4.788/12.752/5.631 ms
Take RTT measurements on each node in your cluster and note the highest value among them.
Parameters that relate to periods and timeouts, such as evs.join_retrans_period (page 164). They must all use values
that exceed the highest RTT measurement in your cluster.
wsrep_provider_options="evs.join_retrans_period=PT0.5S"
This allows the cluster to compensate for the latency issues of the WAN links between your cluster nodes.
12.2.2 Multi-Master Setup
A master is a node that can simultaneously process writes from clients.
The more masters you have in the cluster the higher the probability of certification conflicts. This can lead to undesirable rollbacks and performance degradation.
If you find you experience frequent certification conflicts, consider reducing the number of nodes your cluster uses as
masters.
12.2.3 Single Master Setup
In the event that your cluster uses only one node as a master, there are certain requirements, such as the slave queue
size, that can be relaxed.
To relax flow control, use the settings below:
wsrep_provider_options = "gcs.fc_limit = 256;
gcs.fc_factor = 0.99;
gcs.fc_master_slave = YES"
154
Chapter 12. Tutorials
Galera Documentation, Release 3.x
By reducing the rate of flow control events, these settings may improve replication performance.
Note: You can also use this setting as suboptimal in a multi-master setup.
12.2.4 Using Galera Cluster with SELinux
When you first enable Galera Cluster on a node that runs SELinux, SELinux prohibits all cluster activities. In order to
enable replication on the node, you need a policy so that SELinux can recognize cluster activities as legitimate.
To create a policy for Galera Cluster, set SELinux to run in permissive mode. Permissive mode does not block cluster
activity, but it does log the actions as warnings. By collecting these warnings, you can iteratively create a policy for
Galera Cluster.
Once SELinux no longer registers warnings from Galera Cluster, you can switch it back into enforcing mode. SELinux
then uses the new policy to allow the cluster access to the various ports and files it needs.
Note: Almost all Linux distributions ship with a MySQL policy for SELinux. You can use this policy as a starting
point for Galera Cluster and extend it, using the above procedure.
12.2. Configuration Tips
155
Galera Documentation, Release 3.x
156
Chapter 12. Tutorials
Part V
Reference
157
CHAPTER
THIRTEEN
GALERA PARAMETERS
As of version 0.8, Galera Cluster accepts parameters as semicolon-separated key value pair lists, such as key1 =
value1; key2 = value2. In this way, you can configure an arbitrary number of Galera Cluster parameters in
one call. A key consists of parameter group and parameter name:
<group>.<name>
Where <group> roughly corresponds to some Galera module.
Table legend:
• Numeric values Galera Cluster understands the following numeric modifiers: K, M, G, T standing for 210 , 220 ,
230 and 240 respectively.
• Boolean values Galera Cluster accepts the following boolean values: 0, 1, YES, NO, TRUE, FALSE, ON, OFF.
• Time periods must be expressed in the ISO8601 format. See also the examples below.
• T indicates parameters that are strictly for use in troubleshooting problems. You should not implement these in
production environments.
Parameter
base_host (page 161)
base_port (page 161)
cert.log_conflicts (page 161)
debug (page 161)
evs.auto_evict (page 161)
evs.causal_keepalive_period (page 162)
evs.consensus_timeout (page 162) T
evs.debug_log_mask (page 162)
evs.delayed_keep_period (page 162)
evs.delayed_margin (page 163)
evs.evict (page 163)
evs.inactive_check_period (page 163)
evs.inactive_timeout (page 163)
evs.info_log_mask (page 164)
evs.install_timeout (page 164)
evs.join_retrans_period (page 164)
evs.keepalive_period (page 165)
evs.max_install_timeouts (page 165)
evs.send_window (page 165)
evs.stats_report_period (page 165)
evs.suspect_timeout (page 165)
Default
detected network address
4567
NO
NO
0
PT30S
0x1
PT30S
PT1S
PT1S
PT15S
0
PT15S
PT1S
PT1S
1
4
PT1M
PT5S
Support
Dynamic
1+
1+
2+
Yes
2+
Yes
3.8+
No
1+
No
1-2
No
1+
Yes
3.8+
No
3.8+
No
3.8
No
1+
No
1+
No
1+
No
1+
Yes
1+
Yes
1+
No
1+
No
1+
Yes
1+
No
1+
No
Continued on next page
159
Galera Documentation, Release 3.x
Table 13.1 – continued from previous page
Parameter
Default
Support
Dynamic
evs.use_aggregate (page 166)
TRUE
1+
No
evs.user_send_window (page 166)
2
1+
Yes
evs.view_forget_timeout (page 166)
PT5M
1+
No
evs.version (page 166) T
0
1+
No
gcache.dir (page 167)
working directory
1.0
No
gcache.name (page 167)
galera.cache
1+
No
gcache.keep_pages_size (page 167)
0
1+
No
gcache.page_size (page 168)
128Mb
1+
No
gcache.size (page 168)
128Mb
1+
No
gcs.fc_debug (page 168)
0
1+
No
gcs.fc_factor (page 168)
0.5
1+
Yes
gcs.fc_limit (page 168)
16
1+
Yes
gcs.fc_master_slave (page 169)
NO
1+
No
gcs.max_packet_size (page 169)
32616
1+
No
gcs.max_throttle (page 169)
0.25
1+
No
gcs.recv_q_hard_limit (page 169)
LLONG_MAX
1+
No
gcs.recv_q_soft_limit (page 169)
0.25
1+
No
gcs.sync_donor (page 170)
NO
1+
No
gmcast.listen_addr (page 170)
tcp://0.0.0.0:4567
1+
No
gmcast.mcast_addr (page 170)
1+
No
gmcast.mcast_ttl (page 170)
1
1+
No
gmcast.peer_timeout (page 170)
PT3S
1+
No
gmcast.segment (page 171)
0
3+
No
gmcast.time_wait (page 171)
PT5S
1+
No
gmcast.version (page 171) T
n/a
ist.recv_addr (page 171)
1+
No
pc.recovery (page 171)
TRUE
3+
No
pc.bootstrap (page 172)
n/a
2+
Yes
pc.announce_timeout (page 172)
PT3S
2+
No
pc.checksum (page 172)
TRUE
1+
No
pc.ignore_sb (page 172)
FALSE
1+
Yes
pc.ignore_quorum (page 172)
FALSE
1+
Yes
pc.linger (page 173)
PT2S
1+
No
pc.npvo (page 173)
FALSE
1+
No
pc.wait_prim (page 173)
FALSE
1+
No
pc.wait_prim_timeout (page 173)
P30S
2+
No
pc.weight (page 173)
1
2.4+
Yes
pc.version (page 173) T
n/a
1+
protonet.backend (page 174)
asio
1+
No
protonet.version (page 174) T
n/a
1+
repl.commit_order (page 174)
3
1+
No
repl.causal_read_timeout (page 174)
PT30S
1+
No
repl.key_format (page 174)
FLAT8
3+
No
repl.max_ws_size (page 175)
2147483647
3+
No
repl.proto_max (page 175)
5
2+
No
socket.ssl_ca (page 175)
1+
No
socket.ssl_cert (page 175)
1+
No
socket.checksum (page 176)
1 (for version 2) 2 (for version 3+) 2+
No
socket.ssl_cipher (page 176)
AES128-SHA
1+
No
Continued on next page
160
Chapter 13. Galera Parameters
Galera Documentation, Release 3.x
Table 13.1 – continued from previous page
Parameter
Default
socket.ssl_compression (page 176)
YES
socket.ssl_key (page 176)
socket.ssl_password_file (page 176)
Support
1+
1+
1+
Dynamic
No
No
No
base_host
Global variable for internal use.
Note: Warning: Do not manually set this variable.
Default Values
detected network address
Dynamic
Introduced | Deprecated
base_port
Global variable for internal use.
Note: Warning: Do not manually set this variable.
Default Value
4567
Dynamic
Introduced
Deprecated
cert.log_conflicts
Log details of certification failures.
wsrep_provider_options="cert.log_conflicts=NO"
Default Value
NO
Dynamic
Yes
Introduced
2.0
Deprecated
debug
Enable debugging.
wsrep_provider_options="debug=NO"
Default Value
NO
Dynamic
Yes
Introduced
2.0
Deprecated
evs.auto_evict
Defines how many entries the node allows for given a delayed node before it triggers the Auto Eviction protocol.
wsrep_provider_options="evs.auto_evict=5"
Each cluster node monitors the group communication response times from all other nodes. When the cluster registers
delayed response from a given node, it adds an entry for that node to its delayed list. If the majority of the cluster
nodes show the node as delayed, the node is permanently evicted from the cluster.
161
Galera Documentation, Release 3.x
This parameter determines how many entries a given node can receive before it triggers Auto Eviction.
When this parameter is set to 0, it disables the Auto Eviction protocol for this node. Even when you disable Auto
Eviction, though; the node continues to monitor response times from the cluster.
Note: See Also: For more information on the Auto Eviction process, see Auto Eviction (page 76).
Default Value
0
Dynamic
No
Introduced
3.8
Deprecated
evs.causal_keepalive_period
For developer use only. Defaults to evs.keepalive_period.
Default Value
Dynamic
No
Introduced
1.0
Deprecated
evs.consensus_timeout
Timeout on reaching the consensus about cluster membership.
wsrep_provider_options="evs.consensus_timeout=PT30S"
This variable is mostly used for troubleshooting purposes and should not be implemented in a production environment.
Note: See Also: This feature has been deprecated. It is succeeded by evs.install_timeout (page 164).
Default Value
PT30S
Dynamic
No
Introduced
1.0
Deprecated
2.0
evs.debug_log_mask
Control EVS debug logging, only effective when wsrep_debug is in use.
wsrep_provider_options="evs.debug_log_mask=0x1"
Default Value
0x1
Dynamic
Yes
Introduced
1.0
Deprecated
evs.delayed_keep_period
Defines how long this node requires a delayed node to remain responsive before it removes an entry from the delayed
list.
wsrep_provider_options="evs.delayed_keep_period=PT45S"
Each cluster node monitors the group communication response times from all other nodes. When the cluster registered
delayed responses from a given node, it adds an entry for that node to its delayed list. Nodes that remain on the delayed
list can trigger Auto Eviction, which removes them permanently from the cluster.
This parameter determines how long a node on the delayed list must remain responsive before it removes one entry.
The number of entries on the delayed list and how long it takes before the node removes all entries depends on how
long the delayed node was unresponsive.
162
Chapter 13. Galera Parameters
Galera Documentation, Release 3.x
Note: See Also: For more information on the delayed list and the Auto Eviction process, see Auto Eviction (page 76).
Default Value
PT30S
Dynamic
No
Introduced
3.8
Deprecated
evs.delayed_margin
Defines how long the node allows response times to deviate before adding an entry to the delayed list.
wsrep_provider_options="evs.delayed_margin=PT5S"
Each cluster node monitors group communication response times from all other nodes. When the cluster registers a
delayed response from a given node, it adds an entry for that node to its delayed list. Delayed nodes can trigger Auto
Eviction, which removes them permanently from the cluster.
This parameter determines how long a delay can run before the node adds an entry to the delayed list. You must set
this parameter to a value higher than the round-trip delay time (RTT) between the nodes.
Note: See Also: For more information on the delayed list and the Auto Eviction process, see Auto Eviction (page 76).
Default Value
PT1S
Dynamic
No
Introduced
3.8
Deprecated
evs.evict
Defines the point at which the cluster triggers manual eviction to a certain node value. Setting this parameter as an
empty string causes it to clear the eviction list on the node where it is set.
Note: See Also: For more information on the eviction and Auto Eviction process, see Auto Eviction (page 76).
Default Value
Dynamic
No
Introduced
3.8
Deprecated
evs.inactive_check_period
Defines how often you want the node to check for peer inactivity.
wsrep_provider_options="evs.inactive_check_period=PT1S"
Each cluster node monitors group communication response times from all other nodes. When the cluster registers a
delayed response from a given node, it adds an entry for that node to its delayed list, which can lead to the delayed
node’s eviction from the cluster.
This parameter determines how often you want the node to check for delays in the group communication responses
from other cluster nodes.
Default Value
PT1S
Dynamic
No
Introduced
1.0
Deprecated
evs.inactive_timeout
Defines a hard limit on node inactivity.
163
Galera Documentation, Release 3.x
Hard limit on the inactivity period, after which the node is pronounced dead.
wsrep_provider_options="evs.inactive_timeout=PT15S"
Each cluster node monitors group communication response times from all other nodes. When the cluster registers a
delayed response from a given node, it add an entry for that node to its delayed list, which can lead tot he delayed
node’s eviction from the cluster.
This parameter sets a hard limit for node inactivity. If a delayed node remains unresponsive for longer than this period,
the node pronounces the delayed node as dead.
Default Value
PT15S
Dynamic
No
Introduced
1.0
Deprecated
evs.info_log_mask
Defines additional logging options for the EVS Protocol.
wsrep_provider_options="evs.info_log_mask=0x4"
The EVS Protocol monitors group communication response times and controls the node eviction and auto eviction
processes. This parameter allows you to enable additional logging options, through a bitmask value.
• 0x1 Provides extra view change info.
• 0x2 Provides extra state change info
• 0x4 Provides statistics
• 0x8 Provides profiling (only in builds with profiling enabled)
Default Value
0
Dynamic
No
Introduced
1.0
Deprecated
evs.install_timeout
Defines the timeout for install message acknowledgments.
wsrep_provider_options="evs.install_timeout=PT15S"
Each cluster node monitors group communication response times from all other nodes, checking whether they are
responsive or delayed. This parameter determines how long you want the node to wait on install message acknowledgments.
Note: See Also: This parameter replaces evs.consensus_timeout (page 162).
Default Value
PT15S
Dynamic
Yes
Introduced
1.0
Deprecated
evs.join_retrans_period
Defines how often the node retransmits EVS join messages when forming cluster membership.
wsrep_provider_options="evs.join_retrans_period=PT1S"
Default Value
PT1S
164
Dynamic
Yes
Introduced
1.0
Deprecated
Chapter 13. Galera Parameters
Galera Documentation, Release 3.x
evs.keepalive_period
Defines how often the node emits keepalive signals.
wsrep_provider_options="evs.keepalive_period=PT1S"
Each cluster node monitors group communication response times from all other nodes. When there is no traffic going
out for the cluster to monitor, nodes emit keepalive signals so that other nodes have something to measure. This
parameter determines how often the node emits a keepalive signal, absent any other traffic.
Default Value
PT1S
Dynamic
No
Introduced
1.0
Deprecated
evs.max_install_timeouts
Defines the number of membership install rounds to try before giving up.
wsrep_provider_options="evs.max_install_timeouts=1"
This parameter determines the maximum number of times that the node tries for a membership install acknowledgment, before it stops trying. The total number of rounds it tries is this value plus 2.
Default Value
1
Dynamic
No
Introduced
1.0
Deprecated
evs.send_window
Defines the maximum number of packets at a time in replication.
wsrep_provider_options="evs.send_window=4"
This parameter determines the maximum number of packets the node uses at a time in replication. For clusters
implemented over WAN, you can set this value considerably higher, (for example, 512), than for clusters implemented
over LAN.
You must use a value that is greater than evs.user_send_window (page 166). The recommended value is double
evs.user_send_window (page 166).
Default Value
4
Dynamic
Yes
Introduced
1.0
Deprecated
evs.stats_report_period
Control period of EVS statistics reporting. The node is pronounced dead.
wsrep_provider_options="evs.stats_report_period=PT1M"
Default Value
PT1M
Dynamic
No
Introduced
1.0
Deprecated
evs.suspect_timeout
Defines the inactivity period after which a node is suspected as dead.
165
Galera Documentation, Release 3.x
wsrep_provider_options="evs.suspect_timeout=PT5S"
Each node in the cluster monitors group communications from all other nodes in the cluster. This parameter determines
the period of inactivity before the node suspects another of being dead. If all nodes agree on that, the cluster drops the
inactive node.
Default Value
PT5S
Dynamic
No
Introduced
1.0
Deprecated
evs.use_aggregate
Defines whether the node aggregates small packets into one when possible.
wsrep_provider_options="evs.use_aggregate=TRUE"
Default Value
TRUE
Dynamic
No
Introduced
1
Deprecated
evs.user_send_window
Defines the maximum number of data packets at a time in replication.
wsrep_provider_options="evs.user_send_window=2"
This parameter determines the maximum number of data packets the node uses at a time in replication. For clusters
implemented over WAN, you can set this to a value considerably higher than cluster implementations over LAN, (for
example, 512).
You must use a value that is smaller than evs.send_window (page 165).
evs.send_window (page 165).
The recommended value is half
Note: See Also: evs.send_window (page 165).
Default Value
2
Dynamic
Yes
Introduced
1.0
Deprecated
evs.view_forget_timeout
Defines how long the node saves past views from the view history.
wsrep_provider_options="evs.view_forget_timeout=PT5M"
Each node maintains a history of past views. This parameter determines how long you want the node to save past
views before dropping them from the table.
Default Value
PT5M
Dynamic
No
Introduced
1.0
Deprecated
evs.version
Defines the EVS Protocol version.
166
Chapter 13. Galera Parameters
Galera Documentation, Release 3.x
wsrep_provider_options="evs.version=1"
This parameter determines which version of the EVS Protocol the node uses. In order to ensure backwards compatibility, the parameter defaults to 0. Certain EVS Protocol features, such as Auto Eviction, require you to upgrade to
more recent versions.
Note: See Also: For more information on the procedure to upgrade from one version to another, see Upgrading the
EVS Protocol (page 77).
Default Value
0
Dynamic
No
Introduced
1.0
Deprecated
gcache.dir
Defines the directory where the write-set cache places its files.
wsrep_provider_options="gcache.dir=/usr/share/galera"
When nodes receive state transfers they cannot process incoming write-sets until they finish updating their state. Under
certain methods, the node that sends the state transfer is similarly blocked. To prevent the database from falling further
behind, GCache saves the incoming write-sets on memory mapped files to disk.
This parameter determines where you want the node to save these files for write-set caching. By default, GCache uses
the working directory for the database server.
Default Value
/path/to/working_dir
Dynamic
No
Introduced
1.0
Deprecated
gcache.keep_pages_size
Total size of the page storage pages to keep for caching purposes. If only page storage is enabled, one page is always
present.
wsrep_provider_options="gcache.keep_pages_size=0"
Default Value
0
Dynamic
No
Introduced
1.0
Deprecated
gcache.name
Defines the filename for the write-set cache.
wsrep_provider_options="gcache.name=galera.cache"
When nodes receive state transfers they cannot process incoming write-sets until they finish updating their state. Under
certain methods, the node that sends the state transfer is similarly blocked. To prevent the database from falling further
behind, GCache saves the incoming write-sets on memory-mapped files to disk.
This parameter determines the name you want the node to use for this ring buffer storage file.
Default Value
galera.cache
Dynamic
No
Introduced
1.0
Deprecated
167
Galera Documentation, Release 3.x
gcache.page_size
Size of the page files in page storage. The limit on overall page storage is the size of the disk. Pages are prefixed by
gcache.page.
wsrep_provider_options="gcache.page_size=128Mb"
Default Value
128M
Dynamic
No
Introduced
1.0
Deprecated
gcache.size
Defines the disk space you want to node to use in caching write-sets.
wsrep_provider_options="gcache.size=128Mb"
When nodes receive state transfers they cannot process incoming write-sets until they finish updating their state. Under
certain methods, the node that sends the state transfer is similarly blocked. To prevent the database from falling further
behind, GCache saves the incoming write-sets on memory-mapped files to disk.
This parameter defines the amount of disk space you want to allocate for the present ring buffer storage. The node
allocates this space when it starts the database server.
Note: See Also: For more information on customizing the write-set cache, see Performance (page 151).
Default Value
128M
Dynamic
No
Introduced
1.0
Deprecated
gcs.fc_debug
Post debug statistics about SST flow every this number of writesets.
wsrep_provider_options="gcs.fc_debug=0"
Default Value
0
Dynamic
No
Introduced
1.0
Deprecated
gcs.fc_factor
Resume replication after recv queue drops below this fraction of gcs.fc_limit.
wsrep_provider_options="gcs.fc_factor=0.5"
Default Value
0.5
Dynamic
Yes
Introduced
1.0
Deprecated
gcs.fc_limit
Pause replication if recv queue exceeds this number of writesets. For master-slave setups this number can be increased
considerably.
wsrep_provider_options="gcs.fc_limit=16"
168
Chapter 13. Galera Parameters
Galera Documentation, Release 3.x
Default Value
16
Dynamic
Yes
Introduced
1.0
Deprecated
gcs.fc_master_slave
Defines whether there is only one master node in the group.
wsrep_provider_options="gcs.fc_master_slave=NO"
Default Value
NO
Dynamic
No
Introduced
1.0
Deprecated
gcs.max_packet_size
All writesets exceeding that size will be fragmented.
wsrep_provider_options="gcs.max_packet_size=32616"
Default Value
32616
Dynamic
No
Introduced
1.0
Deprecated
gcs.max_throttle
How much to throttle replication rate during state transfer (to avoid running out of memory). Set the value to 0.0 if
stopping replication is acceptable for completing state transfer.
wsrep_provider_options="gcs.max_throttle=0.25"
Default Value
0.25
Dynamic
No
Introduced
1.0
Deprecated
gcs.recv_q_hard_limit
Maximum allowed size of recv queue. This should normally be half of (RAM + swap). If this limit is exceeded, Galera
Cluster will abort the server.
wsrep_provider_options="gcs.recv_q_hard_limit=LLONG_MAX"
Default Value
LLONG_MAX
Dynamic
No
Introduced
1.0
Deprecated
gcs.recv_q_soft_limit
The fraction of gcs.recv_q_hard_limit (page 169) after which replication rate will be throttled.
wsrep_provider_options="gcs.recv_q_soft_limit=0.25"
The degree of throttling is a linear function of recv queue size and goes from 1.0 (full rate) at
gcs.recv_q_soft_limit (page 169) to gcs.max_throttle (page 169) at gcs.recv_q_hard_limit (page 169) Note that full
rate, as estimated between 0 and gcs.recv_q_soft_limit (page 169) is a very imprecise estimate of a regular replication rate.
Default Value
0.25
Dynamic
No
Introduced
1.0
Deprecated
169
Galera Documentation, Release 3.x
gcs.sync_donor
Should the rest of the cluster keep in sync with the donor? YES means that if the donor is blocked by state transfer,
the whole cluster is blocked with it.
wsrep_provider_options="gcs.sync_donor=NO"
If you choose to use value YES, it is theoretically possible that the donor node cannot keep up with the rest of the
cluster due to the extra load from the SST. If the node lags behind, it may send flow control messages stalling the
whole cluster. However, you can monitor this using the wsrep_flow_control_paused (page 207) status variable.
Default Value
NO
Dynamic
No
Introduced
1.0
Deprecated
gmcast.listen_addr
Address at which Galera Cluster listens to connections from other nodes. By default the port to listen at is taken from
the connection address. This setting can be used to overwrite that.
wsrep_provider_options="gmcast.listen_addr=tcp://0.0.0.0:4567"
Default Value
tcp://0.0.0.0"4567
Dynamic
No
Introduced
1.0
Deprecated
gmcast.mcast_addr
If set, UDP multicast will be used for replication, for example:
wsrep_provider_options="gmcast.mcast_addr=239.192.0.11"
The value must be the same on all nodes.
If you are planning to build a large cluster, we recommend using UDP.
Default Value
Dynamic
No
Introduced
1.0
Deprecated
gmcast.mcast_ttl
Time to live value for multicast packets.
wsrep_provider_options="gmcast.mcast_ttl=1"
Default Value
1
Dynamic
No
Introduced
1.0
Deprecated
gmcast.peer_timeout
Connection timeout to initiate message relaying.
wsrep_provider_options="gmcast.peer_timeout=PT3S"
Default Value
PT3S
170
Dynamic
No
Introduced
1.0
Deprecated
Chapter 13. Galera Parameters
Galera Documentation, Release 3.x
gmcast.segment
Define which network segment this node is in. Optimisations on communication are performed to minimise the amount
of traffic between network segments including writeset relaying and IST and SST donor selection. The gmcast.segment
(page 171) value is an integer from 0 to 255. By default all nodes are placed in the same segment (0).
wsrep_provider_options="gmcast.segment=0"
Default Value
0
Dynamic
No
Introduced
3.0
Deprecated
gmcast.time_wait
Time to wait until allowing peer declared outside of stable view to reconnect.
wsrep_provider_options="gmcast.time_wait=PT5S"
Default Value
PT5S
Dynamic
No
Introduced
1.0
Deprecated
gmcast.version
This status variable is used to check which gmcast protocol version is used.
This variable is mostly used for troubleshooting purposes and should not be implemented in a production environment.
Default Value
Dynamic
No
Introduced
1.0
Deprecated
ist.recv_addr
As of 2.0. Address to listen for Incremental State Transfer. By default this is the <address>:<port+1> from
wsrep_node_address (page 188).
wsrep_provider_options="ist.recv_addr=192.168.1.1"
Default Value
Dynamic
No
Introduced
1.0
Deprecated
pc.recovery
When set to TRUE, the node stores the Primary Component state to disk, in the gvwstate.dat file. The Primary
Component can then recover automatically when all nodes that were part of the last saved state reestablish communications with each other.
wsrep_provider_options="pc.recovery=TRUE"
This allows for:
• Automatic recovery from full cluster crashes, such as in the case of a data center power outage.
• Graceful full cluster restarts without the need for explicitly bootstrapping a new Primary Component.
171
Galera Documentation, Release 3.x
Note: In the event that the wsrep position differs between nodes, recovery also requires a full State Snapshot Transfer.
Default Value
TRUE
Dynamic
No
Introduced
3.0
Deprecated
pc.bootstrap
If you set this value to TRUE is a signal to turn a NON-PRIMARY component into PRIMARY.
wsrep_provider_options="pc.bootstrap=TRUE"
Default Value
Dynamic
Yes
Introduced
2.0
Deprecated
pc.announce_timeout
Cluster joining announcements are sent every
1
2
second for this period of time or less if the other nodes are discovered.
wsrep_provider_options="pc.announce_timeout=PT3S"
Default Value
PT3S
Dynamic
No
Introduced
2.0
Deprecated
pc.checksum
Checksum replicated messages.
wsrep_provider_options="pc.checksum=TRUE"
Default Value
TRUE
Dynamic
No
Introduced
1.0
Deprecated
pc.ignore_sb
Should we allow nodes to process updates even in the case of split brain? This is a dangerous setting in multi-master
setup, but should simplify things in master-slave cluster (especially if only 2 nodes are used).
wsrep_provider_options="pc.ignore_sb=FALSE"
Default Value
FALSE
Dynamic
Yes
Introduced
1.0
Deprecated
pc.ignore_quorum
Completely ignore quorum calculations. For example if the master splits from several slaves it still remains operational.
Use with extreme caution even in master-slave setups, as slaves will not automatically reconnect to master in this case.
wsrep_provider_options="pc.ignore_quorum=FALSE"
Default Value
FALSE
172
Dynamic
Yes
Introduced
1.0
Deprecated
Chapter 13. Galera Parameters
Galera Documentation, Release 3.x
pc.linger
The period for which the PC protocol waits for the EVS termination.
wsrep_provider_options="pc.linger=PT2S"
Default Value
PT2S
Dynamic
No
Introduced
1.0
Deprecated
pc.npvo
If set to TRUE, the more recent primary component overrides older ones in the case of conflicting primaries.
wsrep_provider_options="pc.npvo=FALSE"
Default Value
FALSE
Dynamic
No
Introduced
1.0
Deprecated
pc.wait_prim
If set to TRUE, the node waits for the pc.wait_prim_timeout (page 173) time period. Useful to bring up a non-primary
component and make it primary with pc.bootstrap (page 172).
wsrep_provider_options="pc.wait_prim=FALSE"
Default Value
FALSE
Dynamic
No
Introduced
1.0
Deprecated
pc.wait_prim_timeout
The period of time to wait for a primary component.
wsrep_provider_options="pc.wait_prim_timeout=PT30S"
Default Value
PT30S
Dynamic
No
Introduced
2.0
Deprecated
pc.weight
As of version 2.4. Node weight for quorum calculation.
wsrep_provider_options="pc.weight=1"
Default Value
1
Dynamic
Yes
Introduced
2.4
Deprecated
pc.version
This status variable is used to check which pc protocol version is used.
This variable is mostly used for troubleshooting purposes and should not be implemented in a production environment.
Default Value
Dynamic
No
Introduced
1.0
Deprecated
173
Galera Documentation, Release 3.x
protonet.backend
Which transport backend to use. Currently only ASIO is supported.
wsrep_provider_options="protonet.backend=asio"
Default Value
asio
Dynamic
No
Introduced
1.0
Deprecated
protonet.version
This status variable is used to check which transport backend protocol version is used.
This variable is mostly used for troubleshooting purposes and should not be implemented in a production environment.
Default Value
Dynamic
No
Introduced
1.0
Deprecated
repl.commit_order
Whether to allow Out-Of-Order committing (improves parallel applying performance).
wsrep_provider_options="repl.commit_order=2"
Possible settings:
• 0 or BYPASS All commit order monitoring is switched off (useful for measuring performance penalty).
• 1 or OOOC Allows out of order committing for all transactions.
• 2 or LOCAL_OOOC Allows out of order committing only for local transactions.
• 3 or NO_OOOC No out of order committing is allowed (strict total order committing)
Default Value
3
Dynamic
No
Introduced
1.0
Deprecated
repl.causal_read_timeout
Sometimes causal reads need to timeout.
wsrep_provider_options="repl.causal_read_timeout=PT30S"
Default Value
PT30S
Dynamic
No
Introduced
1.0
Deprecated
repl.key_format
The hash size to use for key formats (in bytes). An A suffix annotates the version.
wsrep_provider_options="repl.key_format=FLAT8"
Possible settings:
• FLAT8
• FLAT8A
174
Chapter 13. Galera Parameters
Galera Documentation, Release 3.x
• FLAT16
• FLAT16A
Default Value
FLAT8
Dynamic
No
Introduced
3.0
Deprecated
repl.max_ws_size
The maximum size of a write-set in bytes. This is limited to 2G.
wsrep_provider_options="repl.max_ws_size=2147483647"
Default Value
2147483647
Dynamic
No
Introduced
3.0
Deprecated
repl.proto_max
The maximum protocol version in replication. Changes to this parameter will only take effect after a provider restart.
wsrep_provider_options="repl.proto_max=5"
Default Value
5
Dynamic
No
Introduced
2.0
Deprecated
socket.ssl_ca
Defines the path to the SSL Certificate Authority (CA) file.
The node uses the CA file to verify the signature on the certificate. You can use either an absolute path or one relative
to the working directory. The file must use PEM format.
wsrep_provider_options=’socket.ssl_ca=/path/to/ca-cert.pem’
Note: See Also: For more information on generating SSL certificate files for your cluster, see SSL Certificates
(page 121).
Default Value
Dynamic
No
Introduced
1.0
Deprecated
socket.ssl_cert
Defines the path to the SSL certificate.
The node uses the certificate as a self-signed public key in encrypting replication traffic over SSL. You can use either
an absolute path or one relative to the working directory. The file must use PEM format.
wsrep_provider_options="socket.ssl_cert=/path/to/server-cert.pem"
Note: See Also: For more information on generating SSL certificate files for your cluster, see SSL Certificates
(page 121).
Default Value
Dynamic
No
Introduced
1.0
Deprecated
175
Galera Documentation, Release 3.x
socket.checksum
Checksum to use on socket layer:
• 0 - disable checksum
• 1 - CRC32
• 2 - CRC-32C (optimized and potentially HW-accelerated on Intel CPUs)
wsrep_provider_options="socket.checksum=2"
Default Value
version 1 : 1
version 3+: 2
Dynamic
No
Introduced
2.0
Deprecated
socket.ssl_cipher
Symmetric cipher to use. AES128 is used by default it is considerably faster and no less secure than AES256.
wsrep_provider_options="socket.ssl_cipher=AES128-SHA"
Default Value
AES128-SHA
Dynamic
No
Introduced
1.0
Deprecated
socket.ssl_compression
Whether to enable compression on SSL connections.
wsrep_provider_options="socket.ssl_compression=YES"
Default Value
YES
Dynamic
No
Introduced
1.0
Deprecated
socket.ssl_key
Defines the path to the SSL certificate key.
The node uses the certificate key a self-signed private key in encrypting replication traffic over SSL. You can use either
an absolute path or one relative to the working directory. The file must use PEM format.
wsrep_provider_options="socket.ssl_key=/path/to/server-key.pem"
Note: See Also: For more information on generating SSL certificate files for your cluster, see SSL Certificates
(page 121).
Default Value
Dynamic
No
Introduced
1.0
Deprecated
socket.ssl_password_file
Defines a password file for use in SSL connections.
176
Chapter 13. Galera Parameters
Galera Documentation, Release 3.x
wsrep_provider_options="socket.ssl_password_file=/path/to/password-file"
In the event that you have your SSL key file encrypted, the node uses the SSL password file to decrypt the key file.
Default Value
Dynamic
No
Introduced
1.0
Deprecated
13.1 Setting Galera Parameters in MySQL
You can set Galera Cluster parameters in the my.cnf configuration file as follows:
wsrep_provider_options="gcs.fc_limit=256;gcs.fc_factor=0.9"
This is useful in master-slave setups.
You can set Galera Cluster parameters through a MySQL client with the following query:
SET GLOBAL wsrep_provider_options="evs.send_window=16";
This query only changes the evs.send_window (page 165) value.
To check which parameters are used in Galera Cluster, enter the following query:
SHOW VARIABLES LIKE ’wsrep_provider_options’;
13.1. Setting Galera Parameters in MySQL
177
Galera Documentation, Release 3.x
178
Chapter 13. Galera Parameters
CHAPTER
FOURTEEN
MYSQL WSREP OPTIONS
These are MySQL system variables introduced by wsrep API patch v0.8. All variables are global except where marked
by an S, for session variables.
Option
wsrep_auto_increment_control (page 180)
wsrep_causal_reads (page 180) S
wsrep_certify_nonPK (page 181)
wsrep_cluster_address (page 181)
wsrep_cluster_name (page 182)
wsrep_convert_LOCK_to_trx (page 182)
wsrep_data_home_dir (page 183)
wsrep_dbug_option (page 183)
wsrep_debug (page 184)
wsrep_desync (page 184)
wsrep_drupal_282555_workaround (page 185)
wsrep_forced_binlog_format (page 185)
wsrep_load_data_splitting (page 186)
wsrep_log_conflicts (page 186)
wsrep_max_ws_rows (page 187)
wsrep_max_ws_size (page 187)
wsrep_node_address (page 188)
wsrep_node_incoming_address (page 188)
wsrep_node_name (page 189)
wsrep_notify_cmd (page 189)
wsrep_on (page 190) S
wsrep_OSU_method (page 191)
wsrep_preordered (page 191)
wsrep_provider (page 192)
wsrep_provider_options (page 192)
wsrep_restart_slave (page 193)
wsrep_retry_autocommit (page 193)
wsrep_slave_FK_checks (page 194)
wsrep_slave_threads (page 194)
wsrep_slave_UK_checks (page 195)
wsrep_sst_auth (page 195)
wsrep_sst_donor (page 196)
wsrep_sst_donor_rejects_queries (page 196)
wsrep_sst_method (page 197)
wsrep_sst_receive_address (page 198)
Default
ON
OFF
ON
Support
Dynamic
1+
1 - 3.6
1+
1+
example_cluster
1+
OFF
1+
/path/to/data_home 1+
1+
OFF
1+
OFF
1+
ON
1+
NONE
1+
ON
1+
OFF
1+
128K
1+
1G
1+
host address:default port
1+
host address:mysqld port
1+
<hostname>
1+
1+
ON
1+
TOI
3+
OFF
1+
NONE
1+
1+
OFF
1+
Yes
1
1+
ON
1+
Yes
1
1+
OFF
1+
Yes
1+
1+
OFF
1+
mysqldump
1+
node IP address
1+
Continued on next page
179
Galera Documentation, Release 3.x
Table 14.1 – continued from previous page
Option
Default
wsrep_start_position (page 199)
see reference entry
wsrep_sync_wait (page 199)
0
wsrep_ws_persistency (page 200)
Support
1+
3.6+
1
Dynamic
Yes
wsrep_auto_increment_control
Enables the automatic adjustment of auto increment system variables with changes in cluster membership.
Command-line Format
System Variable
Permitted Values
Support
--wsrep-auto-increment-control
Name:
wsrep_auto_increment_control
Variable Scope:
Global
Dynamic Variable:
Type:
Boolean
Default Value:
ON
Introduced:
1
The node manages auto-increment values in your table using two variables: auto_increment_increment and
auto_increment_offset. The first relates to the value auto-increment rows count from and the second to the
offset it should use in moving to the next position.
The wsrep_auto_increment_control (page 180) parameter enables additional calculations to this process, using the
number of nodes connected to the Primary Component to adjust the increment and offset. This is done to reduce the
likelihood that two nodes will attempt to write the same auto-increment value to a table.
It significantly reduces the rate of certification conflicts for INSERT commands.
SHOW VARIABLES LIKE ’wsrep_auto_increment_control’;
+------------------------------+-------+
| Variable_name
| Value |
+------------------------------+-------+
| wsrep_auto_increment_control | ON
|
+------------------------------+-------+
wsrep_causal_reads
Enables the enforcement of strict cluster-wide READ COMMITTED semantics on non-transactional reads. Results in
larger read latencies.
Command-line Format
System Variable
Permitted Values
Support
--wsrep-causal-reads
Name:
wsrep_causal_reads
Variable Scope:
Session
Dynamic Variable:
Type:
Boolean
Default Value:
OFF
Introduced:
1
Deprecated:
3.6
SHOW VARIABLES LIKE ’wsrep_causal_reads’;
Note: Warning: This feature has been deprecated. It has been replaced by wsrep_sync_wait (page 199).
180
Chapter 14. MySQL wsrep Options
Galera Documentation, Release 3.x
wsrep_certify_nonPK
Defines whether the node should generate primary keys on rows without them for the purposes of certification.
Command-line Format
System Variable
Permitted Values
Support
--wsrep-certify-nonpk
Name:
wsrep_certify_nonpk
Variable Scope:
Global
Dynamic Variable:
Type:
Boolean
Default Value:
ON
Introduced:
1
Galera Cluster requires primary keys on all tables. The node uses the primary key in replication to allow for the parallel
applying of transactions to the table. This parameter tells the node that when it encounters a row without a primary
key, that it should create one for replication purposes. However, as a rule do not use tables without primary keys.
SHOW VARIABLES LIKE ’wsrep_certify_nonpk’;
+---------------------+-------+
| Variable_name
| Value |
+---------------------+-------+
| wsrep_certify_nonpk | ON
|
+---------------------+-------+
wsrep_cluster_address
Defines the back-end schema, IP addresses, ports and options the node uses in connecting to the cluster.
Command-line Format
System Variable
Permitted Values
Support
--wsrep-cluster-address
Name:
wsrep_cluster_address
Variable Scope:
Global
Dynamic Variable:
Type:
String
Default Value:
Introduced:
1
Galera Cluster uses this parameter to determine the IP addresses for the other nodes in the cluster, the back-end
schema you want it to use and additional options it should use in connecting to and communicating with those nodes.
Currently, the only back-end schema supported for production is gcomm.
The syntax for node addresses uses the following pattern:
<backend schema>://<cluster address>[?option1=value1[&option2=value2]]
For example:
wsrep_cluster_address="gcomm://192.168.0.1:4567?gmcast.listen_addr=0.0.0.0:5678"
Changing this variable in runtime will cause the node to close connection to the current cluster (if any), and reconnect
to the new address. (However, doing this at runtime may not be possible for all SST methods.) As of Galera Cluster
23.2.2, it is possible to provide a comma separated list of other nodes in the cluster as follows:
gcomm://node1:port1,node2:port2,...[?option1=value1&...]
Using the string gcomm:// without any address will cause the node to startup alone, thus initializing a new cluster
(that the other nodes can join to). Using --wsrep-new-cluster is the newer, preferred way.
181
Galera Documentation, Release 3.x
Note: Warning: Never use an empty gcomm:// string in the my.cnf configuration file. If a node restarts, that
will cause the node to not join back to the cluster that it was part of, rather it will initialize a new one node cluster and
cause a split brain. To bootstrap a cluster, you should only pass the --wsrep-new-cluster string, (instead of
using --wsrep-cluster-address="gcomm://") on the command line. For more information, see Starting
the Cluster (page 55).
SHOW VARIABLES LIKE ’wsrep_cluster_address’;
+-----------------------+---------------------------------------------+
| Variable_name
| Value
|
+-----------------------+---------------------------------------------+
| wsrep_cluster_address | gcomm://192.168.1.1,192.168.1.2,192.168.1.3 |
+-----------------------+---------------------------------------------+
wsrep_cluster_name
Defines the logical cluster name for the node.
Command-line Format
System Variable
Permitted Values
Support
--wsrep-cluster-name
Name:
wsrep_cluster_name
Variable Scope:
Global
Dynamic Variable:
Type:
String
Default Value:
exmaple_cluster
Introduced:
1
This parameter allows you to define the logical name the node uses for the cluster. When a node attempts to connect
to a cluster, it checks the value of this parameter against that of the cluster. The connection is only made if the names
match. If they do not, the connection fails. So, the cluster name must be the same on all nodes.
SHOW VARIABLES LIKE ’wsrep_cluster_name’;
+--------------------+-----------------+
| Variable_name
| Value
|
+--------------------+-----------------+
| wsrep_cluster_name | example_cluster |
+--------------------+-----------------+
wsrep_convert_lock_to_trx
Defines whether the node converts LOCK/UNLOCK TABLES statements into BEGIN/COMMIT statements.
Command-line Format
System Variable
Permitted Values
Support
--wsrep-convert-lock-to-trx
Name:
wsrep_convert_lock_to_trx
Variable Scope:
Global
Dynamic Variable:
Type:
Boolean
Default Value:
OFF
Introduced:
1
This parameter determines how the node handles LOCK/UNLOCK TABLES statements, specifically whether or not
you want it to convert these statements into BEGIN/COMMIT statements. In other words, it tells the node to implicitly
convert locking sessions into transactions within the database server. By itself, this is not the same as support for
locking sections, but it does prevent the database from ending up in a logically inconsistent state.
182
Chapter 14. MySQL wsrep Options
Galera Documentation, Release 3.x
Sometimes this parameter may help to get old applications working in a multi-master setup.
Note: Loading a large database dump with LOCK statements can result in abnormally large transactions and cause an
out-of-memory condition.
SHOW VARIABLES LIKE ’wsrep_convert_lock_to_trx’;
+---------------------------+-------+
| Variable_name
| Value |
+---------------------------+-------+
| wsrep_convert_lock_to_trx | OFF
|
+---------------------------+-------+
wsrep_data_home_dir
Defines the directory the wsrep Provider uses for its files.
System Variable
Permitted Values
Support
Name:
Variable Scope:
Dynamic Variable:
Type:
Default Value:
Introduced:
wsrep_data_home_dir
Global
Directory
/path/to/mysql_datahome
1
During operation, the wsrep Provider needs to save various files to disk that record its internal state. This parameter
defines the path to the directory that you want it to use. It defaults the MySQL datadir path.
SHOW VARIABLES LIKE ’wsrep_data_home_dir’;
+---------------------+----------------+
| Variable_name
| Value
|
+---------------------+----------------+
| wsrep_data_home_dir | /var/lib/mysql |
+---------------------+----------------+
wsrep_dbug_option
Defines debug options to pass to the wsrep Provider.
Command-line Format
System Variable
Permitted Values
Support
--wsrep-dbug-option
Name:
wsrep_dbug_option
Variable Scope:
Global
Dynamic Variable:
Type:
String
Default Value:
Introduced:
1
SHOW VARIABLES LIKE ’wsrep_dbug_option’;
+-------------------+-------+
| Variable_name
| Value |
+-------------------+-------+
| wsrep_dbug_option |
|
+-------------------+-------+
183
Galera Documentation, Release 3.x
wsrep_debug
Enables additional debugging output for the database server error log.
Command-line Format
System Variable
Permitted Values
Support
--wsrep-debug
Name:
Variable Scope:
Dynamic Variable:
Type:
Default Value:
Introduced:
wsrep_debug
Global
Boolean
OFF
1
Under normal operation, error events are logged to an error log file for the database server. By default, the name of
this file is the server hostname with the .err extension. You can define a custom path using the log_error parameter.
When you enable wsrep_debug (page 184), the database server logs additional events surrounding these errors to help
you in identifying and correcting problems.
Note: Warning: In addition to useful debugging information, this parameter also causes the database server to print
authentication information, (that is, passwords), to the error logs. Do not enable it in production environments.
SHOW VARIABLES LIKE ’wsrep_debug’;
+---------------+-------+
| Variable_name | Value |
+---------------+-------+
| wsrep_debug
| OFF
|
+---------------+-------+
wsrep_desync
Defines whether or not the node participates in Flow Control.
System Variable
Permitted Values
Support
Name:
Variable Scope:
Dynamic Variable:
Type:
Default Value:
Introduced:
wsrep_desync
Global
Boolean
OFF
1
When a node receives more write-sets than it can apply, the transactions are placed in a received queue. In the event
that the node falls too far behind, it engages Flow Control. The node takes itself out of sync with the cluster and works
through the received queue until it reaches a more manageable size.
Note: See Also: For more information on what Flow Control is and how to configure and manage it in your cluster,
see Flow Control (page 19) and Managing Flow Control (page 74).
When set to ON, this parameter disables Flow Control for the node. The node continues to receive write-sets and fall
further behind the cluster. The cluster does not wait for desynced nodes to catch up, even if it reaches the fc_limit
value.
SHOW VARIABLES LIKE ’wsrep_desync’;
+---------------+-------+
| Variable_name | Value |
+---------------+-------+
184
Chapter 14. MySQL wsrep Options
Galera Documentation, Release 3.x
| wsrep_desync | OFF
|
+---------------+-------+
wsrep_drupal_282555_workaround
Enables workaround for a bug in MySQL InnoDB that affect Drupal installations.
Command-line Format
System Variable
Permitted Values
Support
--wsrep-drupal-282555-workaround
Name:
wsrep_drupal_282555_workaround
Variable Scope:
Global
Dynamic Variable:
Type:
Boolean
Default Value:
ON
Introduced:
1
Drupal installations using MySQL are subject to a bug in InnoDB, tracked as MySQL Bug 41984 and Drupal Issue 282555. Specifically, it is where inserting a DEFAULT value into an AUTO_INCREMENT column may return
duplicate key errors.
This parameter enables a workaround for the bug on Galera Cluster.
SHOW VARIABLES LIKE ’wsrep_drupal_28255_workaround’;
+-------------------------------+-------+
| Variable_name
| Value |
+-------------------------------+-------+
| wsrep_drupal_28255_workaround | ON
|
+-------------------------------+-------+
wsrep_forced_binlog_format
Defines the binary log format for all transactions.
Command-line Format
System Variable
Permitted Values
Support
--wsrep-forced-binlog-format
Name:
wsrep_forced_binlog_format
Variable Scope:
Global
Dynamic Variable:
Type:
enumeration
Default Value:
NONE
ROW
STATEMENT
Valid Values:
MIXED
NONE
Introduced:
1
When set to a value other than NONE, this parameter forces all transactions to use a given binary log format. The node
uses the format given by this parameter regardless of the client session variable binlog_format. Valid choices for this
parameter are: ROW, STATEMENT, and MIXED. Additionally, there is the special value NONE, which means that there
is no forced format in effect for the binary logs.
This variable was introduced to support STATEMENT format replication during Rolling Schema Upgrade. In most
cases, however, ROW format replication is valid for asymmetric schema replication.
SHOW VARIABLES LIKE ’wsrep_forced_binlog_format’;
185
Galera Documentation, Release 3.x
+----------------------------+-------+
| Variable_name
| Value |
+----------------------------+-------+
| wsrep_forced_binlog_format | NONE |
+----------------------------+-------+
wsrep_load_data_splitting
Defines whether the node splits large LOAD DATA commands into more manageable units.
Command-line Format
System Variable
Permitted Values
Support
--wsrep-load-data-splitting
Name:
wsrep_load_data_splitting
Variable Scope:
Global
Dynamic Variable:
Type:
Boolean
Default Value:
ON
Introduced:
1
When loading huge data loads creates problems for Galera Cluster, in that they eventually reach a size that is too
large for the node to completely roll the operation back in the event of a conflict and whatever gets committed stays
committed.
This parameter tells the node to split LOAD DATA commands into transactions of 10,000 rows or less, making the
data more manageable for the cluster. This deviates from the standard behavior for MySQL.
SHOW VARIABLES LIKE ’wsrep_load_data_splitting’;
+---------------------------+-------+
| Variable_name
| Value |
+---------------------------+-------+
| wsrep_load_data_splitting | ON
|
+---------------------------+-------+
wsrep_log_conflicts
Defines whether the node logs additional information about conflicts.
Command-line Format
System Variable
Permitted Values
Support
--wsrep-log-conflicts
Name:
wsrep_log_conflicts
Variable Scope:
Global
Dynamic Variable: No
Type:
Boolean
Default Value:
OFF
Introduced:
1
In Galera Cluster, the database server uses the standard logging features of MySQL, MariaDB or Percona XtraDB.
This parameter enables additional information for the logs pertaining to conflicts, which you may find useful in troubleshooting problems.
Note: See Also: You can also log conflict information with the wsrep Provider option cert.log_conflicts (page 161).
The additional information includes the table and schema where the conflict occurred, as well as the actual values for
the keys that produced the conflict.
186
Chapter 14. MySQL wsrep Options
Galera Documentation, Release 3.x
SHOW VARIABLES LIKE ’wsrep_log_conflicts’;
+---------------------+-------+
| Variable_name
| Value |
+---------------------+-------+
| wsrep_log_conflicts | OFF
|
+---------------------+-------+
wsrep_max_ws_rows
Defines the maximum number of rows the node allows in a write-set.
Command-line Format
System Variable
Permitted Values
Support
--wsrep-max-ws-rows
Name:
wsrep_max_ws_rows
Variable Scope:
Global
Dynamic Variable:
Type:
string
Default Value:
128k
Introduced:
1
This parameter sets the maximum number of rows that the node allows in a write-set. Currently, this value limits the
supported size of transactions and of LOAD DATA statements.
SHOW VARIABLES LIKE ’wsrep_max_ws_rows’;
+-------------------+-------+
| Variable_name
| Value |
+-------------------+-------+
| wsrep_max_ws_rows | 128k |
+-------------------+-------+
wsrep_max_ws_size
Defines the maximum size the node allows for write-sets.
Command-line Format
System Variable
Permitted Values
Support
--wsrep-max-ws-size
Name:
wsrep_max_ws_size
Variable Scope:
Global
Dynamic Variable:
Type:
string
Default Value:
1G
Introduced:
1
This parameter sets the maximum size that the node allows for a write-set. Currently, this value limits the supported
size of transactions and of LOAD DATA statements.
The maximum allowed write-set size is 2G.
SHOW VARIABLES LIKE ’wsrep_max_ws_size’;
+-------------------+-------+
| Variable_name
| Value |
+-------------------+-------+
| wsrep_max_ws_size | 1G
|
+-------------------+-------+
187
Galera Documentation, Release 3.x
wsrep_node_address
Defines the IP address and port of the node.
Command-line Format
System Variable
Permitted Values
Support
--wsrep-node-address
Name:
wsrep_node_address
Variable Scope:
Global
Dynamic Variable:
Type:
string
Default Value:
server IP address, port 4567
Introduced:
1
The node passes its IP address and port number to the Galera Replication Plugin, where it gets used as the base address
in cluster communications. By default, the node pulls the address of the first network interface on your system and the
default port for Galera Cluster. Typically, this is the address of eth0 or enp2s0 on port 4567.
While the default behavior is often sufficient, there are situations where this auto-guessing function produces unreliable
results. For instance,
• Servers with multiple network interfaces.
• Servers that run multiple nodes.
• Network Address Translation (NAT).
• Clusters with nodes in more than one region.
• Container deployments, such as with Docker and jails.
• Cloud deployments, such as with Amazon EC2 and OpenStack.
In these cases, you need to provide an explicit value for this parameter, given that the auto-guess of the IP address does
not produce the correct result.
Note: See Also: In addition to defining the node address and port, this parameter also provides the default values for
the wsrep_sst_receive_address (page 198) parameter and the ist.recv_addr (page 171) option.
In some cases, you may need to provide a different value. For example, Galera Cluster running on Amazon EC2
requires that you use the global DNS name instead of the local IP address.
SHOW VARIABLES LIKE ’wsrep_node_address’;
+--------------------+-------------+
| Variable_name
| Value
|
+--------------------+-------------+
| wsrep_node_address | 192.168.1.1 |
+--------------------+-------------+
wsrep_node_incoming_address
Defines the IP address and port from which the node expects client connections.
Command-line Format
System Variable
Permitted Values
Support
188
--wsrep-node-incoming-address
Name:
wsrep_node_incoming_address
Variable Scope:
Global
Dynamic Variable:
Type:
String
Default Value:
Introduced:
1
Chapter 14. MySQL wsrep Options
Galera Documentation, Release 3.x
This parameter defines the IP address and port number at which the node expects to receive client connections. It is
intended for integration with load balancers and, for now, otherwise unused by the node.
SHOW VARIABLES LIKE ’wsrep_node_incoming_address’;
+-----------------------------+------------------+
| Variable_name
| Value
|
+-----------------------------+------------------+
| wsrep_node_incoming_address | 192.168.1.1:3306 |
+-----------------------------+------------------+
wsrep_node_name
Defines the logical name that the node uses for itself.
Command-line Format
System Variable
Permitted Values
Support
--wsrep-node-name
Name:
wsrep_node_name
Variable Scope:
Global
Dynamic Variable:
Type:
string
Default Value:
server hostname
Introduced:
1
This parameter defines the logical name that the node uses when referring to itself in logs and to the cluster. It is for
convenience, to help you in identifying nodes in the cluster by means other than the node address.
By default, the node uses the server hostname. In some situations, you may need to set it explicitly, such as in container
deployments with Docker or FreeBSD jails, where the node uses the name of the container rather than the hostname.
SHOW VARIABLES LIKE ’wsrep_node_name’;
+-----------------+-------------+
| Variable_name
| Value
|
+-----------------+-------------+
| wsrep_node_name | GaleraNode1 |
+-----------------+-------------+
wsrep_notify_cmd
Defines the command the node runs whenever cluster membership or the state of the node changes.
Command-line Format
System Variable
Permitted Values
Support
--wsrep-notify-cmd
Name:
wsrep_notify_cmd
Variable Scope:
Global
Dynamic Variable:
Type:
string
Default Value:
Introduced:
1
Whenever the node registers changes in cluster membership or its own state, this parameter allows you to send information about that change to an external script defined by the value. You can use this to reconfigure load balancers,
raise alerts and so on, in response to node and cluster activity.
Note: See Also: For an example script that updates two tables on the local node, with changes taking place at the
cluster level, see the Notification Command (page 112).
189
Galera Documentation, Release 3.x
When the node calls the command, it passes one or more arguments that you can use in configuring your custom
notification script and how it responds to the change. The options are:
--status <status str> The status of this node. The possible statuses are:
• Undefined The node has just started up and is not connected to any Primary Component.
• Joiner The node is connected to a primary component and now is receiving state snapshot.
• Donor The node is connected to primary component and now is sending
state snapshot.
• Joined The node has a complete state and now is catching up with the
cluster.
• Synced The node has synchronized itself with the cluster.
• Error(<error code if available>) The node is in an error
state.
--uuid <state UUID> The cluster state UUID.
--primary <yes/no> Whether the current cluster component is primary or not.
--members <list>
A comma-separated list of the component member UUIDs. The members are
presented in the following syntax:
• <node UUID> A unique node ID. The wsrep Provider automatically assigns this ID for each node.
• <node name> The node name as it is set in the wsrep_node_name
option.
• <incoming address> The address for client connections as it is set in
the wsrep_node_incoming_address option.
--index
The index of this node in the node list.
SHOW VARIABLES LIKE ’wsrep_notify_cmd’;
+------------------+--------------------------+
| Variable_name
| Value
|
+------------------+--------------------------+
| wsrep_notify_cmd | /usr/bin/wsrep_notify.sh |
+------------------+--------------------------+
wsrep_on
Defines whether the node participates in replication.
System Variable
Permitted Values
Support
Name:
Variable Scope:
Dynamic Variable:
Type:
Default Value:
Introduced:
wsrep_on
Session
Boolean
ON
1
This parameter defines whether or not updates made in the current session replicate to the cluster and whether the node
applies transactions it receives from the cluster. It does not cause the node to leave the cluster and the node continues
190
Chapter 14. MySQL wsrep Options
Galera Documentation, Release 3.x
to communicate with other nodes. Additionally, it is a session variable. Defining it through the SET GLOBAL syntax
also affects future sessions.
SHOW VARIABLES LIKE ’wsrep_on’;
+---------------+-------+
| Variable_name | Value |
+---------------+-------+
| wsrep_on
| ON
|
+---------------+-------+
wsrep_OSU_method
Defines the Online Schema Upgrade method the node uses to replicate DDL statements.
Command-line Format
System Variable
Permitted Values
Support
--wsrep-OSU-method
Name:
wsrep_OSU_method
Variable Scope:
Global
Dynamic Variable:
Type:
enumeration
Default Value:
TOI
TOI
Valid Values:
ROI
Introduced:
Patch v. 3 (5.5.17-22.3)
DDL statements are non-transactional and as such do not replicate through write-sets. There are two methods available
that determine how the node handles replicating these statements:
• TOI In the Total Order Isolation method, the cluster runs the DDL statement on all nodes in the same total order
sequence, locking the affected table for the duration of the operation. This may result in the whole cluster being
blocked for the duration of the operation.
• RSU In the Rolling Schema Upgrade method, the node runs the DDL statements locally, thus blocking only the
one node where the statement was made. While processing the DDL statement, the node is not replicating and
may be unable to process replication events due to a table lock. Once the DDL operation is complete, the node
catches up and syncs with the cluster to become fully operational again. The DDL statement or its effects are
not replicated; the user is responsible for manually executing this statement on each node in the cluster.
Note: See Also: For more information on DDL statements and OSU methods, see Schema Upgrades (page 79).
SHOW VARIABLES LIKE ’wsrep_OSU_method’;
+------------------+-------+
| Variable_name
| Value |
+------------------+-------+
| wsrep_OSU_method | TOI
|
+------------------+-------+
wsrep_preordered
Defines whether the node uses transparent handling of preordered replication events.
191
Galera Documentation, Release 3.x
Command-line Format
System Variable
Permitted Values
Support
--wsrep-preordered
Name:
wsrep_preordered
Variable Scope:
Global
Dynamic Variable: Yes
Type:
Boolean
Default Value:
OFF
Introduced:
1
This parameter enables transparent handling of preordered replication events, such as replication events arriving from
traditional asynchronous replication. When this option is ON, such events will be applied locally first before being
replicated to the other nodes of the cluster. This could increase the rate at which they can be processed which would
be otherwise limited by the latency between the nodes in the cluster.
Preordered events should not interfere with events that originate on the local node. Therefore, you should not run local
update queries on a table that is also being updated through asynchronous replication.
SHOW VARIABLES LIKE ’wsrep_preordered’;
+------------------+-------+
| Variable_name
| Value |
+------------------+-------+
| wsrep_preordered | OFF
|
+------------------+-------+
wsrep_provider
Defines the path to the Galera Replication Plugin.
Command-line Format
System Variable
Permitted Values
Support
--wsrep-provider
Name:
wsrep_provider
Variable Scope:
Global
Dynamic Variable:
Type:
File
Default Value:
Introduced:
1
When the node starts, it needs to load the wsrep Provider in order to enable replication functions. The path defined
in this parameter tells it what file it needs to load and where to find it. In the event that you do not define this path
or you give it an invalid value, the node bypasses all calls to the wsrep Provider and behaves as a standard standalone
instance of MySQL.
SHOW VARIABLES LIKE ’wsrep_provider’;
+----------------+----------------------------------+
| Variable_name | Value
|
+----------------+----------------------------------+
| wsrep_provider | /usr/lib/galera/libgalera_smm.so |
+----------------+----------------------------------+
wsrep_provider_options
Defines optional settings the node passes to the wsrep Provider.
192
Chapter 14. MySQL wsrep Options
Galera Documentation, Release 3.x
Command-line Format
System Variable
Permitted Values
Support
--wsrep-provider-options
Name:
wsrep_provider_options
Variable Scope:
Global
Dynamic Variable:
Type:
String
Default Value:
Introduced:
1
When the node loads the wsrep Provider, there are several configuration options available that affect how it handles
certain events. These allow you to fine tune how it handles various situations.
For example, you can use gcache.size (page 168) to define how large a write-set cache the node keeps or manage group
communications timeouts.
Note: See Also: For more information on the wsrep Provider options, see Galera Parameters (page 159).
SHOW VARIABLES LIKE ’wsrep_provider_options’;
+------------------------+-----------------------------------------------+
| Variable_name
| Value
|
+------------------------+-----------------------------------------------+
| wsrep_provider_options | ... evs.user_send_window=2,gcache.size=128Mb |
|
| evs.auto_evict=0,debug=OFF, evs.version=0 ... |
+------------------------+-----------------------------------------------+
wsrep_restart_slave
Defines whether the replication slave restarts when the node joins the cluster.
Command-line Format
System Variable
Permitted Values
Support
--wsrep-restart-slave
Name:
wsrep_restart_slave
Variable Scope:
Global
Dynamic Variable: Yes
Type:
boolean
Default Value:
OFF
Introduced:
Enabling this parameter tells the node to restart the replication slave when it joins the cluster.
SHOW VARIABLES LIKE ’wsrep_restart_slave’;
+---------------------+-------+
| Variable_name
| Value |
+---------------------+-------+
| wsrep_restart_slave | OFF
|
+---------------------+-------+
wsrep_retry_autocommit
Defines the number of retries the node attempts when an autocommit query fails.
193
Galera Documentation, Release 3.x
Command-line Format
System Variable
Permitted Values
Support
--wsrep-retry-autocommit
Name:
wsrep_retry_autocommit
Variable Scope:
Global
Dynamic Variable:
Type:
integer
Default Value:
1
Introduced:
1
When an autocommit query fails the certification test due to a cluster-wide conflict, the node can retry it without
returning an error to the client. This parameter defines how many times the node retries the query. It is analogous to
rescheduling an autocommit query should it go into deadlock with other transactions in the database lock manager.
SHOW VARIABLES LIKE ’wsrep_retry_autocommit’;
+------------------------+-------+
| Variable_name
| Value |
+------------------------+-------+
| wsrep_retry_autocommit | 1
|
+------------------------+-------+
wsrep_slave_FK_checks
Defines whether the node performs foreign key checking for applier threads.
Command-line Format
System Variable
Permitted Values
Support
--wsrep-slave-FK-checks
Name:
wsrep_slave_FK_checks
Variable Scope:
Global
Dynamic Variable: Yes
Type:
boolean
Default Value:
ON
Introduced:
This parameter enables foreign key checking on applier threads.
SHOW VARIABLES LIKE ’wsrep_slave_FK_checks’;
+-----------------------+-------+
| Variable_name
| Value |
+-----------------------+-------+
| wsrep_slave_FK_checks | ON
|
+-----------------------+-------+
wsrep_slave_threads
Defines the number of threads to use in applying slave write-sets.
Command-line Format
System Variable
Permitted Values
Support
--wsrep-slave-threads
Name:
wsrep_slave_threads
Variable Scope:
Global
Dynamic Variable:
Type:
integer
Default Value:
1
Introduced:
1
This parameter determines the number of threads the node uses when it applies slave write-sets. In defining this value,
use a figure that is more than twice the number of CPU cores available and at most one quarter the number of writing
194
Chapter 14. MySQL wsrep Options
Galera Documentation, Release 3.x
client connections the other nodes have.
SHOW VARIABLES LIKE ’wsrep_slave_threads’;
+---------------------+-------+
| Variable_name
| Value |
+---------------------+-------+
| wsrep_slave_threads | 1
|
+---------------------+-------+
wsrep_slave_UK_checks
Defines whether the node performs unique key checking on applier threads.
Command-line Format
System Variable
Permitted Values
Support
--wsrep-slave-UK-checks
Name:
wsrep_slave_UK_checks
Variable Scope:
Global
Dynamic Variable: Yes
Type:
boolean
Default Value:
OFF
Introduced:
This parameter enables unique key checking on applier threads.
SHOW VARIABLES LIKE ’wsrep_slave_UK_checks’;
+-----------------------+-------+
| Variable_name
| Value |
+-----------------------+-------+
| wsrep_slave_UK_checks | OFF
|
+-----------------------+-------+
wsrep_sst_auth
Defines the authentication information to use in State Snapshot Transfer.
Command-line Format
System Variable
Permitted Values
Support
--wsrep-sst-auth
Name:
wsrep_sst_auth
Variable Scope:
Global
Dynamic Variable:
Type:
string
Default Value:
Valid Values:
username:password
Introduced:
1
When the node attempts a state snapshot transfer using the Logical State Transfer Method, the transfer script uses
a client connection to the database server in order to obtain the data it needs to send. This parameter provides the
authentication information, (that is, the username and password), that the script uses to access the database servers of
both sending and receiving nodes.
Note: Galera Cluster only uses this parameter for State Snapshot Transfers that use the Logical transfer method.
Currently, the only method to use the Logical transfer method is mysqldump. For all other methods, the node
doesn’t need this parameter.
Format this value to the pattern: username:password.
195
Galera Documentation, Release 3.x
SHOW VARIABLES LIKE ’wsrep_sst_auth’
+----------------+---------------------------+
| Variable_name | Value
|
+----------------+---------------------------+
| wsrep_sst_auth | wsrep_sst_user:mypassword |
+----------------+---------------------------+
wsrep_sst_donor
Defines the name of the node that this node uses as a donor in state transfers.
Command-line Format
System Variable
Permitted Values
Support
--wsrep-sst-donor
Name:
wsrep_sst_donor
Variable Scope:
Global
Dynamic Variable:
Type:
string
Default Value:
Introduced:
1
When the node requires a state transfer from the cluster, it looks for the most appropriate one available. The group
communications module monitors the node state for the purposes of Flow Control, state transfers and quorum calculations. The node can be a donor if it is in the SYNCED state. The first node in the SYNCED state in the index becomes
the donor and is made unavailable for requests while serving as such.
If there are no free SYNCED nodes at the moment, the joining node reports in the logs:
Requesting state transfer failed: -11(Resource temporarily unavailable).
Will keep retrying every 1 second(s)
It continues retrying the state transfer request until it succeeds. When the state transfer request does succeed, the node
makes the following entry in the logs:
Node 0 (XXX) requested state transfer from ’*any*’. Selected 1 (XXX) as donor.
Using this parameter, you can tell the node which cluster node it should use instead for state transfers. The name given
to the receiving node with this parameter must match the name given for wsrep_node_name (page 189) on the donor
node.
SHOW VARIABLES LIKE ’wsrep_sst_donor’;
+-----------------+---------------+
| Variable_name
| Value
|
+-----------------+---------------+
| wsrep_sst_donor | my_donor_node |
+-----------------+---------------+
wsrep_sst_donor_rejects_queries
Defines whether the node rejects blocking client sessions on a node when it is serving as a donor in a blocking state
transfer method, such as mysqldump and rsync.
196
Chapter 14. MySQL wsrep Options
Galera Documentation, Release 3.x
Command-line Format
System Variable
Permitted Values
Support
--wsrep-sst-donor-rejects-queries
Name:
wsrep_sst_donor_rejects_queries
Variable Scope:
Global
Dynamic Variable:
Type:
Boolean
Default Value:
OFF
Introduced:
1
This parameter determines whether the node rejects blocking client sessions while it is sending state transfers using
methods that block it as the donor. In these situations, all queries return the error ER_UNKNOWN_COM_ERROR, that
is they respond with Unknown command, just like the joining node does.
Given that a State Snapshot Transfer is scriptable, there is no way to tell whether the requested method is blocking
or not. You may also want to avoid querying the donor even with non-blocking state transfers. As a result, when
this parameter is enabled the donor node rejects queries regardless the state transfer and even if the initial request
concerned a blocking-only transfer, (meaning, it also rejects during xtrabackup).
Note: Warning: The mysqldump state transfer method does not work with this setting, given that mysqldump
runs queries on the donor and there is no way to differentiate its session from the regular client session.
SHOW VARIABLES LIKE ’wsrep_sst_donor_rejects_queries’;
+---------------------------------+-------+
| Variable_name
| Value |
+---------------------------------+-------+
| wsrep_sst_donor_rejects_queries | OFF
|
+---------------------------------+-------+
wsrep_sst_method
Defines the method or script the node uses in a State Snapshot Transfer.
Command-line Format
System Variable
Permitted Values
Support
--wsrep-sst-method
Name:
wsrep_sst_method
Variable Scope:
Global
Dynamic Variable:
Type:
string
Default Value:
mysqldump
Introduced:
1
When the node makes a state transfer request it calls on an external shell script to establish a connection a with the
donor node and transfer the database state onto the local database server. This parameter allows you to define what
script the node uses in requesting state transfers.
Galera Cluster ships with a number of default scripts that the node can use in state snapshot transfers. The supported
methods are:
• mysqldump This is slow, except for small data-sets, but is the most tested option.
• rsync This option is much faster than mysqldump on large data-sets.
Note: You can only use rsync when anode is starting. You cannot use it with a running InnoDB storage
engine.
• rsync_wan This option is almost the same as rsync, but uses the delta-xfer algorithm to minimize
network traffic.
197
Galera Documentation, Release 3.x
• xtrabackup This option is a fast and practically non-blocking state transfer method based on the Percona
xtrabackup tool. If you want to use it, the following settings must be present in the my.cnf configuration
file on all nodes:
[mysqld]
wsrep_sst_auth=YOUR_SST_USER:YOUR_SST_PASSWORD
wsrep_sst_method=xtrabackup
datadri=/path/to/datadir
[client]
socket=/path/to/socket
In addition to the default scripts provided and supported by Galera Cluster, you can also define your own custom state
transfer script. The naming convention that the node expects is for the value of this parameter to match wsrep_%.sh.
For instance, giving the node a transfer method of MyCustomSST causes it to look for wsrep_MyCustomSST.sh
in /usr/bin.
Bear in mind, the cluster uses the same script to send and receive state transfers. If you want to use a custom state
transfer script, you need to place it on every node in the cluster.
Note: See Also: For more information on scripting state snapshot transfers, see Scriptable State Snapshot Transfers
(page 83).
SHOW VARIABLES LIKE ’wsrep_sst_method’;
+------------------+-----------+
| Variable_name
| Value
|
+------------------+-----------+
| wsrep_sst_method | mysqldump |
+------------------+-----------+
wsrep_sst_receive_address
Defines the address from which the node expects to receive state transfers.
Command-line Format
System Variable
Permitted Values
Support
--wsrep-sst-receive-address
Name:
wsrep_sst_receive_address
Variable Scope:
Global
Dynamic Variable:
Type:
string
Default Value:
wsrep_node_address (page 188)
Introduced:
1
This parameter defines the address from which the node expects to receive state transfers. It is dependent on the State
Snapshot Transfer method the node uses.
For example, mysqldump uses the address and port on which the node listens, which by default is set to the value of
wsrep_node_address (page 188).
Note: Check that your firewall allows connections to this address from other cluster nodes.
SHOW VARIABLES LIKE ’wsrep_sst_receive_address’;
+---------------------------+-------------+
| Variable_name
| Value
|
+---------------------------+-------------+
198
Chapter 14. MySQL wsrep Options
Galera Documentation, Release 3.x
| wsrep_sst_receive_address | 192.168.1.1 |
+---------------------------+-------------+
wsrep_start_position
Defines the node start position.
Command-line Format
System Variable
Permitted Values
Support
--wsrep-start-position
Name:
wsrep_start_position
Variable Scope:
Global
Dynamic Variable:
Type:
string
Default Value:
00000000-0000-0000-0000-00000000000000:-1
Introduced:
1
This parameter defines the node start position. It exists for the sole purpose of notifying the joining node of the
completion of a state transfer.
Note: See Also: For more information on scripting state snapshot transfers, see Scriptable State Snapshot Transfers
(page 83).
SHOW VARIABLES LIKE ’wsrep_start_position’;
+----------------------+-----------------------------------------+
| Variable_name
| Value
|
+----------------------+-----------------------------------------+
| wsrep_start_position | 00000000-0000-0000-0000-000000000000:-1 |
+----------------------+-----------------------------------------+
wsrep_sync_wait
Defines whether the node enforces strict cluster-wide causality checks.
Command-line Format
System Variable
Permitted Values
Support
--wsrep-sync-wait
Name:
wsrep_sync_wait
Variable Scope:
Session
Dynamic Variable: Yes
Type:
bitmask
Default Value:
0
Introduced:
3.6
When you enable this parameter, the node triggers causality checks in response to certain types of queries. During the
check, the node blocks new queries while the database server catches up with all updates made in the cluster to the
point where the check was begun. Once it reaches this point, the node executes the original query.
Note: Causality checks of any type can result in increased latency.
This value of this parameter is a bitmask, which determines the type of check you want the node to run.
199
Galera Documentation, Release 3.x
Bitmask
0
1
2
3
4
Checks
Disabled.
Checks on READ statements, including SELECT, SHOW, and BEGIN / START TRANSACTION.
Checks made on UPDATE and DELETE statements.
Checks made on READ, UPDATE and DELETE statements.
Checks made on INSERT and REPLACE statements.
For example, say that you have a web application. At one point in its run, you need it to perform a critical read. That
is, you want the application to access the database server and run a SELECT query that must return the most up to date
information possible.
SET SESSION wsrep_sync_wait=1;
SELECT * FROM example WHERE field = "value";
SET SESSION wsrep_sync_wait=0
In the example, the application first runs a SET command to enable wsrep_sync_wait (page 199) for READ statements,
then it makes a SELECT query. Rather than running the query, the node initiates a causality check, blocking incoming
queries while it catches up with the cluster. When the node finishes applying the new transaction, it executes the
SELECT query and returns the results to the application. The application, having finished the critical read, disables
wsrep_sync_wait (page 199), returning the node to normal operation.
Note: Setting wsrep_sync_wait (page 199) to 1 is the same as wsrep_causal_reads (page 180) to ON. This deprecates
wsrep_causal_reads (page 180).
SHOW VARIABLES LIKE ’wsrep_sync_wait’;
+-----------------+-------+
| Variable_name
| Value |
+-----------------+-------+
| wsrep_sync_wait | 0
|
+-----------------+-------+
wsrep_ws_persistency
Defines whether the node stores write-sets locally for debugging.
Command-line Format
System Variable
Permitted Values
Support
--wsrep-ws-persistency
Name:
wsrep_ws_persistency
Variable Scope:
Global
Dynamic Variable:
Type:
string
Default Value:
Introduced:
Deprecated:
0.8
This parameter defines whether the node stores write-sets locally for debugging purposes.
SHOW VARIABLES LIKE ’wsrep_ws_persistency’;
+----------------------+-------+
| Variable_name
| Value |
+----------------------+-------+
| wsrep_ws_persistency | ON
|
+----------------------+-------+
200
Chapter 14. MySQL wsrep Options
CHAPTER
FIFTEEN
GALERA STATUS VARIABLES
These variables are Galera Cluster 0.8.x status variables. There are two types of wsrep-related status variables:
• Galera Cluster-specific variables exported by Galera Cluster
• Variables exported by MySQL. These variables are for the general wsrep provider.
This distinction is of importance for developers only. For convenience, all status variables are presented as a single list
below. Variables exported by MySQL are indicated by an M in superscript.
Status Variable
wsrep_apply_oooe (page 202)
wsrep_apply_oool (page 202)
wsrep_apply_window (page 203)
wsrep_cert_deps_distance (page 203)
wsrep_cert_index_size (page 203)
wsrep_cert_interval (page 204)
wsrep_cluster_conf_id (page 204) M
wsrep_cluster_size (page 204) M
wsrep_cluster_state_uuid (page 205) M
wsrep_cluster_status (page 205) M
wsrep_commit_oooe (page 205)
wsrep_commit_oool (page 205)
wsrep_commit_window (page 206)
wsrep_connected (page 206)
wsrep_evs_delayed (page 206)
wsrep_evs_evict_list (page 207)
wsrep_evs_repl_latency (page 207)
wsrep_evs_state (page 207)
wsrep_flow_control_paused (page 207)
wsrep_flow_control_paused_ns (page 208)
wsrep_flow_control_recv (page 208)
wsrep_flow_control_sent (page 208)
wsrep_gcomm_uuid (page 208)
wsrep_incoming_addresses (page 209)
wsrep_last_committed (page 209)
wsrep_local_bf_aborts (page 209)
wsrep_local_cached_downto (page 210)
wsrep_local_cert_failures (page 210)
wsrep_local_commits (page 210)
wsrep_local_index (page 210)
Example
0.671120
0.195248
5.163966
23.88889
30936
Support
1+
1+
1+
1+
1+
1+
34
1+
3
1+
1+
Primary
1+
0.000000
1+
0.000000
1+
0.000000
1+
ON
1+
3.8+
3.8+
3.0+
3.8+
0.184353
1+
20222491180 1+
11
1+
7
1+
1+
1+
409745
1+
960
1+
1+
333
1+
14981
1+
1
1+
Continued on next page
201
Galera Documentation, Release 3.x
Table 15.1 – continued from previous page
Status Variable
Example
wsrep_local_recv_queue (page 211)
0
wsrep_local_recv_queue_avg (page 211)
3.348452
wsrep_local_recv_queue_max (page 211)
10
wsrep_local_recv_queue_min (page 211)
0
wsrep_local_replays (page 212)
0
wsrep_local_send_queue (page 212)
1
wsrep_local_send_queue_avg (page 212)
0.145000
wsrep_local_send_queue_max (page 213)
10
wsrep_local_send_queue_min (page 213)
0
wsrep_local_state (page 213)
4
wsrep_local_state_comment (page 213)
Synced
wsrep_local_state_uuid (page 214)
wsrep_protocol_version (page 214)
4
wsrep_provider_name (page 214) M
Galera
wsrep_provider_vendor (page 215) M
wsrep_provider_version (page 215) M
wsrep_ready (page 215) M
ON
wsrep_received (page 215)
17831
wsrep_received_bytes (page 216)
6637093
wsrep_repl_data_bytes (page 216)
265035226
wsrep_repl_keys (page 216)
797399
wsrep_repl_keys_bytes (page 217)
11203721
wsrep_repl_other_bytes (page 217)
0
wsrep_replicated (page 217)
16109
wsrep_replicated_bytes (page 217)
6526788
Support
1+
1+
1+
1+
1+
1+
1+
1+
1+
1+
1+
1+
1+
1+
1+
1+
1+
1+
1+
1+
1+
1+
1+
1+
1+
wsrep_apply_oooe
How often applier started write-set applying out-of-order (parallelization efficiency).
SHOW STATUS LIKE ’wsrep_apply_oooe’;
+------------------+----------+
| Variable_name
| Value
|
+------------------+----------+
| wsrep_apply_oooe | 0.671120 |
+------------------+----------+
Example Value
0.671120
Location
Galera
Introduced
Deprecated
wsrep_apply_oool
How often write-set was so slow to apply that write-set with higher seqno’s were applied earlier. Values closer to 0
refer to a greater gap between slow and fast write-sets.
SHOW STATUS LIKE ’wsrep_apply_oool’;
+------------------+----------+
| Variable_name
| Value
|
+------------------+----------+
202
Chapter 15. Galera Status Variables
Galera Documentation, Release 3.x
| wsrep_apply_oool | 0.195248 |
+------------------+----------+
Example Value
0.195248
Location
Galera
Introduced
Deprecated
wsrep_apply_window
Average distance between highest and lowest concurrently applied seqno.
SHOW STATUS LIKE ’wsrep_apply_window’;
+--------------------+----------+
| Variable_name
| Value
|
+--------------------+----------+
| wsrep_apply_window | 5.163966 |
+--------------------+----------+
Example Value
5.163966
Location
Galera
Introduced
Deprecated
wsrep_cert_deps_distance
Average distance between highest and lowest seqno value that can be possibly applied in parallel (potential degree of
parallelization).
SHOW STATUS LIKE ’wsrep_cert_deps_distance’;
+--------------------------+----------+
| Variable_name
| Value
|
+--------------------------+----------+
| wsrep_cert_deps_distance | 23.88889 |
+--------------------------+----------+
Example Value
23.888889
Location
Galera
Introduced
Deprecated
wsrep_cert_index_size
The number of entries in the certification index.
SHOW STATUS LIKE ’wsrep_certs_index_size’;
+------------------------+-------+
| Variable_name
| Value |
+------------------------+-------+
| wsrep_certs_index_size | 30936 |
+------------------------+-------+
Example Value
30936
Location
Galera
Introduced
Deprecated
203
Galera Documentation, Release 3.x
wsrep_cert_interval
Average number of transactions received while a transaction replicates.
SHOW STATUS LIKE ’wsrep_cert_interval’;
+---------------------+-------+
| Variable_name
| Value |
+---------------------+-------+
| wsrep_cert_interval | 1.0
|
+---------------------+-------+
When a node replicates a write-set to the cluster, it can take some time before all the nodes in the cluster receive it. By
the time a given node receives, orders and commits a write-set, it may receive and potentially commit others, changing
the state of the database from when the write-set was sent and rendering the transaction inapplicable.
To prevent this, Galera Cluster checks write-sets against all write-sets within its certification interval for potential
conflicts. Using the wsrep_cert_interval (page 204) status variable, you can see the average number of transactions
with the certification interval.
This shows you the number of write-sets concurrently replicating to the cluster. In a fully synchronous cluster, with
one write-set replicating at a time, wsrep_cert_interval (page 204) returns a value of 1.0.
Example Value
1.0
Location
Galera
Introduced
Deprecated
wsrep_cluster_conf_id
Total number of cluster membership changes happened.
SHOW STATUS LIKE ’wsrep_cluster_conf_id’;
+-----------------------+-------+
| Variable_name
| Value |
+-----------------------+-------+
| wsrep_cluster_conf_id | 34
|
+-----------------------+-------+
Example Value
34
Location
MySQL
Introduced
Deprecated
wsrep_cluster_size
Current number of members in the cluster.
SHOW STATUS LIKE ’wsrep_cluster_size’;
+--------------------+-------+
| Variable_name
| Value |
+--------------------+-------+
| wsrep_cluster_size | 15
|
+--------------------+-------+
Example Value
3
204
Location
MySQL
Introduced
Deprecated
Chapter 15. Galera Status Variables
Galera Documentation, Release 3.x
wsrep_cluster_state_uuid
Provides the current State UUID. This is a unique identifier for the current state of the cluster and the sequence of
changes it undergoes.
SHOW STATUS LIKE ’wsrep_cluster_state_uuid’;
+--------------------------+--------------------------------------+
| Variable_name
| Value
|
+--------------------------+--------------------------------------+
| wsrep_cluster_state_uuid | e2c9a15e-5485-11e0-0800-6bbb637e7211 |
+--------------------------+--------------------------------------+
Note: See Also: For more information on the state UUID, see wsrep API (page 14).
Example Value
e2c9a15e-5485-11e0 0900-6bbb637e7211
Location
MySQL
Introduced
Deprecated
wsrep_cluster_status
Status of this cluster component. That is, whether the node is part of a PRIMARY or NON_PRIMARY component.
SHOW STATUS LIKE ’wsrep_cluster_status’;
+----------------------+---------+
| Variable_name
| Value
|
+----------------------+---------+
| wsrep_cluster_status | Primary |
+----------------------+---------+
Example Value
Primary
Location
MySQL
Introduced
Deprecated
wsrep_commit_oooe
How often a transaction was committed out of order.
SHOW STATUS LIKE ’wsrep_commit_oooe’;
+-------------------+----------+
| Variable_name
| Value
|
+-------------------+----------+
| wsrep_commit_oooe | 0.000000 |
+-------------------+----------+
Example Value
0.000000
Location
Galera
Introduced
Deprecated
wsrep_commit_oool
No meaning.
205
Galera Documentation, Release 3.x
SHOW STATUS LIKE ’wsrep_commit_oool’;
+-------------------+----------+
| Variable_name
| Value
|
+-------------------+----------+
| wsrep_commit_oool | 0.000000 |
+-------------------+----------+
Example Value
0.000000
Location
Galera
Introduced
Deprecated
wsrep_commit_window
Average distance between highest and lowest concurrently committed seqno.
SHOW STATUS LIKE ’wsrep_commit_window’;
+---------------------+----------+
| Variable_name
| Value
|
+---------------------+----------+
| wsrep_commit_window | 0.000000 |
+---------------------+----------+
Example Value
0.000000
Location
Galera
Introduced
Deprecated
wsrep_connected
If the value is OFF, the node has not yet connected to any of the cluster components. This may be due to misconfiguration. Check the error log for proper diagnostics.
SHOW STATUS LIKE ’wsrep_connected’;
+-----------------+-------+
| Variable_name
| Value |
+-----------------+-------+
| wsrep_connected | ON
|
+-----------------+-------+
Example Value
ON
Location
Galera
Introduced
Deprecated
wsrep_evs_delayed
Provides a comma separated list of all the nodes this node has registered on its delayed list.
The node listing format is
uuid:address:count
This refers to the UUID and IP address of the delayed node, with a count of the number of entries it has on the delayed
list.
Example Value
206
Location
Galera
Introduced
3.8
Deprecated
Chapter 15. Galera Status Variables
Galera Documentation, Release 3.x
wsrep_evs_evict_list
Lists the UUID’s of all nodes evicted from the cluster. Evicted nodes cannot rejoin the cluster until you restart their
mysqld processes.
Example Value
Location
Galera
Introduced
3.8
Deprecated
wsrep_evs_repl_latency
This status variable provides figures for the replication latency on group communication. It measures latency from
the time point when a message is sent out to the time point when a message is received. As replication is a group
operation, this essentially gives you the slowest ACK and longest RTT in the cluster.
For example,
SHOW STATUS LIKE ’wsrep_evs_repl_latency’;
+------------------------+------------------------------------------+
| Variable_name
| Value
|
+------------------------+------------------------------------------+
| wsrep_evs_repl_latency | 0.00243433/0.144022/0.591963/0.215824/13 |
+------------------------+------------------------------------------+
The units are in seconds. The format of the return value is:
Minimum / Average / Maximum / Standard Deviation / Sample Size
This variable periodically resets. You can control the reset interval using the evs.stats_report_period (page 165)
parameter. The default value is 1 minute.
Example Value
0.00243433/0.144033/ 0.581963/0.215724/13
Location
Galera
Introduced
3.0
Deprecated
wsrep_evs_state
Shows the internal state of the EVS Protocol.
Example Value
Location
Galera
Introduced
3.8
Deprecated
wsrep_flow_control_paused
The fraction of time since the last status query that replication was paused due to flow control.
In other words, how much the slave lag is slowing down the cluster.
SHOW STATUS LIKE ’wsrep_flow_control_paused’;
+---------------------------+----------+
| Variable_name
| Value
|
+---------------------------+----------+
| wsrep_flow_control_paused | 0.184353 |
+---------------------------+----------+
Example Value
0.174353
Location
Galera
Introduced
Deprecated
207
Galera Documentation, Release 3.x
wsrep_flow_control_paused_ns
The total time spent in a paused state measured in nanoseconds.
SHOW STATUS LIKE ’wsrep_flow_control_paused_ns’;
+------------------------------+-------------+
| Variable_name
| Value
|
+------------------------------+-------------+
| wsrep_flow_control_paused_ns | 20222491180 |
+------------------------------+-------------+
Example Value
20222491180
Location
Galera
Introduced
Deprecated
wsrep_flow_control_recv
Returns the number of FC_PAUSE events the node has received, including those the node has sent. Unlike most status
variables, the counter for this one does not reset every time you run the query.
SHOW STATUS LIKE ’wsrep_flow_control_recv’;
+-------------------------+-------+
| Variable_name
| Value |
+-------------------------+-------+
| wsrep_flow_control_recv | 11
|
+-------------------------+-------+
Example Value
11
Location
Galera
Introduced
Deprecated
wsrep_flow_control_sent
Returns the number of FC_PAUSE events the node has sent. Unlike most status variables, the counter for this one
does not reset every time you run the query.
SHOW STATUS LIKE ’wsrep_flow_control_sent’;
+-------------------------+-------+
| Variable_name
| Value |
+-------------------------+-------+
| wsrep_flow_control_sent | 7
|
+-------------------------+-------+
Example Value
7
Location
Galera
Introduced
Deprecated
wsrep_gcomm_uuid
Displays the group communications UUID.
SHOW STATUS LIKE ’wsrep_gcomm_uuid’;
+------------------+--------------------------------------+
| Variable_name
| Value
|
208
Chapter 15. Galera Status Variables
Galera Documentation, Release 3.x
+------------------+--------------------------------------+
| wsrep_gcomm_uuid | 7e729708-605f-11e5-8ddd-8319a704b8c4 |
+------------------+--------------------------------------+
Example Value
7e729708-605f-11e5-8ddd-8319a704b8c4
Location
Galera
Introduced
1
Deprecated
wsrep_incoming_addresses
Comma-separated list of incoming server addresses in the cluster component.
SHOW STATUS LIKE ’wsrep_incoming_addresses’;
+--------------------------+--------------------------------------+
| Variable_name
| Value
|
+--------------------------+--------------------------------------+
| wsrep_incoming_addresses | 10.0.0.1:3306,10.0.02:3306,undefined |
+--------------------------+--------------------------------------+
Example Value
10.0.0.1:3306, 10.0.0.2:3306, undefined
Location
Galera
Introduced
Deprecated
wsrep_last_committed
The sequence number, or seqno, of the last committed transaction. See wsrep API (page 14).
SHOW STATUS LIKE ’wsrep_last_committed’;
+----------------------+--------+
| Variable_name
| Value |
+----------------------+--------+
| wsrep_last_committed | 409745 |
+----------------------+--------+
Note: See Also: For more information, see wsrep API (page 14).
Example Value
409745
Location
Galera
Introduced
Deprecated
wsrep_local_bf_aborts
Total number of local transactions that were aborted by slave transactions while in execution.
SHOW STATUS LIKE ’wsrep_local_bf_aborts’;
+-----------------------+-------+
| Variable_name
| Value |
+-----------------------+-------+
| wsrep_local_bf_aborts | 960
|
+-----------------------+-------+
Example Value
960
Location
Galera
Introduced
Deprecated
209
Galera Documentation, Release 3.x
wsrep_local_cached_downto
The lowest sequence number, or seqno, in the write-set cache (GCache).
SHOW STATUS LIKE ’wsrep_local_cached_downto’;
+---------------------------+----------------------+
| Variable_name
| Value
|
+---------------------------+----------------------+
| wsrep_local_cached_downto | 18446744073709551615 |
+---------------------------+----------------------+
Example Value
18446744073709551615
Location
Galera
Introduced
Deprecated
wsrep_local_cert_failures
Total number of local transactions that failed certification test.
SHOW STATUS LIKE ’wsrep_local_cert_failures’;
+---------------------------+-------+
| Variable_name
| Value |
+---------------------------+-------+
| wsrep_local_cert_failures | 333
|
+---------------------------+-------+
Example Value
333
Location
Galera
Introduced
Deprecated
wsrep_local_commits
Total number of local transactions committed.
SHOW STATUS LIKE ’wsrep_local_commits’;
+---------------------+-------+
| Variable_name
| Value |
+---------------------+-------+
| wsrep_local_commits | 14981 |
+---------------------+-------+
Example Value
14981
Location
Galera
Introduced
Deprecated
wsrep_local_index
This node index in the cluster (base 0).
SHOW STATUS LIKE ’wsrep_local_index’;
+-------------------+-------+
| Variable_name
| Value |
+-------------------+-------+
| wsrep_local_index | 1
|
+-------------------+-------+
210
Chapter 15. Galera Status Variables
Galera Documentation, Release 3.x
Example Value
1
Location
MySQL
Introduced
Deprecated
wsrep_local_recv_queue
Current (instantaneous) length of the recv queue.
SHOW STATUS LIKE ’wsrep_local_recv_queue’;
+------------------------+-------+
| Variable_name
| Value |
+------------------------+-------+
| wsrep_local_recv_queue | 0
|
+------------------------+-------+
Example Value
0
Location
Galera
Introduced
Deprecated
wsrep_local_recv_queue_avg
Recv queue length averaged over interval since the last status query. Values considerably larger than 0.0 mean that
the node cannot apply write-sets as fast as they are received and will generate a lot of replication throttling.
SHOW STATUS LIKE ’wsrep_local_recv_queue_avg’;
+----------------------------+----------+
| Variable_name
| Value
|
+----------------------------+----------+
| wsrep_local_recv_queue_avg | 3.348452 |
+----------------------------+----------+
Example Value
3.348452
Location
Galera
Introduced
Deprecated
wsrep_local_recv_queue_max
The maximum length of the recv queue since the last status query.
SHOW STATUS LIKE ’wsrep_local_recv_queue_max’;
+----------------------------+-------+
| Variable_name
| Value |
+----------------------------+-------+
| wsrep_local_recv_queue_max | 10
|
+----------------------------+-------+
Example Value
10
Location
Galera
Introduced
Deprecated
wsrep_local_recv_queue_min
The minimum length of the recv queue since the last status query.
211
Galera Documentation, Release 3.x
SHOW STATUS LIKE ’wsrep_local_recv_queue_min’;
+-----------------------------+-------+
| Variable_name
| Value |
+-----------------------------+-------+
| wsrep_local_recev_queue_min | 0
|
+-----------------------------+-------+
Example Value
0
Location
Galera
Introduced
Deprecated
wsrep_local_replays
Total number of transaction replays due to asymmetric lock granularity.
SHOW STATUS LIKE ’wsrep_local_replays’;
+---------------------+-------+
| Variable_name
| Value |
+---------------------+-------+
| wsrep_lcoal_replays | 0
|
+---------------------+-------+
Example Value
0
Location
Galera
Introduced
Deprecated
wsrep_local_send_queue
Current (instantaneous) length of the send queue.
SHOW STATUS LIKE ’wsrep_local_send_queue’;
+------------------------+-------+
| Variable_name
| Value |
+------------------------+-------+
| wsrep_local_send_queue | 1
|
+------------------------+-------+
Example Value
1
Location
Galera
Introduced
Deprecated
wsrep_local_send_queue_avg
Send queue length averaged over interval since the last status query. Values considerably larger than 0.0 indicate
replication throttling or network throughput issue.
SHOW STATUS LIKE ’wsrep_local_send_queue_avg’;
+----------------------------+----------+
| Variable_name
| Value
|
+----------------------------+----------+
| wsrep_local_send_queue_avg | 0.145000 |
+----------------------------+----------+
Example Value
0.145000
212
Location
Galera
Introduced
Deprecated
Chapter 15. Galera Status Variables
Galera Documentation, Release 3.x
wsrep_local_send_queue_max
The maximum length of the send queue since the last status query.
SHOW STATUS LIKE ’wsrep_local_send_queue_max’;
+----------------------------+-------+
| Variable_name
| Value |
+----------------------------+-------+
| wsrep_local_send_queue_max | 10
|
+----------------------------+-------+
Example Value
10
Location
Galera
Introduced
Deprecated
wsrep_local_send_queue_min
The minimum length of the send queue since the last status query.
SHOW STATUS LIKE ’wsrep_local_send_queue_min’;
+----------------------------+-------+
| Variable_name
| Value |
+----------------------------+-------+
| wsrep_local_send_queue_min | 0
|
+----------------------------+-------+
Example Value
0
Location
Galera
Introduced
Deprecated
wsrep_local_state
Internal Galera Cluster FSM state number.
SHOW STATUS LIKE ’wsrep_local_state’;
+-------------------+-------+
| Variable_name
| Value |
+-------------------+-------+
| wsrep_local_state | 4
|
+-------------------+-------+
Note: See Also: For more information on the possible node states, see Node State Changes (page 20).
Example Value
4
Location
Galera
Introduced
Deprecated
wsrep_local_state_comment
Human-readable explanation of the state.
SHOW STATUS LIKE ’wsrep_local_state_comment’;
+---------------------------+--------+
213
Galera Documentation, Release 3.x
| Variable_name
| Value |
+---------------------------+--------+
| wsrep_local_state_comment | Synced |
+---------------------------+--------+
Example Value
Synced
Location
Galera
Introduced
Deprecated
wsrep_local_state_uuid
The UUID of the state stored on this node.
SHOW STATUS LIKE ’wsrep_local_state_uuid’;
+------------------------+--------------------------------------+
| Variable_name
| Value
|
+------------------------+--------------------------------------+
| wsrep_local_state_uuid | e2c9a15e-5485-11e0-0800-6bbb637e7211 |
+------------------------+--------------------------------------+
Note: See Also: For more information on the state UUID, see wsrep API (page 14).
Example Value
e2c9a15e-5385-11e0- 0800-6bbb637e7211
Location
Galera
Introduced
Deprecated
wsrep_protocol_version
The version of the wsrep Protocol used.
SHOW STATUS LIKE ’wsrep_protocol_version’;
+------------------------+-------+
| Variable_name
| Value |
+------------------------+-------+
| wsrep_protocol_version | 4
|
+------------------------+-------+
Example Value
4
Location
Galera
Introduced
Deprecated
wsrep_provider_name
The name of the wsrep Provider.
SHOW STATUS LIKE ’wsrep_provider_name’;
+---------------------+--------+
| Variable_name
| Value |
+---------------------+--------+
| wsrep_provider_name | Galera |
+---------------------+--------+
Example Value
Galera
214
Location
MySQL
Introduced
Deprecated
Chapter 15. Galera Status Variables
Galera Documentation, Release 3.x
wsrep_provider_vendor
The name of the wsrep Provider vendor.
SHOW STATUS LIKE ’wsrep_provider_vendor’;
+-----------------------+-----------------------------------+
| Variable_name
| Value
|
+-----------------------+-----------------------------------+
| wsrep_provider_vendor | Codership Oy <[email protected]> |
+-----------------------+-----------------------------------+
Example Value
Codership Oy <[email protected]>
Location
MySQL
Introduced
Deprecated
wsrep_provider_version
The name of the wsrep Provider version string.
SHOW STATUS LIKE ’wsrep_provider_version’;
+------------------------+----------------------+
| Variable_name
| Value
|
+------------------------+----------------------+
| wsrep_provider_version | 25.3.5-wheezy(rXXXX) |
+------------------------+----------------------+
Example Value
25.3.5-wheezy(rXXXX)
Location
MySQL
Introduced
Deprecated
wsrep_ready
Whether the server is ready to accept queries. If this status is OFF, almost all of the queries will fail with:
ERROR 1047 (08S01) Unknown Command
unless the wsrep_on session variable is set to 0.
SHOW STATUS LIKE ’wsrep_ready’;
+---------------+-------+
| Variable_name | Value |
+---------------+-------+
| wsrep_ready
| ON
|
+---------------+-------+
Example Value
ON
Location
MySQL
Introduced
Deprecated
wsrep_received
Total number of write-sets received from other nodes.
SHOW STATUS LIKE ’wsrep_received’;
+----------------+-------+
215
Galera Documentation, Release 3.x
| Variable_name | Value |
+----------------+-------+
| wsrep_received | 17831 |
+----------------+-------+
Example Value
17831
Location
Galera
Introduced
Deprecated
wsrep_received_bytes
Total size of write-sets received from other nodes.
SHOW STATUS LIKE ’wsrep_received_bytes’;
+----------------------+---------+
| Variable_name
| Value
|
+----------------------+---------+
| wsrep_received_bytes | 6637093 |
+----------------------+---------+
Example Value
6637093
Location
Galera
Introduced
Deprecated
wsrep_repl_data_bytes
Total size of data replicated.
SHOW STATUS LIKE ’wsrep_repl_data_bytes’;
+-----------------------+---------+
| Variable_name
| Value
|
+-----------------------+---------+
| wsrep_repl_data_bytes | 6526788 |
+-----------------------+---------+
Example Value
6526788
Location
Galera
Introduced
Deprecated
wsrep_repl_keys
Total number of keys replicated.
SHOW STATUS LIKE ’wsrep_repl_keys’;
+-----------------+--------+
| Variable_name
| Value |
+-----------------+--------+
| wsrep_repl_keys | 797399 |
+-----------------+--------+
Example Value
797399
216
Location
Galera
Introduced
Deprecated
Chapter 15. Galera Status Variables
Galera Documentation, Release 3.x
wsrep_repl_keys_bytes
Total size of keys replicated.
SHOW STATUS LIKE ’wsrep_repl_keys_bytes’;
+-----------------------+----------+
| Variable_name
| Value
|
+-----------------------+----------+
| wsrep_repl_keys_bytes | 11203721 |
+-----------------------+----------+
Example Value
11203721
Location
Galera
Introduced
Deprecated
wsrep_repl_other_bytes
Total size of other bits replicated.
SHOW STATUS LIKE ’wsrep_repl_other_bytes’;
+------------------------+-------+
| Variable_name
| Value |
+------------------------+-------+
| wsrep_repl_other_bytes | 0
|
+------------------------+-------+
Example Value
0
Location
Galera
Introduced
Deprecated
wsrep_replicated
Total number of write-sets replicated (sent to other nodes).
SHOW STATUS LIKE ’wsrep_replicated’;
+------------------+-------+
| Variable_name
| Value |
+------------------+-------+
| wsrep_replicated | 16109 |
+------------------+-------+
Example Value
16109
Location
Galera
Introduced
Deprecated
wsrep_replicated_bytes
Total size of write-sets replicated.
SHOW STATUS LIKE ’wsrep_replicated_bytes’;
+------------------------+---------+
| Variable_name
| Value
|
+------------------------+---------+
| wsrep_replicated_bytes | 6526788 |
+------------------------+---------+
217
Galera Documentation, Release 3.x
Example Value
6526788
218
Location
Galera
Introduced
Deprecated
Chapter 15. Galera Status Variables
CHAPTER
SIXTEEN
GALERA LOAD BALANCER PARAMETERS
Galera Load Balancer provides simple TCP connection balancing developed with scalability and performance in mind.
It draws on Pen for inspiration, but its functionality is limited to only balancing TCP connections.
It can be run either through the service command or the command-line interface of glbd. Configuration for Galera
Load Balancer depends on which you use to run it.
16.1 Configuration Parameters
When Galera Load Balancer starts as a system service, it reads the glbd.cfg configuration file for default parameters
you want to use. Only the LISTEN_ADDR (page 220) parameter is mandatory.
Parameter
CONTROL_ADDR (page 219)
CONTROL_FIFO (page 219)
DEFAULT_TARGETS (page 220)
LISTEN_ADDR (page 220)
MAX_CONN (page 220)
OTHER_OPTIONS (page 220)
THREADS (page 221)
Default Configuration
127.0.0.1:8011
/var/run/glbd.fifo
127.0.0.1:80 10.0.1:80 10.0.0.2:80
8010
2
CONTROL_ADDR
Defines the IP address and port for controlling connections.
Command-line Argument
Default Configuration
Mandatory Parameter
–control (page 222)
127.0.0.1:8011
No
This is an optional parameter. Use it to define the server used in controlling client connections. When using this
parameter you must define the port. In the event that you do not define this parameter, Galera Load Balancer does not
open the relevant socket.
CONTROL_ADDR="127.0.0.1:8011"
CONTROL_FIFO
Defines the path to the FIFO control file.
219
Galera Documentation, Release 3.x
Command-line Argument
Default Configuration
Mandatory Parameter
–fifo (page 223)
/var/run/glbd.fifo
No
This is an optional parameter. It defines the path to the FIFO control file as is always opened. In the event that there is
already a file at this path, Galera Load Balancer fails to start.
CONTROL_FIFO="/var/run/glbd.fifo"
DEFAULT_TARGETS
Defines the IP addresses and ports of the destination servers.
Default Configuration
Mandatory Parameter
127.0.0.1:80 10.0.0.1:80 10.0.0.2:80:2
No
This parameter defines that IP addresses that Galera Load Balancer uses as destination servers. Specifically, in this
case the Galera Cluster nodes that it routes application traffic onto.
DEFAULT_TARGETS="192.168.1.1 192.168.1.2 192.168.1.3"
LISTEN_ADDR
Defines the IP address and port used for client connections.
Default Configuration
Mandatory Parameter
8010
Yes
This parameter defines the IP address and port that Galera Load Balancer listens on for incoming client connections.
The IP address is optional, the port mandatory. In the event that you define a port without an IP address, Galera Load
Balancer listens on that port for all available network interfaces.
LISTEN_ADDR="8010"
MAX_CONN
Defines the maximum allowed client connections.
Command-line Argument
Mandatory Parameter
–max_conn (page 224)
No
This parameter defines the maximum number of client connections that you want to allow to Galera Load Balancer. It
modifies the system open files limit to accommodate at least this many connections, provided sufficient privileges. It
is recommend that you define this parameter if you expect the number of client connections to exceed five hundred.
MAX_CONN="135"
This option defines the maximum number of client connections that you want allow to Galera Load Balancer. Bear in
mind, that it can be operating system dependent.
OTHER_OPTIONS
Defines additional options that you want to pass to Galera Load Balancer.
Mandatory Parameter
220
No
Chapter 16. Galera Load Balancer Parameters
Galera Documentation, Release 3.x
This parameter defines various additional options that you would like to pass to Galera Load Balancer, such as a
destination selection policy or Watchdog configurations. Use the same syntax as you would for the command-line
arguments. For more information on the available options, see Configuration Options (page 221).
OTHER_OPTIONS="--random --watchdog exec:’mysql -utest -ptestpass’ --discover"
THREADS
Defines the number of threads you want to use.
Command-line Argument
Mandatory Parameter
–threads (page 226)
No
This parameter allows you to define the number of threads (that is, connection pools), which you want to allow Galera
Load Balancer to use. It is advisable that you have at least a few per CPU core.
THREADS="6"
16.2 Configuration Options
When Galera Load Balancer starts as a daemon process, through the /sbin/glbd command, it allows you to pass a
number of command-line arguments to configure how it operates. It uses the following syntax:
/usr/local/sbin/glbd [OPTIONS] LISTEN_ADDRESS [DESTINATION_LIST]
In the event that you would like to set any of these options when you run Galera Load Balancer as a service, you can
define them through the OTHER_OPTIONS (page 220) parameter.
Long Argument
–control (page 222)
–daemon (page 222)
–defer-accept (page 222)
–discover (page 222)
–extra (page 223)
–fifo (page 223)
–interval (page 223)
–keepalive (page 223)
–latency (page 224)
–linger (page 224)
–max_conn (page 224)
–nodelay (page 224)
–random (page 225)
–round (page 225)
–single (page 225)
–source (page 226)
–threads (page 226)
–top (page 226)
–verbose (page 226)
–watchdog (page 227)
Short
-c
-d
-a
-D
-x
-f
-i
-K
-L
-l
-m
-n
-r
-b
-S
-s
-t
-T
-v
-w
16.2. Configuration Options
Type
IP address
Boolean
Boolean
Boolean
Decimal
File Path
Decimal
Boolean
Integer
Boolean
Integer
Boolean
Boolean
Boolean
Boolean
Boolean
Integer
Boolean
Boolean
String
Parameter
CONTROL_ADDR (page 219)
CONTROL_FIFO (page 219)
MAX_CONN (page 220)
THREADS (page 221)
221
Galera Documentation, Release 3.x
--control
Defines the IP address and port for control connections.
Short Argument
Syntax
Type
Configuration Parameter
-c
--control [IP|Hostname:]port
IP Address
CONTROL_ADDR (page 219)
For more information on defining the controlling connections, see the CONTROL_ADDR (page 219) parameter.
# glbd --control 192.168.1.1:80 3306 \
192.168.1.1 192.168.1.2 192.168.1.3
--daemon
Defines whether you want Galera Load Balancer to run as a daemon process.
Short Argument
Syntax
Type
-d
--daemon
Boolean
This option defines whether you want to start glbd as a daemon process. That is, if you want it to run in the
background, instead of claiming the current terminal session.
# glbd --daemon 3306 \
192.168.1.1 192.168.1.2 192.168.1.3
--defer-accept
Enables TCP deferred acceptance on the listening socket.
Short Argument
Syntax
Type
-a
--defer-accept
Boolean
Enabling TCP_DEFER_ACCEPT allows Galera Load Balancer to awaken only when data arrives on the listening
socket. It is disabled by default.
# glbd --defer-accept 3306 \
192.168.1.1 192.168.1.2 192.168.1.3
--discover
Defines whether you want to use watchdog results to discover and set new destinations.
Short Argument
Syntax
Type
-D
--discover
Boolean
When you define the –watchdog (page 227) option, this option defines whether Galera Load Balancer uses the return value in discovering and setting new addresses for destination servers. For instance, after querying for the wsrep_cluster_address (page 181) parameter.
# glbd --discover -w exec:"mysql.sh -utest -ptestpass" 3306 \
192.168.1.1 192.168.1.2 192.168.1.3
222
Chapter 16. Galera Load Balancer Parameters
Galera Documentation, Release 3.x
--extra
Defines whether you want to perform an extra destination poll on connection attempts.
Short Argument
Syntax
Type
-x
--extra D.DDD
Decimal
This option defines whether and when you want Galera Load Balancer to perform an additional destination poll on
connection attempts. The given value indicates how many seconds after the previous poll that you want it to run the
extra poll. By default, the extra polling feature is disabled.
# glbd --extra 1.35 3306 \
192.168.1.1 192.168.1.2 192.168.1.3
--fifo
Defines the path to the FIFO control file.
Short Argument
Syntax
Type
Configuration Parameter
-f
--fifo /path/to/glbd.fifo
File Path
CONTROL_FIFO (page 219)
For more information on using FIFO control files, see the CONTROL_FIFO (page 219) parameter.
# glbd --fifo /var/run/glbd.fifo 3306 \
192.168.1.1 192.168.1.2 192.168.1.3
--interval
Defines how often to probe destinations for liveliness.
Short Argument
Syntax
Type
-i
--interval D.DDD
Decimal
This option defines how often Galera Load Balancer checks destination servers for liveliness. It uses values given in
seconds. By default, it checks every second.
# glbd --interval 2.013 3306 \
192.168.1.1 192.168.1.2 192.168.1.3
--keepalive
Defines whether you want to disable the SO_KEEPALIVE socket option on server-side sockets.
Short Argument
Syntax
Type
-K
--keepalive
Boolean
Linux systems feature the socket option SO_KEEPALIVE, which causes the server to send packets to a remote system
in order to main the client connection with the destination server. This option allows you to disable SO_KEEPALIVE
on server-side sockets. It allows SO_KEEPALIVE by default.
16.2. Configuration Options
223
Galera Documentation, Release 3.x
# glbd --keepalive 3306 \
192.168.1.1 192.168.1.2 192.168.1.3
--latency
Defines the number of samples to take in calculating latency for watchdog.
Short Argument
Syntax
Type
-L
--latency N
Integer
When the Watchdog module tests a destination server to calculate latency, it sends a number of packets through to
measure its responsiveness. This option configures how many packets it sends in sampling latency.
# glbd --latency 25 3306 \
192.168.1.1 192.168.1.2 192.168.1.3
--linger
Defines whether Galera Load Balancer disables sockets lingering after they are closed.
Short Argument
Syntax
Type
-l
--linger
Boolean
When Galera Load Balancer sends the close() command, occasionally sockets linger in a TIME_WAIT state. This
options defines whether or not you want Galera Load Balancer to disable lingering sockets.
# glbd --linger 3306 \
192.168.1.1 192.168.1.2 192.168.1.3
--max_conn
Defines the maximum allowed client connections.
Short Argument
Syntax
Type
-m
--max_conn N
Integer
For more information on defining the maximum client connections, see the MAX_CONN (page 220) parameter.
# glbd --max_conn 125 3306 \
192.168.1.1 192.168.1.2 192.168.1.3
--nodelay
Defines whether it disables the TCP no-delay socket option.
Short Argument
Syntax
Type
-n
--nodelay
Boolean
Under normal operation, TCP connections automatically concatenate small packets into larger frames through the
Nagle algorithm. In the event that you want Galera Load Balancer to disable this feature, this option causes it to open
TCP connections with the TCP_NODELAY feature.
224
Chapter 16. Galera Load Balancer Parameters
Galera Documentation, Release 3.x
# glbd --nodelay 3306 \
192.168.1.1 192.168.1.2 192.168.1.3
--random
Defines the destination selection policy as Random.
Short Argument
Syntax
Type
-r
--random
Boolean
The destination selection policy determines how Galera Load Balancer determines which servers to route traffic to.
When you set the policy to Random, it randomly chooses a destination from the pool of available servers. You can
enable this feature by default through the OTHER_OPTIONS (page 220) parameter.
For more information on other policies, see Destination Selection Policies (page 97).
# glbd --random 3306 \
192.168.1.1 192.168.1.2 192.168.1.3
--round
Defines the destination selection policy as Round Robin.
Short Argument
Syntax
Type
-b
--round
Boolean
The destination selection policy determines how Galera Load Balancer determines which servers to route traffic to.
When you set the policy to Round Robin, it directs new connections to the next server in a circular order list. You can
enable this feature by default through the OTHER_OPTIONS (page 220) parameter.
For more information on other policies, see Destination Selection Policies (page 97).
# glbd --round 3306 \
192.168.1.1 192.168.1.2 192.168.1.3
--single
Defines the destination selection policy as Single.
Short Argument
Syntax
Type
-S
--single
Boolean
The destination selection policy determines how Galera Load Balancer determines which servers to route traffic to.
When you set the policy to Single, all connections route to the server with the highest weight value. You can enable
this by default through the OTHER_OPTIONS (page 220) parameter.
# glbd --single 3306 \
192.168.1.1 192.168.1.2 192.168.1.3
16.2. Configuration Options
225
Galera Documentation, Release 3.x
--source
Defines the destination selection policy as Source Tracking.
Short Argument
Syntax
Type
-s
--source
Boolean
The destination selection policy determines how Galera Load Balancer determines which servers to route traffic to.
When you set the policy to Source Tracking, connections that originate from one address are routed to the same
destination. That is, you can ensure that certain IP addresses always route to the same destination server. You can
enable this by default through the OTHER_OPTIONS (page 220) parameter.
Bear in mind, there are some limitations to this selection policy. When the destination list changes, the destination
choice for new connections changes as well, while established connections remain in place. Additionally, when a
destination is marked as unavailable, all connections that would route to it fail over to another, randomly chosen
destination. When the original target becomes available again, routing to it for new connections resumes. In other
words, Source Tracking works best with short-lived connections.
For more information on other policies, see Destination Selection Policies (page 97).
# glbd --source 3306 \
192.168.1.1 192.168.1.2 192.168.1.3
--threads
Defines the number of threads that you want to use.
Short Argument
Syntax
Type
-t
--threads N
Integer
For more information on threading in Galera Load Balancer, see THREADS (page 221).
# glbd --threads 6 3306 \
192.168.1.1 192.168.1.2 192.168.1.3
--top
Enables balancing to top weights only.
Short Argument
Syntax
Type
-T
--top
Boolean
This option restricts all balancing policies to a subset of destination servers with the top weight. For instance, if you
have servers with weights 1, 2 and 3, balancing occurs only on servers with weight 3, while they remain available.
# glbd --top 3306 \
192.168.1.1 192.168.1.2 192.168.1.3
--verbose
Defines whether you want Galera Load Balancer to run as verbose.
226
Chapter 16. Galera Load Balancer Parameters
Galera Documentation, Release 3.x
Short Argument
Syntax
Type
-v
--verbose
Boolean
This option enables verbose output for Galera Load Balancer, which you may find useful for debugging purposes.
# glbd --verbose 3306 \
192.168.1.1 192.168.1.2 192.168.1.3
--watchdog
Defines specifications for watchdog operations.
Short Argument
Syntax
Type
-w
--watchdog SPEC_STR
String
Under normal operation, Galera Load Balancer checks destination availability by attempting to establish a TCP connection to the server. For most use cases, this is insufficient. If you want to establish a connection with web server,
you need to know if it is able to serve web pages. If you want to establish a connection with a database server, you
need to know if it is able to execute queries. TCP connections don’t provide that kind of information.
The Watchdog module implements asynchronous monitoring of destination servers through back-ends designed to
service availability. This option allows you to enable it by defining the back-end ID string, optionally followed by a
colon and the configuration options.
# glbd -w exec:"mysql.sh -utest -ptestpass" 3306 \
192.168.1.1 192.168.1.2 192.168.1.3
This initializes the exec back-end to execute external programs. It runs the mysql.sh script on each destination
server in order to determine it’s availability. You can find the mysql.sh in the Galera Load Balancer build directory,
under files/.
Note: The Watchdog module remains a work in progress. Neither its functionality nor terminology is final.
16.2. Configuration Options
227
Galera Documentation, Release 3.x
228
Chapter 16. Galera Load Balancer Parameters
CHAPTER
SEVENTEEN
MISCELLANEOUS REFERENCE
17.1 Glossary
Galera Arbitrator External process that functions as an additional node in certain cluster operations, such as quorum
calculations and generating consistent application state snapshots.
Consider a situation where you cluster becomes partitioned due to a loss of network connectivity that results in
two components of equal size. Each component initiates quorum calculations to determine which should remain
the Primary Component and which should become a nonoperational component. If the components are of equal
size, it risks a split-brain condition. Galera Arbitrator provides an addition vote in the quorum calculation, so that
one component registers as larger than the other. The larger component then remains the Primary Component.
Unlike the main mysqld process, garbd does not generate replication events of its own and does not store
replication data, but it does acknowledge all replication events. Furthermore, you can route replication through
Galera Arbitrator, such as when generating a consistent application state snapshot for backups.
Note: See Also: For more information, see Galera Arbitrator (page 86) and Backing Up Cluster Data
(page 89).
Galera Replication Plugin Galera Replication Plugin is a general purpose replication plugin for any transactional
system. It can be used to create a synchronous multi-master replication solution to achieve high availability and
scale-out.
Note: See Also: For more information, see Galera Replication Plugin (page 14) for more details.
GCache See Write-set Cache.
Global Transaction ID To keep the state identical on all nodes, the wsrep API uses global transaction IDs (GTID),
which are used to both:
• Identify the state change
• Identify the state itself by the ID of the last state change
The GTID consists of:
• A state UUID, which uniquely identifies the state and the sequence of changes it undergoes
• An ordinal sequence number (seqno, a 64-bit signed integer) to denote the position of the change in the
sequence
Note: See Also: For more information on Global Transaction ID’s, see wsrep API (page 14).
Incremental State Transfer In an Incremental State Transfer (IST) a node only receives the missing write-sets and
catch up with the group by replaying them. See also the definition for State Snapshot Transfer (SST).
229
Galera Documentation, Release 3.x
Note: See Also: For more information on IST’s, see Incremental State Transfer (IST) (page 17).
IST See Incremental State Transfer.
Logical State Transfer Method Type of back-end state transfer method that operates through the database server.
For example: mysqldump.
Note: See Also: For more information see, Logical State Snapshot (page 67).
Physical State Transfer Method Type of back-end state transfer method that operates on the physical media in the
datadir. For example: rsync and xtrabackup.
Note: See Also: For more information see, Physical State Snapshot (page 69).
Primary Component In addition to single node failures, the cluster may be split into several components due to
network failure. In such a situation, only one of the components can continue to modify the database state to
avoid history divergence. This component is called the Primary Component (PC).
Note: See Also: For more information on the Primary Component, see Weighted Quorum (page 23) for more
details.
Rolling Schema Upgrade The rolling schema upgrade is a DDL processing method, where the DDL will only
be processed locally at the node. The node is desynchronized from the cluster for the duration of the DDL
processing in a way that it does not block the rest of the nodes. When the DDL processing is complete, the node
applies the delayed replication events and synchronizes back with the cluster.
Note: See Also: For more information, see Rolling Schema Upgrade (page 80).
RSU See Rolling Schema Upgrade.
seqno See Sequence Number.
sequence number 64-bit signed integer that the node uses to denote the position of a given transaction in the sequence. The seqno is second component to the Global Transaction ID.
SST See State Snapshot Transfer.
State Snapshot Transfer State Snapshot Transfer refers to a full data copy from one cluster node (donor) to the
joining node (joiner). See also the definition for Incremental State Transfer (IST).
Note: See Also: For more information, see State Snapshot Transfer (SST) (page 16).
State UUID Unique identifier for the state of a node and the sequence of changes it undergoes. It is the first component of the Global Transaction ID.
TOI See Total Order Isolation.
Total Order Isolation By default, DDL statements are processed by using the Total Order Isolation (TOI) method.
In TOI, the query is replicated to the nodes in a statement form before executing on master. The query waits for
all preceding transactions to commit and then gets executed in isolation on all nodes simultaneously.
Note: See Also: For more information, see Total Order Isolation (page 79).
write-set Transaction commits the node sends to and receives from the cluster.
230
Chapter 17. Miscellaneous Reference
Galera Documentation, Release 3.x
Write-set Cache Galera stores write-sets in a special cache called Write-set Cache (GCache). In short, GCache is a
memory allocator for write-sets and its primary purpose is to minimize the write set footprint on the RAM.
Note: See Also: For more information, see Write-set Cache (GCache) (page 18).
wsrep API The wsrep API is a generic replication plugin interface for databases. The API defines a set of application
callbacks and replication plugin calls.
Note: See Also: For more information, see wsrep API (page 14).
17.2 Versioning Information
Galera Cluster for MySQL is available in binary software packages for several different Linux distributions, as well as
in source code for other distributions and other Unix-like operating systems, such as FreeBSD and Solaris.
For Linux distributions, binary packages in 32-bit and 64-bit for both the MySQL database server with the wsrep API
patch and the Galera Replication Plugin are available from the Codership Repository. These include support for:
• Red Hat Enterprise Linux
• Fedora
• CentOS
• SUSE Linux Enterprise Server
• openSUSE
• Debian
• Ubuntu
By installing and configuring the Codership Repository on any of these systems, you can install and update Galera
Cluster for MySQL through your package manager. In the event that you use a distribution of Linux that is not
supported, or if you use another Unix-like operating system, source files are available on GitHub, at:
• MySQL Server with the wsrep API patch.
• Galera Replication Plugin.
• glb, the Galera Load Balancer.
For users of FreeBSD and similar operating systems, the Galera Replication Plugin is also available in ports, at
/usr/ports/databases/galera, which corrects for certain compatibility issues with Linux dependencies.
Note: For more information on the installation process, see Installation (page 33).
17.2.1 Release Numbering Schemes
Software packages for Galera Cluster have their own release numbering schemas. There are two schemas to consider
in version numbering:
• Galera wsrep Provider Also, referred to as the Galera Replication Plugin. The wsrep Provider uses the following versioning schema: <wsrep API main version>.<Galera version>. For example, release
24.2.4 indicates wsrep API version 24.x.x with Galera wsrep Provider version 2.4.
17.2. Versioning Information
231
Galera Documentation, Release 3.x
• MySQL Server with wsrep API patch The second versioning schema relates to the database server. Here,
the MySQL server uses the following versioning schema <MySQL server version>-<wsrep API
version>. For example, release 5.5.29-23.7.3 indicates a MySQL database server in 5.5.29 with wsrep API
version 23.7.3.
For instances of Galera Cluster that use the MariaDB or Percona XtraDB database servers, consult their respective
documentation for version and release information.
17.2.2 Third-party Implementations of Galera Cluster
In addition to the Galera Cluster for MySQL, the reference implementation from Codership Oy, there are two third
party implementations of Galera Cluster. These are,
• Percona XtraDB Cluster is a high-availability and high-scalability solution for MySQL users. Percona XtraDB
CLuster integrates Percona XtraDB Server with the Galera library of high-availability solutions in a single
product package.
• MariaDB Galera Cluster uses the Galera library for the replication implementation. To interface with the Galera
Replication Plugin, MariaDB is enhanced to support the replication API definition in the wsrep API project.
Additionally, releases of MariaDB Server from version 10.1 on are packaged with Galera Cluster.
For more information, see What is MariaDB Galera Cluster.
17.3 Legal Notice
Copyright (C) 2013 Codership Oy <[email protected]>
This work is licensed under the Creative Commons Attribution-ShareAlike 3.0 Unported License. To view a copy of
this license, visit Creative Commons Attribution-ShareAlike 3.0 Unported License.
Permission is granted to copy, distribute and/or modify this document under the terms of the GNU Free Documentation
License, Version 1.3 or any later version published by the Free Software Foundation; with no Invariant Sections, no
Front-Cover Texts, and no Back-Cover Texts. To view a copy of that license, visit GNU Free Documentation License.
Any trademarks, logos, and service marks in this document are the property of Codership or other third parties. You
are not permitted to use these Marks without the prior written consent of Codership or such appropriate third party.
Codership, Galera Cluster for MySQL, and the Codership logo are trademarks or registered trademarks of Codership.
All Materials on this Document are (and shall continue to be) owned exclusively by Codership or other respective third
party owners and are protected under applicable copyrights, patents, trademarks, trade dress and/or other proprietary
rights. Under no circumstances will you acquire any ownership rights or other interest in any Materials by or through
your access or use of the Materials. All right, title and interest not expressly granted is reserved to Codership.
• “MySQL” is a registered trademark of Oracle Corporation.
• “Percona XtraDB Cluster” and “Percona Server” are registered trademarks of Percona LLC.
• “MariaDB” and “MariaDB Galera Cluster” are registered trademarks of Monty Program Ab.
• genindex
• search
232
Chapter 17. Miscellaneous Reference
INDEX
Symbols
: Parameters
evs.evict, 163
socket.ssl_ca, 175
: Status Variables
wsrep_evs_state, 207
A
Asynchronous replication
Descriptions, 8
B
base_host
Parameters, 161
base_port
Parameters, 161
C
cert.log_conflicts
Parameters, 146, 161
Certification Based Replication
Descriptions, 9
Certification based replication
Descriptions, 1
Checking
Parameters, 177
Configuration
pc.recovery, 70
SELinux, 155
Configuration Tips
wsrep_provider_options, 153, 154
D
Database cluster
Descriptions, 7
debug
Parameters, 161
Debug log
Logs, 146, 179
Descriptions
Asynchronous replication, 8
Certification Based Replication, 9
Certification based replication, 1
Database cluster, 7
Eager replication, 8
Galera Arbitrator, 86
GCache, 18
Global Transaction ID, 14
Lazy replication, 8
Rolling Schema Upgrade, 80
Synchronous replication, 8
Total Order Isolation, 79
Virtual Synchrony, 14
Virtual synchrony, 1
Weighted Quorum, 23
Writeset Cache, 18
wsrep API, 14
DONOR
Node states, 19
Drupal, 179
E
Eager replication
Descriptions, 8
ER_LOCK_DEADLOCK
Errors, 131
ER_UNKNOWN_COM_ERROR
Errors, 196
Errors
ER_LOCK_DEADLOCK, 131
ER_UNKNOWN_COM_ERROR, 196
evs.auto_evict
Parameters, 161
evs.causal_keepalive_period
Parameters, 162
evs.consensus_timeout
Parameters, 22, 162
evs.debug_log_mask
Parameters, 162
evs.delayed_keep_period
Parameters, 162
evs.delayed_margin
Parameters, 163
evs.evict
233
Galera Documentation, Release 3.x
: Parameters, 163
evs.inactive_check_period
Parameters, 22, 163
evs.inactive_timeout
Parameters, 22, 163
evs.info_log_mask
Parameters, 164
evs.install_timeout
Parameters, 164
evs.join_retrans_period
Parameters, 164
evs.keepalive_period
Parameters, 22, 165
evs.max_install_timeouts
Parameters, 165
evs.send_window
Parameters, 165
evs.stats_report_period
Parameters, 165
evs.suspect_timeout
Parameters, 22, 165
evs.use_aggregate
Parameters, 166
evs.user_send_window
Parameters, 166
evs.version
Parameters, 166
evs.view_forget_timeout
Parameters, 166
F
Firewall settings
iptables, 117
Ports, 117
G
Galera Arbitrator, 89, 229
Descriptions, 86
Logs, 86
Galera Replication Plugin, 229
GCache, 229
Descriptions, 18
gcache
Performance, 151
gcache.dir
Parameters, 167
gcache.keep_pages_size
Parameters, 167
gcache.name
Parameters, 167
gcache.page_size
Parameters, 168
gcache.size
Parameters, 168
234
Performance, 151
gcs.fc_debug
Parameters, 168
gcs.fc_factor
Parameters, 168
gcs.fc_limit
Parameters, 168
gcs.fc_master_slave
Parameters, 169
gcs.max_packet_size
Parameters, 169
gcs.max_throttle
Parameters, 169
gcs.recv_q_hard_limit
Parameters, 169
gcs.recv_q_soft_limit
Parameters, 169
gcs.sync_donor
Parameters, 170
Global Transaction ID, 229
Descriptions, 14
gmcast.listen_addr
Parameters, 89, 170
gmcast.mcast_addr
Parameters, 170
gmcast.mcast_ttl
Parameters, 170
gmcast.peer_timeout
Parameters, 170
gmcast.segment
Parameters, 171
gmcast.time_wait
Parameters, 171
gmcast.version
Parameters, 171
gvwstate.dat
Parameters, 171
I
Incremental State Transfer, 229
State Snapshot Transfer methods, 17
innodb_autoinc_lock_mode
Performance, 152
innodb_locks_unsafe_for_binlog
Performance, 152
iptables
Firewall settings, 117
Ports, 117
IST, 230
ist.recv_addr
Parameters, 171
J
JOINED
Index
Galera Documentation, Release 3.x
Node states, 19
JOINER
Node states, 19
L
Lazy replication
Descriptions, 8
Load balancing, 95
Logical State Transfer Method, 230
Logs
Debug log, 146, 179
Galera Arbitrator, 86
mysqld error log, 89
M
Memory
Performance, 151
my.cnf, 153, 181
mysqld error log
Logs, 89
N
Node state changes
Node states, 20
Node states
DONOR, 19
JOINED, 19
JOINER, 19
Node state changes, 20
OPEN, 19
PRIMARY, 19
SYNCED, 19
O
OPEN
Node states, 19
P
pairs: Parameters
wsrep_slave_UK_checks, 195
Parameters
base_host, 161
base_port, 161
cert.log_conflicts, 146, 161
Checking, 177
debug, 161
evs.auto_evict, 161
evs.causal_keepalive_period, 162
evs.consensus_timeout, 22, 162
evs.debug_log_mask, 162
evs.delayed_keep_period, 162
evs.delayed_margin, 163
evs.inactive_check_period, 22, 163
evs.inactive_timeout, 22, 163
Index
evs.info_log_mask, 164
evs.install_timeout, 164
evs.join_retrans_period, 164
evs.keepalive_period, 22, 165
evs.max_install_timeouts, 165
evs.send_window, 165
evs.stats_report_period, 165
evs.suspect_timeout, 22, 165
evs.use_aggregate, 166
evs.user_send_window, 166
evs.version, 166
evs.view_forget_timeout, 166
gcache.dir, 167
gcache.keep_pages_size, 167
gcache.name, 167
gcache.page_size, 168
gcache.size, 168
gcs.fc_debug, 168
gcs.fc_factor, 168
gcs.fc_limit, 168
gcs.fc_master_slave, 169
gcs.max_packet_size, 169
gcs.max_throttle, 169
gcs.recv_q_hard_limit, 169
gcs.recv_q_soft_limit, 169
gcs.sync_donor, 170
gmcast.listen_addr, 89, 170
gmcast.mcast_addr, 170
gmcast.mcast_ttl, 170
gmcast.peer_timeout, 170
gmcast.segment, 171
gmcast.time_wait, 171
gmcast.version, 171
gvwstate.dat, 171
ist.recv_addr, 171
pc.announce_timeout, 172
pc.bootstrap, 72, 172
pc.checksum, 172
pc.ignore_quorum, 172
pc.ignore_sb, 172
pc.linger, 173
pc.npvo, 173
pc.recovery, 171
pc.version, 173
pc.wait_prim, 173
pc.wait_prim_timeout, 173
pc.weight, 25, 173
protonet.backend, 174
protonet.version, 174
repl.causal_read_timeout, 174
repl.commit_order, 174
repl.key_format, 174
repl.max_ws_size, 175
repl.proto_max, 175
235
Galera Documentation, Release 3.x
Setting, 177
socket.checksum, 176
socket.ssl_cert, 120, 175
socket.ssl_cipher, 120, 176
socket.ssl_compression, 120, 176
socket.ssl_key, 120, 176
socket.ssl_password_file, 176
wsrep_auto_increment_control, 180
wsrep_causal_reads, 180, 199
wsrep_cert_deps_distance, 110
wsrep_certify_nonPK, 181
wsrep_cluster_address, 82, 109, 181
wsrep_cluster_conf_id, 107
wsrep_cluster_name, 89, 182
wsrep_cluster_size, 107
wsrep_cluster_state_uuid, 107
wsrep_cluster_status, 107
wsrep_connected, 109
wsrep_convert_lock_to_trx, 182
wsrep_data_dir, 65
wsrep_data_home_dir, 183
wsrep_dbug_option, 183
wsrep_debug, 146, 184
wsrep_desync, 184
wsrep_drupal_282555_workaround, 185
wsrep_evs_repl_latency, 207
wsrep_flow_control_paused, 110
wsrep_forced_binlog_format, 185
wsrep_last_committed, 72
wsrep_load_data_splitting, 186
wsrep_local_bf_aborts, 146
wsrep_local_cert_failures, 146
wsrep_local_recv_queue_avg, 110
wsrep_local_recv_queue_max, 110
wsrep_local_recv_queue_min, 110
wsrep_local_send_queue_avg, 111
wsrep_local_send_queue_max, 111
wsrep_local_send_queue_min, 111
wsrep_local_state_comment, 109
wsrep_log_conflicts, 186
wsrep_max_ws_rows, 187
wsrep_max_ws_size, 187
wsrep_node_address, 188
wsrep_node_incoming_address, 188
wsrep_node_name, 65, 89, 189
wsrep_notify_cmd, 107, 189
wsrep_on, 190
wsrep_OSU_method, 80, 191
wsrep_preordered, 191
wsrep_provider, 192
wsrep_provider_options, 23, 72, 192
wsrep_ready, 109
wsrep_restart_slave, 193
wsrep_retry_autocommit, 147, 148, 193
236
wsrep_slave_FK_checks, 194
wsrep_slave_threads, 194
wsrep_sst_auth, 195
wsrep_sst_donor, 65, 196
wsrep_sst_donor_rejects_queries, 196
wsrep_sst_method, 16, 17, 197
wsrep_sst_receive_address, 198
wsrep_start_position, 199
wsrep_sync_wait, 199
wsrep_ws_persistency, 200
pc.announce_timeout
Parameters, 172
pc.bootstrap
Parameters, 72, 172
pc.checksum
Parameters, 172
pc.ignore_quorum
Parameters, 172
pc.ignore_sb
Parameters, 172
pc.linger
Parameters, 173
pc.npvo
Parameters, 173
pc.recovery
Configuration, 70
Parameters, 171
pc.version
Parameters, 173
pc.wait_prim
Parameters, 173
pc.wait_prim_timeout
Parameters, 173
pc.weight
Parameters, 25, 173
Performance
gcache, 151
gcache.size, 151
innodb_autoinc_lock_mode, 152
innodb_locks_unsafe_for_binlog, 152
Memory, 151
Swap size, 151
wsrep_received_bytes, 151
wsrep_slave_threads, 152
Physical State Transfer Method, 230
PRIMARY
Node states, 19
Primary Component, 230
Nominating, 72
protonet.backend
Parameters, 174
protonet.version
Parameters, 174
Index
Galera Documentation, Release 3.x
R
repl.causal_read_timeout
Parameters, 174
repl.commit_order
Parameters, 174
repl.key_format
Parameters, 174
repl.max_ws_size
Parameters, 175
repl.proto_max
Parameters, 175
Rolling Schema Upgrade, 230
Descriptions, 80
RSU, 230
S
SELinux
Configuration, 155
seqno, 230
sequence number, 230
Setting
Parameters, 177
socket.checksum
Parameters, 176
socket.ssl_ca
: Parameters, 175
socket.ssl_cert
Parameters, 120, 175
socket.ssl_cipher
Parameters, 120, 176
socket.ssl_compression
Parameters, 120, 176
socket.ssl_key
Parameters, 120, 176
socket.ssl_password_file
Parameters, 176
Split-brain
Descriptions, 23
Prevention, 86
Recovery, 72
SST, 230
State Snapshot Transfer, 230
State Snapshot Transfer methods, 16
State Snapshot Transfer methods
Incremental State Transfer, 17
State Snapshot Transfer, 16
State UUID, 230
Status Variables
wsrep_apply_oooe, 202
wsrep_apply_oool, 202
wsrep_apply_window, 203
wsrep_cert_deps_distance, 203
wsrep_cert_index_size, 203
wsrep_cert_interval, 204
Index
wsrep_cluster_conf_id, 204
wsrep_cluster_size, 204
wsrep_cluster_state_uuid, 205
wsrep_cluster_status, 205
wsrep_commit_oooe, 205
wsrep_commit_oool, 205
wsrep_commit_window, 206
wsrep_connected, 206
wsrep_evs_delayed, 206
wsrep_evs_evict_list, 207
wsrep_flow_control_paused, 207
wsrep_flow_control_paused_ns, 208
wsrep_flow_control_recv, 208
wsrep_flow_control_sent, 208
wsrep_gcomm_uuid, 208
wsrep_incoming_addresses, 209
wsrep_last_committed, 209
wsrep_local_bf_aborts, 209
wsrep_local_cached_downto, 210
wsrep_local_cert_failures, 210
wsrep_local_commits, 210
wsrep_local_index, 210
wsrep_local_recv_queue, 211
wsrep_local_recv_queue_avg, 211
wsrep_local_recv_queue_max, 211
wsrep_local_recv_queue_min, 211
wsrep_local_replays, 212
wsrep_local_send_queue, 212
wsrep_local_send_queue_avg, 212
wsrep_local_send_queue_max, 213
wsrep_local_send_queue_min, 213
wsrep_local_state, 213
wsrep_local_state_comment, 213
wsrep_local_state_uuid, 214
wsrep_protocol_version, 214
wsrep_provider_name, 214
wsrep_provider_vendor, 215
wsrep_provider_version, 215
wsrep_ready, 215
wsrep_received, 215
wsrep_received_bytes, 216
wsrep_repl_data_bytes, 216
wsrep_repl_keys, 216
wsrep_repl_keys_bytes, 217
wsrep_repl_other_bytes, 217
wsrep_replicated, 217
wsrep_replicated_bytes, 217
Swap size
Performance, 151
SYNCED
Node states, 19
Synchronous replication
Descriptions, 8
237
Galera Documentation, Release 3.x
T
TOI, 230
Total Order Isolation, 65, 230
Descriptions, 79
V
Virtual Synchrony
Descriptions, 14
Virtual synchrony
Descriptions, 1
W
Weighted Quorum
Descriptions, 23
write-set, 230
Write-set Cache, 231
Writeset Cache
Descriptions, 18
wsrep API, 231
Descriptions, 14
wsrep_apply_oooe
Status Variables, 202
wsrep_apply_oool
Status Variables, 202
wsrep_apply_window
Status Variables, 203
wsrep_auto_increment_control
Parameters, 180
wsrep_causal_reads
Parameters, 180, 199
wsrep_cert_deps_distance
Parameters, 110
Status Variables, 203
wsrep_cert_index_size
Status Variables, 203
wsrep_cert_interval
Status Variables, 204
wsrep_certify_nonPK
Parameters, 181
wsrep_cluster_address
Parameters, 82, 109, 181
wsrep_cluster_conf_id
Parameters, 107
Status Variables, 204
wsrep_cluster_name
Parameters, 89, 182
wsrep_cluster_size
Parameters, 107
Status Variables, 204
wsrep_cluster_state_uuid
Parameters, 107
Status Variables, 205
wsrep_cluster_status
238
Parameters, 107
Status Variables, 205
wsrep_commit_oooe
Status Variables, 205
wsrep_commit_oool
Status Variables, 205
wsrep_commit_window
Status Variables, 206
wsrep_connected
Parameters, 109
Status Variables, 206
wsrep_convert_lock_to_trx
Parameters, 182
wsrep_data_dir
Parameters, 65
wsrep_data_home_dir
Parameters, 183
wsrep_dbug_option
Parameters, 183
wsrep_debug
Parameters, 146, 184
wsrep_desync
Parameters, 184
wsrep_drupal_282555_workaround
Parameters, 185
wsrep_evs_delayed
Status Variables, 206
wsrep_evs_evict_list
Status Variables, 207
wsrep_evs_repl_latency
Parameters, 207
wsrep_evs_state
: Status Variables, 207
wsrep_flow_control_paused
Parameters, 110
Status Variables, 207
wsrep_flow_control_paused_ns
Status Variables, 208
wsrep_flow_control_recv
Status Variables, 208
wsrep_flow_control_sent
Status Variables, 208
wsrep_forced_binlog_format
Parameters, 185
wsrep_gcomm_uuid
Status Variables, 208
wsrep_incoming_addresses
Status Variables, 209
wsrep_last_committed
Parameters, 72
Status Variables, 209
wsrep_load_data_splitting
Parameters, 186
wsrep_local_bf_aborts
Index
Galera Documentation, Release 3.x
Parameters, 146
Status Variables, 209
wsrep_local_cached_downto
Status Variables, 210
wsrep_local_cert_failures
Parameters, 146
Status Variables, 210
wsrep_local_commits
Status Variables, 210
wsrep_local_index
Status Variables, 210
wsrep_local_recv_queue
Status Variables, 211
wsrep_local_recv_queue_avg
Parameters, 110
Status Variables, 211
wsrep_local_recv_queue_max
Parameters, 110
Status Variables, 211
wsrep_local_recv_queue_min
Parameters, 110
Status Variables, 211
wsrep_local_replays
Status Variables, 212
wsrep_local_send_queue
Status Variables, 212
wsrep_local_send_queue_avg
Parameters, 111
Status Variables, 212
wsrep_local_send_queue_max
Parameters, 111
Status Variables, 213
wsrep_local_send_queue_min
Parameters, 111
Status Variables, 213
wsrep_local_state
Status Variables, 213
wsrep_local_state_comment
Parameters, 109
Status Variables, 213
wsrep_local_state_uuid
Status Variables, 214
wsrep_log_conflicts
Parameters, 186
wsrep_max_ws_rows
Parameters, 187
wsrep_max_ws_size
Parameters, 187
wsrep_node_address
Parameters, 188
wsrep_node_incoming_address
Parameters, 188
wsrep_node_name
Parameters, 65, 89, 189
Index
wsrep_notify_cmd
Parameters, 107, 189
wsrep_on
Parameters, 190
wsrep_OSU_method
Parameters, 80, 191
wsrep_preordered
Parameters, 191
wsrep_protocol_version
Status Variables, 214
wsrep_provider
Parameters, 192
wsrep_provider_name
Status Variables, 214
wsrep_provider_options
Configuration Tips, 153, 154
Parameters, 23, 72, 192
wsrep_provider_vendor
Status Variables, 215
wsrep_provider_version
Status Variables, 215
wsrep_ready
Parameters, 109
Status Variables, 215
wsrep_received
Status Variables, 215
wsrep_received_bytes
Performance, 151
Status Variables, 216
wsrep_repl_data_bytes
Status Variables, 216
wsrep_repl_keys
Status Variables, 216
wsrep_repl_keys_bytes
Status Variables, 217
wsrep_repl_other_bytes
Status Variables, 217
wsrep_replicated
Status Variables, 217
wsrep_replicated_bytes
Status Variables, 217
wsrep_restart_slave
Parameters, 193
wsrep_retry_autocommit
Parameters, 147, 148, 193
wsrep_slave_FK_checks
Parameters, 194
wsrep_slave_threads
Parameters, 194
Performance, 152
wsrep_sst_auth
Parameters, 195
wsrep_sst_donor
Parameters, 65, 196
239
Galera Documentation, Release 3.x
wsrep_sst_donor_rejects_queries
Parameters, 196
wsrep_sst_method
Parameters, 16, 17, 197
wsrep_sst_receive_address
Parameters, 198
wsrep_start_position
Parameters, 199
wsrep_sync_wait
Parameters, 199
wsrep_ws_persistency
Parameters, 200
240
Index