1
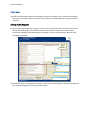
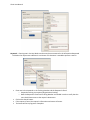
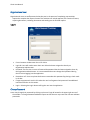
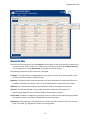
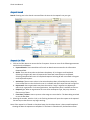
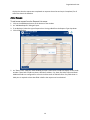
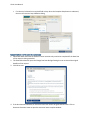
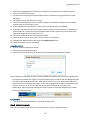
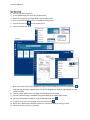
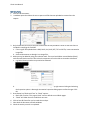
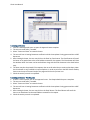
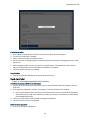
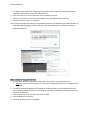
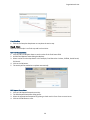
Libria User Manual 1 Contents Contents Introduction ..................................................................................................................................................... 3 Public User ..................................................................................................................................................... 5 Adding Public Request................................................................................................................................ 5 Search for Public Search ............................................................................................................................. 6 Organization User........................................................................................................................................... 9 Log In .......................................................................................................................................................... 9 Staff Home / Request List......................................................................................................................... 11 Add a Request .......................................................................................................................................... 14 Request Fulfillment .................................................................................................................................. 15 Helpful Tips............................................................................................................................................... 28 2 Libria User Manual Introduction MSF&W has set out to create a web-based management system that would allow agencies to electronically manage FOIA documents. The application also will allow members of the public to track FOIA requests via agency websites. Libria will help streamline the requests, so employees are not standing at photocopiers for hours and hours. They can do electronic lookups and electronic documents, so they’re not stuck in the file room, even if they are a paper-heavy environment. Libria Features Secure Redaction: By burning redactions onto the image, your information is safe Granular security controls to manage user permissions and access Document import & scanning: Combine electronic files and paper documents into one response packet Audit Log: easily view an audit trail of all user actions Customizable workflow: Model workflows steps specific to your organization through an easyto-use interface Introduction Dashboard view: easily view request status, outstanding volume, and approaching due dates Reporting: run standard or ad-hoc reports to show FOIA requests by status, date range, user, etc. Web requests: submitted requests are automatically captured and routed to workflow for processing Online Tracking: Tracking number automatically assigned for status checking by requester Online Publishing: Publish responses online to be downloaded by requester Search and retrieve: Easily gather relevant documents from emails, documents repositories, or network directories Hosted or installed: Online, "cloud" based solution or installed on your server Correspondence Manager: Customizable templates make sending response letters simple Custom integration: Optional integration with your document management system Alerts: Automated deadline creation, tracking, and alerts Accessible: Complies with accessibility standards for people with disabilities including Section 508, WCAG 2, and IITAA For more information or a demo, call 877-698-3535 MSF&W 4 Libria User Manual Public User The public intake window can be made available to guest users through a link on the business website. Guest users may submit requests and search for previously submitted requests using Libria's public interface. Adding Public Request From your organization's website, the guest user can click on the link to Libria. Have them enter data in the text box fields and/or select data from the drop down fields. Fields where the label has an asterisk are required to have data entered or selected. Click on the Submit button when all fields have been completed. Once the public user has submitted the request, a confirmation window appears displaying the data that was entered along with the Tracking # of the request. Public User If the public user wants to attach any necessary files to the request, and if the Organization allows uploads from the public site, they can do so by clicking on the Add files button under Document Upload area on the confirmation window. A Choose File to Upload dialog will open to allow them to locate the needed file. File types that are allowed to be uploaded into Libria are PDF's, image files and MS Office documents. If a template confirmation email has been set up in administration, an email will be sent to the address entered in the Email field. Search on Public Search Screen In order for a public user to find out the status of their request, they need to enter the Tracking Number and the Requester's email address that was entered on the request or a keyword from the requested information. Giving public users Keyword searching ability is an optional Organizational setting. See your organizational administrator for more information. Tracking Number - The number assigned to the request. This number was displayed on the confirmation window when the request was submitted and may also have been sent in a confirmation email. Entering only the Tracking Number will return a single result. Requester's Email - Enter requester's Email as it was entered in the Email field when the request was created. Entering only the Requester's Email will return all the requests made by the requester of that email. If the public user has added multiple requests, entering the Tracking Number will narrow the return to a single request item. 6 Libria User Manual Keywords – Entering text in the Key Words searches text that was entered in the Information Requested field when the request was submitted. A minimum of 3 characters is needed to perform a search. Enter text in the Keywords or the Tracking Number and the Requester's Email. o Keyword searching is an optional Organizational setting. o Both the Requester’s Email and Tracking Number are needed in order to verify that the user should have access to the request’s documents. Click on the Search button. If the request is found, the request's information and status will return. The Status will be In progress or Complete. Public User Performing a Keyword search may return multiple results. The Information Requested text appears when the mouse hovers above the Tracking # for each request. The list may be narrowed by entering additional text in the Filter box. This may be the Tracking #, Requester, Affiliation, Status or Information Requested columns. The Information Requested column is a hidden column but can be viewed by using the mouse to hover over the Tracking #. Click on the Tracking # to open the request. If the documents were published to the public site, they will be listed in Document Downloads for the requester to retrieve. If the request is not found, verify that the Tracking Number and Requester's Name was entered exactly as it was given on the confirmation window or in the confirmation email. 8 Libria User Manual Organizational User Organizational Users are staff personnel who take part in the process of completing step activities required to complete the request. Some of the activities can include approval, the creation of letters, acquiring documents, redacting documents and sending out the finished request. Log In From a browser window enter the url for Libria. Login ID: Users will need to enter their user id that has been assigned to them by an Organization Administrator. Password: The first time in users will entered the password that has been assigned to them by the Organization Administrator. It is recommended that users change their password during their first time logging into the application. Remember me?: Users may have the browser remember their password by placing a check mark in the box. I forgot my password: Use this link when the user has forgotten their password. See additional instructions further in this section. Log In: Selecting the Log In button will log the user into the application. Change Password A user may change their password by clicking on the user's login id located in the upper right corner of the window. A Change Password window will open so that the user may enter their Current and New passwords. Organizational User 1. 2. 3. 4. Current password: Enter your current password. New password: Enter a new password. Confirm new password: Reenter the new password. Save: Click on the Save button. 10 Libria User Manual Forgot Password – Reset Password 1. 2. 3. 4. 5. 6. 7. Type in id in Login ID area. Click on 'I forgot my password' link. A confirmation dialog opens requesting that you check your email to reset your password. Click OK. Open you email and click on the 'Reset Password' link. Enter your new password in both the New Password and Confirm new password boxes. Click on the Reset Password button. Staff Home / Request List To a user who belongs to a staff role, the Request List is their home screen. By default, the Request List displays by date due the requests that have a status of In Progress. Further filtering on text, Status of the request, Type of request, by Date submitted or sorting a column may be performed on the list in order to locate a particular request. Organizational User Request List View Users will see all the requests that are In Progress even though they may not have rights to work one of the Current Steps. They can access the requests they have rights to by filtering on My Current Step, or if the organization is using Department, by Department as shown below. The following information for the request list is displayed: Tracking #: Tracking numbers are assigned when a new request is saved. The Tracking number is also the link to access the request's fulfillment steps. Requester: The person whose name was entered in the Name field when the request was filled out. It should be noted that the requester name cannot be edited after the request has been created. Affiliation: The name that was entered in the Affiliation field when the request was filled out. Due Date: The due date is based on the number of Compliance Days that have been set in Administration. Requests that are past due displays the Due Date in red print. Current Step: A request is configured to go through a certain number of steps before being completed. The step the request is currently in is displayed in Current Step column. Department: If the organization uses departments, a column will also be shown in the list as the name given in the Label. e.g. Assignment is shown in the image above. 12 Libria User Manual Request Search Search: Entering text in the Search area auto filters the items in the request list as you type. Request List Filter 1. Click on the Filter button to narrow the list of requests. Set one or more of the following parameters and click on the OK button. a. Keyword Search: Text entered here will search on data that was entered in the Information Requested field. b. Status: There are three values to the Status drop down; All, In Progress and Completed. Selecting In Progress will return all requests that have been entered but not completed. Selecting Completed will return all completed requests. Selecting All will return both In Progress and Completed requests. c. Active Step: There are two values in the Active Step drop down; All and My Current Step. My Current Step filters on the role that the user is a member and which steps that role has rights to. d. Department: Some organizations may have the need to “assign” requests to a department within their organization. For those organizations, the Department filter is available to filter on. e. Request Type: When an organization has more than one Request Type, they may choose to filter on one of them. f. From Date / To Date: Users may enter a date range to narrow the list. The dates being searched on are the Due Date. 2. Selecting the number, which is a link, in the Tracking # column will open the request to the request's Current Step so that the user may begin working. Note: If the request list is filtered on Complete Status, the Due Date column is then named Completed showing the date the request was completed. If the Status is filtered on All, the Due Date column Organizational User displays the date the request was completed on requests whose Current Step is Completed, for all others the date is the date due. Add a Request To add a new request from the Request List screen: 1. Click on the Add Request button at the bottom of the window. 2. An “Add New Request” dialog will open. 3. If not displayed, select the type of request that is being added from the Request Type drop down. 4. Click the OK button. 5. An “Enter a new * Request” intake window will open. Libria's built in fields will display on the intake window. These built in fields are Name, Affiliation, Address, City, State, Zip Code, Phone and Email. Additional fields can configured for use on the intake screen in Administration. Any field shown in bold print is required to have data filled in before the request can be submitted. 14 Libria User Manual 6. To complete the intake screen, fill in the data fields. 7. If the requester wants an email confirmation sent to them, place a check mark in the “Send confirmation email to requester.” box. 8. Click on the Submit button. 9. The newly created request is added to the In Progress list. To cancel without creating a new request, you can either click on the Back to List button or the Home link in the menu bar. Request Fulfillment How to complete a request will depend largely on the steps, and the activities within those steps, that your organization has configured. The organization that we are using as an example in this manual has six steps to complete an approved request. Note: Organization name, Step names, the number of steps, Activities names, field names and roles are customizable for request types. Each step has its own set of activities that need to be completed. There are 13 different types of activities. Depending on the type of activity will determine how the activity is to be performed and completed. A list of activity types is shown in Helpful tips. When the user has performed an activity, they need to place a check mark in the box located in front of the activity name if it has not been done so automatically when the activity is completed. Activities that are linked to a meta data field require a selection of a field value. These activities will automatically be marked as completed when the value is saved. Organizational User Activities that have an asterisk * next to them are required to be completed / check marked in order for the step to be completed. Once they have placed a check mark in front of all the required activities for that step, a Complete Step button will appear on the bottom of the Current Step window. Clicking on the Complete Step button moves the user to the next step. In our example, requests that have been denied for approval will have less steps to complete as they will not need to complete Step 2 (Gather Documents) nor Step 3 (Prepare Documents). Working our Example Request 1. Open a request, from the Requests list Tracking # column, click on the request number link. The link will open the window to the request's current working step. 2. To start out using step 1 from our example organization, click the Tracking # link of a request whose Current Step is Approval. Step 1 - Approval In the Approval step, there are 3 activities, but only 1 of them is required. The required activity is represented by the *. Approve/Deny Request 1. Click on the Approve/Deny Request activity. 2. An Edit Field Value dialog box opens giving the user the ability to set the Approval field. 3. Click OK to save. 4. The activity will automatically be marked as complete. a. If Approved is selected, the next step will be step 2 which is Gather Documents. b. If Denied is selected, the next 2 steps (Gather Documents and Prepare Documents) are skipped sending the request to Prepare Response. 16 Libria User Manual c. If a value isn't selected on a required field activity when the Complete Step button is submitted, the user will receive a Step Validation dialog. Extend Due Date and Generate Extension Letter 1. Extend Due Date and Generate Extension Letter activities only need to be completed if the Date Due of the request is being extended. 2. The Extend Due Date will open the Change Due Date dialog allowing the user to extend the original deadline of the request. 3. Click OK to save. 4. If the due date was extended, an extension letter will need to be generated and sent. Click on Generate Extension Letter to open the extension letter template window. Organizational User 5. In the yellow highlighted area, staff users can replace the text with their own appropriate text. 6. Click on Create and View button. 7. You will see a Creating Document notification while the template is being generated into a PDF document. 8. The Extension Letter PDF opens for viewing. 9. Click on the Email button in order to send the requester an extension notification to the address that was entered on the intake screen. 10. An Emailing Document notification is visible until the email process has completed. 11. If printing to send a hard copy, click on the Print button. Note: the Print button is only available in Internet Explorer. In order to print from the PDF Viewer window, hover over the top of the main body of the page and click on the printer icon. 12. Close both the PDF document and template windows. 13. Check the box in front of the activity in order to mark it as completed. 14. Complete the Approval step by clicking on the Complete Step button. 15. Check the activity to mark it completed. Assign Department 1. Click on the Assign Department activity. 2. An Assign Department dialog opens. 3. Place a check mark in front of the departments that need to help complete the request. Some organizations may have an activity on their request that requires that zero to many departments be assigned to complete the request. The activity would pop up a checklist box field dialog where the user who assigns requests would select which departments, if any, are to perform their own set of activities in order to complete the request. As the request progresses through, the step chevron will display a float over on the current step that has yet be completed by one or more of the departments. When all the departments have their activities for that step completed, the request will move into the next step. Complete Step 1. Click on the Complete Step button to complete the entire step. Step 2 - Gather Documents Step 2 of our example organization has 3 activities where each has a separate function. 18 Libria User Manual Scan Documents 1. Click on Scan Documents link. 2. A scan window opens for users to scan documents. 3. Select the settings for Scan Page Mode, Color and Resolution. 4. Enter a name for the document in Uploaded Document Name 5. Click on the scan icon to scan the document. 6. Click on the Save icon. 7. Note: Documents may also be uploaded through the scan window by click on the Upload icon or using the Drag and Drop method. Emails can also be dragged from Outlook and dropped onto the capture window. 8. To view a page, double click it and page will be displayed in the viewer. 9. You may rotate the page if needed by using the Rotate Left or Rotate Right arrows. 10. You may also deskew the page by using the Deskew Image icon . 11. To return to the main scan window, click on the back arrow 12. When all the documents have been scanned in, close the window by clicking on the X. 13. Check the activity to mark it completed. Organizational User Note: If you use Outlook as your email application, you can drag and drop an email directly from Outlook to the Capture screen. Image, PDF, Word or Excel attachments will also be processed. Upload Documents 1. Click on Upload Documents. 2. An Upload window opens which allows users to browse their file directories and upload files. 3. Click on Add Files and use the Choose File to Upload window to locate electronic files. Files may also be added using the dragging the file and dropping them onto the center of the upload window. a. Most non-proprietary image file formats are supported. b. DOC, DOCX, XLS, XLSX, RTF, TXT and PDF files will be converted into image files along with uploading them in their native format. c. Some file types that cannot be converted to image files but can be uploaded are WAV, AVI and ZIP. These files may be sent along with the final PDF but cannot be edited within Libria. Any edits needing to be made to files that aren’t converted and that will be sent along with the final PDF need to be made outside of the application before they are uploaded to Libria. d. If there are other file types that need to be uploaded, contact your Libria administrator. 4. Once the files are uploaded, click on the Close button. 5. Check the activity to mark it completed. View Gathered Documents 1. Click on View Gather Documents to see a list of documents that have been either scanned or uploaded. a. Image files, scanned and converted, can be viewed on the Source Documents tab. b. Native files are listed on Original Documents tab. Note: image file types are only listed on Source Documents tab. 2. Click the Close button to return to the list of activities. 3. Check the activity to mark it completed. Complete Step 1. Click on the Complete Step button to complete the entire step. Step 3 - Prepare Documents Step 3 of our example has 1 activity to complete. 20 Libria User Manual Edit Documents 1. Click on Edit Documents. 2. A window opens that allows the user to open each file that was uploaded or scanned into the request. 3. Only the documents listed on the Source Document tab may be edited. These are the files that are included in compiling the final PDF. a. If the original file uploaded was a DOC, DOCX, XLS, XLSX, RTF, TXT or PDF file, it was converted to image files. b. Scanned documents are brought in as image files. 4. Markups may be added by using the redaction tools. There are both White-out and Redact (black) tools that will block text on the file so that the requester will not be able to view what is beneath. a. e.g. Social Security Number may need to be redacted. 5. 6. 7. 8. b. The fill and outline color of the redaction can be changed by right mouse clicking and selecting the Properties option. A Rectangle Annotation Properties dialog opens to allow changes. Click OK. Draw Stamp has “Blank with Text” or “Blank” options. a. Blank with Text has “This page is blank” and is a default to mark blank pages. b. “Blank” will allow the user to add their own text. Click on Save & Close after you've made the markups. Close both the document and edit windows. Check the activity to mark it completed. Organizational User NOTE: Template letters that have been created can be seen on the Letters and Response Documents tab. Template created documents cannot be edited. To delete a Source or Letters and Response document: 1. Click on the garbage can icon . 2. A Delete Confirmation will open to verify that you do want to delete. 3. Click on the Yes button. Complete Step 1. Click on the Complete Step button to complete the entire step. Step 4 - Prepare Response Step 4 of our example organization has 5 activities. Create Final PDF 1. Click on Create Final PDF 2. Combines all the documents that have been uploaded and/or scanned in the “Gather Documents” and creates a single PDF file. 3. A Confirmation dialog will display when the PDF has completed. 4. Click OK to close the dialog. 5. Click View to view the final PDF document. 6. Check the activity to mark it completed. View Final Document 1. Click on View Final Document which allows the user to view the PDF file that was created in “Create Final PDF”. 2. Clicking on the Show Acrobat Toolbar icon displays the Acrobat Tool bar. This will allow users to navigate through the pages using the previous and next buttons. 3. Click on the Close button to close the window. 4. Check the activity to mark it completed. Note: the Print button is only available in Internet Explorer. In order to print from the PDF Viewer window, hover over the top of the main body of the page and click on the printer icon. 22 Libria User Manual Create Approval Letter 1. Click on Create Approval Letter to open the Approval Letter template. 2. The user can make edits, if needed. 3. Select “Create and View” to create the letter. 4. The user will see a Creating Document notification while the template is being generated into a PDF document. 5. After viewing the letter, the user may click on the Email or Close button. The Email button will email the letter as an attachment to the email address entered for the request. The Close button will close the window. NOTE: the letter can be emailed later along with the final document in the Send Packet step. 6. The letter may also be printed if the requester has no email and wishes to receive a hardcopy. Note: the Print button is only available in Internet Explorer. In order to print from the PDF Viewer window, hover over the top of the main body of the page and click on the printer icon. 7. Check the activity to mark it completed. Create Approval Letter - Fee Required 1. If there is a fee required, click on the Approval Letter - Fee Required which opens a template. 2. The user can make edits, if needed. 3. Select “Create and View” to create the letter. 4. The user will see a Creating Document notification while the template is being generated into a PDF document. 5. After viewing the letter, the user may click on the Email button. The Email button will email the letter as an attachment to the email address entered for the request. 6. Check the activity to mark it completed. Organizational User Create Denial Letter 1. If the request is being denied, click on the Denial Letter which opens a template. 2. The user can make edits, if needed. 3. Select “Create and View” to create the letter. 4. The user will see a Creating Document notification while the template is being generated into a PDF document. 5. After viewing the letter, the user may click on the Email button. The Email button will email the letter as an attachment to the email address entered for the request. 6. Check the activity to mark it completed. Complete Step 1. Click on the Complete Step button to complete the entire step. Step 5 - Send Packet Step 5 of our example organization has 3 activities. View Final Document and Print and Mail Packet 1. Click on View Final Document which allows users to view the PDF file that was created in “Create Final PDF”. 2. If the requester wanted the response in hardcopy, it can be printed from this window. a. Only Internet Explorer offers the ability to print from the Print button located at the bottom of the window. When using other browsers, use the print icon that is seen when you hover within the embedded pdf viewer. 3. Click on the Close button when finished reviewing the document. 4. Check the activity to mark it completed. Email Packet to Requester 1. Click on Email Packet to Requester. 24 Libria User Manual 2. An “Email Packet Documents” dialog opens that allows users to select from original documents, template created letters and the final PDF document. 3. Place a check mark in front of the items to be included in the email. 4. Click on the OK button to email the documents to the email address of the requester. 5. Check the activity to mark it completed. Note: If the email attachments being sent exceed the maximum size allowed by your administration, an Email Aborted dialog displays with a notification. See your administrator if maximum email size needs to be adjusted. Make available for Requester Download 1. Click on Make Available for Requester Download if the request is to be available online. a. Note: the Create Final PDF activity has to have been completed before the final request can be published. 2. The Publish Documents dialog opens showing the Final Document and any template letters that were created and allows the user to choose which ones will be published on the public site for the requester to download. 3. Place a check mark in front of the items to be included. 4. Click the OK button to publish. 5. Check the activity to mark it completed. Organizational User Complete Step 1. Click on the Complete Step button to complete the entire step. Step 6 - Finish Step 6 of our example is our final step and has 3 activities. Edit Final Request Status 1. Click on Edit Final Request Status to set the value of the Final Status field. 2. An Edit Final Request Status dialog box displays. 3. Select a value from the drop down. In this example, Final Status has 3 values; Fulfilled, Partial Denial, Full Denial. 4. Click on the OK button. 5. The activity will be marked as complete automatically. Edit Request Exemptions 1. Click on Edit Request Exemptions activity. 2. The Edit Request Exemptions dialog opens. 3. Select the appropriate exemptions by placing a check mark in front of one or more items. 4. Click on the OK button to save. 26 Libria User Manual View Documents 1. Click on View Documents to view the documents. 2. Click on the Close button when finished reviewing. When the required activities for the final step in the fulfillment process has been completed, the Complete Request button displays. Complete Step 1. Click on the Complete Step button to complete the entire step. 2. A Request Completed dialog opens stating that the request is now closed. 3. Click on either the Back to List or Close button. Back to List will return the user to the Request List window. The Close button will close the dialog and remain on the current request. The request will be set as Completed. Organizational User Step Progress Represented by Colors Chevrons: Dark Blue – The step has been completed. Light Blue – Active step of the request. Tan – Step yet to be completed. Bar below Chevrons: Dark Blue – Step completed by the role of the logged in user. Tan – The role of the logged in user does not have access to the step. o Step was assigned to a role different from the role of the logged in user. o Step may not have been required to be completed due to a field value. In our example this would be the Denied value of the Approval field. Yellow – The step that the logged in user is currently viewing. Reports Reports specific to FOIA reporting: Monthly Volume Report gives a summary of request totals based on the values of a metadata field named “Final Status”. Set the date range and click on the View Report button. If this report produces an error verify that the request type has “Final Status” as a field. Talk to your system administrator for further help. Monthly Request Log report produces a list of requests received for the date range selected based on the values of the metadata field named “Approval”. Set the date range and click on the View Report button. If this report produces an error verify that the request type has “Approval” as a field. Talk to your system administrator for further help. 28 Libria User Manual Quarterly Exemptions Report lists a summary of exemptions for processed requests by quarter. This report is based on the values of a metadata field named “Exemptions”. It is also dependent on the request type having FOIA as a part of its name. Other reports: Request Processing Time Report gives total of number of requests received, and processed along with the average, lowest and highest number of days to complete for the date range selected. Set the date range and click on the View Report button. Past Due Request Report displays a list of requests that are past due based on the request types Compliance Day Deadlines configuration. Request Summary by Affiliation Report displays requests grouped by Affiliation for the date range selected. Set the date range and click on the View Report button. Activity Report by Month Helpful Tips Browsers: Popups need to be allowed for the URL. A template letter, such as Denial Letter, is created as a pdf file. In order to view the pdf, a modification may need to be made to your browser settings. Google Chrome: Viewing PDF’s In Google Chrome’s address bar, type chrome://plugins/. Disable Chrome PDF Viewer and enable Adobe Reader. Update Adobe Reader plugin if necessary. Right click on the URL's padlock. On the Permissions tab set Popups 'Always allow on this site'. Printing PDF’s Print button is not available on an embedded pdf in Chrome. Hover over the PDF viewer (body of the page) to select the print icon. The print button is only available in IE. Firefox: Viewing PDF’s Open Firefox Options. Select Application. Select Portable Document Format (PDF). Set the dropdown value to Use Adobe Acrobat (in Firefox). Click OK. Organizational User Printing PDF’s Print button is not available on an embedded pdf in Firefox. Hover over the PDF viewer (body of the page) to select the print icon. The print button is only available in IE. Step Titles: Steps that have been completed are titled “Completed Step: %Step%” when you open the step. The first non-completed step is titled “Current Step: %Step%”. Document List: Email, Letter Templates and final pdf that have been sent by email or made public on the website cannot be deleted from the list. Delete Activities and / or Steps If a request type has been published and a request submitted, activities and steps cannot be deleted. If a request type has been published but no request has been submitted, select “Mark Inactive” from the request type menu options. All Step Role Activities, Step Role Fields and Step Roles need to be removed before deleting the step. Activity Types: Activity names are customizable and therefor may be named different for each request type in the organization even though the activity type and manner of how they are completed are identical. Capture: a capture activity type is a link that opens a scan window. Hard copy documents are scanned in this window. Electronic files may be uploaded or drag and dropped in the scan window. Emails can also be dragged from Outlook and dropped onto the capture window. An example of this activity type that we have used in this user manual is “Scan Documents” in the Gather Documents step. Checkoff: checkoff activities are not performed within Libria. Once they are completed the user should place a check mark in the box located in front of the activity name. 30 Libria User Manual CreatePDF: the CreatePDF activity type is a link that creates the final PDF document. This final PDF includes all the files scanned or uploaded by the staff for the request. An example of this activity type is “Create Final PDF” in Prepare Response step. Edit: the Edit activity type is a link that opens a window where the user has access to the files that have been scanned or uploaded. Users can make redactions or additional markups. After making the edits to each document, the file needs to be saved. This edited version of the file is the one that is included in the final CreatePDF. An example of this activity type is the “Edit Documents” in Prepare Documents step. Email: the Email activity type opens a dialog that allows the staff user to select which files are to be sent to the requester. The available files are the final CreatedPDF and letters that have been created using the predefined templates. An example of this activity is the “Email Packet to Requester” in the Send Packet step. ExtendDueDate: the ExtendDueDate activity type will open a dialog window that allows the staff user to change the due date of the request by selecting a predefined extension time or setting a custom date. An example of this activity type is “Extend Due Date” in the Approval step. Info: displays information only and does not required to be checked off. Letter: a Letter activity type is a link that opens a window that will allow the staff user to generate a letter from a predefined template. An example of this activity is “Generate Extension Letter” in the Approval step. Link: this activity is a link to a user defined external location. Publish: the Publish activity type will open a dialog pop-up that allows the staff user to select which files are to be uploaded to the website so that the requester can download them. The available files are the final CreatedPDF and letters that have been created using the predefined templates. An example of this activity is the “Make Available for Requester Download” in the Send Packet step. SetField: the SetField activity type opens a dialog that allows the staff user to set a field value. The field associated with the activity will be either a combo box or a check box list field type. An example of this activity type is “Approve/Deny Request” in the Approval step. Upload: the Upload activity type opens a new window that allows the staff user to upload or drag and drop files that will be included in the final PDF document. An example of this activity that we have used in this user manual is “Upload Documents” in the Gather Documents step. Some of the file types that are allowed are: DOC, DOCX, XLS, XLSX, RTF, TXT, PDF, WAV, AVI, ZIP and image file formats. DOC, DOCX, XLS, XLSX, RTF, TXT and PDF files will be converted into image files along with uploading them in their native format. WAV, AVI and ZIP files cannot be converted to image files. To allow for other file types, add the file extension in the web.config file (ask Libria administrator for details). ViewFinalPDF: is a link that opens the final document created by the CreateFinalPDF activity. An example of this activity type is “View Final Document” in Send Packet step. Native File Type Support Convert to images for redaction: .doc, .docx, .xls, .xlsx, .rtf, .txt, .pdf Image types: .jpg, .tif, .png, .bmp Stored and available to forward: .avi, .zip, .wav