1
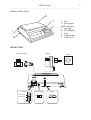
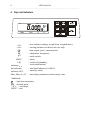
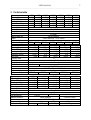
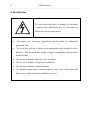
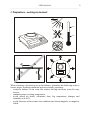
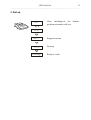
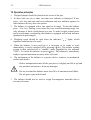
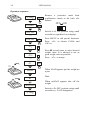
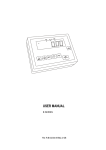
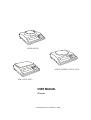
AD50-AD300
AD510-AD3000, AD2.5, AD5
AD6, AD10-AD12
USER MANUAL
AD series
File: ER-AD-041-01-08 AC-4_3 GB
2
USER MANUAL
_________________________________________________________________________________________________________________
Contents:
1. Introduction.................................................................................................................. 3
2. Completeness ............................................................................................................. 3
3. Balance description ..................................................................................................... 4
4. Keys and indicators ..................................................................................................... 6
5. Technical data ............................................................................................................. 7
6. Security rules............................................................................................................... 8
7. Preparations – working environment ........................................................................... 9
8. Preparing a balance to work...................................................................................... 10
9. Start-up ..................................................................................................................... 11
10. Operation principles................................................................................................... 12
11. Balance checking ...................................................................................................... 13
12. Adjusting a balance ................................................................................................... 13
13. Connecting a balance to a computer or a printer ....................................................... 15
14. Special functions description ..................................................................................... 16
15. Legend ...................................................................................................................... 17
16. Normal weighing........................................................................................................ 17
17. Weighing with tare..................................................................................................... 17
18. Weigh summing (rECIPE) ......................................................................................... 18
19. Pieces counting (PCS) .............................................................................................. 19
20. Autozeroing (AUtOtAr)............................................................................................... 20
21. Serial port working mode selection (LPt) ................................................................... 20
22. Serial port setting (rS232).......................................................................................... 21
23. Date and time setting (dAtE) - optional ...................................................................... 22
24. Percentage weighing (PErCEnt)................................................................................ 23
25. Weighing unit selection (UnIt).................................................................................... 24
26. Function Menu customisation (ACtIV) ....................................................................... 25
27. Maintenance and repairs of small defects ................................................................. 26
Declaration of Conformity................................................................................................. 27
USER MANUAL
3
_________________________________________________________________________________________________________________
1. Introduction
AD series balances are destined for laboratory weighing where high accuracy is
required. AD6F balances are designed for precise paint weighing in automatic
paint pouring process.
All balances are metrologically tested - calibration or legal verification
certificate on demand.
Legal verification is required for balances used in some applications: direct
trade, pharmaceutical prescriptions, medical and pharmaceutical analysis, goods
packing and others.
Balances with legal verification are mark with the following:
protective seal placed on the casing mounting screw,
notified body stamps and green M sticker placed on balance name plate.
Legal verification is valid for 3 years (until verification seals are not broken).
As weight indication depends on gravitational acceleration in a place of the
installation, the manufacturer adjusts balance indication for specific gravity zone
basing on delivery address. Gravity zone is specified with gravitational
acceleration range given on a sticker placed at the back of a balance.
In case installation place is changed or balance indications are not accurate, it is
advised to contact a nearest service in order to re-adjust the balance.
NACE classification: 33.20.31.
2. Completeness
A standard set consist of:
1. Balance
2. Pan base and a pan
3. Feeder (ZN12V/500mA)
4. User manual
5. Guarantee Card
4
USER MANUAL
_________________________________________________________________________________________________________________
3. Balance description
FRONT VIEW
Balances 50-AD600:
1
2
3
4
5
7
6
1 – pan
2 – pan support
(under the pan)
3 – pan ring
4 – LCD display
5 – keys
6 – rotating legs
7 – water level
Balances AD510, AD1000-AD3000 and AD2.5-AD5:
1
2
4
5
7
6
1 – pan
2 – pan support
(under the pan)
3 – pan ring
4 – LCD display
5 – keys
6 – rotating legs
7 – water level
5
USER MANUAL
_________________________________________________________________________________________________________________
Balances AD6-AD12:
1
2
4
5
7
6
1 – pan
2 – pan support
(under the pan)
3 – pan ring
4 – LCD display
5 – keys
6 – rotating legs
7 – water level
REAR VIEW
Printer or computer
Feeder
RS232C
RxD (receiver)
TxD (transmitter)
Adjust switch
1
2
3
4
gnd
5
chassis
6
7
8
9
ON
OFF
~230V
Feeder
6
USER MANUAL
_________________________________________________________________________________________________________________
4. Keys and indicators
OFF
MODE
AUT
SUM
100
50
0
Max
→T←
→0←
MENU
I/
Min
e
d
- tare (subtract package weight from weighed mass),
- zeroing (balances for direct sale use only)
-
data output (print / transmission),
calibration/ navigation,
mode switch,
menu,
switch-off (standby),
result stabilisation,
indicator
- total load indicator (0-100%),
bar indicator
- stand-by mode,
indicator OFF
Max, Min, d, e, II - metrologic parameters and accuracy class.
Additional:
- digit incrementation,
- decimal point,
→T← - next digit,
MENU - end.
7
USER MANUAL
_________________________________________________________________________________________________________________
5. Technical data
Type
Capacity (Max)
Min load (Min)
Reading unit (d)
Verification unit (e)
Tare range
Accuracy class
Working temperature
Weighing time
Pan dimensions
Balance base dim.
Power
Balance weight
Calibration weight
Type
Capacity (Max)
Min load (Min)
Reading unit (d)
Verification unit (e)
Tare range
Accuracy class
Working temperature
Weighing time
Pan dimensions
Balance base dim.
Power
Balance weight
Calibration weight
Type
Capacity (Max)
Min load (Min)
Reading unit (d)
Verification unit (e)
Tare range
Accuracy class
Working temperature
Weighing time
Pan dimensions
Balance base dim.
Power
Balance weight
Calibration weight
AD50
50g
0,02g
0,001g
0,01g
-50g
AD60
60g
0,02g
0,001g
0,01g
-60g
F2 50g F2 50g
AD250
250g
0,2g
0,01g
0,05g
-250g
AD600
AD200
AD300
AD500
200g
300g
500g
600g
0,02g
0,02g
0,02g
0,04g
0,001g
0,001g
0,001g
0,002g
0,01g
0,01g
0,01g
0,02g
-200g
-300g
-500g
-600g
II
+18 ÷ +33 °C
<8s
φ115mm
240x275x90mm
~230V 50Hz 6VA / =12V 160mA
4kg
F2 100g F2 200g F2 200g F1 500g F2 500g
AD100
100g
0,02g
0,001g
0,01g
-100g
AD510
500g
0,5g
0,01g
0,1g
-500g
φ115mm
AD1000
1000g
0,5g
0,01g
0,1g
-1000g
II
+18 ÷ +33 °C
<5s
AD2000
2000g
0,5g
0,01g
0,1g
-2000g
AD3000
3000g
0,5g
0,01g
0,1g
-3000g
φ150mm
240x275x90mm
~230V 50Hz 6VA / =12V 160mA
4kg
F2 500g
F2 1000g
F2 2000g
F2 200g
AD2.5
5000g
2500g
5g
0,1g
0,5g
-2500g
AD5
5000g
5g
0,1g
1g (0,5g)
-5000g
AD6(F)
6000g
5g
0,1g
1g (0,5g)
-6000g
AD10
10kg
5g
0,1g
1g (0,5g)
-10kg
F2 2000g
AD12
12kg
5g
0,1g
1g (0,5g)
-12kg
II
+18 ÷ +33 °C
<5s
225x165mm
φ150mm
230x180mm
240x275x90mm
270x305x120mm
~230V 50Hz 6VA / =12V 160mA
4kg
4,5kg
7kg
F2 1000g
F2 2000g
F2 2000g
F2 5000g
8
USER MANUAL
_________________________________________________________________________________________________________________
6. Security rules
To avoid electrical shock or damage of a balance
or connected peripheral devices, it is necessary to
follow the security rules below.
•
All repairs and necessary regulations can be made by authorised
personnel only.
•
To avoid fire risk use a feeder of an appropriate type (supplied with a
balance). Pay attention that supply voltage is compatible with specified
technical data.
•
Do not use a balance when its cover is opened.
•
Do not use a balance in explosive conditions.
•
Do not use a balance in high humidity.
•
If a balance seems not to operate properly, plug it out of the mains and
do not use it until checked by authorised service.
9
USER MANUAL
_________________________________________________________________________________________________________________
7. Preparations – working environment
+33°C
+18°C
When choosing a location to set up the balance, remember the following rules to
ensure proper working conditions and user-friendly operating:
- setup the balance on an even, flat surface leaving necessary room for easy
access,
- maintain proper working temperature,
- avoid strong air drafts, vibrations, dust, big temperature changes and
humidity over 90%,
- avoid locations with extreme heat radiation and electromagnetic or magnetic
fields.
10
USER MANUAL
_________________________________________________________________________________________________________________
8. Preparing a balance to work
1
2
3
7
6
1
2
1. Take all content out of a
package.
2. Place the balance on a stable
ground
not
affected
by
mechanical
vibrations
and
airflows.
3. Level the balance with rotating
rear legs 6 so that the air bubble
in water-level at the back of the
balance is in the middle.
4. (AD50-AD500) Put a pan base
2 on the mandrel sticking out of
a balance cover 3. Put a pan 1 on
a pan base (pan φ150mm is
connected to pan base).
5. (AD10-AD12) Put elements 2
on the mandrel sticking out of
a balance, put a pan 1 .
6. Plug a feeder to the power
socket at the back of the balance.
7
6
Moisture in the air may condense on the surface of the balance when
transferred to the warmer environment. In this case leave the balance
for at least 4 hours unplugged from the mains for conditioning to avoid
wrong operating or damage of the balance.
Leave the pan empty and plug the feeder to the mains 230V. At the end of selftests, the balance displays zero indication and is now ready to work
USER MANUAL
11
_________________________________________________________________________________________________________________
9. Start-up
C-1
After switching-on, the balance
performs automatic self-test.
C-5
AC-...
Program version
-------
Zeroing.
0.000g
Ready to work.
12
USER MANUAL
_________________________________________________________________________________________________________________
10. Operation principles
1. Weighed sample should be placed in the centre of the pan.
2. In direct sale use (d=e), make sure that zero indicator is displayed. If not,
press →0← key and wait until zero indication and zero indicator appears. In
other balances the key does not operate.
3. The balance is equipped with a tare equal to its range. To tare the balance
press →T← key. Storing a tare value does not extend measuring range, but
only subtracts it from a load placed on a pan. To make weight control easier
and to avoid range overdrawing, the balance is equipped with a load indicator
(graduated in percentages).
4. Weighing result should be read when the indicator "
signalises stabilisation of a result.
" lights, which
5. When the balance is not used but it is necessary to be ready to work
immediately, it can be switched off by pressing I/ key. The balance reading
system is then switched off to "standby" mode (signalled by the indicator
"OFF"). To switch the balance on press I/ key. The balance is immediately
ready to operate maximum accuracy (after self tests).
6. The mechanism of the balance is a precise device, sensitive to mechanical
strokes and shocks.
Before transportation take off the pan (move it slightly and lift it up) and
the pan base and preserve from any damages.
Do not overload the balance more then 20% of maximum load (Max).
Do not press a pan with a hand.
7. The balance should not be used to weigh ferromagnetic materials due to
accuracy decrease.
USER MANUAL
13
_________________________________________________________________________________________________________________
11.
Balance checking
As weight indication depends on gravitational acceleration, it is advised to check
balance indication accuracy before and after series of measurement using any
load with known weight.
To check a balance with legal verification use calibration weight as stated
in Technical Data table with valid calibration certificate. In case permissible
error is exceeded it is advised to contact the nearest service to calibrate
a balance.
12. Adjusting a balance
If balance indications exceed permissible error it is necessary to adjust
a balance. To calibrate a balance use calibration weight as stated in Technical
Data table (or of better accuracy) with valid calibration certificate.
To adjust a balance it is necessary to break protective marks – please
contact the nearest service for legal verification in a place
of installation or the nearest Measurements Office.
Calibration report (CAL Prn):
Data:
CALIBRATION REPORT
--------------------------------------------------------------------------FACTORY NUMBER:
...
PROGRAM NUMBER: (version, date)
14
USER MANUAL
_________________________________________________________________________________________________________________
Operation sequence:
0.00g
CALIbr
MENU
OFF
ON
T
Switch to Pr ON position using small
screwdriver (signalised on a display).
CAL oFF
...
CAL on
Remove a protective mark from
a calibration switch at the back of a
balance.
T
Press MENU to call special functions.
Press →T← to choose CALIbr and
CAL on.
m1
several times to select desired
Press
weight value. It is advised to use as
great weight value as possible.
Press →T← to accept.
m2
...
m
T
m
LOAD
C
unLOAD
When LOAD appears put the weight no
a pan.
Wait.
When unLOAD appears take off the
weight.
Switch to Pr OFF position using small
screwdriver ( Pr ON disappears).
0.00g
USER MANUAL
15
_________________________________________________________________________________________________________________
13. Connecting a balance to a computer or a printer
The balance may send data to a computer or a printer via RS232C interface.
RS232C
1
RxD (receiver)
TxD (transmitter)
2
6
7
3
8
4
5
GND
9
Case
When cooperating with a computer, the
balance sends weighing result after
initialising signal from a computer or
key.
after pressing
When cooperating with the balance, a
computer should be equipped with a
program that enables receiving and
processing data from the balance.
AXIS offers computer programs to cooperate with balances. Demo versions and
program descriptions are available on the website: www.axis.pl:
RS 232C Test – free serial port testing program,
ProCell – residual program for cooperation with Microsoft EXCEL and
other Microsoft Windows applications (demo version).
Detailed information for programmers:
The balance sends data with a following method:
Computer → Balance: initiation signal S I CR LF (53h 49h 0Dh 0Ah),
Balance → Computer: weighing result in the following format:
(16Bytes, LONG protocol - 8bits, 1stop, no parity, 4800bps),
Bytes description:
1
- „-„ mark or space
2
- space
3÷4 - digit or space
5÷9 - digit, decimal point or space
10 - digit
11 - space
12 - k, l, c, p or space
13 - g, b, t, c or %
14 - space
15 - CR
16 - LF
16
USER MANUAL
__________________________________________________________________________________________________________________
14. Special functions description
All balances, beside basic functions like weighing and tare, are equipped with the
set of additional functions.
Standard set of special functions include:
- pieces counting,
- autozeroing,
- serial port working mode setting,
- serial port parameters setting,
- percentage weighing,
- weighing unit change (grams / carats / pounds)
- prescriptions making
- calibration options
Other special functions may be enabled as an option on customer request
(described in additional brochure when ordered).
For easy access to the most frequently used functions, use ACtIV function to
select functions to be displayed in functions menu.
When special function is active, MODE indicator is displayed.
USER MANUAL
17
___________________________________________________________________________________________________________________
15. Legend
- loaded pan
- unloaded pan
12g
- press a key when ... (on left)
T
- forced change
- automatic change
16. Normal weighing
When a pan is empty and indication is
different than zero press →T← key.
0.00 g
T
Weighing result should be read when
the indicator " " lights.
43.04 g
17. Weighing with tare
23.13 g
0.00 g
63.24 g
T
A balance is equipped with tare equal
to its range.
18
USER MANUAL
__________________________________________________________________________________________________________________
18. Weigh summing (rECIPE)
0.00 g
rECIPE
MENU
T
rEC oFF
rEC on
T
o 10.01g
T
A
B
o
0.00g
o 10.02g
C
o
0.00g
o 10.03g
SUM
30.06g
T
This function enable to weigh few
ingredients in one container and to
display aggregated sum of all
ingredients.
The function has the following
options:
-rEC oFF – leave the function and
display aggregated sum of all
ingredients,
-rEC on – activate the function,
-rEC Con - return to previous series
of weighing.
Before weighing each ingredient
(A, B, C, etc.) remember to tare the
balance.
To read aggregated sum of all
previously weighed components
press key or use rEC oFF
option. To return to ingredients
weighing press key again.
Note:
When rECIPE function is active,
the sign o is displayed at the left of
the display.
When rEC oFF option was used,
SUM indicator disappears after
pressing →T← key.
USER MANUAL
19
___________________________________________________________________________________________________________________
19. Pieces counting (PCS)
12.05 g
T
0.00 g
5
23.04 g
PCS
MENU
T
This function enables to count
identical pieces, e.g. turnbuckles or
buttons.
A measurement is performed in two
phases:
- first phase - single piece weight
calculation on the basis of defined
pieces amount (5, 10, 20, 50, 100,
200 or 500 pieces),
- second phase – pieces counting.
It is advised that single piece weight
is not less than one reading unit and
sample weight used in first phase is
bigger than 100 reading units.
To leave function press F key and
then with →T←, key chose PCS
and PCS oFF .
PCS oFF
PCS on
T
5
T
0 pcs
12
12 pcs
Note:
Err-3 communicate signalises that a
sample was not put on a pan. The
same communicate appears if single
piece weight is less than one
reading unit (it is possible to count
pieces but measuring error is
bigger).
To chose previously used pieces
amount select “..” in first phase.
During pieces counting →T← key
function does not change.
20
USER MANUAL
__________________________________________________________________________________________________________________
20. Autozeroing (AUtOtAr)
0.01g
AUtOtAr
MENU
T
AUt oFF
AUt on
AUT
When
AUtotAr
function
is
activated, a balance automatically
keeps zero indication if a pan is
empty or if zero indication was
acquired by pressing →T← key.
To leave the function press MENU
key, then with →T← key chose
AUtOtAr and AUt oFF .
Note: Autozeroing function is
activated automatically for 10 min.
after switching-on
T
0.00g
21. Serial port working mode selection (LPt)
0.00g
LPt
MENU
T
LPt oFF
LPt on
0.00g
T
This function enables to select
serial port working mode.
When function is active, weighing
result with successive number is
printed automatically after putting
and replacing weighed sample (after
result stabilisation).
In order to change working mode
(to work with a computer) press
MENU key, then with →T← key
chose LPt and LPt oFF. Weighing
result is send only after pressing
key and result stabilisation (without
successive measurement number).
USER MANUAL
21
___________________________________________________________________________________________________________________
22. Serial port setting (rS232)
0.00g
MENU
-
rS232
T
-
baud
T
-
-4800
-
-9600
T
The function enables to set the
following transmission parameters
(standard parameters underlined):
transmission speed (bAud: 1200,
4800, 9600),
the number of bits in a byte (bit: 7,
8),
parity control (PArItY: 0, 1; Odd: 0,
1),
network number when working in
multistand computer system (when
working as a single scale the value
should be “0”)
continuous transmission – without
using
key, approx. 10 results per
second (SEnd: 0, 1).
Default parameters underlined.
bIt
T
PArItY
T
Odd
T
Send
T
out
T
To set desired transmission
parameters activate rs232 function,
choose appropriate parameter and
press →T← key to accept needed
parameter value. The example at the
left presents how to set transmission
speed value to 9600bps.
To leave the function choose out
option.
22
USER MANUAL
__________________________________________________________________________________________________________________
23. Date and time setting (dAtE) - optional
0.00g
dAtE
MENU
T
dAt oFF
dAt SEt
T
h13 - 18
T
Options:
- dAt oFF – deactivate date printout,
- dAt on – activate date printout
(using
key),
-dAt SEt – change date and time.
The example at the left presents
how to set current date and time.
Time format: h gg – mm
(g - hour, m - minute)
h13 - 18
h13 - 19
This function enables to set current
date and time of internal balance
clock and enable/disable date and
time on weighing result printouts.
T
h13 - 19
Date format: d mm – dd
(m - month, d - day).
d04 - 05
Year format: r
- rr
(r - two last digits of a year).
r
- 06
- 0.00g
USER MANUAL
23
___________________________________________________________________________________________________________________
24. Percentage weighing (PErCEnt)
0.00 g
100%
19.07 g
MENU
PErCEnt
T
PEr oFF
PEr on
100.00%
50%
50.00%
T
This function enables to display
weighing result as a percentage of
a reference sample.
A measurement is performed in two
phases:
- first phase – weighing a reference
sample,
- second phase – measuring specific
sample as a percentage of
the reference sample.
Weighing result is displayed in
different format, depending on the
reference sample weight value. For
values of 0÷3,5% of weighing range
the format is “100.0”, for values
3,5÷35% it is “100.00” and
35÷100% - “100.00”
The function has the following
options:
- PEr oFF – disables the function,
- PEr on – stores current indication
as 100% and activates percentage
weighing,
- PEr Con – activates percentage
weighing with the previous
reference sample value.
Note:
When the function is activated
→T← key function does not
change.
24
USER MANUAL
__________________________________________________________________________________________________________________
25. Weighing unit selection (UnIt)
1.60g
UnIt
CArAt
8.00
ct
MENU
Use this function
weighing unit:
to
choose
T
- carats (1 ct= 0,2 g),
- pounds (1 lb=0,454kg),
- grams.
T
The example at the left presents
how to set carats as weighing unit.
USER MANUAL
25
___________________________________________________________________________________________________________________
26. Function Menu customisation (ACtIV)
0.00
ACtIV
T
To differ ActIV function from the
function menu,
indicator is
displayed at the left side of the
display.
AUtOtAr
rS232
T
Operation sequence shown on the
picture, presents how to add RS232C
parameters setting function (rS232) to
the Function Menu.
To remove a function from the
Function Menu choose rS oFF in the
last operation.
rS oFF
rS on
This function enables to select special
functions that will be displayed after
pressing MENU key. Easy access to
the most useful functions will shorten
operation time and make work more
comfortable.
T
26
USER MANUAL
__________________________________________________________________________________________________________________
27. Maintenance and repairs of small defects
1. A balance should be kept clean.
2. Take care that no dirt gets between a casing and a pan. If found any, remove
a pan (lift it up), remove dirt and then replace a pan.
3. In case of improper operation caused by short-lasting power supply decay,
unplug a balance from the mains and then plug it again after few seconds.
4. To calibrate a balance contact your nearest service (it is necessary to make
legal verification again)
5. It is forbidden to make any repairs by unauthorised persons.
6. To repair a balance, please contact our nearest service.
Error communicates:
Communicate
Possible cause
C-1 ... 6
(over 1 min.)
L
H
Remedy
selftests failed
if displayed more than 1 minute,
contact an authorised service
pan missing
put the pan on
mechanical damage
contact an authorised service
overloading
the scale was switched on with
loaded pan
mechanical damage of the load cell
unstable weighing indications
remove the load from the pan
remove a load from the pan
indicator does
unstable ground
vibrations
air flows
contact an authorised service
press F key,
contact an authorised service
place the scale on a stable
ground not affected by
mechanical vibrations and
airflows
not appear
scale is damaged
contact an authorised service
taring in progress
as above
------
27
USER MANUAL
___________________________________________________________________________________________________________________
Declaration of Conformity
We:
AXIS Spółka z o.o. 80-125 Gdańsk, ul. Kartuska 375B
confirm with all responsibility that scales:
AD50, AD60, AD100, AD200, AD300, AD500, AD600, AD250, AD510,
AD1000, AD2000, AD3000, AD2.5, AD5, AD6, AD6F, AD10, AD12
marked with CE mark comply with the following:
1. EN 55022:2000 standard Limits and methods of measurement of radio
disturbance characteristics of information technology equipment and
IEC 61000-4-3 Electromagnetic compatibility (EMC) - Part 4-3:
Testing and measurement techniques - Radiated, radio-frequency,
electromagnetic field immunity test harmonized with the Council
Directive 89/336/EEC (Electromagnetic compatibility directive).
Additionally scales with the following markings on the name plate:
07
- a sticker with two-digit number of the year in which the mark
was affixed and the number of the Notified Body responsible for
EC verification
- a green metrology sticker with “M” mark
- a protective seal affixed by the Notified Body
comply with THE requirements stipulated on the EC Type-Approval Certificate No. PL 04 030
and was verified to comply with:
2. EN 45501 Metrological aspects of non-automatic weighing instruments harmonised with the
Council Directive 90/384/EEC amended with 93/68/EEC.
Additional information
- Conformity evaluation for the Council Directive 73/23/EEC and 89/336/EEC were carried
out by Laboratorium Badawcze Oddziału Instytutu Elektrotechniki in Gdańsk, accredited by
PCA
- EC Type-Approval Certificate No. PL 04 030 was issued by Główny Urząd Miar in Warsaw
(Notified Body no. 1440).
Gdańsk, 23.01.2007 r.
Per pro Director of AXIS Sp. z o.o.:
Production Manager
Jan Kończak
_________________
Signature
28
USER MANUAL
__________________________________________________________________________________________________________________
Notes