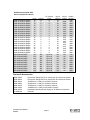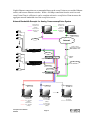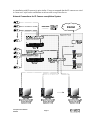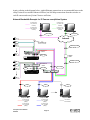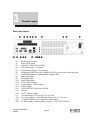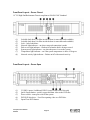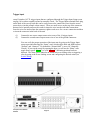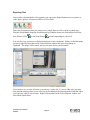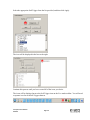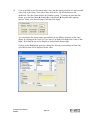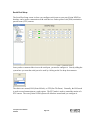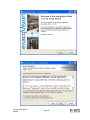
1
Network Video Recorder User Manual (updated February 4, 2009) Information in this document is subject to change without notice. © Copyright 2006-8, Exacq Technologies, Inc. All rights reserved. Exacq Technologies is a trademark of Exacq Technologies, Inc. Other trademarks and trade names may be used in this document to refer to either the entities claiming the marks and names or their products. Exacq Technologies, Inc., disclaims any proprietary interest in trademarks and trade names other than its own. Exacq Technologies makes no warranty of any kind with regard to this material, including, but not limited to, the implied warranties of merchantability and fitness for a particular purpose. Exacq Technologies shall not be liable for errors contained herein or for incidental or consequential damages in connection with the furnishing, performance, or use of this manual. Exacq Technologies, Inc. th 7202 E 87 St., Suite 115 Indianapolis, IN 46256-1200 USA Network Video Recorder TABLE OF CONTENTS 1 Introduction ......................................................................................................4 What You Will Need to Begin ................................................................................................ 6 Product Description ............................................................................................................... 6 Video Recording Overview.................................................................................................... 6 Features................................................................................................................................... 8 Model Numbers ...................................................................................................................... 9 Accessories .......................................................................................................................... 11 2 Sample Configurations..................................................................................12 Standalone exacqVision System ........................................................................................ 12 Remote exacqVision System .............................................................................................. 13 Multi Branch Office exacqVision System .......................................................................... 13 Enterprise exacqVision System.......................................................................................... 14 Network Connections for Analog Camera exacqVision System ..................................... 15 Network Bandwidth Example for Analog Camera exacqVision System ........................ 16 Nework Connections for IP Camera exacqVision System ............................................... 17 Network Bandwidth Example for IP Camera exacqVision System ................................. 18 3 Chassis Layout ..............................................................................................19 Back Panel Layout ............................................................................................................... 19 Front Panel Layout – Doors Closed ................................................................................... 20 Front Panel Layout – Doors Open ...................................................................................... 20 4 Hardware Installation.....................................................................................21 Basic Connections ............................................................................................................... 21 Network Setup ...................................................................................................................... 22 RS-422/RS485 Port Setup .................................................................................................... 23 Trigger Input ......................................................................................................................... 24 Alarm Output - Relay............................................................................................................ 25 Alarm Output - TTL............................................................................................................... 26 Audio Input ........................................................................................................................... 27 5 Software Operation........................................................................................28 exacqVision Software Overview ......................................................................................... 28 Starting the exacqVision NVR System............................................................................... 29 Logging In ............................................................................................................................. 29 exacqVision User Manual 2/4/2009 Page 2 Starting the Local Client ...................................................................................................... 32 Updating exacqVision Software ......................................................................................... 36 Operating Modes .................................................................................................................. 40 Live Mode Overview............................................................................................................. 41 Layout Panel ..................................................................................................................... 43 exacqReplay ...................................................................................................................... 47 Live Event Monitoring ...................................................................................................... 49 Event Buttons ................................................................................................................... 51 Site Tree Navigation ......................................................................................................... 54 About exacqVision ........................................................................................................... 62 Online Help System .......................................................................................................... 63 Display Buttons ................................................................................................................ 64 PTZ Control ....................................................................................................................... 65 Search Mode Overview ........................................................................................................ 69 Video Timeline .................................................................................................................. 74 Video Playback ................................................................................................................. 75 Navigation Pane ................................................................................................................ 79 Searching Views ............................................................................................................... 80 Searching Events.............................................................................................................. 82 Exporting Files .................................................................................................................. 84 Setup Mode Overview .......................................................................................................... 91 Add System ....................................................................................................................... 92 Client Setup ....................................................................................................................... 95 Joystick Setup ................................................................................................................ 102 Event Monitoring ............................................................................................................ 105 Group Setup .................................................................................................................... 108 System Information ........................................................................................................ 113 System Setup .................................................................................................................. 115 Add IP Cameras .............................................................................................................. 117 IP Camera Recording Setup .......................................................................................... 119 IP Camera Setup ............................................................................................................. 121 eDVR 4000 Device........................................................................................................... 128 Camera Recording Setup............................................................................................... 129 Camera Setup.................................................................................................................. 131 Audio Input Setup ........................................................................................................... 144 Trigger Input Setup......................................................................................................... 146 Alarm Output Setup ........................................................................................................ 147 Video Output Setup ........................................................................................................ 149 Storage Setup ................................................................................................................. 151 Serial Profile Setup......................................................................................................... 154 Serial Port Setup............................................................................................................. 162 Notifications .................................................................................................................... 164 exacqRecall Button Configuration................................................................................ 168 Event Linking .................................................................................................................. 176 Schedule .......................................................................................................................... 180 Users Setup ..................................................................................................................... 187 RAID Setup ...................................................................................................................... 190 6 Remote Client Software Setup....................................................................191 Recommended Remote Client PC Requirements ........................................................... 191 Installing the Remote Client Application ......................................................................... 191 Starting the exacqVision Remote Client Application ..................................................... 194 exacqVision User Manual 2/4/2009 Page 3 7 Special Features ..........................................................................................196 Multi Monitor Operation..................................................................................................... 196 8 Trouble Shooting .........................................................................................198 ExacqVision RAID system................................................................................................. 198 Display Issues .................................................................................................................... 207 9 Technical Support........................................................................................209 10 Regulatory Notice........................................................................................210 11 Warranty.......................................................................................................211 12 Manual Updates...........................................................................................212 Release 2.8 .......................................................................................................................... 212 Release 2.9 .......................................................................................................................... 212 Release 2.10 ........................................................................................................................ 213 Release 2.11 ........................................................................................................................ 213 1 Introduction Thank you for purchasing the exacqVision high-performance network digital video recorder. This manual was written to help you install your exacqVision hardware and software. Your new system supports both analog and IP cameras individually or simultaneously. It is designed to preserve any investment you already have in analog cameras while providing you the ability to migrate to new network-based IP camera technology. The exacqVision software can also be purchased separately as a stand-alone NVR solution. Simply install the software to a new or existing off-the-shelf PC and add IP cameras to create your own system. These systems can be linked with other exacqVision systems. For more information, please contact your dealer. Regardless of your camera technology, exacqVision offers you the most advanced video networking, recording and surveillance technology available in the market today. exacqVision User Manual 2/4/2009 Page 4 Again, thank you for selecting the exacqVision System. exacqVision User Manual 2/4/2009 Page 5 What You Will Need to Begin Product Description The exacqVision network video recorder (“NVR”) is a next generation high-performance, MPEG4 advanced simple profile (ASP), 30 images per second per channel security solution. Its’ been designed for users who need an easy to use, yet high performance NVR. The exacqVision NVR systems features 480 images per second 16 channel and 960 ips 32 channel MPEG-4 hardware compression with video motion detection, event based recording, and relay output controls. Models range from a sixteen channel unit with 300 GB of storage to a thirty two channel unit with 1.5 TB of storage. Networking capabilities allow local and remote administration, playback, and export using a common PC or Mac client application. The exacqVision NVR supports a mix of analog and IP cameras with the same intuitive interface. Flexible high speed search include time and date, event, and smart pixel searching. The exacqVision NVR offers users a highly intuitive and ergonomically designed interface that provides simple and efficient access to all setup and operation functions. Overall, the exacqVision NVR combines a feature-rich security platform with a flexible and intuitive user interface offering an unprecedented level of functionality. Video Recording Overview The fundamental functionality of the exacqVision NVR is to record video from analog or IP cameras so that if there’s a breach of security you can quickly and easily search and find the video that will help to solve your security problem. There are many additional features and configuration settings that provide you with tools to customize your system to your specific requirements; however searching recorded video is a fundamental feature of the system. Understanding the basic video recording settings is important in knowing how to take full advantage of this powerful video security solution. You will find a detailed description with diagrams that explain how to configure the video recording settings in the Software Setup section of this manual but before we go there, here’s a brief overview of the three video recording settings. Motion Detection Recording is the default video recording setting of the exacqVision NVR system because it’s the most efficient and frequently used method of recording video. Video is only recorded when the exacqVision System detects motion in the cameras field of view. This is a very efficient method of recording because if the system doesn’t detect motion video is not recorded saving a tremendous amount of disk capacity and extending the recording time. Motion detection recording is configured on the Schedule Setup screen. exacqVision User Manual 2/4/2009 Page 6 Continuous video recording (also known as free run recording) records every video image all the time for the specified schedule you have set for the camera. This is an inefficient method of recording because if a camera is pointed at a door, hall or wall and there is no movement or activity at all, video is still recorded taking up disk capacity and reducing your recording time. This feature is available because there are some applications and situations that require continuous recording. Continuous recording is configured on the Schedule Setup screen. Event Recording provides a method of linking different types of events such as input triggers, point of sale data, and loss of a video signal or video motion to cause an action such as recording video. There are additional action types that can be linked to the event types on the Event Linking screen. Connecting a door sensor to a trigger input on the exacqVision NVR and linking it to a camera to automatically record video upon tripping the sensor is an example of how you might configure event recording. exacqVision User Manual 2/4/2009 Page 7 Features 16 or 32 camera inputs, auto-terminating Choice of 300, 600, 900, 1200 or 1500 GB hard disk System record rates of 120, 240, 480 and 960 images per second (NTSC) MPEG-4 ASP compression with watermarking Built-in hardware motion detection with definable zones per camera Adjustable image rates and resolution per camera 19 inch, 2U Chassis (3 LED: Power, HDD & Network) & Desk Top Chassis Client viewing and administration software 24/7 scheduling Transmission over Ethernet, DSL, or Cable Automatic IP address designation with DHCP Will not stop recording in the event of network failure, watchdog timer Bandwidth limitation for Ethernet/Dial-up networks Simultaneous record, playback, background image archiving 16 internal alarm inputs, 15 alarm outputs, 1 relay outputs 4 channel full duplex audio with recording PTZ Control via RS 232 and RS 485/RS422 Multiscreen monitor (spot monitor) output displays for live video Embedded Linux for stability and reliability Network Time protocol (NTP) support for time synchronization Interface with cash registers (POS) and ATMs for video + transaction text recording DVD Recorder Open API for 3rd party integration and interoperability exacqVision User Manual 2/4/2009 Page 8 Model Numbers exacqVision Desktop Chassis Part Number 0408-12-0160-DT 0408-12-0320-DT 0408-12-0500-DT 0408-12-0750-DT 0408-12-1000-DT 1608-12-0320-DT 1608-12-0500-DT 1608-12-0750-DT 1608-12-1000-DT 1608-48-0320-DT 1608-48-0500-DT 1608-48-0750-DT 1608-48-1000-DT IPS-0160-DT IPS-0320-DT IPS-0500-DT IPS-0750DT IPS-1000-DT Analog Camera Inputs Looping 4 0 4 0 4 0 4 0 4 0 16 0 16 0 16 0 16 0 16 0 16 0 16 0 16 0 NA NA NA NA NA NA NA NA NA NA IP Camera Inputs 8 8 8 8 8 8 8 8 8 8 8 8 8 Up to 64 Up to 64 Up to 64 Up to 64 Up to 64 Analog Camera ips per ips per camera system 30 120 30 120 30 120 30 120 30 120 7.5 120 7.5 120 7.5 120 7.5 120 30 120 30 120 30 120 30 120 NA NA NA NA NA NA NA NA NA NA Usable Storage 160 320 500 750 1000 320 500 750 1000 320 500 750 1000 160 320 500 750 1000 IP Camera Inputs 8 8 8 8 8 8 8 8 8 8 8 8 8 8 ips per camera 7.5 7.5 7.5 7.5 7.5 7.5 7.5 30 30 30 30 30 30 30 Usable Storage 320 500 750 1000 1500 2250 3000 320 500 750 1000 1500 2250 3000 2U Rackmount Hybrid NVR Server exacqVision Chassis Part Number 1608-12-0320-R2 1608-12-0500-R2 1608-12-0750-R2 1608-12-1000-R2 1608-12-1500-R2 1608-12-2250-R2 1608-12-3000-R2 1608-48-0320-R2 1608-48-0500-R2 1608-48-0750-R2 1608-48-1000-R2 1608-48-1500-R2 1608-48-2250-R2 1608-48-3000-R2 exacqVision User Manual 2/4/2009 Inputs 16 16 16 16 16 16 16 16 16 16 16 16 16 16 Looping 16 16 16 16 16 16 16 16 16 16 16 16 16 16 Page 9 ips per system 120 120 120 120 120 120 120 480 480 480 480 480 480 480 2U Rackmount Hybrid NVR Server exacqVision Chassis Part Number 3208-24-0320-R2 3208-24-0500-R2 3208-24-0750-R2 3208-24-1000-R2 3208-24-1500-R2 3208-24-2250-R2 3208-24-3000-R2 3208-96-0320-R2 3208-96-0500-R2 3208-96-0750-R2 3208-96-1000-R2 3208-96-1500-R2 3208-96-2250-R2 3208-96-3000-R2 IPS-0320-R2 IPS-0500-R2 IPS-0750-R2 IPS-1000-R2 IPS-1500-R2 IPS-2250-R2 IPS-3000-R2 Inputs 32 32 32 32 32 32 32 32 32 32 32 32 32 32 NA NA NA NA NA NA NA Looping 0 0 0 0 0 0 0 0 0 0 0 0 0 0 NA NA NA NA NA NA NA IP Camera Inputs 8 8 8 8 8 8 8 8 8 8 8 8 8 8 Up to 64 Up to 64 Up to 64 Up to 64 Up to 64 Up to 64 Up to 64 ips per camera 7.5 7.5 7.5 7.5 7.5 7.5 7.5 30 30 30 30 30 30 30 NA NA NA NA NA NA NA ips per system 240 240 240 240 240 240 240 960 960 960 960 960 960 960 NA NA NA NA NA NA NA Usable Storage 320 500 750 1000 1500 2250 3000 320 500 750 1000 1500 2250 3000 320 500 750 1000 1500 2250 3000 Looping 0 0 0 0 0 0 0 0 0 0 NA NA NA NA NA IP Camera Inputs 8 8 8 8 8 8 8 8 8 8 Up to 64 Up to 64 Up to 64 Up to 64 Up to 64 ips per camera 30 30 30 30 30 30 30 30 30 30 NA NA NA NA NA ips per system 480 480 480 480 480 960 960 960 960 960 NA NA NA NA NA Usable Storage 4000 5000 6000 7000 8000 4000 5000 6000 7000 8000 4000 5000 6000 7000 8000 4U Rackmount Hybrid NVR Server exacqVision Chassis Part Number 1608-48-4000-R4 1608-48-5000-R4 1608-48-6000-R4 1608-48-7000-R4 1608-48-8000-R4 3208-96-4000-R4 3208-96-5000-R4 3208-96-6000-R4 3208-96-7000-R4 3208-96-8000-R4 IPS-4000-R4 IPS-5000-R4 IPS-6000-R4 IPS-7000-R4 IPS-8000-R4 exacqVision User Manual 2/4/2009 Inputs 16 16 16 16 16 32 32 32 32 32 NA NA NA NA NA Page 10 4U Rackmount Hybrid NVR Server exacqVision Chassis 1608-48-0960-R4-RAID5 1608-48-1500-R4-RAID5 1608-48-2250-R4-RAID5 1608-48-3000-R4-RAID5 1608-48-4000-R4-RAID5 1608-48-5000-R4-RAID5 1608-48-6000-R4-RAID5 1608-48-7000-R4-RAID5 1608-48-8000-R4-RAID5 3208-96-0960-R4-RAID5 3208-96-1500-R4-RAID5 3208-96-2250-R4-RAID5 3208-96-3000-R4-RAID5 3208-96-4000-R4-RAID5 3208-96-5000-R4-RAID5 3208-96-6000-R4-RAID5 3208-96-7000-R4-RAID5 3208-96-8000-R4-RAID5 IPS-0960-R4-RAID5 IPS-1500-R4-RAID5 IPS-2250-R4-RAID5 IPS-3000-R4-RAID5 IPS-4000-R4-RAID5 IPS-5000-R4-RAID5 IPS-6000-R4-RAID5 IPS-7000-R4-RAID5 IPS-8000-R4-RAID5 Inputs 16 16 16 16 16 16 16 16 16 32 32 32 32 32 32 32 32 32 NA NA NA NA NA NA NA NA NA Looping 0 0 0 0 0 0 0 0 0 0 0 0 0 0 0 0 0 0 NA NA NA NA NA NA NA NA NA IP Camera Inputs 8 8 8 8 8 8 8 8 8 8 8 8 8 8 8 8 8 8 Up to 64 Up to 64 Up to 64 Up to 64 Up to 64 Up to 64 Up to 64 Up to 64 Up to 64 ips per camera 30 30 30 30 30 30 30 30 30 30 30 30 30 30 30 30 30 30 NA NA NA NA NA NA NA NA NA ips per system 480 480 480 480 480 480 480 480 480 960 960 960 960 960 960 960 960 960 NA NA NA NA NA NA NA NA NA Usable Storage 960 1500 2250 3000 4000 5000 6000 7000 8000 960 1500 2250 3000 4000 5000 6000 7000 8000 640 1000 1500 2000 3000 4000 5000 6000 7000 Options & Accessories 5000-20050 5000-20060 5000-20320 5000-20500 5000-20750 5000-21000 5000-40100 ev-USB-NIC exacqVision User Manual 2/4/2009 Rackmount Sliding Rail Kit for exacqVision 2U rackmount chassis Rackmount Sliding Rail Kit for exacqVision 4U rackmount chassis 320GB drive + Caddy for 4U RAID-5 systems 500GB drive + Caddy for 4U RAID-5 systems 750GB drive + Caddy for 4U RAID-5 systems 1000GB drive + Caddy for 4U RAID-5 systems Redundant Switching Power Supply for 4U Rackmount systems USB NIC Page 11 2 Sample Configurations One of the most appealing features of the exacqVision product line is its ability to address a wide variety of installations all while providing live monitoring, searching, and configuration through the same, easy to use interface. Below are some typical types of installations for which exacqVision is well-suited. Standalone exacqVision System exacqVision User Manual 2/4/2009 Page 12 Remote exacqVision System Multi Branch Office exacqVision System exacqVision User Manual 2/4/2009 Page 13 Enterprise exacqVision System exacqVision User Manual 2/4/2009 Page 14 A detailed example of a small enterprise system is shown to illustrate network configurations which will provide satisfactory performance for your exacqVision systems. In the drawing below, it is assumed that the customer has a pre-existing data network with servers that provide centralized file storage and/or applications to client computers on the network. The exacqVision client can be installed on as many of these client computers as desired. The second Ethernet switch is only required if there are more network client computers than ports on the first Ethernet switch. Network Connections for Analog Camera exacqVision System exacqVision User Manual 2/4/2009 Page 15 Gigabit Ethernet connections are recommended between the exacqVision servers and the Ethernet switch, and between Ethernet switches. While a 100 Mbps connection from the switch to each exacqVision Client is sufficient, it can be seen that each active exacqVision Client increases the aggregate network bandwidth out of the exacqVision server. Network Bandwidth Example for Analog Camera exacqVision System 1 8 cameras from eV1 (frame rate throttled) 8 cameras from eV1 (frame rate throttled) 8 cameras from eV2 (frame rate throttled) 8 cameras from eV2 (frame rate throttled) exacqVision Client 2 exacqVision Client 0.772 Mbps 3 0.772 Mbps Internet 32 1.544 Mbps (T1 limit) exacqVision Server 1 33 8.772 Mbps P 34 1 2 3 7 8 9 4 5 6 1 3 14 15 1 6 17 18 10 1 1 1 2 L in k Mo de 1 2 3 4 7 8 9 10 5 6 13 14 15 16 17 18 12 19 20 21 22 23 24 1 9 20 21 2 2 23 24 L in k Mo de P owe r A ctFDxSpd ! R es et Fault M ode Sele ct S pd Mod e o ff = 10 Mb ps fla sh = 1 00 Mbp s on = 1 00 0M bp s M DI-X 11 Gigabit Ethernet Switch T1 ModemRouter 35 1.544 Mbps (T1 limit) exacqVision Server 2 8.772 Mbps 17.544 Mbps 64 P 1 2 3 7 8 9 1 0 11 1 2 4 5 6 1 3 1 4 15 1 6 1 7 18 L in k Mo de 1 2 3 4 7 8 9 10 5 6 13 14 15 16 17 18 12 19 20 21 22 23 24 1 9 2 0 21 2 2 2 3 24 L in k Mo de Powe r Fault R es et Ac tFD xSpd ! Mode S ele ct S pd M od e o ff = 10 Mb ps fla sh = 10 0M bp s o n = 10 00 Mb ps M DI-X 11 Gigabit Ethernet Switch 8 Mbps 8 Mbps 0 Mbps exacqVision Client exacqVision Client exacqVision Client 8 cameras from eV1 = 500 KB/s (4 Mbps) 8 cameras from eV1 = 500 KB/s (4 Mbps) No cameras = No bandwidth 8 cameras from eV2 = 500 KB/s (4 Mbps) 8 cameras from eV2 = 500 KB/s (4 Mbps) exacqVision User Manual 2/4/2009 Page 16 An installation with IP cameras is quite similar. Exacq recommends that the IP cameras are wired in “home-run” style back to an Ethernet switch near the exacqVision Server. Network Connections for IP Camera exacqVision System exacqVision User Manual 2/4/2009 Page 17 Again, referring to the diagram below, gigabit Ethernet connections are recommended between the exacqVision servers and the Ethernet switches, but 100 Mbps connections from the switches to each IP camera and exacqVision Client are sufficient. Network Bandwidth Example for IP Camera exacqVision System 8 cameras from eV1 (frame rate throttled) 8 cameras from eV1 (frame rate throttled) 8 cameras from eV2 (frame rate throttled) 8 cameras from eV2 (frame rate throttled) exacqVision Client exacqVision Client 0.772 Mbps 0.772 Mbps Internet 1 2 0.5 Mbps 3 1.544 Mbps (T1 limit) 1 2 3 4 5 6 13 14 15 16 17 18 Link Mode 7 8 9 10 11 12 19 20 21 22 23 24 Link Mode P Power ActFDxSpd ! Mode Select Reset Fault Spd Mode off = 10Mbps flash = 100Mbps on = 1000Mbps 1 2 3 4 7 8 9 10 5 6 13 14 15 16 17 18 11 12 19 20 21 22 23 24 Gigabit Ethernet Switch MDI-X 16 Mbps 32 8.772 Mbps T1 ModemRouter exacqVision Server 1 1.544 Mbps (T1 limit) ` 33 35 1 2 3 4 5 6 13 14 15 16 17 18 Link Mode 7 8 9 10 11 12 19 20 21 22 23 24 Link Mode Power Fault ActFDxSpd ! Mode Select Reset Spd Mode off = 10Mbps flash = 100Mbps on = 1000Mbps 1 2 3 4 7 8 9 10 5 6 13 14 15 16 17 18 12 19 20 21 22 23 24 MDI-X 11 16 Mbps Gigabit Ethernet Switch 17.544 Mbps 8.772 Mbps P 1 2 3 4 5 6 13 14 15 16 17 18 Link Mode 7 8 9 10 11 12 19 20 21 22 23 24 Link Mode Power Fault exacqVision Server 2 ` P 34 Reset ActFDxSpd ! Mode Select Spd Mode off = 10Mbps flash = 100Mbps on = 1000Mbps 1 2 3 4 7 8 9 10 5 6 13 14 15 16 17 18 11 12 19 20 21 22 23 24 MDI-X Gigabit Ethernet Switch 64 8 Mbps 8 Mbps 0 Mbps exacqVision Client exacqVision Client exacqVision Client 8 cameras from eV1 = 500 KB/s (4 Mbps) 8 cameras from eV1 = 500 KB/s (4 Mbps) No cameras = No bandwidth 8 cameras from eV2 = 500 KB/s (4 Mbps) 8 cameras from eV2 = 500 KB/s (4 Mbps) exacqVision User Manual 2/4/2009 Page 18 3 Chassis Layout Back Panel Layout (1) (2) (3) (4) (5) (6) (7) (8) (9) (10) (11) (12) (13) (14) (15) (16) (17) (18) (19) (20) Keyboard (PS/2) Input Mouse (PS/2) Input 9 Pin RS-232 Serial Port (COM1) LPT1 Printer Port – 25 pin port VGA Monitor Output – 15-pin output 4 High Speed USB 2.0 Ports (2 additional USB 2.0 ports on the front of the unit) 10/100/1000 Mbits/sec Gigabit Ethernet Adapter Port Audio Line Input Microphone Input Audio Line Output 16 TTL Input Triggers 4 Audio Inputs, 1 Audio Output 1 Relay Output 1 RS-485/RS-422 Serial Port (COM4) Ground 16 TTL Output Triggers 16 Camera Inputs (1-8 row one, 9-16 row two) 16 Camera Outputs – Loop Through (1-8 row one, 9-16 row two) 1 Switched Multi-Picture Composite Video Output AC Power Input – Switching Power Supply – 115V/230V, 50/60 Hz exacqVision User Manual 2/4/2009 Page 19 Front Panel Layout – Doors Closed 19” 2U High-End Rackmount Chassis compliant to EIA RS-310C Standard (1) (2) (3) (4) (5) (6) (7) (8) Lockable latch door (Air filter inside the door is removable and washable) Lockable latch door (Air filter inside the door is removable and washable) Lock – locks both doors Network light indicator – on when a network connection is made Disk access light indicator – flash on/off when the disk is being accessed System power light indicator – on when the power is on to the system Temperature light indicator – on if the system temperature is above 95 degrees Network activity light indicator – flashes on/off with network activity Front Panel Layout – Doors Open (1) (2) (3) (4) (5) 2 USB 2.0 ports (4 additional USB 2.0 ports on the back of the unit) Quick Export button – quickly export and burn video to the DVD disc Power switch – turns power on/off the system DVD R/W disc drive – Used for exporting video to a DVD disc. Open/Close DVD button. exacqVision User Manual 2/4/2009 Page 20 4 Hardware Installation Basic Connections (1) (2) (3) (4) (5) (6) (7) Connect the keyboard to the top PS/2 port Connect the mouse to the bottom PS/2 port Connect the VGA monitor to the 15 pin VGA port Connect the power cord to the back of the unit and a power source Connect the cameras to the BNC connectors Connect the Ethernet switch to the 10/100/1000Base-T Ethernet Adapter Port Connect the IP camera to the Ethernet switch exacqVision User Manual 2/4/2009 Page 21 Network Setup exacqVision systems can be connected to a local area network (LAN) or wide area network (WAN) for the purpose monitoring or searching for video from a remote location. exacqVision systems administration and configuration can also be performed from a remote client PC. (1) (2) (3) (4) (5) Connect the exacqVision 10/100 Base-T Ethernet adapter port to an Ethernet Switch / Router with Cat5 cable and RJ-45 connectors. Connect the Ethernet Switch / Router to a Cable or DSL modem. Connect the Cable or DSL modem to your cable outlet or DSL connection port. Note: In the first three steps, please refer to your manufacturers Ethernet Switch / Router and Cable / DSL modem installation guide for specific installation instructions. Connect your remote client PC to an Ethernet Switch / Router and Cable / DSL modem. Install Exacq exacqVision client software for remote viewing and administration of the exacqVision System. Note: Local Area Network (LAN) installations eliminate the need of the Cable or DSL modem. Simply connect the exacqVision and client PC directly to the Ethernet Switch port. exacqVision User Manual 2/4/2009 Page 22 RS-422/RS485 Port Setup The exacqVision System has one RS-485/RS-422 serial port that can be configured to control a variety of Pan Tilt Zoom (PTZ) cameras. The RS-485/RS-422 serial port terminal block plug on the back of the exacqVision unit can be removed to easily connect the cable that controls the PTZ camera. There are four small screws on the top of the connector that need to be partially unscrewed in order to insert the wire into the individual connections (Tx+, Tx-, Rx+, Rx-). Once the wires are inserted into the connector, tighten each screw for a secure connection and then reinsert the connector in the back of the unit. exacqVision User Manual 2/4/2009 Page 23 Trigger Input exacqVision has 16 TTL trigger inputs that are configured through the Trigger Input Setup screen on page 146 as either normally opened or normally closed. The Trigger Inputs terminal block plug on the back of the exacqVision unit can be easily removed to connect the wires from the source sensor device (in this example a door sensor). There are small screws on the top of the connector that need to be partially unscrewed in order to insert the wire into the individual connections. Once the wires are inserted into the connector, tighten each screw for a secure connection and then re-insert the connector in the back of the unit. (1) (2) Connect the one source output sensor wire to any of the 16 trigger inputs. Connect the second source output sensor wire to one of the ground connectors. You can verify the proper operation of the input state by going to the Trigger Input setup screen and observing the “Status” state, which toggles back and forth between “Normal” and “Alarmed”. By default the “Normal State” is set to NC (Normally Closed). If you trip the sensor by opening the door you will see the “Status” state toggle from a green ‘Normal” to a red “Alarmed” indicating an alarm has been detected. The alarm can be linked to an action such as recording video or triggering a relay by going to the Event Linking screen and configuring the desired action (see Event Linking). exacqVision User Manual 2/4/2009 Page 24 Alarm Output - Relay exacqVision has one Relay Alarm Output that can trigger a variety external events. In this example, the exacqVision is integrated with a lighting control system through a 24 VDC latching relay. Through the Event Linking screen on page 176 exacqVision can be configured to turn on the light upon predefined events (motion, input trigger, etc…). (1) (2) Connect the Alarm Output Relay to the transformers 24 VAC input Connect the Common to the Relay Common exacqVision User Manual 2/4/2009 Page 25 Alarm Output - TTL exacqVision has 15 TTL Alarm Outputs that can be triggered by a variety external events. In this example, the exacqVision is integrated with a building automation system through a 0-5 VDC Digital Input Module for equipment or alarm status monitoring. (1) (2) Connect any of the 15 TTL Alarm Outputs to the 0-5 VDC input Connect ground to ground You can set the “Normal State” of the Alarm Output to either High (5 VDC) or Low (0 VDC) on the Alarm Output setup screen on page 147. exacqVision User Manual 2/4/2009 Page 26 Audio Input exacqVision systems have four (4) Audio Inputs that can be configured to record audio from line level security microphones and other line level audio devices. The audio connections receive an unbalanced, line-level audio signal only. Line-level signaling requires a voltage between -1 V and +1 V into an impedance of 1 kΩ or more. Microphones such as the Crown PZM11LL or Louroe Electronics ASK-4 KIT #101 pre-amplify the microphone signal and produce a line level output that is connected directly to the exacqVision audio inputs. (1) (2) (3) (4) Connect the ground output from the line level security microphone to the ground of the audio input connector Connect the audio output to one of the four (4) audio input connectors. Go to the Audio Input Setup icon and enable the connection Go to the Schedule setup icon and select the audio tab. Select the Audio Input and schedule for Free Run (green). Audio will now be recorded. exacqVision User Manual 2/4/2009 Page 27 5 Software Operation exacqVision Software Overview exacqVision software is based on a client/server architecture. A client/server architecture provides a scalable platform, whereby each computer on a network is either a client, server or both a client/server simultaneously. Client A client is a computer system that accesses a (remote) service on another computer by a TCP/IP network. exacqVision Client software views and searches live and recorded video, audio and alarms, and administers the exacqVision Server configurations. Server A server is a computer system that provides services to other computing systems—called clients—over a TCP/IP network. exacqVision Server software records and retrieves video, audio and alarm data and provides it to the exacqVision Clients upon request. Client/Server A client and server can simultaneously reside and operate on one computer and communicate to each other through a TCP/IP loop back interface. A loopback address is a special IP address (127.0.0.1) that is designed for the client and server software to communicate with each other on the same computer. By combining the functionality of exacqVision Client/Server software on one system, administrators can deploy a flexible standalone and network configurations that can scale to their requirements. There is one exacqVision Client application that can be installed in two different configurations depending on your requirements. The Client has the same features, functions and user interface in either installation configuration. The first client installation is referred to as a Local Client, meaning the client resides on the same system that is “local” to the server. The second installation is referred to as a Remote Client, meaning it is installed on a different computer that is “remote” from the server. All interaction (viewing live or recorded video and administration) with the server is performed through either the local or remote client. The Local Client is factory installed on the exacqVision NVR and the Remote Client is installed by a user on a PC of their choice, either from the supplied CD or by downloading from the Exacq website (www.exacq.com). exacqVision User Manual 2/4/2009 Page 28 exacqVision software can be installed and operated in following configurations: 1. exacqVision Local Client and Server software is factory installed on the exacqVision NVR system. The exacqVision NVR can either operate as a standalone system (not connected to a network) with the locally attached VGA monitor, keyboard, mouse and cameras (analog and IP) or it can be connected to a network to access other exacqVision NVR’s. 2. exacqVision Remote Client is shipped on a CD with the exacqVision NVR and can be installed on a PC of your choice that is networked to the exacqVision NVR. Note: Please skip to the “Starting the Local Client” section, as the steps below pertain to the operating system configuration on systems built at the factory. Starting the exacqVision NVR System The exacqVision NVR has been designed to be very easy to install, operate, and update. The system ships with default settings that make it very simple to begin recording and searching video. Simply connect your keyboard, mouse, VGA monitor and cameras. Turn on the power switch and the system begins recording video from analog cameras. IP cameras require some steps to connect and configure. Logging In Your exacqVision System has been configured to take advantage of operating system security features. The factory configuration includes two operating system accounts: 1) Username: admin Password: admin256 Privileges: computer administrator 2) Username: user Password: user5710 Privileges: restricted user exacqVision User Manual 2/4/2009 Page 29 When the computer boots, the exacqVision Server automatically starts as a background service. The operating system will then automatically log into the user account. Both user and admin accounts are configured to start the exacqVision Client immediately upon login. Since it is running as a service, the exacqVision Server will continue to record video even if no user is logged in or running exacqVision Client. The exacqVision Server will only stop operating if the computer is shut down, its service is stopped from the service control manager, or its process is stopped from the task manager. To prevent this from happening inadvertently, the ability to shut down the computer or access the operating system task manager has been restricted from the user account. To shut down the system or perform maintenance, an operator must switch user to the admin account via the operating system start menu and knowledge of the admin account password. NOTE: Exacq recommends that the default passwords should be changed by the operator and written and stored in a secure fashion to prevent unauthorized access or modifications to the system. The exacqVision Server can be accessed from multiple exacqVision Clients, which may be running from the same computer as exacqVision Server or from remotely networked computers. The exacqVision Server has been preconfigured with one user: 1) Username: admin Password: admin256 Privileges: exacqVision Server administrator Each operating system user account maintains separate settings for its exacqVision Client. These settings include usernames, passwords, and network addresses required for exacqVision Clients to access exacqVision Servers. By default both the user and admin operating system accounts have settings which provide administrator access to the instance of exacqVision Server running on the local computer, which is always via the 127.0.0.1 IP address. The factory configuration is shown below: exacqVision User Manual 2/4/2009 Page 30 Users Operating System admin/admin256 Computer Administrator Services exacqVision Server Starts upon bootup exacqVision Client Users user/user5710 Limited Account Locked-down OS functionality Autologin admin/admin256 Full Admin exacqVision Client Autostart exacqVision Server exacqVision system as configured by factory As part of the initial exacqVision System configuration, Exacq recommends that the operator configure a new user on the exacqVision Server with restricted privilege level, and change the exacqVision Client settings in the user operating system account to connect to the local exacqVision Server via this user. The new recommended configuration is shown below. See the Users Setup section of this manual or the context sensitive online help file for instructions on creating a new exacqVision user. Users Operating System admin/xxxxa Computer Administrator Services exacqVision Server Starts upon bootup exacqVision Client Users user/xxxxb Limited Account Locked-down OS functionality Autologin exacqVision Client Autostart exacqVision Server exacqVision system recommended configuration (note changes in red) exacqVision User Manual 2/4/2009 Page 31 admin/xxxxc Full Admin user/xxxxd Restricted In the recommended configuration, a restart of the exacqVision system due to power outage will put the system in a safe state from which administrator privilege access to exacqVision Server is not available without knowledge of the operating system admin account password or the exacqVision Server admin password. Starting the Local Client After successfully logging in the Local Client application will appear. At the right end of the toolbar, you will find the Help button. Click it, to access online help for your exacqVision System. You can also toggle to and from the online help system by using the F1 key. The system will default to the topic matching the part of the system you are working in. You can then scroll through the Help information by clicking the Next link in the upper right hand corner. You can get to the beginning of the Help information by clicking the Top link. exacqVision User Manual 2/4/2009 Page 32 You can also use the Contents, Search, and Favorites tabs at the left of the Help window. To access information using the Contents tab, simply click the topic you want to review. To use the Search tab, type in a word to search for and then click the List Topics button to generate a list of items that include the word you typed. You can then double click any of the topics in the list to access Help information related to that topic or select the topic and click the Display button. exacqVision User Manual 2/4/2009 Page 33 If you find yourself accessing the same Help topic several times, you may want to add it to the Favorites tab. Select your topic from the Contents or Search page, then access the Favorites tab. The topic will be listed in the Current Topic field and the content for that topic will be displayed in the Help exacqVision User Manual 2/4/2009 Page 34 window. Click the Add button when you are finished, and your topic will be added to the Topics list. You can then easily maneuver through your Favorite Help topics by selecting it from the Topics list and clicking the Display button or by double clicking the topic. You can remove a Favorite by selecting it from the Topics list and clicking the Remove button. You will find the Online Help system very helpful as you setup you exacqVision System. The exacqVision Server application begins recording video based on the factory default settings as soon as the power switch was turned on and the exacqVision NVR system is started. The factory default settings can be changed with the Setup Mode icon to meet your specific requirements. exacqVision User Manual 2/4/2009 Page 35 Updating exacqVision Software Exacq Technologies strives to enhance products based on new technologies as well as customer feedback. New releases of exacqVision software are easily accessed by clicking the About exacqVision box in the upper right corner of your screen. The current version and built date are listed here, as well as a link to updates at www.exacq.com. You can close the window by clicking the OK button. To check for updates, click the Check For Updates From www.exacq.com link. If you have already installed the most recent version of the software, a message box will be displayed. Simply click OK to return to the About exacqVision window. If a more recent version of the exacqVision Client has been released, it will begin the download process. exacqVision User Manual 2/4/2009 Page 36 Once the download is complete, you will need to close all instances of the exacqVision Client to complete the update. Click Yes to accept the download. The exacqVision Client Setup Wizard will guide you through the installation of the latest version of the exacqVision Client. exacqVision User Manual 2/4/2009 Page 37 Next, you’ll need to read the license agreement and accept the terms by clicking the appropriate radio button. Click the Next button to proceed to the next screen. You need to select a location for the exacqVision client. The default…xxx Click the next button to proceed to the next screen. exacqVision User Manual 2/4/2009 Page 38 Once you have selected a location, you’ll need to slect the option to install. Click the Install button to finish the installation process. Finally, click the Finish button to complete the installation. Old versions closed and new one opened automatically. exacqVision User Manual 2/4/2009 Page 39 Operating Modes exacqVision NVR systems have three main modes of operation depicted by the three icons below: Live Mode allows users the ability to view live video. Search Mode allows users the ability to search for recorded video. Setup Mode allows Administrators and Power Users the ability to configure systems. Clicking on any of these icons will change the mode of operation. exacqVision User Manual 2/4/2009 Page 40 Live Mode Overview Live Mode allows users the ability to view live video. To view live video on your exacqVision System, you must first click the Live Operating Mode button. (1) (2) (3) (4) (5) (6) (7) (8) Title bar – displays exacqVision Local and Remote Client application title. Operating Modes – displays the three available views, Live, Search, and Setup. Layout Buttons – allows you to organize your camera views to fit your needs. Site Tree – displays icons representing exacqVision systems, cameras, PTZ cameras, alarms, monitor & audio inputs. Also displays setup icons used to configure exacqVision NVR systems. Navigation Pane – displays cameras and video in organized groups and views. Video View Panel – displays video of cameras. Message – displays system messages providing feedback and information about operating the system. Date and Time – displays the date and time. exacqVision User Manual 2/4/2009 Page 41 (9) (10) (11) (12) (13) (14) About Box – provides information about the client software you are using. Help Button – displays information from the User Manual specific to the screen you are viewing. Show/Hide Navigation Tree Button – expands the display by hiding the Navigation Tree. Full Screen Button – enlarges the display by hiding the title and task bars. PTZ Control Button – displays the PTZ Control window which allows you to maneuver a PTZ camera. Soft Trigger Icon – Displays the status of any soft triggers on connected exacqVision servers. exacqVision User Manual 2/4/2009 Page 42 Layout Panel The system will default to the 2x2 layout, as shown in the example below. You change the layout of the Video Panel by clicking on one of the Layout buttons. Once you select a layout, it will become your new default. Note: The 4x3, 5x4, 6x5, and 8x6 buttons are only available on widescreen monitors. The system will automatically fill the Video View Panel with the cameras from your Live Site Tree in the order they are listed. exacqVision User Manual 2/4/2009 Page 43 exacqVision User Manual 2/4/2009 Page 44 There are several methods for adding cameras to your Video View Panel. (1) Click on one of the Layout buttons on the Toolbar. If you select the Single Camera view, the system will display the camera that was in the upper-left square in your Video View Panel. If you select the Two-By-Two Layout view, the system will keep the camera that is currently in the Video View Panel and grab the next three cameras from the Live Tree. If you select the Seven Camera Layout view, the system will keep the four cameras that are currently in the Video View Panel and add the next three cameras from the Live Tree, and so on. (2) Double click on one of the cameras listed in the Live Site Tree. The system will display that camera in the upper-left square of the Video View Panel and fill the additional squares by going down the list. (3) Drag and drop a camera in a square on the Video View Panel. If a different camera is already being displayed, the system will switch the view to the new camera. You can delete a camera from the Video View Panel by right clicking anywhere in the square and selecting Disconnect Streaming Video. You can also access the Camera Setup screen directly from Live Mode by selecting Camera Properties, and then clicking the OK button. exacqVision User Manual 2/4/2009 Page 45 From here you can reconfigure the camera to fit your needs. See Camera Setup, page 131 for specific instructions. exacqVision User Manual 2/4/2009 Page 46 exacqReplay There may be instances when viewing live video feed that you want to replay a limited amount of recorded video. This can be quickly accomplished by right clicking in the appropriate camera view and selecting exacqReplay. You will have the option of reviewing video in increments of 5 or 30 seconds or 1, 5, or 15 minute increments. Once you select the desired video replay increment, the exacqReplay window will open and begin downloading the recorded video. A blue or green Scrub Bar will track the progress of the download. The total number of frames in the video segment as well as the number that have been downloaded will also be displayed in the status bar. If you wish to stop the download, click the Stop Download button at the bottom of the window. exacqVision User Manual 2/4/2009 Page 47 Once the download has started, you can scrub back and forth through the video using the Scrub Bar & Scrub Handle or the five Video Playback Controls at the bottom of the window: Play video in reverse fast (double) speed Play video in reverse in normal speed Stop video play Play video forward in normal speed Play video forward in fast (double) speed Play video forward one frame at a time Play video backward one frame at a time You can only scan the portion of the video that has downloaded. You will not have access to the entire video segment until the download is complete. You can also maximize, minimize, or close the Video Playback window by clicking the appropriate icon in the upper-right corner. See Search Mode Overview, pages 69-84, for complete instructions on how to search video. exacqVision User Manual 2/4/2009 Page 48 Live Event Monitoring Event Monitoring is another feature that can be activated by right clicking in one of the video panels and selecting Event Monitor and then the profile you would like to view. At this point, an orange border will appear around the video panel and you will probably not have any video in the panel until an event triggers. As motion is triggered on the cameras, it will trigger event monitoring. You can stop the Event Monitoring display by right clicking in the active video panel and disabling the active event monitoring profile. exacqVision User Manual 2/4/2009 Page 49 If you configured your profile as an Event Monitoring mode, the Event Monitor Box will appear just below this panel. You can move it and resize it as you need. Once a video event takes place, it will be automatically listed in the box. Clicking on the event line will switch the video to that camera. Clicking on the small blue rewind button will replay the event as it was tripped. Clicking the small red ‘X’ acknowledges the event and removes it from the list. If you configured your profile in Virtual Matrix Mode, you will not see an Event Monitor box as motion triggers recording. Instead, it automatically switches between cameras and pops them into the frame as motion occurs. Note: For details on how to configure an Event Monitor profile, see Event Monitoring, page 105, in the Setup section of the manual. exacqVision User Manual 2/4/2009 Page 50 Event Buttons Your exacqVision system allows you to monitor live video from a remote location using a separate client application. If you identify suspicious activity, you may want to send a notification via the server housed at the location being monitored. This notification is called a Soft Trigger. For example, you can activate an alarm, turn on a light, or trigger a door lock by using the Event Button feature on the client and the Soft Trigger feature on the server. The Soft Trigger feature is set up on the Event Linking screen in the Setup Mode. See Event Linking, page 176 for detailed instructions. Once you have set up a Soft Trigger, you will see the Soft Trigger icon in the toolbar at the top of the Live Panel screen. exacqVision User Manual 2/4/2009 Page 51 Simply click the icon to access the Soft Trigger window. To activate any of the preset soft triggers, simply select the corresponding checkboxes. exacqVision User Manual 2/4/2009 Page 52 Notice the status changes from Normal (green) to Alarm (red), indicating that the soft trigger has been activated. To deactivate the soft trigger and return to a normal status, simply deselect the checkbox. As an alternative to the Soft Triggers window, you can also create one or more, soft trigger shortcuts by using the Event Button feature on the Client Setup screen in Setup Mode. See Client Setup, page 95, for detailed instructions. exacqVision User Manual 2/4/2009 Page 53 Site Tree Navigation Since you may not want to view your cameras in the order they appear in the Live Site Tree, your exacqVision System allows you to organize your cameras into Groups. (For instructions on creating camera groups, go to Camera Setup, page 131.) This will enable you to efficiently view the cameras in the order you choose regardless of how they are listed in the Live Site Tree. Once you setup the camera groups, you to select the cameras in those groups by clicking on the Group button in the Navigation Pane. For example, if you want to view the Back Door, Front Desk, West Hall, and Reception Desk cameras you would have to individually drag and drop these cameras in the Video View Panel because they are not listed in order in the Site Tree. Using the Live Groups navigation, you can double click on the first camera in the Perimeter Group and the other cameras in that group will be displayed in the Video View Panel in the order they are listed. exacqVision User Manual 2/4/2009 Page 54 You can also organize your cameras into preset Views. There are several methods for creating a View. The simplest method is to select a Layout button in the Live mode and drag the cameras, audio, and/or POS data you want to the appropriate spot on the Video View Panel. Once you have everything laid out the way you want it, click the Save View button at the top of the Live Site Tree. exacqVision User Manual 2/4/2009 Page 55 This will take you to the EDVR Views window. Type a unique name for your view in the View Name field. The system and camera names will be displayed when you hover over the view name in the Live View Site Tree. You can also include a description that will be added to the top line of the View tooltip, by typing it in the Description field. Once you have typed a unique name and a description if desired, click the Apply button. exacqVision User Manual 2/4/2009 Page 56 Once you have saved your view, you can access it by clicking the View button from the Navigation Pane. Select your view from the Live Views Site Tree and the camera layout you saved will be recreated in the Video View Panel. You can also modify your views by clicking the Modify button at the top of the View Site Tree. exacqVision User Manual 2/4/2009 Page 57 Here you can organize your views into folders or create tours of multiple views. To create a folder, simply click the New Folder button. Type a unique name for the folder and a description if desired. The folder will appear in the My Views Site Tree in the lower-left quadrant of the screen. You can then drag and drop any views you wish to place in the folder. exacqVision User Manual 2/4/2009 Page 58 You can then organize your folders within your views by dragging it to the desired location in the My Views Site Tree. If you would like your video view panel to automatically cycle through two or more views, you can create a View Tour. Begin by clicking the New Tour button in the center of the Modify Views window. exacqVision User Manual 2/4/2009 Page 59 You will see a New Tour icon at the bottom of the My Tours tree in the lower-right quadrant of the window. In the upper-right corner of the window, type a unique name for the tour in the Tour Name field. You can then begin adding views by selecting them from the My Views Site Tree and clicking the Add button. Once you have added all of the desired views, you may want to type a description of the tour in the Description field. This description will appear whenever you hover your cursor over the tour. It is optional, but it can serve as a helpful reminder when you go to select the tour. Below the Description field, is the Dwell Time field. This sets the amount of time, in seconds, each view will remain in the Video View Panel before cycling to the next view. In this example, we used 5 seconds. You can increase or decrease the dwell time by using the up or down arrows. Once you have named the tour, added the views and a description, and selected the appropriate dwell time, simply click the Apply button to save the settings. exacqVision User Manual 2/4/2009 Page 60 You can also organize your tours in folders by creating a new folder and then dragging and dropping the appropriate tours in the folder. You can now select the tour from the Live Views Site Tree and the views you have created will cycle through the Video View Panel. exacqVision User Manual 2/4/2009 Page 61 About exacqVision Moving to the upper-right corner of the title bar, you’ll see an About exacqVision Box. Clicking on this box provides information about the client software you are using. This information will be important when troubleshooting any issues you may have using your exacqVision System. exacqVision User Manual 2/4/2009 Page 62 Online Help System You can also access online help for your exacqVision System by clicking the Help button or the F1 key. The system will default to information regarding the topic matching the part of the system you are working in. For more instructions on using the Online Help system, see Starting the Local Client, page 32. To exit the Online Help system, click the Close button exacqVision User Manual 2/4/2009 Page 63 or the F1 key. Display Buttons Next to the Help button, you’ll find the Hide/Show Navigation Panel button. Click the button to enlarge the exacqVision display by hiding the Live Camera Site Tree. Click it again to return to the normal view. The F4 key will perform the same function. Click it once to enlarge the exacqVision display. Click it again to return to the normal view. The Full Screen Mode button enlarges the exacqVision display by hiding the title and task bars. Click it once to expand the display. Click it again to return to the normal view. The F11 key will perform the same function. Click it once to expand the display. Click it again to return to the normal view. The F8 key will expand the display by hiding the toolbar. Click it again to return to the normal view. Note: To expand your display to the maximum size, you can use all of the panel navigation and/or corresponding function keys at once. exacqVision User Manual 2/4/2009 Page 64 PTZ Control The PTZ Control Button displays the PTZ Control window which allows you to maneuver a PTZ camera or digitally zoom any video. Click the button to access the PTZ Control windows. Please note that the controls will only open when a PTZ enabled camera is displayed in the Video View Panel. Even if you do not have a PTZ camera, you can use the digital PTZ feature to zoom in and pan around an image, provided digital PTZ has not been disallowed during Setup. (See Setup Mode, page 91.) To enable digital PTZ, right click in the appropriate Video Panel and select Digital PTZ. A checkmark will be displayed in the menu once the digital PTZ feature has been enabled. exacqVision User Manual 2/4/2009 Page 65 Once you open the PTZ Control windows, a green border will be displayed around the Video Panel in use. The name of the camera being controlled will also be displayed in the PTZ Control title bar. To switch the controls, click anywhere in the desired video panel. You can also click and drag on the title bar of the PTZ Controls to move them anywhere on your screen. There are several ways to maneuver your PTZ camera. First, you can use the Arrows and Zoom features on the PTZ Control. Click the arrow that corresponds to the direction you want your camera to move. To zoom in or out, click the appropriate Zoom button. You can adjust the speed of the Pan/Tilt and Zoom features in the Live view by using the Speed slider controls. You can also use the Preset buttons you have setup by clicking on the green, numerical buttons at the bottom of the PTZ control. For directions on how to setup a Preset button, see Camera Setup, page 131. By rolling your cursor over the Preset buttons, you can access a tool tip based on the preset name you typed in when you set up the PTZ camera. exacqVision User Manual 2/4/2009 Page 66 An even more efficient way to access the PTZ Controls is to use the Arrows, Page Up, and Page Down keys on your keyboard. The arrow keys will move your camera to the left, right, up, and down. Page Up will zoom in, and Page Down will Zoom Out. You can also move your mouse roller up and down to zoom in and out. Move your cursor to one of the corners or edges of the image, and the PTZ control arrows will appear. Click your mouse to pan the image in the direction of the arrow. When you reach the edge of the image, PTZ limit indicator will be displayed. To get a closer view, simply use your mouse roller to zoom in. The PTZ limit indicator will disappear, allowing you to pan the image again. Clicking Alt and Z at the same time will enable the zoom box. You can zoom in on a particular location by holding down the control key and dragging the zoom box over the desired portion of the image. Clicking Alt Z again will bring it back. exacqVision User Manual 2/4/2009 Page 67 You can also use your mouse to access the PTZ presets by right clicking anywhere in the PTZ Video Panel and selecting PTZ Presets and then the name of the desired preset. You can also use your mouse to maneuver the PTZ controls within the PTZ Video Panel. Move your cursor to the top and center of the PTZ camera view and you should see an up arrow. Click your mouse and the camera will move up. Move your cursor to the corner of the box and you will get a diagonal box. By clicking your mouse the camera will now move in that direction. You can continue this process along the remaining sides and corners of the PTZ camera display until you have positioned the camera in the desired location. You can zoom the camera in and out by using your mouse roller. To zoom in, roll you mouse wheel forward one click and then quickly roll it back one click. To zoom out, roll the mouse wheel back one click first and then one click forward. Remember, you can adjust the speed the Zoom feature by using the Speed slider control on the PTZ Control. Finally, if you have access to a USB joystick, you can use it to maneuver your PTZ controls. See Joystick Setup, page 102, for detailed instructions on how to set up your joystick. exacqVision User Manual 2/4/2009 Page 68 Search Mode Overview Search Mode allows users the ability to search for recorded video. (1) (2) (3) (4) (5) (6) Camera Selection Tree – Check the box to select the camera(s) to search. Navigation Pane – displays cameras, video, audio, and events in organized groups and views. Left and Right Scroll Buttons – Scrolls left and right on the time line. Clicking on the left or right scroll button increments the time line by one major division, and initiates a new search. Zoom In (+) and Zoom Out (-) Buttons – Zooms in and out on the video time line. Video Time Line – time line of video that is displayed as blue bars. The video time line is displayed in views of 5 minutes, 1, 8 and 24 hours. Hovering your cursor on the top of the video time line then clicking and dragging either up or down allows expanding or shrinking the camera selection list and associated video bars along with the video playback display. Camera Selection List – list of cameras that have been selected with the check box in the camera tree. Camera name is displayed in bold when it has been clicked on video time line bar. exacqVision User Manual 2/4/2009 Page 69 (7) (8) (9) (10) Video Cursor – the video cursor is used to select the segment of video you would like to playback. One click will move the video cursor to a new location. Double click will begin video playback. Recorded Video Bar – blue bars represent video that has been recorded. Cursor Time – when the video cursor (6) is single clicked on a recorded video bar (7) the cursor time is displayed. When the video cursor is double clicked the recorded video is played back and the cursor time is also played in synchronization with the video. Video Playback Controls – there are seven playback controls: Play video in reverse fast (double) speed Play video in reverse in normal speed Stop video play Play video forward in normal speed Play video forward in fast speed Play video forward one frame at a time Play video backward one frame at a time (11) (12) (13) (14) (15) (16) (17) Search Button – the search button initiates a new video search based on changes that have been made in the camera selection tree (1), calendar (12) and start time (11). Start Search Time – used to change the desired time of the video search Calendar – used to select the day of the video search Video Playback – video window that video is played in. Export Buttons – Save Picture, Save Video, Print Picture, and Burn to CD or DVD. Scrub Bar & Scrub Handle – used to quickly scrub back and forth through video. Stop Download Button – used to stop the down the download. To begin a search, you must first select a source or sources (i.e., camera, audio, POS, or event). To search every camera on an exacqVision server, simply check the box to the left of the server in the Camera Selection Tree. You can then deselect any cameras you don’t want to search. You can also select individual cameras using the check boxes to the left of each camera. You can also select individual cameras without checking the box next to the server. exacqVision User Manual 2/4/2009 Page 70 To search for POS data or audio, check the box next to the desired source in the Camera Selection Tree. exacqVision User Manual 2/4/2009 Page 71 Once you have selected your sources, select the date and time you want to search. Use the arrows to the left and right of the month to go backwards or forward a month at a time. The up and down arrows next to the time will go backwards or forward in one hour increments. You can also adjust the time by typing directly in the Start Time field. Once you have selected the date and time, click the Search button. When your search is complete, the camera names you selected will appear in the Camera Selection List with the corresponding Recorded Video Bar to the right. A Legend for the Recorded Video Bar is displayed in the lower right corner of the Search window. exacqVision User Manual 2/4/2009 Page 72 As you can see, a blue bar represents video recorded in Motion mode. The white bar represents a segment when no video was recorded. The green bar will be displayed when video was recorded in Free Run mode. A red bar will be displayed when the camera is recorded based on an alarm link. The evenly spaced green bars represent video that was recorded based on the time lapse setting. (See Storage Setup, page 151) exacqVision User Manual 2/4/2009 Page 73 Video Timeline Just above the Camera Selection List and the Recorded Video Bars, you’ll find the Video Time Line. The system will automatically display a two-hour timeline in 30 minute increments. You can adjust the search time by clicking the left or right arrows or by typing a new start time in the Start Time field and clicking the Search button. In addition to 30 minute increments (shown above), the Video Timeline can be displayed in increments of five minutes (A), as well as one (B), two (C), or 24 hours (D). A. B. C. D. You can adjust the time increments by using the Zoom buttons. Click the (-) button once to change the display to shorter increments. Click the (+) button to display longer increments. The yellow Video Cursor is used to select a segment of recorded video. exacqVision User Manual 2/4/2009 Page 74 Video Playback To select a segment of video or begin video playback, start by moving your mouse cursor along the Recorded Video Bar next to the appropriate camera until you reach the time you want to play back. Clicking once will change the location of the Video Cursor. Double clicking it will begin the playback in the Video Playback window at the top-center of the Search screen. The name of the camera will be highlighted in the Camera Selection List. The date, time (milliseconds), and camera name will also be displayed in the Video Playback window based on the configurations in Camera Setup, page 131. This particular camera was set up to record on motion and it has an alarm linked to the front door opening. The blue border indicates that the recording occurred using the motion mode. A red border around the playback window indicates an alarm triggered the recording. exacqVision User Manual 2/4/2009 Page 75 In some cases, wind or some other invisible motion sets off the camera. On an analog camera, you can highlight the motion that triggered the recording to identify the cause by right clicking anywhere in the playback window and select View Motion. Note: This feature is not available on IP cameras. Blue motion boxes will mark the area where the motion occurred. When you want to remove the motion boxes, right click in the Video Playback window again and select Disable Motion. exacqVision User Manual 2/4/2009 Page 76 You can resize the Video Playback window by holding your cursor over the sash at the bottom of the window until it changes to a double arrow. Grab the sash and drag it up or down until you get the desired size. When the video playback begins, a blue or green Scrub Bar will track the progress of the download. The total number of frames in the video segment as well as the number that have been downloaded will also be displayed in the status bar. Once the download has started, you can scrub back and forth through the video using the Scrub Bar & Scrub Handle or the Video Playback Controls. You can only scan the portion of the video that has downloaded. You will not have access to the entire video segment until the download is complete. You can quickly scan the video by dragging the Scrub Handle along the Scrub Bar to the left or right. exacqVision User Manual 2/4/2009 Page 77 You can also use any of the seven, blue Video Playback controls to scan the video. The button plays video in reverse fast speed. Click it once to reverse in 2x speed. Each additional click doubles the current speed. For example two clicks will reverse in 4x speed. Three will increase it to a speed of 8x, etc. The button plays video in reverse in normal speed. The button pauses the video play. The button plays video forward in normal speed. The button plays video forward in fast speed. Click it once to forward in 2x speed. Each additional click doubles the current speed. For example two clicks will forward in 4x speed. Three will increase it to a speed of 8x, etc. The button plays video forward one frame at a time. The button plays video backward one frame at a time. exacqVision User Manual 2/4/2009 Page 78 Navigation Pane In addition to using the Camera Selection Tree, you can also search using the Groups, Views or Events Navigation Pane. Note: Conducting a Groups search allows you to organize your cameras in groups that suit your needs. (See Group Setup, page 108, for Groups set up instructions.) The actual Groups search process is the same as conducting a Cameras search. exacqVision User Manual 2/4/2009 Page 79 Searching Views You can display multiple cameras in the Video Playback window by creating a view. (See Site Tree Navigation, page 51, for View set up instructions.) Select Views from the Navigation Pane, and then select the View you want to search by clicking the appropriate checkbox. Select the date and time you would like to search by using the Calendar and Start Time fields, and then click the Search button. All of the cameras in the View will be displayed in the Video Playback window. exacqVision User Manual 2/4/2009 Page 80 To zoom in on one of the cameras, simply double click on the video in the Video Playback window. Double click in the Video Playback window again to return to the multi camera view. exacqVision User Manual 2/4/2009 Page 81 Searching Events There may be times when you want to narrow your search to a specific event rather than all video that recorded on a particular camera during a given time period. For example, you may have a camera in the main lobby set to record upon motion. Rather than searching all of the video that recorded upon motion, you may only want to view instances when the front door opened. To start this process, you first need to create an event to record video based on the front door opening. See Event Linking, page 176, for instructions on creating and linking an event. Once this event has been established and linked appropriately, you will be able to conduct an Events search to locate video or audio associated with the event. To do this, click the Events button on the Navigation pane and the Event you want to search. exacqVision User Manual 2/4/2009 Page 82 Once you have selected your event or events, select the desired date and time and click the Search button. The red bars indicate instances when the event triggered video or audio recording. To search for the video associated with this particular event, you’ll need to click the Cameras button in the Navigation Pane, and then conduct a search on the camera associated with that event. exacqVision User Manual 2/4/2009 Page 83 Exporting Files Once you have downloaded a video segment, you can use the Export buttons to save a picture or video, print a picture, or burn saved files to a CD or DVD. There may be instances when you want to save a single frame to a file or print it in hard copy. Drag the Scrub Handle along the Scrub Bar until you find the frame you need and then select the Save Picture to File or the Print Picture or both, depending on your need. You can also copy a picture to a clip board and paste it into a document. When you find the image you need, right click anywhere in the Video Playback window and select Copy Image to Clipboard. The image will be stored, and you can paste it into your document. If you need to save a series of frames, you can save a video clip. To save a video clip, you must first mark the starting point of your video clip by Scrubbing to the location on the Scrub Bar where you want your video to clip to begin. Right click anywhere in the Video Playback window and select Mark Export Start. exacqVision User Manual 2/4/2009 Page 84 Use the same process to mark the ending point of your video clip, right click anywhere in the Video Playback window, and select Mark Export Stop. Once you have marked the beginning and ending points, click the Save Video Button. You will be prompted to save the file. You can store multiple video clips in a directory and then email the files or burn them to a CD or DVD. exacqVision User Manual 2/4/2009 Page 85 The default directory is exacqVision Files in My Documents. The file name will default to the camera name. You can assign it a unique name or keep it as is. Once you have named the file, select a file type. The system defaults to a standalone *.exe file which plays on its own and can be emailed to someone who does not have access to an exacqVision Client. You may also choose to save the clip as an *.avi file or a *.ps file if you are emailing it to another exacqVision Client user. This will save about a megabyte of disk space per clip. If you are running the client on a Linux or Mac operating system, you should save the clip as a *.ps file unless you are emailing it to a Windows user, in which case, you should use the default, *exe, or the space saving file types described above. Once you have named the file and selected the appropriate file type, click the Save button. Once you have saved the files into a directory, you can attach them to an email or export them to a CD or DVD. If you wish to burn them to a CD or DVD, insert a writable CD or DVD and click the “Save to a CD or DVD” button at the top of the toolbar. exacqVision User Manual 2/4/2009 Page 86 Note: If you do not have a CD burner, the Save to a CD or DVD button will not be enabled. If you are running the client on a Mac, you can drag and drop the files into your Burn Folder. It will create links to these files. Once you are finished copying all the files, select the Burn button in the right hand corner. This will burn the files to the Disk. Once you click the Save to a CD or DVD button, the Burn Disc window will be displayed. You can change the name of the disc by clicking the “Edit Disc Name” button. The Disc Contents list displays all of the video clips in your directory. exacqVision User Manual 2/4/2009 Page 87 The system will automatically select all of the video clips. You can edit the list by deselecting the checkboxes next to the file name. If you would like to review one of the video clips, select the file and then click the “Open File” button. You can also delete a file by selecting it and clicking the “Delete File” button. The Disc Info box displays some important information about your disc capacity. The disc capacity thermometer (green bar) is a visual queue indicating how much disc space is required for the files you have selected. The disc capacity is also reflected in a numerical format. The first number listed (MB) is the amount of space required to burn all of the video clips you have selected. The next number represents the capacity of the disc you have inserted. Note: If you forget to insert a disc, this number will be zero. If you happen to click the “Burn CD” button without inserting a writable CD or DVD, you will need to click the Refresh Disc button before clicking the Burn CD button again. If your files exceed the disk capacity, you will need to either remove some files before Burning the CD or insert a new Disc with a larger capacity. When you insert a new disk, you will need to click the Refresh Disc button before Burning the new CD. Once you have made all of the appropriate changes, press the “Burn Disc” button. If you wish to cancel the process, click the “Cancel” button. exacqVision User Manual 2/4/2009 Page 88 exacqVision User Manual 2/4/2009 Page 89 After clicking the “Burn Disc” button, the Disc Burning Progress window will be displayed. The system will automatically default to ejecting the disc when the burning process is completed. You may also want to uncheck this checkbox if the CD drive is behind closed doors as in the exacqVision Server. It will also automatically delete the files from the hard drive after a successful burn unless you uncheck the appropriate checkbox. Click the Burn button to initiate the writing process. This may take several minutes, depending upon the amount of video to be written. exacqVision User Manual 2/4/2009 Page 90 Setup Mode Overview Setup Mode is where Administrators and Power Users configure systems. (1) (2) (3) Setup Configuration Tree – click on any of the icons in the camera tree to take you to a new screen (see number 3 below) for configuring the item you selected My Systems – is the first screen that displays systems that you have connected to. If you have only one stand alone system you will see one system listed on this screen. If you have configured multiple systems with the Network Setup screen (see Add System, page 92) that you are connected to you will see you will see each of those systems, the system status and the IP address. Setup Screen – this area is known as a “screen.” It’s the area that will change to a new configuration screen when you click on the icons in the configuration tree. exacqVision User Manual 2/4/2009 Page 91 Add System The Add System screen is where you add systems to your Systems List that you will connect to with your client application for viewing live and recorded video. To add an exacqVision NVR to your System List click the New button and enter the Username, Password, and Password Confirm. exacqVision User Manual 2/4/2009 Page 92 If you know the Hostname or IP address, enter it in the appropriate field by clicking the corresponding radio button. Contact your IT department if you don’t have either the Hostname OR the IP address. Select the radio button that matches your Connection Speed. This tells the system how much audio to buffer in order to help maintain a smooth audio stream. After you have competed entering the settings, click the Apply button. Once a system has been added to the Systems List, the Client will automatically connect to the system. All authorized video viewing, searching and system configuration functions will be available to your client application. It will now also appear in the Configuration, Live and Search trees. To disconnect or reconnect a system, simply deselect or select the Connection box in the System List. Disconnected systems do not appear in the Configuration tree. Only those systems selected will be displayed. exacqVision User Manual 2/4/2009 Page 93 If desired, you can change the space allocated to the Add System window. Simply hover your cursor over the Resizing Bar, and drag it up or down to adjust the spacing to suit your needs. exacqVision User Manual 2/4/2009 Page 94 Client Setup The Client Setup Screen allows you to customize your client based on your personal preferences. The Live Video Borders field gives you the opportunity to disable the colored borders that are displayed in Live mode to indicate motion, alarms, or PTZ focus. You can disable the blue motion and red alarm border by deselecting the Show Record Status checkbox and the green PTZ border by deselecting the PTZ Focus checkbox. The VGA Acceleration Mode (Video Graphics Adapter) field can be used to resolve display issues that may be caused by your video card. See Display Issues, page 207. exacqVision User Manual 2/4/2009 Page 95 The Timelapse Playback Interval Control allows you to adjust the amount of display time between video gaps due to timelapse recording or discontinuous motion. The system automatically jumps to the next video frame after a one second gap. You can decrease the dwell time to zero by sliding the interval control to the left or increase the dwell time up to 15 seconds by sliding it to the right. . The Show Configuration Mode to Operating System Restricted Users checkbox allows you to hide the Setup button for a client who has a restricted Windows setting. By default, the Setup button is displayed for all clients, but you can hide it for an individual client by deselecting the checkbox. Instead of seeing the Live, Search and Setup icons, the restricted Windows user will only see the Live and Search icons. This may prevent confusion that may occur from displaying an icon the restricted user can’t utilize. exacqVision User Manual 2/4/2009 Page 96 The Colors field gives you the opportunity to change the default border colors for Motion, Alarm, Free Run, PTZ Focus and Event Monitor. To change the color, simply click on the colored bar beside the border you would like to change. Select a basic color or create a custom color, and then click OK. exacqVision User Manual 2/4/2009 Page 97 The new color will be reflected on the color bar in the Colors window. To return to the Default colors, simply click the Default button. exacqVision User Manual 2/4/2009 Page 98 The Event Buttons field allows you to create a shortcut to any Soft Triggers you have set up. See Event Linking, page 176, for instructions on setting up a Soft Trigger event. To create an Event Button, click the New button. The Tool Tip will default to Event button, but you can change it to something more descriptive by typing in the Tool Tip field. exacqVision User Manual 2/4/2009 Page 99 To select your icon, click the Change Icon button. The system will automatically provide icon options of black, blue, green or red buttons. Click the desired file, and then the Open button. You can also customize your icon using the Look in field. Once you find an appropriate icon, click the Open button. exacqVision User Manual 2/4/2009 Page 100 Select the appropriate Soft Trigger from the list provided, and then click Apply. The icon will be displayed in the box to the right. Continue this process until you have created all of the icons you desire. The icons will be displayed next to the Soft Trigger icon on the Live mode toolbar. You will need a separate icon for each Soft Trigger shortcut. exacqVision User Manual 2/4/2009 Page 101 Joystick Setup The Joystick Setup screen allows you to configure any standard USB joystick to work with your exacqVision system. If you have more than one joystick plugged into your USB ports, you will need to select the joystick you would like to configure in the Preferred Joystick field. If the position control is drifting while the joystick is in its resting position, you can calibrate your joystick by clicking the Calibrate button. exacqVision User Manual 2/4/2009 Page 102 There are several Position Controls that can be adjusted to suit you personal preferences. The sensitivity of the joystick can be adjusted by moving the Sensitivity slide bar to the left, making it less sensitive, or to the right, making it more sensitive. You can also alter the north and south movement of the camera or view. When the Invert Y Axis checkbox is selected, the PTZ camera or digital PTZ view, represented by the red dot in the picture above, will move north when you move your joystick down and South when you move it up. This can be reversed by deselecting the Invert Y Axis checkbox. Note: If your joystick has a Point of View source, you can switch your joystick functionality to the POV by selecting the POV radio button in the Position Control Source box. The Zoom Controls box allows you to adjust the zoom features on your camera. The camera or camera view can be zoomed in or out by twisting the joystick to the right or left. The zoom status is reflected by the green highlight as shown in the picture above. You can configure the joystick to zoom in by twisting the joystick to the right or left, depending on your personal preference. When the Invert Rudder checkbox is selected, the camera will zoom in by twisting the joystick to the left and zoom out when it is twisted to the right. Deselecting the Invert Rudder checkbox will reverse the zoom control. The Sensitivity slide bar allows you to adjust the sensitivity of the twisting motion required to zoom the camera. Note: If your joystick has a rudder, you can switch the zoom functionality to the rudder by selecting the Rudder radio button in the Zoom Control Source box. exacqVision User Manual 2/4/2009 Page 103 Finally, you can program one or more joystick buttons by using the drop down menu to select the desired setting. PTZ Zoom In/Out Increase/Decrease PTZ Zoom Speed Zooms the camera in and out. Click the button(s) multiple times until the camera is in the desired position. Adjusts the zoom speed of the camera. Increase/Decrease PTZ Pan/Tilt Speed Adjusts the pan and tilt speed of a mechanical PTZ camera. Next/Previous Video Panel Changes the PTZ focus to the next/previous camera in the video panel. View This Camera Only Switches a camera in a multi-camera layout panel to a 1 x 1 layout. Clicking the button again will return it to the original layout. Toggle Digital PTZ Switches between digital and mechanical PTZ. Note: If the camera does not have mechanical PTZ, this setting will toggle between digital PTZ and off. Moves to the next camera or set of cameras in the Camera Site tree, depending on the Layout button selected. Navigates the PTZ presets that have been configured on the Camera Setup screen. See Camera Setup, page 131. Traverse The Camera Tree Goto PTZ Preset Number 1-16 Note: To determine which joystick button correlates to the number identified on the screen, simply press the button on the joystick. The corresponding number on the screen will turn from red to green. Once you have finished programming the settings for your joystick, click the Apply button. exacqVision User Manual 2/4/2009 Page 104 Event Monitoring The Event Monitoring screen allows you to set up your exacqVision client to react to events that take place in the server or servers to which it is connected. To activate the Event Monitoring feature, you must first create and define a new Event Monitoring Profile. A profile is a set of actions (e.g. the playing of live video or an alarm sound) triggered by sources such as video motion, input triggers, etc. Each profile can then be activated and assigned to a specific video panel by the user. To create a new profile, click the New button in the Profiles field. exacqVision User Manual 2/4/2009 Page 105 Give the profile a name and a description. In this example, we used Main Entrances. You can also type a brief description of your profile in the Description field. Next, you’ll need to select the type of profile you would like to create using the Type radio buttons. A Virtual Matrix profile will automatically show video as it is triggered. For example, if you have a series of entrances in one profile, each time any of the entrances is triggered, the video panel will switch to the camera displaying the most recent door motion. Event Acknowledge Mode brings up a list of events which the user can click on to view giving you much more control. Using the same Main Entrances profile as our example, instead of the video panel automatically switching to the camera displaying the most recent door opening, the event would be added to a list. You could then click on the item to display the video. This may be useful if a guard needs to leave the monitor for a period of time. It is also helpful when you have events occurring on two cameras at the same time. Instead of seeing each event for a split second, you can view each event for as long as you need to. Once you have initiated your profile, you need to add an event or events that you wish to monitor. If you are familiar with exacqVision’s Event Linking feature (Event Linking, page 176), this will look familiar to you. In the “Event Type” box, click once on “Video Motion.” The next box, “Event Source,” allows you to select a camera from which to monitor video. The “Action Type” and the “Action Target” are set by default to show the video clip in the matrix display whenever motion is detected on the camera. To add another event to this profile click on the other “New” button located at the bottom of the page. exacqVision User Manual 2/4/2009 Page 106 Repeat this process to add additional events to the profile. Click the “Apply” button on the upper right when you have finished your profile. You can now view your event profile in Live mode. (Live Event Monitor, page 49.) If desired, you can change the space allocated to the Event Monitoring window. Simply hover your cursor over the Resizing Bar, and drag it up or down to adjust the spacing to suit your needs. exacqVision User Manual 2/4/2009 Page 107 Group Setup The Group Setup screen is where you create logical groups of cameras from single or multiple exacqVision NVR systems. This is a useful feature when you have multiple systems with a fairly large number of cameras spread across a large building or campus and you would like to place cameras in logically named groups such as 1st floor, 2nd floor, and 3rd floor and so on. In this example you might have two exacqVision NVR systems with 16 cameras each, and you have a four story building that you want to place eight cameras on each floor. Instead of viewing your cameras as they are physically connected to your exacqVision NVR systems, you create four named groups consisting of eight cameras each. It’s much easier for a user to find cameras when they are located in named groups that match the logical layout of their building. In addition to monitoring live video, groups are very useful for searching video. On the search video screen (page 41), simply click on the Groups navigation pane on the lower left corner of the screen then select your group and search. exacqVision User Manual 2/4/2009 Page 108 To access the Group Setup page, click Group Setup from the Setup Site Tree. Create a new group by clicking on the New Group button. In the Group Details setup box Group Name will be populated with New Group. Type a unique name over New Group and tab to the Description box to describe the new group you’re creating. Select an icon to represent your group. exacqVision User Manual 2/4/2009 Page 109 This icon will be displayed to the left of the group in the Live and Search site trees. To add cameras to your group, select a camera from the All Cameras list and then click the Add button. The video will be displayed in the upper left hand corner, and your camera name will appear in the Cameras in Group box. Continue adding cameras until your group is complete. If you want to remove a camera from the Group, select the Camera from the Cameras in Group box, and click the Remove button. exacqVision User Manual 2/4/2009 Page 110 Once your group is complete, click the Apply button. Should you decide you don’t want to finish setting up the group, you can click the Cancel button as long as you haven’t clicked the Apply button yet. exacqVision User Manual 2/4/2009 Page 111 To delete a group you have already set up, simply highlight it in the Groups list, and click the Delete Group button. Continue this process until all of your cameras are organized to fit your needs. These groups can now be used to monitor live video (page 41), or searching video (page 30). exacqVision User Manual 2/4/2009 Page 112 System Information The System Information screen is where you can see information about users that are currently logged into the system, plugin file version information number and status, and the System Log. The system log can be viewed by selecting the start and end date and time and clicking on the search button. If you would like to view the system log with a text editor you can export the log to a file name and open the log with the text editor. The system log is a useful tool for viewing a detailed history of all the processes that take place on the system. The Log Settings control box gives you the ability to set the maximum days that Logged Alarms and the System Logs are kept on the system. If desired, you can change the space allocated to the System Information window. Simply hover your cursor over the Resizing Bar, and drag it up or down to adjust the spacing to suit your needs. exacqVision User Manual 2/4/2009 Page 113 exacqVision User Manual 2/4/2009 Page 114 System Setup The System Setup screen is where you set basic system parameters for the client application, including the System Name, Time and Date, Time Zone, Time Server and IP Address Network Settings. (1) The System Name field will default to the serial number for the system you purchased. You can keep this name or change it by typing a new name over the serial number. Remember, your system name must be unique. (2) Your exacqVision System will automatically set your date and time based on time.nist.gov. (3) The Time Zone will be set as Eastern Standard or Daylight Savings Time depending on the time of year. You can change the time zone by using the dropdown menu. (4) Use the radio buttons to indicate Daylight Savings or Standard time. exacqVision User Manual 2/4/2009 Page 115 (5) If you do not have access to time.nist.gov, you will need to disable the Time Server field by deselecting the box. Contact your IT department to get access to your company’s internal time server, and enter that address in the Time Server field. (6) The Network Settings field stores your system’s Hostname, IP Address, Network, Gateway and DHCP status. This feature has not yet been implemented. (7) You can also Import and Export system settings. Every feature in the system that is setup and configured through the Setup Mode site tree can be imported or exported. After setting up your system it is a good idea to export your System Settings to a disk or USB key and store it in a safe place in the case of a disaster such as a fire or hard disk failure. The exported system settings will enable you to quickly reconfigure your system to the original settings. If you have multiple sites that require similarly configured systems the import setting function can also help you duplicate the settings saving you time. To save your settings, click the Export Settings button. You can either save the information as a file in your Client Folder, or export it to a disk or USB key. To do this, insert the disk or USB key, then select the appropriate drive from the dropdown menu and click save. If you need to restore your settings, insert the disk or USB key and click the Import Settings button. Use the dropdown menu to locate the appropriate file, and click Open. Confirm that you wish to open the settings by clicking Confirm. Your settings should be restored. (8) Bandwidth Settings. (9) Without a license key, your exacqVision Server can only connect to one IP device at a time. To obtain your license key online, go to www.exacq.com, or you may contact Exacq Technologies by phone. You will need to provide your network adapter hardware MAC address. It is a twelve character string which can be found on the System Setup page. Once you receive your license key, you may enter it by hand in the license key edit fields, or import it from a file. Note: Click the Apply Settings button to apply each setting to your Client application. exacqVision User Manual 2/4/2009 Page 116 Add IP Cameras The IP Cameras Setup screen is where you add IP cameras to your IP Camera List that will connect to your exacqVision NDVR server. Once IP cameras have been added to the IP Camera List your exacqVision Client application will be able to configure the camera settings and view live and recorded video. Before adding any IP cameras, there is some background research to be done. First, ensure that your IP cameras are powered and connected to the same LAN as the exacqVision Server. Next, you’ll need to find or assign the IP address of the cameras. The Exacq IP Camera Finder will find cameras from any of the supported manufacturers which are on the same network subnet as the exacqVision Server. Note: If you need to confirm which camera you are installing, you can right click any of the cameras in the IP Camera List or IP Camera Finder to access the camera’s website to see a video image. If the IP address has already been assigned, you will see a unique number listed in the address field. You can simply click on the appropriate camera to auto populate the Device Type and IP Address. Since you are adding a new IP Camera to the exacqVision Server, you will more than likely find a default IP address listed for the camera in the IP Camera Finder. In this case, you need to change the IP address using the camera manufacturer’s software. See the Manufacturer Specific exacqVision User Manual 2/4/2009 Page 117 Addendum to the exacqVision IP QuickStart guide for more information. Note: You may also need to contact your IT department to determine the appropriate range of IP addresses to use. Once you have assigned the appropriate IP address, click the Rescan Network button to refresh the list of cameras in the IP Camera Finder. You can then select the camera to auto populate the Device Type, and IP Address. After completing the tasks above, you can begin adding the IP Cameras. 1) 2) 3) 4) 5) 6) Tab through the Device Type field since it was auto populated. Tab to the Username field and enter your Username. Enter your password and confirm it. Tab through the IP Address field since it was auto populated. To connect your new IP camera, locate your camera in the IP Camera List and click the corresponding check box. The maximum number of IP cameras that can be connected at one time with a basic license is eight. You may need to deselect another camera to make room for the new one. To do this, click the checkbox in front of the camera you want to disconnect. All cameras that have been added to the IP Camera List will now also appear in the Configuration, Live and Search trees. If desired, you can change the space allocated to the IP Cameras window. Simply hover your cursor over the Resizing Bar, and drag it up or down to adjust the spacing to suit your needs. exacqVision User Manual 2/4/2009 Page 118 IP Camera Recording Setup Once IP cameras have been added to the server you can enable recording, set the recording resolution and recording frame rate measured in images per second (IPS). Each IP camera can be individually set. The Camera Recording Setup screen is where you enable cameras to record video, set the recording resolution and set the image per second (IPS) recording rate. The Camera Input column is the physical input connect that the camera is connected to on the back of the exacqVision NVR. Refer to the Back Panel Layout on page 19. If a camera has been connected to an exacqVision NVR system and the camera is producing a video signal, the exacqVision client application will automatically detect the video signal. If a video signal is detected it is indicated with a green “YES” under the Video Detection column and by default the Record Enabled column check box for that camera is checked. To disable recording uncheck the enable check box. The exacqVision NVR systems by default are setup to record in CIF resolution if a video signal is detected. exacqVision User Manual 2/4/2009 Page 119 You can change individual camera resolutions by clicking on the Record Resolution drop down box and selecting one of the resolutions listed. Your options will vary based on the camera manufacturer and model. Once you have made the change you must click the Apply button to make the change. To cancel the changes, click the cancel button. exacqVision User Manual 2/4/2009 Page 120 IP Camera Setup The IP Camera Setup screen is where you configure the individual IP camera settings such as camera name, on-screen display, PTZ settings, video settings, recording quality and motion and video masks. You can also access the camera’s website to change camera settings that are not available in the exacqVision software by clicking the link in the IP Address field. exacqVision User Manual 2/4/2009 Page 121 Note: If you don’t see a hyperlink beside the IP Address field, it could be for two reasons: 1.) You are not logged in to the operating system with administrative privileges. You will need to switch your operating system account to one with admin privileges in order to access the hyperlink. 2.) Your client computer may not be on the same IP subnet as the IP camera; for example, if you are using the client from you home computer to access a server at your office. This restriction should cause few issues since the need to access the camera website settings should happen only during the initial set up. Most of the procedures for setting up an IP Camera are identical to those for an analog camera. See Camera Setup, page 131, for instructions on adjusting all settings in the exacqVision software with the exception of Motion Mask and Crop Window. To add a new Motion Mask or edit an existing mask, click the Edit button. The Add and Remove buttons, as well as the Motion Mask tabs will now be enabled. A separate tab will be created for each mask setting. To add a new mask, click the Add button. exacqVision User Manual 2/4/2009 Page 122 exacqVision User Manual 2/4/2009 Page 123 Move your cursor to the video display panel at the top left corner of the IP Camera Setup screen. Determine where you want to set your rectangular mask to appear, click in the upper-left corner and drag it to the lower right corner. A blue rectangle will mark the location of the mask. If you are not happy with the location of the mask you created, you can delete it by clicking anywhere in the mask area. You can also cancel any edits you have made on any of the Motion Mask tabs (as long as you have not clicked the Apply button) by clicking the Cancel button. The Sensitivity slider control increases and decreases the sensitivity of the motion necessary to trigger the video recording. It is a useful tool for adjusting motion recording for certain environmental or camera signal quality factors. For example, you can set the sensitivity high (90 or 100%) if your cameras produce a good quality video signal with little noise and are in a bright environment because camera noise or shadows won’t cause unwanted motion recording. If you have a dark environment with poor visibility and a poor quality video signal, setting the sensitivity low (10 or 20%) will reduce unwanted motion recording. The slider control ranges from 1% on the left being the least sensitive to 100% on the right being the most sensitive. To adjust the motion sensitivity, you can move the slider to the right and left or click on the control and use the left and right arrow keys. The Percentage slider control increases or decreases the portion of the mask area that must be filled to trigger video recording. Once you get the Motion Mask in the location you desire, you can set the camera to record only when motion occurs inside the mask area by clicking the Include button. This is the system default, but you can also block recording in the mask area by clicking the Exclude button. exacqVision User Manual 2/4/2009 Page 124 You can add additional Motion Mask tabs by clicking the Add button again and repeating the process above. To set your Motion Mask tab or tabs, click the Apply button. To remove a Motion Mask tab, click the Edit button, click on the tab you want to remove, and then click the Remove button. You can also remove all of the Mask tabs by clicking the Edit button and then the Clear button. To return to the default settings, click the Defaults button. The system will reset the Format to mpeg and the Quality to 8. It will also clear any Motion Masks that had been created. Some camera manufactures have implemented cropping in their IP cameras. If you are using one of those cameras, the Crop Window will be enabled, allowing you to crop unimportant portions of a camera image in order to save disk space. Click the Edit button to start the cropping process. Click and drag your cursor over the portion of the camera image you would like to be displayed. Anything outside of the rectangle will be cropped. exacqVision User Manual 2/4/2009 Page 125 If you are not happy with the new configuration and you haven’t clicked Apply yet, you remove the setting by clicking the Cancel button. You will need to click the Edit button to start the cropping process again. Once you are satisfied with the crop settings, click the Apply button. The camera display will lose video for a couple of seconds before displaying the new, cropped image. In this example, you will notice that the Avg Image Size decreased from 215539 to 174054. exacqVision User Manual 2/4/2009 Page 126 If you wish to restore the camera image to full-size, simply click the Edit ►Clear ►Apply to clear the crop setting. exacqVision User Manual 2/4/2009 Page 127 eDVR 4000 Device The eDVR 4000 Device is the compression board installed in the exacqVision video server that manages the analog video cameras connected to the system. The Device Information field displays the eDVR Device Type and Serial Number. You can also set a temperature threshold that can be linked to an event action using the Event Linking feature. See Event Linking, page 176. exacqVision User Manual 2/4/2009 Page 128 Camera Recording Setup The Camera Recording Setup screen is where you enable cameras to record video, set the recording resolution and set the image per second (IPS) recording rate. The Camera Position column is the physical input connect that the camera is connected to on the back of the exacqVision NVR. Refer to the Back Panel Layout on page 19. If a camera has been connected to an exacqVision NVR system and the camera is producing a video signal, the exacqVision client application will automatically detect the video signal. If a video signal is detected it is indicated with a green “YES” under the Video Detection column and by default the Record Enabled column check box for that camera is checked. To disable recording uncheck the enable check box. The exacqVision NVR systems by default are setup to record in 2CIF resolution if a video signal is detected. exacqVision User Manual 2/4/2009 Page 129 There are two methods for changing a cameras record resolution. The first method is to change individual camera resolutions by clicking on the Record Resolution drop down box and selecting CIF, 2CIF or D1 resolutions. Once you have made the change you must click the Apply button to make the change. The second method is by clicking on the D1, 2CIF or CIF optimize buttons on the bottom of the screen, which will change all detected cameras equally for that setting. Once you have made the change you must click the Apply button to make the change. exacqVision User Manual 2/4/2009 Page 130 Camera Setup The Camera Setup screen is where you configure the individual camera settings such as camera name, video settings, recording quality and motion and video masks. (1) Click on one of the cameras in the camera tree to select the video source to display. (2) Move your cursor to the Name field and enter a new camera name then click Apply to make the change. You will see the new camera name in the Camera tree and Camera Information box (12). exacqVision User Manual 2/4/2009 Page 131 (3) If you would like to see the camera name, time, and date displayed on the live and recorded video click on the Name, Time and/or Date check boxes. By default these are left unchecked. The date format follows the Windows setting. To change the time and date format, go to the Start Menu ► Settings ► Control Panel ► Regional and Language Options. Make your desired changes, and then click Apply. You can position the camera name, time and date on six different locations on the video display by clicking on the Top-Left, Top-Center, Top-Right, Bot-Right, Bot-Center or BotRight. By default the On-Screen Display is located on the bottom right, Clicking on the Font button opens up a dialog box allowing you to change the font, font style and size that will be displayed on the video. exacqVision User Manual 2/4/2009 Page 132 (4) The compression Format can be changed from MPEG4 to JPEG by clicking on the radio buttons. MPEG4 is the default setting because it saves approximately seven (7) times the disk space than JPEG compressed video. Look at the Average Image Size in the Channel Information box (9). Click on JPEG and wait a few seconds then click back on MPEG4. Note how MPEG4 saves disk space! (5) The Quality slider control gives you the ability to increase or decrease the visual and recorded quality of the video, which increases or decreases the Average Image Size. Moving the quality slider control to the right (10 maximum quality setting) increases the visual and recorded video quality and also increases the average image size (see Camera Information). Moving the slider control to the left (1 minimum) decreased the visual and recorded image quality decreases the average image size. Notice how the video becomes blocky when the quality slider is moved to a lower quality setting. The default quality setting is 8. Decreasing image quality saves disk space by reducing the size of the video that’s being recorded. A smaller video image size also transmits faster over local and wide area network. If you have a slow network connection you may want to reduce your average image size. (6) The Motion Detection Sensitivity sliders control increases and decreases the sensitivity of the motion detection algorithm used to record video. The slider control ranges from 1 on the left being the least sensitive to 10 on the right being the most sensitive. The default setting is 6. The sensitivity control is a useful tool for adjusting motion recording for certain environmental or camera signal quality factors. For example, you can set the sensitivity high (9 or 10) if your cameras produce a good quality video signal with little noise and in a bright environment because camera noise or shadows won’t cause unwanted motion recording. If you have a dark environment with poor visibility and a poor quality video signal, setting the sensitivity low (1 or 2) will reduce unwanted motion recording. exacqVision User Manual 2/4/2009 Page 133 (7) An effective method for seeing motion detection sensitivity setting feedback is to turn on the motion mask grid by clicking motion mask Edit button. Motion in the video will be highlighted with red squares in the motion mask grid. If you lower the sensitivity setting you will see fewer red squares. If you increase the sensitivity setting you will see more frequent red squares. The outside border of the video display will turn blue indicating motion recording. The Smooth Begin and Smooth End slider controls are used to reduce undesirable motion recording artifacts. The Smooth Begin slider control requires a minimum amount of time specified in fraction of a second from zero (0) to two (2) before the system begins to record motion video. The default is .25 second, which means the system will begin recording motion video only after it has acquired .25 second of motion. This will reduce short duration motion events like the blinking light of a laser bar code scanner in a dark room from triggering motion recording. Another example is placing a camera pointed at a lobby entrance with a window or glass door that has a road visible in the distant background. While the camera was placed to monitor and record people entering the lobby it also picks up moving cars through the window and glass door passing in the background. The cars pass quickly through the cameras field of view setting off unwanted motion recording. By increasing the Smooth Begin setting to .5 the car motion is not detected or recorded. exacqVision User Manual 2/4/2009 Page 134 The Smooth End slider control specifies that amount of time in seconds from zero (0) to two (2) that the system will continue recording motion video after an object ends moving. This Smooth End slider control smoothes out motion recording when a person or object momentarily stop moving and prevents the system from recording choppy segments of video. A motion mask will also reduce unwanted recording by eliminating motion events in certain areas of an image. For example, if a camera is pointed at a room that has a moving ceiling fan in the field of view you can eliminate continuous motion recording by masking out the fan. When someone walks into the room area not masked out in the cameras field of view the system will record video based on the motion. By creating motion masks you not only save storage space that will extend you recording time, you also make it easier to visually see motion events depicted as blue bars when you search for video. You can create a motion masks in a variety of patterns to suit your needs. To create a motion mask, complete the following steps: If you haven’t already done so, click on the Edit button: A blue 11 x 8 motion grid is displayed over the live video. To create a mask you can either individually click on each motion region or you can left click holding down your mouse and drag the cursor to another region selecting multiple regions. exacqVision User Manual 2/4/2009 Page 135 Click the Apply button to enable the motion mask. exacqVision User Manual 2/4/2009 Page 136 There are a couple of ways to remove a motion mask. First, if you have not yet clicked the apply button, you can remove the mask by clicking the cancel button. You can then create a new mask. Once you are happy with the location of the mask, click the Apply button. If you have already clicked the Apply button and want to delete them, click the Edit button again and then click the Clear button. All of the masks will be cleared from the window. You can now add a new mask or keep the window clear. Remember to click the Apply button to accept the changes. Clicking the Defaults button will clear any motion masks you have created AND reset all of the Record Settings to the default settings. exacqVision User Manual 2/4/2009 Page 137 (8) The Crop Window feature is not available on analog cameras. See IP Camera Setup, page 121 for more details. (9) The Video Mask is used to mask out a one rectangular region of live and recorded video. If you need to secure an area with video cameras but there’s an object such as a combination safe or keypad that you don’t want anyone to see, the video mask will permanently mask both live and recorded video from being viewed. Click on the Edit button and a yellow video mask grid will appear over the live video. exacqVision User Manual 2/4/2009 Page 138 Left Click, hold and drag the cursor over the area of the grid you want to mask. A green rectangle will mark the masked area. Click the Apply button and the yellow grid and green rectangle will disappear and the green rectangle will be replaced by a solid gray rectangle. This area is now masked from both live and recorded video. To clear the mask, click the Clear button. exacqVision User Manual 2/4/2009 Page 139 (10) The Video Settings slider controls are used to adjust the image on your screen. The system defaults to 50% for Brightness, Contrast, Saturation, and Hue. The Sharpness is set to 100%. You can easily reset to the system defaults by clicking the Defaults button. Clicking the Defaults button will clear any video masks you have created AND reset all of the Video Settings to the default settings. (11) The PTZ (Pan Tilt Zoom) Control box is used to set up your PTZ camera and to add position presets. To set up your camera, select the Serial Port from the dropdown box. Check the switch setting on your camera and select that address in the Address dropdown menu. The protocol is automatically set based on the serial port selection. You can allow use of digital PTZ on the Live and Search pages with the Digital checkbox. Digital PTZ allows a user to zoom and pan around a video stream without needing a mechanical PTZ camera. The Digital PTZ box will automatically be selected to enable digital PTZ. You can disallow digital PTZ by deselecting this box. exacqVision User Manual 2/4/2009 Page 140 You can create camera analog or digital presets by clicking one of the Presets buttons to access the PTZ Control window. Analog Digital (1) To add a new preset, use the arrows to point the camera to the appropriate location. (2) Use the Zoom Control buttons to zoom the camera in and out. (3) Type a unique name in the Name field. (4) Once you have the camera in the desired position, click the Set button. (5) You can adjust the speed of the Pan/Tilt and Zoom features in the Live view by using the Speed slider controls. Note: To adjust an existing Preset, you must delete it by selecting it in the Preset field and then clicking the Delete button. You can then set the camera to the desired location, retype the name, and then click the Set button. exacqVision User Manual 2/4/2009 Page 141 (6) The PTZ Tour feature allows you loop through a group of presets. (7) To add a preset to the Tour, select it from the Preset list and click the Add button. To remove a preset from the Tour, select it from the Tour list and click the Remove button. (8) From the Tour list, you can drag and drop the presets until you get the desired order. You can add a preset multiple times if you want to view a camera more frequently than the others. (9) The Dwell Time field controls the amount of time the camera pauses on each preset. The Resume Time field sets the delay if you take over the Tour manually. (10) exacqVision User Manual 2/4/2009 Page 142 Check the Enable box to activate the Tour. (12) The Camera Information box contains important information regarding the camera name, status, resolution, image rate, average image size, and recording mode. exacqVision User Manual 2/4/2009 Page 143 Audio Input Setup The Audio Input Setup screen is where you name and enable the audio inputs you want to record. There are up to 4 audio input positions that correspond to the audio inputs on the back the exacqVision NDVR (see Audio Input, page 27). The exacqVision System ships with the audio input positions disabled due to legal restraints on audio recording in some jurisdictions. You may want to seek legal guidance prior to recording any audio inputs. exacqVision User Manual 2/4/2009 Page 144 To assign a new, logical name for the Audio Input Channel, simply highlight the existing name and type the new name. Enable the Audio Input Channel by checking the Record Enable box. Repeat this process until all audio inputs have been named and then click the Apply button. The Listen field allows you to verify the audio input connected to a channel. This is sometimes helpful when assigning names to multiple audio inputs. Simply check the Listen box and you will hear the audio for the corresponding input channel. To stop the live audio feed, deselect the Listen box. exacqVision User Manual 2/4/2009 Page 145 Trigger Input Setup The Trigger Input Setup screen is where you assign names and set the Normal State (NO = Normally Open and NC = Normally Closed) of the exacqVision input triggers. There are 16 Trigger Position that correspond to the 16 Trigger Inputs on the back the exacqVision NDVR (see Trigger Input, page 24). You can assign a new logical name and change the Normal State from the default of NO to NC. Once you have made changes click on Apply. You can verify the proper operation of the input state by going to the Trigger Input setup screen and observing the “Status” state, which toggles back and forth between “Normal” and “Alarm”. By default the “Normal State” is set to NC (Normally Closed). If you trip the sensor by opening the door you will see the “Status” state toggle from a green ‘NORMAL” to a red “ALARM” indicating an alarm has been detected. The alarm can be linked to an action such as recording video or triggering a relay by going to the Event Linking screen and configuring the desired action (see Event Linking, page 176). exacqVision User Manual 2/4/2009 Page 146 Alarm Output Setup The Alarm Output Setup screen is where you assign names and set the Normal State of the exacqVision output triggers. There is one (1) Relay Output and 15 TTL Alarm Outputs that correspond to the output triggers on the back the exacqVision NDVR (see Trigger Input, page 24). You can assign a new logical name and change the Normal State of the 15 TTL Alarm Outputs from the default of Hi (5 VDC) to Lo (0 VDC). The Status is NORMAL in either the Hi or Lo Normal State setting until an event from the Event Linking screen activates an ALARM status. Once you have made changes click on Apply. You can verify the proper operation of the output state by observing the “Status” state, which toggles back and forth between “Normal” and “Alarm”. By default the “Normal State” is set to Hi (5 VDC). exacqVision User Manual 2/4/2009 Page 147 Go to the Event Linking Setup Screen (page 176) and create an event that links Video Motion to an Output Trigger I’ve named Front Door Alarm. Now, whenever video motion is detected you will see the Front Door Alarm is toggled from NORMAL to ALARM. exacqVision User Manual 2/4/2009 Page 148 Video Output Setup The Video Output Setup screen is where you configure your security spot monitor for touring (switching) between video cameras in either full, quad (2 x 2), 3 x 3, or 4 x 4 screen display modes. Select the cameras you would like to include in the tour by clicking on the Camera in Tour check box. When you click on the check box or camera name, video will be displayed to visually assist you to select the cameras you want to include. exacqVision User Manual 2/4/2009 Page 149 Click on the 1 x 1 Full Screen, 2 x 2 Quad, 3 x 3, or 4 x 4 radio button to select your display mode. Slide the Dwell Time control to desired length of time before the monitor switches to the next camera. The Dwell Time range is from 1 to 60 seconds. Once you have made changes click on Apply and the video output tour will begin. exacqVision User Manual 2/4/2009 Page 150 Storage Setup The Storage Setup screen is used to configure your hard drives for video storage. If you purchased an exacqVision System, you and your dealer determined how many hard drives to install based on your video storage needs. The C: drive is reserved for the exacqVision software and operating system, so you will notice that it is not enabled for video storage. We strongly recommend that you not record video to this drive as a precaution. Your other drives will also be visible on this screen. You can review and adjust the drive configuration, but if you purchased an exacqVision System, this should be unnecessary. You may also purchase the exacqVision software and install it on your own system. There is a calculator on http://www.exacq.com/evCalc/exacqVisionCalculator.html to help you determine the hard drive space recommended for your storage needs. We advise you to install the exacqVision software on your C: drive and use separate hard drives for video storage. This is because the standard drives in most general purpose computers are not designed for the rigors of video recording. The video storage drives should be designed for high duty cycle operation as it is likely that video will be recorded on a continual basis. Exacq recommends Western Digital RE drives. exacqVision User Manual 2/4/2009 Page 151 You can enable or disable a drive for video storage by selecting or deselecting the Enabled: box on the Storage Setup screen. You can use the entire hard drive or set an upper limit by adjusting the Video Space slider. If you choose to use your C: drive for video storage, it is a good idea to set the Video Space at no more than 90% to reserve space for other operating system tasks. The Used Space display lets you know how much of the hard drive capacity you are currently using. Any hard drive issues will be displayed in the Status field. Also displayed is a field which indicates the age of the oldest video recorded on this system. The website calculator will give you an estimate of how much hard drive capacity you need to meet your video needs, but it is only an estimate. The actual amount of motion and complexity in the images from your cameras may not be accurately reflected in the estimate. In this example, video has been stored for 19 days and the drive usage is at 94.4%. If the storage need was for 30 days, there would not be enough drive space. An additional hard drive could be added to expand the storage capacity or the quality of the video could be adjusted to conserve space. (See Camera Recording Setup, page 129, and Camera Setup, page 131.) exacqVision User Manual 2/4/2009 Page 152 You can set your exacqVision system to take a periodic snapshot even if the cameras are set to record upon motion or alarm. This is useful if it is necessary to prove the system was operational even in the absence of motion. For example, in a slip and fall situation, you can use the snapshots to prove that the camera was functioning, but no motion (or fall) occurred to trigger the recording. Use the up and down arrows to the desired increment and then select either the Hours, Minutes, or Seconds radio button. Selecting zero will disable this feature. Click the Apply button to save your Storage settings. exacqVision User Manual 2/4/2009 Page 153 Serial Profile Setup The Serial Profile Setup screen is where you view and create profiles for sales transactions so they can be viewed through live video or recorded and stored. You can also input an Event Keyword that will trigger a system alarm or action when certain items are being purchased. exacqVision User Manual 2/4/2009 Page 154 To view an existing profile, simply click on it in the Existing Profiles field. You can delete an existing profile by clicking the Delete button. To add a new profile, click the New Profile button in the Existing Profiles box. Type a unique name in the Profile Name field in the Current Profile Properties box. The EOT, or End of Transaction, marker tells the exacqVision System when the transaction has ended. You will want to enter the last line on the receipt to tell the system to start a new transaction each time it sees that line. For example, “www.marsh.net” or “Thank you for shopping at…” exacqVision User Manual 2/4/2009 Page 155 The Select Display Font button allows you to select the font you want to be display on the Live view. The Live Display and Record Masks box allows you to black out lines so they aren’t visible on the live camera or through recorded data. This is frequently used to hide credit card information. Simply type a signal word or words in the String field, and the system will black out the entire line on either the live display screen or recorded transaction or both. To mask the live video feed, tab to or check the Mask Display box. To mask the recorded transaction data, tab to the Mask Record Box or click in the box. exacqVision User Manual 2/4/2009 Page 156 The Days to keep POS data field will automatically default to 60 days, but you can extend or shorten the time by using the up or down arrows or typing directly in the field. The Event Keywords box allows you to set alarms that will be triggered through keywords on a receipt once you link the profile through the Event Linking system. Once you have input all the information for your profile, click the Apply button at the bottom of the screen. exacqVision User Manual 2/4/2009 Page 157 You have now created the new POS profile. If you entered any data in the Event Keywords box, you must link the profile to the appropriate Action through the Event Linking. See page 176. exacqVision User Manual 2/4/2009 Page 158 Return to the Event Linking system using the Set Up tree. The Event List shows all of the Events. Note: Red highlight indicates that one of the event parameters has been changed, making the event invalid. To link your profile to an event, begin by clicking the New Event button. Select POS Profile as the Event Type. exacqVision User Manual 2/4/2009 Page 159 Then Select your profile from the Event Source box. Select the Appropriate Action Type. For example, you can have the system “Notify” you via a page or an email when a particular item or a certain dollar value has been purchased or returned. You can also have it set off an alarm in an office when this occurs. You also have the option to record video or audio based on the profile you created, you will want to set up a Serial Port rather than a profile. (See Important Notes for instructions.) Now select the Action Target, or the location of the Action. The Pre Trigger and Post Trigger fields’ tells the system to perform the Action Type for a certain period of time before and after the event occurs. For example, record video for five seconds prior and after the words beer, wine, cigarettes, and or liquor appear on the receipt. The system will default to 0 for every Action Type except Record Audio. Record Audio defaults to five seconds prior and after the event occurs. You can change the pre and post trigger settings by using the up and down arrows. exacqVision User Manual 2/4/2009 Page 160 The system will automatically store the data for 30 days. If you wish to change that setting, simply click in the field and type or use the up and down arrows. Important notes: If your action type is to record video based on the keywords you input when you created the profile, and you have more than one register, you will want to use a POS Port rather than a profile so that only those cameras linked with the port that triggered the event will record. You will create the POS Profile as you did in the previous example, but when you get to the Event Linking screen, you will select POS Port rather than POS Profile. The profile will be assigned on the Serial Port Setup screen. exacqVision User Manual 2/4/2009 Page 161 Serial Port Setup The Serial Port Setup screen is where you configure serial ports on your exacqVision NDVR so that they can be used to communicate with serial devices such as point of sale (POS) terminals or pan-tilt-zoom (PTZ) cameras. Once you have connected the wires to the serial port, you need to configure it. Start by telling the system how you want the serial port to be used by clicking on the Use drop down menu to. The choices are unused, POS (Point Of Sale), or PTZ (Pan Tilt Zoom). Generally, the POS mode is used to record transactions at a cash register. The PTZ mode is used to control the motion of a PTZ camera. The exacqVision NVDR system will default to unused until you configure it. exacqVision User Manual 2/4/2009 Page 162 Once you have selected the Use, you will want to type a unique name for your POS, such as Express Lane, in the Name field. The Port will is automatically set by the Operating System. The Baud Rate, Data Bits, Stop Bits, Parity, and Flow control must match the devise you are connecting to. Check the User Manual for the devise you are using to determine the appropriate settings and use the drop down menus to make your selections. The Max Line Length will default to 80. Generally, you will keep the setting at 80, but you can change the length by clicking on the up or down arrows. When you are finished, save the settings by clicking the Apply button at the bottom of the screen. exacqVision User Manual 2/4/2009 Page 163 Notifications The Notifications screen is where you configure an e-mail server and message profile that will send an email message when an event occurs. Once you have configured the e-mail server and message profile you will need to go to Event Linking, page 176) to configure the events that will cause an email message to be sent. The E-mail Server Configuration box is where you setup the outgoing SMTP mail server that you will use to send email from the exacqVision System. Obtain this information from your network administrator. Note: If the SMTP mail server has already been configured, move to the instructions for creating a Message Profile. exacqVision User Manual 2/4/2009 Page 164 Click on the Server Description field and enter a descriptive name of email server so that you can uniquely identify it if you use more than one mail sever. This is a required field. Enter the address and port number (25 is the default) of our Outgoing mail server (SMTP). If your email server requires authentication enter your Username and Password. Once the email server is configured, you are ready to create a Message Profile. First, enter a brief description in the Profile Description field. This description will also appear in the Action Target field on the Event Linking Screen, page 176. Next, enter the e-mail address of the person the email is coming from as well as the e-mail address of the person or persons to whom the e-mail will be sent. Finally, type the Subject and Message and click the Add button. The profile is now listed under the Message Profile list. exacqVision User Manual 2/4/2009 Page 165 You can test the profile by selecting it from the Message Profile list and clicking the Test Profile button. You can make modifications as necessary by selecting the profile from the Message Profile list, making the appropriate changes, and clicking the Modify button. exacqVision User Manual 2/4/2009 Page 166 NOTE: Once you have setup the Message Profile, you must go to the Event Linking screen, page 176, to link it to an event. exacqVision User Manual 2/4/2009 Page 167 exacqRecall Button Configuration The exacqRecall Button can be very helpful in the event of a security violation. You can program it to export a video segment from specific cameras or audio inputs to a CD or DVD. It can also be programmed to send an email or text message notifying a contact that the button has been pushed. To configure the exacqRecall button: (“Change to Configuration page”) button to go to the exacqVision Click on the configuration page. In the Setup menu on the left of your screen, click on the name of the exacqVision server on which you will be setting up the exacqRecall button. Then, scroll down the Setup menu and click on “exacqRecall Setup.” exacqVision User Manual 2/4/2009 Page 168 This will take you to the exacqRecall Setup screen. exacqVision User Manual 2/4/2009 Page 169 On the left of the screen, you will find four status boxes. The top Activity Status box is where you select (check) or unselect (uncheck) that the CD/DVD drive should be automatically ejected when the system finishes burning it. It's an option because if the front door on the system is latched, the drive can't really eject anything. You can check or uncheck the box based on your system and click the Save button. The second Activity Status box indicates the status of the exacqRecall feature. Normally it's "Idle." If the system were to begin exacqRecall, either by clicking the "exacqRecall Now!" button or the green button on the system itself, a sequence of different status messages, such as “Gathering video" or "Creating ISO image", will appear here to keep you informed of the status. If exacqRecall is actually running, the profile “In Use” will be indicated as well. exacqVision User Manual 2/4/2009 Page 170 The Drive Status box indicates whether the system has a writable CD/DVD drive, and if so, what kinds of blank discs are compatible with it (i.e. CD-R, CD-RW, DVD-R, etc.). The Media Status box indicates whether there's a blank disc in the drive, and if so, what kind of disc it is, for example, CD-R, CD-RW, DVD-R, etc. It also indicates how much space it can hold. If you add a disk to the system, click the Refresh Status button, and in a moment, you should see a message confirming that a blank CD is in the drive and is ready. exacqVision User Manual 2/4/2009 Page 171 In the middle of the exacqRecall Setup screen, you will notice the Edit Profile box. To create a new profile, start by clicking on the New Profile button in the Edit Profile box. In the “Minutes Before” field, select the number of minutes of recorded video you want to export before the button is pushed. The default setting is 30, but you can increase or decrease the time by using the up or down arrows. Repeat this process to export the appropriate number of minutes after the button is pushed. This will delay the export process after the button is pushed in order for the system to record additional video or audio input. This is useful when the button is pushed and users are waiting for a supervisor or police officer to arrive. In some cases, events are still taking place after the button is pushed. exacqVision User Manual 2/4/2009 Page 172 exacqVision User Manual 2/4/2009 Page 173 Next, name the profile (e.g. “Main Street Branch”). Finally, choose the cameras you wish to export and then click on the Apply button. exacqVision User Manual 2/4/2009 Page 174 At this point, you have completed the process for creating an exacqRecall profile, but the system will NOT use your settings until you link the profile to an event on the Event Linking screen. Return to the Setup menu to the left of the screen, and select Event Linking. Click on the “New Event” button located at the bottom left of the screen. While still on the Event Linking page, locate the “Event Type” box at the bottom of the screen and scroll down to select “Button Input.” Next go to the “Action Type” field and select ExacqRecall. Finally, choose the appropriate profile as the “Action Target.” In this case, we selected “Entrances.” Finally, click the Apply button at the bottom of the Event Linking page to apply the changes to the exacqVision System. Your exacqRecall button is now configured and activated. exacqVision User Manual 2/4/2009 Page 175 Event Linking The Event Linking Setup screen is where you connect different types of events such as an input triggers to a desired action such as recording video or triggering an alarm. An Event Type occurs on a predetermined Event Source which triggers an Action Type on a predetermined Action Target. Events are stored in a database for you to quickly find. The reason for linking an event to an action is to create a logical relationship between your physical security devices to improve your ability to quickly search and find them when an event occurs. Event linking helps to narrow the information you are looking for. As an example, let’s say you want to find video every time a door opened in a busy lobby. If a camera that is pointed at a door and is set to record upon motion you could simply search the camera for motion video. However, the problem is that people standing or passing through the lobby also set off motion recording and you can’t distinguish it from the door opening. A solution for distinguishing between when the door opens and people pass through the lobby is to connect a door sensor to an input trigger and link it to video recording. Now you can go to the event searching screen and select the event and only find video associated with the event. exacqVision User Manual 2/4/2009 Page 176 To create a new event, follow the steps below: 1. Click the New button to add the new event to the Event List. 2. Select one of the Event Types. Event Type Video Motion Video Loss Input Trigger Serial Port Serial Profile Button Input Health IP Camera Connection Soft Trigger Description Camera detects motion. Video signal is disconnected. Wire trigger installed in back of server is activated. Key word entered on Serial Profile page is detected on a preselected port. Key word is detected on any Serial Port with that profile. Button of front of the system typically used for ExacqRecall. Problem detected involving health of the exacqVision server hardware. Network can’t connect to the IP Camera. Signal sent from the client to the server. 3. Select an Event Source. Event Type Video Motion Video Loss Input Trigger Event Source Any one of the cameras connected to the exacqVision server. Any one of the cameras connected to the exacqVision server. Any input trigger on the back of the server or IP camera connected to the server. The system will default to a device and input number, but these can be customized on the Input Trigger screen. See Trigger Input Setup, page 146. Serial Port Any of the serial ports that you have configured on your server. See Serial Port Setup, page 162. Serial Profile Any of the serial profiles you have configured. See Serial Profile Setup, page 154. Button Input Button 1. Health Temperature 1 (See eDVR 4000 Device, page 128) or Storage. IP Camera Connection Any one of the IP cameras connected to the exacqVision server. Soft Trigger Select New to create a new soft trigger with a default name. (Double click to name it.) Or select any of the predetermined soft triggers listed. exacqVision User Manual 2/4/2009 Page 177 4. Select an Action Type. Action Type None Record Video Record Audio Output Trigger Output Video 1 Notify exacqRecall PTZ Preset Description No action will be preformed. The event will be logged in the Event Database which can be accessed in Search Mode. Video will be recorded based on event. Audio will be recorded based on event. Activates a wired output trigger on the back of the server or IP camera. Switches the analog monitor from existing to state to a full screen view of the selected camera. An email notification will be sent according to profile created on the Notifications screen. See Notifications, page 164. Burns a predetermined profile to a cd/dvd. See exacqRecall Button , page 168. Positions the camera to a specific location based on the selected preset. See Camera Setup, page 131. 5. Select an Action Target. Action Type None Recorded Video Recorded Audio Output Trigger Output Video 1 Notify exacqRecall Preset Action Target No Action Target selected. Any one of the cameras connected to the exacqVision server. Any one of the audio inputs connected to the exacqVision server. Any output triggers on the back of the exacqVision server or IP cameras. Any of the analog cameras connected to the exacqVision server. Any of the profiles that have been setup on the Notifications screen. See Notifications, page 164. Any of the profiles that have been setup on the exacqRecall Setup screen. See exacqRecall Button , page 168. Any of the presets configured on any of the mechanical PTZ cameras. 6. Pre and Post Triggers can be used to trigger some action types before and/or after the event occurs. For example, if a door opening is set to trigger video recording, a Pre and/or Post Trigger can be set to capture the video for up to 100 seconds before and/or after the door opened. exacqVision User Manual 2/4/2009 Page 178 7. Click the Apply button to apply these settings to the event. 8. The Log Settings field is used to determine how long the event will be stored in the Event database. The system defaults to 30, but can modified by using the up or down arrows to select a number from 0 to 365. If desired, you can change the space allocated to the Event Linking window. Simply hover your cursor over the Resizing Bar, and drag it up or down to adjust the spacing to suit your needs. exacqVision User Manual 2/4/2009 Page 179 Schedule To maximize the amount of storage on your system, you will want to schedule your cameras based on your individual needs. For example, you may want continuous recording during business hours, but after business hours you may want your cameras to record based on motion or a specific event. The Schedule screen is where you setup your camera and event recording schedule. exacqVision software ships with Motion (Blue) recording as the default schedule because this is the most common and efficient (disk saving) way to record video. The default Event schedule is shipped Enabled (Red) so that when events are setup in the Event Linking screen they will automatically function once created. exacqVision User Manual 2/4/2009 Page 180 There are four modes of video recording: Motion (Blue) means video is recorded when motion is detected Free Run (Green) means video is continually recorded nonstop Alarm (Red) means video is recorded when there is a triggering event Off (White) means video is not recorded at this time Caution should be taken when setting up a camera to record video in the Free Run recording mode. In Free Run mode, video is continually recorded nonstop for the time you specified taking up valuable disk space even if there is nothing to record except an empty hall or blank wall. Customizing a recording schedule is quick and easy. There are four scheduling tabs: The Days and Cameras tabs are used to customize camera recording schedules. You can use either or both tabs to customize the schedule. The Events tab is used to enable or disable events for a particular time and day created on the Event Linking screen (page 176). The Audio tab is used to schedule when audio is recorded. exacqVision User Manual 2/4/2009 Page 181 In the Days view you see each camera connected to the system, audio inputs, and events in the left column and the hours of the day across the top row labeled 12 a.m. through 12 p.m. At the top of the schedule you see the Day drop down box, which allows you to select the day of the week to schedule. Note: Cameras and Audios which have been disabled will be reflected on the Days Scheduling tab as a lighter shade of blue or green. exacqVision User Manual 2/4/2009 Page 182 In the Cameras View you see each day of the week in the left column and the hours of the day across the top row labeled 12 a.m. through 12 p.m. At the top of the schedule you see the Camera drop down box, which allows you to select on of the enabled cameras connected to the system. An easy way to quickly review the schedule is to click once on either the Camera or Day drop down box, which highlights the camera in blue. Use your up or down arrow key to scroll through each camera or day of the week. or exacqVision User Manual 2/4/2009 Page 183 Customize the schedule by clicking on either the Days or Camera tab. Next, select the Motion, Free or the Off button to select the recording mode. In this example the Free recording mode was chosen from the Days tab. Next, select the day you want to customize in the camera drop down box. Left click on the desired camera and hour grid holding the mouse button down while dragging it to another grid location and release the mouse button. The area will change to green representing free run continuous recording. Once you have made the change you must click the Apply button to make the change. The Apply to All Days allows you to make changes for one day and apply them to all days. Note: You can make the same customizations using the Cameras tab, depending on your preference. From the Cameras tab, you will see the days of the week on the left and the cameras will be listed in the drop down box at the top. Instead of an Apply to All Days button, you will see an Apply to All Cameras button. This will enable you to schedule one camera for the week and then apply that same schedule to all of the cameras. You do not need to customize your schedule in both views. Select the view that best meets your needs. exacqVision User Manual 2/4/2009 Page 184 The Events schedule is where you enable or disable events created in Event Linking (page 176). By default, when an event is created in the Event Linking screen, it is automatically enabled in the Event Scheduling screen, meaning the action you have attached to the event will occur every time the event occurs. For example, if you have created a link with an input trigger of a door opening and an action target of a camera recording, the camera will record every time the door opens. However, if you only want the camera to record when the door opens on a specific day of the week or during set hours, you can use the Events schedule to customize when the actions will operate. To customize an event schedule: Click on the Disable button. Click on the Event drop down box and select an event. Left click on the desired day and hour grid holding the mouse button down while dragging it to another grid location and release the mouse button. The area will change to white indicating the date and time has been disabled. The Event will remain Enabled in the red area. Once you have made the change you must click the Apply button to make the change. If you want the same schedule for every event you have enabled, you can click the Apply to All Events button. exacqVision User Manual 2/4/2009 Page 185 The Audio tab enables you to schedule when the system records audio input. There are two modes for recording audio, Free Run, represented by the color green, or Off, represented by the color white. The system defaults to the Off mode, meaning no audio is being recorded. To set the system up to record audio, select the Audio tab. Select the appropriate Audio Input using the dropdown menu. (Any audio terminals that have not been enabled on the Audio Input Setup screen will be listed as disabled.) Click the Free Run radio button, then click in a square or drag your cursor across the multiple squares representing the day(s) and hour(s) you would like to record audio. To turn the audio recording off, select the Off radio button and drag it over any green squares you want to turn off. Once you have the completed your schedule, click the Apply button to set the Audio Input you selected. You can apply the schedule to all of the audio inputs by clicking Apply to All Audio In button. To cancel the schedule you created, click the Cancel button. exacqVision User Manual 2/4/2009 Page 186 Users Setup The User Setup screen is where you add or delete users to and from the exacqVision system. The User Setup screen is also where you set a users group access level and the cameras they have access to viewing. Once a user has been added to the system he/she will have the ability to login to view live and recorded video. exacqVision User Manual 2/4/2009 Page 187 To add new users click the New User button. The Username field is automatically populated with “newuser” and highlighted in blue to begin adding the new user. Type in the name of the new user you are adding then tab to the Password field and enter a new password. Tab to the Password Confirm field and retype the password. Users are assigned to one of three groups that have different level of access to system features. The three group access levels are: Administrator: Power User: User Admin: Restricted: Has access to all features of the system. Has access to all features except adding or deleting users. Has access to viewing live video, searching recorded video and the ability to add and delete users. Has access to viewing live video and searching recorded video. Click on the Group drop down box to select the type of assess level that will be assigned to this user. The Authorized Sources tree gives the administrator the ability to restrict users of the Restricted or User Admin class from seeing specific sources for viewing live and recorded video, audio, and POS data. Note: The Authorized Sources tree will be disabled when Power User or Full Admin is selected. exacqVision User Manual 2/4/2009 Page 188 Clicking on the camera name in the Authorized Sources tree will display the video that you are authorizing or restricting. By unchecking cameras in the Authorized Source tree users are limited in the cameras they are authorized to view. By default all cameras selected (checked) for viewing. At the top of the tree you can uncheck the server and deselect all of the cameras. If you check the server check box all of the cameras will be selected. Click on any of the individual camera check boxes to select and deselect cameras. When the user logs in to the system they will not see the restricted sources listed in the Camera tree for viewing live and recorded video. Click on the Apply button to apply the new user to the exacqVision Server. If you need to delete a user from the system click on the user in the User list to highlight the user then click the Delete button. exacqVision User Manual 2/4/2009 Page 189 RAID Setup Your exacqVision RAID system has redundant hard drive to protect data upon hard drive failure. In the event that one hard drive fails, the information can be recreated once the hard drive is replaced. You will want to create a notification and link it to a health event on the RAID server to alert you when there is an issue with one of the hard drives. Follow the instructions in the Notifications section, page 164, to set up the email notification. Once you have configured the message profile, follow these steps to link the notification to the health event on the RAID server. 1. Click the Add button to add the event to the Event List. 2. Select Health as the Event Type. 3. Select Storage Alarm as the Event Source. 4. Select Notify as the Action Type. 5. Select the Action Target that matches your Message Profile Description. 6. Click the Apply button to apply these settings to the event. Your RAID system will now send an email notification when it detects a hard drive issue. Should you receive this notification, go to the Trouble Shooting section, page 198, in this document and follow the steps for replacing the hard drive. exacqVision User Manual 2/4/2009 Page 190 6 Remote Client Software Setup Recommended Remote Client PC Requirements The recommended Remote Client PC requirements for the exacqVision Client applications include: Intel® Celeron® D Processor 325 (2.53 GHz, 533 FSB) Memory: 256 MB of RAM VGA card with minimum of 64 MB of video RAM, 1024 x 768 display resolution, 32-bit color, and DirectX® 8.1 or later hardware acceleration 30GB of free disk space Monitor: VGA with 1024 x 768 resolution, 32-bit color Operating system: Windows® Windows XP Installing the Remote Client Application 1. Start the Windows operating system. 2. Close all programs, including any antivirus software. 3. Insert the exacqVision CD into your PC CD-ROM drive and the installation wizard will prompt you for installation instructions. exacqVision User Manual 2/4/2009 Page 191 exacqVision User Manual 2/4/2009 Page 192 exacqVision User Manual 2/4/2009 Page 193 Starting the exacqVision Remote Client Application The exacqVision Remote Client will automatically start if you choose “Run exacqVision Client on System Startup” in the installation procedure above. If you didn’t select this startup option, follow the steps below: 1. Click the Windows Start icon 2. Click the Windows All Program icon 3. Click the exacqVision folder 4. Click on Start exacqVision using conservative graphics mode exacqVision User Manual 2/4/2009 Page 194 To display live video either drag a camera into the camera display area or click on one of the blue display modes. exacqVision User Manual 2/4/2009 Page 195 7 Special Features Multi Monitor Operation If you are running exacqVision client on a computer that is equipped with multiple monitors, you can greatly enhance your operating experience. First, configure your Windows Display Properties to use multiple monitors making sure the Extend my Windows desktop onto this monitor box is checked. Once you have configured your Windows Display Properties to use multiple monitors, open exacqVision client on your primary monitor and drag it to one of your attached monitors. You can then maximize the application to fill the monitor. Return to your primary monitor and open a second exacqVision client application. Repeat this process until all of your attached monitors have an open instance of exacqVision client. Note: The next time you open an instance of exacqVision client, it will automatically open on the last monitor it was connected to. exacqVision User Manual 2/4/2009 Page 196 You can now set each monitor to a different mode, searching recorded video or audio on one, and viewing live video on another, etc. Or, you can set the monitors to the same mode, expanding your view or workspace. You can also drag and drop cameras between clients. For example, you may be using a multiple view layout panel on one client, and want to take a closer look at one of the cameras. Simply drag a camera to your second monitor, leaving your original layout panel intact. Note: You can drag multiple cameras by selecting a different layout button on your second monitor. exacqVision User Manual 2/4/2009 Page 197 8 Trouble Shooting The information outlined in this section may be helpful if you experience a problem with your ExacqVision System. If you are unable to find the information you need or cannot resolve the issue, contact Exacq Technologies. Contact information is available in the Technical Support section of this manual, page 209. ExacqVision RAID system The RAID5 configuration which is used in Exacq Technologies’ RAID systems provides redundancy for a single drive failure. If you have a hard drive failure, it is important to replace the drive as soon as possible, as a second drive failure will cause all the data on the system to be irretrievably lost. See the RAID Setup section of Chapter 5 (page 190)of this manual for instructions on how to set up email notifications to alert you if the RAID system experiences problems. If you receive an email notification that a hard drive issue has been detected, follow these steps to pinpoint the problem: From the START menu, access Programs ►Intel® Matrix Storage Console. Click the Switch to Advanced Mode view button. exacqVision User Manual 2/4/2009 Page 198 A healthy RAID system is reflected in this screen shot. Select the Volume to display details about the hard drives. exacqVision User Manual 2/4/2009 Page 199 If you receive an email notification alerting you that a hard drive issue was detected, the screen will reflect a missing hard drive in the Volume. Click on the Volume to display specific details. The hard drives will be listed in the Parameter column, and the status will be listed in the Value column. exacqVision User Manual 2/4/2009 Page 200 The hard drive number in the Parameter column corresponds to the numbers on the diagram below. To replace the failed hard drive: First power down your exacqVision system and unplug it from the AC voltage supply. Pull the handle on the front of the drive bay to remove the drive carrier of the affected drive from the chassis. Unscrew the faulty hard drive from the carrier and replace it with an identical model. Re-insert the carrier into the chassis. Plug in the system and power on. The RAID BIOS screen which is initially displayed will show a “Non-member Disk” at the position of the new drive. Do not press Ctrl-I to enter the RAID BIOS setup. Windows will boot when the Ctrl-I prompt times out. On exacqVision systems, Windows is set at the factory to boot into the operating system restricted account called User and automatically start the exacqVision Client. Press Alt-F4 to close the exacqVision Client. Go to Start->Log Off User Press Log Off Select Admin. The factory default password for the Admin is admin256. You may see a message from the Intel Matrix Storage Manager in the system tray in the lower right corner that the RAID volume is running in a degraded state. Go to Start->Programs->Intel Matrix Storage Manager->Intel Matrix Storage Console Select the View->Advanced menu item and you should see a screen similar to that below: exacqVision User Manual 2/4/2009 Page 201 Right click on the drive under the Non-RAID hard drives tree item and select “Rebuild to this Hard Drive”. The following wizard will be displayed. exacqVision User Manual 2/4/2009 Page 202 Press Next exacqVision User Manual 2/4/2009 Page 203 The single new drive should automatically be shown in the “Selected” list. Press Next exacqVision User Manual 2/4/2009 Page 204 Press Next at this wizard screen to rebuild the factory default volume named “Data” using the new hard drive. The wizard will close and you will see a screen similar to the following: exacqVision User Manual 2/4/2009 Page 205 The rebuilding status in the right hand side information panel will update from 0% to 100%. This will take several hours. Upon completion, the volume status should show “Normal” as shown below. Do not log out of the admin operating system account until this process has completed. If your exacqVision Server was set up to notify you on storage health events, you should receive an email at the end of the process which says the volume status has changed from rebuilding to healthy. exacqVision User Manual 2/4/2009 Page 206 Display Issues In rare instances, a video card issue may cause a distorted display as shown in the picture below. Should this occur, follow these steps below to restore the video display. 1. 2. Close the exacqVision Client Determine the video card manufacturer. This can be accomplished by right clicking on the Windows desktop, selecting the Properties menu item. In the dialog that pops up, select the Settings tab. In the middle of the page is a Display dropdown. It will identify the graphics chip manufacturer and model number. 3. Go to the manufacturer's website and download the latest drivers for the graphics chip, then install them. Alternatively, from the Update Drivers page that you access by right-clicking the Display Adapter item in Windows Device Manager, you can access the Microsoft-maintained driver database, but it quite often lags behind the drivers available on the manufacturer's site. (Start Menu ► Settings ► Control Panel ► System ► Hardware Tab ► Device Manager Button) 4. 5. 6. 7. Install the new drivers. Restart the exacqVision Client. If you are still experiencing a display issue, continue to step 6. Go to the Setup mode, Client Setup tree item. It is likely that the VGA acceleration mode is Auto. Select the Offscreen radio button instead, then close and restart the exacqVision Client. exacqVision User Manual 2/4/2009 Page 207 8. If the display issue persists, repeat step 7), selecting the None radio button. exacqVision User Manual 2/4/2009 Page 208 9 Technical Support Exacq Technologies is committed to providing exceptional technical and engineering support. When you need help with your exacqVision product, please have the following information available: A complete description of the problem, including any error messages or instructions on re-creating the error. Technical support can be contacted as follows: Exacq Technologies, Inc. 7202 East 87th St. Suite 115 Indianapolis, IN 46256-1200 USA Phone: 1-317-845-5710 Fax: 1-317-845-5720 e-mail: [email protected] Web: http://www.exacq.com Technical Support Hours: Monday – Friday: Weekends & Holidays: exacqVision User Manual 2/4/2009 9:00 am – 5:00 pm EST (GMT -5) Closed Page 209 10 Regulatory Notice Federal Communications Commission (FCC) Radio Frequency Interference Statement The Exacq Product contains incidental radio frequency-generating circuitry and, if not installed and used properly, may cause interference to radio and television reception. This equipment has been tested and found to comply with the limits for a Class A computing device pursuant to Subpart J of Part 15 of the Federal Communications Commission (FCC) Rules. These limits are designed to provide reasonable protection against such interference when operated in a commercial environment. Operation of this equipment in a residential area may cause interference to radio and television reception, in which case users will be required to correct the interference at their own expense. If this equipment does cause interference to radio or television reception, which can be determined by turning the equipment off and on, users are encouraged to try to correct the interference by one or more of the following measures: Reorient the television or radio receiving antenna, and/or relocate the Exacq product and the radio or TV with respect to each other. If necessary, users should consult the manufacturer or an experienced radio/television technician for additional suggestions. Users may find helpful the following booklet prepared by the Federal Communications Commission: “How to Identify and Resolve Radio-TV Interference Problems,” which is available from the Government Printing Office, Washington DC, 20402 (stock #004000-00345-4). CE Notice Marking by the symbol indicates compliance of this device to the EMC directive of the European Community. Such marking is indicative that this device meets or exceeds the following technical standards: - EN55022: Conducted Emissions - EN55022: Radiated Emissions - 61000-4-2 Electrostatic Discharge - 61000-4-3 Radiated Immunity - 61000-4-4 Electrical Fast Transients - 61000-4-5 Surge Immunity - 61000-4-6 Conducted Immunity Electromagnetic compatibility (EMC) requires the use of shielded cable and ferrite cores for all wiring added by the user. Good shielding techniques should be applied in the user’s system. exacqVision User Manual 2/4/2009 Page 210 11 Warranty LIMITED WARRANTY AND LIMITATION OF LIABILITY LIMITED WARRANTY. Exacq hardware products are warranted against defects in materials and workmanship for three (3) years from the date Exacq ships the products to the Customer. All software products are licensed to the Customer under the terms of the appropriate Exacq Technologies license. For a period of ninety (90) days from the Delivery Date, Exacq software products (when properly installed on Exacq hardware products) (a) will perform substantially in accordance with the accompanying written materials, and (b) the medium on which the software product is recorded will be free from defects in materials and workmanship under normal use and service. Any replacement of a licensed software product will be warranted for the remainder of the original warranty period or thirty (30) days, whichever is longer. Customer must obtain a Return Material Authorization number from Exacq before returning any products under warranty to Exacq. Customer shall pay expenses for shipment of repaired or replacement products to and from Exacq. After examining and testing a returned product, if Exacq concludes that a returned product is not defective, Customer will be notified, the product returned at Customer’s expense, and a charge made for examination and testing. This Limited Warranty is void if products or parts are damaged by (a) improper handling, normal wear and tear, accidents, theft, vandalism, fire, water or other peril; (b) conditions outside the specifications for operation of the products, including but not limited to, electrical power, temperature humidity, dust or lightning; (c) Customer supplied third party software not intended for use with the applicable Exacq software; (d) utilization of an improper hardware or software key; (e) or improper use, negligence, repair, alteration or maintenance of the product not performed by Exacq Technologies, Inc. or its authorized service centers or authorized technicians. CUSTOMER REMEDIES. Exacq’s sole obligation (and Customer’s sole remedy) with respect to the foregoing Limited Warranty shall be to, at its option, return the fees paid or repair/replace any defective products, provided that Exacq receives written notice of such defects during the applicable warranty period. Customer may not bring an action to enforce its remedies under the foregoing Limited Warranty more than one (1) year after the accrual of such cause of action. RETURN/CANCELLATION POLICY. Customer may return unwanted products within thirty (30) days of the Delivery Date. Customer shall pay a fifteen percent (15%) restocking charge on any unwanted products returned to Exacq. No returns will be accepted after the thirty (30) day period has expired. Where special equipment or services are involved, Customer shall be responsible for all related work in progress; however, Exacq shall take responsible steps to mitigate damages immediately upon receipt of a written cancellation notice from Customer. A Return Material Authorization number must be obtained from Exacq for return of any products. Exacq may terminate any order if any representations made by Customer to EXACQ are false or misleading. NO OTHER WARRANTIES. EXCEPT AS EXPRESSLY SET FORTH ABOVE, THE PRODUCTS ARE PROVIDED “AS IS” WITHOUT WARRANTY OF ANY KIND, AND NO OTHER WARRANTIES, EITHER EXPRESSED OR IMPLIED ARE MADE WITH RESPECT TO THE PRODUCTS, INCLUDING BUT NOT LIMITED TO ANY IMPLIED WARRANTIES OF MERCHANTABILITY, FITNESS FOR A PARTICULAR PURPOSE, TITLE OR NON-INFRINGEMENT OR ANY OTHER WARRANTIES THAT MAY ARISE FROM USAGE OF TRADE OR COURSE OF DEALING. EXACQ DOES NOT WARRANT, GUARANTEE, OR MAKE ANY REPRESENTATIONS REGARDING THE USE OF OR THE RESULTS OF THE USE OF THE PRODUCTS IN TERMS OF CORRECTNESS ACCURACY RELIABILITY OR OTHERWISE AND DOES NOT WARRANT THAT THE OPERATION OF THE PRODUCTS WILL BE UNINTERRUPTED OR ERROR FREE. EXACQ EXPRESSLY DISCLAIMS ANY WARRANTIES NOT STATED HEREIN. NO LIABILITY FOR CONSEQUENTIAL DAMAGES. The entire liability of Exacq and its licensors, distributors and suppliers (including its and their directors, officers, employees and agents) is set forth above. To the maximum extent permitted by applicable law, in no event shall Exacq and its licensors, distributors and suppliers (including its and their directors, officers, employees and agents) be liable for any damages including but not limited to any special, direct, indirect, incidental, exemplary, or consequential damages, expenses, lost profits, lost savings, business interruption, lost business information, or any other damages arising out of the use or inability to use the products, even if Exacq or its licensors, distributors, and suppliers has been advised of the possibility of such damages. Customer acknowledges that the applicable purchase price or license fee for the products reflects this allocation of risk. Because some states/jurisdictions do not allow the exclusion or limitation of liability for consequential or incidental damages, the above limitation may not apply. If the foregoing limitation of liability is not enforceable because an Exacq product sold or licensed to Customer is determined by a court of competent jurisdiction in a final non appeal able judgment to be defective and to have directly caused bodily injury death or property damage in no event shall Exacq’s liability for property damage exceed the greater of $50,000 or fees paid for the specific product that caused such damage WARNING: IN ANY APPLICATION THE RELIABILITY OF OPERATION OF THE PRODUCTS CAN BE IMPAIRED BY ADVERSE FACTORS, INCLUDING BUT NOT LIMITED TO FLUCTUATIONS IN ELECTRICAL POWER SUPPLY, COMPUTER HARDWARE MALFUNCTIONS, COMPUTER OPERATING SYSTEM SOFTWARE FITNESS, FITNESS OF COMPILERS AND DEVELOPMENT SOFTWARE USED TO DEVELOP AN APPLICATION, INSTALLATION ERRORS, SOFTWARE AND HARDWARE COMPATIBILITY PROBLEMS, MALFUNCTIONS OR FAILURES OF ELECTRONIC MONITORING OR CONTROL DEVICES, TRANSIENT FAILURES OF ELECTRONIC SYSTEMS (HARDWARE AND/OR SOFTWARE), UNANTICIPATED USES OR MISUSES, OR ERRORS ON THE PART OF THE USER OR APPLICATIONS DESIGNER (ADVERSE FACTORS SUCH AS THESE ARE HEREAFTER COLLECTIVELY TERMED “SYSTEM FAILURES”). ANY APPLICATION WHERE A SYSTEM FAILURE WOULD CREATE A RISK OF HARM TO PROPERTY OR PERSONS (INCLUDING THE RISK OF BODILY INJURY AND DEATH) SHOULD NOT BE RELIANT SOLELY UPON ONE FORM OF ELECTRONIC SYSTEM DUE TO THE RISK OF SYSTEM FAILURE. TO AVOID DAMAGE, INJURY, OR DEATH, THE USER OR APPLICATION DESIGNER MUST TAKE REASONABLY PRUDENT STEPS TO PROTECT AGAINST SYSTEM FAILURES, INCLUDING BUT NOT LIMITED TO BACK-UP OR SHUT DOWN MECHANISMS. BECAUSE EACH END-USER SYSTEM IS CUSTOMIZED AND DIFFERS FROM EXACQ’S TESTING PLATFORMS AND BECAUSE A USER OR APPLICATION DESIGNER MAY USE EXACQ PRODUCTS IN COMBINATION WITH OTHER PRODUCTS IN A MANNER NOT EVALUATED OR CONTEMPLATED BY EXACQ THE USER OR APPLICATION DESIGNER IS ULTIMATELY RESPONSIBLE FOR VERIFYING AND VALIDATING THE SUITABILITY OF EXACQ PRODUCTS WHENEVER EXACQ PRODUCTS ARE INCORPORATED IN A SYSTEM OR APPLICATION, INCLUDING, WITHOUT LIMITATION, THE APPROPRIATE DESIGN, PROCESS AND SAFETY LEVEL OF SUCH SYSTEM OR APPLICATION. exacqVision User Manual 2/4/2009 Page 211 12 Manual Updates Release 2.8 Added Event Monitoring to the Setup section. Added Live Event Monitoring section under Live Mode Overview. Added Client Setup section. Added Display Issues to Trouble Shooting section. Created subheadings to Software Operation section to make it easier to find information. Release 2.9 Replaced screenshots in Setup Mode Overview section to reflect that disconnected d systems no longer show up in the configuration tree. Added a Searching Views section to Search Mode Overview. Inserted a line in the Site Tree Navigation section to reflect that a Tooltip displaying the cameras and servers included in a View will be displayed when hovering over the View name. Added instructions for copying a searched image to the clipboard in the Exporting Files section Added instructions for zooming in on one video view panel from a multi-camera view to the Searching Views section. Included instructions for changing the colors of Motion, Alarm, Free Run, PTZ Focus and Event Monitor borders in the Client Setup section. Added the PTZ cursor panning limit indicator and instructions for using the Alt-Z keys to enable a Digital PTZ zoom box to the PTZ Control section of Live Mode Overview. Revised the Multi Monitor Operation section in the Special Features chapter to include instructions for dragging and dropping between separate instances of the client. exacqVision User Manual 2/4/2009 Page 212 Release 2.10 Added a new picture of the Layout Buttons includes an 8x6 button available on widescreen monitors. Added an Event Buttons section to the Live Mode Overview section. Added Camera Properties dialog to Layout Panel section of Live Mode Overview. Added Event Buttons/Soft Triggers to the end of the Client Setup section. Updated the Camera Setup screens in both the IP Camera Setup and Camera Setup screens. Replaced Device Name field with IP Address field in the IP Camera Setup section of Setup Mode Overview. Added Cropping to the IP Camera Setup and Camera Setup sections. Removed references to the Device Name field in the Camera Setup section of Setup Mode Overview. Revised the Event Linking section and added Soft Trigger to the Event Type field descriptions. Release 2.11 Added a Searching Events tab to the Search Mode Overview section. Revised Logging In section with diagrams showing factory and recommended configurations. Replaced Live Mode Overview screenshot. Revised description for bullet 4, Site Tree. Added a bullet 14, Soft Trigger Icon, to the Live Mode Overview section. Release 3.0 Added Mac to the Product Description Updated Model Numbers Added instructions for saving video clips using a Linux or Mac operating system. Added instructions for exporting video using a Mac to the Exporting Files section under Search Mode Overview. exacqVision User Manual 2/4/2009 Page 213 exacqVision User Manual 2/4/2009 Page 214