1
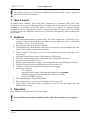
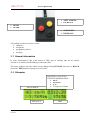
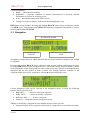
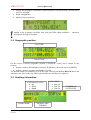
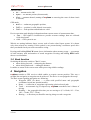
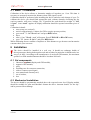
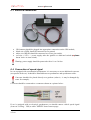
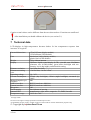
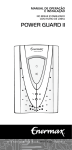
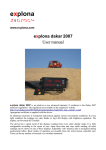
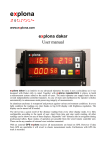
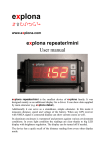
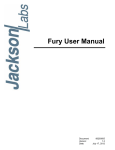
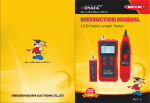
explona www.explona.com GPS odometer User manual explona series are devices designed to provide accurate distance measurement and navigation. It can have both ground and marine use. It is a modern odometer with an integrated GPS receiver. So far most devices uses data collected from wheel turns to determine elapsed distance. explona enhances this mode by using GPS information as well. This solution provides very accurate measurements and enables to display current speed, geographic location, altitude above the sea level and precise time. Furthermore the navigation toward user waypoints is also possible. A voltage of the main battery is shown as well. The device is equipped with standard RS232 communication interface. It allows to connect to PC or PDA. This way additional navigation help can be provided externally. www.explona.com You should calibrate the device after installation and each change of tyres. Imprecise measurement can occur otherwise. 1 How it works In normal mode distance, speed and other parameters are computed using GPS. This information are correct even during long drive through mud or deep sand where slewing and skidding are unavoidable. If the GPS signal is weak (e.g. in tunnels) or antenna has been damaged the device automatically reverts to measurement based on wheel turns. The validity of data is preserved. Calibration of the device is preformed automatically, almost without user intervention. 2 Features Two independent distance measurements. The main counter has a resolution of 1m, auxiliary 100m. Both values decrease while reversing. Maximum value is 20000km. After that a rollover to 0 is performed. Speed measurement with 1km/h resolution. Configurable units. Both distance and speed can be shown in most common units: km (km/h), miles (mph) or nautical miles (knots). ”Back” function, allowing to preserve correct measurements while returning to the correct route. Automatic choice of best source of information (GPS/wheels). 24h clock, automatically adjusted from GPS, with configurable time zone. Stop-watch with resolution of 0.1s. Display of the main battery voltage, with configurable low-mark and high-mark alerts. Display of current location and height above the mean sea level. Compass – indication of current course (only while moving). Advanced navigation: – 100 waypoints, – waypoints can be added, edited and deleted directly in explona, – automatic logging of track from the last 14 hours of driving, – Garmin and NMEA support. Selectable languages: English and Polish. Backed-up memory. All values are remembered after power off. Large, backlit LCD display with two brightness levels (for day and night work) and antireflection coating. 3 Operation Basic functions of buttons are shown on next page. It is recommended to hold manipulator with a cable directed upward (see a figure). explona v2.0 User manual version 1 www.explona.com NEXT SCREEN INCREASE SUBSCREEN DECREASE RESET ENTER All readings are shown on four screens: odometer, navigation, geographic position, auxiliary. 3.1 General information In some circumstances (due to the nature of GPS) part of readings may not be entirely accurate. It is indicated with blinking of uncertain value. The cursor indicates the place which can be changed using YELLOW (increase) or BLACK (decrease). RED button accepts/goes to next field. 3.2 Odometer REAL SPEED DISTANCE explona v2.0 User manual version 1 BATTERY VOLTAGE or URGENT INFORMATION: Back Antenna H-W Voltage out of limits TIME www.explona.com Urgent information: Back — Back function enabled, Antenna — improper condition of antenna (disconnected or shorted), detailed information is present on auxiliary screen, H-W — no communication with GPS receiver, Voltage out of preset limits is indicated with blinking battery icon. RED button resets distance. Pressing and holding BLACK button shows a subscreen. In this case RED resets Total distance and YELLOW starts/stops stopwatch. Stopwatch is reset by pressing and holding YELLOW. 3.3 Navigation WAYPOINT NAME NAVIGATION TO TARGET DISTANCE IN STRAIGHT LINE Navigation to target shows in which direction and how much should be turned to aim straight to waypoint. Pressing and holding BLACK shows subscreen with present heading and bearing to target. Pressing RED button invokes navigation menu. Afterwards current waypoint name is shown in the bottom line of the display and first menu option in top one. Options are distinguished by indention and the dot symbol in front of them. The triangle indicates selection of the waypoint. Right arrow picks waypoint to edit and X means deleting the point. Current navigation point can be selected in the navigation menu. In menu the following options can be picked as well: New WPT... — allows to add a new waypoint, Edit WPT... — allows to modify a waypoint, Delete WPT... — deletes a waypoint, Cancel — abort and return to navigation screen. Adding or modifying a waypoint invokes another menu in which you can: change the name of the waypoint (initial name is composed of a current date and time), explona v2.0 User manual version 1 www.explona.com change the geographic coordinates (current position is an initial value); invalid entries won’t be accepted, Save waypoint, Cancel entire operation. Adding a new waypoint is possible only with good GPS signal condition — otherwise appropriate message will appear. 3.4 Geographic position LATITUDE LONGITUDE On this screen a current geographic position is displayed. Values can be shown in two formats: degrees, minutes, thousandths of minutes; height above the mean sea level (HMSL); degrees, minutes, seconds, hundredths of second. The default format of coordinates is set in the setup. Pressing and holding BLACK shows the alternative one. Due to the way GPS works altitude can sometimes be imprecise. 3.5 Auxiliary information ANTENNA STATUS: OK Shrt Open WORK MODE explona v2.0 User manual version 1 WHEELS ARE TURNING GPS MODE: NoFix 2Dfix 3DFix NUMBER OF SATELLITES www.explona.com Antenna status: OK — antenna works OK, Open — no antenna present (disconnected), Shrt — antenna shorted (turning off explona or removing the cause of short circuit is advised). GPS mode: NoFix — unknown geographic position, 2Dfix — position is valid, altitude is uncertain, 3DFix — both position and altitude are valid. Device operation mode displays information about current source of measurement data: imp — GPS signal is insufficient to provide accurate readings, data are collected from wheel turns GPS — GPS system in use. Wheels are turning indicator shows correct work of entire wheel input system. It is shown only when wheels are rotating. If this symbol is not present during a moderate speed drive then you should check your converter and its wiring. Pressing and holding BLACK button shows information about memory usage — percentage of track memory used and number of stored waypoints. Pressing and holding RED button shows a serial number. 3.6 Back function Switching the direction switch to ”Back” causes: when driving forward — subtracting the distance when driving backward — adding the distance. It enables to return to the correct route while preserving reliable readings. 4 Navigation explona contains a GPS receiver which enables to acquire current position. This way a straight-line navigation to waypoint can be achieved. The device is not equipped with a map. The basic terms regarding navigation are following: Waypoint (WPT for short) — a point with specified name and geographic coordinates stored into internal memory. Route — a collection of waypoints representing a desired travel path. Track — an automatic log of elapsed way. explona remembers last 14 hours of driving. Heading — the geographic direction you are moving to (0° is North, 90°— East, 180°— South, 270°— West). Bearing — a direction you should be moving along to reach a waypoint. explona v2.0 User manual version 1 www.explona.com Waypoints shown upon a map. A map with a track. 4.1 PC/PDA communication using Garmin protocol The Garmin protocol enables a bidirectional communication of explona with an external navigation software. This way a software can: send and receive waypoints, send routes, receive a logged track, receive current position and time. 4.2 Communication using NMEA The device is equipped with a NMEA (National Marine Electronics Association) interface as well. This way explona informs external devices about current position, speed, altitude and time. The exact way of using provided data depends on external software. In order to connect explona to external PC/PDA you need to obtain special cable. If you’re connecting NMEA to PC be sure to plug it in after an operating system starts. Otherwise (due to peripheral autodetection) sometimes NMEA transmissions can be mistaken for a serial mouse, rendering pointer useless. In such case disconnect explona from PC, restart your PC and reattach NMEA after a operating system is loaded. explona v2.0 User manual version 1 www.explona.com 4.3 Compatible software explona v2.0 was successfully tested with the following software: AutoMapa, EasyGPS, emapa nawigator, Fugawi, GPS utility, Kashmir 3D, OziExplorer. Other software expecting NMEA and/or Garmin GPS receiver should also work. 5 Configuration Entering into configuration menu (setup): turn off the power, turn on the power, press and hold RED button when ”Hold RED button to enter SETUP” appears, setup menu will appear shortly afterwards. In setup you can change following settings: 1 Time zone — sets a local time zone. Allowable settings are from GMT-12 to GMT+12. In Europe winter time is usually GMT+1 and summer (also known as ”Daylight saving”) is GMT+2. 2 Language — selection of a language (English or Polish). 3 Calibration — enable to automatically calibrate the device. 4 Units — selection of units of speed and distance: km/h km, mph mi — miles per hour, miles, kts Nm — knots, Nautical miles. 5 Operation mode — sets mode of operation: GPS+imp (auto) — automatic selection of the best source of measurements, GPS only — forces use of GPS only (useful if a malfunction occurs in wheel speed converter). 6 Battery good — setting of allowable range for a voltage. 7 Reverse gear — allows to select used method of connecting reverse gear (activated by ”+” or ”–” of installation). On the screen there is symbol ”F” when explona thinks you’re going forward and symbol ”R” when going backward. You should pick appropriate mode to match the real settings. 8 Lat/Lon format — selects default format of displaying and editing geographic coordinates (ddd°mm.mmm’ or ddd°mm’ss.ss”). 9 Restore factory settings — resets all options to the factory defaults (Time zone GMT+2, English language, 3500 pulses/km, metric units (km/h & km), automatic mode of operation, battery good range: 11.5V–14.8V, reverse gear activated by ”–”, geographic position with degrees and minutes). Warning: distance and timer are reset as well. 10 Clear track — erases logged track. 11 Save & quit — leaves setup. explona v2.0 User manual version 1 www.explona.com 5.1 Menu ”3 Calibration” Calibration of the device allows to determine number of impulses per 1 km. This data is necessary to accurately measure the distance when GPS signal is weak. Calibration should be performed after installing the device and after each change of tyres. To calibrate the device you should find appropriate road, without obstacles obscuring the sky (such as tunnels, wide trees, bridges, etc). If possible the road should be straight. If ”GPS signal too weak” appears on display calibration should be repeated on another piece of road. Calibration in detail: enter setup (see section 5), wait for approximately 1 minute for GPS to acquire present position, go to menu ”3 Calibration” and press RED button, drive, after a 1 km ”Thank you” will appear. Press YELLOW or BLACK button, go to ”11 Save & quit” and press RED button. While calibrating observe number of impulses n. If the distance to go decreases and n remains constant check your converter. 6 Installation The device should be installed in a safe way. It should not endanger health of driver/passengers during both regular work and accident. In particular it should not be in a way of air bags. According to the manufacturer of enclosed GPS antenna, the maximum speed of car with attached antenna should be less than 180 km/h. 6.1 Set components 1. 2. 3. 4. 5. 6. 7. 8. Odometer explona (display and GPS module), magnetic GPS antenna, pilot, shielding case for converter connection, cable to connect speed signal, user manual and warranty card, set of stickers, box. 6.2 Mechanical installation The device should be permanently attached above the expected water level. Display module should be readable for pilot and shouldn’t distract the driver. Antenna should ”see the sky” and be protected from damage. explona v2.0 User manual version 1 www.explona.com 6.3 Electrical installation GPS antenna should be plugged into appropriate connection on the GPS module, black wire (GND) should be connected to car ground, white wire (REAR) should be connected to reverse gear switch, red wire (+12V) — power supply after the ignition or dedicated switch (explona doesn’t have its own switch). Warning: power supply should be protected with a 1A to 3A fuse. 6.4 Connection of speed signal In cars equipped with a mechanical speedometer it is necessary to use an additional converter (not present in the set). It should be installed between speedometer and speedometer cable. Converter shouldn’t be placed directly on a gearbox (reducer) – it may be damaged (by water for example). Converter should be connected to a connector shown on a picture below: If car is equipped with an electrical speedometer you should connect vehicle speed signal (from car’s wiring – VSS) to cable ”SPEED” shown on next page. explona v2.0 User manual version 1 www.explona.com Caution: actual colours can be different from the ones shown above. Functions are unaffected. After installation you should calibrate the device (see section 5.1) 7 Technical data LCD displays in high temperatures becomes darker. In low temperatures response time increases. It is typical. External dimensions Case Weight Display Distance resolution Distance measuring error Operating voltage Current consumption Minimal impulses per kilometre NMEA interface Garmin interface Waypoints Track capacity Antenna GPS Temperature range 170x65x35mm (display module) 155x50x28mm (GPS module) aluminium, black (display module) plastic, black (GPS module) 730g, without antenna Character liquid crystal display (LCD), viewable area: 99x24mm (character size: 4.84x9.66mm), green-yellow backlight with two intensity levels (day/night), antireflection coating 1m (100m for total) +3m for 1km; -1m for 2.5km* 10 – 36V 270mA (day backlight), 120mA (night backlight), measured @ 14.4V 400 RS232, baud rate: 4800 bit/s RS232, baud rate: 9600 bit/s 100 last 14 hours of moving manufacturer: Alps, active, magnetic, 3V, SMB, 5m cable -20°C do +70°C * Average results. We reserve the right to change specifications without prior notice. All trademarks are the property of their respective owners and are used for information purposes only. © Copyright by explona Devel Team explona v2.0 User manual version 1