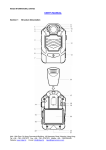
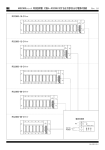
1
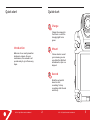
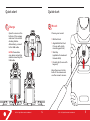
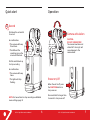
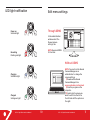
RS2 X 2 With you on the front line Quick Start and User Manual V 1.0 REVEALMEDIA.COM Quick start Quick start 1 Charge Charge the camera for four hours or until the charging light turns green. Introduction 2 Mount Welcome to our next generation body worn camera. For your convenience, the camera is set up and ready to go in three easy steps. Choose how to mount your camera; you can use either the Klickfast attachments, clips or a lanyard. 3 Record Slide the red switch down to start recording. To stop recording, slide the red switch up. RS2 - X2 Quick Start and User Manual 2 RS2 - X2 Quick Start and User Manual 3 Quick start Quick start 2 Mount 1 Charge Open the cover on the bottom of the camera and insert into an RS2 docking station. Alternatively, connect to the USB cable. Choose your mount: NOTE: Please take care when connecting and disconnecting the USB cable. • Shirt clip • Klickfast stud • Angled Klickfast stud (for use with a high mounting position) (ajustable for male and female shirts) • Pocket clip (for use with lanyard) Align the mount on the back of the camera and use the screw to secure. RS2 - X2 Quick Start and User Manual 4 RS2 - X2 Quick Start and User Manual 5 Quick start Operation 3 Record Pull down the red switch to record. Camera articulation As confirmation: CAUTION: DO NOT OVER ROTATE! The camera head does not rotate 360°. Forcing it will cause damage to the camera head. • The camera will beep three times. • The LED and the recording icon on the screen will flash red. Pull the switch back up to stop recording. As confirmation: • The camera will beep twice. Power on/off • The lights will stop flashing. When the unit is off, press the FUNCTION button to turn power on. Press and hold for longer than 2 seconds to turn power off. NOTE: For two actions to stop recording see Editable menu settings, page 13. RS2 - X2 Quick Start and User Manual 6 RS2 - X2 Quick Start and User Manual 7 Operation Function Button Go back PLAY / PAUSE VIDEO REWIND / SCROLL THROUGH VIDEOS Press the FUNCTION button once to go back on the menu screen and in playback mode. FAST FORWARD / SCROLL THROUGH VIDEOS Show menu options Onboard playback Press the FUNCTION button to turn the camera on. Once on, press the PLAY button to open playback mode. NOTE: If encryption is activated you will need to enter your encryption pin for playback. See notes on Activating AES-256 bit encryption, page 14-15. In preview mode, press and hold FWD and RWD simultaneously to bring up menu screen. Use FWD and RWD buttons to scroll through menu options and press PLAY button to view chosen setting. Mark as evidential While recording: press once to mark as evidential. NOTE: Menu options can only be changed via a PC. See Edit menu settings, page 11. The symbol will appear in the bottom right corner of the screen. Select the desired thumbnail in playback mode: press and hold for 2 seconds to mark video as evidential. Stealth mode Stealth mode enables recording without the front facing screen or LED light. The symbol will appear in the bottom right corner of the thumbnail. Hold RWD button for three seconds to activate or deactivate stealth mode. RS2 - X2 Quick Start and User Manual Press the FUNCTION button twice to exit the ENTER PIN screen and go back to preview mode. 8 GO BACK / MARK AS EVIDENTIAL RS2 - X2 Quick Start and User Manual 9 LED light notification Edit menu settings Through DEMS Power on Solid red light In the administration window select the ‘Reveal camera settings’ tab. NOTE: Requires DEMS V3.5 or later. Recording Flashing red light Without DEMS NOTE: You must run the Reveal Camera Manager as an administrator to change the camera settings. 1) Download the Reveal Camera Manager from www.revealmedia.com/downloads 2) Run the program on the computer. 3) Select which camera you want to edit from the list on the left and edit the options on the right. Charging Solid blue light Charged Solid green light RS2 - X2 Quick Start and User Manual 10 RS2 - X2 Quick Start and User Manual 11 Editable menu settings 1. RESOLUTION Editable menu settings 9. AUTO LCD OFF 1920x1080 30FPS 10. DEFAULT SETTINGS 1280x720 30FPS (Default) 2. PRE-RECORDING Stores 30 seconds prior to record activation. 3. AUDIO ALARMS Resets camera to default settings. 848x480 30FPS 11. UNIT ID SETUP 640x480 30FPS 12. PRE-RECORD MUTE ON With protected mode enabled the ON camera is seen as a mass storage device on your computer and video files can be accessed and copied, but videos cannot OFF (DEFAULT) be played without DEMS or Reveal Camera Manager. ON (DEFAULT) 14. TRUSTED MODE AUTO (DEFAULT) SUNNY / CLOUDY / FLUORESCENT/INCANDESCENT ENGLISH (DEFAULT) 6. TIME AND DATE STAMP ON (DEFAULT) With trusted mode enabled the camera is ON seen as a removable disk on your computer, but if you try to access the disk, windows will report there is no disk in the drive and no data from the camera can be accessed OFF (DEFAULT) without DEMS or Reveal Camera Manager. 15. RECORD OFF MODE For single or two actions to stop recording. OFF 7. TIME AND DATE SETUP 8. START IN STEALTH MODE 16. FIRMWARE VERSION ON OFF (DEFAULT) 12 SLIDER ONLY (DEFAULT) SLIDER PLUS POWER BUTTON SET YYYY/MM/DD HR/MIN/SEC RS2 - X2 Quick Start and User Manual USER SET (five alphanumerics) 13. PROTECTED MODE OFF (DEFAULT) 5. LANGUAGE NO / YES ON No audio is recorded during the pre-record section of video. Once the user switches on record mode, audio is OFF (DEFAULT) then recorded. OFF 4. WHITE BALANCE 30 SECS / 2 MINS / 5 MINS /OFF (DEFAULT) Displays the version of firmware installed on the device. RS2 - X2 Quick Start and User Manual 13 Activating AES-256 bit encryption Activating encryption Through DEMS 1 Encryption settings: Choose between activating encryption automatically for all cameras when connected to DEMS using the same encryption PIN or activating each camera individually using a different encryption PIN. 2 Encryption PIN: Enter 4 to 8 digits. Use this to enable playback of videos on the camera. This will automatically generate a keystroke sequence. 3 Recovery PIN: Enter 8 to 20 digits. Use this to deactivate encryption on the camera. This is required to recover the camera if the number of failed attempts to decrypt the camera has been exceeded. 4 Try count: Enter a value between 3 and 15. This value indicates the number of failed attempts to decrypt the camera before it is blocked. 5 Keystroke sequence: Shows the order of button presses that you will need to enter on the camera to enable playback of encrypted videos. 6 Activate encryption: Click this to activate encryption with the settings you have entered followed by clicking OK in the confirmation pop-up window. Login to DEMS as administrator. Navigate to Reveal camera encryption tab in the Administration window under the Advanced menu. Administration Retention Policy Cameras Reveal Camera Settings Files in Transfer 1 Users Generate Licence Request Job Manager Storage Manager Import Licence User Permissions Errors Settings Encryption Settings All Cameras Mode Use this mode to automatically activate encryption on any encryptable camera connected to DEMS. Thesettings below will be applied to all RS2-X2 cameras when connected to DEMS. Individual Cameras Mode Use this mode to activate encryption for every camera individually. The camera has to be connectedto DEMS to activate encryption. Camera Settings Drive Letter E:\ A1801 Status: Encryption disabled You may activate encryption for the camera. Keystroke sequence for playback on camera: Encryption PIN 2 ? Recovery PIN 3 ? Try Count 4 15 ? 5 6 Activate Encryption Through Reveal Camera Manager IMPORTANT NOTE: Protected mode must be turned off in the settings on each Reveal camera before encryption is activated, otherwise videos will be corrupted. RS2 - X2 Quick Start and User Manual Although the layout of the settings will vary, please note encryption is activated by following the same steps as in DEMS. 14 RS2 - X2 Quick Start and User Manual 15 Deactivating AES-256 bit encryption Deactivating encryption Through DEMS FOR INDIVIDUAL CAMERAS MODE Connect the camera you want to deactivate encryption on. Login to DEMS as administrator. Enter recovery PIN and click “Deactivate”. Navigate to Reveal camera encryption tab in the Administration window under the Advanced menu. NOTE: The camera should now operate as normal without encryption. Administration Retention Policy Cameras Reveal Camera Settings Files in Transfer Users Generate Licence Request Job Manager Storage Manager Import Licence User Permissions Errors FOR ALL CAMERAS MODE Settings Encryption Settings Deselect the checkbox for "All Cameras Mode” for activating encryption automatically or simply select the other encryption option. All Cameras Mode Use this mode to automatically activate encryption on any encryptable camera connected to DEMS. Thesettings below will be applied to all RS2-X2 cameras when connected to DEMS. Individual Cameras Mode Use this mode to activate encryption for every camera individually. The camera has to be connectedto DEMS to activate encryption. Camera Settings Drive Letter Connect all of the cameras you would like to deactivate encryption on to DEMS. E:\ A1801 Status: Encryption enabled The files on the camera are encrypted. Please select Decrypt option below to access the files on this camera. You do not need to manually enter this PIN in normal use; DEMS automatically decrypts the files. Encryption PIN ? Decrypt Recovery PIN ? Deactivate NOTE: The cameras should all now operate as normal without encryption. Please press the following sequence of keystrokes on your Reveal camera to play videos: Reset Through Reveal Camera Manager Although the layout of the settings will vary, please note encryption is deactivated by following the same steps as in DEMS. RS2 - X2 Quick Start and User Manual 16 RS2 - X2 Quick Start and User Manual 17 Mounting and usage options Mounting and usage options Klickfast Car Mount Standard or angled. Use the angled Klickfast when using a high mounting position. Suction cup is attached to windscreen for in-car camera. (optional extra) Shoulder mounts Shirt clip • harnesses • epaulette mount • shoulder mount For use on a shirt (ajustable for male and female shirts). For use with loose fitted clothes or with shirted uniforms. (optional extra) Pocket clip Table top For use with a lanyard around the neck or attached to a pocket. For use in interviews and other static situations. RS2 - X2 Quick Start and User Manual 18 RS2 - X2 Quick Start and User Manual 19