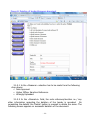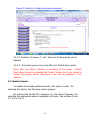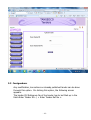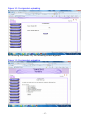
1
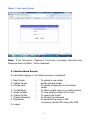
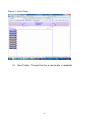
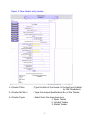
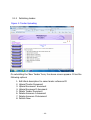
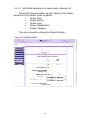
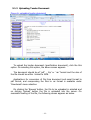
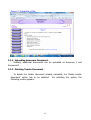
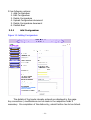
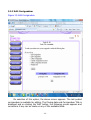
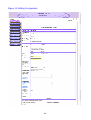
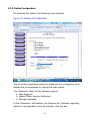
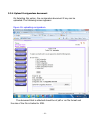
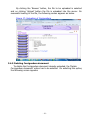
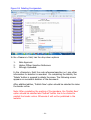
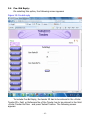
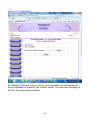
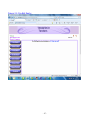
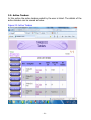
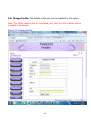
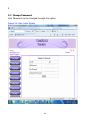
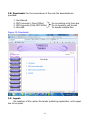
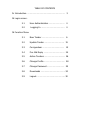
TABLE OF CONTENTS
1. Introduction. ………………………………………………………. 3
2. Login screen.
2.1
User Authentication ……………………… 4
2.2
Logging In …………………………………. 4
3. Function Menu.
3.1
New Tender ………………………………… 6
3.2
Update Tender ……………………………. 15
3.3
Corrigendum ………………………………. 15
3.4
Pre- Bid Reply ……………………………… 24
3.5
Active Tenders …………………………….. 26
3.6
Change Profile ……………………………… 28
3.7
Change Password ………………………… 29
3.8
Downloads …………………………………… 30
3.9
Logout. ……………………………………….. 30
TABLE OF FIGURES
Figure
Figure
Figure
Figure
Figure
Figure
Figure
Figure
Figure
Figure
Figure
Figure
Figure
Figure
Figure
Figure
Figure
Figure
Figure
Figure
Figure
Figure
Figure
Figure
Figure
1: User Login Screen ………………………………………
2: Home Page ………………………………………………..
3: New tender entry screen …………………………….
4: Tender Uploading ……………………………………….
5: Update tender ……………………………………………
6: Uploading tender document ………………………..
7: Uploading of file …………………………………………
8: Deletion of tender/Annexure document …………
9: Deletion of tender/Annexure document ………..
10: Corrigendum uploading ……………………………..
11: Corrigendum uploading ……………………………..
12: Adding Corrigendum …………………………………..
13: Edit Corrigendum ……………………………………….
14: Editing Corrigendum …………………………………..
15: Deleting of Corrigendum …………………………….
16: uploading corrigendum ………………………………
17: Uploading of Corrigendum ………………………….
18: Deleting Corrigendum …………………………………
19: Pre-bid reply ………………………………………………
20: Pre-bid reply ………………………………………………
21: Pre-Bid Reply ……………………………………………..
22: Active Tenders ……………………………………………
23: Change Profile ……………………………………………
24: User Login Screen ………………………………………
25: Downloads ………………………………………………..
-2-
5
5
7
10
11
12
13
14
15
16
16
17
18
19
20
21
22
23
24
25
26
27
28
29
30
1. Introduction
The purpose of the User Manual is to provide a detailed overview
of the application. It describes how the user should use the application.
It also provides a complete description of all the functionalities and the
necessary steps in performing the required task. The main purpose of
this application is to ensure proper publishing of tenders in the
TANGEDCO public website.
-3-
2. Login screen
2.1 User Authentication:
Every user in the Tender -Publish application will be
provided with a unique username and password. Only on proper
authentication the user will be logged in. Following steps should be
followed for getting authenticated:
2.2. Logging In:
a. On the desktop, double click on the ‘Internet Explorer’ or
‘Mozilla Firefox’ icon to display the web page.
b. On the address bar of the web page, type the URL (Uniform
Resource
Locator)
of
the
application
192.168.150.6/gedcotenders/publish and then press ‘Enter’ to
display the ‘Login’ screen
c. In the <Username> textbox, enter the username assigned to
you.
d. Corresponding to the username; in the <Password> textbox,
enter the password assigned to you.
e. Click on the [Login] button. If the entered username &
password is authenticated, system will direct you to the landing
page. The landing page will highlight only those functionalities for
which the privilege / access has been granted.
-4-
Figure 1: User Login Screen
Note: If the ‘Username’ / ‘Password’ is incorrect, a message ‘Username and
Password does not Match’ will be displayed.
3. Function Menu Screen:
On successful logging in, the following screen is displayed.
1. New Tender
2. Update Tender
3. Corrigendum
–
–
–
4.
5.
6.
7.
8.
–
–
–
–
–
Pre Bid Reply
Active Tenders
Change Profile
Change Password
Downloads
To upload a new tender
Update existing tender
To upload corrigendum to an existing
tender
To attach prebid reply to an existing tender
To view existing tenders of the user
To change the profile
To Change the password
To download the word to PDF
converters, Adobe PDF viewer,Win RAR
9. Logout.
-5-
Figure 2: Home Page
3.1
New Tender: Through this link, a new tender is uploaded
-6-
Figure 3: New tender entry screen:
1.<Tender Title>
2.<Tender Ref No.>
3.<Tender Type>
: Type the title of the tender in the text box.(limited
to 150 Characters)
: Type the unique Specification No. of the Tender.
: Select from the drop down box
1. Open Tender
2. Limited Tender
3. Global Tender
-7-
4. <Tender Classification> : Select from the drop down box
1.
Buy
2.
Sell
3.
Works Contract
4.
Service Contract
5.< Product Category>
: Select from the drop down box.
1.
Supply, Erection and Commission
2.
Maintenance Service / Support
3.
Supply and Erection
4.
Computer Hardware
5.
Computer Software
6.
Electrical Work / Equipment
7.
Spares and Accessories
8.
Civil Works
9.
Electronic Equipment
10. Fabrication Works
11. Scrap / Disposables
12. Line Materials / Equipments
13. SS Materials / Equipments
14. Transportation
15. Miscellaneous
6.<Tender Value>
:Select either the ‘Less than 10 Lakhs’ or ’10
Lakhs accordingly.
7.<Document Cost>
: In TN
– Enter the cost of the tender in
Tamil Nadu State
: In Other States – Enter the cost of the tender
in other States.
8. <Postal charges if any charges>:Enter the postal charges in numbers
(without any special characters like’ ,’)
9. <Location>
:Enter the location of the tender to be opened.
10.< Last Date & Time of
: On clicking the , select the date,
Document Downloading : month, year and enter time and click ‘OK’
/Sale>
: button.
-8-
11.<Last Date & Time for Submission> : On clicking the , select the date,
month, year and enter time and
click ‘OK’ button.
12. <Opening Date & Time>
: On clicking the , select the date,
month, year and enter time and
click ‘OK’ button.
13.<Work Description>
: Type the tender details. (Limited to
1000 Characters). In case of more
details, the same attached as
Tender/ Annexure Documents.
14. <Pre Bid Qualifying Requirements> : Enter Pre Bid Qualifying
Requirements .
(Limited to 1000 Characters).
In case of more details, the same
attached as Tender/Annexure
Documents.
15. <Pre Bid Meeting Availability>
: Select from the drop down.
( Yes / No).
If yes, the date and time of the
prebid meeting has to be selected
by clicking the , select the date,
month, year and enter time and
click ‘OK’ button.
On successful completion of the form, click on the ‘Submit’ button to
store the tender in to database. Though the tender has been successfully
uploaded, it will made available to the public only after publishing the
tender.
-9-
3.1.2 Publishing tender:
Figure 4: Tender Uploading
On submitting the ‘New Tender’ form, the above screen appears. It has the
following options:
1.
2.
3.
4.
5.
6.
7.
8.
Edit Work description for same tender reference ID
Upload Tender Document
Upload Annexure I document
Upload Annexure II document
Delete Tender Document
Delete Annexure I document
Delete Annexure II document
Publish Now.
- 10 -
3.1.2.1
Edit Work description for same tender reference ID
Except the following details, all other details of the tender
pertaining of this tender id can be edited.
•
Tender Title
•
Tender Ref No
•
Tender Type
•
Tender Classification
•
Product Category
This can be saved by clicking the ‘Submit’ Button.
Figure 5: Update tender.
- 11 -
3.1.3 Uploading Tender Document
Figure 6: uploading tender document:
To upload the tender document (specification document), click the this
option. On selecting this option, the above screen appears.
The document should be of ‘pdf’ , ‘zip’ or ‘rar’ format and the size of
the file should be within limited to 2MB.
Applications for conversion of file from document and excel format to
pdf format, and compressing the files to rar format is available under
‘Downloads’ menu selection.
On clicking the ‘Browse’ button, the file to be uploaded is selected and
on clicking ‘Upload’ button the file is uploaded into the server. On
successful loading of the file, the following screen appears as below.
- 12 -
Figure 7: Uploading of file:
3.1.4 Uploading Annexure Document:
Similarly additional documents can be uploaded as Annexure I and
Annexure II .
3.1.5 Deleting Tender Document :
To delete the tender document already uploaded, the ‘Delete tender
document’ option has to be selected. On selecting this option, the
following screen appears.
- 13 -
Figure 8: Deletion of tender/Annexure document
3.1.5.1 In the <Reasons> selection has to be made from the following
drop downs
• Note Approval.
• Higher Officer Sanction Reference.
• Wrongly Uploaded.
3.1.5.2 In the <Remarks> field, the note reference/sanction no / any
other information regarding the deletion of the tender is recorded. On
completing the details, the ‘Delete’ button is pressed to delete the same. The
following screen appears on successful deletion of the document.
- 14 -
Figure 9: Deletion of tender/Annexure document
3.1.5.3 Similarly, ‘Annexure I’ and ‘ Annexure II’ documents can be
deleted.
3.1.5.4 The tender goes on line only after the ‘Publish Now’ option
Note: After any edition, deletion or uploading of the tender , ‘Publish
Now’ option should be selected and ‘Submit’ button has to be clicked to
publish the tender online. Otherwise it will not be published in the
website.
3.2 Update Tender :
To update the already published tender, this option is used. On
selecting this option, the following screen appears:
On entering the Tender ID / reference no., the Figure 9 appears. On
selecting the appropriate options updatation of tender can be done (From
3.1.2 to 3.1.5.4 )
- 15 -
3.3 Corrigendum:
Any modification /corrections on already published tender can be done
through this option. On clicking this option, the following screen
appears.
The tender ID/ Reference No of the tender has to be filled up in the
field<Enter Tender ID> / < Enter Tender Ref No >.
- 16 -
Figure 10: Corrigendum uploading
On entering the tender ID, the following screen appears.
Figure 11: Corrigendum uploading
- 17 -
It has following options:
1. Add Corrigendum
2. Edit Corrigendum
3. Delete Corrigendum
4. Upload Corrigendum document
5. Delete Corrigendum document
6. Publish Now
3.2.1
Add Corrigendum
Figure 12: Adding Corrigendum
The details of the tender already entered are displayed in the page.
Any corrections / modifications can be made in the respective fields if
necessary. On completion of the data entry, submit button has to be clicked.
- 18 -
3.2.2 Edit Corrigendum
Figure 13: Edit Corrigendum
On selection of this option, the above screen appears. The last posted
corrigendum is available for editing. The Closing date and Corrigendum Title is
displayed and on clicking the ‘Edit’ button, the following screen appears and
corrections if any can be made on any of the available fields.
- 19 -
Figure 14: Editing Corrigendum
- 20 -
3.3.3 Delete Corrigendum
On selecting this option, the following screen appears:
Figure 15: Deleting of Corrigendum
The list of all corrigendum posted are listed and the corrigendum to be
deleted has to be selected on clicking the radio button.
The <Reasons> field, has the following options.
1. Note Approval
2. Higher Officer Sanction Reference
3. Wrongly Uploaded
In the <Remarks> field textbox, the Sanction No / Remarks regarding
deletion of corrigendum has to be entered in the text box.
- 21 -
3.3.4 Upload Corrigendum document
On Selecting this option, the corrigendum document if any can be
uploaded. The following screen appears:
Figure 16: uploading corrigendum.
The document that is attached should be of pdf or rar file format and
the size of the file is limited to 2MB.
- 22 -
By clicking the ‘Browse’ button, the file to be uploaded is selected
and on clicking ‘Upload’ button the file is uploaded into the server. On
successful loading of the file, the following screen appears as below.
Figure 17: Uploading of Corrigendum
3.4.5 Deleting Corrigendum document
To delete the Corrigendum document already uploaded, the ‘Delete
Corrigendum document’ option has to be selected. On selecting this option,
the following screen appears.
- 23 -
Figure 18: Deleting Corrigendum
In the <Reasons> field, has the drop down options
1.
2.
3.
Note Approval.
Higher Officer Sanction Reference.
Wrongly Uploaded.
In the <Remarks> field, the note reference/sanction no / any other
information for deletion is recorded. On completing the details, the
‘Delete’ button is pressed to delete the same. The following screen
appears on successful deletion of the document.
After addition/edition, ‘Publish Now’ option should be selected to make
the tender online.
Note: After completing the posting of Corrigendum, the ‘Publish Now’
option should be selected and ‘Submit’ button has to be clicked to
publish the tender online. Otherwise it will not be published in the
website.
- 24 -
3.4 Pre- Bid Reply:
On selecting this option, the following screen appears:
Figure 19: Pre-bid reply
To include Pre-Bid Reply, the tender ID has to be entered in the <Enter
Tender ID> field or Reference No of the Tender has to be entered in the field
<Enter Tender Ref No> and press ‘Submit’ button. The following screen
appears
- 25 -
Figure 20: Pre-Bid Reply:
By clicking the ‘Browse’ button, the file to be uploaded can be selected and
can be uploaded by pressing the ‘Upload’ button. On successful uploading of
the file, the screen below appears.
- 26 -
Figure 21: Pre-Bid Reply:
- 27 -
3.5. Active Tenders:
In this option the active tenders posted by the user is listed. The details of the
active tenders can be viewed as below.
Figure 22: Active Tenders
- 28 -
3.6. Change Profile: The details of the user can be updated in this option.
Note: The Office address has to completed, only then the office details will be
included in the tender.
Figure 23: Change Profile
- 29 -
l
3.7. Change Password:
User Password can be changed through this option.
Figure 24: User Login Screen
- 30 -
3.8. Downloads: For the convenience of the user the downloads are
provided:
1.
2.
3.
4.
Use Manual
PDF Converter ( Open Office)
PDF Converter (Cute PDF Writer)
Win RAR
-
For converting a file from doc
Or xls format to pdf format
To bundle multiple files
Figure 25: Downloads
3.9. Logout:
On selection of this option the tender publishing application exit Logout
has to be opted.
- 31 -