1
User's Guide
EthervaneEcho Help
© 2012 Marek Jedlinski
Contents
Chapter 1
1 Introduction
2 Echo Interface
2 Features
3 Getting Started
6 What's New
12 License
Chapter 2
12 Installation
13 System Requirements
13 Standard Installation
14 Portable Installation
Chapter 3
14 Using Echo
15 Main Window
19 Main Menu
21 Connecting to Clipboard
23 Capturing Clips
24 Pasting Clips
25 Searching for Clips
28
Basic Search
28
Advanced Search
29
Using Wildcards
30 Sticky Clips
31 Deleting Clips
32 Editing Clips
34 Exporting Clips
34 Importing Clips
35 Keyboard Reference
Chapter 4
2
39 Quick Views
Contents
41 Default Views
42 Managing Views
43 Modifying Views
47 Quick View Filters
Chapter 5
50 Advanced Topics
50 Selecting Clipboard Formats
53 Database maintenance
56 Privacy Considerations
57
Excluding Applications
59
In-Memory Database
60 Automatically splitting clips
60 Automatically saving clips
Chapter 6
61 Configuration
61 Master Config
63 Command-line Parameters
Chapter 7
64 Useful information
64 Tips and Tricks
65 Troubleshooting
67 Limitations
67 Bugs and Known Issues
Chapter 8
68 Contact
3
Introduction
1
Ethervane Echo is a clipboard extender for Microsoft Windows operating systems. As other
clipboard extenders, it automatically captures data copied to clipboard from any Windows
application, stores it and lets you retrieve it easily later.
Ethervane Echo is specifically designed to help those who spend much time writing,
translating or editing text, such as journalists, editors, technical writers, programmers,
translators. Unlike some other clipboard extenders, Echo captures only text in various formats,
but not images or any other non-text data.
The program features instant search: just type a few characters, and the list of clips will be
automatically filtered to include only those that match the characters you have typed. There are
also advanced search modes that let you use wildcards and logical expressions like in popular
search engines.
The single most important design principle in Ethervane Echo is to help you retrieve clips
fast. All functions have easy to remember keyboard shortcuts, and the most commonly used
features can be accessed with as few key-presses as possible. If you ever find yourself using
the mouse in Ethervane Echo, know that the same thing can be achieved much quicker using
just the keyboard.
Ethervane Echo stores clips in a database to minimize its memory footprint. A new database is
created automatically when you run the program for the first time. Then Echo begins to populate
the database by capturing any text you copy or cut to the clipboard in other applications. When
you need to retrieve a previously captured clip, press a hotkey to bring up Echo, then select the
clip in the list or type a few characters to locate the clip you are looking for. Press Enter to paste
the clip in the currently active application, or press Ctrl+C to copy the clip to the clipboard
(without pasting it).
There are many configuration options to fine-tune what clips are stored in the database and how
long they are retained. Privacy-conscious users can configure Echo to use an in-memory
database only, so that the clips are never saved to disk.
To download the latest version of Ethervane Echo, visit the program's website: tranglos.com. If
you need support, please use this thread on DonationCode.com, where Echo was originally
published.
This help file contains all the instructions and tips to help you get started with Ethervane Echo.
Explore the program on your own to find out what it can do - you won't break anything by trying!
Remember that you can right-click various areas of the interface to display convenient context
menus. I hope you enjoy Echo!
See also:
Features
Getting Started
What's New In This Version
Main Window
Main Menu
Capturing Clips
1
Chapter 1 Introduction
Introduction
1
Browsing and Pasting Clips
Searching for Clips
Keyboard Reference
Tips and Tricks
Troubleshooting
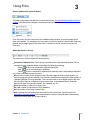
Echo Interface
Brief overview of the main Echo interface:
See Main Window for a detailed description of all the elements and information displayed in the
main window of the program.
Features
Clean, elegant interface that never gets in the way
All major features available via the keyboard for fast access
Capturing data copied to clipboard from any Windows application, as plain text format and
any number of additional, configurable formats (RTF, HTML, etc.)
Super-fast instant search with filtering
Search using wildcards (* and ?) or advanced expressions similar to popular search engines
Can be used in portable mode (download separate installation package or modify the
Chapter 1 Introduction
2
Introduction
1
master.config file)
Views with user-defined sort order and filters (e.g. show only clips captured within the last
hour, show only sticky clips, show only clips that were copied from Firefox, etc.)
Paste any clip into active application window
Paste clips using all available formats or only text
Paste individual or multiple clips at a time
Automatic positioning of the program window next to text caret or mouse cursor
Clear, configurable display with text wrapping and item height depending on clip length
Full support for Unicode encodings (Echo database can capture, store and paste clips in
multiple languages, preserving all the characters)
Privacy features, including ability to store clips in memory only
Ability to exclude (ignore) clips from certain applications
Automatic database maintenance
Two methods of capturing clips available on Windows Vista, Windows 7 and later
Importing clips from Ditto database and text files
Exporting clips to text files
Option to automatically save all captured clips to individual text files
Editing clips directly ("in-place") or in separate editor window
Spellchecker for the external editor (over 20 languages supported; dictionaries mist be
installed separately)
Search history
Getting Started
Once the program is installed, you can try out its features. Go ahead and run Ethervane Echo!
If you are starting Echo for the first time, it will create a new, empty database and a default
configuration. You can tweak some useful settings later, but for now let's just see how Echo
works with the clipboard.
Make sure Echo is running. Echo automatically starts minimized to the notification area of the
taskbar (also known as the system tray), usually located in the bottom-right corner of the
screen, next to the clock. You can click the icon there to display the main Echo window, or you
can just press the activation hotkey. By default the activation hotkey is Win+Insert. (You can
change it later, but if your keyboard has the Insert key traditionally placed in a two-row section to
the right of the Backspace key, try sticking with it, it's quite convenient.)
Press the hotkey to make sure Echo is running. The small icon in the lower left corner of the
status bar should have a green checkmark to indicate that Echo is connected to clipboard. (If
the icon has a red "x" instead, see Connecting to Clipboard and Troubleshooting.)
Hit Escape to close and hide Echo. It will run in the background and capture any piece of text
3
Chapter 1 Introduction
Introduction
1
you copy to clipboard.
Now open any application you can write in. It could be Word, Excel, Notepad or your favorite text
editor. Type in some text or open a recently used file. When you have some useful text onscreen, select some of it, then press Ctrl+C (or Edit -> Copy if you prefer the menu). Do this a
few times, with different pieces of text. If you like, you can switch to your browser or any other
application in which you can copy text to clipboard, and repeat the process. This is just to
imitate a normal workflow, where you type or read text and occasionally copy something useful
to the clipboard.
Now go back to your text editor. We will recall a piece of text you have recently copied. Press
the hotkey (Win+Insert by default) to bring up Echo. Echo should now be displaying a list of all
the pieces of text you have recently copied. Using the Up and Down arrow keys, select one of
the clips, then press Enter. As soon as you do, Echo will hide, and the clip you selected will be
pasted into your text editor.
Now bring up Echo again for another trick. First, notice that the clip you have just pasted is now
the first one on top. By default Echo sorts clips by date, putting the most recent clips on top.
This way you can reach your latest clips as soon as possible. But of course scrolling and
looking for clips isn't going to be very convenient when there are thousands of clips in the
database. It's much easier and faster to search for clips, so let's try it now.
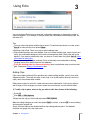
Is Echo still visible? Great! (If it isn't, bring it up again.) Without clicking anything, just type a few
letters to match a recently copied clip. The text you type will be entered in the search box at the
bottom of the main window. (You do not have to "go to" the search box first, please leave that
mouse alone!) Just start typing as soon as Echo opens. If the text you have typed matches any
of the clips, you will see that the list of clips gets filtered to include only the matching clips. Also,
the color of the selection bar changes to orange, so that you can easily see when the list is
filtered. As before, you can just press Enter to paste the selected clip in your active application:
Chapter 1 Introduction
4
Introduction
1
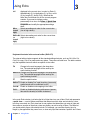
(If you want to put the clip on the clipboard without pasting it into whatever application is
currently active, press Ctrl+C instead of Enter. The clip will be copied, and you can later paste it
as needed.)
Now for the last thing to try: bring up Echo again, and start typing. As the text is entered in the
search box, you may make a typo, or you may find out that there are no clips that match what
you have typed. To try again, press Escape once. The search box will be cleared, and the list of
clips will become un-filtered. Now you can scroll the list again, or type another search phrase,
or press Escape again to hide Echo.
Note that most of the time you do not need to close Echo manually. It will hide automatically
when you:
press Enter to paste a clip,
click outside of the Echo window,
switch to another Windows application.
Echo knows that you need it only occasionally, so it tries not to get in your way.
Sometimes though Echo will stay open — for example if you press Ctrl+C instead of Enter on a
selected clip. Just hit Escape once or twice to hide it. (All these behaviors can be adjusted if you
like.)
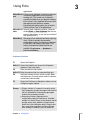
One last thing before you move on. Bring up Echo again, and right-click the list of clips. A handy
shortcut menu will be displayed:
The menu contains the commands you will probably be using most often. You can delete clips
here or make clips "sticky" to prevent them from being deleted accidentally. As you can see,
there are also two quick ways to edit a clip. These and other features are described later in this
help file. For now remember that you can right-click anywhere in Echo to show useful
5
Chapter 1 Introduction
Introduction
1
commands.
That's it for getting started! The best way to learn Echo is to leave it running in the background
as you work. Whenever you need to retrieve back something from the clipboard, bring up Echo
and use its search feature. Other chapters in this help file explain all the configuration settings
and the various search methods, from basic to quite advanced.
What's New
2012-03-25
version 1.1.2 build 126
FIXED: A significant bug that would cause loss of certain clips when Echo performed database
maintenance. This bug affected only certain installations, but was quite severe when it
occurred.
FIXED: Minor change to allow Echo to paste clips into certain applications with non-standard
windows that do not automatically regain focus (e.g. Stickes). Echo should now be able to
paste clips into such applications, but only if Echo runs minimized and only if it is activated by
the activation hotkey (not with the mouse).
FIXED: Freeware licensing explained in more detail
2012-02-21
version 1.1.1 build 122
ADDED: Keyboard shortcut to toggle the option to keep Echo always on top of other windows:
Ctrl+Y.
ADDED: Global hotkey to connect/disconnect from clipboard. By default this hotkey is
disabled. The default hotkey is Shift+Win+] and it can be changed in Preferences ->
Keyboard ->ConnectHotkeyKey and ConnectHotkeyModifier. To enable the hotkey, set
UseConnectHotkey to True.
ADDED: An option to control what happens after Echo hides itself and pastes a clip into the
active window: Preferences -> Pasting clips -> FinalWindowAction. By default, Echo behaves
as it had before: hides itself and does nothing. The other available setting is waRestore: Echo
will hide, paste the clip and restore itself (but it will not regain focus). The new option is useful if
you want to keep Echo on top of all other windows, since in that case you probably don't want
Echo to hide and stay hidden.
ADDED: In the external clip editor, a prompt is now displayed if you close the editor without
saving the changes. The prompt can be disabled directly in the dialog box, or under
Preferences -> Prompting -> BeforeClosingEditor.
ADDED: An option to ignore clips if they were copied from within Echo itself, for example in the
clip editor. This option is disabled by default, so Echo will capture clips from itself. To change
this setting: Preferences -> Capturing clips -> IgnoreFromSelf and set this value to True.
ADDED: A new action was added in the "Maintain" section of the Database Maintenance dialog:
Chapter 1 Introduction
6
Introduction
1
o Refresh clip data: this action refreshes the "display text" for all clips in the database, as
well as the part of each clip that gets searched. You may want to use this action after you
have made a change to the setting in Preferences -> Database -> MaxDispTextSize. This
setting controls how much of each clip is displayed and searched. (For very long clips,
Echo displays and scans only the first part of each clip, up to the length specified here).
Since this operation is time-consuming, Echo does not perform it automatically.A change in
MaxDispTextSize is only applied to clips captured after the change has been made. This
maintenance action applies the new MaxDispTextSize to all clips in the database. Note
that this procedure takes a long time to complete; perhaps as much as 10-15 seconds
for a thousand clips in the database. Echo is unresponsive during that time. A small
progress bar is displayed to indicate how much of the process has been completed.
ADDED: One new action was added in the "Erase" section of the Database Maintenance
dialog:
o Delete application icons: this action deletes from the database all application icons.
ADDED: In the Database Maintenance dialog, a prompt is now displayed if you choose to delete
all clips from the database on the Erase tab. The prompt can be disabled directly in the dialog
box, or under Preferences -> Prompting -> BeforeErasingAllClips.
CHANGED: When the option to keep Echo always on top of other windows is enabled, Echo no
longer automatically hides itself when you switch to another application, even if the option to do
so (Preferences -> Display -> MinimizeOnDeactivate) is enabled. This is because hiding Echo
in this case defeats the purpose of the "stay on top" feature.
CHANGED: In Preferences -> Display, two options have been removed: TrayNotifications and
TrayNotificationsOnlyIfIconic. These options controlled which tray notification messages
("balloons") to show, but they were incorrectly implemented. Two new options have been added
to replace them:
TrayMsgsToSkip: a list of events for which Echo should not display tray notifications. By
default, the list includes only "tnCapture", which means Echo will not be notifying you every
time it captures a clip. All other notifications will be shown by default: tnClipboardConnect (on
connecting and disconnecting from clipboard), tnClearClipboard (when clipboard has been
cleared), tnMaintenance (when Echo has finished database maintenance) and tnDBCreated
(when Echo has created a new database, e.g. because the old one was missing).
TrayMsgsOnlyWhenIconic: when set to True, Echo will show tray notifications only when it
is minimized, buyt not when its window is visible. When set to False, Echo will always show
notifications, regardless of its window state.
REMOVED: Preferences -> Database -> StoreFullApplicationPath. This option was false by
default. When set to True, it would prevent Echo from finding application icons for clips. Since
the full path information is not needed and not used anywhere, the option has been removed.
Echo will now store application executable names only (notepad.exe instead of c:
\Windows\notepad.exe).
2012-02-12
7
Chapter 1 Introduction
Introduction
1
version 1.1.0 build 117
CHANGED: This release uses a different editor control for the "edit clip" dialog. The
change was necessary, because the editor I originally used had some random-looking
problems with the Addict spellchecker, such as ignoring obvious misspellings, even though they
were recognized as such and got the proper red wavy underline. The new editor has an almost
identical functionality, with a few minor differences, e.g. no support for marking modified lines.
At the moment URL highlighting is not possible either, sorry about that! On the flip side,
incremental search is now supported in the editor (press Ctrl+E).
ADDED: Option to automatically mark edited clips as sticky: Preferences -> Editing clips ->
MakeEditedClipsSticky. This option is disabled by default.
ADDED: Option to update the date and time of edited clips: Preferences -> Editing clips ->
UpdateClipTimestamp. This option is disabled by default.
ADDED: Option to always refresh the current view after editing a clip. Preferences -> Editing
clips -> AlwaysRefresh. This option is disabled by default.
Why this may be useful: When you edit a clip, you are changing its text and probably its length as
well. Using the other editing-related options, editing a clip may change its timestamp or mak e it stick y.
Depending on what view was active when you started editing the clip, it is possible that after editing,
the clip no longer "fits" the view. For example, the view shows only clips shorter than 10 characters,
but the edited clip is longer. Or, the view contains only clips with URLs, but you have deleted the URL
while editing. By default, when you save the clip, Echo does not refresh the view, so that the clip you
were editing remains selected in the view. This seems to be the most natural behavior, but in cases
similar to the examples above it may cause the view to show a clip which does not belong. If you
enable this option, Echo will always refresh the view when you finish editing a clip; in this case it is
possible that the edited clip will "disappear" from view, if it no longer matches its filters. (You can also
refresh a view manually at any time by pressing Ctrl+R. Note also that when you use the newly added
"Save as New" command, the view will always be refreshed.)
ADDED: In the external editor you can now save the text as a new clip instead of replacing the
original. Click the "Save as New" button on the toolbar (or command in the context menu).
When you use this function, Echo will always refresh the current view.
ADDED: In the external editor, option to keep the editor open after saving a clip. To enable it,
click the Options button and make sure "Close Editor on Save" is unchecked. This way you can
continue editing a clip after using the Save or Save as New commands.
ADDED: "Refresh View" command under the View menu (Ctrl+R). You can use it to refresh a
view manually, for example if the view was not refreshed after editing clips, and the edited clips
may no longer belong in the view (e.g. because their text, date or length has changed).
IMPROVED: When you edit a clip in the external editor, Echo no longer suspends capturing
clips. This means Echo can now capture text copied inside the editor as well. (When editing a
clip in-place, capturing is still suspended, because new clips cannot be added to the list while
the in-place editor is active.)
IMPROVED: Echo now properly restores the selection of multiple clips in some situations, e.g.
after using the Copy (Ctrl+C) command.
Chapter 1 Introduction
8
Introduction
1
IMPROVED: Loading clips is now faster and Echo uses less memory to display a view than
before.
FIXED: When a clip was edited and saved, Echo would not update the clip's size on the clip
information bar (display only).
2012-01-27
version 1.0.6, build 110
ADDED: Echo can now store its database and configuration files in any user-specified folder
(by request). This works the same way for both the desktop and portable editions. Custom
folder can be specified on the command line or in the master.config file. This is useful for
example if you want Echo to keep its data and configuration in a folder that you can easily
include in your backup.
ADDED: A new option to keep main program window on top of other windows (often called
"stay on top"). Disabled by default. To enable, click View -> Keep on Top of Other Windows.
2012-01-20
version 1.0.5, build 108
ADDED: When you copy or paste a clip, Echo would always update the clip's timestamp, so
that the clip would move to the top of the list when sorted by date. This is now optional:
Preferences -> Pasting clips -> UpdateClipTimeStamp. This setting is still True by default, so
that Echo's behavior does not change unless you modify this setting. (Thanks, Easye!)
ADDED (by popular request): Option to minimize Echo when the Close button on the title bar is
clicked. This option is disabled by default. To enable it, click Tools -> Preferences -> Display ->
MinimizeOnCloseButton and set the option to True. When enabled, you must use the File ->
Exit command (or press Alt+F4) to really quit Echo.
ADDED (by popular request): If the activation hotkey is pressed while Echo is already the active
application, Echo will be minimized. Effectively, the activation hotkey acts as a toggle. To
restore the old behavior, click Tools -> Preferences -> Keyboard -> ActivationHotkeyToggle and
set the option to False.
ADDED: The connection indicator (icon: ) in the status bar may now display a third state:
suspended (yellow marker). This indicates Echo remains connected to the clipboard, but
capturing clips is temporarily suspended, for example because a clip is being edited.
FIXED: A bug that caused an error when a system clipboard format was added to the list of
captured formats (thanks, Sascha!)
FIXED: A bug that caused Echo to "hang" for a few seconds and then display an error message
as it could not open the clipboard in the Available Clipboard Formats dialog box when the
Refresh button was clicked.
9
Chapter 1 Introduction
Introduction
1
FIXED: A bug that would sometimes cause an error when editing a clip in-place.
FIXED: Echo was showing the "Connected to clipboard" tray notification too eagerly (even when
it had not actually re-connected)
FIXED: A bug in the Help file that identified the previous release (1.0.4) as beta, even though it
was a non-beta release :)
2011-12-30
version 1.0.4, build 103
First out-of-beta release, so not many new features this time.
ADDED: System-wide hotkey to paste clipboard contents as plain text. By default this
action is assigned to Shift+Win+Insert. When you press this hotkey, Echo checks if the
clipboard contains text. If so, Echo removes from clipboard all formats that are not plain text (in
effect, "clears" the clipboard of any rich data) and performs a paste in whatever application is
current. This gives you a "Paste as text" command in any Windows application that supports
rich text editing. Useful especially when an application does not have such a command readily
available. (Of course, Echo already had a "paste as text" command for the selected clip. This
new feature works without opening Echo, and it operates only on current contents of the
clipboard.)
ADDED: System-wide hotkey to clear clipboard contents. By default this action is assigned
to Shift+Win+Delete. When you press this hotkey, Echo erases all data currently on
clipboard. Useful when you want Windows to instantly "forget" whatever has been copied to
clipboard last. (Of course the clip may still exist in Echo's database.)
FIXED: Broken in previous release: Delete key could no longer be used in the in-place editor. It
can be now.
REMOVED: Dependency on the FastMM_FullDebugMode.dll library. This file is no longer
needed, since the current release is no longer a debug build. If you are upgrading from an
earlier version of Echo, you can delete this file manually in a file manager.
Miscellaneous internal fix-ups.
2011-11-27
version 0.9.3 beta, build 101
CHANGED: To make Echo easier to use and more intuitive, three search modes (Basic,
Wildcards, Advanced) have been reduced to two: Basic and Advanced. Wildcards are
now supported in both modes (previously they worked only in the dedicated Wildcards mode).
In short, there are now two search modes instead of three, and you can use wildcards
everywhere. Please see Searching for clips and Using wildcards for details.
ADDED: Basic editing buttons added to the toolbar in the external clip editor.
ADDED: URL highlighting in the external clip editor.
ADDED: You can now use the "Delete" key to delete clips. (The previous shortcut Ctrl+Delete
still works as well.)
Chapter 1 Introduction
10
Introduction
1
ADDED: Several more Help topics completed, notably Selecting Clipboard Formats and
Database Maintenance.
FIXED: The "Reset on restart" option in Search group was resetting ALL the search settings,
including min text length, the "Wait for Enter key" toggle, etc. As a result, these settings were
not preserved across sessions if "Reset on restart" was enabled. This has been fixed, and the
option has been renamed to "Reset mode on restart" to clarify.
FIXED: The option to start Echo minimized works now (thanks, highend01!)
FIXED: The option to hide application icon to notification area (tray) did not always work,
depending on the state of several other non-related settings.
FIXED: When a view's name was changed in the View Properties dialog box, the name was not
updated on the view tab until Echo was restarted.
FIXED: Small internal inconsistencies is the Database Maintenance dialog box.
2011-10-03
version 0.9.2 beta, build 99
FIXED: Pasted clip did not move to the top of the list if list was sorted by date (thanks, Tomos!)
FIXED: Duplicate commands assigned to Shift+F1.
FIXED: "Wait for Enter" option should be disabled in Advanced mode, because it is always ON
in this mode.
ADDED: Spell checking (including "spell as you type" live spell checker) in the external clip
editor. (Spelling dictionaries must be downloaded and installed separately! They are available
from the same place you downloaded Ethervane Echo.)
ADDED: A simple toolbar in the external clip editor.
ADDED: New search-related option: "Auto Wrap Wildcards".
ADDED: New search-related option: "Auto Detect Wildcards".
ADDED: Several more Help topics completed.
ADDED: New items under the Help menu: Keyboard Reference and What's New.
ADDED: Keyboard shortcuts to quickly select the sorting method for the current view: Alt+1 (by
date) to Alt+6 (by ID). See Keyboard Reference for details.
ADDED: Max and average clip length and spellchecker configuration information in Database
Information dialog (Ctrl+I).
ADDED: Vertical scrollbar in the in-place editor.
CHANGED: The default installation directory was changed from c:\Program Files\Ethervane
Echo to c:\Program Files\Ethervane\Echo.
CHANGED: A few minor UI items were renamed without altering their functionality.
REMOVED: The option to use either Ctrl or Alt key as the modifier for view selection.
Previously, you could choose whether views should be selected by pressing Ctrl+digit or
Alt+digit. That option has been removed, because Alt+digit combinations are now used to select
the sorting method for the view.
2011-09-03
version 0.8.1 beta, build 88
11
Chapter 1 Introduction
Introduction
1
First public release
License
Ethervane Echo is free for personal, educational, non-profit and commercial use. Do
not pay for this software! If someone tries to sell you Ethervane Echo, they are breaking this
license and extorting money from you, so please contact the author.
Ethervane Echo is Copyright © Marek Jedlinski, 2011.
You may:
Copy, install and use Ethervane Echo on as many computers as you wish, at home and in
the office.
Publish download links to Ethervane Echo on your website, including commercial websites,
provided you prominently display information about the author (Marek Jedlinski,
www.tranglos.com) next to the download link(s).
You may not:
Sell Ethervane Echo or require any remuneration or exchange of goods in return for its
distribution, delivery and/or use. Ethervane Echo is free and must not be sold in any manner
or form.
Repackage Ethervane Echo, claim authorship or in any way indicate that you are the author of
Ethervane Echo.
You may include Ethervane Echo with an electronic or printed publication only if the publication
is distributed for free or if it is a non-profit undertaking. If the publication is commercial or
otherwise profit-making, you must first obtain a written permission from the author. Email me at
<[email protected]>.
That should be simple enough! :)
Ethervane Echo is written in Delphi XE. Source code is not available, sorry! (Echo uses a
number of commercial 3rd-party components, without which the source code will not compile.)
To download the latest version of Ethervane Echo, visit the program's website: tranglos.com
Ethervane Echo can be installed as a standard, desktop application or as a portable
application. When Echo detects it is running from a removable drive, such as a USB disk, it
automatically assumes portable mode.
Echo does not create any registry entries, whether in standard or in portable mode. However,
the installer creates a single new entry in the registry that contains the installation path. This is
required so that when you update to a new version later, the installer knows where to find the
existing, previous version.
See the following chapters for detailed information on system requirements and installing Echo:
System Requirements
Chapter 1 Introduction
12
Installation
2
Standard Installation
Portable Installation
System Requirements
Ethervane Echo requires one of the following operating systems:
Windows XP
Windows Vista
Windows 7 or later.
In particular, Ethervane Echo will not run on any version of Windows earlier than XP, such
as Windows 95, Windows 98 or Windows ME.
Echo should run well on 64-bit versions of Windows Vista and 7, but has not been extensively
tested on these versions.
Operating systems other than Windows are not and will not be supported.
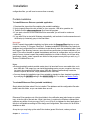
Standard Installation
To install Ethervane Echo as a standard desktop application:
1. Download the installer package to your computer.
2. Double-click the downloaded file to launch the installer.
3. Follow the installation wizard directions to install Ethervane Echo.
If you want Ethervane Echo to be started automatically whenever your computer starts, you
may need to add a shortcut to the ethervaneecho.exe file to the Startup folder in the Start
menu. (This cannot be configured inside the program, because under Windows Vista, 7 and
later regular applications do not have permissions to add shortcuts to the Start menu. Only the
installer can perform this function.)
Notes:
Echo automatically selects portable mode when it is launched from a removable drive, such
as a USB disk. This means you can install the desktop version on your computer, then copy
(or move) the complete Echo folder onto a USB disk. Echo will automatically create the
folders it requires and a new, empty database on the USB disk.
A standard installation can be changed into a portable installation by modifying the portable
setting in the master.config file. For details see Master Config.
By default, the program is installed in c:\Program Files\Ethervane\Echo.
To uninstall Ethervane Echo (standard installation):
Use the Control Panel "Add or Remove Programs" (or "Programs and features") applet to
uninstall Echo. Please note that uninstalling Echo will not delete the database and the
13
Chapter 2 Installation
Installation
2
configuration files; you will have to remove them manually.
Portable Installation
To install Ethervane Echo as a portable application:
1. Download the zip archive file containing the portable installation.
2. Unzip (unpack) the archive into a folder on your computer, USB drive, pendrive etc.
3. Double-click the ethervaneecho.exe file to start the program.
4. If you want a shortcut to the Ethervane Echo executable, you will need to create one
manually.
5. If you want Echo to start with Windows automatically, add a shortcut to ethervaneecho.exe in
the Startup (or Autostart) group in the Start Menu.
Important:
Do NOT unpack the portable installation to a folder under the Program Files directory on your
computer, such as "C:\Program Files\Echo". Portable installation of Ethervane Echo stores its
database and configuration files in subfolders located directly under the installation folder. Under
the Program Files directory however, users do not have permissions to these subfolders. As a
result, Echo will not be able to update the database and store its configuration, and you will see
plenty of errors. Instead, unpack the portable installation to a folder to which you do have write
permissions. Ideally, create a special new folder for that purpose on any drive you wish, e.g. C:
\Echo or D:\Utilities\Echo, etc.
Notes:
Echo automatically selects portable mode when it is launched from a removable drive, such
as a USB disk. This means you can install the desktop version on your computer, then copy
(or move) the complete Echo folder onto a USB disk. Echo will automatically create the
folders it requires and a new, empty database on the USB disk.
You can change the installation type (from portable to standard or from standard to portable)
by modifying the portable setting in the master.config file. For details see Master Config.
To uninstall Ethervane Echo (portable installation):
Simply delete the folder where Echo is installed. The database and the configuration files also
reside under this folder, so you can delete them as well.
Ethervane Echo spends most of the time hidden in the notification area (also known as system
tray), at the far-right of the task bar. While it sits there, it monitors the Windows clipboard and
captures any pieces of text you copy (Ctrl+C) or cut (Ctrl+X) to clipboard in other applications. If
the clip is acceptable according to Echo design and configuration, Echo stores it in an SQLite
database on disk.
At any time you may bring up the main Echo window (press Win+Insert, unless you have
Chapter 2 Installation
14
Using Echo
3
changed the activation hotkey in program configuration). In the list of clips, you can select one
or more clips or type some text to find matching clips. Press Enter to paste the selected clip (or
multiple clips) into the active application, or press Ctrl+C to just copy the selected clip(s) to
clipboard, without pasting them anywhere.
The following sections describe what you can do with Echo in much more detail:
Main Window
Main Menu
Browsing and Pasting Clips
Searching for Clips
Sticky Clips
Deleting Clips
Editing Clips
Exporting Clips
Importing Clips
Quick Views
Configuration
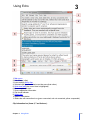
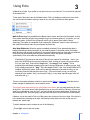
Main Window
Elements of the Ethervane Echo main window:
15
Chapter 3 Using Echo
Using Echo
3
1. Main menu
2. List of items (clips)
3. Icons marking sticky clips
4. Selected clips (you can select more than one clip at a time)
5. Quick view tabs (the current view is highlighted)
6. Source application icon
7. Source application information
8. Clip format indicator
9. Search box
10.Search mode button
11.Status bar with connection icon (green: connected, red: not connected, yellow: suspended)
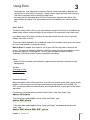
Clip information bar (items 6, 7 and 8 above):
Chapter 3 Using Echo
16
Using Echo
3
This pane shows brief information about the selected clip. On the left Echo displays the icon of
the application which was active when the clip was captured. (Usually this is the application in
which you pressed Ctrl+C or Ctrl+X to put data on clipboard.) A special, pale icon is displayed
for clips whose source application could not be determined:
Following the icon is more information about the clip:
name of the source application (this is the name you can use to create an application filter, for
example)
date and time the clip was captured or last used
number of times the clip has been used
length of the clip
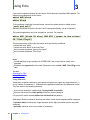
Finally, the icon at the right end of the information bar provides a general indication of the
formats which are available for the selected clip. The icon can have one of three states:
The clip contains rich formatting - usually RTF or HTML, but possibly also other advanced
formats.
The clip contains only plain text format.
The clip has been edited in Echo (and therefore contains only plain text format — see
Editing Clips).
At any time you can close (hide) the information bar. To hide or show the information bar, do
one of the following:
Click View -> Show Clip Details.
Press Ctrl+D.
Search box (item 9 above):
When you type text in this box, Echo automatically filters the list of clips to include only those
which match the text you have typed. This is by far the fastest method of finding the clip you
need. Very important: you do not have to click or focus the search box. Just start typing, and
Echo will automagically focus the search box. Press ESC to clear the search box and display
the complete, unfiltered list of clips.
By default, Echo searches for clips as you type, so there is no need to press Enter. Depending
on the selected search mode and configuration options, pressing the Enter key may be
necessary. See a detailed description of search modes.
17
Chapter 3 Using Echo
Using Echo
3
Search mode button (item 10 above):
The label on the button indicates the current search mode. See a detailed description of search
modes. Click this button to display a small drop-down menu of options:
From this menu you can select one of the available search modes, as well as change a few
other quick options. For example there is an option to tell Echo whether it should start searching
instantly as you begin typing in the search box, or whether it should wait until you press the
Enter key.
Status bar (item 11 above):
The status bar in Echo contains the following items:
Connection indicator icon. The icon has a marker whose color indicates whether Echo is
connected to the clipboard. Marker colors have the following meanings:
Green
: Echo is not connected to clipboard and active.
Red
: Echo is not connected to clipboard.
Yellow
: Echo is connected to clipboard but capturing clips is temporarily suspended
(e.g. when some dialog boxes are open).
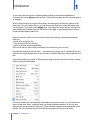
New: the first number is the number of clips Echo has captured in the current session (i.e.,
since the program was last started). The number in parentheses indicates the total number of
clipboard changes Echo has detected. This second number may be higher than the first one,
because Echo may be configured to ignore some clips. In the example above, Echo has
detected 22 clips in the current session, but captured only 18.
View: the number of clips in the current view.
Db: total number of clips stored in Echo database.
Sel: the number of currently selected clips
Sort: indicates the sort method and sort order for the current view. See this section for
description of sorting options. In the example above, clips are sorted by date in descending
order (most recent clips are on top of the list).
Chapter 3 Using Echo
18
Using Echo
3
Main Menu
This topic contains a detailed description of all the commands in Ethervane Echo main menu.
Echo menu
ESC key
function
Manual Capture Performs a capture as if Echo detected a new clip. Use this feature
to override certain configured restrictions (for example, by using the
manual capture you can capture a clip that is shorter than the
minimum length.) You can also use this feature in case Echo did not
capture a specific clip automatically.
Search Mode Cycles to the next search mode setting. The menu item displays the
currently selected mode.
Connect to
If checked, Echo is connected to the clipboard and is capturing clips.
Clipboard
Use this menu command to check whether Echo is connected to
clipboard, and to temporarily disconnect in case you want Echo to
suspend capturing clips for a while. See Connecting to Clipboard.
Clear Clipboard Clears (deletes) all information currently held in the Windows
clipboard.
Split New
Toggles (enables or disables) automatically splitting all newly
Clips...
captured clips.
Autosave New Toggles (enables or disables) automatically saving all newly captured
Clips...
clips to text files.
Edit menu
Paste (all
formats)
Copies the selected clip(s) to the clipboard and attempts to paste
them in the currently active application. Clips are pasted using all
available formats.
Paste (text only) Copies the selected clip(s) to the clipboard and attempts to paste
them in the currently active application. Clips are pasted as plain text
only (other formats are omitted).
Copy (all
Copies the selected clip(s) to the clipboard. Clips are copied using all
formats)
available formats.
Copy (text only) Copies the selected clip(s) to the clipboard. Clips are copied as plain
text only.
Sticky
Toggles (enabled or disables) the "sticky" state for selected clips.
See Sticky clips.
Edit (inplace) Opens the selected clip for editing directly in the list of clips. See
Editing clips.
Edit (external) Opens the selected clip for editing in an external editor wqindow. See
Editing clips.
Delete
Deletes the currently selected clip or clips. (Sticky clips are not
deleted.) See Deleting clips.
Select All
Selects all clips in the current view.
Navigate menu
19
Chapter 3 Using Echo
Using Echo
First Item
Last Item
History (Back)
History
(Forward)
Previous View
Next View
3
Selects the first clip in the list.
Selects the last clip in the list.
Moves back in search history.
Moves forward in search history.
Shows the previous view.
Shows the next view.
View menu
Quick Views
Sort Clips By
Show Clip
Details
Refresh View
Displays a submenu with a list of existing quick views and keyboard
shortcuts to access them.
Displays a submenu with sorting options for the current view.
Changing the sort settings using this menu does not modify the
definition of the current view. If you want to change sorting
permanently, you have to modify the view. Note that the current sort
settings for a view are indicated in the status bar.
Shows or hides the clip information bar.
Forces Echo to re-generate the current view. In most cases Echo
refreshes the view automatically when needed. This command may
be useful if the option to automatically refresh after editing clips is
disabled, in which case the view may contain clips that no longer
belong in it, because their text, length and/or date have changed as a
result of editing.
Fixed Item
When this setting is enabled (checked), all items in the list of clips
Height
have the same height, regardless of how many lines they contain.
When this setting is disabled, each item is only as high as required to
fit the lines of each clip, up to the maximum number of lines
configured in Preferences.
Show Indicator Shows or hides a narrow column which displays an indictor triangle
to help locate the currently focused clip in the list.
Show Gridlines Shows or hides gridlines in the clip list.
Show Tab
Toggles between the standard quick view tab color taken from the
Colors
current Windows theme, and custom colors. You can assign a
custom color to each quick view tab in the Quick View Properties
dialog box.
Show Tab
Toggles the gradient display on the quick view tabs.
Gradients
Keep on Top of When enabled, Echo'd main window will not hide behind other
Other Windows applications' windows.
Manage Quick Opens a dialog box where you can create, delete and edit quick
Views
views. See Managing Views.
Quick View
Opens a dialog box where you can modify the settings and filters for
Properties
the current quick view. See Modifying Views.
Tools menu
Chapter 3 Using Echo
20
Using Echo
3
Available
Opens a dialog box where you can select clipboard formats you want
Clipboard
Echo to capture and store. See Selecting Clipboard Formats.
Formats
Maintain
Opens a database maintenance dialog box to run maintenance
Database
manually. See Database maintenance.
Database
Displays statistical information about the database.
Information
Export Selected Exports selected clips to a text file. See Exporting Clips.
Clips
Import Clips
Displays a submenu with available import commands:
Import From Ditto — imports clips from a Ditto database
Import From Text File — imports clips from a plain text file
(each line of text in the file becomes a new clip)
Preferences
Displays the Preferences dialog box, where you can customize Echo
and configure all its options.
Help menu
Show Help
Displays the main Help topic for the program.
Getting Started Displays the "Getting Started" Help topic.
What's New
Displays the "What's New" Help topic (changes in the latest version).
Keyboard
Displays the "Keyboard reference" Help topic (a list of keyboard
Reference
shortcuts supported in Echo).
About EthervaneDisplays a dialog box with the version number and authorship
Echo
information.
Show Debug
Displays the debug log in a separate, non-modal window. This menu
Log
command is only displayed if logging is enabled via the master.config
file.
In addition, you can right-click the following areas of the main program window to display useful
context menus:
Clip list: most often used commands related to managing clips. (The same context menu is
displayed when you right-click the clip information bar.)
Quick view tabs: commands related to view management.
Connecting to Clipboard
When Echo starts, it automatically connects to clipboard. When Echo is connected to
clipboard, it receives notifications whenever you copy or cut data to clipboard from other
applications. This way Echo can capture any new clips that appear on clipboard.
To check if Echo is connected to clipoboard:
Click the Echo menu and look for an item called "Connect to Clipboard" under it. There should
be a checkmark next to the item, signifying that Echo is connected to the clipboard and ready to
capture clips:
21
Chapter 3 Using Echo
Using Echo
3
If the item is not checked, click it. Echo should now connect to clipboard, and there should be a
checkmark shown next to the menu command, as in the image above.
You can also click this menu command to temporarily disconnect from clipboard and suspend
capturing clips.
To quickly check if Echo is connected to clipboard, you can also look at the status bar. There is
a small icon in the bottom-left corner. If the icon has a green check mark, Echo is connected
and everything is go. This is the icon you should see whenever you start Echo:
- connected to clipboard and active
If there is a red marker instead, Echo is not connected to the Windows clipboard, so see the
Troubleshooting section:
- NOT connected to clipboard
A yellow marker indicates that Echo is connected to the clipboard, but capturing clips is
temporarily suspended (because Echo is performing certain operations during which clips
cannot be captured). You can see this icon for example when editing a clip in-place, since
capturing is not possible then:
- connected to clipboard, capturing clips is SUSPENDED
Two methods of connecting to clipboard
Chapter 3 Using Echo
22
Using Echo
3
Windows Vista, Windows 7 and newer versions offer two different techniques applications can
use to connect to clipboard. If Echo detects that it runs on one of those version of Windows, it
uses the latest, more advanced method. It seems however that when one application uses the
newer method, some older applications Using the older, legacy connection method) may not be
able to monitor clipboard correctly. If you find that this is the case, you can manually enable the
"legacy" connection method in Echo configuration.
On Windows XP only the legacy connection method is available, and Echo selects it
automatically. In this case you cannot manually change the connection method.
See also:
Capturing Clips
Troubleshooting
Capturing Clips
Ethervane Echo monitors the Windows clipboard and automatically captures all textual data
that you copy to clipboard in other applications. Captured clips are stored in the database —
there is no manual "save" command.
You can also force Echo to capture a clip manually. To do this, click Echo -> Manual Capture,
or press Ctrl+M in the main window.
When capturing clips, Echo performs several checks which may restrict what clips get stored
in the database. Some of these restrictions are fixed and cannot be changed, while others are
configurable:
Text only: Echo captures only clips that contain text. It may be plain text or formatted text
such as RTF or HTML, but some form of text must be present. For example, if you open an
image file in Paint and copy it to the clipboard, Echo will not capture the image. This is a basic
design principle of the program. If you need a clipboard extender that does handle images,
Echo is not for you!
Clips containing certain format markers: Echo supports the "CLIPBOARD VIEWER
IGNORE" flag, which tells clipboard extenders to ignore (not capture) certain clips. This
feature is used primarily by password managers, to prevent programs from capturing
passwords. You can disable this behavior in the Preferences dialog box, but you should only
do so if you really want Echo to capture passwords from your password manager.
Duplicate clips: Echo detects and ignores duplicate clips. This behavior is configurable. You
can configure Echo to accept and store duplicate clips, update the timestamp of the existing
clip, or replace the existing clip with the new one.
Minimum interval: After capturing a clip, Echo waits for a very short time and ignores any
new clips that arrive within that time. By default, the minimum interval is 100 ms (one tenth of
a second). This value can be changed in the Preferences dialog box.
Minimum length: Echo ignores clips whose text is shorter than the configured minimum. By
default, the minimum length is 2 characters. This means Echo will ignore clips that contain
only 1 letter. (This is because for such short clips Echo is really unnecessary: you can type
the single letter much faster than it would take to bring up Echo and paste the clip from there.)
You may decrease this default value, so that even 1-character clips are captured. You can
23
Chapter 3 Using Echo
Using Echo
3
also increase it, to ensure that only longer clips are captured and stored.
Maximum Length: If you happen to open an 800-page PDF, select all text and copy it, the
resulting clips will be very large. Storing such huge clips may affect the performance of the
database. Therefore Echo allows you to configure a maximum size for clips that are
captured. Any clips exceeding the maximum size will be ignored. By default Echo ignores
clips larger than 1 MB (megabyte). You may lower or increase this value to fit your needs and
achieve the optimal performance.
Applications: You can configure Echo to ignore clips which are copied from specific
applications. This is done by specifying the application's executable name, its complete path,
or part of the path. You can use this feature to prevent Echo from capturing sensitive
information that some applications, such as password managers, can copy to clipboard. This
feature is called "application filter", see Excluding applications for details. You can also use
the filter as an "inclusive" filter, to capture clips only from the applications you specify.
Notes:
Capturing clips is automatically suspended when you edit a clip (in the in-place editor or in the
external editor window). Capturing resumes automatically when you finish editing a clip.
See also:
Preferences
Limitations
Pasting Clips
When you work in another application, you can use Echo to quickly find and paste a previously
copied clip. The easiest way to do so is to use only the keyboard:
1. Press the activation hotkey to bring up Echo. By default the hotkey is Win+Insert (you can
change it in the Preferences dialog box).
2. Find the clip you want: either by scrolling, or by typing text to filter the list of clips. (Remember
to use the views, which can help you find the necessary clip quickly!)
3. Press Enter to paste the selected clip. Echo will minimize, and the selected clip will be
pasted into the active window.
You can paste more than one clip at a time. Just select as many clips as you want, and
press Enter to paste them.,
You can also copy clips from Echo without pasting them immediately. To do this, select one
or more clips, then press Ctrl+C. The selected clip(s) will be copied to clipboard, and you can
paste them in any application using standard editing commands.
By default, when you press Enter or Ctrl+C, Echo copies (and pastes) the selected clip
including all formats stored in the database for that clip. Sometimes you may want to copy or
paste only the plain text form, without any formatting. To do so, add Shift to the appropriate
keypress:
Shift+Enter: paste selected clip(s) as text only
Chapter 3 Using Echo
24
Using Echo
3
Shift+Ctrl+C: copy selected clip(s) as text only
Unlike when using the Paste command, Echo does not minimize by default when you use the
Copy feature. If you want Echo to minimize when you copy clips as well, you can enable it in the
Preferences dialog box.
If you find that you use this feature very often, you can alter Echo's behavior in the Preferences
dialog box, so that the default command (Enter or Ctrl+C, without the Shift key) will paste clips
as text only. In that configuration, you need to use the Shift+Enter and Shift+Ctrl+C to paste
clips using all available formats.
Note that you do not need to remember these keyboard combinations and their meanings. You
can always right-click the selected clips and choose the appropriate command from the menu.
Notes on copying and pasting multiple clips
In the Preferences dialog box you can specify how Echo should order multiple clips when you
copy (Ctrl+C) or Paste (Enter) them in the main window. By default, Echo orders clip in straight
chronological order: from oldest to newest, so that oldest clips come first. Depending on how
the list of clips is sorted, it may not be the same order in which clips are currently displayed. If
you prefer, you can change the configuration option so that multiple clips are always copied and
pasted in the same order in which they appear in the list. See Modifying Views for information on
sorting the list of clips.
Searching for Clips
The search functionality is at the very core of Ethervane Echo. In the basic mode, searching for
text instantaneously filters the list, so that only the matching clips are displayed. This is by far
the fastest way to locate a clip. To find a clip, just type some text in the search box at bottom of
the main window:
Echo supports two search modes: Basic and Advanced. In the Basic mode, Echo starts
searching as soon as you start typing, so there is no need to press the Enter key. In the
Advanced mode you type the search phrase, then press Enter. (This is because the Advanced
mode requires a complete search phrase, otherwise no useful search results would be
returned.)
When you start searching, note that the color of the selection bar in the clip list changes from
blue (unfiltered list) to orange (filtered list). This way you can instantly tell whether a search is
active. You can customize the colors in Preferences.
Clicking the blue looking glass icon at the right end of the search box is the same as pressing
Enter to execute the search, and it is usually not necessary, because in the basic mode Echo
To clear the search box, press ESC. The search will be canceled and Echo will display the full,
25
Chapter 3 Using Echo
Using Echo
3
unfiltered list of clips. If you prefer to use the mouse,you can click the "x" icon at the far right end
of the search box.
To the right of the search box is the Mode button. Click it to display a small menu, from which
you can choose the search mode you want to use, as well as pick a few other options:
Wait for Enter key: Only available in the Basic search mode, and turned off by default, so that
Echo starts searching as soon as you begin to type your search phrase. If you prefer, you can
enable this option, so that Echo will always wait for you to press Enter before if starts
searching. This option is unavailable if you choose the "Advanced" search mode, because in
this mode Echo always waits for you to press the Enter key.
Auto Wrap Wildcards: When the option is enabled (checked), Echo automatically adds a
leading and trailing wildcard (asterisk) to your search pattern, if the pattern does not already
begin and does not end with a wildcard. If your search pattern begins or ends with any wildcard,
Echo does not automatically add any other wildcards. When this option is disabled
(unchecked), Echo never adds any wildcards automatically.
Explanation: Echo assumes that most of the time you search for substrings – that is, you
don’t care WHERE the text occurs inside your clips, as long as it does occur somewhere.
So if you type "dog", Echo will find "doghouse", “boondoggle" and "lapdog". This is
achieved by automatically wrapping your search string in wildcards, so when you type “dog”,
Echo actually searches for “*dog*”. But, this happens ONLY if the “Auto Wrap Wildcards” is
enabled. Without this option, Echo will not add any wildcards to the search string, so you
would only find clips that equal the word “dog”. (This is still useful, since you may use
wildcards in the middle: “do*g” would match “doing”, or any other clip that begins with “do”
and ends with “g”)
The two commands at bottom select the search mode: Basic or Advanced. The label on the
button changes to indicate the current search mode.
The single most important tip for using Ethervane Echo: you can start searching for clips
at any time. You do not have to click the search box or move to it with the Tab key, or press any
other key combinations such as Ctrl+F, as you typically do in other applications. Whenever you
are browsing the list, just start typing, and the focus will switch to the search box automatically.
Likewise, you do not need to Tab out of the search box to return to the list of clips. If the focus is
in the search box, pressing arrow keys will instantly switch back to the list so that you can
browse and select clips.
To switch between search modes do one of the following:
Press F4 to cycle to the next mode.
Chapter 3 Using Echo
26
Using Echo
3
Click the Mode button next to the search box and select the mode from the menu.
Click Echo -> Search mode to cycle to the next mode.
Notice that selecting a search mode changes the icon on the Mode button and the background
color of the search box. These hints help you determine which mode is currently active.
Search box and Mode button in Basic mode:
Search box and Mode button in Advanced mode:
Remember to check the current mode when you search for clips, because the same search
phrase can return good results in one mode but fail (or be meaningless) in another.
By default, Echo always starts in the Basic mode, which is the one you'll be using most
often. If you prefer, you can configure Echo to remember the last mode you selected, and
begin in this mode when it is restarted.
The three search modes are described in the following sections:
Basic Search
Advanced search
Using Wildcards
Notes:
Regardless of the search mode, Echo always performs a case-insensitive search. That is,
uppercase and lowercase characters are not distinguished.
If the phrase you are searching for returns too many results, you can use quick views to
narrow down the results. All the features of a quick view apply to search results as well. For
example, searching within a "Sticky" view will return only clips that are sticky.
In the definition of a quick view there are separate settings for sorting: one used for the
unfiltered list, the other used for search results. For example, the unfiltered list can be sorted
by date, but as soon as you start searching, the list can switch to sorting alphabetically or by
clip length. By default the sort settings are the same for the filtered and unfiltered list, but you
can change them for each quick view individually.
Sorting search results by length in ascending order (shortest clips on top, longest at bottom)
will display the most relevant results first.
By default, if a clip is longer than 512 characters, Echo will only search the first 512
characters of the clip's text. The same limit is used to truncate longer clips for display: by
default, Echo displays only the first 512 characters of each clip. Echo always stores complete
clips in its database, so that when you paste a clip from Echo, the full clip is put on clipboard,
but when displaying and searching, Echo only uses the first portion of long clips. The limit can
be lowered or increased, but it is always applied. It is necessary to keep the search
27
Chapter 3 Using Echo
Using Echo
3
reasonably fast. If you happened to capture a clip that contains hundreds of kilobytes (the
complete text of an e-book, for example), it would cause a significant delay while searching.
Feel free to experiment with increasing the default limit.
Increasing the limit described above in Echo's Preferences dialog box only affects clips
captured after the change. The clips already stored in the database will retain the previous
limit.
Basic Search
The Basic search mode is the one you will probably be using most of the time. By default Echo
always starts in Basic mode (although you can configure it to remember the last mode used).
In the Basic mode, Echo simply searches for clips that contain the exact text you type and
displays the results in the list.
There is one option applicable only to the Basic mode. Click the Mode button (next to the search
box in the main window) to change the setting:
Wait for Enter: if enabled, Echo waits for you to press the Enter key before it executes the
search. This option is disabled by default, so that Echo starts searching immediately, as soon
as you start typing your search phrase. You may want to enable the option on slower
computers, if the instant search causes a perceptible slow-down.
Notes:
Search in Echo is always case-insensitive (uppercase and lowercase characters are not
distinguished).
See also:
Searching for Clips
Using Wildcards
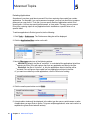
Advanced Search
Advanced search mode in Ethervane Echo is similar to the special syntax used in some search
engines. In this mode you can build logical expressions using operators such as AND, OR,
NOT, use double quotes to enclose phrases, and use parentheses to group parts of the search
expression.
For example, to find clips which contain the word "white" or the word "black", type:
white OR black
To find clips that contain both the words "white" and "black", type:
white AND black
To find clips that contain both the words "white" and "black", but do not contain the word
"color", type:
white AND black AND NOT color
Chapter 3 Using Echo
28
Using Echo
3
If you omit the operator between any two words, Echo assumes the default AND operator. The
following two expressions are the same:
white AND black
white black
To find a phrase consisting of several words, enclose the whole phrase in double quotes:
"rock and roll"
(Because the phrase is quoted, the word "and" is interpreted literally, not as an operator.)
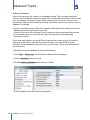
The search expressions can be as complex as you want. For example:
white AND (black OR blue) AND NOT ("green is the colour"
OR "Pink Floyd")
This last expression will find clips that match all of the following conditions:
contain the word "white"
contain the word "black" or the word "blue"
do not contain the phrase "green is the colour"
do not contain the phrase "Pink Floyd"
Notes:
You do not have to type operators in UPPERCASE, this is only done for clarity of the
examples
Wildcards are supported in this mode. Expressions such as blac? AND ?hite OR gr*n are
valid.
See also:
Searching for Clips
Using Wildcards
Using Wildcards
A wildcard is a special character in your search string that can match any single character (?)
or any number of characters (*). Wildcards are supported in both Basic and Advanced modes.
They are useful in the following situations:
If you want to search for a pattern that clips begin with or end with
If you are not sure of the exact spelling of the text you are looking for
If you want to match several similar, but not identical text patterns
Wildcards in Echo are similar to how they are used in some search engines and file managers:
? (question mark): matches any single character (letter, digit, punctuation mark or any other
character)
* (asterisk): matches zero or any number of characters
29
Chapter 3 Using Echo
Using Echo
3
To find clips which begin with a specific pattern, add an asterisk to the end of the pattern.
Example:
This*
To find clips which end with a specific pattern, add an asterisk at the beginning of the pattern.
Example:
*that
To find clips which contain a pattern anywhere, add an asterisk at the beginning and the end of
the pattern. Example:
*they*
To find words with alternate spellings, replace the part you don't know with an asterisk.
Example:
analy*e
(will match both "analyze" and "analyse")
To find words which may be separated by multiple spaces, use asterisks in place of the
spaces. Example:
black*and*white
You can use the asterisk in place of unknown words. Example:
rock*roll
(will match "rock and roll", "rock & roll", "rock'n'roll", etc.)
Notes:
In the Wildcards mode, if the text you are looking for may occur in the middle of a clip, you
must wrap the search phrase in asterisks on both sides, *like this*. If you omit the
leading asterisk, Echo will only find clips that begin with your search phrase. If you omit the
trailing asterisk, Echo will only find clips that end with your search phrase. (See examples
above.)
See also:
Searching for Clips
Sticky Clips
In Ethervane Echo you can mark certain clips as "sticky". Sticky clips have the following special
properties:
They cannot be deleted. If you try to delete multiple clips, and some of them are sticky,
Echo will only delete the non-sticky clips. To delete a sticky clip you must first make it "nonsticky" again.
They are never purged when Echo runs the periodic database maintenance. (See more
Chapter 3 Using Echo
30
Using Echo
3
information on maintaining the database.)
Using sticky clips you can make sure that certain important clips will always be available, no
matter how old. In addition, the sticky feature prevents you from accidentally deleting clips that
you really want to keep.
Sticky clips are marked with a special icon in Echo:
To make a clip sticky, select one or more clips that you want to be sticky, then do one of the
following:
Click Edit -> Sticky.
Press Ctrl+S
Right click the selected clip(s) and select Sticky.
To return a sticky clip to the normal, non-sticky state, do the same again. The easiest and
fastest way is to select the clips that you want to mark or un-mark as sticky and press Ctrl+S.
Tip: the "sticky" marker can be used as a filter for a quick view. That is to say, you can create
quick views which show only the sticky clips, or only the non-sticky clips. By default Echo
comes configured with a quick view called "Sticky", which displays only the sticky clips.
Deleting Clips
To delete a clip:
Select the clip you want to delete and press Delete. Or, right-click a clip to display the context
menu, then click Delete.
By default, if you try to delete 10 or more clips at once, a confirmation dialog box is displayed:
31
Chapter 3 Using Echo
Using Echo
3
You can configure Echo never to show this confirmation message, or change the number of
clips that triggers it. (For example, to always display the confirmation before deleting clips, set
the value to 1.)
Tips:
You may select and delete multiple clips at a time. To delete all clips shown in a view, press
Ctrl+A to select all clips, then press Delete.
Deleting a clip is final. There is no way to restore deleted clips.
Clips marked as sticky are never deleted. If you try to delete multiple clips, some of which are
sticky, the confirmation dialog box will include a message that reads "Sticky clips will not be
deleted". If you want to delete sticky clips, you have to un-stick them first (press Ctrl+S). More
information on sticky clips.
You rarely need to delete clips manually. Echo occasionally runs maintenance, deleting
(purging) some of the oldest clips from the database.
If you are deleting clips for reasons of privacy, there may be better ways to achieve that
goal. Please see Privacy Considerations topic.
Editing Clips
Clips can be edited, although Echo provides only a basic editing facilities, since it is not a fullfledged text editor. There are two ways to edit a clip: in an in-place editor (directly in the list of
clips), and in an external editor window.
Editing clips in-place is useful for smaller clips and minor adjustments. If the clip you want to
edit is longer or if the changes you wish to make are more involved, use the external editor.
1) To edit a clip in place, select a clip you wish to edit, then do one of the following:
Press F2.
Click Edit -> Edit (inplace).
Right-click the clip you wish to edit and select Edit (inplace).
Make the editing changes you want, then press Enter to confirm, or press ESC to cancel editing
and restore the original clip.
Some of Echo's features are disabled while a clip is being edited in-place. The disabled
functions are grayed out in the main menu.
Chapter 3 Using Echo
32
Using Echo
3
To add a new line in the editor, press Ctrl+Enter.
2) To edit a clip in the external editor, select a clip you wish to edit, then do one of the
following:
Press Shift+F2.
Click Edit -> Edit (external).
Right-click the clip you wish to edit and select Edit (external).
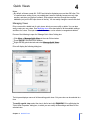
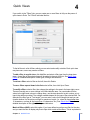
The clip text will be displayed in a separate modal window:
The editor window is resizable and will retain its last size and position.
Click Options to display a small drop-down menu with a few options for the editor:
For example, you can toggle between fixed and variable width font, show or hide line numbers,
and show or hide white space markers. The command to enable "live" spellchecker (spelling as
you type) is also found in this menu. The settings you choose here will be preserved.
33
Chapter 3 Using Echo
Using Echo
3
To use the spellchecker, you may need to download and install dictionaries. Only
English dictionaries are distributed with the program. Dictionaries are available from
the same place you downloaded Ethervane Echo.
To use the spellchecker, first select the appropriate language from the drop-down list at the top
of the editor window. Then click the Check spelling button, or enable "live" spell checking by
clicking Options -> Live Spelling.
Make the editing changes you wish, then click Save and close to save the clip and return to the
main window. Press ESC or click Cancel to abandon editing and restore the original clip in Echo.
Notes:
While a clip is being edited in-place, Echo suspends capturing clips from the
clipboard. When you finish editing, capturing is automatically resumed. When a clip is edited
in the external editor, Echo continues capturing clips normally.
Only one clip can be edited at a time.
Echo only supports editing the plain-text portion of a clip. If a clip was copied and
captured with additional formats, such as Rich Text (RTF) or HTML, these advanced formats
will be removed when you save the clip. Only the plain text version of the edited clip will be
preserved.
In some cases, especially if you wish to preserve more formats that just plain text, it nay be a
better idea to copy/paste a clip to the original application, edit the clip there, and then copy the
result to clipboard, so that Echo will capture it again.
When saving an edited clip, Echo does not check for duplicates.
Exporting Clips
The clips stored in Echo database can be exported to a text file. To export clips, do the
following:
1. Select the clip(s) you want to export.
2. Click Tools -> Export Selected Clips.
3. Pick a file or enter a filename in the dialog box. (If you choose an existing file, it will be
overwritten)..
4. Click Save.
Notes:
Echo saves the exported clips using UTF-8 format with the BOM marker. This ensures that
the text of the clips will be correctly encoded, regardless of the current Windows locale.
Importing Clips
Echo supports importing clips from plain text files and from Ditto, a similar clipboard extender.
Importing from a plain text file
Chapter 3 Using Echo
34
Using Echo
3
When clips are imported from a text file, each line in the text file (separated by carriage return)
becomes a separate new clip. Empty lines are not imported, and duplicates are handled the
same way as when capturing clips from the clipboard. Echo supports importing clips from
UTF8 and UTF16-encoded files, as well as regular (ANSI) encodings.
To import clips from a text file:
1. Click Tools -> Import Clips -> Import from Text File.
2. In the dialog box displayed find the text file from which you want to import clips.
3. Click Open.
Echo will import clips from the text file. Each newly imported clip will receive the current
timestamp.
Importing from Ditto
Ditto is a clipboard extender somewhat similar to Echo, and it also uses an SQLite database to
store the clips. Echo can import clips directly from that database, preserving properties such as
sticky clips (in Ditto this feature is called "Never auto delete") and timestamps.
To import clips from Ditto:
1. Click Tools -> Import Clips -> Import from Ditto.
2. Echo will try to locate the Ditto database. If the database is located where Echo cannot find it,
use the dialog box to find the Ditto database file, called Ditto.db.
3. Click Open.
Echo will import clips from the Ditto database, retaining their timestamps.
Notes:
You may notice that not all clips are imported. This is because Echo respects certain
configuration settings while importing. For example, clips longer than the maximum length
configured in Echo are not imported. For more details see Configuration.
Duplicate clips are not imported.
Importing clips from a large text file or database may take a few minutes to complete. Please
wait until the process is complete.
Keyboard Reference
System hotkeys
System hotkeys are keyboard shortcuts that Echo registers in the system. They can be used
even if Echo is not the active application. Typically, a system hotkey is used to activate (bring
up) Echo when you are working in another application. All these hotkeys can be changed or
disabled in configuration (Keyboard section).
Win+Insert
35
Default activation hotkey. Press this hotkey
used to bring up Echo when working in other
Chapter 3 Using Echo
Using Echo
3
applications.
Shift+Win+In Paste current clipboard contents as plain text
in whatever application you are currently
sert
working with. This works only if clipboard
contains text data when you press the hotkey.
Echo "clears" from clipboard all formats other
than plain text and performs a paste.
Essentially this feature gices you an instant
"Paste as Plain Text" in all applications.
Shift+Win+D Instantly clear clipboard contents. (Same as
elete
clicking Echo -> Clear clipboard, but this is a
system-wide hotkey, so you can use it without
first opening Echo.)
Shift+Win+] Disconnect from clipboard and stop capturing
clips. If Echo is already disconnected,
pressing this hotkey re-connects to clipboard,
so that Echo can capture clips again. This
hotkey is disabled by default and can be
enabled in Preferences -> Keyboard ->
UseConnectHotkey.
Keyboard shortcuts
F1
Opens this Help file.
Shift+F1 Opens this Help file and shows the "Keyboard
reference" topic (this topic).
F2
Edits the selected clip in place.
Shift+F2 Edits the selected clip in a separate dialog box.
F4
F5
Escape
Switches between the two search modes: Basic
and Advanced. (Currently active mode is reflected
on the Search button label)
Opens the Preferences dialog box, where you can
configure program options.
Primary function: if a search is currently active,
the Escape key cancels the search and restores
the full, unfiltered list. Pressing Escape again
invokes the secondary function.
Secondary function: depends on the
configuration setting in Preferences. Available
options are: Switch focus (move between the list
and the search box); Minimize (minimize and
hide Echo in the notification area); Reset (reset
the current view) and None (pressing Escape
does nothing). In addition, you can enable an
Chapter 3 Using Echo
36
Using Echo
option to activate the default (leftmost) view
when Escape is pressed. This function is
performed independently of the previously
described settings. For example, pressing
Escape can both minimize Echo and activate
the default view.
Shift+Es Minimizes Echo and hides the program in the
notification area.
cape
Enter
Copies the selected clip(s) to clipboard using all
formats stored in the database, and pastes them
in whatever application is currently active. After
selecting this command Echo is automatically
minimized.
Shift+En Copies the selected clip(s) to clipboard using only
the plain text format, and pastes them in whatever
ter
application is currently active. After selecting this
command Echo is automatically minimized. (If you
prefer, the meaning of Enter and Shift+Enter
commands can be exchanged in Preferences.)
Alt+B
Switches to "Basic" search mode.
Alt+A
Switches to "Advanced" search mode.
Ctrl+A
Selects all clips in the current view.
Ctrl+B
Opens a dialog box used to manually maintain the
database (purge old clips) or permanently erase
all clips and other information from the database.
Ctrl+C Copies the selected clip(s) to clipboard using all
formats stored in the database, but does not
attempt to paste the clip..
Shift+Ct Copies the selected clip(s) to clipboard using only
the plain text format, but does not attempt to paste
rl+C
the clip. (If you prefer, the meaning of Ctrl+C and
Shift+Ctrl+C commands can be exchanged in
Preferences.)
Ctrl+D Shows or hides clip information pane. Clip
information pane is located below the list of clips
and displays the source application icon and
name, timestamp and length of the clip, as well as
the number of times the clip has been used in
Echo.
Ctrl+E
Invokes the previous search from history (i.e.,
moves back in history)
Shift+Ct Invokes the next search from history (i.e., moves
forward in history)
rl+E
37
Chapter 3 Using Echo
3
Using Echo
Ctrl+F
Ctrl+H
Ctrl+I
Ctrl+M
Ctrl+R
Ctrl+S
Ctrl+Q
Ctrl+U
Ctrl+Y
3
Opens a dialog box where you can inspect
available clipboard formats and select the formats
you want Echo to store.
Toggles the "Fixed item height" setting. When this
setting is enabled, all items in the list of clips have
the same height, regardless of how many lines
they contain. When this setting is disabled, each
item is only as high as required to fit the lines of
each clip, up to the maximum number of lines
configured in Preferences.
Displays statistical information about the
database, such as total number of clips, number
of sticky clips, etc.
Performs a manual capture. By manually
capturing a clip, you can override certain
conditions that normally prevent Echo from
capturing a clip automatically (e.g., if the clip is too
short or too long).
Refreshes (re-generates) current view.
Marks currently selected clip(s) as sticky. If the
selected clips are already sticky, removes the
sticky marker.
Opens the View Properties dialog box, where you
can inspect and modify the settings of the
currently active view.
Opens the Manage Quick Views dialog box, where
you can delete, create and reorder views, as well
as re-create the factory default set of views.
Toggles the option to keep Echo always on top of
other windows (View -> Keep on Top of Other
Windows)
Delete Deletes selected clips, with an optional
confirmation.
or
Ctrl+Del
ete
Ctrl+(minus)
Clears the clipboard.
Ctrl+1... Press to select a quick view corresponding to the
number. Ctrl+1 activates the first (leftmost) view;
Ctrl+0
Ctrl+2 activates the second view, etc. This only
works for the first 10 views (Ctrl+0 activates the
tenth view).
Alt+1...Al Press to select the sorting method for clips
Chapter 3 Using Echo
38
Using Echo
t+6
Alt+=
(equal
sign)
3
displayed in the current view, in order: by Date (1),
Alphabetically (2), by Application (3), by Use count
(4), by Length (5), and by ID (6). Note that this
alters the sort method only for the current program
session. If you want to change sorting
permanently for a view, click View -> Quick View
Properties and modify the appropriate settings
there.
Select ascending sort order for the current view
(low to high values).
Shift+Alt Select descending sort order for the current view
(high to low values).
+=
(equal
sign)
Keyboard shortcuts in the external editor (Shift+F2)
The external editor window supports all the standard editing shortcuts, such as Ctrl+X for Cut,
Ctrl+C for copy, Ctrl+V for paste and many others. These are not listed here. The table contains
only the keyboard shortcuts which are specific to the editor
F4
Change to the next language in the drop-down
box. The selected language will be used by the
spell checking function.
Shift+F4 Change to the previous language in the drop-down
box. The selected language will be used by the
spell checking function. .
F7
Start the spell-checker.
Shift+F7 Enable or disable "live" spell checking. (Incorrectly
spelled words will be underlined in red.)
Ctrl+W
Enable or disable word wrapping in the editor.
Ctrl+\
Enable or disable displaying white space (spaces,
tabs and line breaks) as visible characters.
In the main Echo window, just below the list of clips there is a row of tabs. Each tab represents
a quick view — a set of options and filters that determine which clips are included in a view,
how they are sorted, etc. Each view has its own options that determine sort order of clips and
the maximum number of clips that a view can display, as well as a list of filters. The filters let
you decide which clips a view should include. For example, you can filter clips by time, by
length, by the application they come from, or show only clips that contains a specific text. Views
39
Chapter 3 Using Echo
Quick Views
4
are a very useful way to quickly limit the list of clips and show just the ones that are interesting
to you at the moment.
To see how views work, just switch among the default views created by Echo. (Make sure the
database already contains some clips, otherwise some of the views may be empty.)
The default set of views looks like this:
(See Default Views for a description of the predefined views in Echo.)
To select a view, simply click its tab. There are also several ways of navigating the views using
the keyboard:
Press Ctrl+Tab or Ctrl+PageDown to cycle to the next view.
Press Shift+Ctrl+Tab or Ctrl+PageUp to cycle to the previous view.
Press Ctrl+<digit> to switch immediately to the view corresponding to the number you
pressed. For example, Ctrl+1 switches to the first view. This feature is limited to the first ten
views. The number of the tenth view is zero, so press Ctrl+0 to activate it.
You can rearrange the views by clicking and dragging their tabs with the mouse.
To modify a view, click View -> Quick View Properties, or press Ctrl+Q.
To create new views, delete existing views and modify properties of the defined quick views,
click View -> Manage Quick Views, or press Ctrl+U.
See also:
Default Views
Managing Views
Modifying Views
Chapter 4 Quick Views
40
Quick Views
4
Default Views
The initial database created by Echo when it is first installed contains a default set of views.
These views are intended to show you the possibilities. For example, a view can show only the
"sticky" clips, only short or long clips, clips collected within the last hour, etc. You can remove
the views you do not need and create your own: see Managing Views and Modifying Views.
Echo automatically creates the following views:
Default:
This is the first view on the left. It shows the 500 most recent clips. You can remove all other
views except for this one, because at least one view must exist. (You can however rename this
view and modiy its settings.)
Sticky:
This view shows all the clips that have been marked as sticky. See Sticky Clips for more
information.
Used:
This view shows all the clips that have been "used" within Echo — that is, all clips that have
been pasted (by pressing Enter) or copied (by pressing Ctrl+C). Unlike other default views, this
view is sorted by use count (most often used clips are on top).
Last hour:
This view shows all the clips that have been collected or used within the last hour. It is an easy
way to browse your most recent clips.
Short:
This view shows clips whose length is 12 characters or less. (You can just as easily create a
view that shows only "long" clips, or clips within any particular range of lengths). Unlike other
default views, this view is sorted by length (shortest clips are on top).
URLs:
This view shows clips which begin with the "http://" prefix. In other words, this view shows all
clips that are probably website addresses.
Browsers:
This view shows clips which were copied from popular browsers: Internet Explorer, Firefox or
Chrome. If your browser is not listed here, you can easily add it to the list of filters.
ALL CLIPS:
This view shows all clips in Echo database, regardless of their number. Note that if your
database contains a very large number of clips (perhaps more than 10,000) this view may show
some lag. You can always remove this view or limit the number of clips it displays.
41
Chapter 4 Quick Views
Quick Views
4
Notes:
By default, all views except ALL CLIPS are limited to displaying no more than 500 clips. This
is a performance setting, since you probably don't want to manually browse so many clips
anyway, and when you perform a search, Echo always searches through the complete
database (not just the 500 clips shown in the list). You can easily change or remove this limit.
Managing Views
Echo comes with a default set of quick views, which you can modify or delete. You can also
easily create your own views. See Modifying views for a description of all the available settings
and filters for a view. This topic describes how views can be created, managed and deleted.
Do one of the following to open the "Manage Quick Views" dialog box:
Click View -> Manage Quick Views in the main Echo window.
Press Ctrl+U in the main Echo window.
Right-click any quick view tab and select Manage Quick Views.
Echo will display the following dialog box:
The list pane displays names of all the existing quick views. Only one view can be selected at a
time.
To modify a quick view: select the view in the list and click Properties. Echo will display the
"Quick View Properties" dialog box, in which you can modify all the settings and filters for the
selected view.
Chapter 4 Quick Views
42
Quick Views
4
To create a new quick view: click Add View. A new, unnamed view will be added to the end
of the list. Select that view and click Properties to modify its settings.
To delete a quick view: select the view which you want to delete and click Delete.
To re-order quick views: select a view and click Up and Down buttons. The selected quick
view will be moved towards the top or bottom of the list. Tip: You can also re-order views by
clicking and dragging the quick view tabs with the mouse in the main Echo window.
To restore the factory default set of quick views: click Default views. A confirmation dialog
box will be displayed:
If you really want to delete all your existing quick views and have Echo re-create the original,
default set of views, first check Yes, I am sure. Continue! at bottom, and then click Yes. This
additional confirmation is needed, because once you confirm the operation, it cannot be
undone. After you confirm, Echo will restore the factory default views, described here.
See Modifying views for instructions on how to edit quick view options and filters.
Modifying Views
The Quick View Properties dialog box is where you can configure all the options and filters of a
quick view in Ethervane Echo. This dialog box can be accessed in several ways:
To modify the properties of the currently active quick view in the main Echo window, do one of
the following:
Click View -> Quick View Properties.
Press Ctrl+Q.
43
Chapter 4 Quick Views
Quick Views
4
Right-click the tab of the active quick view and select Quick View Properties.
To modify the properties of any view in the Manage Quick Views dialog box, do the following:
1. Open the Manage Quick Views dialog box as described in this section.
2. Select the view you want to manage or create a new view.
3. Click Properties.
Either way, the following dialog box will be displayed, containing two tabs: "Basic view settings"
and "Filters":
View name:
Enter or change the name of the view. It is best to keep the name short, but there are no
restrictions on how you can name a view,
Sort list in full mode by:
Controls how clips in the view are sorted when the full list of clips is displayed. The options are:
Date
Date and time the clip was captured or used
Alphabetic Sort clips in standard alphabetical order
ally
Applicatio Sort clips alphabetically by the source application (i.e., the application from
n
which each clip was copied when Echo captured it)
Use count Sort clips by the number of times they were used (i.e. copied or pasted
from inside Echo)
Length
Sort clips by their length
Chapter 4 Quick Views
44
Quick Views
ID
4
Sort clips by the ID (number) which Echo database internally assigns.
Since the IDs generally grow, a lower ID generally means the clip is older,
even if it was very recently used so that its date and time are "new".
Full mode sort order:
Controls sort order when the full list of clips is displayed. The options are:
AscendingSort order is from low to high values (oldest clips first, shortest clips first,
least used clips first etc.)
Descendi Sort order is from high to low values (newest clips first, longest clips first,
ng
most often used clips first etc.)
Sort list in search mode by: and Search mode sort order:
The meaning of these settings is the same as the sort options described above. However,
these two settings are applied to the list of clips when it is filtered by typing text in the search
box. This lets you use different sort settings for the full (unfiltered) list and use separate sort
settings when you are searching for clips.
Limit number of shown items to:
If this option is checked, the view will display clips up to the number in the edit box below it. The
default is 500 clips, and the option to limit the number of clips is selected by default. This setting
works in concert with the sort options. For example, since the default sort setting is by date,
descending, Echo will show up to 500 latest clips. If you sort a view by clip length, ascending,
Echo will show 500 shortest clips.
Notes:
The limit applies only to the number of clips displayed. When you search for clips, Echo
always scans the whole database. If it finds fewer matching clips than the limit allows, all
matches will be displayed. If Echo finds more clip than the limit, it will discard the surplus
clips.
The default set of quick views in Echo includes a view called "ALL CLIPS", which is
configured to not limit the number of clips displayed.
The default value of 500 was chosen because a list of 500 items is small enough to be
generated very fast even on slower computers, and it is large enough to suffice for most
purposes. You probably don't want to manually browse through more than 20 or 50 clips
anyway. If you're trying to find one clip among 500, you'll get results much faster if you refine
the search criteria.
Tab color:
Normally all tabs are shown using the default color taken from the Windows theme. However,
you can enable an option to manually set color for each tab. Some users may find it easier to
distinguish quick views in this way. If that option is enabled, you can use this drop-down box to
select a custom color for the view.
Use as default settings for newly created views:
This checkbox is unchecked by default. If you check it and then click OK, all the settings made
on this tab (except for View name) will be applied to any new quick view you create. (See
Managing Views.) Please note that this applies only to the settings made on the "Basic view
settings" tab. Filters must be defined separately for each new view, and newly created views do
not have any filters defined.
45
Chapter 4 Quick Views
Quick Views
4
If you switch to the "Filters" tab, you can create one or more filters to fully use the power of
quick views in Echo. The "Filters" tab looks like this:
To the left there is a list of filters which you can select and modify or delete. Each quick view
may have zero, one or any number of filters.
To add a filter to a quick view: click Add filter and select a filter type from the drop-down
menu. A new filter of the selected type will be added to the end of the list. See Quick View
Filters for a detailed description of filter types, settings and behaviors.
To delete a filter: select a filter on the left, then click Delete.
To move filters up and down in the list: select a filter, then click Up or Down.
To modify a filter: select a filter, then change the settings in the area in the lower right corner.
There are usually one or more settings in the little table-like area. You can double-click the
values in the right-hand column to change them, use the drop-down list to pick a value, or just
type in the edit box provided. The settings available depend on the type of the selected filter. For
example if the filter type is "Text length", you can enter a value for the length limit and you can
choose whether it is the minimum length or maximum length. (I.e., show all clips shorter than
12 characters, or show all clip longer than 12 characters, etc.) See Quick View Filters for a
detailed description of filter types, settings and behaviors.
Match all filters (AND): select this option, if you have defined more than one filter for the view,
and you want the view to display only those clips which match all the filters. This is equivalent to
Chapter 4 Quick Views
46
Quick Views
4
the "AND" operator in some search engines.
Match any filter (OR): select this option, if you have defined more than one filter for the view,
and you want the view to display clips which match at least one of the filters. This is equivalent
to the "OR" operator in some search engines.
See Quick View Filters for a detailed description of filter types, settings and behaviors.
Quick View Filters
Filtering is what makes quick views really shine in Echo. Filters let you can create views that
display only the clips that satisfy a particular condition — such as only the sticky clips, only the
clips that contain specific text, only clips which are shorter or longer than a specified value, etc.
Each quick view can include one or more filters, and you can choose whether all filters or any of
the filters must match in order for clips to be displayed.
To define filters for a quick view, first open the Quick View Properties dialog box, as described
in the section on modifying quick views. Then click the Filters tab. The dialog box will look like
this:
To add a filter, click the Add filter button. A drop-down menu will be displayed similar to the
one above, containing a list of all the available filter types. Select the type of filter you want to
use, and the filter will be added to the list on the left.
Echo supports the following types of filters:
Sticky clips:
47
Chapter 4 Quick Views
Quick Views
4
The filter includes only the clips which are marked as sticky.
Edited clips:
The filter includes only the clips which have been edited in Echo.
Used clips:
The filter includes only the clips which have been used at least once in Echo. This means clips
that have been copied or pasted in the main Echo window. You can specify the minimum
number of times a clip must have been used to be included in the filter. Example: clips used at
least once, or: clips used at least 15 times.
Current timeframe:
The filter includes clips which have been captured or last used within the current unit of time:
this day, this week, this month or this year. Example: clips whose timestamp is within today's
date.
Recent:
The filter includes clips which have been captured or last used within the last n seconds,
minutes, hours, days, weeks, months or years. N is a number that you specify. Example: clips
whose timestamp is within the last 60 minutes.
Fixed date:
The filter includes clips which have been captured or last used either on the specified day, or
before or after that day. Example: clips whose timestamp is after July 7, 2011.
Text length:
The filter includes clips which have a specific text length, or clips which are shorter or longer
than a specific length. Example: clips longer than 100 characters, or: clips shorter than 5
characters.
Application:
The filter includes clips which were copied from a specific application. By creating multiple
filters of this type, you can create a quick view that shows clips captured from various
browsers: Firefox, Chrome, Opera, Internet Explorer etc.
Pattern Match:
The filter includes clips which contain a specific text. This type of filter works very much like the
basic search in the main window, but without you having to type the text every time. Example:
by using "http://" as the pattern, you can create a quick view that shows all clips containing
Internet addresses (URLs).
Notes:
There is a subtle difference between "Current timeframe" and "Recent" filters. Imagine you
have a "Current timeframe" filter set to "today", and a "Recent" filter set to 24 hours. They
seem similar, but each will produce a different set of clips. The "Recent" filter will show more
clips, because it will include clips from the full 24 hours preceding the current time, and some
of those 24 hours will technically be "yesterday". By contrast, the "Current timeframe" filter will
only include clips whose date is the same as the current date, i.e. clips dated since last
midnight. For example, if the current time is 7 am, the "Current timeframe" filter set to "today"
will show clips from the last seven hours, while the "Recent" filter will include a full 24 hours'
Chapter 4 Quick Views
48
Quick Views
4
worth of clips, since 7 am yesterday.
After you add a filter, you can select it in the list of filters on the left. The filter's properties will be
displayed in the smaller table-like area on the right, where you can modify the filter. Each filter
type has its own set of properties. The properties are mostly self-explanatory. A few examples
follow.
Properties for a "Used clips" filter:
Count: usage count to use for deciding whether or not to include a clip in the view.
Relation: less than, less than or equal, equal, greater than, greater than or equal.
In the above example, the filter will accept only clips which have been used more than twice.
Properties for a "Recent" filter:
Count: number of time units (seconds, minutes, hours et.c) to use.
TimeUnit: the time unit to use: second, minute, hour, week, month or year.
In the above example, the filter will accept only clips whose timestamp falls within the last 24
hours.
Notes:
There is only one property common to all filters: Reverse. You can use it to invert the meaning
of a filter, so that its condition becomes the opposite. If you reverse a "Sticky" filter, the filter
will include only non-sticky clips. If you reverse a "Used clips" filter, the quick view will contain
only the clips that have never been used, etc. If you reverse a "Recent" filter set to show clips
from the last 60 minutes, the quick view will contain all clips except those from the last 60
minutes. To reverse the meaning of a filter, set its Reverse option to True.
Remember that when you define multiple filters for a quick view, you can also decide whether
all filters must match or any of the filters must match in order for a clip to be included in the
view. This setting is controlled by the two radio buttons above the filter properties area: Match
all filters (AND) and Match any filter (OR). See the previous section for more details.
49
Chapter 4 Quick Views
Advanced Topics
5
Selecting Clipboard Formats
You can tell Echo which clipboard formats to store in the database, and which to ignore. Before
you know how to do it, it is important to understand why.
On the outside, the Windows clipboard is deceptively simple: it can hold only one piece of data
at a time. Under the hood, however, things become a little more complicated. Have you ever
wondered how it is possible that you can copy some text in Word and paste it in Notepad? On
the face of it, Notepad should not be able to accept any data from Word, because the two
programs use entirely different kinds of data: pure text in Notepad and rich, formatted text in
Word, that can include graphics, tables, footnotes, indexes and many more elements. Or
perhaps you have tried something a little more esoteric: you can copy a table from Excel and
paste it in Paint (or any other image editor), even though the two applications operate on
completely different data formats. Then, of course, there are things that cannot be done at all,
such as copying a waveform (sound) in an audio editor such as Sound Forge or Audacity and
pasting it in Notepad. But most of the time you can copy and paste data quite freely between
different Windows applications.
The way this is achieved is that a single piece of data is stored on clipboard in multiple formats.
Even plain text copied from Notepad ends up on the clipboard in four different formats - four
different "versions". And when you copy data from richer applications such as Word or Excel,
the number of different versions become quite high. Word 2007 puts each copied piece of text
in 14 different formats, while Excel creates as many as 29! (In a minute I'll show you how to see
this for yourself in Echo). The number of formats varies with each application, but the purpose
is always the same: provide the data in as many different versions as possible, so that other
applications can find and use the version they support.
For example, when you copy text from Word, it ends up on the clipboard in several different
formats, including:
o Word data (to be pasted in Word)
o RTF (formatted text understood by other advanced word processors such as Open Office
Write)
o plain text without any formatting (to be pasted in text editors such as Notepad), and
o a bitmap (to be pasted in an image editor).
All this (and much more) happens when you press Ctrl+C in Word. Some applications even
have their own, private data formats, which only they understand. This is useful, because those
apps can preserve and recognize their data when it gets put on the clipboard, even though
Windows has no idea what the actual data format is.
So now you know why many different formats exist. But why is it a good idea to store only some
of them in Echo, and discard others? The reason is performance. When you copy text in Word,
Word doesn't actually generate all the 14 different versions of the text you've copied. Nor does
Excel generate 29. It would take way too much time, take too much memory, and you would feel
the application "freeze" for a moment after pressing Ctrl+C or Ctrl+X. Instead, applications such
as Word and Excel (and many others, of course) only tell Windows: "This data is available in 20
different formats. Here's the list", but they do not actually copy any data. Then, when you switch
to another application and click "Paste", that application looks at the list of available formats,
decides which format it wants to use, and asks Windows to fetch it. At this point Windows goes
back to the application from which you copied the text and asks it for the data in only one format
- the one your application requested.
Chapter 5 Advanced Topics
50
Advanced Topics
5
So when you copy formatted text in Word in order to paste it in Notepad, Word tells Windows
that the text is available in 14 different formats, but only has to generate one - plain text. And
when you copy a table in Excel and paste it in Paint, Excel does not generate all 29 versions of
your table, but only one, the bitmap. This is a little more complicated than it could be, but it
allows applications to exchange data much easier, much faster and using less memory.
Indeed, this is what happens most of the time. It is extremely rare for an application to have to
physically put data on clipboard in all the formats it supports. It almost never happens - and
when it does, the system has to do a lot of work, which you can easily notice, as the computer
will seem sluggish for a moment.
By this time you probably realize that Echo could put your computer under a lot of strain: not
only can it ask applications for all the clipboard formats they can create, but it would be doing so
all the time, for every bit of data you ever copy! Now, that is definitely not a good idea. Hence,
selecting clipboard formats in Echo.
By default, Echo saves only a small selection of formats in its database: plain text encoded as
ANSI, plain text encoded as Unicode, RTF, HTML and CSV (comma separated values, a
common format for tabular data). These are all the formats Echo asks for when it detects new
data on the clipboard, and it ignores all other formats. At any time you can remove some of
these default formats (with some exceptions) and add any new formats you want Echo to store.
In order to do that, you need to know what other formats are available, of course. Echo provides
all the necessary information.
Copy some text from Word, Excel or any other application. It doesn't matter what application
you use, as long as you copy text (and not an image or some other type of data). Then do the
following:
Press Ctrl+F or click Tools > Available Clipboard Formats. The following dialog box will be
displayed:
51
Chapter 5 Advanced Topics
Advanced Topics
5
(The screenshot shows clipboard contents after copying text in Word 2007)
The dialog box contains two main panes:
o left pane: contains a list of formats currently available on the clipboard. The Stored
column indicates whether any given format is already captured and saved in Echo's
database.
o right pane: contains a list of formats that Echo is configured to store in the database.
Whenever you add a new format, it appears here. You can also remove most of the formats
in this list. The Kind column indicates whether a format is "System" (defined by Windows)
or "Custom" (defined by individual applications). Formats marked as "Required" in this
column are system formats that Echo must preserve in order to perform its function - these
formats cannot be removed from the list. The Text only column indicates whether the
format is considered to be plain text: if yes, then Echo will include the format when you use
the "Paste as Text" command.
When you look at the left pane, you can see all the different formats currently available on the
clipboard. This is how you can discover what formats exist and decide whether you want Echo
to use them. The items in the list will be different depending on what application you have most
recently copied data in. It may also be empty, if you have just started Windows and have not
copied anything yet.
Under the left pane there are three buttons:
o Refresh: Click to refresh the list (e.g. if you have copied new data to clipboard while this
window was open)
Chapter 5 Advanced Topics
52
Advanced Topics
5
o Add: Click to add the format currently selected on the left to the list on the right. This will tell
Echo that you want to store the selected format. The Add button is disabled when you
select a format that is already stored in the database.
o Add Other: Click to add a new format that is not listed in the left pane. In order to do this,
you need to enter a name of the format you want to add - you can find it in the
documentation of some applications that register their own formats. This is a rarely used
feature; don't worry if you don't see a need for it :)
The list on the right contains the formats Echo is currently configured to store. The buttons
below this list are:
o Toggle text-only: Click to mark the selected format as plain text or not. When a format is
marked as plain text, Echo will include it when you use the "Copy Text Only" or "Paste Text
Only" command. If the format is not marked as plain text, Echo will put it on the clipboard
only when you use the basic "Copy" and "Paste" commands, but not when you use their
text-only equivalents. Note that marking formats as text only is entirely up to you: Echo does
not care if a format is truly "just text". This is merely a way to tell Echo whether a particular
format should be included when you copy or paste clips as "text only" in Echo.
o Remove: Click to remove the selected format. Formats removed from the list will not be
stored in Echo database. Echo will not purge the existing clips in the database, but from
now on it will not collect data in the formats you have removed. Note that there are two
formats marked as "Required", which cannot be removed, because Echo must have them
in order to store a minimal amount of data in the database.
When you are finished configuring the formats, click OK to close this dialog box.
Notes:
Instead of clicking the buttons under each pane, you can also right-click the panes with the
mouse to display context menus containing the same commands and their keyboard
shortcuts.
There is a drop-down menu above the left pane. In the screenshot it reads "Formats currently
on clipboard". You can click it and select "Standard system formats" instead:
This will display a list of standard clipboard formats that are defined in Windows. You can use it
to add to Echo formats that are not on the clipboard at the moment, but which you want to add
anyway.
Database maintenance
Echo database can easily hold thousands of clips, but you probably don't want to keep all your
clips forever. As the size of the database grows over time, searching for clips will become a
little slower. This is why it is sometimes useful to do "database maintenance" - purge some of
the oldest clips you don't need anymore. By default, Echo automatically runs the maintenance
task twice a day (every 12 hours). Since maintaining the database takes a few seconds to
complete, Echo only runs it when it is minimized and the computer has been idle for a while.
53
Chapter 5 Advanced Topics
Advanced Topics
5
By default, Echo purges clips that are older than 30 days. After that, Echo checks how many
clips remain in the database. If the number of clips is greater than 5000, Echo deletes some of
the oldest clips, so that the database contains no more than 5000 clips. Similarly, Echo may
purge some of the oldest search history entries: by default history entries older than 30 days are
deleted, and then Echo trims the number of history entries so that it does not exceed 100. The
settings for age and maximum number of clips and history entries can be configured in the
Preferences dialog box (see below). You can also disable some or all of the maintenance tasks.
Clips marked as sticky are never purged, regardless of their age and number.
If you want, you can run database maintenance manually by performing the following steps:
1. Click Tools -> Maintain database. The Echo database maintenance dialog box will be
displayed
2. Click the Maintain tab.
3. Select the options (checkboxes) for the tasks you want Echo to perform; uncheck the options
you want to omit.
4. Click the Perform selected maintenance tasks button.
5. The dialog box will close and Echo will perform database maintenance. The process may
take a few seconds to complete. A message on the status bar will indicate successful
completion.
In the Preferences dialog box you can configure how the maintenance is performed.
Chapter 5 Advanced Topics
54
Advanced Topics
5
You can set the following options, among others:
Whether Echo should delete the oldest clips (UseMaxClipAge)
How long a clip remains in the database before it is purged (MaxClipAgeDays)
Whether Echo should purge clips if the total number of clips exceeds a specified number
(UseMaxClipCount)
Maximum number of clips permitted in the database (MaxClipCount)
Click Tools -> Preferences to open the Preferences dialog box, and then click the Database
maintenance section. All the options are available there. When Echo performs an automatic or
manual maintenance, it will use the settings configured in this section.
Notes:
To remove all traces of deleted clips, the database must be compacted. If you delete a clip for
privacy reasons, the physical data will still be present in the database file, although it will not
be accessible directly. To erase all traces of the deleted clips, run database maintenance
manually and make sure to select the "Compact.database" task.
Maintenance purges not only clips, but search history entries as well. Uncheck the
appropriate task if you do not with to purge search history.
In the maintenance dialog box, there is also an Erase tab. It contains similar tasks to the ones
found on the Maintain tab, but erasing simply deletes all clips from the database,
regardless of their age or number. This is almost the same as physically deleting the
database file, except erasing data will not affect your existing configurations, such as views
55
Chapter 5 Advanced Topics
Advanced Topics
5
and filters. Use this function to clear all clips (including sticky clips!) and/or search history
entries from the database. This operation can only be done manually; it is never performed as
part of automatic database maintenance.
When Echo performs maintenance (automatic or manual), sticky clips are never deleted.
However, when you use the Erase task, the database is emptied of all clips, including sticky
clips.
The "Perform selected maintenance tasks" button becomes disabled if all tasks on the page
are unchecked. You must check at least one task to perform for the button to be enabled.
On the Erase tabs, all tasks are initially disabled (unchecked), because the operations are
destructive. You must manually check the tasks you wish to perform.
If you find you often purge or erase clips for privacy reasons, consider using the in-memory
database instead.
Privacy Considerations
A program that automatically captures and stores anything you ever copy to the clipboard is
quite useful... until it isn't. There may be times when you do not want certain clips to get
captured. Passwords are a good example. Perhaps you use a password manager, or maybe
you just store passwords in a text file (hope its encrypted!), and copy / paste them when
needed. That's a common scenario where the last thing you want is for your passwords to be
captured and stored in an unencrypted database which can be read by anyone with access to
your computer.
Ethervane Echo comes equipped with features to minimize the risk in such situations. First of
all, it recognizes a special clipboard format called "Clipboard Viewer Ignore", which tells Echo
that it should skip capturing a particular clip. A password manager creates this format on the
clipboard to let other applications know that they should not capture this data. The idea was
originally developed by Chris Thornton, the author of the famous ClipMate, and you can read
more about it here. If you are using a password manager, make sure it includes "Clipboard
Viewer Ignore" together with any data it copied to clipboard. And then make sure you are using a
clipboard extender which supports this technique, such as Ethervane Echo.
Beyond that, Echo gives you two ways of protecting your privacy, described in the next two
sections:
Ignoring clips from certain applications: you can create a list of applications or folders which
Echo should ignore. When Echo detects that a clip was copied from one of those
applications, it will not capture it.
Using an in-memory database: Echo's database can be kept in your computers memory,
instead of on the disk, so that every time you reboot the computer (or restart Echo), all the
collected clips will disappear forever.
Chapter 5 Advanced Topics
56
Advanced Topics
5
Excluding Applications
Sometimes it may be a good idea to prevent Echo from capturing clips copied from certain
applications. For example, if you use a password manager, you may not want Echo to capture
password you copy from it. To do this, you can specify names of applications which Echo
should ignore. You can also specify partial names, or even paths. This way you can prevent
Echo from capturing clips from any application that is installed on a specific drive or in a
specific folder.
To add an application to Echo's ignore list, do the following:
1. Click Tools -> Preferences. The Preferences dialog box will be displayed.
2. Click the Application filter section on the left:
3. Next to Filter type select one of the following options:
ftExclusive (default): the filter is "exclusive", ie. excluded all the applications listed from
capturing by Echo. Echo will capture clips from any application not listed in the filter.
ftInclusive: the filter is "inclusive", ie. only the applications listed in the filter will be
included. Echo will ignore clips copied from any application not listed in the filter.
o If you want to exclude only certain applications, use the "ftExclusive" setting:
4. Click the small square button next to Items.
5. A simple editor window will be displayed. In the editor type the names, partial names or paths
of applications you want Echo to ignore. To ignore multiple applications, enter each name in a
separate line (press Enter between entries).
57
Chapter 5 Advanced Topics
Advanced Topics
5
6. Click OK to close the editor and save your changes.
7. Click OK again to close the Preferences dialog box.
Examples:
If you want Echo to ignore (exclude) clips copied from Notepad, enter notepad.exe or just
notepad
If you want Echo to ignore clips copied from any application on your "d:" drive, enter d:\
If you want Echo to ignore clips copied from any application installed under C:\secretapps,
enter C:\secretapps or just secretapps
Important:
Please TEST your filters. In some cases (especially on 64-bit versions of Windows) Echo
may not be able to retrieve the full path of an application. If this is the case on your system,
listing drives or folders in the application filter will not work, and you will only be able to use
application names (e.g. "notepad.exe"). Make sure the filter works before you start relying on
it.
Remember that the filter only looks at the application, not the document you are editing in
it. For example, let's assume you tell Echo to ignore all apps installed on drive "d:" (as in the
second example above). Now imagine you have started Notepad and opened in it a text file
residing on the "d:" drive, such as d:\My Files\letters.txt. If you select some text
and cop[y it, Echo will capture it, because the application in this case is Notepad, which is
typically installed on the C: drive (the system drive). You can only exclude applications, not
documents you open in applications.
In the Preferences dialog box, Application filter section (see screenshot above), there is one
more setting not yet described: AcceptFromUnknownApps.This setting tells Echo what to
do if it detects a new clip, but cannot detect what application copied it to the clipboard. Set this
option to "True", if you want Echo to capture clips from applications it cannot detect. Set it to
"False", if you want Echo to always ignore clips if it does not know the source application.
Chapter 5 Advanced Topics
58
Advanced Topics
5
In-Memory Database
When Echo captures a clip, it saves it to its database on disk. This is normally the desired
outcome, since a database is extremely robust and can easily hold thousands of clips for a long
time. The database is needed to let you retrieve captured clips in the future. However, there
may be times when you do not want Echo to keep a permanent record of every clip you copy to
clipboard. For example:
If you run a portable version of Echo from a pendrive (USB flash drive), frequent writes to the
database will shorten the lifespan of your drive.
If you run Echo on an office computer or on a computer to which many people have access
In any situation when you do not want your clips to be stored on disk and potentially
accessible to others.
Echo has an easy solution: you can tell Echo to keep the clips in memory only, and never to
write them to disk. Keep in mind that if you use this feature, your clips will not be stored
anywhere, and will disappear forever as soon as you close Echo. This is the intended result if
you need privacy.
To enable the in-memory database in Echo, do the following:
1. Click Tools -> Preferences. The Preferences dialog box will be displayed.
2. Click the Database section on the left.
3. Find the InMemoryDatabase option and set it to True:
4. Click OK again to close the Preferences dialog box.
59
Chapter 5 Advanced Topics
Advanced Topics
5
Automatically splitting clips
This is a somewhat obscure feature that you may not need often. When enabled, it causes
Echo to split each clip it captures into separate lines, and store each line as a separate clip.
The original clip is optionally stored as well. This feature has no effect on clips already stored in
the database.
To enable splitting clips:
Click Echo -> Split New Clips. The following dialog box will be displayed:
Click "Yes, enable splitting clips" to turn the feature on, or click Cancel if you have changed your
mind.
Enable for this session only: if this checkbox is selected, and you enable splitting clips, the
feature will remain enabled only until you exit Echo or restart the computer. If this checkbox is
unchecked, splitting clips will remain active until you disable it manually.
When the feature is enabled, the SPLIT indicator is displayed in the status bar.
To disable splitting clips:
Click Echo -> Split New Clips. The checkmark next to the option will disappear, and the feature
will be turned off.
Automatically saving clips
When this feature enabled, Echo will save each clip it captures to a text file stored in a specified
folder.
To enable splitting clips:
Click Echo -> Autosave Captured Clips. The following dialog box will be displayed:
Chapter 5 Advanced Topics
60
Advanced Topics
5
Click "Autosave newly captured clips" to turn the feature on, or click Cancel if you have changed
your mind.
Enable for this session only: if this checkbox is selected, and you enable saving clips, the
feature will remain enabled only until you exit Echo or restart the computer. If this checkbox is
unchecked, saving clips will remain active until you disable it manually.
When the feature is enabled, the SAVE indicator is displayed in the status bar.
To disable saving clips:
Click Echo -> Autosave Captured Clips. The checkmark next to the option will disappear, and
the feature will be turned off.
You can specify the folder where clips are saved in the Preferences dialog box. By default the
files are stored using UTF-8 encoding, which you can also configure in Preferences.
Notes:
When this feature is enabled, the plain text version of each clip is stored as a single, separate
file. The file is named after the first few words of each clip. It is not possible to store all clips in
the same file, but you can use the Export feature to achieve the equivalent effect.
To change how Echo behaves and set your preferred fonts and colors, click Tools ->
Preferences or press F5. This dialog box will be enhanced in a later version. For now, please
ask here if you are unsure how to configure certain options.
Master Config
Echo uses a file named master.config to store a few basic configuration settings that affect
the program as a whole. The file is always located in the same folder as the executable
(ethervaneecho.exe).
Configuration settings stored in this file can only be changed manually. They cannot be modified
inside Echo, and Echo never saves the master.config file, only reads it at startup.
You can edit the file in any plain text editor, such as Notepad. Echo must be restarted for any
changes to take effect.
61
Chapter 5 Advanced Topics
Configuration
6
Some settings in the master.config file are used only for debugging the program and should
never be modified by the user, because doing so will usually cause all kinds of errors. Below
only those settings are described which you may safely modify.
Most settings are boolean (yes / no) toggles. To enable a setting, change it to 1. To disable it,
change it to 0.
Important: the settings in master.config file will affect all users on a particular computer (unless
you installed Echo in portable mode and each user has his or her own installation). Use with
care!
section: [EchoMasterConfig]
portable=0
This setting tells Echo whether it should run in portable mode. You only need to set it to 1 if you
want to run Echo as portable from the internal hard disk in your computer. (In this case,
remember that you Echo must be installed in a folder to which you have write permissions,
which means **not** under the Program Files folder.) If you run Echo from a USB pendrive or
other removable disk, Echo will run in the portable mode automatically, so there is no need to
change this setting.
nowriteconfig=0
This setting prevents Echo from saving any configuration changes to disk. By default it is set to
0, which means Echo can save configuration. If you set it to 1, configuration changes will not be
saved.
noreadconfig=0
This setting prevents Echo from reading any configuration files on startup. By default it is set to
0, which means Echo will read its configuration normally. If you set it to 1, Echo will not read any
configuration files, so it will start with the default settings each time.
section: [EchoLog]
enablelog=0
Set this to 1 to enable debug log in Echo. If you encounter a repeatable bug, enabling the log
may help in diagnosing the problem.
diagnosticlog=0
Set this to 1 to enable more detailed diagnostic log. (Enablelog must be set to 1 as well).
sessionlog=0
When set to 0, Echo will create a new log file each time it starts, overwriting the previous log
file. When set to 1, Echo will continue writing log data to an existing log file.
Chapter 6 Configuration
62
Configuration
6
section: [EchoDatabase]
altdbfilename=
This setting allows you to change the filename of Echo database. By default, the database is
named "EthervaneEcho.sqlite. Using this setting you can specify any other, valid filename.
Example: "altdbfilename=MyEchoDatabase.sqlite". Note that this setting controls only the
filename itself, not the path, so you cannot include path here.
cleardboninit=0
If you set it to 1, Echo will delete all clips from the database each time it starts. This setting may
be removed in the future; please use "In-memory database only" in Preferences.
cleardbonexit=0
If you set it to 1, Echo will delete all clips from the database each time it exits. This setting may
be removed in the future; please use "In-memory database only" in Preferences.
directoryoverride=<custom data and configuration directory>
This setting is empty by default. You can use it to specify a folder under which Echo will keep its
database and configuration files. The setting will override Echo's normal data and config
locations, and it works the same way for both the desktop and standard editions. You can
specify a folder that does not exist, but Echo must be able to create it. Alternatively, instead of
editing the master.config file, you can specify your custom folder on the command line.
Notes:
In a standard (non-portable) Echo installation, you must have administrator permissions to
modify this file.
Command-line Parameters
Echo supports a number of command-line parameters,which let you control certain aspects of
how the program behaves. These parameters can be specified on the command line or in the
properties of a shortcut you use to start Echo. To use the latter method, right-click the shortcut,
select Properties, and append appropriate parameters in the "Target element" field.
Echo supports the following command-line parameters:
-f:<custom
config folder>
You can use this parameter to specify a folder under which Echo will keep its
database and configuration files. The setting will override Echo's normal data
and config locations, and it works the same way for both the desktop and
standard editions. You can specify a folder that does not exist, but Echo must
be able to create it.
Examples:
-f:c:\tools\config
63
Chapter 6 Configuration
Configuration
6
-f:"c:\my configurations\Echo"
Note the colon and note that the folder name must be enclosed in quotation
marks if it contains spaces.
Alternatively, you can set this custom folder in the master.config file.
-log
Enable debug log
-diag
Enable more detailed diagnostics log
-nwc
Prevents Echo from writing any configuration files to disk
-nowriteconfig
-nrc
Prevents Echo from reading any existing configuration data (Echo will start
-noreadconfig with the default settings for all options). Note that even if this parameter is
specified, Echo will still read the master.config file, because this file is
processed before the command-line arguments.
-portable
Makes Echo run in portable mode. This is an alternative to setting this value in
the master.config file.
Tips and Tricks
Echo has been carefully designed to help you find clips as fast as possible. Use the following
tips to get the results you need quicker:
If you want to begin searching, just start typing! No need to click the search box first or
navigate to it using the Tab key. As soon as you type the first letter, digit or punctuation mark,
the cursor will jump to the search box. Just type what you are looking for, and Echo will
display the results immediately.
When search results are displayed, they are immediately ready to use. Press Enter to paste
the first (highlighted) clip, or press Down and Up arrow keys to navigate the list. Again, there
is no need to click the list of results or move to it with the Tab key.
You can select multiple clips: hold down the Shift key and click the last clip to select a
contiguous range, or hold down the Ctrl key and click each clip you want to select, if the clips
are not contiguous. (You can also press Ctrl+A to select all clips in the current view.) This is
of course a fast way to delete many clips at once, but Echo can also paste multiple selected
clips. Simply select more than one clip and press Enter.
Before you begin searching, sometimes it may help to select a better view first. For example,
if you remember that the clip you are looking for is marked as "sticky", you can switch to the
"Sticky" view before typing the search text. That way, search results will include only sticky
clips. Of course, switching to the "Sticky" view is not required, but it may return the correct
Chapter 6 Configuration
64
Useful information
7
results faster if you keep a lot of clips in the database.
If you want to create a new database, simply close (exit) Echo and delete the database file. A
new, empty database will be created the next time you start the program.
If you do not know where the database file is located, click Tools -> Database Information.
Full database filename is displayed at the top of the information table.
If you use Echo in portable mode, install it on the fastest hard disk you have. The
performance of the database depends largely on the speed of the disk.
Troubleshooting
1. Echo is not capturing clips
Is Echo connected to the clipboard?
Check the connection indicator icon in the status bar. A green checkmark indicates that Echo is
connected to the clipboard (and therefore should be capturing clips). A red "x" indicates that
Echo is not connected to the clipboard, perhaps due to some earlier error. Click the Echo menu
and make sure that Connect to clipboard is checked; if it is not, click this option. See also
Getting Started for detailed information on connecting to clipboard.
On Windows Vista, Windows 7 and later, enable "Force legacy mode" in configuration. If you
are using legacy mode already, enable the option to periodically check and automatically
reconnect.
Is Scroll Lock turned on?
Check the Scroll Lock key, and turn it off if the LED indicator is on. Consider disabling the
option to stop capturing when Scroll Lock is on.
Copy a piece of text to clipboard and check if it gets captured. If not, click Tools -> Available
Clipboard Formats. Check what formats are available (left pane) and make sure these formats
are included in Echo configuration (right pane). Also check if at least one of CF_TEXT or
CF_UNICODETEXT is shown in the left pane, because clips are only captured if they contain at
least one of these formats.
Are you trying to capture images or other binary data?
Echo only captures text.
Are you editing a clip?
Capturing clips is disabled while a clip is being edited. When you finish editing, capturing clips
resumes automatically.
Check application filters. Are you copying data to clipboard from an application that is excluded
in Echo? (Note that applications may also be excluded by path). More information about
excluding applications.
Check constraints configured in Preferences -> Capturing clips. You may have set a
minimum clip length or maximum clip length - perhaps the data you are copying to clipboard
exceeds these limits.
65
Chapter 7 Useful information
Useful information
7
In Echo, check the numbers shown in the leftmost section of the status bar "New: xx (yy)". The
first number is the number of clips captured since the program was started. The second
number (in parentheses) shows the total number of detected clipboard changes. Note these
numbers. When you copy data to clipboard (in another application), return to Echo and check
the numbers again Have they increased? If the number on the right (i parentheses) has not
increased, this means Echo did not detect the copy operation. If that number has increased,
Echo detected it. If the number on the left has not increased, it means the clip was ignored check the log to find out why.
Enable the debug log (in diagnostic mode), restart Echo, then try copying clips to clipboard and
check for any log messages, especially warnings.
2. Cannot find a clip, but you know it exists in the database
Check spelling of the search text. It may contain a typo.
Try using wildcards (press F4 to cycle through search modes), especially if you aren't sure of
the spelling. For example, if you know the clip you are looking for contains the word "analyze",
which may also be spelled as "analyse", using wildcards you can search for "analy?e" to find
either spelling. You can also use wildcards in place of spaces, in case there is more than one
space between words or if non-space characters may have been used (e.g. "plug*play" to find
all of "plug and play", "plug-and-play", "plug-&-play" and "plug'n'play", etc.)
Try the Advanced search mode (press F4 to cycle through search modes), and try several
variants of the word you are looking for (e.g. "analyse OR analyze")
Make sure the current view is appropriate for the clip you are looking for. If in doubt, switch to
the "Default" view or to the "All clips" view. If you have another view selected, perhaps it
contains filters that the clip you are searching for does not match. For example, if the current
view is "Sticky", your searches will return only sticky clips.
Perhaps the clip is no longer in the database. Depending on the configuration options in Tools > Preferences -> Database, older clips are periodically removed from the database. The clip
you are looking for may have been purged. Check the purging options and adjust them if
necessary to retain clips longer. Mark important clips as sticly (Ctrl+S), so that they will never
be automatically purged.
It is possible that the text you are looking for occurs in a clip that has been truncated due to its
length. Echo always stores complete clips in the database, but when clips are very long, it
displays and searches only the first 512 characters. This value (called MaxDispTextSize) can
be increased if necessary, but changing the configuration will not affect clips that are already
stored in the database.
3. The view is empty
Check the filter configuration. Perhaps there are no clips in the database that match the filters
defined for a particular view. Change from AND to OR filters. Remove the filters one by one and
see if the view becomes populated with clips. More information on editing quick view filters.
Chapter 7 Useful information
66
Useful information
7
Check other views. Does the database contain clips? Perhaps Echo could not find your
database and created a new one, which starts empty? Look at the status bar indicator to find
out how many clips are stored in the database.
Switch to another view and then back to the one that was blank. Is the view still blank?
Limitations
This section lists certain limitations of Ethervane Echo. They are not bugs and they will not
be "fixed" in future releases. Rather, these limitations are inherent in the concept and design
of the program.
Echo captures and stores only clips that contain text. Echo can be configured to capture
additional non-text formats (e.g. Excel copies data as a bitmap, among other formats), but
clips that do not contain text will never be collected. This is a fundamental design principle of
the application and will not be altered.
Only plain text version of clips is displayed, even for clips that contain data in rich formats
(e.g. RTF or HTML).
When a clip is edited, only two plain text formats are preserved: ansi text and unicode text. If
the clip you are editing contains other formats (e.g. RTF or HTML), these formats will be
dropped when the edited clip is saved. (A feature may be added later to save edited clips as
new, which would allow the original clip to remain unchanged. This feature is not yet
available.)
In Echo configuration there is a setting called MaxDispTextSize, that lets you specify the
maximum length of text to display and search for each clip. If a clip is longer than this value, it
will be truncated on display, and the part of the clip that is longer than the value will not be
searched. This is a performance-related trade-off, since searching through a large number of
lengthy clips might slow down the process. By default, the configuration option is set to 512
characters. If the text you are searching for occurs past the first 512 characters, it will not be
found. You may of course increase the value of this setting if you tend to store very long clips,
but you may notice a slight drop in search performance. Note that increasing or decreasing
this configuration value will affect newly captured clips, but will not affect the clips that are
already present in the database.
Bugs and Known Issues
The problems listed in this section will most likely be fixed in a later release.
When you select multiple clips, then copy or paste them, the items become de-selected. This
will be fixed in a later release.
When you select multiple clips, then copy or paste them, sometimes the clipboard ends up
with garbage data. Only the first of the selected clips is copied properly, while other clips
produce garbled text. This bug is extremely rare. I have only seen it happen once and could
not reproduce it afterwards.
When you press the activation hotkey, Echo tries to position itself near the caret. Sometimes
this doesn't work, and Echo may even show up on another monitor (if you have ore than one).
67
Chapter 7 Useful information
Useful information
7
Still working on that.
The Preferences dialog box, where you configure the program, is somewhat obscure at the
moment. It will be improved in a later release.
When capturing clips, Echo can store and display icons of applications that copied data to
clipboard. These icons sometimes get replaced with those of other, unrelated applications.
This is going to be very difficult, perhaps impossible to get around. Explanation: this problem
only occurs with applications that modify the Windows clipboard when they are being closed,
notably Microsoft Excel. If you copy some data in Excel, Echo will capture the data and store
Excel's icon correctly. Then, when you exit Excel, Excel will modify the clipboard, and
Windows will notify Echo of that change. The data on the clipboard remains the same, so
Echo only updates the latest clip. However, when Echo tries to access the application that
placed data on the clipboard, Excel is already gone (closed), and a different application is
active. As a result, Echo collects the icon of the application that has become activated after
Excel window disappeared. In general, this happens when the clipboard is modified by an
application that is not active (does not have keyboard focus) or is about to become inactive.
Echo is available only in English, and at the moment it cannot be localized. Maybe later, but
no promises!
Contact the author at: [email protected]
Websites:
www.tranglos.com
www.ethervane.com
Chapter 7 Useful information
68
© © 2012 Marek Jedlinski.
All rights reserved.
Product and company names mentioned in this
manual may be trademarks or registered
trademarks of their respective companies.
Mention of third-party products is for
informational purposes only and constitutes
neither an endorsement nor a recommendation.
The author assumes no responsibility w ith
regard to the performance or use of these
products. All understandings, agreements, or
w arranties, if any, take place directly betw een
the vendors and the prospective users. Every
effort has been made to ensure that the
information in this manual is accurate. The author
is not responsible for printing or clerical errors.
The product described in this manual
incorporates copyright protection technology that
is protected by
method claims of certain U.S. patents and other
intellectual property rights.
This user manual w as created w ith Help &
Manual.
Index
Index
A
adding a quick view 42
adding filters to a quick view
administrator 61
advanced search 28
arguments 63
author 12, 68
B
basic search 28
bugs 65, 67
C
capturing clips 23, 57
changes 6
check spelling 32
clip list 15, 24
clipboard, connecting 21
clips, browsing 24
clips, capturing 23, 57
clips, copying 24
clips, deleting 31
clips, editing 32
clips, exporting 34
clips, ignoring 57
clips, importing 34
clips, list 15
clips, pasting 24
clips, saving 60
clips, searching 25, 28, 29
clips, splitting 60
clips, sticky 30
command-line 63
commands 19, 35
configuration 61
connecting to clipboard 21
contact information 68
creating quick views 42
customizing Echo 61
D
47
deleting clips 31
deleting quick views 42
display 2, 15
displaying clips 39
distributing Echo 12
E
echo 1, 2, 3, 15
Echo commands and menus
editing clips 32
editing quick views 43
email 68
errors 65, 67
excluding applications 57
exporting clips 34
19
F
features 2, 19
filtering quick views
finding clips 25
freeware 12
47
G
general program description
getting started 3
2
H
help 3
hints 64
history 6
hotkeys 35
how clips are captured
23
I
ignoring clips 57
importing clips 34
in-memory database
instant search 25
interface 2, 15
introduction 1, 3
issues 67
59
database 56, 59
default views 41
70
K
keyboard
35
L
latest version 6
license 12
limitations 67
listing clips 24
main menu 19
main window 15
managing quick views 42
master.config 61
menu commands 19
modifying quick views 43, 47
O
T
tips and tricks 64
troubleshotting 65
UI 2, 15
useful usage tips
64
V
views 39
views, default 41
views, filters 47
views, managing 42
views, modifying 43
61
P
parameters 63
preferences 61
privacy 56, 57, 59
problems 65, 67
Q
quick view properties 43
quick views 39
quick views, default 41
quick views, filters 47
quick views, managing 42
quick views, modifying 43
S
search box 15, 25
searching 25
searching, advanced 28
searching, basic 28
searching, wildcards 29
71
settings 61
shortcut 63
spelling 32
status bar 15
sticky clips 30
U
M
options
Index
Index
W
website 68
what's new 6
wildcard search
29