1
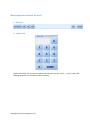
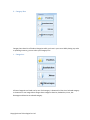
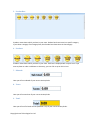
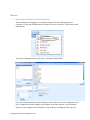
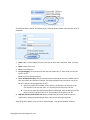
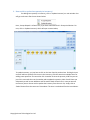
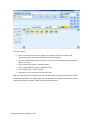
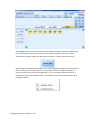
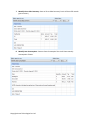
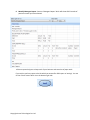
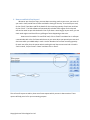
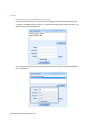
K.S. POS User Guide This document is the user manual for KS POS. The content is presented in a FAQ style (How To) and includes details along with screen shots. For any other help required, please send an email to [email protected] Contents Main Components (Before we start) ........................................................................................................ 3 1. Menu Bar: ..................................................................................................................................... 3 2. Number Pad: ................................................................................................................................. 3 3. Category Box: ................................................................................................................................ 4 4. Categories: .................................................................................................................................... 4 5. Product Box: .................................................................................................................................. 5 6. Products: ....................................................................................................................................... 5 7. Subtotal: ........................................................................................................................................ 5 8. Taxes: ............................................................................................................................................ 5 9. Total: ............................................................................................................................................. 5 10. Arrows: ...................................................................................................................................... 6 Login .......................................................................................................................................................... 7 1. How to Login into the system? ..................................................................................................... 7 Masters ..................................................................................................................................................... 8 1. How to add new Item in Item list in inventory? ........................................................................... 8 2. How to add or update Item quantity in inventory? .................................................................... 11 3. How to modify Category details?................................................................................................ 13 4. How to modify Item details? ....................................................................................................... 14 5. How to remove a Category? ....................................................................................................... 15 6. How to remove an Item from the Item List? .............................................................................. 16 7. How to select your printer? ........................................................................................................ 17 8. How to set/change your Bill format? .......................................................................................... 19 9. How to add/remove email ids for EOD reports? ........................................................................ 20 10. How to change store opening time? ....................................................................................... 20 Billing....................................................................................................................................................... 21 Copyright Arvan Technologies Pvt. Ltd. 1. How to make an Invoice/Bill? ..................................................................................................... 21 2. How to make an Advance Order: ................................................................................................ 24 3. How to make Complimentary Invoice/Bill: ................................................................................. 25 4. How to cancel Bill/Invoice:.......................................................................................................... 25 5. How to deliver Advance Order: .................................................................................................. 26 6. How to print last invoice/bill? ..................................................................................................... 27 Reports .................................................................................................................................................... 28 1. How to run Report? .................................................................................................................... 28 2. How to send End of Day Report? ................................................................................................ 34 Users ....................................................................................................................................................... 35 1. How to edit User Accounts (change password)? ........................................................................ 35 2. How to add new Users? .............................................................................................................. 36 Misc ......................................................................................................................................................... 38 1. How to check Logs?..................................................................................................................... 38 2. How to change your License type: .............................................................................................. 39 Copyright Arvan Technologies Pvt. Ltd. Main Components (Before we start) 1. Menu Bar: 2. Number Pad: Number pad allows you to perform number pad operations using a mouse. It can be used while updating the quantity of the items in a bill or inventory. Copyright Arvan Technologies Pvt. Ltd. 3. Category Box: Category box shows list of Product-Categories which you have in your store. While placing any order or updating inventory, you can select your Category first. 4. Categories: All Item-Categories are listed one by one. Each category is shown with a blue icon. Selected category is shown with a star image. Above image shows categories Pastries, Sandwiches, Juices, Hot Beverages and Pastries as selected category. Copyright Arvan Technologies Pvt. Ltd. 5. Product Box: Products means Items which you have in your store. Product box shows Items in a specific category. If you select a category from Category Box, then Product box shows items in that category. 6. Products: Products means Items which you have in your store. Each item is displayed with a square icon. If you want to place an order or add items to inventory, you can click or tap on this its icon. 7. Subtotal: Here you will see subtotal of your current invoice/order. 8. Taxes: Here you will see total tax of your current invoice/order. 9. Total: Here you will see final total amount (Subtotal + Tax) of your current invoice/order. Copyright Arvan Technologies Pvt. Ltd. 10. Arrows: Arrows are used to scroll Product or category box. Copyright Arvan Technologies Pvt. Ltd. Login 1. How to Login into the system? The POS software has two users added when the software is installed. One is ‘admin’ and second is ‘user’. By default, the username and password to login into the system is: Username: admin Password: admin123. Or you can also use the following combination: Username: user Password: user123 A user will not see the ‘Admin’ menu on the main window and has limited privileges. Please note that the passwords can be changed after logging into the system. Please refer the section ‘Users’ in this document for more details on how to change the password or to add more users. Copyright Arvan Technologies Pvt. Ltd. Masters 1. How to add new Item in Item list in inventory? After installing POS and logging in, first thing you might like to do is adding new item to inventory. It’s very easy to add an item to inventory. First click on ‘Admin ’, you will see a small submenu like Then click on ‘Manage Inventory and Users’. It will open a new window Here, you can add new Item but before adding an item, make sure you have a category for that item. Categories are used to organize your products. If you have ‘Pastries’ in your store then ‘Pastries’ is your ‘category’ and ‘Pineapple’ is a type of pastry. For adding an item, you must Copyright Arvan Technologies Pvt. Ltd. specify a category for that item. If you already have that category in ‘Category List’ then you can select it or else you have to add a category for item. To add a category in Category List, on left hand side, you get a ‘Categories’ box Click on ‘New Category’, you can notice that ‘Name’ box is empty and a cursor is blinking there. Please enter the name of the Category and then click on ‘Save Changes’. That’s it. Now you have a new category for your item. Then for adding new item in inventory, click on ‘New Item’ which can be found just below the item list Copyright Arvan Technologies Pvt. Ltd. You will then see the ‘Name’ box where cursor is blinking. Now to add an item you have to fill all the details. 1. Code: Code is a short identity for your item. You can write short codes like ‘P001’ or ‘Pastry1’. 2. Name: Name of the item. 3. Price: Price of the item. 4. Tax (Percentage): Tax in percent for that item. No need to put ‘%’ after value. You can just write 5 not 5%. Below, there are two check boxes, 1. Tax is included in the price: If the Price that you have entered for the item, includes the Tax also, then select this check box. Example: You add a Pineapple Pastry and price it at Rs. 60 per unit. And the Tax Rate applicable is 10%. a. Now if you select this checkbox, then in the bill, the base price of the pastry is Rs. 54.5 and the Tax on the item is Rs. 5.5. The total price of the pasty is Rs. 60. b. If you do not select the check box and leave it unchecked, then the base price of the pastry in the bill is 60 and Tax is Rs. 6. The total price of the pastry is Rs. 66. 2. Skip item check in stock before sale: When you add items in the bill you don’t want to check stock in inventory while selling an item, then you can select this checkbox. After filling all the details, you can click on ‘Save Changes’. Your item is added in inventory. Copyright Arvan Technologies Pvt. Ltd. 2. How to add or update Item quantity in inventory? For adding item quantity in inventory, click on ‘Update Inventory’ on main window. You will get a sub menu like the one shown below Here, ‘Accept Dispatch’ will work only if you have subscribed for K.S. Enterprise Solution. For now, click on ‘Update Inventory’ which will open a new window, To update inventory, you just have to click on the item listed in products box. Clicking the item once will add one quantity of the item in the inventory. Click the same item multiple times for adding more quantities. You can either click it number of times the quantity is OR else you can just click it once and then use the number pad to update the quantity. Main list will show you old quantity as well as new Additions and the total of both old and new. In case you want to remove any item or do not wish to update the inventory from the main list, simply click on ‘Delete’ button from the same row. Please Note: The item is not deleted from the Item Master. Copyright Arvan Technologies Pvt. Ltd. After adding all the items, click on ‘Update’. It will ask for confirmation Click on ‘Yes’ if you want to add these items in inventory. It will show a popup with a success message. Copyright Arvan Technologies Pvt. Ltd. 3. How to modify Category details? To modify item-category details, go to ‘Admin -> Manage Inventory and Users’. It will open same window which you open for adding item in inventory. On the left side you have category box. Select a category from the list and then observe ‘Name’ field below. It will be filled with category name which you have selected. You can modify category name from the ‘Name’ box and click ‘Save Changes’. It will modify the category name. Copyright Arvan Technologies Pvt. Ltd. 4. How to modify Item details? To modify item details, go to ‘Admin -> Manage Inventory and Users’. It will open same window which you open for adding item in inventory. Now on right side, from ‘Items’ list select the item which you want to modify and then observe the fields below the list. You can modify all the settings for that item and then click ‘Save Changes’. It will modify the item details. Copyright Arvan Technologies Pvt. Ltd. 5. How to remove a Category? To remove a category, first assign a new category to items under the category which you want to delete. You could also delete those items. Failing to do so will give errors later. To remove a category, just open ‘Admin -> Manage Inventory and Users’. From the ‘Category’ box, select category which you want to remove and then click ‘Delete Selected’. Copyright Arvan Technologies Pvt. Ltd. 6. How to remove an Item from the Item List? To remove an item, open ‘Admin -> Manage Inventory and Users’. In ‘Items’ panel, click on item which you want to delete. Then click on ‘Delete Selected’. This will delete your item from Inventory. Copyright Arvan Technologies Pvt. Ltd. 7. How to select your printer? For printing any bill, you need to have a printer connected with your machine. You might have connected multiple printers to your machine. So if you want to set a default printer for POS, go to ‘Admin -> Modify Settings’ This will open a new window. Copyright Arvan Technologies Pvt. Ltd. Here, we have a section called ‘Printer Settings’. The printer assigned to the software needs to be changed to the one present on your computer. If you want to change it, click on ‘Select Printer’, it will open a new window. Select your printer from ‘Select Printer’ and then click on ‘Print’. It will be saved as your default printer. Copyright Arvan Technologies Pvt. Ltd. 8. How to set/change your Bill format? Above bill is a normal invoice bill. In that bill, text inside black box is ‘Bill Header’ and red box is ‘Bill Footer’. If you want to modify the Header and Footer, go to ‘Admin -> Modify Settings’ and inside that form, you will see the sections to modify Bill Header and Footer Copyright Arvan Technologies Pvt. Ltd. From here, you can modify your Bill Header, Bill Footer, and Store Name by changing the text inside these fields. After changing it, click on ‘Save’ which is at the bottom of ‘Settings’ form. It will save your current header, footer and store name. Test the new layout by printing an invoice. 9. How to add/remove email ids for EOD reports? EOD reports means End of Day reports. These reports are mainly used to send daily sales summary to the owner/manager of the store. The recipient of the email will get the stock register, sales summary, bill register and other reports attached in the email. To add/remove emails for these reports, go to ‘Admin -> Modify Settings’ and in that window, you will see ‘Email Settings’ section. Add multiple emails separated by comma ‘ , ’ to send EOD reports. And then click on ‘Save’ at the bottom. It will save your email ids. 10. How to change store opening time? To modify your store opening time which is mainly used for accounting purpose, go to ‘Admin -> Modify Settings’ and at the ‘Settings’ form go to section ‘Store timing settings’ From here you can modify your stores opening time. Please enter correct timing because all the accounting is done on the basis of this timing. After entering correct time, click on ‘Save’. It will save your store start time. Copyright Arvan Technologies Pvt. Ltd. Billing 1. How to make an Invoice/Bill? After Login you will see Main window First, select any category from category box and then click on items inside the products box. Example: To add Pineapple Pastry to the bill, select ‘Pastries’ and then click on ‘Pineapple’ once. Your will see your item added in list as shown below Copyright Arvan Technologies Pvt. Ltd. List has 6 columns Name: Name of the item with its category. If you select ‘Pastries’ as category and ‘Pineapple’ as item, then name is shown like ‘Pastries Pineapple’ Quantity: Quantity which you entered for current item. Can be updated using the Number Pad on the screen. Price: Price of current item * selected quantity. Tax: Tax applicable on the item * selected quantity. Total: Total of Price + Tax for the item. Delete Row: In case you want to remove that item. Now, If you want to add more quantity of same item then either you can click the same item again to add more quantity or else simply select that item and then from ‘Number Pad’ you can enter its total quantity and press ‘DONE’. Please see the image shown below Copyright Arvan Technologies Pvt. Ltd. After adding items, click on ‘Save and Print’ button. (Before saving an order/bill, make sure you have connected your machine to printer and your printer settings are correct. To check or change Printer Settings, please refer the question: Masters -> How to select your printer) After clicking on the button, you will get a small menu asking for what type of order you want to place. Usually, it is on ‘On The Counter’. But if you want to make a Complimentary Bill for a special person or VIP, then select ‘Complimentary’. If you are taking an advance order for a birthday cake, then select ‘Advance Order’. The bill will be saved to the system and also print through the printer. Copyright Arvan Technologies Pvt. Ltd. 2. How to make an Advance Order: To make an advance order, first add order items just like you added for Invoice/Bill. Then on ‘Save & Print’ button, select ‘Advance Order’. Here you will get a small popup menu asking for Notes and Adv Amount. Notes: You can enter notes like customers name, delivery date, special message, if any. Example: For birthday cake you can write “Message: Happy Birthday Rishi”. Adv Amount: If person gives Advance Amount then you can enter it here. It will be printed in Bill. Copyright Arvan Technologies Pvt. Ltd. After adding the Advance Order, you will get a bill which will have the Advance Order number. This bill is a temporary bill for advance order. Please give this bill to the customer. The most important part of this bill is ‘No.’ that is bill number. You can note it down for your purpose. Then while delivering order, customer will come with this bill. Then you have to enter that bill number for making proper invoice/bill. For more info, please refer the question: ‘Billing -> How to deliver Advance Order’. 3. How to make Complimentary Invoice/Bill: If you want to make complimentary invoice, add items for bill and from ‘Save & Print’ select ‘Complimentary’. You will get a popup asking for a reason for the complimentary bill. Here, enter your Reason for Complimentary bill and click ‘OK’. (Complimentary cannot be done until you enter some reason). 4. How to cancel Bill/Invoice: In case, if someone wants to cancel his bill/invoice due to some item related issue, then, from ‘Menu Bar’, click ‘Admin -> Void Invoices’. You will see a new window. On the top, you get two date selectors, first as ‘Select Start Date’ and another is ‘Select End Date’. Select the start date and end date and then click on ‘Fetch Invoices’. Copyright Arvan Technologies Pvt. Ltd. Void Bill: If you want to cancel that invoice/bill then you click on ‘Make Void’. After clicking on ‘Make Void’, a popup will appear Once you make invoice void, this action CANNOT be undone, so this popup asks for confirmation. Once you click ‘Yes’, it will open a popup asking for reason Please enter the reason for making this invoice void. After entering some reason, you can click OK. This will make your invoice/bill void, that is, it will cancel the order. 5. How to deliver Advance Order: To deliver an Advance Order, on the ‘Menu Bar’ click on ‘Order -> Advance Order Delivery’. You will see a popup asking for order number. Copyright Arvan Technologies Pvt. Ltd. Enter the order number which is printed on the top left corner of the bill under ‘No.’. When you enter correct order number, you will see main window populated with your Advance Order Items. Follow the instruction shown at top of the window: ‘To make Invoice, Click ‘Save & Print’ -> ‘On the Counter’’. Click on ‘Save & Print’ button and select ‘Save on Counter’ option. This will print your proper bill with new invoice number. If you want to cancel, you can click on ‘Clear’. 6. How to print last invoice/bill? In case you want to print last order bill again, like for ‘Advance Order’ you can print two bills for that Order; One for you and other to customer. For that, you can click on ‘Order -> Print Last Order’ It will directly print most recent bill/invoice. Copyright Arvan Technologies Pvt. Ltd. Reports 1. How to run Report? To run a report, go to ‘Admin -> Run Reports’. It will open a new Reports window as shown below On the left hand side is a dropdown with several reports. You can select a report and then select date from the date picker. Click ‘Execute’ on right side of the window. Copyright Arvan Technologies Pvt. Ltd. The different Reports currently available with the system are 1. Bill Register: Bill register will give you list invoice/bill summary of particular day. It won’t show you Advance Orders or Complimentary invoices/bills. You will get detailed information of the invoices/bills for the day you selected. It will also show total of Items sold, Bill amount, Tax and addition of Amount + tax. 2. Gross Sales Report: Gross Sales Report will show you the total sales amount for the day selected. Copyright Arvan Technologies Pvt. Ltd. 3. Item Consumption: This report will show the items are sold on particular day along with the quantity consumed. It will also show the amount earned through sale of those items. 4. Managers Report: Managers report is mainly for store manager to check total sales, including complimentary bills. It also displays which bills were cancelled, i.e. void bills. It shows details for Complimentary and Void Bills. Copyright Arvan Technologies Pvt. Ltd. 5. Material Management: This report will run only when you have sent End of Day (EOD) report from the ‘Email’ button. This report will display details about the stock register for every item for a particular day. This report is allows you to check for any difference between your calculation (physical quantity) and systems calculation about stock. 6. Monthly Bill Register: This report is same as ‘Bill Register’ but this report will show you all invoices/bills of particular month you selected. Copyright Arvan Technologies Pvt. Ltd. 7. Monthly Gross Sales Summary: Same as ‘Gross Sales Summary’ but it will show full months gross summary 8. Monthly Item Consumption: Same as ‘Item Consumption’ but it will show monthly consumption of items. Copyright Arvan Technologies Pvt. Ltd. 9. Monthly Managers Report: Same as ‘Managers Report’ which will show all bill records of particular month you have selected. All these reports help you to keep track of your business and saves lots of paper work. If you wish to mail any report to the ids which you entered for EOD report at ‘settings’. You can click on ‘Email’ button which is on the bottom right side. Copyright Arvan Technologies Pvt. Ltd. 2. How to send End of Day Report? Whenever you close your shop, you note down remaining stock at your store, you count all your cash in hand, and do lots of other work before closing for the day. To minimize your work, click on ‘Email’ from Menu and fill the details for the remaining quantity of each item and then click on ‘Email’. The POS software will automatically calculate stock register for the day and will send an email to you with the details. Even if you have a store boy/girl at your store, you can check stock register and check for any pilferage of items happening at the store. How to use this module: To send ‘EOD’ mail, click on ‘Email’ from Menu bar. It will open a new window with a list of all items which were in your store when you opened your store and also items which you added today in stock. Use the ‘Number Pad’ to enter remaining quantity for each item. After that, the person who is sending this mail has to enter total cash in hand in ‘Cash in Hand’ , his/her name in ‘Name’ and then click on ‘Email’. This will send 5 reports to admin; these are all same reports which you saw in above section. These reports will help you a lot for your accounting purpose. Copyright Arvan Technologies Pvt. Ltd. Users 1. How to edit User Accounts (change password)? Every user has a password. In case you as a store manager want to modify the password, click on ‘Admin -> Manage Inventory and Users’. On bottom left side of the window that opens, you will see a section ‘User Management’ In this window, select user from User List and then observe other fields. They will be filled with user’s information Copyright Arvan Technologies Pvt. Ltd. To change the password, click on ‘Change’ next to the password and enter the new passwords. If you want to make user as an Administrator then you can select ‘Administrator’. You don’t have to change the Username, it will be same as your name but in small letters. Remember, ‘Password’ and ‘Confirm’ both should be same. After updating details, click on ‘Save Changes’. This will save your current settings. 2. How to add new Users? For adding new user, go to ‘Admin -> Manage Inventory and Users’ and then from ‘User Management’ section, click on ‘New User’. Copyright Arvan Technologies Pvt. Ltd. You will observe that cursor is blinking at Name, this means you can add new user. Just fill all the details and if new user have ‘Administrator’ rights then select ‘Administrator’. 1. 2. 3. 4. Name: Real name of the user. Username: Username is an id for User from which he can log into POS. Password: Password for user which will be used to authenticate user for logging in POS. Confirm: Enter same text which you entered for ‘Password’. It’s to confirm your ‘Password’. Remember that ‘Password’ and ‘Confirm’ both should be same. After filling correct information click on ‘Save Changes’. This will add the new user to your POS software. Copyright Arvan Technologies Pvt. Ltd. Misc 1. How to check Logs? K.S. POS keeps logs of all your store operations like adding an item, removing an Item, Modifying stock, etc. POS stores these operations with its time and user name doing that operation. To see the entire ‘Logs’, click on ‘Admin -> View Logs’. In the new window that opens, you can select both ‘Start Date’ and ‘End Date’ to see logs between those days. After selecting dates, click on ‘Fetch Logs’. It will list all the logs between those days. Copyright Arvan Technologies Pvt. Ltd. This might help you if you foound any problem in stock. 2. How to change your License type: First time when you install POS on your machine, it is registered as ‘Demo’ for 30 days. If you want to register K.S. POS for perpetual license (lifetime), you can buy the software by sending us an email at [email protected] with your contact information. After the purchase, we will send you a key which you can use to register your POS. To register your POS, click on ‘Admin -> About K.S. POS’ This will open a small window like, Copyright Arvan Technologies Pvt. Ltd. Click on ‘Click here to change license type’. It will open registration window, Now, change the Name, remove the old Serial and enter the new serial key which we have sent to you. After filling correct key, click on ‘Register’. This will register your POS for lifetime. Copyright Arvan Technologies Pvt. Ltd.