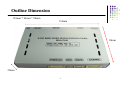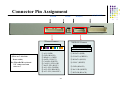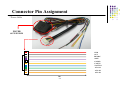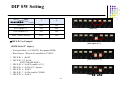
1
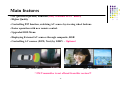
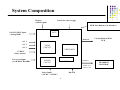
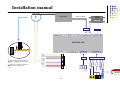
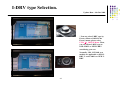
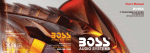
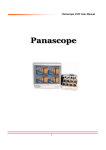
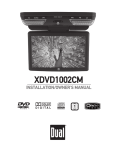
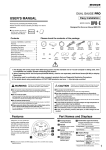
BMW PIP User manual
子母畫面介面說明書
3/5/6 系列 X5, X6
INDEX
-. Precaution ……………………………………………………………… P 3
-. Updated points on this version………………………………………P 4
-. Main Spec.………………………………………………………………P 5
-. System Composition……………………………………………………P 6
-. Outline Dimension ………………………………………………………P7
-. External Appearance……………………………………………………P8
-. Connector Pin Assignment ……………………………………………P10
-. DIP Switch Setting ………………………………………………………P12
-. How to use Remote……………………………………………………P14
-. OSD (On Screen Display) ……………………………………………P15
-. How to use parking guide line …………………………………………P19
-. CAN Wiring & Steering wheel button……………………………………P21
-. Product Composition ……………………………………………………P22
-. Installation manual ……………………………………………………P23
-. FAQ …………………………………………………………………………P24
-2-
Precaution
- You must keep the car key taken off from the car while you work
this and finally, connect power of the interface.
- When to connect the interface cable, you must keep the power
cable taken off.
- You must work this at the environment without any static electricity
or damages.
- All of process on this installation should be done by professionals.
- You must not break the labels attached on the board, if it’s broken,
no warranty.
- When you receive this package you have to check whether there’s
any parts not included and you have to contact us right away.
- Our repair service do not accept any problems caused by user’s
any fault or carelessness.
-3-
Main features
- PIP (picture in picture) Function (Only available in 8.8” model)
- Higher Quality
- Controlling PIP function, switching AV source by steering wheel buttons.
- Easier operation with new remote control.
- Upgraded OSD Menu
- Displaying External AV sources through composite, RGB
- Controlling AV sources (DVD, Navi) by I-DRV – Optional
[PDP – Rear Camera]
[PIP – A/V Mode]
* FM Transmitter is not offered from this version!!!
-4-
Main Spec.
1. Input Spec. (MULTI VIDEO INTERFACE)
-. 1 x Analog R,G,B (Sync on Green)
-. 1 x CVBS(REAR CAMERA) Input. (Rear camera source)
- 3 x A/V (NTST & PAL) Input.
-. 1 x LCD Input (Car system Input)
2. Output Spec.
-. 2 X CVBS OUTPUT (Video Out for installing Headrest monitor)
-. 1 x Audio OUTPUT
-. 1 X LCD OUTPUT(LCD Operation)
-. 4 X Audio Select Output
3. Electric Power Consumption
- Input Power : 8VDC ~ 24VDC
- Consumption Power : 12WATT, Max
4. Switching Mode (AV source)
- Possible to skip AV source while switching Mode (AV source) by DIP S/W
(Refer to the DIP S/W page)
- By Remote control
- By Toggle Switch (Option)
- By button on the steering wheel in the car via CAN
-5-
System Composition
Switch for source toggle
Remote
(OSD keypad)
OEM Navi Button (Can Interface)
NAVIGATION Input
(Analog RGB)
MCU
DISPLAY
A/V 1
A/V 2
A/V 3
VIDEO
CIRCUIT
Car installation OEM
LCD
VIDEO MUX
CVBS In
(Rear camera)
Car Screen Input
(CAR MAIN BOARD)
POWER
CIRCUIT
A/V OUT
FMTX
(Video out 2
Audio L, R1)
Power Input
(+8VDC ~ +24VDC)
Dip S/W
-6-
HEADREST
MONITOR
Outline Dimension
154mm * 94mm * 20mm
154mm
94mm
20mm
-7-
External Appearance
Remote
LED
DIP S/W
LCD-IN
(KEYPAD)
MODE
POWER/CAN
-8-
RGB(IN)
LCD-OUT
A/V(IN/OUT)
External Appearance
Remote
LCD-OUT
LCD-IN
DIP S/W
(KEYPAD)
MODE
POWER
-9-
RGB(IN)
A/V (IN/OUT)
LED
Connector Pin Assignment
*Power Connect
① ② ③ ④
*12V Select
(Wire no.7~10 of the
Power cable)
Ex) When RGB is selected
12V comes out from
wire no. 7
A/V (IN/OUT)
RGB(IN)
MODE
POWER
*RGB-IN Connect
⑤ ⑥ ⑦ ⑧ ⑨
⑩
① ACC (RED)
② GND (BLACK)
③ REAR-C (GREY)
④ SAFE (VIOLET)
⑤ CAN(H) (WHITE)
⑥ CAN(L) (YELLOW)
⑦ NAVI SEL (BLUE)
⑧ AV1-SEL (GREEN)
⑨ AV2-SEL (BROWN)
⑩ AV3-SEL (ORANGE)
-10-
①
②
③
④
⑤
⑥
① R DATA (RED)
② G DATA (GREEN)
③ B DATA (BLUE)
④ SYNC (WHITE)
⑤ GND (BLACK)
⑥ NAVI IR (WHITE)
⑦ DVD IR (BLACK)
⑦
Connector Pin Assignment
* Power Cable
FILTER
& FUSE BOX
GND
ACC
REAR-C
SAFE
CAN(H)
CAN(L)
NAVI Sel
AV1-Sel
AV2-Sel
AV3-Sel
1m
-11-
DIP SW Setting
※ ON : DOWN, OFF : UP
#PIN
FUNCTION
1
RGB INPUT MUTE
2
A/V 1 MUTE
ON : Skipping A/V 1
OFF : A/V1 Display
3
A/V 2 MUTE
ON : Skipping A/V 2
OFF : A/V2 Display
4
A/V 3 MUTE
ON : Skipping A/V 3
OFF : A/V3 Display
5
To select monitor size
6
Type of monitor
7
Rear Mode
8
DIP S/W Selection
ON : Skipping RGB Mode
OFF : RGB Display
ON : 6.5” LCD Setting (Possible to use BMW 1 series)
OFF : 8.8” LCD Setting
ON : Siemens setting (only when to turn on the 5th pin)
OFF : Alpine setting (only when to turn on the 5th pin)
ON : 2009model’s 3series(only when to turn off the 5th pin)
OFF : 8.8” Setting
ON : External Rear Camera
OFF : OEM Rear Camera
N.C
-12-
DIP SW Setting
#PIN
5
6
E60 8.8”
OFF
OFF
E60 Alpine 6.5”
ON
OFF
E60 Siemens 6.5”
ON
ON
New 3 Series in 2009
OFF
ON
모니터 지원방식
[E60 8.8”]
※DIP S/W Use Example
[E60 Alpine 6.5”]
[BMW E60-6.5” Alpine]
-. Use Input Mode : A/V3(DVD), Navigation (RGB)
-. Rear Camera : When to be installed on CVBS 4
▷ DIP S/W : 1 Æ OFF
▷ DIP S/W : 2,3 Æ ON
(INPUT MODE SKIP)
▷ DIP S/W : 4 Æ OFF (enable A/V3)
▷ DIP S/W : 5 Æ ON (6.5” Alpine)
▷ DIP S/W : 6 Æ OFF
▷ DIP S/W : 7 Æ ON (enable CVBS4)
▷ DIP S/W : 8 Æ OFF
[E60 Siemens 6.5”]
[2009년형 3시리즈]
-13-
How to use Remote
Dimension : 85 * 40 * 8 (mm)
POWER : Interface operation
PIP : Short press – Activating PIP (Picture in Picture)
Long press – Switching AV source
MENU : Activating OSD Menu
OK : Select
▲ : UP
▼ : DOWN
◀ : LEFT
▶ : RIGHT
*FACTORY MODE (Interface setting)
: Operated with pressing ▲ -> ▼ -> ▲ ->MENU
buttons of the remote in sequence
-14-
-OSD(On Screen Display)
· Analog RGB Mode
· Video Mode
IMAGE Menu
- BRIGHTNESS
- CONTRAST
-SHARPNESS
- SATURATION
-HUE
-USER IMAGE
-15-
OSD(On Screen Display)
· Analog RGB Mode
· Video Mode
OSD Menu
-LANGUAGE : (Only available for English)
-TRANSPARENT
-H_POSITION : Move the position of AV sources to Left, Right
-V_POSITION : Move the position of AV sources to Up, Down
-16-
OSD(On Screen Display)
· Analog RGB Mode
· Video Mode
UTIL Menu
- FACTORY RESET : Initializing of all values of OSD setting
(Impossible to reset of screen position, only possible for functions in OSD)
-17-
OSD(On Screen Display)
· Factory Mode
- Factory mode is activated by pressing ▲ → ▼ → ▲ →MENU buttons of the remote.
Factory Mode
- PARK – PARK ENABLE
- H-POSITION
- V-POSITION
- UTIL – CAR MODEL : Selection of using this interface for E60, E70.
- FACTORY RESET : Initializing
-18-
How to use parking guide line
Factory Default : DISPLAY - DISABLE
①
① When the car gear is in reverse,
Enter to the Factory mode by
▲ → ▼ → ▲ →MENU button of
remote. Then, the left image will
be displayed on the screen.
②
② Set “PARK ENABLE” to “ON” on
the park mode, then the line will
be displayed like the pic no. 2
* If you would like to remove this
line, just select “Off” on the
above process.
-19-
How to use parking guide line
③
③ Can move the line with H-Position
on the factory mode.
④
④ Can move the line with V-Position
on the factory mode.
-20-
CAN Wiring & Steering wheel button
☆ : PIP Mode
: Switching AV source with long press
Orange+Black:
CAN HIGH
Yellow:
CAN LOW
* The colors of wires could be
Different by car models.
-21-
Product Composition
Remote : 1 EA
Ground Cable : 1 EA
LCD (F-TYPE) Cable : 1 EA Power Cable : 1 EA Navi Cable : 1 EA
Toggle Switch : 1 EA (Optional) A/V Cable : 1 EA
-22-
Installation manual
Factory CAN wires
Control Box
Backside of
monitor
Factory LCD wire
Connector
LED
DIP S/W
KEYPAD
LCD-OUT
LCD-IN
PIP-BMW-STD
노
란
색
흰
색
POWER/CAN
MODE
RGB(IN)
A/V(IN/OUT)
CAN
AV3-SEL
AV2-SEL
AV1-SEL
NAVI SEL
CAN(L)
ACC
AV/OU
T
AV
3
SAFE
REAE-C
GND
AV
2
※ Wiring CAN Low (Yellow) of the interface
with the CAN Low (Yellow) of the
car.
CAN(H)
AV
1
REAR
C
※ Wiring CAN High (White) of the interface
with the CAN High (Orange+Black) of the
car.
RG B S G D N
Y N V A
N D D V
I
C
AUDIO R
AUDIO L
-23-
노
랑
빨
강
흰
색
VIDE
O
노
랑
-FAQ
1. When can not change mode.
-. Check if the IR Cable (Remote) is connected or not.
-. Check if LED is turned on or not. If it is not turned on, Check if power cable is connected or not.
-. Check if CAN is connected well.
2. When the screen is displaying only black color.
-. Check if 2nd LED is turned on or not. If it is not turned on, please check all video sources that you
will connect with the interface is operating well or not.
-. Check if interface is connected well.
3. When displayed color of screen is not proper. (If it’s too dark or the color is not proper)
-. Try to push “Reset button” on the remote control. If the color of screen keeps on displaying wrong
color, you have to ask manufacturer for the problem.
-. Try to adjust Color, Contrast, Brightness by the remote.
4. When Back-up camera is not displayed on the screen.
-. Turn Dip S/W no.7 on.
5. When the mode you set is not skip.
-. Check if Dip S/W is set in proper way.
6. When Main screen on the car is not displayed.
-. Check if In/Out cables are connected well. If it keeps showing the same problem, you have to
ask manufacturer for the problem.
7. When the screen is displaying only white color.
-. Check if out cable is connected well. If it keeps showing the same problem, you have to ask
manufacturer for the problem.
-24-
I-DRV type Selection.
Update Date : 10th.Dec.2008
* You can select I-DRV type by
Factory Menu of OSD. In the
Factory menu, please select
UTIL Æ I_DRIVE Menu. Then,
you can choose I-DRV type to
OLD I-DRV or NEW I-DRV
considering your car.
Normally, 328i, 335i 2009 year
models are applicable to OLD IDRV, 5 series 2009 is to NEW IDRV.
-25-