1
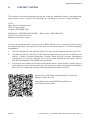
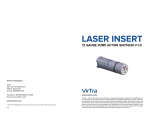
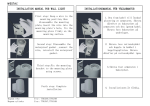
LASER INSERT
12 GAUGE PUMP-ACTION SHOTGUN V.2.0
Service and Support
VirTra
Attn: Service Department
7970 S. Kyrene Rd.
Tempe, AZ 85284 USA
Telephone: 480.968.1488 ext. 5029
E-mail: [email protected]
WWW.VIRTRA.COM
© 2012 VirTra. All Rights Reserved. Trademarks and trade names are property of their respective owners.
0712
WWW.VIRTRA.COM
VirTra Inc. shall not be liable for any incidental or consequential damage resulting from the performance or
use of this product. This company makes no representations or warranties regarding the contents of this manual. Information in this manual has been carefully checked for reliability; however, no guarantee is given as to
the correctness of the contents. In the interest of continued product improvement, this company reserves the
right to revise the manual or include changes in the specifications of the product described within it at any
time without notice and without obligation to notify any person of such revision or changes. The information
contained in this manual is provided for general use by the customers of the product.
TABLE OF CONTENTS
COPYRIGHT
TABLE OF CONTENTS
Copyright © 2012 by VirTra Inc. All Rights Reserved. No part of this publication
may be reproduced, transcribed, stored in a retrieval system, translated into any
language, or transmitted in any form or by any means, electronic, mechanical,
magnetic, optical, chemical, photocopying, manual, or otherwise, without prior
written permission from VirTra Inc.
I.
EXPLODED VIEW
6
II.
USE IN SHOTGUN
7
III.
TROUBLESHOOTING
8
3.1
3.2
DISCLAIMER
VirTra Inc. shall not be liable for any incidental or consequential damage resulting
from the performance or use of this product. This company makes no
representations or warranties regarding the contents of this manual. Information
in this manual has been carefully checked for reliability; however, no guarantee is
given as to the correctness of the contents. In the interest of continued product
improvement, this company reserves the right to revise the manual or include
changes in the specifications of the product described within it at any time
without notice and without obligation to notify any person of such revision or
changes. The information contained in this manual is provided for general use by
the customers of the product.
IV.
V.
No Shots Register on Screen
The Shotgun Insert is Being Extracted
APPENDICES
8
8
10
4.1Disassembly
10
CONTACT VIRTRA
12
TRADEMARKS
Product names used in this manual are ascribed to their respective owners and
acknowledged.
LASER INSERT : 12 GAUGE PUMP-ACTION SHOTGUN VER.2.0
PAGE 5
TABLE OF CONTENTS
I.
EXPLODED VIEW
TABLE OF CONTENTS
II.
USE IN SHOTGUN
STOP! Must read to the end of the paragraph before proceeding. Ensure that
the shotgun for use with the 12 Gauge Pump-action Shotgun Insert is clear of ANY
shotgun ammunition, live or otherwise. Visually inspect the chamber of the shotgun
by pulling the action of the shotgun back toward the butt of the gun. Ensure that no
ammunition is in the chamber or magazine tube awaiting insertion into the chamber.
If any ammunition is present in the chamber or magazine tube, gently remove it
with your fingers. At this point the user should reference the user manual of the
shotgun manufacturer if he or she does not feel comfortable performing the above
operations.
Figure 01 below depicts how the 12 Gauge Pump-action Shotgun Insert (referred
to as the “shotgun insert” from here on out) should be inserted into the 12 gauge
shotgun.
Ensure letters of the word “UP”
are oriented in the vertical
direction when chambering the
shotgun insert.
ITEM NUMBER
1
2
3
4
5
6
7
8
9
ITEM NAME
Laser Housing
4-40 x 1/8” Stainless Steel Cut Point Set Screw
Shock Spring
Shock Spring Guide Rod
Battery Sleeve Retainer
Pogo Pin
Battery Sleeve
4-Cell Battery Pack
Rear Housing Assembly
Fig. 1: Correct way to insert.
Laser end must be pointed
down the barrel of the
shotgun.
NOTE: Rubber-type O-rings are shown on items 1, 5, and 7 but have not been
assigned separate item numbers. Item #8 is comprised of Qty(4) individual #392
coin cell batteries that can be purchased from a variety of retail outlets. The item
numbers assigned to the parts in the previous and following exploded views are
for the purposes of this document ONLY and should not be used for the purpose of
ordering replacement parts.
PAGE 6
LASER INSERT : 12 GAUGE PUMP-ACTION SHOTGUN VER.2.0
LASER INSERT : 12 GAUGE PUMP-ACTION SHOTGUN VER.2.0
PAGE 7
TABLE OF CONTENTS
TABLE OF CONTENTS
If no shots register on the screen with the shotgun insert properly inserted in the
chamber of the shotgun please follow the steps outlined below to try and remedy
this issue.
2. Lastly, ensure that the shotgun the reader is using has only ONE extractor pin.
If this necessity is unclear to the reader please reference the user manual for
the shotgun in question. NOTE: the extractor pin is what removes the casing
from the chamber.
III.
TROUBLESHOOTING
3.1
1.
No Shots Register on Screen
The first item to verify is whether or not the batteries are properly oriented. See
Section IV Appendices.
2. Second, if the batteries were properly oriented then replace the 4-Cell battery
pack with a new 4-Cell battery pack and properly dispose of the old 4-Cell battery pack. Reassemble and test the shotgun insert on a simulator. If it is working properly then return the shotgun insert to normal operation. If it is still not
working proceed to step three below.
3. If you are at this step that means there is a possibility that the firing pin of the
shotgun has worn down to the point that it can no longer strike the shotgun
insert. Follow the instructions of the shotgun manufacturer for removing, inspecting, and replacement of the firing pin. If, according to the guidelines of
the manufacturer, the firing pin did not have to be replaced or it was replaced
and the shotgun insert still does not work properly then the shotgun insert
will have to be sent back to VirTra for repair. If the shotgun insert is still under
warranty please follow the steps outlined in page 12 for properly submitting a
service request.
3.2
This version of the shotgun insert is intended for shotguns with only one extractor
pin, a standard Remington R 870 for example. However, if the reader possesses
only shotguns with TWO extractor pins then it might be possible to complete an
exchange for a shotgun insert with two flat cutouts, see Fig. 03 below.
Two flat cutouts.
The Shotgun Insert is Being Extracted
If the shotgun insert is being ejected like a standard round of shotgun ammunition
then please follow the steps below to try and remedy this issue.
1.
Ensure that the shotgun insert is properly oriented in the chamber of the shotgun. The word “UP” engraved into the back of the shotgun insert should be
pointed toward the sky. See Fig. 02 below.
CORRECT
Correct orientation
of shotgun insert.
INCORRECT
Fig. 03: Two flat cutouts.
Incorrect orientation
of shotgun insert.
Please contact VirTra’s Service Department, see page 12, for help in exchanging the shotgun insert with a single flat cutout for a shotgun insert with a two flat
cutouts.
Fig. 02: Proper Orientation
PAGE 8
LASER INSERT : 12 GAUGE PUMP-ACTION SHOTGUN VER.2.0
LASER INSERT : 12 GAUGE PUMP-ACTION SHOTGUN VER.2.0
PAGE 9
TABLE OF CONTENTS
IV.
APPENDICES
4.1Disassembly
The reader should take the following steps in order to properly disassemble the
shotgun insert.
1.
TABLE OF CONTENTS
2. Remove the rear housing assembly and note the current orientation of the
battery pack in the main assembly as this will aid in troubleshooting, see
Section 3.1. See Fig. 05 below for clarification.
Unscrew the rear housing assembly, Item #9, from the battery sleeve retainer,
Item #5, using standard 3/4” open-end wrench and VirTra’s custom 3/4” open
end wrench. See Fig. 04 below.
Remove rear housing
assembly from main
assembly.
Use VirTra’s custom 3/4”
open-end wrench to hold the
midsection of the shotgun
insert in place whilst the rear
house.
NOTE: Orientation of
4-cell pattery pack.
Fig. 05: Removing the housing assembly.
3. Remove the 4-Cell battery pack by tipping the main assembly over with one
hand and dumping the 4-Cell battery pack out into the other. See Fig. 06 below.
Use a standard 3/4” openend wrench to unscrew
rear housing assembly from
remaining assembly. Turn
wrench counter clockwise
(CCW) to unscrew.
Remove 4-cell battery
pack from main assembly.
Fig. 04: Proper diassemble of the shotgun insert.
Fig. 06: Removing the battery.
PAGE 10
LASER INSERT : 12 GAUGE PUMP-ACTION SHOTGUN VER.2.0
LASER INSERT : 12 GAUGE PUMP-ACTION SHOTGUN VER.2.0
PAGE 11
TABLE OF CONTENTS
V.
CONTACT VIRTRA
The contact information below should be used for additional help in troubleshooting current issues as well as the location for sending any items in need of repair.
VirTra
Attn: Service Department
7970 S. Kyrene Rd.
Tempe, AZ 85284 USA
Telephone: 480.968.1488 x5029 | After hours 602.456.9173
E-mail: [email protected]
Website: www.virtra.com
If any of the components making up the Refill Station are in need of repair/service
the following steps are necessary to have the desired repairs or service properly
completed.
1.
Consult Section III and Section IV of this manual first before contacting VirTra.
2. If problems persist, contact VirTra Service Department via email or phone and
obtain a Return Authorization(RA) number. Save the RA number someplace
convenient as you will need to use it to fill in the “Reference Number” field in
the Service Request Form(SRF) found below.
3. Fill out the remainder of the Service Request Form and include a paper copy in
package of all items being returned. An electronic copy of the Service Request
Form can be saved by printing the completed document to PDF.
Please Scan QR Code to download the Service
Request Form or visit:
http://www.virtra.com/PDF/ServiceForms/
VirTraServiceForm.pdf
PAGE 12
LASER INSERT : 12 GAUGE PUMP-ACTION SHOTGUN VER.2.0