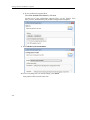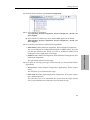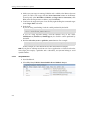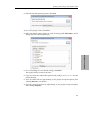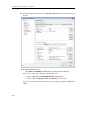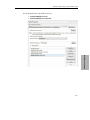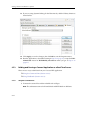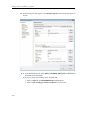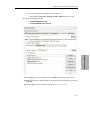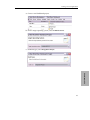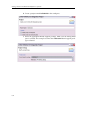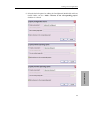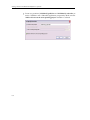
1
RTI Connext
Core Libraries and Utilities
Getting Started Guide
Addendum for Embedded Systems
Version 4.5
© 2012 Real-Time Innovations, Inc.
All rights reserved.
Printed in U.S.A. First printing.
March 2012.
Trademarks
Real-Time Innovations, RTI, DataBus, and Connext are trademarks or registered trademarks of
Real-Time Innovations, Inc. All other trademarks used in this document are the property of their
respective owners.
Copy and Use Restrictions
No part of this publication may be reproduced, stored in a retrieval system, or transmitted in any
form (including electronic, mechanical, photocopy, and facsimile) without the prior written
permission of Real-Time Innovations, Inc. The software described in this document is furnished
under and subject to the RTI software license agreement. The software may be used or copied only
under the terms of the license agreement.
Technical Support
Real-Time Innovations, Inc.
232 E. Java Drive
Sunnyvale, CA 94089
Phone:
(408) 990-7444
Email:
[email protected]
Website: https://support.rti.com/
Contents
1 Addendum for Embedded Platforms
2 Getting Started on Embedded UNIX-like Systems
2.1
Building and Running a Hello World Example ...................................................................2-2
2.2
Configuring Automatic Discovery ........................................................................................2-2
3 Getting Started on INTEGRITY Systems
3.1
Building the Kernel ..................................................................................................................3-1
3.2
Building and Running a Hello World Example ...................................................................3-3
3.2.1
Generate Example Code and Project File with rtiddsgen ....................................3-3
3.2.2
Build the Publish and Subscribe Applications ......................................................3-4
3.2.3
Connect to the INTEGRITY Target from MULTI...................................................3-4
3.2.4
Load the Application on the Target.........................................................................3-4
3.2.5
Run the Application and View the Output ............................................................3-5
4 Getting Started on VxWorks 6.x Systems
4.1
Building the Kernel ..................................................................................................................4-2
4.2
Building and Running a Hello World Example ...................................................................4-6
4.2.1
Generate Example Code and Makefile with rtiddsgen ........................................4-6
4.2.2
Building and Running a Connext Application as a Kernel Task ........................4-7
4.2.3
Building and Running a Connext Application as a Real-Time Process ...........4-12
5 Getting Started on VxWorks 653 Platform 2.x Systems
5.1
Setting up Workbench for Building Connext Applications ...............................................5-2
5.2
Creating Connext Applications ..............................................................................................5-2
5.3
Running Connext Applications............................................................................................5-16
6 Getting Started on Wind River Linux Systems
iii
iv
1. Addendum for
Embedded Platforms
Chapter 1
Addendum for Embedded Platforms
In addition to enterprise-class platforms like Microsoft Windows and Linux, RTI® Connext™ (formerly RTI Data Distribution Service) supports a wide range of embedded platforms. This document is a companion to the RTI Core Libraries and Utilities Getting Started
Guide especially for users of those platforms. It describes how to configure some of the
most popular embedded systems for use with Connext and to get up and running as
quickly as possible. The code examples covered in this document can be generated for
your platform(s) using the rtiddsgen code generator that accompanies Connext, as
described in the Getting Started Guide (Generating Code with rtiddsgen (Section 4.3.2.1)).
This document assumes at least minimal knowledge with the platforms it describes and
is not a substitute for the documentation from the vendors of those platforms. For further instruction on the general operation of your embedded system, please consult the
product documentation for your board and operating system.
1-1
Addendum for Embedded Platforms
1-2
Getting Started on Embedded UNIX-like
Systems
This chapter provides instructions on building and running Connext applications on
embedded UNIX-like systems, including QNX® and LynxOS® systems. It will guide
you through the process of generating, compiling, and running a Hello World application on an embedded UNIX-like system by expanding on Generating Code with rtiddsgen (Section 4.3.2.1) in the Getting Started Guide. Please read the following alongside that
section.
In the following steps:
❏ All commands must be executed in a command shell that has all the required
environment variables. For details, see Set Up the Environment on Your Development Machine (Section 3.1.1.1) in the Getting Started Guide.
❏ You need to know the name of your target architecture (look in your
NDDSHOME/lib directory). Use it in place of <architecture> in the example
commands. For example, your architecture might be ‘i86Lynx4.0.0gcc3.2.2’.
❏ We assume that you have gmake installed. If you have gmake, you can use the
generated makefile to compile. If you do not have gmake, use your normal compilation process. (Note: the generated makefile assumes the correct version of the
compiler is already in your path and that NDDSHOME is set.)
2-1
2. Embedded UNIXbased Systems
Chapter 2
Getting Started on Embedded UNIX-like Systems
2.1
Building and Running a Hello World Example
This section describes the basic steps for building and running an rtiddsgen-generated
example on an embedded UNIX-like target.
1. Create a directory to work in. In this example, we use a directory called myhello.
2. In the myhello directory, create a file called HelloWorld.idl that contains a userdefined data type:
struct HelloWorld {
string<128> msg;
};
3. Use the rtiddsgen utility to generate sample code and a makefile. Modify, build,
and run the generated code as described in Using Types Defined at Compile
Time (Section 4.3.2) in the Getting Started Guide:
For C++:
rtiddsgen -language C++ -example <architecture> HelloWorld.idl
gmake -f makefile_HelloWorld_<architecture>
./objs/<architecture>/HelloWorld_subscriber
./objs/<architecture>/HelloWorld_publisher
For Java:
rtiddsgen -language Java -example <architecture> HelloWorld.idl
gmake -f makefile_HelloWorld_<architecture>
gmake -f makefile_HelloWorld_<architecture> HelloWorldSubscriber
gmake -f makefile_HelloWorld_<architecture> HelloWorldPublisher
For Java users: The generated makefile deduces the path to the java executable
based on the APOGEE_HOME environment variable1, which therefore must be
set in order to run the example applications.
2.2
Configuring Automatic Discovery
In most cases, multiple applications—whether on the same host or different hosts—will
discover each other and begin communicating automatically. However, in some cases
you must configure the discovery service manually. For example, on LynxOS systems,
multicast is not used for discovery by default; you will need to configure the addresses
it will use. For more information about these situations, and how to configure discovery,
see Automatic Application Discovery (Section 4.1) in the Getting Started Guidee.
1.
2-2
For example: $(APOGEE_HOME)/lynx/pcc/ive/bin/j9
Chapter 3
Getting Started on INTEGRITY Systems
This process has been tested on INTEGRITY 5.0.11 and assumes that applications are
downloaded dynamically.
For more information on using Connext on an INTEGRITY system, please see the RTI
Core Libraries and Utilities Platform Notes.
The first section describes Building the Kernel (Section 3.1).
The next section guides you through the steps to build and run an rtiddsgen-generated
example application on an INTEGRITY target: Building and Running a Hello World
Example (Section 3.2).
Before you start, make sure that you know how to:
1. Boot/reboot your INTEGRITY target.
2. Get the serial port output of your target (using telnet, minicom or hyperterminal).
3.1
Building the Kernel
Before you start, you should be familiar with running a kernel on your target.
1. Launch MULTI.
2. Select File, Create new project.
3-1
3. INTEGRITY Systems
This chapter provides simple instructions on configuring a kernel and running Connext
applications on an INTEGRITY system. Please refer to the documentation provided by
Green Hills Systems for more information about this operating system.
Getting Started on INTEGRITY Systems
3. Choose the INTEGRITY Operating System and make sure the path to your
INTEGRITY distribution is correct.
4. Choose a processor family and board name.
5. Click Next.
6. Choose Language: C/C++.
7. Project type: INTEGRITY Kernel.
8. Choose a project directory and name.
9. Click Next.
10. In Kernel Options, choose at least: 'TCP/IP stack'. Everything else can be left to
default.
11. In the Project Builder, you should see the following file:
<name of your project>_default.ld (under src/resource.gpj).
12. Right-click the file and edit it; the parameters of interest are the following:
CONSTANTS
{
__INTEGRITY_DebugBufferSize = 0x10000
__INTEGRITY_HeapSize = 0x100000
__INTEGRITY_StackSize = 0x4000
__INTEGRITY_DownloadSize = 0x400000
__INTEGRITY_MaxCoreSize = 0x200000
}
Note that most Connext applications will require the StackSize and HeapSize
parameters to be increased from their default value. The values shown above are
adequate to run the examples presented in this document.
13. Once you have changed the desired values, right-click the top-level project and
select Build.
14. Run the new kernel on your target.
3-2
Building and Running a Hello World Example
3.2
Building and Running a Hello World Example
This section describes the basic steps for building and running an rtiddsgen-generated
example on an INTEGRITY target:
❏
❏
❏
❏
❏
Build the Publish and Subscribe Applications (Section 3.2.2)
Connect to the INTEGRITY Target from MULTI (Section 3.2.3)
Load the Application on the Target (Section 3.2.4)
Run the Application and View the Output (Section 3.2.5)
Generate Example Code and Project File with rtiddsgen
To create the example applications:
1. Create a directory to work in. In this example, we use a directory called myhello.
2. In the myhello directory, create a file called HelloWorld.idl that contains a userdefined data type:
struct HelloWorld {
string<128> msg;
};
3. Use the rtiddsgen utility to generate sample code and a project file as described in
Generating Code with rtiddsgen (Section 4.3.2.1) in the Getting Started Guide.
Choose either C or C++.
For C:
rtiddsgen -language C -example <architecture> HelloWorld.idl
For C++:
rtiddsgen -language ++C -example <architecture> HelloWorld.idl
In your myhello directory, you will see that rtiddsgen has created a number of
source code files (described in Section 3.7 of the RTI Core Libraries and Utilities
User’s Manual), additional support files (not listed here), and a project file:
HelloWorld_default.gpj.
4. Edit the example code to modify the data as described in Generating Code with
rtiddsgen (Section 4.3.2.1) in the Getting Started Guide.
3-3
3. INTEGRITY Systems
3.2.1
Generate Example Code and Project File with rtiddsgen (Section 3.2.1)
Getting Started on INTEGRITY Systems
3.2.2
Build the Publish and Subscribe Applications
1. Launch MULTI.
2. Select File, Open Project Builder and choose the top-level project file generated
by rtiddsgen, HelloWorld_default.gpj.
3. Right-click the top-level project file in the Project builder and edit it to add the
following line:
-os_dir=<the path to your INTEGRITY distribution>
Note: For Interpeak architectures: Also add the location of your Interpeak libraries:
-L<interpeak install dir>/libs
4. Save your changes.
5. Right-click the top-level project and Build the project. MULTI might ask you if
you want to load the changes to your project, you should do so.
3.2.3
Connect to the INTEGRITY Target from MULTI
1. From the MULTI Launcher, click the Connection button and open the Connect
option. Your mode should be Download (Download and debug application).
2. Create a custom connection with the following line:
rtserv -port udp@<ip address of your INTEGRITY target>
(You might be able to see the IP address of your target on the output of its boot
sequence.)
You only have to create your connection once, MULTI will remember it.
3. Make sure your target has booted; then select Connect. You should see a new
window with the Kernel Tasks running on your target.
3.2.4
Load the Application on the Target
1. In the task window, select Target, Load module.
2. Browse for your executables; there should be 3 of them in your project directory:
• HelloWorld_publisherdd
• HelloWorld_subscriberdd
• posix_shm_manager
3-4
Building and Running a Hello World Example
3. Load the posix_shm_manager first, it will appear in the Tasks window as a separate address space and start running by itself once loaded. It will allow you to
use the shared memory transport on your target.
Note: The default rtiddsgen-generated code tries to use shared memory, so unless
you have manually disabled it, your application will crash if you do not load the
shared memory manager before running the application.
4. Load the publisher, subscriber, or both. They should appear in separate address
spaces in the Tasks window.
3.2.5
Run the Application and View the Output
Note that with some versions of INTEGRITY, it is difficult to pass arguments to
applications. Arguments can always be hard-coded in your application before
compiling it. To quickly experiment with multiple runs of the application with
different arguments, one option is to run your application within the debugger.
Then you can set a breakpoint before the arguments are used and change them at
that point.
2. From the Tasks window, select Target, Show Target Windows. This will show
you the standard output of your target.
Some errors messages may still go through the serial port, so you should leave
your serial port connection open and monitor it as well.
To reboot the target:
Go to your serial port connection monitor and type 'rset'.
3-5
3. INTEGRITY Systems
1. Select the task called "Initial" in your application's address space in the Tasks
window; you can either click the play button to run it, or click the debug button
to debug it.
Getting Started on INTEGRITY Systems
3-6
Chapter 4
Getting Started on VxWorks 6.x Systems
This chapter provides simple instructions to configure a kernel and run Connext applications on VxWorks 6.x systems. Please refer to the documentation provided by Wind
River Systems for more information on this operating system. See also the RTI Core
Libraries and Utilities Platform Notes.
This chapter will guide you through the process of generating, compiling, and running
a Hello World application on VxWorks 6.x systems by expanding on Generating Code
with rtiddsgen (Section 4.3.2.1) in the Getting Started Guide; please read the following
alongside that section.
The first section describes how to build the kernel:
The next section guides you through the steps to generate, modify, build, and run the
provided example HelloWorld application on a VxWorks target:
❏ Building and Running a Hello World Example (Section 4.2)
4-1
4. VxWorks Systems
❏ Building the Kernel (Section 4.1)
Getting Started on VxWorks 6.x Systems
4.1
Building the Kernel
Before you start, you should be familiar with running a kernel on your target.
1. Launch Workbench.
2. Select File, New, VxWorks Image Project
3. Select the desired operating system; click Next.
4-2
Building the Kernel
4. Give your project a name; click Next.
5. Choose the board support package (BSP) based on your hardware.
6. For VxWorks 6.9: Select the correct Address mode.
7. For the Tool chain option, select GNU; click Next
4. VxWorks Systems
8. a) For VxWorks 6.8 and higher:
Select SMP support in kernel (regardless of whether or not you run on an
SMP board).
b) For VxWorks 6.7:
Select SMP support in kernel only if you want SMP support.
4-3
Getting Started on VxWorks 6.x Systems
c) If your architecture supports IPv6:
Select IPv6 enabled kernel libraries; click Next.
To find out if your architecture supports IPv6, see the Platform Notes
(RTI_Connext_PlatformNotes.pdf, Section 9.6 Supported Transports).
9. Select PROFILE_DEVELOPMENT.
10. Leave everything else at its default setting. Click Finish.
Your project will be created at this time.
4-4
Building the Kernel
11. From the Project Explorer, open Kernel Configuration.
12. a) For VxWorks 6.8 and higher:
Add Operating System Components, Kernel Components, _thread variables support.
b) For VxWorks 6.7, ONLY if you have enabled SMP support in the kernel:
Add Operating System Components, Kernel Components, _thread variables support.
13. For VxWorks 6.4 and below, add the following modules:
• ZBUF Socket (under Network Components, Network Socket Components)
The Connext libraries for VxWorks Kernel Mode use ZBUF sockets. If you do
not add this module to the kernel, you will see undefined symbols when
loading the Connext application on the target.
work IPv4 Components)
This will enable multicast for the target.
14. If you plan on accessing your target via the network, you may need the following modules:
• Telnet Server (under Network Components, Applications, Telnet Components)
This will allow you to telnet into the target.
• NFS client all (under Operating System Components, IO System Components, NFS components)
This will allow you to see networked file systems from the target (contact
your system administrator to find out if you have them set up).
4-5
4. VxWorks Systems
• IGMP v4 (under Network Components, Network Protocol Components, Net-
Getting Started on VxWorks 6.x Systems
15. If you are running applications in RTP mode, you may increase Operating System components, Real Time Processes components, Number of entries in an
RTP fd table from the default value of 20 to a higher value such as 256. This will
enable you to open more sockets from an RTP application.
16. Compile the Kernel by right-clicking the project and selecting Build project.
The Kernel and associated symbol file will be found in <your project directory>/
default/.
4.2
Building and Running a Hello World Example
This section will guide you through the steps required to successfully run an rtiddsgengenerated example application on a VxWorks 6.x target using kernel mode or RTP
mode:
❏ Kernel Mode: see Section 4.2.2
❏ RTP Mode: see Section 4.2.3
4.2.1
Generate Example Code and Makefile with rtiddsgen
To create the example applications:
1. Set up the environment on your development machine: set the NDDSHOME
environment variable and update your PATH as described in Step 1: Set Up the
Environment (Section 3.1.1) in the Getting Started Guide.
2. Create a directory to work in. In this example, we use a directory called myhello.
3. In the myhello directory, create a file called HelloWorld.idl that contains a userdefined data type:
struct HelloWorld {
string<128> msg;
};
4. Use the rtiddsgen utility to generate sample code and a makefile as described in
Generating Code with rtiddsgen (Section 4.3.2.1) in the Getting Started Guide.
Choose either C or C++.
Note: The architecture names for Kernel Mode and RTP Mode are different.
4-6
Building and Running a Hello World Example
For C:
rtiddsgen -language C -example <architecture> HelloWorld.idl
For C++:
rtiddsgen -language C++ -example <architecture> HelloWorld.idl
Edit the generated example code as described in Generating Code with rtiddsgen (Section 4.3.2.1) in the Getting Started Guide.
4.2.2
Building and Running a Connext Application as a Kernel Task
There are two ways to build and run your Connext application:
❏ Using the Command Line (Section 4.2.2.1)
❏ Using Workbench (Section 4.2.2.2)
4.2.2.1
Using the Command Line
1. Set up your environment with the wrenv.sh script or wrenv.bat batch file in the
VxWorks base directory.
3. Build the Publisher and Subscriber modules using the generated makefile. You
may have to modify the HOST_TYPE, compiler and linker paths to match your
development setup.
4. To use dynamic linking, remove the Connext libraries from the link objects.
(Note: steps 5-7 can be replaced by establishing a telnet connection to the
VxWorks target. In that case, Workbench does not need to be used and both the
Host Shell and Target Console will be redirected to the telnet connection. Once in
the C interpreter (you will see the prompt '->' in the shell) you can type cmd and
then help for more information on how to load and run applications on your target.)
5. Launch Workbench.
4-7
4. VxWorks Systems
2. Set the NDDSHOME environment variable as described in Step 1: Set Up the
Environment (Section 3.1.1) in the Getting Started Guide.
Getting Started on VxWorks 6.x Systems
6. Make sure your target is running VxWorks and is added to the Remote Systems
panel. (To add a new target, click the New Connection button on the Remote
System panel, select Wind River VxWorks 6.x Target Server Connection, click
Next, enter the Target name or address, and click Finish).
7. Connect to the target and open a host shell by right-clicking the connected target
in the Target Tools sub-menu.
8. In the shell:
If you are using static linking: Load the .so file produced by the build:
>cd "directory"
>ld 1 < HelloWorld_subscriber.so
If you are using dynamic linking: load the libraries first, in this order:
libnddscore.so, libnddsc.so, libnddscpp.so; then load the .so file produced by
the build.
9. Run the subscriber_main or publisher_main function. For example:
>taskSpawn "sub", 255, 0x8, 150000, subscriber_main, 38, 10
In this example, 38 is the domain ID and 10 is the number of samples.
Note: If you plan on running more than one Connext application as a Kernel task on the
same target (for example, a publisher and a subscriber), use dynamic linking to avoid
symbol conflicts.
4.2.2.2
Using Workbench
1. Start Workbench.
2. Select File, New, VxWorks Downloadable Kernel Module Project.
4-8
Building and Running a Hello World Example
3. Select the desired operating system; click Next.
4. Give your project a name; click Next.
5. Select the default options until you reach the dialog titled Build Specs. In this
dialog, choose the desired build spec.
4. VxWorks Systems
6. Leave everything else at its default setting; click Finish.
Your project will be created at this time.
7. Copy the source files and headers generated by rtiddsgen in Section 4.2.1 into the
project directory.
8. View the added files by right-clicking on the project in Project Explorer, then
selecting Refresh to see the files.
9. Open the project Properties by right-clicking on the project in Project Explorer
and selecting Properties.
4-9
Getting Started on VxWorks 6.x Systems
10. In the dialog box that appears, select Build Properties in the navigation pane on
the left.
11. a) In the Build Macros tab:
Add -DRTI_VXWORKS to DEFINES in the Build macro definitions.
b) If you are using static linking, in the Variables tab:
• Add to LIBPATH: -L/(NDDSHOME)/lib/<architecture>
• Add to LIBS: -lnddscppz -lnddscz -lnddscorez (in that order)
(If you are using dynamic linking, there are no changes required to LIBPATH or
LIBS.)
4-10
Building and Running a Hello World Example
12. In the Build Paths tab, add both of these:
• -I$(NDDSHOME)/include
• -I$(NDDSHOME)/include/ndds
4. VxWorks Systems
4-11
Getting Started on VxWorks 6.x Systems
13. If you are using dynamic linking: In the Libraries tab, add the Library directives
shown below:
14. Click Apply to save the changes, then click OK to exit the Properties menu.
15. Run the application as described starting in Step 5 on page 4-7, except load HelloWorld.out instead of HelloWorld_subscriber.so when you get to Step 9 on
page 4-8.
4.2.3
Building and Running a Connext Application as a Real-Time Process
There are two ways to build and run your Connext RTP application:
❏ Using the Command Line (Section 4.2.3.1)
❏ Using Workbench (Section 4.2.3.2)
4.2.3.1
Using the Command Line
1. Generate the source files and the makefile with rtiddsgen.
Note: The architecture names for Kernel Mode and RTP Mode are different.
4-12
Building and Running a Hello World Example
Please refer to the RTI Core Libraries and Utilities User’s Manual for more information on how to use rtiddsgen.
2. Set up your environment with the wrenv.sh script or the wrenv.bat batch file in
the VxWorks base directory.
3. Set the NDDSHOME environment variable as described in Step 1: Set Up the
Environment (Section 3.1.1) in the Getting Started Guide.
4. Build the Publisher and Subscriber modules using the generated makefile. You
may need to modify the HOST_TYPE, compiler and linker paths to match your
development setup.
Notes:
• Steps 5-12 below can be replaced by establishing a telnet connection to the
VxWorks target. In that case, Workbench does not need to be used and both
the Host Shell and Target Console will be redirected to the telnet connection. Once in the C interpreter (you will see a prompt '->' in the shell) you
can type cmd and then help for more information on how to load and run
applications on your target.)
• If you want to dynamically link your RTP to the RTI libraries (VxWorks 6.3
and above only), make the following modifications the generated makefile:
LIBS = -L$(NDDSHOME)/lib/<architecture> -non-static -lnddscpp \
-lnddsc -lnddscore $(syslibs_<architecture>)
6. Launch Workbench.
7. Make sure your target is running VxWorks.
8. Connect to the target with the target manager and open a host shell and a Target
Console Tool to look at the output. Both are found by right-clicking the connected target in the Target Tools sub-menu.
9. Right-click your target in the Target Manager window, then select Run Real
Time Process.
10. Set the Exec Path on Target to the HelloWorld_subscriber.vxe or the
HelloWorld_publisher.vxe file created by the build.
11. Set the arguments (domain ID and number of samples, using a space separator).
A Stack size of 0x100000 should be sufficient. If your application doesn't run, try
increasing this value.
4-13
4. VxWorks Systems
5. Add to the LD_LIBRARY_PATH environment variable the path to your RTI
libraries as well as the path to libc.so.1 of your VxWorks installation to launch
your RTP successfully.)
Getting Started on VxWorks 6.x Systems
12.
4.2.3.2
Click Run.
Using Workbench
1. Start Workbench.
2. Select File, New, VxWorks Real Time Process Project.
3. Select the desired operating system; click Next.
4. Give your project a name; click Next.
4-14
Building and Running a Hello World Example
5. You can select the default options until you reach the dialog titled Build Specs.
In this dialog, choose the desired build spec:
Your project will be created at this time.
7. Copy the source and header files generated by rtiddsgen in Section 4.2.1 into the
project directory. There can only be one main() in your project, so you must
choose either a subscriber or a publisher. If you want to run both, you will need
to create two separate projects.
8. View the added files by right-clicking on the project in Project Explorer, then
selecting Refresh to see the files.
9.
Open the project Properties by right-clicking on the project in Project Explorer
and selecting Properties.
4-15
4. VxWorks Systems
6. Leave everything else at its default setting; click Finish.
Getting Started on VxWorks 6.x Systems
10. In the dialog box that appears, select Build Properties in the navigation pane on
the left.
11. a) In the Build Macros tab: Add -DRTI_VXWORKS -DRTI_RTP to DEFINES in
the Build macro definitions.
b) If you are using static linking, in the Variables tab:
• Add to LIBPATH: -L/(NDDSHOME)/lib/<architecture>
• Add to LIBS: -lnddscppz -lnddscz -lnddscorez (in that order)
4-16
Building and Running a Hello World Example
c) If you are using dynamic linking, in the Variables tab:
• Add to LIBS: -non-static -lnddscpp -lnddsc -lnddscore (in that order)
12. In the Build Paths tab, add:
• -I$(NDDSHOME)/include
• -I$(NDDSHOME)/include/ndds
4. VxWorks Systems
13. Click Apply to save the changes, then click OK to exit the Properties menu.
14. Build the project, by right-clicking on the project in Project Explorer, then selecting Build.
15. Run the application as described starting in Step 5 on page 4-13.
4-17
Getting Started on VxWorks 6.x Systems
4-18
Chapter 5
Getting Started on VxWorks 653 Platform
2.x Systems
This chapter provides simple instructions on how to configure a kernel and run Connext
applications on a VxWorks 653 Platform 2.x system. Please refer to the documentation
provided by Wind River Systems for more information, as well as the RTI Core Libraries
and Utilities Platform Notes.
Developing a complete system typically involves the cooperation of developers who
play the following principal roles:
❏ A platform provider, who develops the platform
❏ An application developer, who develops applications
❏ A system integrator, who designs and specifies the module, and integrates a set of
applications with a platform to create a module
For more information on these roles, please see the VxWorks 653 Configuration and Build
Guide.
This document assumes the above distribution of development responsibilities, with the
Connext Core Libraries being a part of the application. This document is targeted
towards platform providers, application developers, and system integrators.
For application developers, this chapter describes how to create Connext applications.
Application developers must use the platform provided by the platform provider. To
create a Connext application, follow Step 5 on page 5-11 to Step 7 on page 5-12.
5-1
5. VxWorks 653
For platform providers, this chapter indicates what your system must provide to Connext. Platform providers must provide a platform that application developers will use to
create the application. The provided platform must support worker tasks and the socket
driver. For the actual list of components, refer to Table 8.3, “Building Instructions for
VxWorks 653 Architectures,” on page 53 in the Platform Notes.
Getting Started on VxWorks 653 Platform 2.x Systems
For system integrators, this document describes how to combine the platform from the
platform provider, and the application from the application developer, and create the
system to be deployed. System integrators must create an integration project using the
module OS and partition OS provided by the platform provider, and the application
provided by the application provider. To create a system capable of running Connext
applications, the system integrator needs to create a ConfigRecord considering the
requirements noted in Step 2 on page 5-8.
For someone creating a Connext application, this document provides an example from
the ground up.
5.1
Setting up Workbench for Building Connext Applications
1. Install Workbench.
2. Copy the socket driver files from Wind River to each BSP of interest. For example, for sbc8641Vx653-2.3gcc3.3.2, copy the socket driver files into
$(WIND_BASE)/target/config/wrSbc8641d.
3. Copy the socket library header files into $(WIND_BASE)/target/h/netinet. The
file in.h will be replaced.
5.2
Creating Connext Applications
This section contains instructions for creating Connext applications for the
sbc8641Vx653-2.3gcc3.3.2 platform. The procedure is the same for all VxWorks 653 platforms, but the actual values used in the configuration may vary.
1. Create an integration project with two partitions (one for the publisher, one for
the subscriber). Follow the instructions from Wind River for doing this. The following screenshots will guide you through the process.
5-2
Creating Connext Applications
a. Create a new Workbench project.
b. For the Target operating system, select VxWorks 653 2.3.
c. For Build type, select Integration Project.
5. VxWorks 653
5-3
Getting Started on VxWorks 653 Platform 2.x Systems
d. Create a project named helloWorld in the workspace.
e. Select the appropriate Board Support package. Make sure the debug Build
spec is selected. This example assumes the wrSbc8641d board support package is selected.
5-4
Creating Connext Applications
f. Select the default options for adding the ConfigRecord, ModuleOS, and PartitionOS. Make sure the “Add a reference to the corresponding project”
checkbox is selected.
5. VxWorks 653
5-5
Getting Started on VxWorks 653 Platform 2.x Systems
g. Create two partitions, helloWorld_publisher and helloWorld_subscriber, to
create a Publisher and a Subscriber application, respectively. Make sure the
“Add a reference to the corresponding project” checkbox is selected.
5-6
Creating Connext Applications
h. Now you are ready to create the Integration Project.
5. VxWorks 653
i. Click Finish to create the Integration project.
5-7
Getting Started on VxWorks 653 Platform 2.x Systems
This will create an integration project with ConfigRecord, ModuleOS, PartitionOS and two partitions, helloWorld_publisher and helloWorld_subscriber.
2. Open helloWorld_ConfigRecord->
wrSbc8641d_default.xml and make
the changes noted below. By default,
the file opens in design mode. You
may wish to switch to source mode,
which makes it easier to copy and
paste sections, which is required in
later steps.
a. Under Applications:
i. Change the application name
from wrSbc8641d_part1 to
helloWorld_publisher.
ii. Under MemorySize:
(1). Change MemorySizeText to 0x450000.
(2). Change
MemorySizeRoData to 0x90000.
(3). Remove MemorySizePersistentData and MemorySizePersistentBss.
5-8
Creating Connext Applications
(4). For C++ only:
Change the MemorySize tag so it ends with ‘>’ (not ‘/>’).
Within MemorySize, add:
<AdditionalSection Name=".gcc_except_table"
Size="0x2000" Type="DATA"/>
Close MemorySize with </MemorySize> .
It should look like this when you are done (the actual values may be
different):
<MemorySize
MemorySizeBss="0x1000"
MemorySizeText="0x4f0000"
MemorySizeData="0x1000"
MemorySizeRoData="0x90000">
<AdditionalSection Name=".gcc_except_table"
Size="0x2000" Type="DATA"/>
</MemorySize>
iii. Create a copy of the application helloWorld_publisher and rename it
helloWorld_subscriber.
b. Under Partitions:
i. Change
the
partition
helloWorld_publisher.
name
ii. Change the Application
helloWorld_publisher.
NameRef
from
from
wrSbc8641d_part1
wrSbc8641d_part1
to
to
iii. Under Settings, change RequiredMemorySize to 0x100000 and change
numWorkerTasks to 10.
iv. Create a copy of the partition application helloWorld_publisher and
rename it helloWorld_subscriber. Change its ID to 2 and its Application
NameRef to helloWorld_subscriber.
i. Rename PartitionWindow PartitionNameRef from wrSbc8641d_part1 to
helloWorld_publisher.
ii. Create a copy of the PartitionWindow, and change PartitionNameRef to
helloWorld_subscriber.
iii. Add another PartitionWindow, with PartitionNameRef “SPARE” and
Duration 0.05. This partition window schedules the kernel, allowing time
in the schedule for system activities like network communications.
5-9
5. VxWorks 653
c. Under Schedules:
Getting Started on VxWorks 653 Platform 2.x Systems
iv. Optionally:
(1). If you want only one of the applications to run
(helloWorld_publisher or helloWorld_subscriber), then you only
need a partition window for the one you want to run.
(2). If you do not want the Connext application to run immediately when
the system boots up, change the schedule ID to non-zero and add a
SPARE schedule with ID 0.
d. Under HealthMonitor:
i. In PartitionHMTable Settings, change TrustedPartition NameRef from
wrSbc8641d_part1 to helloWorld_publisher. This is an optional field, so it
can even be removed from the configuration.
ii. Optionally, change the ErrorActions from hmDefaultHandler to
hmDbgDefaultHandler, in case you want the partitions to stop and not
restart on exceptions.
e. Under Payloads:
i. Change PartitionPayload
helloWorld_publisher.
NameRef
from
wrSbc8641d_part1
to
ii. Create a copy of the PartitionPayload, and change NameRef to
helloWorld_subscriber.
f. Save the changes to wrSbc8641d_default.xml.
3. In helloWorld_ModuleOS->Kernel Configuration:
a. Include hardware->peripherals->hard disks->
socket I/O device [INCLUDE_SOCKET_DEV].
b. Include development tool components->
debug utilities [INCLUDE_DEBUG_UTIL].
This is needed to enable worker tasks.
c. Optionally, include target-resident shell components, and any other components you want
to include in the ModuleOS.
d. Save the changes to Kernel Configuration.
Note:
See
the
Platform
Notes
(RTI_Connext_PlatformNotes.pdf) for a complete list of required kernel components for each platform.
5-10
Creating Connext Applications
4. Build the target helloWorld_ModuleOS->ADD_NEEDED.
5. Generate example code with rtiddsgen.
a. Create a directory to work in. In this example, we use a directory called
myhello.
b. In the myhello directory, create a file called HelloWorld.idl that contains a
user defined data type:
struct HelloWorld {
string<128> msg;
};
For C:
rtiddsgen -language C -example <architecture> HelloWorld.idl
For C++:
rtiddsgen -language C++ -example <architecture> HelloWorld.idl
5-11
5. VxWorks 653
c. Use the rtiddsgen utility to generate sample code and a makefile as described
in Generating Code with rtiddsgen (Section 4.3.2.1) in the Getting Started
Guide. Choose either C or C++.
Getting Started on VxWorks 653 Platform 2.x Systems
For this release, the supported architectures are sbc8641Vx653-2.3gcc3.3.2
and simpcVx653-2.3gcc3.3.2.
d. Edit the generated example code as described in Generating Code with rtiddsgen (Section 4.3.2.1) in the Getting Started Guide.
6. Import generated code into the application.
a. Right-click helloWorld_publisher and select Import.
b. In the Import wizard, select General->File System, then click Next.
c. Browse to the myhello directory.
d. Select the generated files, except HelloWorld_subscriber.
e. Import sockLib.c from the socket library into the project.
f. Right-click usrAppInit.c and delete it.
g. Repeat the same process for helloWorld_subscriber, this time importing
HelloWorld_subscriber instead of HelloWorld_publisher.
7. Configure properties for the application.
a. Right-click helloWorld_publisher and select Properties.
i. Select Build Properties in the selection list on the left.
ii. In the Build Macros tab:
• Add a new macro, NDDSHOME, and set its value to the location
where Connext is installed. If this is in a directory with spaces in the
path (such as Program Files), put quotation marks around the whole
path.
• Change the BLACKBOX value to helloWorld_publisher.
iii. For C++ only:
• In the Build Tools tab, select Build tool: C++-Compiler.
• Change Suffixes to *.cxx.
iv. Click OK.
5-12
Creating Connext Applications
5. VxWorks 653
b. For C:
For C++:
Right-click helloWorld_publisher.
Right-click helloWorld_publisher->Build Targets->
helloWorld_publisher-pm.
c. Select Properties.
5-13
Getting Started on VxWorks 653 Platform 2.x Systems
d. In the Build Macros tab, add -DRTI_VXWORKS -DRTI_VX653 to DEFINES.
e. In the Build Paths tab, add these Include directories:
i.
-I$(WIND_BASE)/target/h
ii. -I$(WIND_BASE)/target/config/wrSbc8641d
iii. -I$(NDDSHOME)/include
iv. -I$(NDDSHOME)/include/ndds
5-14
Creating Connext Applications
f. In the Libraries tab:
5. VxWorks 653
i. For C++ only, add:
(1). $(WIND_BASE)/target/vThreads/lib/objPPC604gnuvx/
vThreadsCplusComponent.o
(2). $(WIND_BASE)/target/vThreads/lib/objPPC604gnuvx/
vThreadsCplusLibraryComponent.o
ii. Add $(NDDSHOME)/lib/sbc8641Vx653-2.3gcc3.3.2/libnddscore.so
iii. Add $(NDDSHOME)/lib/sbc8641Vx653-2.3gcc3.3.2/libnddsc.so
5-15
Getting Started on VxWorks 653 Platform 2.x Systems
iv. For C++ only:
$(NDDSHOME)/lib/sbc8641Vx653-2.3gcc3.3.2/libnddscpp.so
g. Click OK.
h. Repeat the same process for helloWorld_subscriber.
8. Build the Integration Project.
5.3
Running Connext Applications
1. Boot up your target board with the kernel created by the Integration project.
2. If the Connext applications are in schedule 0, they will start up automatically, and
you should see the publisher and subscriber communicating with each other.
3. If the Connext applications are not in schedule 0, use this command to change to
the desired schedule: arincSchedSet <Schedule number>.
5-16
6. Wind River Linux
Systems
Chapter 6
Getting Started on Wind River Linux
Systems
This chapter provides instructions on building and running Connext applications on a
Wind River Linux system.
This chapter will guide you through the process of compiling and running the Hello
World application on a Wind River Linux system.
In the following steps:
❏ Steps 1-5 must be executed on the host machine in a shell that has all the
required environment variables. For details, see Step 1: Set Up the Environment
(Section 3.1.1) in the Core Libraries and Utilities Getting Started Guide.
❏ You need to know the name of your target architecture (look in your
%NDDSHOME%\lib directory). Use it in place of <architecture> in the example
commands. Your architecture might be ‘ppc85xxWRLinux2.6gcc4.3.2’.
❏ We assume that you have gmake installed. If you have gmake, you can use the
generated makefile to compile. If you do not have gmake, use your normal compilation process. (Note: the generated makefile assumes the correct version of the
compiler is already in your path and that NDDSHOME is set.)
To create the example applications:
1. Create a directory to work in. In this example, we use a directory called myhello.
2. In the myhello directory, create a file called HelloWorld.idl that contains a userdefined data type:
struct HelloWorld {
string<128> msg;
};
6-1
Getting Started on Wind River Linux Systems
3. Use rtiddsgen to generate sample code and a makefile as described in Generating
Code with rtiddsgen (Section 4.3.2.1) in the Core Libraries and Utilities Getting
Started Guide. Choose either C or C++.
For C:
rtiddsgen -language C -example <architecture> HelloWorld.idl
For C++:
rtiddsgen -language C++ -example <architecture> HelloWorld.idl
Edit the generated example code as described in Generating Code with rtiddsgen (Section 4.3.2.1) in the Core Libraries and Utilities Getting Started Guide.
4. Set up your environment with the wrenv.sh script in the Wind River Linux base
directory.
wrenv.sh -p wrlinux-3.0
5. With the NDDSHOME environment variable set, build the Publisher and Subscriber modules using the generated makefile.
make -f makefile_HelloWorld_<architecture>
After compiling, you will find the application executables in myhello/objs/
<architecture>.
6. Connect to the Wind River Linux target (using telnet, ssh, serial console, connection manager, etc.) and start the subscriber application, HelloWorld_subscriber.
HelloWorld_subscriber
In this shell, you should see that the subscriber is waking up every 4 seconds to
print a message:
HelloWorld subscriber sleeping for 4 sec...
HelloWorld subscriber sleeping for 4 sec...
HelloWorld subscriber sleeping for 4 sec...
7. Connect to the Wind River Linux target and start the publisher application,
HelloWorld_publisher.
HelloWorld_publisher
In this second (publishing) shell, you should see:
Writing HelloWorld, count 0
Writing HelloWorld, count 1
Writing HelloWorld, count 2
6-2
HelloWorld subscriber sleeping for 4 sec...
msg: “Hello World! {0}“
HelloWorld subscriber sleeping for 4 sec...
msg: “Hello World! {1}“
HelloWorld subscriber sleeping for 4 sec...
6-3
6. Wind River Linux
Systems
8. Look back in the first (subscribing) shell. You should see that the subscriber is
now receiving messages from the publisher:
Getting Started on Wind River Linux Systems
6-4