1
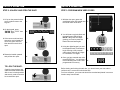
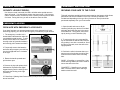
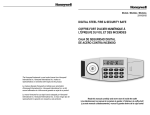
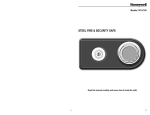
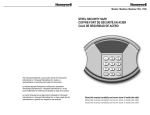
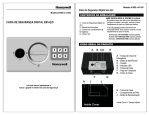
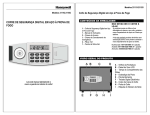
Models
2202 & 2204
DIGITAL STEEL FIRE & SECURITY SAFE
Read this manual carefully and never store it inside the safe!
Models 2202 & 2204
Digital Steel Fire & Security Safe
STEP 1: INSTALL BATTERIES
PACKAGE CONTENTS
1 – Digital Steel Fire & Security Safe
1 – Operation Manual
4 – “AA” Batteries
2 – Emergency Access Keys
1 – Silica Gel Pack
1 – Removable Drawer Tray
SETUP & OPERATION
DO NOT RETURN SAFE TO STORE!
If there are any missing parts or you have
difficulty setting up or operating your safe,
please contact our Consumer Assistance
Department by telephone:
1-877-354-5457 (USA & Canada)
Monday–Friday 7am - 5pm PST
PRODUCT OVERVIEW
FRONT:
A
B
C
D
E
- Safe Door
- Entry Handle
- Keypad Cover
- Door Hinges
- Electronic Digital Keypad
INSIDE DOOR:
A
B
C
D
- Live locking Bolts
- Reset Button
- Dead Lock Bolt
- Door Hinges
For your convenience, we have included 4 “AA” Batteries that provide the power
for the electronic controls. These must be installed before using your safe.
1. The battery compartment is located
behind round digital keypad housing.
To gain access, turn the housing to the
left (counterclockwise) and carefully
pull forward and down.
1.
2. Install the 4 “AA” batteries in the battery
compartment as illustrated on the
inside of the compartment.
2.
3. Re-install battery compartment cover
by inserting into the locking holes and
turning housing to the right (clockwise).
3.
TO REPLACE BATTERIES:
For best results, it is recommended to replace the batteries when they
become weak as shown on the Battery Power Level Indicator or at least once
a year. NOTE: It is NOT RECOMMENDED to use Non-alkaline or
rechargeable batteries.
IMPORTANT: When the batteries need replacing,
the small Red LED lamp will begin to glow. If the
batteries are fully discharged, the digital keypad will
not function and the batteries will need to be
replaced in order to gain access to the safe.
If the batteries are removed or fail, the keypad memory will NOT be erased
and the active programmed code will still work once power has been
restored.
SETUP & OPERATION
SETUP & OPERATION
STEP 2: UNLOCK AND OPEN THE SAFE
STEP 3: PROGRAM NEW USER CODES
1. Lift up on the protective dust
cover to gain access to the
keypad
1.
1. With the door open, press the
small black button (B) located near
the inside center of the door.
1.
2. On the keypad, press
“ENTER” then “7 7 7 7” then
“ENTER” again.
2.
2. You will hear a musical chime and
the small green LED will glow.
NOTE: If the green LED stops
glowing, you need to press the
black button and start again.
2.
3. Using the digital keypad, you now
have approximately 5 seconds to
begin entering a new personal
code using a minimum of 4 digits
to a maximum of 16 digits.
3.
4. Once you have entered new code,
press ENTER key. You will hear a
chime indicating new code is now
programmed into memory.
4.
3. If the correct code has been
entered, a musical code will
chime, the green LED will
blink and the lock will click
open.
4. Rotate the handle upwards
and pull the door open.
3.
4.
TO LOCK THE SAFE:
Carefully close the door and
rotate the handle downwards.
Safe is now in locked position
and security code will need to
be re-entered to open.
Before closing and locking the safe door, you should enter your new code to
confirm that it is correct and unlocks the safe.
For future reference, your new code should be recorded and placed in a secure
location away from the safe.
SECURITY FEATURES
PERMANENT INSTALLATION
SECURITY LOCKOUT PERIOD:
SECURING YOUR SAFE TO THE FLOOR
If an incorrect code is entered, the LED’s will blink and a special two-tone
alarm will sound. You should then re-enter the proper code. If an incorrect
code is entered 4 times, the safe will enter a security lockout period of about
5 minutes. During this time, you will not be able to enter the safe.
This safe includes a special knockout insert located on the bottom which allows
permanent and secure installation to the floor. Mounting hardware is not
included and depending on the type floor (Concrete or wood) it should be
purchased separately from your local retailer.
EMERGENCY ACCESS
OPEN SAFE WITH EMERGENCY ACCESS KEY
If you have forgotten your personal access code or the electronic lock is not
functioning properly, you can use the Emergency Override Key to gain access.
1. The emergency override lock is
located behind the batteries under the
round digital keypad housing. To gain 1.
access, lift the dust cover, rotate the
housing to the left (counterclockwise)
and carefully pull it forward and down.
2. Temporarily remove the batteries
2.
and Insert the emergency override key
into the lock (K) and turn it clockwise
to the right.
3. Rotate the handle upwards and
pull the door open.
4. Remove the key and replace the 4AA batteries. Reposition the digital
keypad housing into the locking holes
and rotate the housing to the right
(clockwise).
3.
4.
5. Follow Step 3 (Setting New Personal Entry Code) to re-set your code and
test as instructed.
1. Open the safe and remove all the
contents (including any shelves if included
with safe) and locate the cap in the center
of the safe floor. Using pliers, remove the
cap by turning counter clockwise (left).
1.
2. To remove the plug you must carefully
2.
lay the safe down on the back and remove
it by pushing it out with a screwdriver. Once
the plug is removed, return the safe to the
upright position.
3. Position the safe in the area where you
want to secure it and using a marking pen,
mark the exact location of the mounting
hole.
WOOD - If installing on a wood floor, a lag
screw and large washer should be used to
secure the safe to the floor.
CONCRETE - If installing on a concrete
slab, a concrete insert, screw and large
washer should be used.
3.
SAFE SERIAL NUMBER
LIMITED WARRANTY
LH Licensed Products, Inc., (“LHLP, Inc.”) warrants that for a period of seven (7) years from the date of
purchase, this product will be free from structural or mechanical defects resulting from materials or
workmanship. LHLP, Inc., at its sole option and as the purchaser’s sole remedy under this warranty, will
repair or replace this product or any component of the product found to be defective during the warranty
period. Replacement or repair will be made with a new or remanufactured product or component. If the
product is no longer available, replacement may be made with a similar product of equal or greater value.
THIS IS YOUR EXCLUSIVE WARRANTY.
Whenever contacting our Consumer
Assistance Department, you will need to
provide them with the serial number of your
safe. The serial number tag is located either
on the lower right front or lower front right of
the safe.
This warranty is only valid for the original retail purchaser from the date of initial retail purchase and is not
transferable. You must keep the original sales receipt. Proof of purchase is required to obtain warranty
service.
ORDERING NEW KEYS
If a key is lost or you would like additional keys, you must first contact our
Consumer Assistance Department to verify ownership.
• Safe Serial Number
• Number of keys requested
• Name / Address / Telephone
• E-mail address if available
You need to
provide the
following:
To order by telephone, call us toll-free at: 1-877-354-5457 (USA & Canada)
Monday - Friday / 7am - 5pm PST
After speaking with a representative you Consumer Assistance Dept.
may order keys via mail by sending the LH Licensed Products, Inc.,
above information along with a 860 East Sandhill Avenue,
check or money order for $12.00 (U.S. Carson, CA 90746 USA
funds) to:
We do accept Visa and MasterCard payments for orders received by
telephone. Express Delivery available for additional charge.
Subject to change without prior notification.
Contact us by telephone (toll-free) at:
This warranty does not apply to the finish on the product. This warranty does not cover normal wear and
tear of parts or damage resulting from any of the following: negligent use or misuse of the product, use
contrary to the operating instructions, disassembly, repair or alteration by anyone other than LHLP, Inc. or
an authorized service center, improper installation, or exposure to extremes of heat or humidity. Further,
the warranty does not cover Acts of God, such as fire, flood, hurricanes and tornadoes.
LHLP, Inc. shall not be liable for any incidental or consequential damages caused by the breach of any
express or implied warranty or otherwise relating to the sale of this product. LHLP, Inc. is also not
responsible for: costs associated with removing or installing the product; damage or loss of the contents of
the product; nor for the unauthorized removal of the contents; or damages incurred during shipment.
THE ABOVE WARRANTY IS IN LIEU OF ALL OTHER WARRANTIES, EXPRESS OR IMPLIED,
INCLUDING ANY WARRANTIES OF MERCHANTABILITY OR FITNESS FOR A PARTICULAR
PURPOSE, AND LHLP, INC. DISCLAIMS ANY AND ALL OTHER COVENANTS AND WARRANTIES.
Except to the extent prohibited by applicable law, any implied warranty of merchantability or fitness for a
particular purpose is limited in duration to the duration of the above warranty period. Some states,
provinces or jurisdictions do not allow the exclusion or limitation of incidental or consequential damages or
limitations on how long an implied warranty lasts, so the above limitations or exclusion may not apply to
you. This warranty gives you specific legal rights, and you may also have other rights that vary from state
to state, or province to province, or jurisdiction to jurisdiction.
LIFETIME AFTER-FIRE REPLACEMENT GUARANTEE
If this Honeywell UL classified fire resistant product was purchased from LH Licensed Products, Inc.
(“LHLP”) and is damaged by fire at any time while still owned by you (the original owner), LHLP will ship a
free replacement if you send the following to Customer Service, LH Licensed Products, Inc., 860 E.
Sandhill Ave., Carson, CA 90746 USA:
CONSUMER ASSISTANCE
Contact us by mail at the following
address:
LHLP, Inc. dealers, service centers, or retail stores selling this product do not have the right to alter, modify
or in any way change the terms and conditions of this warranty.
Consumer Assistance Dept.
LH Licensed Products, Inc.,
860 East Sandhill Avenue,
Carson, CA 90746 USA
1-877-354-5457
(USA & Canada)
Monday–Friday
7am - 5pm PST
1. Your name, mailing address, email address, and phone number with area code;
2. A description of the fire, the model number and a photo of the burned unit, and a copy of the report from
the fire department, insurance or police.
Freight on the replacement unit is not included in the guarantee and must be paid by the consumer. If an
identical product is no longer available, LHLP will provide a similar unit from its current product line. LHLP
is not responsible for any loss or damage to the contents of the safe.
The Honeywell trademark is used under license from Honeywell
International inc. Honeywell International inc. makes no
representations or warranties with respect to this product.