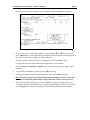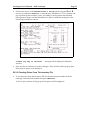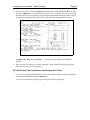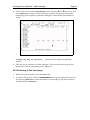
1
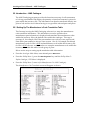
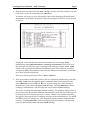
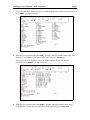
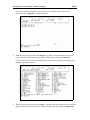
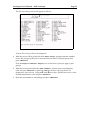
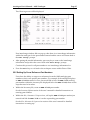
Autologue User’s Manual – AMS Catalog
Page i
Table Of Contents
22. Introduction – AMS Catalogue ....................................................................................... 1
22.1 Setting Up The Manufacturer’s Code Translation Table ........................................ 1
22.2 Accessing The Catalogue ............................................................................................... 3
22.3 Looking Up Information Within The Catalogue....................................................... 3
22.3.1 Selling A Part From The Catalogue .................................................................... 8
22.3.2 Checking A Manufacturer’s Price....................................................................... 10
22.3.3 Checking Prices From The Inventory File......................................................... 11
22.3.4 Checking The Part Number Interchanges For A Part ..................................... 12
22.4 Performing A Part Interchange ..................................................................................... 13
22.5 Setting Up Cross Reference Part Numbers................................................................. 15
Revision 3/02
Version 7.1
Autologue User’s Manual – AMS Catalogue
Page 1
22. Introduction – AMS Catalogue
The AMS Cataloging program provides the functions necessary for all countermen
to look up part numbers and display the quantity on hand and customer’s prices for
parts within the inventory file. This information can then be transferred directly into
point of sale and invoices without having to re-type all the selected parts and prices.
22.1 Setting Up The Manufacturer’s Code Translation Table
The first step in using the AMS Cataloging software is to setup the manufacturer
code translation information. This information is used to prioritize how
manufacturer part information is displayed and translates the manufacturer codes
within the inventory file to the default codes within the catalogue. This step is
necessary if, for example, Wix Filter part numbers are to always come up first and
Fram Filter part numbers to always come up next. Also if, for example, the default
manufacturer code for Wix is WIX and manufacturer code within the inventory file
for Wix is WXF, the user would then have to setup the manufacturer code within the
inventory file within this table for each group of parts.
Below are the steps to setting up the translation table information:
•
From the Autologue Main Menu, enter 21 and press <Return>.
•
From the Utility Menu 1, press the <Backspace> key until the Utility Menu 5 –
Update Catalogue / EPS Menu is displayed.
•
From the Utility Menu 5, enter 3 (Set Manufacturers For AMS Catalogue).
The Manufacturer Code Translation screen will appear as shown:
Autologue User’s Manual – AMS Catalogue
•
Page 2
With the cursor positioned at the Part Group: prompt, enter the number to the left
of the Part Group to be setup and press <Return>.
A window will now pop up in the middle of the screen displaying all the different
manufacturer information contained within the catalogue for the Part Group selected
as shown:
Displayed are the default three character manufacturer code (Orig Code),
manufacturer name (Manufacturer), Catalog Information such as the year
the catalogue was released, type of catalogue and catalogue number, Your Code
which is the original three character manufacturer code until otherwise specified,
and priority (Pri) which defines what order the different manufacturer’s parts that
are looked up will be displayed.
The cursor will be positioned on the 1st Your Code line.
•
If the part numbers within the inventory file use a different manufacturer code than
the Orig Code, enter the manufacturer contained within the inventory file and
press <Return> or use the and arrow keys to change any of the displayed
manufacturer codes under the Your Code heading. Pressing <Return> without
changing a manufacturer code will place the cursor under the Pri heading.
The cursor will be positioned under the Pri heading. The numbers displayed show
the priority order in which the different manufacturer’s parts that are looked up will
be displayed with 1 being first priority on down. If there is no number entered in
the priority, the program will not display the parts for this manufacturer. Use the
and arrow keys to change any of the displayed priority numbers under the Pri
heading. Pressing <Return>, without changing a priority number, will place the
cursor on the next line under the Your Code heading.
Autologue User’s Manual – AMS Catalogue
•
Page 3
Once all manufacturer codes and priority numbers have been setup, press the <F10>
key to save the screen information.
The screen will now display the first Manufacturer Code Translation screen. Repeat
this process for all Part Groups! Use the Page and <Shift> Page keys to scroll
forward and backward a whole screen.
•
Press the <F11> key to exit the program when finished.
22.2 Accessing The Catalogue
•
From the Autologue Main Menu, enter 1 (Point of Sale) and press <Return>.
•
The point of sale program will be loaded and the COUNTERMAN CODE prompt will
now appear.
•
With the cursor positioned at the COUNTERMAN CODE prompt, enter a counterman
code (A - 9) and press <Return>.
•
With the cursor positioned at the ENTER CUSTOMER NAME OR NUMBER prompt,
enter the customer’s name or customer number and press <Return>.
•
Within the open workspace, press the <F16> key.
A window will pop-up, select the AMS CATALOGUE menu option using the arrow
keys and pressing <Return> or enter the number corresponding to the selection
desired and press <Return>.
The Main Catalogue screen will appear as follows:
22.3 Looking Up Information Within The Catalogue
The cursor will now be positioned at the Year: prompt.
Autologue User’s Manual – AMS Catalogue
•
Page 4
If the Car Code number is known, press the arrow key to position the cursor at the
Car Code: prompt, enter the Car Identification Code and press <Return>.
This will bypass having to enter the year, make, model and engine size information.
The cursor will then be positioned next to the Group: field.
•
To display a choice list window of the last 10 Car Identification Codes called up for this
customer, press the <F3> (Last Car) key.
A window will pop up displaying a list of the last 10 Car Codes called up for this
particular customer number as shown:
•
Position the cursor on the desired Car Code using the and arrow keys and press
<Return>, or simply enter the letter that is next to the desired Car Code.
This will bypass having to enter the year, make, model and engine size information.
The cursor will then be positioned next to the Group: field.
A few lines down the screen, the allowable year range will be displayed. Only enter
numbers within the range displayed.
•
With the cursor positioned at the Make: prompt, enter the year using either of two
ways: 1999 or just 99 and press <Return>.
Autologue User’s Manual – AMS Catalogue
Page 5
The screen will now display a list of Car Makes and the cursor will now be positioned
at the Make: prompt as shown:
•
With the cursor positioned at the Make: prompt, enter the number next to the make
desired or enter the first few letters of the make and press <Return>.
The screen will now display a list of Car Models and the cursor will now be
positioned at the Model: prompt as shown:
•
With the cursor positioned at the Model: prompt, enter the number next to the
model desired or enter the first few letters of the model and press <Return>.
Autologue User’s Manual – AMS Catalogue
Page 6
The screen will now display a list of Engine Sizes and the cursor will now be
positioned at the Engine: prompt as shown:
•
With the cursor positioned at the Engine: prompt, enter the number next to the
engine desired or enter the first few letters of the engine and press <Return>.
A list of Part Groups will now be displayed and the cursor will be positioned at the
Group: prompt as shown:
•
With the cursor positioned at the Group: prompt, enter the number next to the part
group desired or enter the first few letters of the part group and press <Return>.
Autologue User’s Manual – AMS Catalogue
Page 7
Press the Page and <Shift> Page keys to see the next or previous page of Part
Groups.
•
A list of Part Types will now be displayed and the cursor will be positioned at the
Part: prompt as shown:
•
With the cursor positioned at the Part: prompt, enter the number next to the part
type desired or enter the first few letters of the part type and press <Return>.
Press the Page and <Shift> Page keys to see the next or previous page of part
types.
Note: This field allows the user to jump directly to specific types of parts within a
Part Group. It saves time from having to scroll through many pages of part
numbers for a Part Group!
Autologue User’s Manual – AMS Catalogue
Page 8
A list of parts, with the manufacturer names beside them, possibly footnotes, and
possibly quantity on hands and list and selling price information (if the part number
exists within the Inventory File), will now be displayed and the cursor will be
positioned at the Sell: prompt as shown:
Note: The sell price shown is according to the customers exception and standard
pricing matrix setups!
Users have the ability to see the Alternate Manufacturer’s parts when looking up
parts. To see the Alternate Manufacturer’s part numbers, press the <F3> (Alt Mfrs)
key when parts information is listed. The screen will now display all the Alternate
Manufacturer’s parts information on the screen. Alternate Manufacturer’s are those
that were setup without a priority number when setting up the Manufacturer’s Code
Translation Table through the Utility Menu. Pressing the <F3> (Alt Mfrs) key again
will bring back the original parts information listed.
22.3.1 Selling A Part From The Catalogue
•
To sell a part listed and with the cursor positioned at the Sell: prompt, enter the
number next to the part number or enter the first few characters of the part number
and press <Return>.
Autologue User’s Manual – AMS Catalogue
Page 9
A Select Option window will pop up and 4 options will be displayed as shown:
•
Position the cursor on the Sell part option using the and arrow keys and
press <Return>, or enter S and the part number will be selected to be brought back
into point of sale upon exiting out of the catalogue.
The part number selected will now be displayed next to the Sell: field.
Continue this process until all the desired parts have been selected.
Press the Page and <Shift> Page keys to see the next or previous page of part
numbers.
•
To get back to the Part: prompt, press the
•
Pressing the <F1> (Restart) key takes the user back to the Year: prompt.
arrow key.
Note: Pressing the <F2> key will print the parts information on the screen out to
the system or terminal printer that is setup within the Flexible Printing screen.
•
After selecting all desired parts, press the <F11> (Exit) key to return to the open
workspace and the first part that was selected will be displayed and the cursor will
be in the QTY field. Enter the quantity to sell and then extend the part number.
Autologue User’s Manual – AMS Catalogue
Page 10
This process will be continued until all parts, that were selected, are extended. A
line will then be appended to the workspace showing the year, make, model, engine
size and car code number as shown:
22.3.2 Checking A Manufacturer’s Price
•
To see the manufacturer prices for a part listed and with the cursor positioned at the
Sell: prompt, enter the number next to the part number and press <Return>.
A Select Option window will pop up and 4 options will be displayed.
Autologue User’s Manual – AMS Catalogue
•
Page 11
Position the cursor on the Manufacturer’s Price option using the and
arrow keys and press <Return>, or enter P and a Manufacturer’s Price window will
pop up showing the customer’s price, according to the exception and standard
pricing matrix setups, and the manufacturer’s prices within the catalogue for the
selected part number as shown:
A Press any key to continue... message will be displayed within the
window.
•
Press any key to continue to use the catalogue. If the window didn’t pop up, then
there were no prices to be displayed.
22.3.3 Checking Prices From The Inventory File
•
To see the prices from the Inventory File for the selected part number from the
catalogue, enter the item number and press <Return>.
A Select Option window will pop up and 4 options will be displayed.
Autologue User’s Manual – AMS Catalogue
•
Page 12
Position the cursor on the Inventory Price option using the and arrow keys
and press <Return>, or enter N and an Inventory Price window will pop up showing
the customer’s price, according to the exception and standard pricing matrix setups,
and the prices within the Inventory File for the selected part number as shown:
A Press any key to continue... message will be displayed within the
window.
•
Press any key to continue to use the catalogue. If the window didn’t pop up, then
there were no prices to be displayed.
22.3.4 Checking The Part Number Interchanges For A Part
•
To see the Interchange part numbers for the selected part number from the catalogue,
enter the item number and press <Return>.
A Select Option window will pop up and 4 options will be displayed.
Autologue User’s Manual – AMS Catalogue
•
Page 13
Position the cursor on the Interchange option using the and arrow keys and
press <Return>, or enter I and an Interchange window will pop up showing the
interchange parts and prices within the catalogue for the selected part number as
shown:
A Press any key to continue... message will be displayed within the
window.
•
Press any key to continue to use the catalogue. If the window didn’t pop up, this
means there were no interchanges to be displayed.
22.4 Performing A Part Interchange
•
Within an open workspace, press the <F16> key.
•
A window will pop-up, select the INTERCHANGE menu option using the arrow keys
and pressing <Return> or enter the number corresponding to the menu selection
desired and press <Return>.
Autologue User’s Manual – AMS Catalogue
Page 14
The Part Interchange screen will appear as follows:
A list of Part Groups will now be displayed.
•
With the cursor will be positioned at the Part Group: prompt, enter the number
next to the part group desired or enter the first few letters of the part group and
press <Return>.
Press the Page and <Shift> Page keys to see the next or previous page of part
groups.
•
With the cursor positioned at the Part Number: prompt, enter a manufacturer
code and press <Return> or press the <F2> key to have a pop-up choice list
displayed to choose from. Using the and arrow keys, position the cursor on the
desired manufacturer code and press <Return>.
•
Enter the part number to interchange and press <Return>.
Autologue User’s Manual – AMS Catalogue
Page 15
The following screen will be displayed:
If an interchange window did not pop-up, then there is no interchange information
within the catalogue for the part number entered and the cursor will return back to
the Part Group: prompt.
•
After getting the needed information, press any key to remove the interchange
information and position the cursor back at the Part Group: prompt.
Continue this process for all part numbers to see interchange information for.
•
Press the <F11> key to exit back to the workspace screen within Point of Sale.
22.5 Setting Up Cross Reference Part Numbers
Users have the ability to setup cross-references from the AMS cataloging part
numbers to their own specific part numbers. For example, if the catalogue displays
an ARE-07135 alternator for a car, but would like to have the REB-7135 stocking
part number within the inventory file displayed below the ARE-07135, these are the
steps that need to be taken:
•
Within the Inventory file, create an ARE-07135 part number.
See the Inventory Update section of the user’s manual for detailed instructions on
entering part numbers.
•
Within the Kits, Alternates & Supersessions, call up the ARE-07135 part number just
entered and link the REB-7135 to it as the superseding part number.
See the Kits, Alternates & Supersessions section of the user’s manual for detailed
instructions on setting up!
Autologue User’s Manual – AMS Catalogue
Page 16
Now whenever the catalogue displays the ARE-07135 part number, the REB-7135
will always be the next part number displayed beneath it, as if it were actually in the
catalogue! When the part number is selected within the catalogue, it will be
automatically transferred back to point of sale. The parts can also be linked together
as alternates! Cataloging will display all the alternates below the AMS cataloging
part number in the order they are linked. When selecting one of the alternate part
numbers to be sold, the alternate’s pop up window screen will be displayed within
point of sale. The user can then choose a part to be sold and sell it as normal.