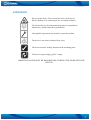
1
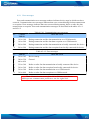
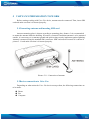
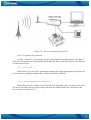
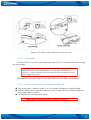
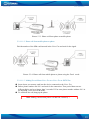
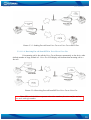
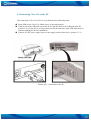
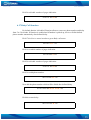
Voice Fax
User Manual
Copyright © 2007 UAB “Teltonika“.
All rights reserved. Reproduction, transfer, distribution or storage of part or all of the contents
in this document in any form without the prior written permission of UAB “Teltonika“is prohibited.
Other products and company name mentioned herein may be trademarks or trade names of
their respective owners...
Last Updated : 20/08/2008
2
Voice Fax
User Manual
Table of Contents
GENERAL SAFETY REQUIREMENTS...........................................................................................................................6
1 ABOUT THE DOCUMENT.............................................................................................................................................8
2 INTRODUCTION.............................................................................................................................................................8
3 PACKAGE CONTENTS..................................................................................................................................................9
4 TECHNICAL CHARACTERISTCS................................................................................................................................9
4.1 Data Transfer.............................................................................................................................................................9
4.2 Mechanical characteristics.......................................................................................................................................10
4.3 Operating characteristics..........................................................................................................................................10
4.4 LED Indication.......................................................................................................................................................11
4.5 LCD messages........................................................................................................................................................11
4.5.1 Startup messages..............................................................................................................................................11
4.5.2 Idle messages...................................................................................................................................................12
4.5.3 Fax transmission messages..............................................................................................................................12
4.5.4 Fax reception messages....................................................................................................................................13
4.5.5 General, voice call transmission and reception messages................................................................................14
4.5.6 Error messages.................................................................................................................................................15
5 VOICE FAX PREPARATION TO WORK....................................................................................................................16
5.1 Connecting antenna and inserting SIM card ...........................................................................................................16
5.2 Devices connection to Voice Fax............................................................................................................................16
5.2.1 Trunk mode....................................................................................................................................................18
5.2.1.1 Connecting phone or fax to Voice Fax.....................................................................................................18
5.2.1.1.1 Call examples...................................................................................................................................19
5.2.1.1.1.1 Phone call from phone to a mobile phone using mode.............................................................19
5.2.1.1.1.2 Phone call from mobile phone to phone...................................................................................20
5.2.1.1.1.3 Making Fax call from Voice Fax to a Voice Fax or PSTN Fax...............................................20
5.2.1.1.1.4 Receiving Fax call from PSTN or Voice Fax to Voice Fax.....................................................21
5.3 Connecting Voice Fax to the PC..............................................................................................................................23
5.4 Connection of the power supply..............................................................................................................................24
5.5 THE START...........................................................................................................................................................25
5.6 Entering the PIN code.............................................................................................................................................25
5.6.1 Manual PIN code entering...............................................................................................................................25
5.6.2 Automatic PIN code entering...........................................................................................................................25
6 Voice Fax Service menu..................................................................................................................................................26
6.1 Interval Between Dial And Connection..................................................................................................................28
6.2 Prefix.......................................................................................................................................................................28
6.3 GPRS Inactivity Timeout........................................................................................................................................29
6.4 Caller ID Display ...................................................................................................................................................29
6.5 Calling line identification restriction......................................................................................................................29
6.6 Call Duration Indicating Signal..............................................................................................................................30
6.7 Changing Service menu password..........................................................................................................................31
6.8 PIN Code Entering Control.....................................................................................................................................31
6.9 Prefix Blocking.......................................................................................................................................................31
6.9.1 Entry Supplement............................................................................................................................................32
6.9.2 Delete Entry.....................................................................................................................................................32
6.10 Number Blocking..................................................................................................................................................33
6.10.1 Entry Supplement...........................................................................................................................................33
6.10.2 Delete Entry...................................................................................................................................................34
6.11 Set Number of Rings.............................................................................................................................................34
6.12 Set number of tries................................................................................................................................................34
6.13 Set delay between retries......................................................................................................................................35
6.14 Turning on/off allways answer as fax...................................................................................................................35
6.15 Turning on/off delete facsimile from memory after retries..................................................................................36
6.16 Show incomming number of pages......................................................................................................................36
6.17 Baby Call function ..............................................................................................................................................37
6.18 Restore Default Settings.......................................................................................................................................38
7 Manufacturer parameters................................................................................................................................................39
8 Table of Parameters........................................................................................................................................................40
9 ACRONYMS...................................................................................................................................................................41
10 TECHNICAL SUPPORT..............................................................................................................................................41
3
Voice Fax
User Manual
4
Voice Fax
User Manual
ATTENTION
Do not rip the device. Do not touch the device if the device
block is broken or its connecting wires are without isolation.
All wireless devices for data transferring may be susceptible to
interference, which could affect performance.
Only qualified personnel may install or repair this product.
The device is not water-resistant. Keep it dry.
The device must be steadily fastened on the mounting place.
The device requires high
230V voltage.
IMPORTANT NOTES MUST BE READ BEFORE STARTING THE WORK WITH THE
DEVICE!
5
Voice Fax
User Manual
GENERAL SAFETY REQUIREMENTS
You will avoid dangerous situations and harming of yourself if you will follow to these
recommendations. You have to be familiar with the safety requirements before starting using the
device!
To avoid burning and voltage caused traumas, of the personnel working with device, please
follow these safety requirements.
Installation and technical support of the Voice Fax device can
be performed only by a qualified personnel or a person who has
enough knowledge about this device and safety requirements.
Voice Fax device requires 9V
1.12 A constant power supply
source that satisfies all safety requirements listed in LST EN
60950-1 standard.
The PC and power supply source, to which the device Voice
Fax is connected, should satisfy LST EN 60950 - 1 standard.
The device Voice Fax can be used on first (Personal Computer)
or second (Notebook) computer safety class.
The phone or fax connected to the device must satisfy all safety
requirements listed in LST EN 60950-1 standad.
Do not mount or serve device during the thunderbolt.
To avoid mechanical damages of the device it is recommended to transport the Voice Fax
device packed in damage-proof pack. While using the device, it should be placed so, that its
indication LED and LCD would be visible as they inform in which working mode the device is and
if it has any working problems.
For Voice Fax device‘s network capacity working environment has big influence. If
the device starts working insufficiently only qualified personnel may repair this product. We
recommend to forward it to repair centre or to manufacturers. No exchangeable parts inside of the
device.
6
Voice Fax
User Manual
In the installation place and supply circuits protective devices (bipolar release device)
should be tooled up which will protect from short-circuit and earth false. The power of connected
device should satisfy power of release device. The interstice between contacts should be no less
than 3mm. Power supply network should be installed near device on easy accessible place.
Protection against overcurrents, short circuits and earth faults shall be provided as a
part of the building installation. Two pole device which disconnects related devices simultaneously
must be installed in the building to avoid grounding faults. To disconnect the device plug off
AC/DC power adapter from the wall outlet or power strip. The interstice between contacts should
be no less than 3mm.
Picture 1.Connection scheme of Voice Fax device
7
Voice Fax
User Manual
Mounting of the device
Disconnect device from power supply before mounting to avoid
voltage effect!
Device service
If the device starts working insufficiently only qualified personnel may repair this product.
We recommend to forward it to repair centre or to manufacturers. No exchangeable parts inside of
the device.
1 ABOUT THE DOCUMENT
In this document Voice Fax device technical characteristics are presented, also it is
described how to connect Voice Fax device to other devices and how to configure it..
Voice Fax device is being continuously improved: working quality, adding specific
requirements from the clients. Therefore, a Firmware update procedure is created.
2 INTRODUCTION
Voice Fax device is created correspondingly to up-to-date telecommunications and electronic
technologies.
Voice Fax emulates the line. Phone calls or facsimile messages in GSM network can be
received with the connected to the device analogue phone or fax device.
Voice Fax device can work as a GSM modem that can create pathway to Internet, exchange
data using GPRS data bearer.
It also gives a user exclusive possibility to change parameters using keybord of localy
connected device by entering Voice Fax Service menu or with a connected PC with special Voice
Fax Configuration Tool software.
8
Voice Fax
User Manual
3 PACKAGE CONTENTS
Voice Fax device is delivered to the client in cardboard box with all required supplements
necessary for work. Package consists of:
●
●
●
●
●
●
●
Cardboard box.
Voice Fax device.
USB A USB mini B connection cable.
AC/DC power supply adapter.
CD with User Manual and drivers.
External GSM antenna.
Components of mounting.
Note: the manufacturer does not provide SIM card, which is
necessary for connecting to the GSM network! SIM card can be obtained
from your GSM operator!
If any of the components is missing from your package, please contact manufacturer’s
representative or salesperson.
4 TECHNICAL CHARACTERISTCS
4.1Data Transfer
Voice Fax device supports the following data bearers used in GSM network. Which data
channel is used depends on your GSM operator and data transfer capacity in chosen GSM network:
● GPRS class 10:
o Full PBCH support.
o MS class B.
o Coding scheme 1-4.
Voice Fax device also has an incoming number detection function. A ES300778-1/2 standard
and MDMF format is used for it.
9
Voice Fax
User Manual
4.2Mechanical characteristics
Voice Fax device case is made of plastic. External view and measurements of the device are
shown in picture 4.2.1.
Picture 4.2.1. External view and measurements of the device
4.3Operating characteristics
The device is powered from a 9 V (DC) power supply. The PC to which the Voice Fax device
is connected must have a USB interface corresponding to USB 1.1 or USB 2.0 standards. Electrical
parameters of the device are shown in Table 4.3.1.
Table 4.3.1. Electrical characteristics of Voice Fax
Parameter
Power Supply Voltage
Average Power consumption
Current Consumption when idle
Current Consumption in voice/fax
mode
Current Consumption in GPRS
Value
+9 - +13
1.2 - 7.2
120 - 180
300 - 800
400 - 800
Units
V
W
mA
mA
mA
Operating conditions and weight of the device are shown in Table 4.3.2 .
Table 4.3.2. Operating conditions and weight
Parameter
Value
Weight
200 ± 10
Operating Temperature
0 - +55
Storage Temperature
-20 - +70
Units
g
ºC
ºC
Note: If the settings outreach the characteristics given above, the device
can be damaged!
10
Voice Fax
User Manual
4.4 LED Indication
Voice Fax has one LED for device status indication. It is located at the top part of the device.
The indication statuses of the device are described in Table 4.4.1.Table 4.4.1. Device status
description
Table 4.4.1. Device status description
Status
Description
Power LED is on
Power supply on
Error LED blinking
Device is awaiting for PIN code
Error LED blinking with
pauses
The number of blinks shows the number of
unsent/unprinted pages
Error LED on
No SIM card, wrong PIN code or handset off hook
during startup.
4.5 LCD messages
Voice Fax has LCD indicator which displays device status messages. The status messages of
the device are described below .
4.5.1
Startup messages
Table 4.5.1.1. Startup messages
DESCRIPTION
No.
LCD MESSAGE
1
STARTING
PLEASE WAIT
2
INSERT SIM CARD
AND RESTART DEVICE
3
ENTER PIN
4
INCORRECT PIN
ENTER CORRECT PIN
5
PIN ACCEPTED
This message appear if correct PIN code is entered.
7
REPLACE
THE HANDSET
The handset is picked up during device startup. Replace the
handset.
8
EMERGENCY CALL
number
If emergency number 112 or 911 is dialed during ENTER PIN
or INCORREC PIN, ENTER CORRECT PIN message.
9
ERROR
###
Restart device if ERROR message was displayed. If the same
ERROR message number occurs constantly contact support.
Device is starting. Startup lasts 15-20 seconds.
The SIM card is not inserted. Insert SIM card and restart
device.
PIN code required. After pin code is entered, confirmation
message will appear.
Wrong pin code entered or automatic PIN code entering
function is enabled and incorrect PIN code saved in memory.
11
Voice Fax
User Manual
4.5.2
No.
Idle messages
LCD MESSAGE
1
operator
2
Table 4.5.2.1. Idle messages
DESCRIPTION
Usual idle LCD screen where “operator” is home network
operator name
Bar indicates signal strength.
3
# OF # PAGES
UNSENT
Shows unsent number of pages if option “delete after tries” is
disabled. To resend press ###.
4
# OF # PAGES
UNPRINTED
Shows unprinted number of pages if option “delete after tries”
is disabled. To print press ###.
5
NO NETWORK
If signal strength is too low or antenna is disconnected.
EMERGENCY CALLS ONLY
If ### pressed after the message telling that there was unsent
pages in memory.
6
RESENDING
STORED FAX
7
PRINTING
FAX
If ### pressed after the message telling that there was
unprinted pages in memory.
8
NO SAVED DATA
IN MEMORY
If there is no saved data in memory and ### is pressed.
9
DELETING
STORED FAX
4.5.3
If there is saved data in memory and *** is pressed.
Fax transmission messages
Table 4.5.3.1. Fax transmission messages
DESCRIPTION
No.
LCD MESSAGE
1
CALLING
number
2
CALLING TO
LOCAL FAX
Call in progress to locally connected fax device.
3
CONNECTING
Local or remote fax device answered and connection in
progress.
4
SENDING # OF #
5
NO ANSWER
If destination fax device is not answering.
6
# OF #
PAGES SENT
Shows number of sent pages of total amount.
Message shows that call in progress to the destination
“number”.
Shows outgoing page number of total number of pages. Bar
shows percentage of set page.
12
Voice Fax
User Manual
7
NEXT RETRY
IN ## SECONDS
8
MAX NUMBER OF
RETRIES REACHED
When maximum number of retries is reached.
9
TRANSMISSION OK
Message appears after successful transmission.
10
CANCELING FAX
TRANSMISSION
11
NUMBER OR PREFIX
BLOCKED
12
COMMUNICATION
ERROR ###
Restart device if ERROR message was displayed. If the same
ERROR message number occurs constantly contact support.
13
ERROR
###
Restart device if ERROR message was displayed. If the same
ERROR message number occurs constantly contact support.
4.5.4
Informs about delay length after unsuccessful try before next
retry.
If *** is pressed fax transmission will be canceled.
If prefix or number blocking option is enabled and entered
prefix or number corresponds to dialed number or prefix.
Fax reception messages
Table 4.5.4.1. Fax reception messages
DESCRIPTION
No.
LCD MESSAGE
1
INCOMMING
FAX CALL
2
INCOMMING LOCAL
FAX CALL
3
CONNECTING
Device has answered and connection in progress.
4
RECEIVING
PAGE #
Shows number of pages is being received.
5
NOT ENOUGHT ROOM
FOR PAGE #
6
RECEPTION OK
7
COMMUNICATION
ERROR ###
Restart device if ERROR message was displayed. If the same
ERROR message number occurs constantly contact support.
8
ERROR
###
Restart device if ERROR message was displayed. If the same
ERROR message number occurs constantly contact support.
Displays that incoming call is a fax call.
Displays that incoming fax call is from locally connected fax
device.
Reports that there is no room in device memory for current
page.
Message appears after successful reception.
13
Voice Fax
User Manual
4.5.5
No.
General, voice call transmission and reception messages
Table 4.5.5.1. General, voice call transmission and reception messages
LCD MESSAGE
DESCRIPTION
Displays that outgoing voice call and shows dialed number.
1
CALLING
number
2
INCOMMING
VOICE CALL
Displays that incoming call is a voice call.
3
INCOMMING
DATA CALL
Incoming call is a data call. Device cannot answer to this type
of call when not in USB mode. Device will hang up.
3
UNDETECTED
CALL TYPE
Displays that incoming call is undetected. Device will hang
up.
5
UNKNOWN
CALL TYPE
Displays that incoming call is unknown. Device will hang up.
NUMBER OR PREFIX
BLOCKED
If prefix or number blocking option is enabled and entered
prefix or number corresponds to dialed number or prefix.
6
COMMUNICATION
ERROR ###
Restart device if ERROR message was displayed. If the same
ERROR message number occurs constantly contact support.
7
ERROR
###
Restart device if ERROR message was displayed. If the same
ERROR message number occurs constantly contact support.
8
USB
MODE
9
CONFIGURATION
MODE
10
GPRS
MODE
Message appear after GPRS connection is established
successfully.
11
MAIN MENU
Message shows current menu item after service menu
password is entered.
12
INCORRECT
MENU ITEM
Displays that incorrect menu item was chosen.
If USB cable connected to the device and PC.
Displays that configuration tool is connected to the device.
14
Voice Fax
User Manual
4.5.6
Error messages
Error and communication error message numbers indicates device stage in which error have
occurred. Communication error messages indicates that error occurred during fax data transmission
or reception. Error messages indicates that error occurred during startup, before or after fax data
transmission or reception. Error and communication messages are described in the tables 4.5.6.1.
and 4.5.6.2.
Table 4.5.6.1. Communication error messages
DESCRIPTION
No.
COMM.
ERROR
1
101 to 140
During connection and fax data transmission over GSM network.
2
141 to 200
During connection and fax data data reception over GSM network.
3
201 to 240
During connection and fax data transmission to locally connected fax device.
4
241 to 280
During connection and fax data reception from locally connected fax device.
Table 4.5.6.2. Error messages
DESCRIPTION
No.
ERROR
1
301 to 305
Device startup.
2
306 to 320
400 to 420
General.
3
321 to 340
Before or after fax data transmission to locally connected fax device.
4
341 to 360
Before or after fax data reception from locally connected fax device.
5
361 to 380
Before or after fax data transmission over GSM network.
6
381 to 400
Before or after fax data reception over GSM network.
Note: Communication errors from 101 to 280 may occur due to
GSM operator communication problems or too low signal level.
15
Voice Fax
User Manual
5 VOICE FAX PREPARATION TO WORK
Before starting working with Voice Fax device, antenna must be connected. Then, insert SIM
card and make sure that it is inserted properly.
5.1Connecting antenna and inserting SIM card
Antenna mounting place is chosen according to mounting place features. It is recommended
to mount the antenna inside the building. If because of network conditions antenna is to be mounted
outside, it is necessary to set antenna ground and quick-acting security implement against lightning.
Antenna is mounted using the standard SMA connector. SIM card must be inserted as is shown in
picture 5.1.1 and make sure that it is inserted properly.
Picture 5.1.1. Connection of antenna
5.2Devices connection to Voice Fax
Depending on what action the Voice Fax device must perform, the following connections are
to be made:
● Phone
● Fax
● Computer.
16
Voice Fax
User Manual
Picture 5.3.1 Devices connection to Voice Fax
Voice Fax operates in Trunk mode.
In Trunk mode Voice Fax emulates the line. With connected analogue phone, voice phone
calls can be made and received through the GSM network. With connected fax device fax calls can
be made and received.
5.2.1
Trunk mode
In this mode Voice Fax device emulates the analogue line. Depending upon needs, phone can
be connected to it through a standard RJ11 connector marked as PHONE.
5.2.1.1 Connecting phone or fax to Voice Fax
Module generates the voltages necessary for the call. The phone or fax connected to the Voice
Fax device can make and receive incoming calls from the GSM network. The connection to the
device is shown in picture 5.3.2.
17
Voice Fax
User Manual
Picture 5.3.2. Phone or Fax connection to the Voice Fax
5.2.1.1.1 Call examples
To make a voice or fax call, connect the phone to the Voice Fax, insert the SIM card and plug
the power supply.
Note: Calling mode may not work in the following situations: a)
when USB cable is inserted into davice; b) when fax transmition in
progress; c) when working in Service menu; d) when working with Voice
Fax Configuration Tool
Wait until the device gets ready for work. Enter PIN code of the SIM card if required.
5.2.1.1.1.1 Phone call from phone to a mobile phone using mode
● Pick up the phone, connected to the Voice Fax, handset. Dialing tone should be heard.
● Dial the number and wait for the connection. Time period between two different digits can
be no longer than 3 seconds.
● To terminate the call, hang up the phone.
Note: Making international phone call dial 00, instead of +
18
Voice Fax
User Manual
Picture 5.3.3. Phone call from phone to mobile phone
5.2.1.1.1.2 Phone call from mobile phone to phone
Dial the number of the SIM card inserted in the Voice Fax and wait for the signal.
Picture 5.3.4. Phone call from mobile phone to phone using the Trunk mode
5.2.1.1.1.3 Making Fax call from Voice Fax to a Voice Fax or PSTN Fax.
● Insert sheets you want to send into fax device connected to the Voice Fax.
● Before phone number dial *01* and wait for the connection. Time period between two
different digits can be no longer than 3 seconds. If You enter phone number without *01* in
the begining, voice call will be made.
● To terminate the call, hang up the phone.
Note: Making international phone call dial 00, instead of +
19
Voice Fax
User Manual
Picture 5.3.3. Sending Fax call from Voice Fax to a Voice Fax or PSTN Fax.
5.2.1.1.1.4 Receiving Fax call from PSTN or Voice Fax to Voice Fax
If incomming call is fax call the Voice Fax will answer automaticly as fax device after
defined number of rings, default is 2. Voice Fax LCD display will indicate that incoming call is a
fax call.
Picture 5.3.4. Receiving Fax call from PSTN or Voice Fax to Voice Fax
Note: SIM card should have separate subscriber numbers for voice and fax and may
not work with sigle number.
20
Voice Fax
User Manual
●
Note: The fax data transmition is divided into two stages. Voice Fax receives
fax data into internal memory and after reception is succsessfull it transmits data
to localy connected or remote fax device.
●
If device fails to transmit data it automaticly makes up to (default) three
redials with (default) 30 second delays and if it fails, by default Voice Fax deletes
fax data from internal FLASH memory.
●
This function can be switched off so after unsuccessful number of tries fax
data will stay in nmemory and will be possible to retry fax transmition by picking
up handset and pressing # # # later or even after Voice Fax restart.
●
It is possible that after succsessfull tranmition fax will print 3 same pages.
This means that after fax page there was no confirmation and device
automaticaly retried current page.
●
If option „Delete after tries“ is switched off, unsuccessfull tranmition is
displayed over LCD by showing number of unsent or unprinted pages. To delete
fax data from FLASH memory pick up the handset and press * * * alternatively
every next fax session will overwrite previous fax data in the FLASH.
●
If it is not possible to send or receive fax few times in a row it might be
because of GSM network problems, please wait few minutes and try again.
●
If device not responding please restart device by pressing reset buton on the
back side of the enclosure.
●
If by mistake wrong destination fax number is entered and Voice Fax have
started dialing press *** to stop transmition. If *** will be pressed at the moment
of dialing or at the pause between tries, calling will be terminated and data deleted
from flash immediately. If *** will be pressed at the moment when device is
connecting, sending, calling will be terminated and data deleted from flash after
unsuccessful attemp will be finished.
21
Voice Fax
User Manual
5.3Connecting Voice Fax to the PC
The connection of Voice Fax device is performed in the following order:
● Insert SIM card to Voice Fax. Make sure it is inserted properly.
● Connect one mini USB cable end to the device and the other to the USB port in the PC
(picture 5.4.1). If the device is being connected for the first time, mini USB cable must be
connected during the drivers installation.
● Connect AC/DC power supply source to the supply socket of the device (picture 5.5.1).
Picture 5.4.1. Connection to the PC
22
Voice Fax
User Manual
5.4Connection of the power supply
Voice Fax module uses 9V 1.12 A direct current power supply source which goes with the
package. The connection of the power supply is shown in picture 5.5.1 .
Picture 5.5.1. Connection of the power supply
23
Voice Fax
User Manual
5.5 THE START
When the Voice Fax device is set to work, that is, SIM card inserted, antenna, phone, analog
phone line or PC (depending on needs) and power supply are connected, the Power LED is on and
LCD displays message „STARTING PLEASE WAIT“, that the module is preparing for work. The
initialization can take up to 20 seconds (it is recommended to wait). During that time, the module
checks the SIM card, detects the appropriate GSM network and checks the operating parameters.
When initialization is done, LCD display shows signal strength bar and operator name.
After power on, when USB cable is pluged in, only when LCD display message „USB
MODE“, Voice Fax will enter USB mode. In USB mode it is not possible to make voice or fax
calls.
5.6 Entering the PIN code
There are two possible PIN code entering ways in Voice Fax: manual and automatic.
5.6.1
Manual PIN code entering
If SIM card PIN code request is activated, LCD will show meesage „ENTER PIN“. PIN must
be entered with the help of the phone buttons. If the PIN code entered correctly, a long phone signal
is on the line indicating, that the Voice Fax is ready for work. If the PIN code is entered incorrectly,
LCD message „INCORRECT PIN, ENTER CORRECT PIN“ appear and the phone line become
busy. PIN code can be entered through the Service menu or with Voice Fax Configuration Tools.
5.6.2
Automatic PIN code entering
If SIM card PIN code request is activated, the Voice Fax device takes the PIN code from its
memory. The PIN code can be entered into Voice Fax memory using Service menu
(##1111#8#3#<PIN code>#) or Voice Fax Configuration Tool.
24
Voice Fax
User Manual
6 Voice Fax Service menu
Voice Fax device parameters can be changed using ordinary telephone connected to Voice
Fax device through a standard RJ11 connector named PHONE. When the device is turned on, wait
until it sets for work. If required enter PIN code of the SIM card. After a long beep, enter Service
menu password. Standard password is ##1111#. When password is entered Voice Fax controlling
through the phone is activated and user directly accesses Voice Fax main Service menu. Exit from
any part of the Service menu by hanging up the phone or dialing **. While navigating in Service
menu, long beeps are heard on the line. When any function is being activated, short beeps are heard
on the line.
Service menu command list of the device is shown in the table.
General parameters
Security parameters
Nubers and prefixes
blocking
Fax parameters
Comm
and
1#
2#
3#
4#
5#
6#
7#
8#
9#
10#
11#
12#
13#
14#
15#
16#
17#
99#
Description
Set time interval between dialing and connecting
Prefix
Set GPRS inactivity timeout
Caller ID display control
Calling line identification restriction
Turning on/off the call duration signal
Changing Service menu password
PIN code entering control
Prefix blocking
Number blocking
Set number of rings
Set number of tries
Set delay between retries
Turning on/off allways answer as fax
Turning on/off delete facsimile from memory after retries
Show incomming number of pages
Baby Call Function
Restoring default settings
Service menu parameters are divided into:
●
●
●
●
General parameters
Security parameters
Nubers and prefixes blocking
Fax parameters
25
Voice Fax
User Manual
6.1 Interval Between Dial And Connection
It is possible to change time interval between dialing and connecting with the help of
the phone. Time is set in seconds. Dial 7# in order to change the time interval.
##1111# 1# ... 0#
Now enter numbers from 1to 5 and press #.
##1111# 1# (1...5) # 0#
6.2 Prefix
It is possible in Voice Fax device to activate the function that would automatically add
prefix to dialed number. To do so, dial 2# in main Service menu.
##1111# 2# ... 0#
Now dial 1# to activate prefix adding.
##1111# 2# 1# 0#
Dial 2# in Prefix menu to disable the function.
##1111# 2# 2# 0#
To add a prefix dial 3# Prefix and #.
##1111# 2# 3# <Prefix># 0#
E.g. In order to add “370” prefix, you have to dial: ##1111#2#3#370#; and for
activation: 1#.
When dialing 123456 on the phone connected to the Voice Fax device, the device will dial
370123456.
26
Voice Fax
User Manual
6.3 GPRS Inactivity Timeout
It is possible to set GPRS inactivity timeout after which device will terminate GPRS
session. Time is set in minutes. Dial 3# in main Service menu.
##1111# 3# ... 0#
Now enter numbers from 1to 60 and press #.
##1111# 3# (1...60) # 0#
6.4 Caller ID Display
Voice Fax device has a Caller ID detection function. The function allows to see the
incoming phone number.
By default this function is active. Dial 4# in Service menu in order to get to Caller ID
menu.
##1111# 4# ... 0#
Dial 1# to enable DTMF function.
##1111# 4# 1# 0#
Dial 2# to disable the function.
##1111# 4# 2# 0#
6.5 Calling line identification restriction
Voice Fax device has a Caller line identification restriction function. Function is
available only if it is supported by the operator. Default option is set to operator default.
Dial 5# in Service menu in order to get to calling line identification restriction menu.
27
Voice Fax
User Manual
##1111# 5# ... 0#
Dial 1# to set to operator default.
##1111# 5# 1# 0#
Dial 2# to enable calling line identification restriction.
##1111# 5# 2# 0#
Dial 3# to disable calling line identification restriction.
##1111# 5# 3# 0#
If calling line identification restriction is not allowed by operator, disabling or
enabling of calling line identification restriction will take no action.
6.6 Call Duration Indicating Signal
Dial 6# in the main menu in order to get to Signal Indicating Call Duration menu.
##1111# 6# ... 0#
The signal indicating call duration can be turned on/off with the help of the phone.
The call duration is indicated with a beep per minute.
In signal indicating call duration menu press 1# to enable the function.
##1111# 6# 1# 0#
Press 2# to disable the function.
##1111# 3# 2# 0#
28
Voice Fax
User Manual
6.7 Changing Service menu password
##1111# 7# <New 4 digit menu password > #
In order to change Service menu password, dial 7# in main Service menu. Now enter
new 4 digit user password and press #. New password will be saved in device memory. When the
new password is saved, the device returns to the main menu.
6.8 PIN Code Entering Control
PIN code automatic entering of the GSM SIM card inserted in the Voice Fax device,
can be enabled/disabled with the help of the phone.
To get to the PIN Code Entering Control menu, dial 8# in the main menu.
##1111# 8# ... 0#
If 1# is dialed in the main menu, the manual PIN code entering is activated and each
time the
device is being turned on, the PIN code will have to be entered manually.
##1111# 8# 1# 0#
In PIN code entering control menu dial 2#, and the automatic PIN code entering will
be activated, that is, PIN code will be automatically read from the device memory.
##1111# 8# 2# 0#
Note: in order to use automatic PIN code entering, the PIN code
has to be saved in device memory.
To save PIN code in device memory, dial 3# in PIN code entering control menu, enter the
PIN code and press #
##1111# 8# 3# <PIN code> #
6.9 Prefix Blocking
Prefix blocking can be performed with the help of the phone. In order to get to the
29
Voice Fax
User Manual
Prefix Blocking menu, dial 9# in the main menu. Total 10 entries can be done.
##1111# 9# ... 0#
To enable the function, press 1# in Prefix Blocking menu.
##1111# 9# 1# 0#
Dial 2# in order to disable the function.
##1111# 9# 2# 0#
The phone call will not be made if the dialed number will have a blocked prefix.
Maximum length of the blocking prefix is 6 digits.
6.9.1
Entry Supplement
To add new entry, dial 3# in Prefix Blocking menu.
##1111# 9# 3# ... 0#
This command activates entry supplement function. When the function is activated,
choose entry place in the list. This is done by dialing the place number from 0 to 9 and pressing #.
In such case particular placement in the list is chosen for the blocked prefix.
##1111# 9# 3# (0 ... 9) # … 0#
Now you can enter a prefix and dial #.
##1111# 9# 3# (0 ... 9) # <prefix> # 0#
6.9.2
Delete Entry
Dial 4# in order to delete prefix in Prefix Blocking menu.
30
Voice Fax
User Manual
##1111# 9# 4# ... 0#
4# command activates entry deleting function. When the function is activated choose
the entry place in the list. This is done by dialing an entry place number from 0 to 9 and pressing #.
##1111# 9# 4# (0 ... 9) # 0#
The particular blocked prefix will be deleted from the particular place in the list.
6.10 Number Blocking
Number blocking can be performed with the help of the phone. The function is
activated by dialing 10#.
##1111# 10# ... 0#
In total 10 entries are allowed. To enable number blocking, dial 1#.
##1111# 10# 1# 0#
Dial 2# to disable number blocking. The blocking numbers can consist of max 15
digits.
##1111# 10# 2# 0#
6.10.1 Entry Supplement
Dial 3# to add new entry.
##1111# 10# 3# … 0#
This command activates number adding function. When the function is activated,
place in the list has to be chosen. This is done by dialing the place number in the list from 0 to 9 and
pressing #.
##1111# 10# 3# (0…9) # … 0#
31
Voice Fax
User Manual
Now add a new phone number and dial #. Number starts with the prefix, + is omitted.
##1111# 10# 3# (0…9) # 370 651 12345 # 0#
6.10.2 Delete Entry
Entry is deleted by dialing 4#.
##1111# 10# 4# … 0#
This command activates the entry deleting function. When the function is activated,
choose entry place number in the list. This is done by dialing place number in the list from 0 to 9
and pressing #.
##1111# 10# 4# (0…9) # 0#
6.11 Set Number of Rings
This function allows to set number of rings after which the device will answer as a fax
machine. Interval is from 2 to 9 rings. Default is 2. In order to get to the Set Number of Rings menu,
dial 11# in the main menu.
##1111# 11# ... 0#
To set number of rings
##1111# 11# (2...9)# 0#
6.12 Set number of tries
If there is unsuccessful faximile transmition attempt, it is possible to set number of
automatic tries. Default number of tries is 3.
Dial 12# in the main menu in order to get to Set number of tries menu.
32
Voice Fax
User Manual
##1111# 12# ... 0#
To set number of rings
##1111# 12# (1...5)# 0#
6.13 Set delay between retries
If there is unsuccessful faximile transmition attempt, it is possible to set time interval
in seconds between automatic retries. Default value is 30 seconds.
Dial 13# in the main menu in order to get to Set delay between tries menu.
##1111# 13# ... 0#
To set time interval between tries
##1111# 13# (1...60)# 0#
6.14 Turning on/off allways answer as fax
There is a possibility to activate allways answer as fax function. If it is on, device
automaticaly will answer as a fax machine after defined number of rings even if incomming voice
call.
By default this function is not active. Dial 14# in Service menu in order to get to
Turning on/off allways answer as fax menu.
##1111# 14# ... 0#
Dial 1# to enable Answer as Fax function.
##1111#14# 1# 0#
Dial 2# to disable Answer as Fax function.
33
Voice Fax
User Manual
##1111# 14# 2# 0#
6.15 Turning on/off delete facsimile from memory after retries
By default function is enabled. It means that after defined unsuccessful number of
tries faximile message will be deleted from memory. If disabled, facsimile message stays in flash
memory after defined unsuccessful number of tries and can be repeatedly resent later even after
power off.
Dial 15# in Service menu in order to get to Turning on/off delete facsimile from
memory after retries menu.
##1111# 15# ... 0#
Dial 1# to enable function which will delete facsimile message from memory.
##1111#15# 1# 0#
Dial 2# to disable function which will delete facsimile message from memory.
##1111# 15# 2# 0#
6.16 Show incomming number of pages
This function allows to turn on/off indication of incoming number of fax pages on
remotely or localy connected faximile machine LCD screen. By default this function is on.
Dial 16# in Service menu in order to get to Show incomming number of pages menu.
##1111# 16# ... 0#
Dial 1# to enable number of pages indication.
##1111#16# 1# 0#
34
Voice Fax
User Manual
Dial 2# to disable number of pages indication.
##1111# 16# 2# 0#
6.17 Baby Call function
By default funcion is disabled. Function allows to enter one phone number and delay
from 5 to 30 seconds. If function is enabled and if handset is picked up, device will dial defined
phone number automaticaly after defined delay.
Dial 17# in Service menu in order to get to Baby call menu.
##1111# 17# ... 0#
Dial 1# to enable number of pages indication.
##1111#16# 1# 0#
Dial 2# to disable number of pages indication.
##1111# 16# 2# 0#
Dial 3# to add phone number.
##1111#16# 3#... 0#
Now add the phone number which will be dialed after defined delay.
##1111#16# 3#370 651 12345 # 0#
Dial 4# to enter delay.
##1111# 16# 4#...0#
35
Voice Fax
User Manual
Enter delay from 5 to 30 seconds, default is 10 seconds..
##1111# 16# 4#(5...30)#0#
6.18 Restore Default Settings
Dial 99# to restore default settings.
##1111# 99#
36
Voice Fax
User Manual
7
Manufacturer parameters
Manufacturer parameters
Set time interval between dialing and connecting
Prefix
Set GPRS inactivity timeout
Caller ID display control
Calling line identification restriction
Turning on/off the call duration signal
Changing Service menu password
PIN code entering control
Prefix blocking
Number blocking
Set number of rings
Set number of tries
Set delay between retries
Turning on/off allways answer as fax
Turning on/off delete facsimile from memory after retries
Show incomming number of pages
Baby Call
3 seconds
OFF
20 minutes
ON
Operator default
OFF
1111
Manual
OFF
OFF
2
3
30 seconds
OFF
ON
ON
OFF
37
Voice Fax
User Manual
8 Table of Parameters
##1111# 1# (1...5) # 0#
##1111# 2# 1# 0#
##1111# 2# 2# 0#
##1111# 2# 3# <Prefix># 0#
##1111# 3# (1...60) # 0#
##1111# 4# 1# 0#
##1111# 4# 2# 0#
##1111# 5# 1# 0#
##1111# 5# 2# 0#
##1111# 5# 3# 0#
##1111# 6# 1# 0#
##1111# 6# 2# 0#
##1111# 7# <New 4 digit menu password> #
##1111# 8# 1# 0#
##1111# 8# 2# 0#
##1111# 8# 3# <New 4 digits PIN code># 0#
##1111# 9# 1# 0#
##1111# 9# 2# 0#
##1111# 9# 3# (0 ... 9)# <Prefix># 0#
##1111# 9# 4# (0 ... 9)# 0#
##1111# 10# 1# 0#
##1111# 10# 2# 0#
##1111# 10# 3# (0 ... 9)# <Prefix># 0#
##1111# 10# 4# (0 ... 9) # 0#
##1111# 11# (2 ... 9)# 0#
##1111# 12# (1 ... 5)# 0#
##1111# 13# (1 ... 60)# 0#
##1111# 14# 1# 0#
##1111# 14# 2# 0#
##1111# 15# 1# 0#
##1111# 15# 2# 0#
##1111# 16# 1# 0#
##1111# 16# 2# 0#
##1111# 17# 1# 0#
##1111# 17# 2# 0#
##1111# 17# 3# <Number># 0#
##1111# 17# 4# (5 ... 30)# 0#
##1111# 99#
Set time interval between dialing and connecting
Number prefix blocking enable
Number prefix blocking disable
Prefix blocking entering
GPRS inactivity timeout
Caller ID DTMF enable
Caller ID type disable
Calling line identification restriction operator default
Calling line identification restriction enable
Calling line identification restriction disable
Minute notification on (1min.)
Minute notification off
Service menu password changing
Manual PIN code entering
Automatic PIN code entering
PIN code entering to memory
Prefix blocking enable
Prefix blocking disable
Prefix adding
Prefix deleting
Number blocking enabled
Number blocking disabled
Number adding to the list
Number deleting from the list
Number of rings to answer
Number of tries
Delay between retries
Answer as Fax enable
Answer as Fax enable
Delete facsimile from memory after retries enable
Delete facsimile from memory after retries disable
Show incomming number of pages enable
Show incomming number of pages disable
Enable Baby Call Function
Disable Baby Call Function
Enter Baby Call number
Enter Baby Call delay
Restore default settings
38
Voice Fax
User Manual
9 ACRONYMS
PC
- Personal Computer.
USB - Universal Serial Bus.
GPRS - General Packet Radio Service.
MDMF - Multiple Data Message Format.
GSM - Global System for Mobile communications.
BPX - Private Branch Exchange.
SIM - Subscriber Identity Module.
PIN - Personal Identification Number.
AC/DC- Alternating Current/Direct Current.
APN - Access Point Name.
PSTN - Public switched telephone network.
DTMF - Dual Tone Multiple Frequency.
FAX - Facsimile
10 TECHNICAL SUPPORT
This sign on the package means that it is necessary to read the User’s Manual,
which is on the CD before you start using the device.
This sign on the package means, that used electronic and electric equipment
should be stored separately.
If you encounter any problems while using the device and you are not able to solve them
please follow these direction:
● double check if everything was accomplished according to Voice Fax user manual,
● set device back to default factory settings,
● download and install the newest Voice Fax device drivers and software from
www.teltonika.com,
● download the newest Voice Fax device firmware and update it from www.teltonika.com.
If all direction above were performed but the problem still remains please contact our
technical support team via e-mail [email protected]. We will be glad to help You.
39