1
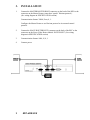
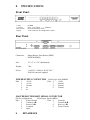
12843 Foothill Blvd., Suite D Sylmar, CA 91342 818 898 3380 voice 818 898 3360 fax www.dnfcontrols.com Model No. RPC-HOR-SVS Horizon Protocol To Sierra Video Systems (SVS) USER MANUAL Manual Version ...................................………...............1.2 120403 Document ID:............…........... RPC-HOR-SVS_User_Manual.doc 1 RPC-HOR-SVS 1. REVISION HISTORY 120403 2. Rev. 1.2 Company header information revised. Added DNF Controls Limited Warranty. DESCRIPTION Maintain control of your routers with DNF’s Router Protocol Converter (RPC) — the missing link for control integration of routers from different manufacturers. The RPC lets routers from different manufacturers communicate with each other. Instead of using a different control system for each router in your facility, consolidate control under your main router. The other routers “look like” levels on your main system. Allows any router that “speaks” Horizon protocol to control the SVS Router as a level on the Master Router The SVS looks like one or more levels on the Master Router Fast and Easy to set up and use Map SVS router levels to desired levels on the Master Router Supports up to 128 Input x 128 Output matrix Supports up to 4 levels. DEFINITIONS: Words surrounded by brackets, for example, [ENTER], are keys on the RPC. [XXX] + [XXX] means hold the two keys down simultaneously. XXX= Key name. 2 RPC-HOR-SVS 3. INSTALLATION 1. Connect the MASTER ROUTER RS422 connector on the back of the RPC to the connector on the Master Router (router that “speaks” Horizon protocol ). (See wiring diagram in SPECIFICATION section) Communication format: 38400, Even, 8, 1. Configure the Master Router to use Horizon protocol as its external control protocol. 2. Connect the SLAVE ROUTER RS232 connector on the back of the RPC to the connector on the Sierra Video Router labeled “RS232/RS422” (See wiring diagram in SPECIFICATION section) 3. Communication format: 9600, N, 8, 1. 4. Connect power. 3 RPC-HOR-SVS 4. SIERRA VIDEO LEVEL MAPPING TO MASTER ROUTER The RPC-HOR-SVS supports up to 4 levels. If the SVS router has more than 4 levels, use this function to map the SVS levels to the available 4 levels. 1. Press [SHIFT] + [LEVEL] on the RPC. 2. The display shows: “SVS:aa x bb L:c”, where: aa- number of outputs on the SVS router, bb- number of inputs on the SVS routers, c- number of levels of SVS router. The second line of the display prompts: “ENTER- map levels” 3. Press [ENTER] to map levels. 4. The display shows “SVS=xx, HOR=yy”, where: xx- level on the Sierra Video Systems router, yy- corresponding level on the Master Router. 5. Press [Í] to walk through all the existing SVS levels and view HOR levels associated to them. 6. Press [Î] to change the HOR level mapping for the selected SVS level, or turn it off. 7. Press [ESC] twice when done. Setup is complete. Now, the Sierra Video Systems router behaves as part of the Master Router. 5. RPC STATUS DISPLAY The RPC Display shows the communication status between the Master Router and the RPC, as well as the communication status between the RPC and the SVS router. If communications with the Master Router is established, then the first line of the display shows “Master: OK”. Otherwise, it shows “Master: Error”. If communication with the SVS is established, the second line of the display shows “SVS: OK”. Otherwise, it shows “SVS: ERR”. On the lower right corner of the display, the Master Router protocol is displayed all the time. (HOR) – means that the Master Router speaks Horizon protocol. 4 RPC-HOR-SVS 6. TEST COMMUNICATION BETWEEN MASTER ROUTER AND RPC 1. Press [SHIFT] + [MENU]. 2. Press [Î] or [Í] until the display says “MASTER TEST”. 3. Press [ENTER]. 4. The first line of the display says “Master data”. 5. The second line of the display shows data received from the Master Router. The data is represented as standard ASCII characters. 6. Press [ESC] to exit test mode. 7. TEST COMMUNICATION BETWEEN SVS AND RPC 1. Press [SHIFT] + [MENU]. 2. Press [Î] or [Í] until the display says “SVS TEST”. 3. Press [ENTER]. 4. The first line of the display says “SVS TEST”. 5. If communication is established between the RPC and the SVS, the second line of the display shows version information for the Sierra Video Router. If there is an error, the display says “Comm. Error”. 6. Press [ESC] to exit test mode. 5 RPC-HOR-SVS 8. SPECIFICATIONS Front Panel 1 LED 6 switches Reset Switch Display POWER Enter, Level, Menu, <, >, Shift/ESC Recessed momentary switch 2-Line LCD, back lit with adjustable contrast Rear Panel Connectors: Master Router, Slave Router (DB9F) POWER (DB9M) Size: 19” x 5” x 1-3/4” (Rackmount) Weight: 7 lbs. Power: 5 volt D.C., 1500 ma. 90-265 VAC 50/60 Hz converter supplied POWER SUPPLY CONNECTOR Pin# 1 2 3 4 5 +5Vdc +5Vdc Ground nc nc 9-Pin D-type, male (DB9M) Pin# 6 +5Vdc 7 Ground 8 Ground 9 Ground MASTER ROUTER RS422 SERIAL CONNECTOR (Device configuration) 9-Pin D-type, female (DB9F) Pin # 1 Frame Ground Pin# 6 Common 2 Transmit A Î 7 Transmit B Î 3 Receive B Í 8 Receive A Í 4 Common 9 Frame Ground 5 Spare 6 RPC-HOR-SVS SLAVE ROUTER RS232 SERIAL CONNECTOR 9-Pin D-type, female (DB9F) Pin# 1 No Connection 2 RD (Receive Data) 3 TD (Transmit Data) 4 No Connection 5 Ground Pin# 6 7 8 9 No Connection No Connection No Connection No Connection HORIZON (Master Router) to RPC Wiring Interface Master Router (RS422) Pin# 1 2 3 4 5 6 7 8 9 Frame Ground Receive A Í Transmit B Î Common Spare Common Receive B Í Transmit A Î Frame Ground RPC (RS422) Pin# 1 2 3 4 5 6 7 8 9 Frame Ground Transmit A Î Receive B Í Common Spare Common Transmit B Î Receive A Í Frame Ground RPC to SVS Wiring Interface RPC (RS232) Pin# 1 2 3 4 5 6 7 8 9 7 SVS (RS232) Pin# No Connection Receive Í Transmit Î No Connection Ground No Connection No Connection No Connection No Connection RPC-HOR-SVS 2 8 Transmit Î Receive Í 1 Ground 9. DNF CONTROLS LIMITED WARRANTY DNF Controls warrants its product to be free from defects in material and workmanship for a period of one (1) year from the date of sale to the original purchaser from DNF Controls. In order to enforce the rights under this warranty, the customer must first contact DNF’s Customer Support Department to afford the opportunity of identifying and fixing the problem without sending the unit in for repair. If DNF’s Customer Support Department cannot fix the problem, the customer will be issued a Returned Merchandise Authorization number (RMA). The customer will then ship the defective product prepaid to DNF Controls with the RMA number clearly indicated on the customer’s shipping document. The merchandise is to be shipped to: DNF Controls 12843 Foothill Blvd., Suite D Sylmar, CA 91342 USA Failure to obtain a proper RMA number prior to returning the product may result in the return not being accepted, or in a charge for the required repair. DNF Controls, at its option, will repair or replace the defective unit. DNF Controls will return the unit prepaid to the customer. The method of shipment is at the discretion of DNF Controls, principally UPS Ground for shipments within the United States of America. Shipments to international customers will be sent via air. Should a customer require the product to be returned in a more expeditious manner, the return shipment will be billed to their freight account. This warranty will be considered null and void if accident, misuse, abuse, improper line voltage, fire, water, lightning or other acts of God damaged the product. All repair parts are to be supplied by DNF Controls, either directly or through its authorized dealer network. Similarly, any repair work not performed by either DNF Controls or its authorized dealer may void the warranty. After the warranty period has expired, DNF Controls offers repair services at prices listed in the DNF Controls Price List. DNF Controls reserves the right to refuse repair of any unit outside the warranty period that is deemed non-repairable. DNF Controls shall not be liable for direct, indirect, incidental, consequential or other types of damage resulting from the use of the product. ### 8 RPC-HOR-SVS