1
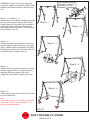
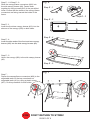
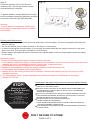
ASSEMBLY INSTRUCTIONS
ATTENTION: THIS PRODUCT IS NOT FOR COMMERCIAL USE
INTENDED FOR RESIDENTIAL USE ONLY.
RUS422W-WM
!
!
!
!
Do not discard any of the packaging until you have checked that you have all the parts
and pack of fittings.
Keep children away during assembly. This item contains small parts which can be
swallowed by children. Children should always be under direct adult supervision while
using the product.
Retain the assembly instructions for future reference.
Please quote following FQC NO. when contacting service center.
SERVICE CENTER TOLL FREE NO.
TEL: 1-877-539-7436
FAX: 1-877-539-7439
STOP
DON’T RETURN TO STORE!
PAGE 1 OF 6
COURTYARD CREATIONS INC.
A. Please read instructions thoroughly. Acquaint yourself with the inventory of
parts and the accompanying drawings to ensure safe and proper assembly.
B. You will need the following tools
- Phillips Screwdriver(Not Included)
- Nut Wrench (See Part #29)
- Hex. Key Wrench (See Part #28)
C. Lay out all parts on a flat surface and identify them using the table below.
PARTS LIST
PART
MATERIAL CODE
NO.
1
2
RUS422W-CS02
PART
Q’TY
16
BOLT M8*75
TOP CROSS BEAM
W/ADJUSTABLE TEETH
1
18
19
17C17A1306001Y4
FRONT UPRIGHT SUPPORT
4
20
17FA05050401-Y4
1
62RUS459FH102
21
17FA08060601-Y4
REAR CROSS BRACE
6
22
1800C23001
1
RUS422W-CS01
23
1800C06001
4
62RUS422WM101
24
1800337002
2
62RUS422WH102
25
1800337005
SIDE CANOPY BRACE
10
26
1802605001
2
2800221023
27
RTS423E-CS06
FRONT LEG CAP
12
28
17KAA0201----Y4
REAR LEG CAP
13
29
17KAB1201----Y4
SUSPENSION SPRING
14
30
61R422WD00001BA
BOLT M6*40
15
31
61R422WC00001BA
BOLT M6*65
STOP
1
CANOPY
4
17C01A0722011Y4
1
NUT WRENCH 13&17MM
6
17C01A0714003Y4
1
HEX.KEY WRENCH 6MM
2
17GC06043401-Y3
2
PLASTIC SCREW
2
2800221024
2
CANOPY/FRAME CONNECTOR
FRONT/REAR CANOPY BRACE
11
2
BOLT CAP M8
2
62RUS422WI102
14
BOLT CAP M6
SWING ARM TUBE
9
2
PLASTIC NUT M8*P1.25
SEAT ASSEMBLY
8
14
PLASTIC NUT M6*P1.0
SWING ARM
7
4
WASHER d8.5*D17*1.6
2
RUS4060-CS02N
28
WASHER d6.5*D16*1.2
LATERAL CROSS BRACE
5
4
SCREW ST4.2*16
2
62RUS422WI101
2
17C01A0716072Y4
BOLT M6*45
2
62RUS422WN101
2
17C01A0725101Y4
BOLT M6*75
2
62RUS422WN102
17
REAR UPRIGHT SUPPORT
3
2
17C01A0822071Y4
3
CUSHION
DON’T RETURN TO STORE!
PAGE 2 OF 6
Do not tighten bolts/nuts
after Step 1. Fasten all
bolts/nuts after Fig A.
ASSEMBLY (Note: For all nuts and bolts
fastening, always use a washer (#20 or #21)
between the tube and bolt or the tube and
nut.)
1
24
22
14
20
20
20
14
2
22
24
3
2
3
Step A - 1 and Step A - 2:
Insert the top cross beam w/adjustable teeth
(#1) into the upright supports (#2 and #3).
Fasten them by using bolts (#14), washers
(#20) and plastic nuts (#22). Repeat the
procedure for the other side. Do not tighten
bolts & plastic nuts yet.
20
1
Step A - 1
Step A - 2
3
2
2
3
Step A - 3:
Fasten the lateral cross braces (#4) to the
upright supports (#2 and #3) by using bolts
(#15), washers (#20) and plastic nuts (#22).
Repeat the procedure for the other side. Do
not tighten bolts & plastic nuts yet.
Step A - 3
2
3
2
4
4
3
22
20
20
15
24
Step A - 4
Step A - 4:
Fasten the rear cross brace (#5) to the rear
upright supports (#2) by using bolts (#14),
washers (#20) and plastic nuts (#22).
Tighten all of the bolts & plastic nuts now.
2
5
22
20
20
14
24
Step A - 5
Step A - 5:
Insert the leg caps (#11 and #12) to the rear
and front base feet.
Note:
The labels marked “A” and “B” on the legs
caps (#11 and #12) should Step A - 5 to
ensure proper assembly.
2
2
3
B
12
3
12 B
11
A
11
Fig. A
STOP
A
DON’T RETURN TO STORE!
PAGE 3 OF 6
2
Step B :
Open the seat assembly (#7) and fasten a
swing arm tube (#8) and a swing arm (#6) to
the seat back by using bolt (#17), washers
(#20), and plastic nut (#22). Do the same
procedure for both sides.
Fasten another swing arm tube (#8) to the
swing arm (#6) at the front bend by using
bolt (#18), washers (#20), and plastic nut
(#22). Do the same procedure for both sides.
Fasten the other end of the swing arm (#6)
to the front of the seat assembly (#7) by
using bolt (#16), washers (#21), and plastic
nut (#23). Do the same procedure for both
sides. See Fig. B.
Fig. B
8
8
20
6
22
7
20
6
17
24
8
8
24
18
20
20
23
22
21
21
16
25
Step C:
Hook the suspension springs (#13) into the
top of both swing arm tubes (#8). Do the
same procedure for both sides.
Fig. C
13
13
13
13
8
8
8
Step D:
Hang the opposite ends of the suspension
springs (#13) into the holes located on the
angled braces of the top cross beam
w/adjustable teeth (#1). Do the same
procedure for both sides.
Warning:
Make sure that both ends of the
suspension springs (#13) go completely
through the holes on the top cross beam w/
adjustable teeth (#1) and the swing arm
tubes (#8).
STOP
Fig. D
1
13
13
DON’T RETURN TO STORE!
PAGE 4 OF 6
8
Fig. E
Step E - 1 & Step E - 2 :
Slide the canopy/frame connectors (#26) into
the side canopy braces (#9). Fasten them
together by using screws (#19) in the pre-drilled
holes. Ensure that the teeth on the canopy/frame
connectors are facing toward the inside of the
frame.
19
19
Step E - 1
26
26
9
9
Step E - 2
Step E - 3
10
Step E- 3:
Insert the front/rear canopy braces (#10) into the
sleeves of the canopy (#30) on both sides.
30
10
Step E - 4
Step E - 4:
Insert the tube ends of the front and rear canopy
braces (#10) into the side canopy braces (#9).
10
9
30
10
9
30
Step E - 5:
Velcro the canopy (#30) to the side canopy braces
(#9).
9
9
Step E - 5
Fig. F
Step F :
Fasten the canopy/frame connectors (#26) to the
adjustable teeth on the top cross beam w/
adjustable teeth (#1) by using a plastic screw
(#27). Do this procedure for both sides.
28
1
27
26
26
STOP
DON’T RETURN TO STORE!
PAGE 5 OF 6
27
Fig. G
Step G :
Place the cushions (#31) onto the seat
assembly (#7). Secure the cushions to the
seat assembly by using ties.
To assure stability, double check that all of the
bolts have been completely tightened, and then
cover them with bolt caps (#24 and #25).
31
31
31
Warning:
To avoid danger of suffocation, please keep
plastic bags or small parts away from babies
and children.
Cleaning and Maintenance
• Wash frame parts and fabric with mild soap and water, rinse thoroughly. Dry frame completely and allow the
fabric to drip dry.
• Do not use bleach, acid, or other solvents on the fabric or frame parts.
• In order to prolong the life and beauty of your swing, we recommend that the swing be stored in a dry area
when not in use. (For example, overnight or on rainy days)
• Please inspect and tighten all bolts or fasteners on a regular basis to ensure proper performance and safety
of your swing.
Special Warnings:
The user of this swing should always inspect it before each use.
1. It is essential to place the swing on level ground and not less than 6 feet from any obstruction such as fences,
garages, the house, overhanging branches, laundry lines, or electrical wires.
2. Check all bolts and nuts for tightness on a regular basis.
3. Make sure the suspension springs are always properly hooked before each use.
4. Oil all metallic moving parts during usage season.
5. Always remove the canopy in heavy wind conditions, otherwise the canopy may tip over and may cause
damage to its parts.
6. The manufacturer will not accept responsibly for unauthorized repair or modifications to the swing.
7. Weight limit 750 lbs.
STOP!
Missing
A Part?
Part?
Missing A
No
BackTo
To
NoNeed
Need To
To Go
Go Back
The
Store!
The
Store
The store where you made your purchase
The store where you made your purchase
does
doesnot
notstock
stockparts
partsforforthis
thisitem
item
if you need parts,
if you need parts,
whether they are missing or damaged.
whether they are missing or damaged.
CallToll
TollFree
Free
Call
TEL:1-877-539-7436
1-877-539-7436
TEL:
FAX:1-877-539-7439
1-877-539-7439
FAX:
Callus
usbetween
between9:00
9:00AM
AMand
and 4:30
4:30 PM
PM
Call
Eastern
Time
Mondaythrough
throughFriday
Friday
Eastern Time Monday
STOP
PLEASE READ THESE INSTRUCTIONS COMPLETELY BEFORE STARTING ASSEMBLY
PLEASE SEPARATE AND IDENTIFY ALL PARTS, MAKING SURE THAT YOU
HAVE ALL OF THE PARTS LISTED.
SHOULD YOU NOT LOCATE ALL OF THE ABOVE PARTS, PLEASE INSPECT ALL
PACKING MATERIAL FOR ANY SMALL PARTS THAT MAY HAVE BECOME
SEPARATED IN SHIPMENT.
SHOULD YOU EXPERIENCE ANY DIFFICULTY DURING ASSEMBLY OR IF ANY
PART IS MISSING OR DAMAGED, PLEASE CALL THE HELP LINE 1-877-539-7436
BEFORE RETURNING THE ITEM TO THE STORE.
PLEASE PROVIDE THE FOLLOWING INFORMATION:
1-MODEL NUMBER OF THE PRODUCT.
2-PART NUMBER AND MATERIAL CODE OF THE PART FROM THE PARTS LIST
SHOWN ON ASSEMBLY INSTRUCTIONS.
MOST PROBLEMS CAN BE RESOLVED WITHOUT RETURNING THIS PRODUCT
TO THE RETAILER.
DON’T RETURN TO STORE!
PAGE 6 OF 6