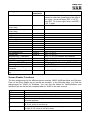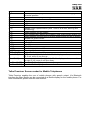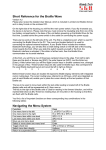
1
HandyTech
ElektronikGmbH
Easy Braille Quick Reference
Version 3.1
Please also review the detailed User Manual, which is included in printed (not Braille)
format and in audio format on the enclosed CD.
Set up the Easy Braille in front of you so that the two long keys are closest to you. These
two keys are navigation keys. They also act as the space bars while you are entering text.
The left-hand navigation key moves the cursor backwards and is designated as [L] from
now on. The right-hand key moves the cursor forwards and is designated as [R] from now
on. In all cases where both the left and right key can be used interchangeably, they are
represented as [SPC].
Behind these two keys, you will find the 8 function keys, which can also be used as input
keys. The assignment of Braille dots to these keys corresponds to the usual Braille
keyboard assignments:
7
3
2
1
4
5
6
8
Behind the input keys are located 40 ergonomic Braille display elements with integrated
cursor routing keys. These cursor routing keys, called CR keys for short, which are
integrated in each Braille display module, enable you to place the cursor directly at the text
position of that Braille module.
On the right side of the housing you find the main power switch. If you flip it towards you,
the device is turned on.
If your Easy Braille is not equipped with the Bluetooth option, it receives its power via the
USB interface. It can thus be switched on only when the USB cable is connected to a PC
and the PC is turned on. The USB port for connecting the device to a computer is located
on the left side of the Easy Braille's housing.
If your Easy Braille is equipped with the wireless Bluetooth option, it has four battery
compartments on the bottom, each containing a replaceable, rechargeable battery. Before
switching your Easy Braille on for the first time, you must remove the insulating strip from
one of these compartments. The socket for connection of the external power supply unit is
located on the left side of the device, in front of the USB connector.
Software Installation
Before you connect the Easy Braille to your computer, you should install the software
delivered with the device. First make sure the screen reader you use is installed. Then
insert the CD containing the software package into the CD-ROM drive of your computer
and start the program "Setup.exe" on the CD. This installation program installs the latest
driver for your screen reader, together with this user manual. Follow the instructions on the
screen to install the necessary software components. After completion of the installation
procedure, you can connect your Easy Braille to your computer.
Connecting the Easy Braille to the PC
Please connect the square plug to the port on the left side of your Easy Braille. The flat
plug is then plugged into the PC's USB port. When both the Easy Braille and the PC are
HandyTech
ElektronikGmbH
turned on, the Easy Braille will automatically be recognized by USB-enabled operating
systems. The power for the Easy Braille is supplied via the USB interface. You can turn on
the Easy Braille with its power switch as soon as the USB cable is connected and the PC
is turned on.
If you want to connect the Easy Braille via the wireless Bluetooth interface, please read
section 2.5 “Installing the Bluetooth Connection” in the user manual.
Operation as a Braille Display
Please make sure that your Easy Braille is properly connected and switched on before
starting up the screen reader program, because otherwise the screen reader will not be
able to detect it. As a rule, the screen reader will display the currently selected position
within the active window on the Braille display. For example, if you are moving through a
menu, the selected menu item is displayed. The two long navigation keys [L] and [R] allow
you to move through text. The various screen reader program functions are assigned to
specific keys on your Easy Braille.
Braille Input with the Easy Braille Function Keys (SPC+1 2 7) (Chord B)
In order to utilize this function, you will need the current driver of your screen reader for
Handy Tech's Braille displays. We recommend installing the driver that was delivered
along with your Easy Braille.
Table of Key Commands for Controlling the PC
PC key(s)
Activate/deactivate PC
control
Backspace
Delete
Paste
Alt for next character
Activate/deactivate Alt
Enter
Ctrl for next character
Activate/deactivate Ctrl
Tab
Shift + Tab
Ctrl + Tab
Ctrl + Shift + Tab
Escape
Shift + Escape
Shift + character
Shift Lock on/off
Cursor keys
Mark
Chord
commands
Chord B
Emulated on the Easy Braille by
Chord b
SPC + 1 2 or 7
SPC + 4 5
SPC + 2 4
SPC + 7 8
L+R+78
8
SPC + 3 6
L+R+36
SPC + 2 3 4 5
SPC + 2 3 4 5 7
SPC + 3 6, SPC + 2 3 4 5
SPC + 3 6, SPC + 2 3 4 5 7
SPC + 1 5
SPC + 1 5 7
SPC + 2 3 4, character
SPC + 2 3 4 7
Up: SPC + 1, Left: SPC + 7,
Down: SPC + 4, Right: SPC + 8
SPC + 2 3 4 7 "holds down" the shift key until
SPC + 2 3 4 7 is pressed again. It is
therefore possible to work with all cursor
Chord i
Chord t
Chord T
Chord e
Chord E
Chord s
Chord S
Chord S
SPC + 1 2 7
HandyTech
ElektronikGmbH
PC key(s)
Chord
commands
Previous word (Ctrl + left
cursor key)
Next word (Ctrl + right
cursor key)
Page Up
Page Down
Ctrl + Page Up
Ctrl + Page Down
Pos1
End
Ctrl + Pos1
Ctrl + End
Function Keys F1 to F12
Left Windows key
Context key
Windows key + character
Lock/unlock Windows key
PAUSE key
Windows + PAUSE key
Space bar
Screen Reader key +
character
Lock/unlock Screen Reader
key
Emulated on the Easy Braille by
movements, such as Pos1, End, etc. If you
wanted to mark two characters to the right of
the cursor, you would enter SPC + 2 3 4 7,
then SPC + 8 (cursor right) twice, and SPC +
2 3 4 7 again.
SPC + 3
SPC + 6
Chord k
Chord l
Chord w
Chord W
Chord p
SPC + 2
SPC + 5
SPC + 3 6, SPC + 2
SPC + 3 6, SPC + 5
SPC + 1 3
SPC + 4 6
SPC + 1 2 3
SPC + 4 5 6
SPC + CR1 to CR12
SPC + 2 4 5 6
SPC + 2 4 5 6 7
SPC + 2 4 5 6 8 followed by character
L+R+24568
SPC + 1 2 3 4
SPC + 2 4 5 6 8 followed by SPC + 1 2 3 4
L or R (SPC)
SPC + 2 3 4 8 followed by character
L+R+2348
Screen Reader Functions
The key assignments for the different screen readers JAWS, Hal/SuperNova and WindowEyes on the Easy Braille are as similar as possible. In the following table, you find the
assignments for JAWS for Windows. You can find the tables for Hal/SuperNova and
Window-Eyes as well as the complete table for JAWS in the user manual.
Key / Braille Dot
[7]
[3]
[2]
[1]
[L]
[R]
Function
Activate PC cursor tracking.
Display the first line of the window (title).
Move the Braille display to the left.
Move the Braille display section one line up without changing the
horizontal position.
If there is any text to the left of the Braille display section, move it to the
left; if not, move it one line up.
If there is any text to the right of the Braille display section, move it to
the right; if not, move it one line down.
HandyTech
ElektronikGmbH
Key / Braille Dot Function
[4]
Move the Braille display section one line down without changing the
horizontal position.
[5]
Move the Braille display to the right.
[6]
Display the last line in the window.
[8]
Drag the JAWS cursor to the PC cursor and activate the JAWS cursor.
[L + R]
Toggle status modules on and off.
[7 8]
Switch between structured mode, section output and speech output.
[3 8]
Change cursor representation (dots 7 and 8, all 8 dots, blinking and
non-blinking).
[2 8]
Toggle between 6/8 dot Braille.
[1 8]
Driver configuration dialog (as of Handy Tech JAWS Driver version 3.x)
[4 8]
Toggle between focused text on Braille display/same text as on screen.
[5 8]
Activate the JAWS cursor.
[2 3]
Beginning of line
[5 6]
End of line
[1 2 3]
Top of file
[4 5 6]
End of file
[3 6 7]
Speech interruption on/off
[3 6 7 8]
Output task bar
[SPC + 1 2 7]
Toggle Braille input on/off
[L + 1 2 3 7]
If there is any text to the left of the Braille display section, move it to the
left; if not, move it one line up.
[R + 4 5 6 8]
If there is any text to the right of the Braille display section, move it to
the right; if not, move it one line down.
[L + R + 1 2 3 7] Move the Braille display section one line up.
[L + R + 4 5 6 8] Move the Braille display section one line down.
Talks Premium: Screen reader for Mobile Telephones
Talks Premium enables the use of mobile phones with speech output. Via Bluetooth
interface the Easy Braille can be connected as a Braille display for the mobile phone. For
more information, please read the user manual.