1
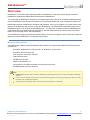
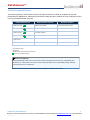
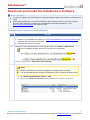
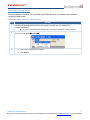
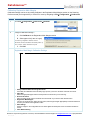
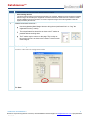
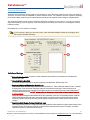
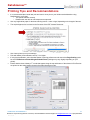
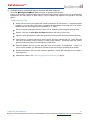
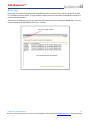
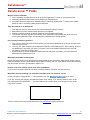
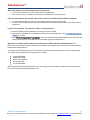
D ata S canner ™ for USER MANUAL DataScanner™ Con t e n t s Overview.....................................................................................................................................................................3 Minimum Requirements ........................................................................................................................................3 Certified Compatible Devices .................................................................................................................................4 Download and Install the DataScanner Software ......................................................................................................5 Before you begin .................................................................................................................................................5 Configuring DataScanner ............................................................................................................................................6 Server Connection Settings ....................................................................................................................................6 Calibrating Registration Mark Margins...................................................................................................................8 Starting DataScanner ............................................................................................................................................... 11 Printing Tips and Recommendations....................................................................................................................... 12 How to Scan Answer Documents ............................................................................................................................ 13 Troubleshooting ...................................................................................................................................................... 17 Addressing Unapproved Answer Documents.................................................................................................. 17 How to Resolve Issues ..................................................................................................................................... 17 Error Log .............................................................................................................................................................. 19 DataScanner™ FAQs ................................................................................................................................................ 20 DataScanner for DataDirector™ 2 Questions? If you have any questions or concerns, contact DataDirector Customer Support at [email protected] or (877)993-2633. Rev 1/3/12 DataScanner™ Overview DataScanner™ is the plain paper scanning module for DataDirector™ that scans answer sheets created for DataDirector Assessments and transfers student results to DataDirector. You must install the DataScanner software on a windows-based computer and use a TWAIN compliant scanning device. DataScanner uses an internet connection to access answer sheets and create templates to capture and DataScanner requires a DataDirector Username and Password. Once you are logged in, you have access to the same list of assessments that you have access to in DataDirector. The Assessment Answer Sheet must exist in DataDirector before it can be scanned with DataScanner. You must print an answer sheet from DataDirector for each student that will be administered the assessment, load the marked answer documents into the document feeder of your scanning device, and start scanning. Once DataScanner finishes processing the answer sheets, you review and approve all the results and commit the approved results to DataDirector™ for analysis and reporting. Minimum Requirements The DataScanner software must be downloaded and installed on a computer that meets the following minimum requirements. Microsoft® Windows XP Pro, Service Pack 2 or Windows 7, Service Pack 1 Microsoft® .NET Framework 3.0 Intel® Pentium® 4 Processor 2.8 GHz+ 2 GB RAM (minimum) 500 MB free disk space Adobe Acrobat Reader 7.0 Connected to a Certified Compatible scanning device (see chart) Broadband/Cable Internet connection Notes DataScanner does not work on Mac OS, Windows NT, Windows 98 or earlier versions of Windows operating systems. If you are not sure which service pack or version operating system you are using, simply right-click you’re My Computer icon and select Properties. The computer and scanning device must be directly connected via a USB cable. DataScanner for DataDirector™ 3 Questions? If you have any questions or concerns, contact DataDirector Customer Support at [email protected] or (877)993-2633. Rev 1/3/12 DataScanner™ Certified Compatible Devices The following scanners, multi-function devices, and copiers have been certified as compatible for use with DataScanner for DataDirector. Although all of the devices listed have been certified, the level of difficulty involved in set-up and implementation may vary. Dedicated Scanners Fujitsu fi-5120c* Multi-Function Devices Business Copiers Brother DCP-8060* Xerox WorkCentre 5638 1 Brother DCP-8080DN Xerox WorkCentre 7435 2 Lexmark X364dn Fujitsu fi-6130 Fujitsu fi-6140 2 Fujitsu fi-6670 Fujitsu 6230 HP Scan Jet 5000 1 Recommended model VRS disabled * Model has been discontinued by manufacturer 2 Easy set-up and implementation New Scanner Approval Riverside Publishing is able to test scanners not listed on the approved scanner list for compatibility with DataScanner on a limited basis. A loaner scanner will be required to do the compatibility testing. Network attached scanners are not approved. Please contact your Riverside Publishing Account Manager for additional information. DataScanner for DataDirector™ 4 Questions? If you have any questions or concerns, contact DataDirector Customer Support at [email protected] or (877)993-2633. Rev 1/3/12 DataScanner™ Download and Install the DataScanner Software Before you begin You must be logged in as an Administrator or have administrative rights to the machine to download and install. Before using DataScanner, you must have Microsoft .Net Framework Version 3.0 (or later) installed. Microsoft .Net Framework is available free for download from the Microsoft website. Go to www.microsoft.com/downloads and search for .NET. Follow these steps to download and install DataScanner: STEP 1 ACTION Login to DataDirector: A. Navigate to your DataDirector website (e.g. https://www.datadirector.com/yourdistrictname) and login with your Username and Password. B. Select the site and level of access 2 Change the URL in the address bar on the Welcome page from /?News to /datascanner: Select to highlight the word ―News‖ and type the word ―datascanner‖ from to You are redirected to the DataScanner Download Page 3 Download DataScanner Notes: Read the instructions on the download page prior to beginning the download. You must uninstall previous versions of DataScanner prior to installing the latest version. A. Click Download DataScanner Version… Now B. Double-click DataScannerInstaller.exe and following the installation instructions. DataScanner for DataDirector™ 5 Questions? If you have any questions or concerns, contact DataDirector Customer Support at [email protected] or (877)993-2633. Rev 1/3/12 DataScanner™ Configuring DataScanner Connection to DataDirector™ Server DataScannerTM requires connection to DataDirectorTM in order to operate. To connect to DataDirector™, your Server Connections and Scanning Preferences settings must be configured. The first time you log on you will be prompted to configure the internet settings. Set the Address and Site Name on the Server Connections tab. Server Connection Settings 1. Address: www.datadirector.com Enter the web address used to connect to the DataDirector™ web site. The default setting is www.datadirector.com". 2. Site Name The name of the web site that you are logging into. The same name as appears in the address bar that you would enter when connecting to the DataDirector™ web site. The site name is case sensitive and you should enter the site name in lower cases. (Use the district/consortium name that DataDirector™ uses--this is what is typed in the address bar when logging into DataDirector™). Example: The "my-site-name" portion of the web site address "http://www.datadirector.com/my-site-name". Notes Port is already set to the defaults to 443 this field is not enabled. Protocol is the network communication protocol being used between DataScanner and DataDirector over the Internet. For security reasons, the only choice is the Hyper Text Transfer Protocol under Secured Socket Layer (HTTPS). This field is not enabled. You may click Save to save these settings now or click the Scanning Preferences or Other tabs to configure additional settings. DataScanner for DataDirector™ 6 Questions? If you have any questions or concerns, contact DataDirector Customer Support at [email protected] or (877)993-2633. Rev 1/3/12 DataScanner™ Select the Scanning Source Once the software is installed, you must select the TWAIN driver as your scanning source before configuring DataScanner. Follow these steps to select your scanning source: STEP ACTION 1 Double-click the DataScanner Icon on your desktop and login with your DataDirector username/password. If you are associated with multiple sites, you may be prompted to select your site 2 From the menu SelectScanner 3 A. Select the TWAIN driver from the list B. Click Select. DataScanner for DataDirector™ 7 Questions? If you have any questions or concerns, contact DataDirector Customer Support at [email protected] or (877)993-2633. Rev 1/3/12 DataScanner™ Calibrating Registration Mark Margins Calibration settings can be set by clicking Calibrate in the Registration Mark Margins section on the Scanning Preferences tab (see image above) or via the File menu by navigating to File Configuration Preferences STEP ACTION 1. Go to FileConfigurationPreferencesCalibrate 2 Configure calibration settings— A. Click Calibrate in the Registration Mark Margins section B. Select paper size (Letter or Legal) You will be prompted to load an answer document into the automatic document feeder of your scanner. Allow document to feed. C. Click OK Registration Mark Margin Calibration Settings 1. Always Calibrate Before Scanning Documents If checked, this calibration screen will always pop up when you scan a new batch of answer documents. 2. Paper Size Select the appropriate paper size that corresponds to the document you are scanning. 3. Re-scan Document Place an answer sheet onto the automatic document feeder of your scanner and click this button. 4. Registration Mark Margins 5. 6. This is a very important step. Adjust the top, bottom, left and right margins appropriately so that the dotted red lines are just outside of the registration marks. Save Settings Save the margins in the configuration file so it will be applied to subsequent scans. The window will then be closed. Close Without Saving DataScanner for DataDirector™ 8 Questions? If you have any questions or concerns, contact DataDirector Customer Support at [email protected] or (877)993-2633. Rev 1/3/12 DataScanner™ STEP ACTION Click this button will close the window without saving the settings. 7. Scanned Image Preview This shows exactly what the scanned image looks like in the computer. Different scanners will produce a slightly different image; and most likely the margins will not look the same as the actual document. That is the reason that this calibration process is important. You need to adjust the margins so that the registration marks are tightly bounded by the red lines. 3 Calibrate the Answer Document— Use the registration Mark Margin Arrows to bring the red perforated line in to ―hug‖ the registration marks (T-marks) The red perforated line should be as close to the T-marks as possible without touching them. The T-marks may be uneven on the page. This is okay as long as the red line is as close to the nearest T-mark on each of the margins. 4 Click Save Settings You will be re-directed to the configuration window. Click Save DataScanner for DataDirector™ 9 Questions? If you have any questions or concerns, contact DataDirector Customer Support at [email protected] or (877)993-2633. Rev 1/3/12 DataScanner™ Scanning Preferences Scanners produce different quality images even though they are of the same model from the same manufacturer. Therefore, a scanner must be calibrated to produce uniform results. The calibration process consists of adjusting the marked bubble sensitivity and unmarked bubble sensitivity and registration mark margins of DataScanner. The Scanning Preferences tab contains settings to adjust the sensitivity of your scanner. You may only need to adjust these settings if you are getting a lot of scanning errors because your scanner is not reading the marked bubbles correctly. Click Save once you’ve made your changes. Tip: If your scanner is picking up too many marks, lower the Marked Bubble Sensitivity and slightly raise the Unmarked Bubble Sensitivity. A B C D Definition of Settings A. Marked Bubble Sensitivity It is used to control at what density a bubble is considered as a marked bubble. Default value is 60. B. Unmarked Bubble Sensitivity It is used to identify and include or exclude marginally marked bubbles. Default value is 20. C. Registration Marks and Registration Mark Margins Each answer sheet has six T-shaped reference marks printed on it. These marks are rotated counter- clockwise for 90 degrees. Three on the top of the page and three on the bottom of the page. These marks serve as reference points and are very important in normalizing the form to increase the accuracy when DataScannerTM processes the answer sheet. Do NOT write anything on the marks or close to the marks as inaccurate results may be produced. Registration Mark Margins tell the software where the registration marks are. The possibility that the marks fall outside the dotted red lines will lead to inaccurate results. In an ideal scenario, the outer edges of the marks should be just within the corner formed by the two adjacent dotted red lines. Default value is 0.25 for all four margins. D. Registration Mark Margins Preview (Dotted Red Lines) This image preview gives you a rough idea where the registration marks should be on the scanned image. Due to scanners variation, the scanned image will not look the same as the actual document. Therefore, we need to calibrate the scanner to work with the document. DataScanner for DataDirector™ 10 Questions? If you have any questions or concerns, contact DataDirector Customer Support at [email protected] or (877)993-2633. Rev 1/3/12 DataScanner™ Starting DataScanner After DataScanner is installed and configured, you can start DataScanner by double-clicking the shortcut icon on your desktop or selecting DataScanner from the Start Menu. STEP 1 ACTION You must enter your DataDirector Username/Password and click Login. 2 If your username is affiliated with more than one site or group, you will need to select the site/group. 3 Follow the step in How to Scan Answer Documents, page 13, below. DataScanner for DataDirector™ 11 Questions? If you have any questions or concerns, contact DataDirector Customer Support at [email protected] or (877)993-2633. Rev 1/3/12 DataScanner™ Printing Tips and Recommendations It is recommended that a small test print and scan is done prior to your initial test administration using DataScanner to verify that: o The sheets scanned correctly o DataScanner was able to read responses as expected Use very bright white paper for the best scanning results – letter or legal, depending on the length of the test. The required paper size is printed on the first page of the PDF Answer Document. Use a laser printer (not ink or bubblejet). Print with Adobe Acrobat Reader version 7.0 or higher. If using Acrobat Reader, select Acrobat Reader in printing preferences and ensure that Page Scaling option be set to Fit/Reduce to Printer Margins/Printable Area (verbiage may vary slightly depending on your printer). Ensure that the three sideways ―T‖ marks that appear along the top and bottom of the sheets in Print Preview are printed on the actual answer sheets before administering an exam. DataScanner for DataDirector™ 12 Questions? If you have any questions or concerns, contact DataDirector Customer Support at [email protected] or (877)993-2633. Rev 1/3/12 DataScanner™ How to Scan Answer Documents Before scanning answer sheets, a template that corresponds to the answer sheets need to be selected. The template provides information about the answer sheets, so that DataScanner knows exactly where to find the data on the sheet. Follow these steps to scan answer documents: STEP 1 ACTION Login to DataScanner with your DataDirector username/password. 2 If your account is associated with multiple sites or groups, you may be prompted to select your site/group before proceeding to the next step. Select an Assessment— To search for an Assessment: Check boxes to filter available answer sheets that appear in the bottom portion of the screen, or To search for an Assessment by ID If you printed your Answer Sheet prior to December 22, 2011, an Exam ID will be printed in the lower left of the answer sheet. Enter and ―E‖ followed by the Exam ID in the Quick Search ID box (ex. E5378) and click Go If you printed your Answer Sheet after January 1, 2012, enter the Assessment ID as printed in the lower left of the answer sheet in the Quick Search ID box (ex. 5378) and click Go Click an assessment in the list to select it The assessment template is retrieved and displayed in the image viewer. Verify that the image on the screen is the same as the answer document you are about to scan. You will receive a confirmation pop-up box to verify whether the correct assessment was selected. DataScanner for DataDirector™ 13 Questions? If you have any questions or concerns, contact DataDirector Customer Support at [email protected] or (877)993-2633. Rev 1/3/12 DataScanner™ STEP ACTION Click Yes 3 Scan Documents a. Load answer documents according to your scanner’s specifications b. Click Scan Now You will receive a pop-up message indicating the number of documents scanned when all the documents you loaded have been scanned. You have two options: a. Click Finish to close scanning for this test, or b. Click Continue to scan more documents for the same test. Do no t s ca n d oc u me n ts f or a diff e r en t t es t . Scanning Summary The Scanning Summary indicates the number of documents scanned, processed, and approved. Review the scanning summary and fix errors, if necessary. Scanned – the number of sheets identified by the scanner Processed – the number of DataDirector answer documents recognized Approved – the number of answer documents ready to commit to DataDirector. The summary also indicates the number scanning errors. These documents did not process. Click Why? for an explanation of why the document did not process, or How Do I Fix? for tips on fixing the error. Click Ok when you have reviewed the summary and/or errors. DataScanner for DataDirector™ 14 Questions? If you have any questions or concerns, contact DataDirector Customer Support at [email protected] or (877)993-2633. Rev 1/3/12 DataScanner™ STEP 4. ACTION Review, Approve, and Commit results— A. Review DataScanner automatically displays unapproved answer documents. You can use the Document Filter to view the other categories of documents scanned: All Documents – displays all scanned documents regardless of their status Approved Documents – displays all documents that scanned correctly and are ready to commit to DataDirector Disapproved Documents – displays documents recognized as DataDirector scan sheets, but contain errors Unprocessed Documents – displays documents not recognized as DataDirector scan sheets. B. Approve See Troubleshooting Disapproved or Unprocessed Documents, below for steps on fixing documents that didn’t process. Click Approve this document to resubmit. C. Commit results Verify in the Summary, that all answer docs have been processed and approved. The total column should reflect all documents scanned. A. Click Commit Results. Results are sent to directly to DataDirector after committing and are available for viewing and reporting. DataScanner for DataDirector™ 15 Questions? If you have any questions or concerns, contact DataDirector Customer Support at [email protected] or (877)993-2633. Rev 1/3/12 DataScanner™ If the acquired image or the data appear incorrect, you can clear the results instead of committing the results and process the answer sheets again. Also, you can clear the data after the results have been approved and committed and start scanning another set of documents for the same test without repeating the search and re-selecting it in the list. There are three ways to clear the results and the image viewer: o From the main menu, go to ActionClear DataKeep Scanning o Click the Clear Data and Keep Scanning Button. o Click the CTRL-X keys. Accessing the Results of Scanned Tests Login to DataDirector to view the results of scanned answer documents. Locate the Assessment and open the Assessment Overview page. Click on any of the reports in the Reports related to this assessment section. Scores from the scanned answer documents are reflected here. Scanned results are also reflected in Exam Reports in the Prebuilt Reports section. DataScanner for DataDirector™ 16 Questions? If you have any questions or concerns, contact DataDirector Customer Support at [email protected] or (877)993-2633. Rev 1/3/12 DataScanner™ Troubleshooting Addressing Unapproved Answer Documents DataScanner expects exactly one marked bubble for each row or column of bubbles. DataScanner will not approve an answer sheet. if more than one bubble is marked for a question, such as "A" and "B" instead of just "A". The reason for not approving this type of situation is to alert you that marginally marked bubbles may exist. It is up to you to decide if these marginally marked bubbles should be treated as marked or unmarked. Documents that are unapproved are displayed with the student responses that caused the document not to be approved flagged in yellow. Some of the reasons a document may not process include: Missing identification information (Student ID, Teacher ID) Incomplete bubbles Multiple responses to a question Sheet was skewed or twisted during scanning DataScanner did not recognize the scan sheet (could not locate the 6 registration marks) How to Resolve Issues You have several options to resolve errors caused by improper answer sheet completion. A. Ignore all highlighted (yellow) responses and grade them all as incorrect. Select the yellow box in the answer document—all highlighted responses will be graded as incorrect. B. Click the yellow text and make manual corrections. C. Adjust the Bubble Sensitivity – Click the down arrow to decrease the sensitivity for faint bubbles, Click the up arrow to increase the sensitivity for dark bubbles, or Click Recapture Current or Recapture All to instantly adjust the sensitivity. DataScanner for DataDirector™ 17 Questions? If you have any questions or concerns, contact DataDirector Customer Support at [email protected] or (877)993-2633. Rev 1/3/12 DataScanner™ D. Set DataScanner to automatically approve documents with blank responses. Go to: File ConfigurationOther Select the option to Approve Blank Answers. This is not necessarily a recommended feature because faintly bubbled responses may not be detected by DataScanner and may display as blank when in fact the student did respond to the question. Use with caution. Troubleshooting Tips Answer documents may be unapproved if student responses are not detected. If responses appear bubbled in on the left side of the screen, but appear as yellow blanks on the right side of the screen, DataScanner may not recognize all six registration or ―T‖ marks. Check your printer settings to ensure it is set to ―Fit‖ or ―Scaled‖ to printer margins before printing. Rescan—Click the red Clear Data and Start Over button and start your scan over. Adjust the sheet feed guides, re-place the documents in the automatic document feeder and rescan. Clean Scanner—scanners collect dust, pencil residue, and other particles with use. These elements may cause documents to twist, crumple, or clump during scanning. Periodically clean the scanner glass and rollers according to the manufacturer’s instructions. Software updates—be sure you are using the most recent version of DataScanner. If there is a newer version available, you will need to uninstall the old version before upgrading to the newest. Restart DataScanner—like any other software application, closing and restarting can be helpful in resolving issues. Calibrate the scanner. See Calibrating Registration Mark Margins page 8. DataScanner for DataDirector™ 18 Questions? If you have any questions or concerns, contact DataDirector Customer Support at [email protected] or (877)993-2633. Rev 1/3/12 DataScanner™ Error Log Errors may occur when committing results to DataDirector due to incorrect site ID, exam ID, student ID, teacher ID, or network connection issues. A log is created to capture these errors and allow the DataScanner session to continue without interruption. These errors are displayed in a pop-up Log Browser after all the results are committed to DataDirector. This log may be saved as a tab-delimited text file on your computer. Save log to computer as text file. List of records that were not committed. DataScanner for DataDirector™ 19 Questions? If you have any questions or concerns, contact DataDirector Customer Support at [email protected] or (877)993-2633. Rev 1/3/12 DataScanner™ DataScanner™ FAQs Why do I need to calibrate? o o o This is necessary to adjust the scanner to render the registration/”T” marks on your answer sheet. Calibrating allows accurate answers to be picked up by DataScanner™. As answer sheets are printed from different printers, calibrating adjusts to the “T” marks on the answer sheets in order to accurately identify student responses. Why are commas in my student id? o o o o This happens when the scanner does not read the student ID bubbles correctly. Most often this is due to answer sheets that were not calibrated. Another possibility could be the bubble sensitivity is not adjusted appropriately. The scanner may have dog-eared your sheets. If the upper left or right corners were folder over and covering the registration marks, this will affect the readability of the answer sheets. Can I edit my student’s responses? o o o Yes, once you have scanned the answer sheets you may make adjustments to the image scanned on the right side of the screen. You may also make corrections to the student’s responses within DataDirector™. After scanning, proceed to DataDirector™ and locate your exam. From there, click on the Student Responses link on the left navigation to make the necessary fixes. If you would like to re-scan a student’s sheet that has already been committed, you must delete their responses from DataDirector™ first. What does the bubble sensitivity do? Bubble sensitivity allows you to adjust for those students that did not mark heavy (dark) enough. Simply raise or lower the sensitivity levels. Lighter bubbles require lower sensitivity and vice-versa. Bubble over/under-sensitivity may also cause commas in your student or teacher id’s How do I scan more answer sheets once I have committed? If you have more answer sheets to scan after committing a batch, click Clear data and start over. What does the error message “An unhandled exception error has occurred” mean? Check your system configurations, i.e. .Net Framework 3.0. See Minimum Requirements, pg 3, above. If you are receiving the following unhandled exception error stating, "The specified module could not be found (Exception from HPRESULT..." you must install the HP scanner driver even though you may not be using an HP scanner. The HP scanner drivers can be downloaded from the www.hp.com >Support & Drivers DataScanner for DataDirector™ 20 Questions? If you have any questions or concerns, contact DataDirector Customer Support at [email protected] or (877)993-2633. Rev 1/3/12 DataScanner™ Why is the image on my screen blank when I am scanning? o o You may have placed one of your answer sheets in upside down. One or more of your “T” marks were covered by a folded corner on the sheet itself. How can I best maintain my scanner? How should I clean it? (for Multi-Function Brother Scanners) o o It is recommended that you clean your glass with glass cleaner and a lint free cloth. It is also recommended that you have your scanners either professionally maintained or purchase scanner cleaner kits. I get the error message “The scanner is offline” what should I do? a. Check the USB connection between your scanner and the computer. b. Verify that the TWAIN driver is installed and selected as the scanning source. See Selecting the Scanning Source, pg 7, above. c. Go to File > Configurations > Connections – make sure the address has www.DataDirector.com and the site name matches the URL in the address bar used when logged into DataDirector™. My device is no longer listed in the Approved Scanners list. Will it still work with DataScanner™? Certain devices have been discontinued by the manufacturer and therefore were not available for testing with the latest release of DataScanner, The following list of dedicated scanners, multi-function devices, and business copiers are currently discontinued and could not be acquired from the manufacturer for testing. Lexmark XS463de Brother MFC-8440 Brother DCP-8065DN HP Scanjet 6010 HP Scanjet N8460 While we expect the following devices to function accordingly, we were unable to certify each scanner according to the latest specifications of DataScanner™v1.3. DataScanner for DataDirector™ 21 Questions? If you have any questions or concerns, contact DataDirector Customer Support at [email protected] or (877)993-2633. Rev 1/3/12 DataScanner™ Other Preferences The setting in the Others tab are optional. • Default Download Directory This is the default directory in which all downloaded files are saved. • Log Files Directory This is the default directory in which all log files are saved. • Server Connection Timeout From time to time, DataScanner™ needs to communicate with DataDirector™ server. Whenever a communication error occurs, due to such conditions as Internet traffic or server load, DataScanner™ will try to re-establish the communication with the server until this connection timeout (in seconds) has passed. Then, an error message will be generated. • Check for version update during program startup Enabling this option will make the software check for updates whenever the program is started. By default, this option is enabled. • Hide scanner program menu DataScanner™ automatically sets the necessary scanning parameters on the scanner. Some scanners may not support this feature. Unchecking this option displays the manufacturer's user interface and allows you to set these parameters manually. The following parameters must be set for DataScanner to work properly: Resolution: 300 x 300 dpi Scan Type: Black and White (1 bit per pixel) • Approve blank answers Enabling this option allow the software approve the answer sheets with blank answers. • Enable error log Enabling this option to log software-generated error messages to a text file. This option is always enabled and cannot be changed. • Enable summary logs for committing results Enabling this option to log the scanning results to a text file. • Always calibrate before scanning documents Enabling this option automatically calibrates before scanning documents. See Calibrating Registration Mark Margins, page 8. DataScanner for DataDirector™ 22 Questions? If you have any questions or concerns, contact DataDirector Customer Support at [email protected] or (877)993-2633. Rev 1/3/12