1
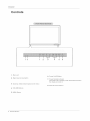
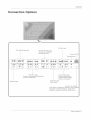
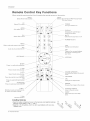
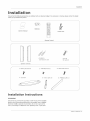
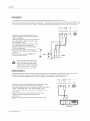
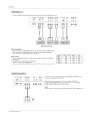
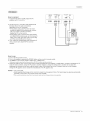
PLAS
O
A
]-OR
42EP24S
i
i!_ i _ _i
i
i
i
i i _ iii
_i_I
i
_i
ii
i
_i_
ill
i_
i i
i
_ii_ _iii iiiiiiiiiiii iiiii _I __i
ii
ii
ii
ii
ii
i_iiii
i
i
i ii_ _
Please read this manual carefully and completely
operating your monitor,
Retain this manual for future reference,
before
i
WARNING
WARNING
:To reduce the risk of electric
shock do notremovecoverorback.
No user-serviceable
parts inside refer service to qualified
service personnel.
Safety of operators has been taken into consideration
at the design and manufacture
phase, but inappropriate operation may cause electric shock or fire. To prevent the product
from being damaged, the following rules should be observed for the installation, use and
maintenance of th product. Read the following safety instruction before starting the operation.
The User Manual uses the following
symbols
any damage to operators
or properties:
THiS
SYMBOL
INS|DE.
iT
WiTH
THiS
ANY
iNDiCATES
iS
SYMBOL
OPERATING
L|T_=RATIJR
Foe
THAT
DANGEROUS
iNSiDE
PART
TO
OF
iNDiCATES
AND
to ensure
MAINTm=NANCE
_= ACCOMPANYING
STATEMENT
HIGH
MAKE
THiS
THAT
a safe
operation
VOLTAGE
ANY
KiND
iS
OF
and prevent
PRESENT
CONTACT
PRODUCT.
THERE
ARm= iMPORTANT
iNSTRUCTiONS
iN
THE
TH _= APPLIANC_=o
]
This equipment has been tested and found to comply with the limits for a Class B digital device,
)ursuant to Part 15 of the FCC Rule. These limits are designed to provide reasonable protection
against harmful interference in a residential installation. This equipment generates, use and
can radiate radio frequency energy and, if not installed and used in accordance with the
instructions, may cause harmful interference to radio communications.
However ,there is no
guarantee that interference with not occur in a particular installation. If this equipment does
cause harmful interference to radio or television reception, which can be determined by turning
the equipment off and on, the user is encourage to try to correct the interference by one or
more of the following measures:
*Reorient or relocate the receiving antenna.
*Increase the separation between the equipment and receiver.
*Connect the equipment into an outlet on a circuit different from that to which the receiver
is connected.
*Consult the dealer or an experienced radio/TV technician for help.
This device compiles with Part ! 5 of the FCC Rules. Operation is subject to the following
two conditions: (1) This device may be not cause harmful interference, and (2) this device
must accept any interference received, including interference that may cause undesired
operation.
FCC CAUTION:
To assure continued compliance and possible undesirable interference, the provided ferrite
cores must be used when connecting this plasma display to video equipment; and maintain
at least 40cm spacing to other peripheral device.
CANADIAN
NOTICE:
This Class B digital apparatus
2
P/asma
Monitor
compiles with Canadian
ICES=003.
Safety
instructions
iMPORTANT
Read
appliance,
SAFETY
iNSTRUCTiONS
all of the instructions
before using this appliance.
When using this
always exercise
basic safety
precautions,
including
the following:
1)Save these Instructions
---the
retained forfuture
reference.
safety
and operating
instructions
should
be
2)All warning on the appliance
and in the operating
instructions
should be followed.
3)Cleaning
--- Unplug from the wall outlet before cleaning.
Do not use liquid
cleaners
oraerosol
cleaners.
Use onlydry
cloth for cleaning.
4)Attachments
---do not use attachments
not recommended
bythe manufacturer
as they may cause hazards.
5)Water and moisture-do not place this product near water, for example,
neara
bathtub, wash bowl, kitchen sink, laundry tub, in a wet basement,
or near a
swimming
pool.
6)Accessories
---do not place this unit on an unstable
cart, stand, tripod, bracket,
or table. Use onlywith
a cart, stand, tripod, bracket, or table recommend
bythe
manufacture,
orsold with the unit.
7)Ventilation---Slots
and openings
in the cabinets and the back or bottom are
provided forvenfilation.
These openings
must not be blocked. In a built in
installation
such a bookcase
or rack do not install product unless properventilation
is provided.
8)Power
Source ---this monitor should be operated
only from the type of power source
indicated
on the rating label. Ifyou are not sure of thetype
of power supplyto
your
home, consultyour
appliance
dealer orlocal
power company.
9)Do not defeat the safety purpose of the polarized
orgrounding-type
plug. A
polarized
plug has two blades with one widerthan
the other. Agrounding
type plug
has two blades and a third grounding
prong. The wide blade orthe third prong are
provided foryour
safety. Ifthe provided
plug does not fit into youroutlet,
consult an
electrician
for replacement
of the obsolete
outlet. To prevent electric
shock, ensure
the grounding
pin on theAC
cord power plug is securely connected.
10)Power
cord protection
---Power supply cords should be routed so that they are
not likely to be walked on or pinched by items placed upon or against them. Pay
particular
attention to cords or plugs, convenience
receptacle,
and the point where
they exit from the appliance.
1 1 )Lighting
precaution
---for added protection
for this product during a lighting
storm orwhen
itis left unattended
forlong
period of time, unplug it from thewall
outlet and disconnect
the antenna or cable system. This will prevent damage to the
product due to lighting and power line surges.
12)Never
push objects of any kind into this product through openings
as they may
touch dangerous
voltage point or short out parts that could result in a fire or electric
shock. Avoid spilling liquid of any kind on the product.
13)Servicing
---do not attempt to service the product by yourself,
as opening or
removing
covers may expose you to dangerous
voltage or other hazards.
Refer all
servicing
to authorized
service personnel.
14)Unplug
this unit from the wall outlet and refer servicing
to qualified service
personnel
underthe
following
conditions:
a. When the power supply cord or plug is damaged
or frayed.
Owner's
Manual
3
Safety
Instructions
b.ffliquid
has been spilled, or objects have been fallen into the unit.
c.Efthe unit has been exposed
to rain orwater.
d.ffthe
unit does not operate
normally
by following
the operating
instructions.
Adjust only those controls
that are covered by the operating
instructions,
as
improper
adjustment
of other controls
may result in damage and will often
require extensive
work bya qualified
technician
to restore the unit to its normal
operation.
e.lfthe
unit has been dropped
ordamaged
in any way.
f.When the unit exhibits
a distinct change in performance;
this indicates
a need
for service.
15)Heat--The product should be situated away heat source such as radiators,
heat
registers,
stoves, or other products
(Including
amplifiers)
that product heat.
16)Overloading
--Do not overload wall outlets and extension
cord as this can result
in a risk offire orelectric
shock.
ESE!
Thank you for using our Haier product.
Thiseasy_to-use
getting the best use of your product.
Remember
to record
number. They are on label in back of the unit.
manualwill
the model
guideyou
and serial
Model number
serial
number
Date of purchase
Staple
4 Plasma
your receipt
Monitor
to your
manual.
You will
need it to obtain
warranty
service.
in
Introduction
Warning ..............................................................
Safety Instructions ............................................
Instruction
Controls .......................................................
Connection
Options .......................................
Remote Control KeyFunctions
.......................
Installing Batteries ........................................
2
3-4
Change Password .....................................
Preset Prog ..............................................
Source Lock .............................................
Child Lock ................................................
Max Volume ..............................................
Unlock .....................................................
6
7
8
8
Screen
Menu Options ...................................
Troubleshooting
Installation
Installation
instructions
................................
VCR Setup/Cable
TV Setup ..........................
External A/V Source Setup ...........................
DVD Setup ..................................................
DTV Setup/Monitor
OutSetup .......................
PC Setup ....................................................
Install the Speakers .....................................
Install the Stand ..........................................
Install the Standto the PDR ..........................
Operation
Turning the Monitor On .................................
Basic Function
Saving Mode ............................................
Operation
Menu .......................................
Sound Mode .............................................
Picture Mode ............................................
Sleep Timer'. .............................................
AVl/S-Video/YPbPr/YCbCr/VGA/DV!
Play.
Picture QualityAdjust
AV1/S-Video/YPbPr/YCbCr/VGA
Menu .....
DVI Menu ................................................
Sound Adjustment ........................................
Adjustment
Setup ........................................
Function Setup
Function Setup .........................................
Menu Language Option .............................
Menu TimeOut Option ..............................
Menu Background
Option ..........................
Auto Off ...................................................
Close Caption ..........................................
Calendar Display andCheck .....................
Parental ..................................................
Time Setup .................................................
Lock Menu Options
Lock Setup ..............................................
Setu p and Operation
Setup and Operation Checklist
(See pages 10--15 for available connection
!. Unpack
Monitor
9
10
11
11
12
13
14
45
15
Maintenance
Product
Checklist
.......................................................
Specifications
Warranty
....................................
26
27
27
27
27
27
28
29
30
.........................................
.............................................................
31
32
16
17
47
17
18
18
:18
19
20
21
22
2,3
23
23
23
23
23
24
24
25
26
Chec k rest
mm
and operationa_ setup options.)
and amlaccessories.
5. Turn Monitor
on.
See page 16.
2. Connect all external video and audio equipment.
see pages 10 - 13.
3. Install the speakers
4. Install batteries
6. Turn video source equipment on.
and stand see pages 15-16,
in remote control.
See page 8.
Owner's
Manual
5
Introduction
7
8
1
2
5
6
1. Menu exit
6o Power On/Off
2. Signal
source
Button
inputoption
7o Power Standby Indicator
illuminates
red instandby
the display isturned on
3, Down/Up.
Select
desired
optionon
the menu
8,
4. VOLUME
5. MENU
6
Plasma
Buttons
Button
Monitor
Remote
Control
Sensor
mode,illuminates
bluewhen
Introduction
C o R n e c ti o R O pt iOn S:
S-Video
VGA Input/Audio
input
Input
DVI Input/Audio
input
connect your cable/PC
through the input
Power
•
o
DVD/DTV Input
Connect a component video/audio
device to these jacks
AUDIO
output
On/Off
I
@
oo
O
Audio/Video
Input
Connect audio/video
output from anexternal
device to these jacks
Exterr a! audio/
video output
Power Cord Sock_
This monitor operateson
ACpower.The
voltageis
indicated onthespecifications
page. Never
attempt to operate the monitor onDC power
Owner's
Manual
7
Introduction
Remote
When
using
Conttom
the
remote
control=
Key
Aim
Functions
it towards
the remote
sensor
on the monitor=
VIDEO
Select AV/S-Video
source\
J
\
PC
PC source---
Select
INPUT
_
/
j
Selects:AV1/S_Video/YPbPr/YC
DVI input source
POWER
Turnyourmonitoron
_
VIDEO
INPUT
DV
MUTE
bCr/VGA/
AUTO
Auto adjust forPC--_-_
DISPLAY
Displays the currentinput
signal information
Select
DV!
DV! source
MUTE
Switches
the soundon
or off
MENU
Bring up the main menu to the screen
Auto volume
-_
................
AVC
control On/Off-_-__
DNR
Digital
noise reduction
EXIT
Clears all omscreendisplays
and return toviewing
from
any menu
LEFT/RIGHT
Press
to confirmthe
Picture
.... UP/DOWN
ENTER
selection
LOCK
P STD
mode menudisplay
S STD
Sound
Press
Q SET
VOLUME UP/DOWN
Increases/decreases
level
CC
mode menudisplay
to enterthe
LOCK
Lock Setmenu
CALENDAR
SLEEP
! / I1
Press to selectleft/right/stereo
track
SURROUND
Press to selectsurround
ON/OFF
ARC
Changes
Q SET
the screen
set sleep
Batteries
cover on the back side and install the batteries
(_
(_)
(_
%
_
Don't mix old or used batteries with new ones.
Replace correct
cover. polarity (+ with +, o with =).
matching
Monitor
this keyto
V_chip
Control
, Install two 1.5V AA batteries.
8 Plasma
the imageon
SLEEP
Press
timer.
- Open the battery compartment
ratio
CC(Closed
Caption)
Select different modes
Selects pre_set userpreferenoes
for audio andvideo
settings
Installing
the aspect
FREEZE
Freezes
Parental
the sound
_
installation
Ensure that the following accessories
where you purchased the product.
//
are incmuded with your plasma dispmay. _f an accessory is missing, please contact the deamer
/
/
Batteries
Owner's Manual
Power Cord
Remote Contro_
J
S
Y
(2.5MX2)
Connection
Speaker
cord
ST4Xt6
Screw(x4)
unit(X2)
1) M4X12Screwsx8
2) M4X8Screwsx2
4) Standxl
5)
brace
pole x2
3) M5X16Screwsx4
6) PMMA baffle
xl
Ia sta mm
at io n n st:t u c:tIo n s:
_
m
GROUNDING
Ensure that you connect the grounding / earth wire to prevent possible
electric shock. _f grounding methods are not possibb, have a quaBified
electrician install a separate circuit breaker. Do not try to ground the
unit by connecting
it to temephone wires, lightening
rods, or gas pipes.
Owner's
Manual
9
Installation
To avoid picture noise (interference),
leave an adequate distance between the VCR and monitor
Do not leavea still picturefrom
a VCRon the screenfor
a Iongtime.
Ifthe 4:3format
is used,the fixed imageson
the
sides of thescreen
may remainvisible
on thescreen,
if thisformat
is usedday after day. This is known asburmin,
it
is uneven wearof the screenarea.
Reduce contrastwhen
displaying
fixedimages
on thescreen
for along time.
@
SWH'CH
AC 4_PU,
O
O
1. Connect the audio and video cabHes from the
VCR's output jacks to the monitor input jacks, as
shown in the figure.
When connecting the monitor to VCR, match the
jack colors (Video = yeH_ow,Audio Left = white,
and Audio Right = red).
_fyou connect an SoV[DEO output from VCR to
the SoV[DEO input, the picture quality is
_HHHHHHHHHHHHHHHHB
m
VCR to the Video input.
._._
_
2. Insert a video tape into the VCR and press
-_'&-_
PLAY on the VOR. (Refer to the VCR owner's
_
improved; compared to connecting a regular
Se.ect
the,op
source
tbythe,O.O
button
onthe
remote
contro,,
manuaH.)
_mmmml
__
_
_---
__
!
l
Do not connect to both Video and S o
Video at the same time. _nthe event
that you connect both Video and the
SoVideo cabHes, onHythe SoVideo wi[[
work. So you should not connect to
S-Video
if you want rouse
Video.
After subscribing to a cabHe TV service from a HocaHprovider you can watch came TV programming. The monitor
dispmay TV programming unHess a TV tuner device or cabHe TV converter box is connected to the monitor.
For further information regarding cable TV service, contact your local cable TV service provider(s).
cannot
SWITCH
AC It_PU_
1. Connect the audio and video caMes from the CaMe Box's output
jacks to the monitor input jacks, as shown in the figure.
When connecting the monitorto
a Cable Box, match the jack co_ors
(Video = yellow, Audio Left = white, and Audio Right = red).
(If you havea digital cablebox
please referto page 12, for
DTV setup)
2. Select the input source by using the _NPUT button on the
remote control (If connected to AV _N, select AVl
input source)
3. Select your desired channel with the remote control for cable
box.
@®®
Cable Box
10
Plasma
Monitor
installation
O
swl rCH
^C INPUT
How to connect
Connect the audio and video cabmes from the external
equipment"s output jacks to the monitor input jacks, as shown
in the figure.
When connecting the monitor to external equipment, match the
jack coUors (Video = yellow, Audio Left = white, and Audio
Right = red).
HOW to use
1. Select the input source by using the INPUT button on
the remote control
_Also,you
could
useshortcut
key onthe
remote
control)
Camcorder
2. Operate the corresponding external equipment.
external equipment operating guide.
Refer to
Video Game Set
HOW to connect
1. Connect the DVD video outputs (Y, Pb, Pr) to the COMPONENT
(Y, Pb, Pr) mNPUTjacks on the monitor and connect the DVD audio
outputs to the AUDIO _NPUT jacks on the monitor,
as shown in the fig-
_p_
ure.
2. _f your DVD only has an SWideo output jack, connect this to
SW_DEO input on the monitorand
connect the DVD audio outputs to
the AUDIO _NPUT iacks on the monitor, as shown in the figure.
NOTE: _f your DVD p_ayer does not have component video output,
use SWideo or composite(AV).
the
How
/
)Or
pbOCb /O
ODOR
/
to use
1. Turn on the DVD p_ayer, insert a DVD.
2. Use the INPUT button on the remote control
to semect YPbPr/YCbCr
(_f connected to S=
VIDEO, semectthe AVl/S_Video
externam input source.)
3. Refer to the DVD pmayer's manual for operating instructions.
o Component
input ports
To get better picture quality, connect a DVD player to the component input ports as shown below.
Component ports
on the monitor
or
DVD
Video output ports
on DVD pmayer
Owner's
Manual
1I
installation
To watch digitally broadcast
programs, purchase
and connect a digital setotop box.
®®÷l
@@
_
L
i
r
Digitam Set-top
How
Box
to connect
Use the monitor's COMPONENT (Y, Pb, Pr) _N jacks, VGA or DV_ IN port for
video connections, depending on your set-top box connections available.
Then, make the corresponding audio connections.
How
Signam
480i
to use
1. Turn on the digitamsetotop box. (Refer to the owner's
set-top box.)
2. Use INPUT on the remote control to semect
YPbPr/YCbCr,VGA,
or DV| source.
(Also,you
could useshortcut
key suchas PC,DVI
.
Monitor
Yes
No
No
control)
Connect the second monitor or TV to the monitor's
@@@@
LJ
Plasma
remote
DVI
No
Yes
Yes
Yes
©
AUDIO
@
12
onthe
480p
720p
!080i
1080P
VGA
Yes
Yes
Yes
Yes
The monitor has a speciam signamoutput capabimity which allows you
to hook up a second monitor or TV.
PYLON I
bW
manuam for the digitam
YPbPr/YCbC_
Yes
Yes
Yes
Yes
AV OUT.
See the Operating ManuaU of the second monitor or TV for further
details regarding that device's input settings.
NOTE
,YPbPr/YCbCr,VGA,
DV_ input sources cannot be used for Monitor out.
Installation
HOW to Connect
1. To get the best picture quamity,adjust the PC
graphics card ,if necessary.
2. Use the monitor's
VGA _N or DVI (DigitamVisua_
_nterface) mNport for video connections,
depending on your PC connector.
_fthe graphic card on the PC does not output
analog and digital RGB simukaneously, connect
onmy one of either VGA BNor DVl _N to
display the PC on the monitor.
_fthe graphic card on the PC does output analog
and digital RGB simukaneously, set the display to
either VGAor DVU; (the other mode is set to P_ug
and Play automatically by the display.)
3. Then, make the corresponding audio connection. _f
using a sound card, adiust the PC sound as
required.
HOw to use
1. Turn on the PC and themonitor.
2. Turn on the dispmay by pressing the POWER button on the monitor"s
3. Use mNPUT on the remote controm to semectVGA, or DV| source.
remote control
(Also,you
could useshortcut
key suchas PC,DVI onthe remote control)
4. Check the image on your monitor.There may be noise associated with the resolution, vertical pattern, contrast or brightness
mode. _fnoise is present, change the PC mode to another resomution, change the refresh rate to another rate or adjust the
brightness and contrast on the menu untimthe picture is cmear,mfthe refresh rate of the PC graphic card can not be changed,
change the PC graphic card or consult the manufacturer of the PC graphic card.
NOTES:
in PC
• Use a DVl cable.
Avoid keeping a fixed image on the monitor's screen for a long period of time. The fixed image may become permanently
imprinted on the screen. Use a screen saver when possibme.
"The synchronization
inputfrom
horizontal
andvertical
frequencies
areseparate.
Owner's
Manual
13
Installation
1, Face the PDPscreen
lay the twospeaker
2,
Insert
3,
Fix the speakerto
upside
aside
downon
ofthe
a cleanblanket
and payattention
not toindent
the casing.
(See figure),
PDP.
the pothooktothefaucetofthe
the PDPwith
or abracket
PDPscreen.
the screws4-ST
4X16.
I
a_\
2, Before
turningonthe
Connect the speaker
cable is inserted
youhaveconnectedtheline
to the speaker terminal
Press the speaker terminal
Release the speaker
PDP,ensure
of plasmascreen:
and insert the connecting
cable intothe terminal
terminal and ensure that the white connecting
in the black terminal
@
The right speaker
Monitor
The left speaker
slot.
cable is inserted
slot, and that anode and cathode
rE
14 Plasma
betweenthespeakerandthePDP.
in the terminal slot marked red and black connecting
poles are correctly connected.
(See Figure )
Installation
Hnstall
After
the PMMA
installing
Baffle
thebrace
rip the protectivesheet
and put thebaffle
Hnstall
1, After
the brace
3,
put thebrace
pole tothe
M4x12
not totouch
the brace
pole;
Fix the PMMAbaffle
screw 2 M4X8rom
Lay down thestand
stand,
tofixit.
the standand
withthe
the front.
Face the PDPscreen
PDPbrace
stand.
pole
Takecare
Fix2
figurebelow)
off of the PMMAbaffle
intothe
use thescrew8
2,
pole(see
upside
downon
a cleanblanket
and putit to respondingposition
pole
tothe
PDP on the backof
or thebracket
of thePDP
and payattention
screen
the plasmadisplay
not toindent
,and make surethe
with 4M5X16
brace
the casing.
poletowards
(See figure)
the holeof
the PDP.
screws.
Owner's
Manual
15
Operation
Tumin 9 the Monitor On
1. Connect power cord correctmy.
2. Press the ON/OFF button on back of the monitor. At this moment, the monitor is switched to standby mode.
press the POWER button on the remote control or (DON/OFF button on the monitor and then the monitor will turn on.
Turning
on the monitor
1. |f the monitor
was turned
* Press the (DON/OFF
2. if the monitor
(power
cord
is still
off with the (D ON/OFF button
button on the monitor
was turned
connected}
off
with the remote
control
Press the ON/OFF button on back of the monitor
turn the monitor
on the monitor
to turn the monitor
on.
and then the
ON/OFF button on back of the monitor
and then press the POWER button on the remote controU to
on.
NOTE
_f you intend to be away on vacation, disconnect the power plug from the wall power outlet.
16 Plasma
Monitor
Operation
B a,_S iiilC F U n C t: ii_;
O_n
Hold Q SET button
1.Press
pressed
_ / _ buttonfor
2.PressA/V
onthe
desired
buttonfor
remote
for3 seconds
untilQuick
Set modesetup
3. Press
QSET
display
4.Press
EXIT button to closescreen
the screen.
Quick Set Setup
setupoption.
setup option.
button (Screen
menu appearson
sees right figure)
display.
Light
Sound
Bright
Noise
Normal
Normal
Gray
Quiet
Dark
(10
seconds
laterafter
the
latest
press,
the
screendisplay
will
disappearautomatically.)
Qu i ck
Set
Mode
Off
Quick
Set
Mode
On
1.Press
MENU
2.Press
_./V
3.Press
MENU to return
4.The
buttonto
button
setup timein
open themain
toselect
Press
andpress
display
willdisappear
button
to selectPIC.,
SOU.,ADJ.,
button
toincrease/decrease
SYS. , FUN. orTIME
the valueor
select
menu.
thesetup.
controller
(This feature
rd_Theater_
whenthe
latest
presettime
expiries.
The menu displaytime
can
and 40 seconds
S STD button on the remote
Music-_Standa
._/_
automatically
EXIT button to exit any menu ifthe
the mode asfollows:
t
submenu,
Press4/_.
to main menu
be set to 5,10,15,20,25,30
5.Press
menu.
canalso
menu isin display.
for menu display,
be changedfrom
and press A/V
button
the sound menu function
to change
screen)
Personal
Sou.Mode
Music
Standard
Theater
Personal
Owner's
Manual
17
Operation
Press
P STD button
mode as follows:
onthe
remote
controllerfor
(This changecanalso
menu display,
bemadefrom
and press A/T"
Picture
button
for desired
menuadjustmentscreen)
Pic.Mode
Bright_Normal-_Soft-*Personal
t
Bright
Normal
Soft
Personal
Every
press of SLEEP
Sleep
0Min_Sleep
If remaining
1. Press
timeof
INPUTbutton
2. Press,&/V
button, the timer
5Min_Sleep
set timeris
will be set inthe following
15Min_Sleep
to bedisplayed,
on theremote
controller,the
buttonforoptionandthenpress
30Min_Sleep
60Min_Sleep
press theSLEEP
following
4/1_
sequence:
120Min_Sleep
0Min
buttononce.
menuwill
buttonor
90Min_Sleep
appear
onthe
screen.
ENTERtoconfirm.
Source
Note:
If AV1 and S-',,/ideo are insertedat
be given to S-Video.
the sametime,
priority
will
AV1/SWideo
YPbPr/YCbCr
VGA
DV!
18 P/asma
Monitor
Operation
P ic t
re Q
Picture
canbe
quality
The picture
1. Press
qualityon
adjusted
forany
the screencan
MENU button and
AV1/S-Video
! ity A
4/_*
st
input separately.
be adjusted
as follows:
untilthefollowing
menuappearsonthescreen:
menu:
Mode
Personal
Contrast
Brightness
[
50
]
Color
[
50
]
Tint
[
0
]
Sharpness
[
50
]
DNR
Auto
I P_C.I s0u. I ADJ.I sYs.I FUN.I T_ME.I
A
YPbPr/YCbCr
menu:
Mode
Personal
Contrast
Brightness
[
50
]
Color
[
50
]
Tint
[
0
]
Sharpness
[
50
]
DNR
(Not available)
Auto
I
(Not a'vailable)
A
VGA menu:
Mode
Personal
F
J
Contrast
Brightness
[
50
]
Color
[
50
]
Tint
[
0
]
Sharpness
[
50
]
DNR
II
i
(Not available)
Auto
(not
available)
Owner's
Manual
19
Operation
DV! menu:
Mode
Personal
Contrast
Brightness
Color
[
[
50
50
J
J
Tint
[
0
J
Sharpness
DNR
[
50
Auto
J
(not available)
(not available)
2.Press
A/Y
buttontoenterpicturemenuandtoselectdesiredoption,thecurrentitemis
3. Press4/l_
4. Repeat
marked
yellow.
buttonagaintoadjustselectedoption.
step2 and 3until
any operation
in sequence
desired
picturequality
,the menu disappearsfrom
orimmediately
has beenachieved
the picture,
If MENUor
. Whendisplayed
EXIT button
time formenu
is pressed,
setup expireswithout
the menuon
display
respectively.
Note:
1.When
Personal
mode is not selected,
Color, Tint and Sharpness
2.Noise
20
Reduction
Plasma
Monitor
parameters
mode (DNR)
the Personal
mode can be entered
automatically
areadjusted.
can besettoAuto,Off,
Weak, Medium
or Strong.
if Contrast,
Brightness,
willdisappear
Opermdon
Soui!n d
adjustm e
Sound can beadjusted
1. Press
MENU button
2. Press
A/T
for anyinput
and _/I_
as follows:
button until the following
toentersoundsetupmenu,
menu appears
and press A/V
on the screen.
button
again for desiredoption.
VoUume
BaUance
3. Afteryour
option
isselected,
press _ / _ buttonto
Mode
adjust.
Personam
Treble
4. Repeat
step2
and 3until
when
displayed
timefor
desired
soundhas
Bass
been achieved
Surround
operation
, themenu
or EXIT button
in sequence
menu setupexpires
disappears
is pressed,
fromthe
without
picture
the menu in display
orimmediately
any
On
AV0
Off
.If MENU
will disappear
respectively.
Note:
1. Select
Balanceto
indication
value
respectively.
weaker
2.When
balance
of Balance
When
and stronger,
Personal
rightand
increases
indication
left soundchannels
toward+SO,
value of Balance
of the monitor.
sound ofthe
decreasestoward
The intermediate
right and leftspeaker
-50, soundof
value
becomes
the rightand
is0. When
strongerand
weaker,
left speakerbecomes
respectively.
modeisnotselected,thePersonalmodecan
beenteredautomaticallyifTrebleorBass
parameters
are
adjusted.
3.AVC:AutomaticVolume
Control.
This feature
maintainsa
fixed volumefor
differentlevels
of programmaterial,
like loud
commercials.
Owner's
Manual
21
Operation
Adjustment
In VGAand
Setup
DVI inputmode
, H Position
and VPosition
can beused
to
VGA/DVm:
adjust
the pictureposition.
WhenVGA,
DVlinput
modeisset
Display
1. Press MENU
button
on theremote
option of pictureposition
2. Press&/Vto
controller
position
Reset
setup
Auto
4. Press 4/_
fordesired
satisfactory
received,
desired
value
adjust parameter
option.
parameteroption
until
adjust
is achieved.
When VGAsignals
the automaticmode
Screen
RGB
menu ofpicture
3. Press,&/Ybuttonfor
Full
Adjust
and</_for
adjust.
enterthe
Mode
is usedfor
Sync.
0olor
Temperature
Normal
Black
Stretch
ON ...............
are
parameter
adjustment.
Note:
Z_
Adjust,
RGBandResetarefunctionalonly
1)Adjust
is optedfor
parameters
available
2)RGB
adjusting
HPosition
DV! mode,andAutoSyncisfunctionalinVGA
and VPosition
in VGA and DVI modes.(PhaseAdjust
as wellas
H Size
adjustment
and bluein
VGA/DV!
ofthe
Complete
4)Autosync
numerical
valueof
red,
H Posit
on
V Size
mode.
3)Resetisoptedforadjustment
operation,
relative
isnot
in DV!)
is optedfor
green
underVGAand
ofparameters
V Posit
(After the
will be on the right of the option)
Phase
on
Adjust
isoptedforadjustmentofpicturelocationfreque-
ncy and phaseparameters
DV!)(After
the operation,
in VGAmode.(Not
Complete
available
will beon
in
A
the rightof
the option)
5) Under theVGA
signal, there
4:3 Mode forDisplay
Under theAVlor
S-Video
Zoom, Half Zoom,
Display
Mode toselect.
Under the DVIsignal,
22 P/asma
signal,
there
Green
there
are Full Screen,
Panoramaand
areFull
Red
Screen
Blue
4:3 Modefor
and4:3
Mode for
Mode toselect.
6) ColorTemperatureis
normal
, one to one and
mode toselect.
Vertical
Display
are Full Screen
and warm.
Monitor
opted forcolor
parameters
ofcold,
A
mode.
Not
available
Operation
F
iun_ctuii@in
Setup
m
It is possibleto
1. Press
select
language,OSD
MENU button
translucent,
once, and the 4/_
2. PressA/Vbuttonon
button
the remotecontroller
3. Press
,A/_"
toselect
desired
4. Press
4/_
toadjust
selected
optionon
positionand
untilthe
to enterthe
screen
following
displayof
the menuas
menuappears
menu ofsystem
follows:
on thescreen:
setup.
AVI:
the menu.
option.
Language
EngHish
Menu
Timeout
15seconds
Menu
Background
Transmucent
0alendar
Auto
Off
Omose
Off
Caption
Off
Parentai
-_
I PIC. I sou. I ADJ.I SYS.
I FUN.I TmME.
I
A
Repeat
step 3and
4 toseiect
English,
Francaisor
Espanol
asthe
Repeat
step 3and 4 to select
menu displaytime
Repeat
step 3and 4 toselect
OSD background
Repeat
step3and4t_se_ectOn/Off.IfOnisselected,andthereisnosigna_t_them_nit_rf_r2minutes,
be onthescreen
andfor3
minutes
monitor
for3minuteswithoutanyoperation,
Repeat
step 3and
(Note:
Close
4 toset
Caption
for 5,10,15,20,
menu language.
between
25, 30 or 40 seconds.
Translucentand
the monitorwillbeinstandbycondition.
"Haler"
Opaque.
If Offisselected,andthereis
"Auto
Off"
no signalto
will
the
will beonthescreen.
up Off/CC1/CC2/CC3/CC4/TXl/TX2/TX3/TX4/XDS.
is only availablein
AV and S-Video
signal)
Owner's
Manual
23
Operation
Repeat
step 3and
press
4/_orENTERbuttontoentercalendar
menuasfollows:
!981-01-01
SJ_
Enter Calendar
Designate
menu, press A/V
and press _or
ENTER
Mon.
Tue.
Wed.
Thu
Fri.
Sat.
1
2
3
4
5
6
7
8
9
10
II
12
13
14
15
16
17
18
19
20
21
22
23
24
, 25
26
27
28
29
30
3/
and 4/_
buttonto
button to adjust
or check the date.
enter Parentalsubmenu
as follows:
PassWord
Initial
The
password
password
is0000,
herewill
andsecuritydefault
also
....
passwordis9443.1fthepasswordintheLockSet
menu
changed,
change
Parental
Parental
Control
Unrated
Program
TV Rating
Movie
Select
option
3and 4 onthe
menu, enterthe
submenu
Off
BUock
Off
Limit
Rating
Limit
as follows:
Rating
TV-Y
TV-Y7
TV-G
TV-PG
TV-14
TV-MA
ALL
V
V
V
V
V
V
V
S
L
D
Movie Rating Limit
G
PG
PG-13
R
NC17
X
V
V
V
V
V
V
V
V
V
V
V
V
V
V
V
V
V
V
TV Rating Limit
Note:
If someoption
is locked, the options
TV Rating
Limitand
(Parental
isonlyavailableinAVand
24 Plasma
Monitor
Movie
ofthe
same levelwill
Rating Limit can onlybe
S-Videosignal)
also be locked
opted whenParental
and thescreen
Control
displays
isset to Custom.
Lock.
Operation
T
u
If Off-timeor
1.After
On-time
choosing
2. If Clock
thetime
for OffTime
Otherwise,
andOn
time fromthe
inAV1/S-Video/YPbPr/YCbCr/VGA,
function
is set, time youset
a point oftime.
account
isintended
Timewill
fromthe
main menu,press
for Off Timeand
ifCIock
is notset,
be a period
time whenyou
,A/Y
follow
to select
theinstructions
theclock
as below:
,then press,,_/I_
to adjust.
On Time will be
time youset
Clock
of time. And itwill
Off
--:-Time
--:--
On Time
set automatically.
--:--
Note:
A
The SleepTime
andOff
Time can notbe
set atsimultaneously.
If both time areset,
thelater
setup will be in
operation.
Indication
will appearon
the screen 1 minute
priorto
expiration
ofthe
set time.
Off
Time
Owner's
Manual
25
Operation
Lock
Press
Opt:! i on
Nenu
LOCK buttonon
remote
menu willl be entered.
stay at thefirst
Password
If thepassword
place.
will disappear
control,
PressEXlT
will appearon
is notcorrectly
toerase
entered,
the window.
the screen.
youwill
If timeyou
If password
be requiredto
set inOSD
iscorrectly
reenter
entered,
the Lock se
thepassword
menu expiresafter
and thecursor
the latestpress,
will
the menu
automatically.
Lock
Set
PassWord
1.The
password
Password.
canbe
Press_/_orENTER
Old Pw.---,which
is entered.
display
changed.
will stayon
Ifcorrect
New Pw.----.
Confirm-===.
is not correctlyentered
,A/y
button,
thescreen
the screenif
password
isentered
thescreen
and select
Off
100
Unlock
will display
the screen
the newpassword,
password
twice,
button
Off
a wrongpassword
isentered,
Thenenter
If thesame
Press
Preset
Prog,
Source
Lock
OhiJd
Lock
Max Volume
will
and thescreen
correctly
will display
twice, the old passwordwill
will displayNew
Pw.----,then
be changed.
you haveto
reenter
If the same password
thepassword.
Note:
The initial
cannot
passwordis
0000, and thesecurity
default
passwordis
9443,
If Unlockis
activated,
the password
setup
be changed,
Caution:
The monitor
hasthe
to be set. The initial
function
password
ofsecurity
default
of the monitor
lock. Password
is0OOO and security
needs robe entered
default
password
whenthe
program
is 9443.
PassWord
Change
[ _,--
password
Old Pw.
New Pw.
Press
digit buttonon
the remotecontrol
to enterthe
digits.
Con1:i rrn
26
Plasma
Monitor
Iockmode
is
Operation
Preset
Prog.
button,
sources
entered
isopted
for setting
oanbe
swapped
if the monitor
Source
Lock isopted
the option,
andpress
Press A/Ybutton
Source
Lock.
will display
whenscreen
If lock models
PressA/T'
button
inactivated
automatically.
can be erasedby
Press
enter
Child
Prog.
to select
value
volume
is over Max Volume,when
volume
is belowmaximum
A/V
is set, when volume
button
and the maximum
to select
volume
Lock.
andset
toset
resumed
laterafter
andthe
Press
4/
be entere
byentering
Volume.
Press
customerset
relative
modeoff
On orOff
mode. If lock onmode
mode. Press_/_or
is set, Child
Lock is
thescreenwilldisplayChildLock,
the screendisplay
Lock Setmenu
to setChild
_/_,
for
willstay
button toselect
Source
Lock
AV1
Off
S-Video
Off
YPbPr/YCbOr
Off
VGA
Off
DVl
Off
the screen
button
volume
will become
which
will disappearauto-
Lock off or activeUnlock.
adjustment
the sound value cannot exceed
volume
A/Y
screen
Inlock
the latestpress,
Lock Set menu is set, current
Unlock
returns
button
is being adjusted,
volume,
and VGA. Press
Menu.
seconds
Max
PresetProg..
to set up the mode of
Ifbuttonsonmonitorarepressed,
press of EXlT button.5
select
Lock menu
displayedon
submenu
Lock. Press _/_
Insuchcase,
certain
Press
button
mode activatedand
SourceLock
in thePreset
toselect
button
4/_
S -Video
mode will be entered
is blank, icon Lock will be always
The Child Lock mode canbe
A,/_'
to displaySource
set on,the
with themute
buttonto
mode. After setup, the set modewill
input modes, such asAV,
option. Press
Lockis
to beverified,
or select Unlockmode
matically.
desired
Source
A/V
again,
or ENTERbutton
bluebackground
on mode,
andon
to hinderexternal
4/_
Press
inAVl/SVideo/YPbPr/VGA/DV!/Off
is switchedoff
to select
Ifsome
up start signalresource.
maximum
between
0 -_ 100.
volume
set maximum
value.
volume.
If
a
Ifcurrent
If current
unchanged
ENTER button
to unlock all set modes, setting
all lock options
to off,
to 100.
Owner's
Manual
27
Operation
i
Menu Opton
Seree
=
=
=
=
RGB (PC) mode only; This function doesn't work for RGB=DTV mode.
Automatically adiusts picture position and minimizes image shaking .
After adjustment, if the image is still not correct, your monitor is functioning
The Auto sync are not active in DV_ mode.
proper_y but needs further adjustment.
1. Press the MENU button and then use 4 / I_ button to select the ADJ menu.
2. Press the A/Ybutton
to select Auto Sync
3. Press the 4 / _ or ENTER
button to run Auto Sync.
• When Auto Synchas finished,
a better quality picture will be shown on screen.
_f the position of the image is stil_ not correct, try Auto adjustment again.
Note: It is better
to useResetinsteadofAutosyncin48OP,72OP,1080i,
4. _n RGB (PC) mode, if the image needs to be adjusted more after using Auto
Sync.
you can try AutoSync
again.
Caution: If a 4:3 or one to one fixed image is on the screen for a long time, it may remain visible. This is called burn=in.
= Set every aspect ratio for Video, Component 480i sources.
= Use 4:3, or !6:9 for other RGB=PC and DVm=PCsources.
= Horizon is available for Component (480p,720p,1080i),
DTV (480p,720p,1080i) sources.
!. Press the ARC button repeatedmy to select the desired picture format.
,4:3
Mode
Choose 4:3 when you want to view a picture with an original 4:3 aspect ratio, with b_ack bars appearing at both the
left and right sides.
• Full screen(
Choose
® One
correspond
Full Screen
to fill the entire screen.
to one
Choose One to onewhen
mode and modesof
®Vertical
Zoom
=Choose
Vertical
• Half
with 16:9)
when you want to adjust the picture horizontally, in a linear proportion
you want to adjust the picture in real proportion
(Only available
in PC signal,
especial
for 80OX6O0
under it)
Zoom when you want to adjust
the picturevertically,thatiswithoutanyback
bars
Zoom
= Choose Half Zoom when youwanttoenlargethepictureverticallybyenlarge
bottom are stillon the screen.
topofthe
picture,
thatisthelettersonthe
Panorama
= Choose
Panorama
whenyouwanttoenlargethetwosidesofthepictureinanomlinear
Note: Thesetting
of aspect
in different source
ratio is respectivein
differentsignal
= This function works in the following modes:
RGB=PC, RGB=DTV (480p,720p,1080i),
DV_=DTV (480p,720p,1080i),
PONENT (480p,720p, 1080i).
source
COM-
1. Press the MENU button and then use _ / _ button to select the ADJ menu.
2. Press theA/'_button
to select Adjust
3. Press the 4 / _ or enter
4. Press theA/T
5. Press
28
button to select
MENUor
Plasma
button to enter thesubmenu
Monitor
EXITto
exit it.
one optionand
then press_
/ _to
adjust
proportion.
,that means different
aspect
ratiocould
be saved
Troubleshooting
Checklist
Tro u b mes h oot _mn g C h ec k m_ st
itor is turned on from both front button
and theback_
!
d into wamlpower outlet?
R
!
t, pmuganother product's power cord into the outlet
er cord was plugged in.
Press the VOL+
,J
button.
'_
/
,J
Sound muted? Press MUTE button.
Check to see if there is any object between the monitorand
the remote control _
causing obstruction.
The remote
control
.
Are batteries installed with correct polarity (+ to %= to =)?
(Refer to p.8)
® Correct remote operating mode set:
VCR etc.?
This is normal, the image is muted during the display
startup process. Please
contact your service center, if the picture has not appeared after five minutes,
Select Color
Temperature
in the ADJ menu and press the
4/_
j
button
to adjust.
No or poor
Color.
Keep a sufficient distance between the monitor
and the VCR.
Activate any function to restore the brightness of the picture.
%
J
ii ¸!
!
Check for local interlerence
Adjust Balance
such as an emectrica_appliance or power tool
Unusuall
sound
_
_!n_idOti_oiit-or
J
in the SOU. menu. (Refer to p.21)
A change in ambient humidity or temperature
|
M
J
may result in an unusual noise
from
m
when the p,asma disp,ay is tumed on or off and does not ",ndlcate
'
a fau,t wlthit
'
Owner's
J
Manual
29
Mamtenance
- Early malfunctions
new monitor.
can be prevented. Careful and regumar cleaning can extend the amount of time you wiii have your
Be sure to turn the power off and unplug the power cord before you begin any cleaning.
1. Here's a great way to keep the dust off your screen for a while. Wet a soft cmoth in a mixture of lukewarm water and
a little fabric softener or dish washing detergent. Wring the cloth unti_ it's ammost dry, and then use it to wipe the
screen.
2. Make sure the excess water is off the screen, and then let it aff-dry before you turn on your monitor.
To remove dirt or dust, wipe the cabinet with a soft, dry, lint-free cloth.
Please be sure not to use a wet cloth.
If you expect to leave your monitor dormant for a long time (such as a vacation), it's a good idea to unplug
the power cord to protect against possible damage from lightning or power surges.
The PDP Manufacturing
Process:
a few
minute
colored
dots
may be present
on the
PDP screen
The PDP (Plasma DispRay Panel), which is the dispUay device of this product is composed of 0=9 to 2.2 million cells. A few ceBU
defects will normally occur in the PDP manufacturing process. Several tiny, minute colored dots visible on the screen shoumd be
acceptable. This amsooccurs in other PDP manufacturers' products. The tiny dots appearing does not mean that this PDP is defec=
tive. Thus a few cell defects are not sufficient cause for the PDP to be exchanged or returned. Our production technology mini=
mizes these cell defects during the manufacture and operation of this product.
30
Plasma
Monitor
Specification
Dimensen(WXHXD)
Unit::inches/mm
(main compoment)
Weight (pounds / kg)
Resolution
Power requirement
Color
System
41.3X3.4X26.1/1050X664X86
60.6/27.5
852X480(Dot)
120V-
, 60Hz
NTSC
Comor
16,770,000 (256 steps of each R, G and B)
Operating Temperature Range
32 - 104°F (0 - 40°0)
Operating
Humidity Range
Maximum Elevation
Impedance
Input
consumption
Speakers
Size(WXHXD'
(inches/ram)
Weight
(pounds/kg)
Less than 80%
656! feet (2O00m)
8_)
2X10W
4.3X21.9X2.4/110X556X62
2X5.5/2X2.5
* The specifications shown above may be changed without notice for quality improvement.
Owner's
Manual
31
WarraRty
This Haier brand product, when shipped in its
original container, will be free from defective
workmanship and materials, and Haler agrees
that it will, at its option, either repair the defect or
replace the defective product with a new or
reomanufactured equivalent at no change to the
purchaser, for parts or labor for the periods set
forth below.
This warranty does not apply to the appearance
of the product or the exterior of the product,
which has been damaged or defaced, altered or
modified in design or construction. It does not
apply to the additional excluded items set forth
below,
The warranty commences on the date the item
was purchased and the original purchase receipt
must be presented to the authorized service
center before warranty repairs are rendered.
The limited warranty described herein is in
addition to whatever implied warranties may be
granted to purchasers by law. ALL IMPLIED
WARRANTIES INCLUDING THE WARRANTIES OF
MERCHANTABILITY AND FITNESS FOR USE ARE
LIMITED TO THE PERIOD(s) FROM THE DATE OF
PURCHASE. Some states do not allow limitations
on how long an implied warranty lasts, so the
above [imitation may not apply to you.
Neither the sales personnel of the seller nor any
other person is authorized to make any
warranties other than those described herein, or
to extend the duration of any warranties beyond
the time period described herein on behalf of
Haier.
32
Plasma
Monitor
The warranties
described herein shall be the sole
and exclusive warranties granted by Haier and
shall be the sole and exclusive remedy available
to the purchasen Correction of defects in the
manner and for the period of time described
herein shall constitute complete fulfillment of
obligations and responsibilities of Haler to the
purchaser with respect to the product and shall
constitute fuji satisfaction of a[[ claims, whether
based on contract, negligence, strict liability or
otherwise. In no event shall Haier be liable, or in
any way responsible, for any damages or defects
in the product which were caused by repairs or
attempted repairs performed by anyone other
than an authorized service center or dealer, nor
shall Haier be liable, or in any way responsible,
for inddenta[ or consequential economic or
property damage. Some states do not allow the
exclusion of incidental or consequential damages,
so the above exclusion may not apply to you.
THIS WARRANTY GIVES YOU SPECIFIC LEGAL
RIGHTS. YOU MAY ALSO HAVE OTHER RIGHTS
WHICH VARY FROM STATETO STATE.
Warranty period for this product: 90 days for
labor, one year for parts, in home service.
Additional items excluded from warranty
coverage: nonorechargeabie
batteries.
What to do to obtain service or to obtain product
literature, accessories, supplies or customer
assistance: Simply call 1o877-337-3639.
Be sure to have proof of purchase.
VO.2
0090506332