1
By Dogtra
Remote Controlled Dog Training Collars
Owner's Manual
Please read this manual thoroughly
before operating the Dogtra ARC training collar.
1
1
Product Safety and Health Statement
Proper e-collar use
Dogtra e-collars are intended for the sole purpose of
EHKDYLRUPRGL¿FDWLRQRIGRJV7KH\DUH127LQWHQGHGIRU
human use or use on other animals. Dogtra Company does
not assume any liability for the improper use of a Dogtra
e-collar.
Aggressive dogs
Dogtra highly recommends consulting a dog training
professional when using an e-collar to correct dogs that are
aggressive towards other dogs or people.
Interference with other electronic devices
'RJWUD¶VLQGXVWU\OHDGLQJWHFKQRORJ\¿OWHULQJV\VWHP
ensures minimal interference with other electronic devices
JDUDJHGRRURSHQHUVPRELOHSKRQHVHWF2XUGLJLWDO
microprocessor offers thousands of unique codes to
eliminate frequency match-up with other Dogtra e-collars.
Dogtra recommends consulting your physician if you are
going to use the e-collar and you have any type of medical
devices.
Duration your dog can wear the unit
/HDYLQJWKHUHFHLYHUFROODULQWKHVDPHORFDWLRQRQWKH
dog’s neck for an extended period of time can cause skin
irritation. If the dog is to wear the e-collar for long periods,
RFFDVLRQDOO\UHSRVLWLRQWKHUHFHLYHUFROODUVRWKDWWKHFRQWDFW
points are moved to a different location on the dog’s neck.
Make sure you check for skin irritation each time you use
the unit. If your dog exhibits signs of skin irritation, consult
with a veterinarian.
Reaction to the stimulation
Every dog has a different tolerance and reaction to the
VWLPXODWLRQ3OHDVHORRNDW\RXUGRJ¶VUHDFWLRQWR¿QGMXVW
the right level of stimulation. The stimulation level may
YDU\GHSHQGLQJRQWKHVLWXDWLRQDQGGLVWUDFWLRQV1RUPDOO\
a distracted dog (chasing another dog, squirrel, etc.) will
require a higher level of stimulation compared to when
there is no distraction.
Training Methods
E-collars can be used with many different methods. If you
have any concerns in the training methods provided by
Dogtra, consult with a dog training professional.
Inadvertent activation
If the constant button is held down for 12 seconds or more,
the unit will automatically shut down. It reactivates when
the button is released and depressed again.
Proper Fit
$ORRVH¿WFDQDOORZWKHUHFHLYHUFROODUWRPRYHDURXQGRQ
the dog’s neck. When this happens, the contact points may
rub the skin and cause irritation. If the unit is too loose, the
contact points will not make proper contact and your dog
will not receive consistent stimulation.
2
3
Table of Contents
At a Glance ........................................................ 5
Main Features of the ARC ...................................... 6
2YHUYLHZ........................................................... 7
Understanding your training system
+RZWRWXUQWKH$5&RQRII............................... 9
2. How the transmitter buttons work ....................... 10
&ROODU¿WWLQJ................................................. 12
+RZWR¿QGWKHULJKWVWLPXODWLRQ......................... 13
5. To maximize the distance ................................. 13
6. The LED indicator .......................................... 14
7. Charging the battery ........................................ 15
8. How to change the stimulation intensity ................ 16
9. The handheld transmitter LCD ........................... 17
10. Code setting ................................................. 18
11. How to attach the belt clip on the ARC ................ 19
12. How to use the test lamp .................................. 20
General Training Tips ............................................ 22
Maintenance ...................................................... 24
Troubleshooting Guide .......................................... 25
Warranty and repair information .............................. 27
4
At a Glance
Transmitter
2ZQHU
V
Manual
5HFHLYHU
Collar
Belt clip
Battery
charger
Splitter
cable
Test lamp
Optional accessories
Field auto charger
'RJWUD¶V¿HOGDXWRFKDUJHUVDUHGHVLJQHGIRUXVHZLWKD
volt car outlet.
European charger
Dogtra’s European chargers are designed for use with a
230V AC electrical outlet.
To purchase accessories, please visit Dogtra’s online store
at shop.dogtra.com or call customer service at 1-888-8119111.
5
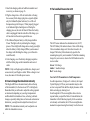
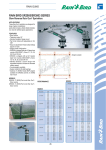
Main Features of the ARC
Overview
5KHRVWDWYROXPHVW\OHZLWKVWLPXODWLRQOHYHOVa
Antenna
3/4
PLOHUDQJH
Rheostat
intensity dial
1LFN&RQVWDQWQRQVWLPXODWLQJ3DJHUYLEUDWLRQPRGHV
/RZ0HGLXP6WLPXODWLRQ
User expandable to a two-dog system
Fully waterproof
LCD screen
Belt clip
For dogs as small as 15 lbs
Indicator
light
(LED
window)
1st-dog
Pager
(gray
button)
2nd-dog
Pager
(orange
button)
1LFN
&RQVWDQW
toggle
switch
2QRII
switch
(mode
button)
1st-dog
1LFN
Constant
(gray
button)
2nd-dog
1LFN
Constant
(orange
button)
Belt clip
LCD
screen
2QRII
magnetic
red dot
Battery
charging
receptacle &
rubber plug
2-hour rapid charge batteries
Transmitter
6
7
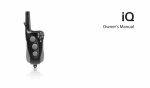
Understanding your training system
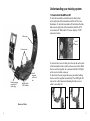
1. How to turn the ARC on/off
To turn the transmitter on, hold down the blue button
on the right side of the transmitter until the LCD screen
illuminates. To turn the transmitter off, hold down the blue
button on the right side of the transmitter until the LCD
VFUHHQVKXWVRII:KHQWKH/&'VFUHHQGLVSOD\V2))
release the button.
Collar strap
2QRII
Button
Contact points
2QRII
magnetic
switch red
dot
Battery charging
receptacle &
rubber plug
Indicator light
(LED window)
7RDFWLYDWHWKHUHFHLYHUFROODUSODFHWKHUHGGRWRQWKHEDFN
RIWKHWUDQVPLWWHUWRWKHUHGGRWRQWKHUHFHLYHUFROODU+ROG
the two red dots together for a moment until the LED light
RQWKHUHFHLYHUFROODUFRPHVRQ
To deactivate the unit, repeat the same procedure holding
the two red dots together momentarily. The LED light will
WXUQUHGIRUDEULHIPRPHQWLQGLFDWLQJWKDWWKHUHFHLYHU
collar is now shut off.
Receiver/Collar
8
9
2. How the transmitter buttons work
7KH$5&WZRGRJXQLWKDV¿YHEXWWRQVDQGDWRJJOHVZLWFK
on the transmitter (Two on the face of the transmitter, two
on the left side, and one on the right side.).
1LFN&RQVWDQW
toggle switch
1st-dog
1LFN&RQVWDQW
(gray button)
Pager Button
7KH³3DJHU´EXWWRQVDUHORFDWHGRQWKHIDFHRIWKH
transmitter.
7KHRUDQJHEXWWRQFRUUHVSRQGVZLWKWKHRUDQJHUHFHLYHU
FROODUDQGWKHJUD\ZLWKWKHEODFNUHFHLYHUFROODU3UHVVLQJ
it will give a non-stimulating vibration for as long as the
button is depressed, for up to 12 seconds.
2QRIIVZLWFK
(mode button)
1st-dog
Pager
(gray button)
2nd-dog
1LFN&RQVWDQW
(orange button)
2nd-dog
Pager
(orange button)
Nick & Constant toggle switch
Located on the face of the transmitter is a toggle switch.
7KHWRJJOHVZLWFKKDVDVHWWLQJIRU³1LFN´DQGDQRWKHUIRU
³&RQVWDQW´7KHFRORUFRRUGLQDWHGEXWWRQVRUDQJHIRUWKH
RUDQJHUHFHLYHUFROODUDQGJUD\IRUWKHEODFNUHFHLYHUFROODU
will implement the desired stimulation based on the toggle
switch setting.
When either the orange or gray stimulation button is pressed
DQGWKHWRJJOHLVVHWRQ³1LFN´WKHUHFHLYHUHPLWVDVLQJOH
pulse of electrical stimulation.
When you press either the orange or gray stimulation
EXWWRQDQGWKHWRJJOHLVVHWRQ³&RQVWDQW´WKHUHFHLYHU
emits a continuous stimulation for as long as the button is
pushed, for up to 12 seconds to the corresponding collar. If
the button is not released after 12 seconds, the stimulation
will automatically stop as a safety feature. The collar will be
ready to be reactivated once the button has been released.
10
11
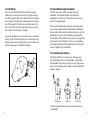
3. Collar fitting
4. How to find the right stimulation
7KHUHFHLYHUFROODUVKRXOGEH¿WWHGVRWKDWWKHVXUJLFDO
VWDLQOHVVVWHHOFRQWDFWSRLQWVSUHVV¿UPO\DJDLQVWWKHGRJ¶V
VNLQ:KHQSURSHUO\¿WWHG\RXVKRXOGEHDEOHWR¿WD¿QJHU
or two snugly in between the contact points and your dog’s
VNLQ:KHQSURSHUO\¿WWHGWKHUHFHLYHUFROODUVKRXOGQRW
PRYHRQWKHGRJ7KHEHVWORFDWLRQIRUWKHUHFHLYHUFROODU
box is either side of the dog’s windpipe.
The ARC unit comes with the rheostat dial on the
transmitter. The rheostat intensity dial controls the
stimulation level, with level 0 being the lowest level and
level 127 being the highest.
$ORRVH¿WFDQDOORZWKHUHFHLYHUFROODUWRPRYHDURXQGRQ
the dog’s neck. When this happens, the contact points may
UXEWKHVNLQDQGFDXVHLUULWDWLRQ,IWKHUHFHLYHUFROODULVWRR
WLJKWWKHGRJVPD\KDYHGLI¿FXOW\EUHDWKLQJ
The level of stimulation best suited for your dog depends
on your dog’s temperament and threshold for stimulation.
Always start at the lowest level and work your way up. The
appropriate level can be found when the dog responds to
the stimulation with a mild reaction, such as a tensing of the
neck muscles. The stimulation level may vary depending
on the training situation. When highly distracted, dogs will
require a higher level of stimulation.
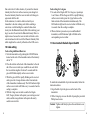
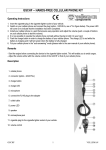
5. To maximize the distance
7KH'RJWUD$5&KDVDPLOHUDQJH7KHUDQJHPD\
vary depending on the way the transmitter is held. Hold
the transmitter away from your body to receive the greatest
range. For maximum signal strength, keep the Dogtra ARC
properly charged.
Maximum range
Typical range
Minimum range
*Avoid touching the antenna or the range may decrease
substantially.
12
13
6. The LED indicator
7. Charging the battery
7KH/('LQGLFDWRUÀDVKHVHYHU\VHFRQGVZKHQWKH
receiver is on and ready for use. The LED indicator will
blink on both the transmitter and the receiver when the
transmitter buttons are pressed.
The LED indicator color indicates the battery life level.
Green = Fully charged, Amber = Medium, Red 1HHGV
charging
If the unit is used while the LED indicator is red, it will shut
down automatically.
Dogtra ARC uses Lithium-Polymer batteries.
&KDUJHWKHXQLWEHIRUHXVLQJWKHXQLWIRUWKH¿UVWWLPH
'RQRWFKDUJHWKHEDWWHULHVQHDUDQ\ÀDPPDEOH
substances.
3. Fully charge the batteries if the unit is to be stored
without use for a period of 3 months or more.
Receiver Indicator Light
:KHQWKH³&RQVWDQW´EXWWRQRQWKHWUDQVPLWWHULVSXVKHG
the collar indicator light will glow steadily (either green,
amber, or red based on the remaining battery life), as long
as you hold the button down, for up to 12 seconds.
:KHQWKH³1LFN´EXWWRQLVSXVKHGWKHOLJKWFRPHVRQIRUD
fraction of a second.
Recharge the unit if :
The indicator light on the collar is emitting a red color.
,IWKHEDULQGLFDWRURQWKHWUDQVPLWWHU/&'VKRZVMXVW
1 bar.
The indicator light on the transmitter or receiver will not
come on. The indicator light on the transmitter or receiver
comes on momentarily, but will not stay on when the
³&RQVWDQW´EXWWRQLVSXVKHG
Battery Charging Procedure
NOTE : The unit has a partial charge when it leaves the
Dogtra facility, upon receipt of the collar, be sure to give it a
IXOOKRXULQLWLDOFKDUJHEHIRUHWKH¿UVWXVH
14
15
1. Attach the charging cables to both the transmitter and
receiver(s), as shown on page 16.
2. Plug the charger into a 120-volt wall outlet or if using
WKHDFFHVVRU\¿HOGFKDUJHUSOXJLQWRDFLJDUHWWHOLJKWHU
only for Lithium-Polymer batteries (Use a 230-volt
European charger for Europe.). When properly plugged
in, all indicator lights should glow red. During the
FKDUJLQJSURFHVVWKHXQLWZLOOVKXWRII2QFHWKHEDWWHU\
cable is unplugged from the unit after a full charge, you
will need to turn the unit on again before use.
3. The Lithium-Polymer battery is fully charged within
2-hour. The lights will stay red during the charging
process. The red light will change into a steady green light
when the battery is fully charged (When you disconnect
WKHFKDUJHUDIWHU¿QLVKLQJWKHFKDUJH\RXZLOOQHHGWR
restart the unit).
4. After charging, cover the battery charging receptacles
ZLWKWKHUXEEHUSOXJVRQWKHWUDQVPLWWHUDQGUHFHLYHU
collar.
NOTE : 2QO\XVH'RJWUDDSSURYHGEDWWHULHVFKDUJHUVDQG
accessories for your Dogtra e-collars. When a charger is not
in use, disconnect it from the power source.
8. How to change the stimulation intensity
The Dogtra ARC has a rheostat intensity dial on the top
of the transmitter (0 is the lowest and 127 is the highest).
5HPHPEHUWKDW\RXZLOOQHHGWRDGMXVWWKHVHWWLQJXSZDUG
or downward) depending on your dog’s temperament
and threshold for stimulation. Also, as the dog’s attitude
changes, especially during times of increased excitement or
GLVWUDFWLRQ\RXPLJKWQHHGWRDGMXVWWKHLQWHQVLW\OHYHO
NOTE : 7KHVWLPXODWLRQLQWHQVLW\FDQEHDGMXVWHGHYHQ
while the stimulation is in use.
16
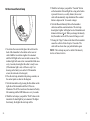
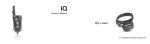
9. The handheld transmitter LCD
The LCD screen indicates the stimulation level (0-127).
The LCD battery life indicator shows 3 bars at full charge,
2 bars at medium charge and 1 bar when it needs to be
FKDUJHG7KHEDWWHU\OLIHLQGLFDWRURQO\VSHFL¿HVWKH
UHPDLQLQJFKDUJHIRU\RXUWUDQVPLWWHU7R¿QGWKHUHPDLQLQJ
charge for your receiver, observe the LED indicator on the
UHFHLYHUFROODU
Green = full charge
Amber = medium charge
Red = needs charge
Care for LCD Transmitters in Cold Temperature
In cold temperatures (10 degrees F or below), the Liquid
Crystal Display (LCD) on your transmitter may be dim
or slow to respond. Wait until the display becomes visible
before selecting any training level.
Even though the LCD screen might be dim or slow to
UHVSRQGZKHQ\RXSXVKWKH1LFNRU&RQVWDQWEXWWRQWKH
transmitter will still function properly. In the occurrence
of extremely cold weather, the LCD screen might take a
moment to respond causing the intensity level to freeze at
17
that current level. In this situation, if you turn the rheostat
intensity dial, the level on the screen may not change but
WKHDFWXDOLQWHQVLW\IURPWKHUHFHLYHUFROODUZLOOFKDQJHLQ
agreement with the dial.
In this situation, it is ideal to either wait until your
transmitter is back to working order before emitting a
correction, or while holding the constant button down
slowly turn the Rheostat Intensity Dial while watching your
dog’s reaction. Do not turn the Rheostat Intensity Dial at a
UDSLGLQFUHDVHEHFDXVHWKHUHFHLYHUFROODUZLOOHPLWDVWDWLF
correction based on the level of the Rheostat Intensity Dial,
ZKLFKPLJKWQRWEHFRUUHFWO\UHÀHFWHGRQWKH/&'VFUHHQ
Code setting for 1-dog use
5. To code set the Dogtra ARC for 1-dog use, repeat steps
1 and 2 above. While the green LED is rapidly blinking
RQWKHUHFHLYHUFROODUSUHVVWKHJUD\EXWWRQVRQWKH
front and side of the transmitter simultaneously. The
/('LQGLFDWRUOLJKWRQWKHUHFHLYHUFROODUZLOOEOLQNHYHU\
4 seconds when the coding is complete.
6. When a button is pressed on your coded handheld
transmitter, an LED indicator light will blink on the
FRUUHVSRQGLQJUHFHLYHUFROODU
11. How to attach the belt clip on the ARC
10. Code setting
Code setting Additional Receivers
7XUQWKHWUDQVPLWWHURQE\SXVKLQJWKH212))EXWWRQ
located on the side of the transmitter and set the intensity
GLDOWR³´
2. Place the red dot on the back of the transmitter to the red
GRWRIWKHUHFHLYHUFROODU\RXZRXOGOLNHWRFRGH+ROG
the two red dots together for about 5 seconds until the
green /('EOLQNVUDSLGO\RQWKHUHFHLYHUFROODU
:KLOHWKHJUHHQ/('LVUDSLGO\EOLQNLQJRQWKHUHFHLYHU
collar, press the 2 orange buttons on the front and side
of the transmitter simultaneously. The LED indicator light
RQWKHUHFHLYHUFROODUZLOOEOLQNHYHU\VHFRQGVZKHQWKH
coding is complete.
:LWKWKHGRJUHFHLYHUFROODUFRGHGWRWKH'RJWUD
$5&WKHJUD\EXWWRQVZLOORSHUDWH\RXUH[LVWLQJUHFHLYHU
collar, and the orange buttons will operate the newly
FRGHGUHFHLYHUFROODU
18
To attach the included belt clip to the transmitter, follow the
instructions below.
1. Align the belt clip to the grooves on the back of the
transmitter.
:LWKD¿UPJULSVFUHZRQWKHEHOWFOLSXVLQJWKHSURYLGHG
Philips head screws.
Caution! 7LJKWHQXQWLO¿UPO\LQSODFH%HFDUHIXOQRWWRRYHU
tighten.
19
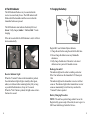
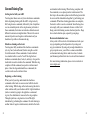
12. How to use the test lamp
7RDFWLYDWHWKHUHFHLYHUFROODUSODFHWKHUHGGRWRQWKH
EDFNRIWKHWUDQVPLWWHUWRWKHUHGGRWRQWKHUHFHLYHU
collar. Hold the two red dots together for a moment
XQWLOWKH/('OLJKWRQWKHUHFHLYHUFROODUFRPHVRQ7KH
indicator light will come on for a moment then blink once
every 4 seconds, showing that the collar is ready to use.
(If the indicator light is red, or if there is only 1 bar
showing on the battery icon on the LCD transmitter
screen, the unit needs to be charged.)
2. Place the test lamp, included in the package contents, on
the contact points as shown in the diagram.
3. Turn the transmitter on by pressing the blue button on the
right side of the transmitter until the LCD screen
illuminates. The LCD screen shows the amount of battery
life remaining and the LED blinks once every 4 seconds.
:DWFKWKHWHVWODPSDV\RXSXVKWKH³1LFN´EXWWRQRQWKH
WUDQVPLWWHU,WVKRXOGOLJKWIRUMXVWDPRPHQW7KHKLJKHU
the intensity, the brighter the test lamp will be.
20
:DWFKWKHWHVWODPSDV\RXSXVKWKH³&RQVWDQW´EXWWRQ
on the transmitter. It should light for as long as the button
LVSUHVVHG+RZHYHUDVDVDIHW\IHDWXUHWKHUHFHLYHU
collar will automatically stop stimulation if the constant
button is depressed for 12 seconds or longer.
6. Turn the Rheostat Intensity Dial on the transmitter
clockwise and then counterclockwise. The test lamp
should glow brighter with higher levels of stimulation and
dimmer with lower levels. When you change the intensity
dial, the number on the LCD screen will change as well.
3UHVVLQJWKH³3DJHU´EXWWRQRQWKHIURQWRIWKHWUDQVPLWWHU
causes the collar to vibrate for up to 12 seconds. The
collar will reactivate when you push the button again.
NOTE : The test lamp may not be visible if the intensity
level is set below level ten.
21
General Training Tips
Getting started with your ARC
Your dog must know some very basic obedience commands
before beginning training with the ARC. A dog learns by
¿UVWEHLQJVKRZQDFRPPDQGIROORZHGE\ORWVRIUHSHWLWLRQ
RYHUDQH[WHQGHGSHULRG$VWKHGRJEHFRPHVSUR¿FLHQWDW
these commands, the trainer can introduce distractions and
different locations to strengthen them. Throw in the correct
amount of positive and negative reinforcement and you
should end up with a well-mannered dog.
Obedience training on the leash
Your dog must fully understand the obedience commands
(sit, stay, here, heel and kennel) before using the e-collar
for reinforcement of these commands. A leash attached
to a standard collar is used to "teach" the dog the basic
obedience commands (here, heel, sit, and stay). A tug on the
OHDVKFROODULVXVHGWRUHLQIRUFHWKHFRPPDQG:KHQWKHGRJ
FRPSOLHVZLWKWKHFRPPDQGXVHSRVLWLYHUHLQIRUFHPHQW
SUDLVH2QFHWKHGRJXQGHUVWDQGVWKHVHFRPPDQGVWKH
e-collar can be used to reinforce them.
and standard collar training. When the dog complies with
WKHFRPPDQGZHXVHSUDLVHSRVLWLYHUHLQIRUFHPHQW7KH
¿QDOVWHSLVWKHDYRLGDQFHSKDVHLQZKLFKWKHGRJOHDUQVWKDW
he can avoid the stimulation altogether by performing your
commands. When these training procedures are complete,
the electric collar is used as a reminder when the dog does
QRWFRPSO\ZLWK\RXUFRPPDQGVDWKRPHRULQWKH¿HOG
Keep your initial training sessions short and positive. Dogs
have a short attention span, especially young dogs.
How much stimulation to use
Always start with low levels of stimulation and work your
way up depending on the disposition of your dog and
any given situation. By using only enough stimulation to
get your point across, you will have a more controllable
environment and a dog that is under less stress. Animals
(and humans) perform better in a less stressful environment.
For more training information, please visit our website at
www.dogtra.com.
Beginning e-collar training
When you feel your dog understands the obedience
commands on the leash we can now start with the electric
collar training. With the dog on the leash wearing the electric
collar continue with your obedience drills. Light stimulation
(nick or constant) is going to be applied as a command
is given, the stimulation is removed as the dog complies.
Through repetition, a dog learns to turn off the light
stimulation by performing the command. E-collar training is
another form of negative reinforcement, similar to the leash
22
23
Maintenance
Troubleshooting Guide
Basic maintenance
Be sure the rubber-charging cap is securely in place
when the collar is in use. After each training session,
carefully inspect the unit for any missing parts or damage
to the casing. Damaged or broken casing may affect the
ZDWHUSURRIJXDUDQWHHRQWKHXQLW$IWHUFRQ¿UPLQJWKDW
WKHUHLVQRGDPDJHWRWKHFDVLQJULQVHWKHUHFHLYHUFROODU
and clean out any dirt or debris.
1. My dog is not reacting to the collar.
0DNHVXUHWKHUHFHLYHUFROODULVWXUQHGRQ7RWXUQWKH
UHFHLYHUFROODURQKROGGRZQWKHRQRIIEXWWRQXQWLOWKH
green LED indicator turns on.
- Be sure the strap is on the dog tight enough so that both
contact points are touching the dog’s skin.
- The contact points may be too short for your dog’s
thick or long coat. Use the included contact point
extensions to extend the length of the contact points.
If you are already using longer contact points, you may
need to trim the hair on the dog’s neck, so that both
contact points are touching the dog’s skin.
- The intensity level may be too low for your dog. Increase
the stimulation until the dog responds, usually by a neck
movement, head shaking, or looking over the shoulders.
The response may be very subtle.
Storage maintenance
The Dogtra ARC should be fully charged before storing
for extended periods. While in storage, the unit should be
JLYHQDIXOOFKDUJHRQFHDPRQWKDQGEHIRUHWKH¿UVWXVH
Store the units in room temperature. Do not keep the units
exposed to extreme climates.
Troubleshooting
If the unit is malfunctioning, please refer to the
³7URXEOHVKRRWLQJ*XLGH´EHIRUHVHQGLQJLWWR'RJWUDIRU
service. If you have any questions or concerns, you may
email them to [email protected], or call customer service
at 1-888-811-9111.
24
2. The LED indicator light comes on, but I do not feel
any stimulation.
- Your tolerance may be higher than your dog’s. You may
QHHGWRWU\WKHXQLWRQ\RXU¿QJHUWLSVZKHUHVHQVLWLYLW\LV
KLJKHUDQGRULQFUHDVHWKHVWLPXODWLRQOHYHO%HVXUHERWK
FRQWDFWSRLQWVDUHWRXFKLQJERWKRI\RXU¿QJHUWLSV
- The battery may be low, check the LED indicator light on
WKHWUDQVPLWWHUDQGUHFHLYHUFROODUIRUEDWWHU\OLIH
0DNHVXUHWKHUHFHLYHUFROODULVFRGHGWRWKHWUDQVPLWWHU
7RFRGHWKHUHFHLYHUFROODUWRWKHWUDQVPLWWHUVHHVHFWLRQ
10. Code Setting.
- If you have a full charge, and you have done all of the
above, your unit may need to be serviced. Please email us
at [email protected], or call customer service at
1-888-811-9111.
25
26
3. The transmitter has no range, or the stimulation is
weaker when my dog is farther away.
&KHFNWRVHHLI\RXU¿QJHUVDUHWRXFKLQJWKHDQWHQQDDV
the range may decrease substantially.
7KHUDQJHLQGLFDWHGRQWKHXQLW¶VER[LVIRUÀDWWHUUDLQ
OLQHRIVLJKW+HDY\EUXVKWUHHVKLOOVEXLOGLQJVDQG
or moisture will affect the range of your unit. For the best
range, hold the transmitter vertically above your head,
DQGRUWU\PRYLQJWRKLJKHUJURXQG
- Any electrical conductors will affect the range, such as
cars, chain-link dog runs, metal buildings, and radio
towers. For the best results, operate away from these
structures.
WARRANTY AND REPAIR INFORMATION
4. My units are not holding a charge.
- The charging pin may be damaged. A metal pin inside the
FKDUJLQJSRUWVKRXOGVWDQGVWUDLJKWXSDQG¿UPLQWKH
center. If the pin is wobbling, broken or missing, you will
need to send the unit in to the repairs department.
- The charging port must be clean prior to charging, clean
the dirt out with a cotton swab and some rubbing alcohol.
If the dog was in salt-water, be sure to rinse the receiver
and charging port with clean water.
- For Dogtra units over two years old from the purchase
date, the batteries may need to be replaced. You can
replace them yourself by contacting Dogtra for a
replacement battery. Damages incurred to the unit due to
improper battery installations are not covered under the
warranty. Dogtra strongly recommends sending the unit
in for inspection.
To Qualify for the Dogtra Warranty
$OOSURGXFWVPXVWEHUHJLVWHUHGDQGRUDSURRIRISXUFKDVHLVUHTXLUHGWRLQLWLDWHUHSDLU
work under warranty. To register your Dogtra product, log onto our website at www.
GRJWUDFRPFOLFNRQWKHZDUUDQW\UHJLVWUDWLRQOLQNDQG¿OORXWWKHUHTXLUHGLQIRUPDWLRQ
Registration must be completed within 30 days of purchase. If you do not have access
to a computer, you can call our toll free number at 1-888-811-9111, and one of our
customer service representatives will register the product for you. If you were unable to
register your product within 30 days of purchase, we will accept all products for repair
with a proof of purchase. We strongly recommend keeping the original receipt. If your
product is not registered and a proof of purchase is not available at the time of service,
Dogtra will estimate the age of the unit by the serial number. Serial number estimates
can differ from the actual purchase date. A serial number estimate is the only method of
determining an approximate date of purchase without product registration or a proof of
purchase.
5. My dog has skin irritation.
7KLVPD\EHGXHWRDQLPSURSHU¿W,I\RXUGRJH[KLELWV
signs of skin irritation, consult with a veterinarian.
2QFHWKHGRJ¶VVNLQUHWXUQVWRDQRUPDOFRQGLWLRQ
continue to use the collar and check your dog’s neck each
time you use the unit.
2-Year Limited Lifetime Warranty
'RJWUD&RPSDQ\SURYLGHVWKHRULJLQDOSXUFKDVHUZLWKD<($5:$55$17<IRUWKH
1&31&31&3*ROG6HULHV1&36HULHV1&36HULHV06HULHV
1&36HULHV1&36HULHV1&36HULHV1&36HULHV1&6HULHV
1&36HULHV7%6HULHV1&36HULHV1&36HULHV7%
6HULHV1&36HULHVWKH6XUH6WLP6HULHVDQGWKH$5&VHULHV
7KHZDUUDQW\EHJLQVIURPWKHGDWHRISXUFKDVH)RUWKH¿UVWWZR\HDUVFRYHUDJHLVIRU
both Parts and Labor on warranty repair services.
Accessories such as chargers, splitter cables, antennas, straps, and batteries are covered
IRUWKH¿UVW\HDURQO\$IWHUWKH¿UVWWZR\HDUVWKH/LPLWHG/LIHWLPH:DUUDQW\FRYHUV
Parts only and does not cover Labor Fees and Accessories. All Shipping fees incurred,
WKHFRVWRI$FFHVVRULHVDIWHUWKH¿UVW\HDUDQG/DERUIHHVDVVRFLDWHGZLWKRXWRIZDUUDQW\
repair work, are the customer’s responsibility. Labor fees will be variable depending on
the extent of the work required. The Limited Lifetime Warranty expires 5 years after a
model is discontinued from production by Dogtra.
Not Covered Under Warranty
'RJWUD'2(6127RIIHUZDUUDQW\IRUSURGXFWVWKDWKDYHEHHQERXJKWVHFRQGKDQGRUDV
a resold product.
'RJWUD'2(6127UHSODFHGHIHFWLYHXQLWVRUSURYLGHUHIXQGVIRUSURGXFWVSXUFKDVHG
from us after 30 days from the date of purchase.
'RJWUD'2(6127FRYHUWKHFRVWRIVKLSSLQJRXWVLGHRIWKH&RQWLQHQWDO8QLWHG6WDWHV
Issues of replacement and refunds on units purchased less than 30 days from an
authorized dealer must be addressed to the dealer directly. If the products purchased
from an authorized dealer are after 30 days from the date of purchase, please send the
units to Dogtra for service and repair.
'RJWUD'2(6127FRYHUWKHFRVWRIUHSDLUVDQGUHSODFHPHQWVGXHWRPLVXVHE\WKH
RZQHURUGRJLPSURSHUPDLQWHQDQFHDQGRUORVWXQLWV$Q\ZDWHUGDPDJHRQWKH:DWHU
5HVLVWDQW7UDQVPLWWHUVRIWKH1&31&31&36HULHV1&36HULHV
1&36HULHVDQGL43HW6HULHVDQGWKH:DWHU5HVLVWDQW5HFHLYHUVRIWKH556
RRD, and RR Deluxe, will not be covered. All replacement costs for either the
transmitter or receiver will be the owner’s responsibility.
27
The warranty is void if the unit has been altered or an unauthorized person has damaged
the unit while attempting repair work.
%DWWHU\UHSODFHPHQWE\WKHFXVWRPHUGXULQJWKH¿UVW\HDURIWKH\HDU/LPLWHG/LIHWLPH
Warranty is not recommended. If the customer chooses to replace the batteries, any
damage to the unit during the change-out by the owner will void the warranty.
The removal of serial numbers from any Dogtra products will void the warranty.
Dogtra reserves the right to retain and discard any parts or accessories that have been
found damaged upon replacement and repair.
Procedure for Repair Work
,IWKHXQLWLVPDOIXQFWLRQLQJSOHDVHUHIHUWRWKH³7URXEOHVKRRWLQJ*XLGH´LQWKH2ZQHU¶V
Manual and call customer service at 1-888-811-9111, for technical support, before
sending it to Dogtra for Service.
The cost of shipping products under warranty back to Dogtra is the customer’s
responsibility. Dogtra is not responsible for units damaged or lost in transition to Dogtra.
Dogtra is not responsible for loss of training time or inconvenience while the unit is
in for repair work. Dogtra does not provide loaner units or any form of compensation
during the repair period.
A copy of the sales receipt showing the purchase date may be required before warranty
work is initiated.
Please include a brief explanation outlining the problem and include your name, address,
FLW\VWDWH]LSFRGHGD\WLPHSKRQHQXPEHUHYHQLQJSKRQHQXPEHUDQGHPDLODGGUHVV
2U\RXFDQYLVLWRXUZHEVLWHDWZZZGRJWUDFRPIRUDVHUYLFHUHTXHVWIRUP,IWKHUHSDLU
costs are not covered under warranty, we will call you for payment information and
authorization. For any questions concerning your Dogtra products, call us toll free at
0)$0303DFL¿F6WDQGDUG7LPHRUHPDLOXVDWrepair@
dogtra.comIRUVSHFL¿FUHSDLULQTXLULHV
Send repair units to :
Dogtra Company / Repairs
22912 Lockness Avenue
Torrance, CA 90501
U.S.A.
The diagrams and representations in the manual may differ slightly from the actual product
depending on the model type.
28
29