1
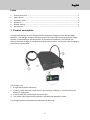
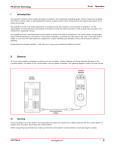
c-Go
24V/6A
24V/8A
24V/12A
Battery charger
GB
Instruction manual
1
English
Index
1.
2.
3.
4.
5.
6.
Product description ......................................................................................................................... 2
Safety advices .................................................................................................................................. 3
Quick start guide .............................................................................................................................. 4
Operation ......................................................................................................................................... 4
Problem solving ............................................................................................................................... 6
Specifications ................................................................................................................................... 7
1. Product description
De c-Go 24V charger series is designed for full automatic charging of 24V Gel and AGM
batteries. The charger contains the latest, state of the art power converter and the charge
process is controlled by a microcontroller. If the safety precautions in this manual are
observed and the charger is operated according to this manual, optimal and save charging of
the battery is guaranteed.
The charger consists of:
1. A high quality plastic enclosure.
2. A battery cable with XLR connector for connecting to a battery or a means where the
battery is integrated.
3. A mains cable for connecting to the public grid.
4. Two colour LEDs (Light Emitting Diodes) indicating the operation mode.
The charger operates automatically and needs no adjusting.
2
English
Symbols:
Read the safety advices carefully.
Read the user manual before using the battery charger.
For indoor use only
Do not use the battery charger in a wet environment or in the rain.
The battery charger and batteries are not to be discarded with normal
household waste. Dispose properly according to the local regulations.
The battery charger is a class II appliance (double insulated)
The battery charger complies with the European CE requirements.
2. Safety advices
-
-
-
-
-
This appliance can be used by children aged from 8 years and above and persons with
reduced physical, sensory or mental capabilities or lack of experience and knowledge if
they have been given supervision or instruction concerning use of the appliance in a safe
way and understand the hazards involved. Children shall not play with the appliance.
Cleaning and user maintenance shall not be made by children without supervision.
Never use the charger in a wet environment (for example outside), spill fluids over the
enclosure or submerge it in water.
Do not use the charger if the cables are damaged, the enclosure is open, or the charger is
damaged in such way that internal parts become accessible.
If the supply cord is damaged, it must be replaced by the manufacturer, its service agent
or similarly qualified persons in order to avoid a hazard. If the charger is defective, do not
try to repair it.
Make sure the charger is positioned stable.
Keep a free zone of 10cm around the charger to ensure that heat, generated during
operation, can be removed.
The battery charger is suited for the Europe standard 220-240V/50Hz mains grid.
Operating the charger in places where different mains voltages are applicable will
damage the charger or render it unsafe. Please consult your supplier in case of doubt.
Charge specified batteries only. Do not recharge non-rechargeable batteries.
Charge the batteries only if there is proper ventilation. Especially around the batteries.
While charging, a small amount of explosive gasses can be generated in the batteries.
inadequate ventilation in combination with open fire or sparks can lead to dangerous
situations.
Do not disconnect the battery while it is charging. To reduce risk of sparking.
First disconnect the charger from the mains. Or wait until the charger has completed the
charge cycle.
3
English
-
-
Batteries are capable of providing much energy in a very short time. Prevent short
circuits any way. For example walking over the cables or damaging the cables or
connector by improper use.
Do not shorten the length of the charge cable.
3. Quick start guide
The battery charger is very simple to operate.
1. Connect the battery charger to the mains. The orange LED , marked
will blink.
2. Connect the battery cable to the battery to be charged. When the battery charger
decides that the battery should be charged , The orange LED marked
turns on
continuously and the charging will start.
3. As long as the orange LED marked
is on and it is not necessary to use the battery, it
is recommended not to interrupt the charge process. Interrupted charges will shorten
the battery life.
4. When the battery is full the green LED, marked
turns on. The battery can be used
now. However, if the battery will not be used directly, it is recommended to leave the
charger connected. The battery charger will keep the battery in optimal charged
condition.
5. If there is a problem, the charger will indicate this by quickly blinking the orange and
green LEDs simultaneously. Please consult the chapter “Problem solving”.
4. Operation
Positioning:
The battery charger is not suited for outdoor use.
Put the charger on a stable place.
Keep at least an area of 10cm around the enclosure for proper battery charger cooling.
During charging, the enclosure can become hand warm. This is normal.
The 12A version is equipped with a build in fan, operating automatically when the internal
battery charger temperature increases. With insufficient cooling or too high ambient
temperatures the output power will be reduced. The time required for the total charge
process may increase. For this reason, do not subject the battery charger to direct sunlight.
Electrical connections:
The battery charger is equipped with a EU plug for connection to the 220-240V/50Hz mains
grid. By default the battery charger has a XLR connector for connecting to the battery.
4
English
XLR front view:
Pins 1 is the plus (+) and pin 2 is the minus (-).
Pin 3 is the inhibit signal for preventing unsafe actions of the
application to be charged.
It is possible that your supplier provided a different connection type.
In this case, please consult the supplier for more information.
Operation:
After the battery charger has been positioned or mounted correctly, connect the battery
charger to the mains grid. The orange LED , marked
will start to blink slowly.
This is the stand-by position indicating that no battery is connected.
Connect the battery cable to the battery or the equipment in where the batteries are
mounted. After 3 seconds the battery charger has detected if the battery can be charged.
If yes, it will start the charging process. The orange LED marked
turns on. Also some
clicking sounds can be heard from inside the battery charger. This is normal.
If the battery is charged fully very recently, it is possible that the charging will not start.
The orange LED will keep blinking slowly until the voltage has dropped enough to enable
charging.
Depending on the state of charge and the battery capacity the charging process will take
minimal 1 and maximal 24 hours.
End of charge:
If the battery charger detects the battery is full, the green LED, marked
turns on.
The battery may be disconnected and used. However, if the battery will not be used directly,
it is recommended to leave the charger connected. The battery charger will keep the battery
in optimal charged condition by applying a maintenance charge periodically. Also here some
clicking sounds can be heard from inside the battery charger. This is normal.
LED indication overview:
Orange LED
Green LED
Off
Blinking
Off
Off
On
Off
Blinking
Off
On
Blinking
Description:
Battery charger not connected to the mains.
1: Battery charger connected to the mains and no battery
connected.
2: Battery charger connected to the mains and the connected
battery is full.
The battery is charging.
The battery is full.
A problem occurred.
See chapter “Problem solving”
5
English
User tips:
Prevent deep discharging of the batteries. The battery life will be reduced significantly.
Charge a deep discharged battery as soon as possible.
Let the battery charger finish the charge cycle completely.
If the battery is not charged for a longer period, for example during winter, connect the
battery charger every month to charge the battery. Battery self-discharge and the quiescent
current of the connected users will drain the battery charge slowly.
It is also possible to keep the battery charger connected to the battery and the mains during
this period.
Do not charge batteries below 0°C. Move the battery to a warmer place and start the
charge.
Keep the ventilation openings clean and free of accumulated dust. Blow away the dust and
clean the battery charger enclosure with a slightly moistened cloth, if required.
Despite the fact that the battery charger power consumption during stand-by is very low,
it is recommended to unplug the battery charger from the mains if it will not be used for a
longer period. This is to prevent unnecessary energy consumption.
5. Problem solving
In case there is a problem or there is a suspicion the charger is not operating as expected,
first check which of the indication LEDs are on.
If the orange and the green LED are blinking simultaneously, they are indicating an error.
( ½ second on, ½ second off followed by a 1 second pause).
The number of flashes, between the pauses are indicating the error code.
Consult the next tables to diagnose the problem.
Table 1: Fault diagnostics
Problem
None of the LEDs
are on
All LEDs are on
continuously
All LEDs are blinking
simultaneously
Possible causes
No mains voltage.
Battery charger or mains
cable broken.
Battery charger broken.
Solution
Check mains voltage.
Consult Your supplier.
Problem detected.
Count the number of flashes between
the pauses and consult table 2
6
Consult Your supplier.
English
Table 2: Error codes
Error code(s)
1, 2 , 3
4
Description
Internal battery charger
problem.
Temperature too low.
5
Temperature too high
6
Too many ampere
hours charged.
8
Voltage increase
insufficient.
Possible causes and solution(s)
Restart battery charger. If the error is repeated
Consult Your supplier.
Move to a warmer environment and restart the
charging.
Let the charger cool down for 15 minutes and
restart the charging. If the problem persists
please consult Your supplier.
1: Connected a battery with higher capacity then
specified.
2: Unknown problem. Please consult Your
supplier.
Possibly a defective battery.
Please consult Your supplier.
If the cause of the failure has been removed, the battery charger can be restarted by
disconnecting and reconnecting the mains .
6. Specifications
c-Go specifications / model
Supported batteries
Battery capacity range
Mains voltage
Mains frequency
Output voltage range
Output current range
Maximum output power *
Efficiency
Protections
Dimensions
Charge status indication
Use
Operational temperature range *
Storage temperature
Cooling
Maximum humidity
Safety class
Regulations
Standards
6A
8A
12A
Lead Acid (Gel/ AGM) 24V or 2 x 12V
40-60Ah
60-85Ah
80-125Ah
220-240Vac nominal, (single phase)
50/60 Hz
24V nominal
0.25 – 6A
0.25 – 8A
0.25 – 12A
180W
240W
360W
> 90% at full load and 230Vac
Polarity , Output voltage , Temperature
210 x 175 x 65mm
2 LEDs
Indoor use only
0 – 40°C
-15 - +50°C
Passive
Passive
Active (Fan)
95% (non condensing)
II
CE (LVD, EMC, RoHS)
EN60335-2-29 , EN12184 , ISO7176-14, EN60601-1-2
* At elevated ambient temperatures or if there is no sufficient cooling, the output current
can be reduced.
7
EC Declaration of conformity
We:
IVRA Electronics B.V.
Address:
Delta 44
6825 MS Arnhem, the Netherlands
herewith declare under our sole responsibility that:
Product range:
c-Go 24V/6A, 24V/8A, 24V/12A battery chargers
Article numbers:
526-2100, 526-2101, 526-2102
to which this declaration relates, is in conformity with the requirements of:
Directive:
Applied specific European standards:
Low voltage
(2006/95/EC)
EN-IEC60335-2-29:2004+A2:2010
Household and similar electrical appliances – Safety –
Part 2-29: Particular requirements for battery chargers
EMC
(2004/108/EC)
EN-IEC60601-1-2:2007/AC:2010
Medical electrical equipment – Part 1-2:
General requirements for basic safety and essential performance
– Collateral standard: Electromagnetic compatibility –
Requirements and tests
RoHS
(2011/65/EC)
provided that the equipment is installed and used according to our instructions.
Date of issue:
Signed:
(project manager)
1th October 2013