1
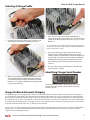
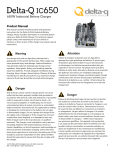
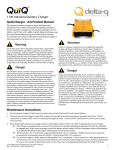
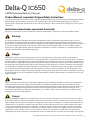
Delta-Q IC650 650W Industrial Battery Charger Product Manual - Important Original Safety Instructions Save these instructions. This manual contains important safety and operating instructions for the Delta-Q IC650 Industrial Battery Charger. Please read this information in its entirety before using your Delta-Q IC650 Charger. For technical support, please contact the manufacturer of your vehicle or machine, as their version of this charger may require special instructions. Instructions importantes concernant la sécurité Conserver ces instructions. Ce manuel contient des instructions importantes concernant la sécurité et le fonctionnement. Warning Use charger only with an algorithm selected that is appropriate to the specific battery type. Other usage may cause personal injury and damage. Lead acid batteries may generate explosive hydrogen gas during normal operation. Keep sparks, flames, and smoking materials away from batteries. Provide adequate ventilation during charging. Chargers require 1” clearance on both sides and the ends left open (where cables exit and indicator lights can be seen). Never charge a frozen or non-rechargeable battery. Observe all battery manufacturers’ specific precautions (e.g. maximum charge rates and if cell caps should be removed while charging). Danger Risk of electric shock. Connect charger power cord to an outlet that has been properly installed and grounded in accordance with all local codes and ordinances. A grounded outlet is required to reduce risk of electric shock—do not use ground adapters or modify plug. Do not touch uninsulated portions of output connector or uninsulated battery terminals. Disconnect the AC supply before making or breaking the connections to the battery. Do not open or disassemble charger. Do not operate this charger if the AC supply cord is damaged or if the charger has received a sharp blow, been dropped, or is damaged in any way. Refer all repair work to the manufacturer, or qualified personnel. This charger is not intended for use by persons (including children) with reduced physical, sensory or mental capabilities, or lack of experience and knowledge on electrical systems and battery charging, unless they have been given supervision or instruction concerning use of the charger by a person responsible for their safety. Children should be supervised to ensure that they do not play with the charger. Attention Utiliser le chargeur seulement avec un algorithme approprié au type spécifique de batterie. D´autres types de batteries pourraient éclater et causer des blessures ou dommages. Les batteries peuvent produire des gaz explosifs en service normal. Ne jamais fumer près de la batterie et éviter toute étincelle ou flamme nue à proximité des batteries. Fournissez une ventilation adéquate du chargement. Ne jamais charger une batterie gelée. Prendre connaissance des mesures de précaution spécifiées par le fabricant de la batterie, p. ex., vérifier s´il faut enlever les bouchons des cellules lors du chargement, et les taux de chargement. Danger Risque de décharge électrique. Ne pas toucher les parties non isolées du connecteur de sortie ou les bornes non isolées de la batterie. Toujours connecter le chargeur à une prise de courant mise à la terre. Déconnectez la source AC avant de faire ou défaire les connections à la batterie en chargement. Ne pas utiliser le chargeur si le cordon d’alimentation AC est endommagé ou si le chargeur est abîmé suite à une chute ou autre indicent. Ne pas ouvrir ni désassembler le chargeur – référer toute réparation aux personnes qualifiées. Cet appareil n’est pas destiné à un usage par des personnes (dont les enfants) avec des facultés motrices, sensorielles ou mentales réduites, ou ayant une expérience et des connaissances insuffisantes, à moins qu’elles sont sous la supervision ou reçoivent les instructions sur l’utilisation de l’appareil d’un répondant garant de leur sécurité. Les enfants devraient être surveillés afin qu’il ne jouent en aucun temps avec l’appareil. © 2014 Delta-Q Technologies Corp. All rights reserved. (PN: 710-0138 Rev 3 Date: 14/07/2014) 1 Delta-Q IC650 Charger Manual Maintenance Instructions 1. Unplug the charger from both AC and DC sources when cleaning, moving or conducting any maintenance or repair on the charger. 2. Do not expose charger to oil, dirt, mud or direct heavy water spray when cleaning the vehicle or machine. 3. The enclosure of the charger meets IP66, making it dust-tight and protected against powerful water jets. The AC inlet connection itself, when mated, is rated to IP20, which is not protected against water. Protect the AC connection if used in wet or dusty environments. 4. If the detachable AC input power supply cord or the DC output cord set is damaged, do not use the charger until they are replaced. Replace with a cord that is appropriate for your region: This charger is provided with a cord set for connection to outlets operating at nominal 120 Volts (or 240 Volts as appropriate). If the input plug does not fit the power outlet, contact Delta-Q Technologies for the proper cord set terminating in an attachment plug of the proper configuration for the power outlet. North America: UL or CSA listed / approved detachable cord at least 1.8m in length (≥ 6 feet), 3 conductor, 16AWG minimum and rated SJT; terminated in a grounding type IEC 60320 C14 plug rated 250V, 13A minimum. All other regions: Safety approved detachable cord, 3 conductor, 1.5mm² minimum, rated appropriately for industrial use. The cord set must be terminated on one end with a grounding type input connector appropriate for use in the country of destination and, on the other end, an output grounding type IEC 60320 C14 plug. Operating Instructions The charger may become hot during charging. Use hand protection to safely handle the charger during charging. Extension cords must be 3-wire cord no longer than 30m (100’) at 10 AWG or 7.5m (25’) at 16 AWG, per UL guidelines. Fault / Error / USB Indicator Battery Charging Indicator AC Power Indicator Charging Output Indicator1 USB Host Port Charge Profile / Error Display2 Select Charge Profile Button3 Solid red = Charger fault See display panel for details Solid blue = AC power available Flashing amber = External error condition - caution See display panel for details Flashing green = Low state of charge Solid green = High state of charge Flashing green = USB port active Solid green = Safe to remove USB flash drive Flashing green = High state of charge Solid green = Charge completed 1. The USB Host Port allows data to be transferred to and from the charger using a standard USB flash drive, including the downloading of charge tracking data and updating of the charger’s software and / or charge profiles. 2. The Charging Output Indicator means that the charger output is active, and there is a potential risk of electric shock. 3. The Charge Profile / Error Display shows one of four possible codes to indicate different conditions: ‘F’ codes meaning that an internal fault condition has caused charging to stop. ‘E’ codes meaning that an external error condition has caused charging to stop. ‘P’ code meaning that the charger programming mode is active. ‘USB’ code meaning that the USB interface is active, and the USB flash drive should not be removed. The ‘E,’ ‘F’ and ‘P’ codes will appear, then are followed by three numbers and a period to indicate different conditions (e.g. E-0-0-4). See the “Charger Fault Codes” or “Charger Error Codes” sections for details on these conditions and their solutions. 4. The Select Charge Profile Button is used to select a charge profile from those stored on the charger. Up to 25 charge profiles can be stored. See the “Selecting A Charge Profile” section for instructions. www.delta-q.com 2 Delta-Q IC650 Charger Manual Selecting A Charge Profile 1. Disconnect AC input from the charger, or from the wall outlet. Wait 30 seconds for the input relay to open. 3. Press and release the Select Charge Profile Button to advance through the charge profiles. The selected charging profile will be displayed up to three times (e.g. “P-0-1-1” for Profile 11).* * Process will time out and profile will remain unchanged if there is 15 seconds of inactivity, a profile number is allowed to display three times, or if AC power is cycled. 4. Once desired charging profile is displayed, press and hold the Select Charge Profile button for 10 seconds to confirm selection and exit Profile Selection Mode. When the charge profile is confirmed, the Error Indicator and Battery Charging Indicator lights will turn off, while the blue AC Power Indicator stays lit. At this point, the button can be released. 5. Press the Select Charge Profile Button to check that the desired profile is selected. Identifying Charger Serial Number 2. While reconnecting AC input, press and hold the Select Charge Profile Button. Hold the button (approximately 10 seconds) through the light check function until Error Indicator is on (in amber) and Battery Charging Indicator (in green) starts flashing. The charger’s serial number is printed on the front of the charger. This is the number to provide when requesting technical support. Charge Profiles & Automatic Charging The IC650 Charger uses charging profiles stored in its internal memory to deliver charge into the batteries according to a set of parameters, depending on the manufacturer and model of the battery. The user is responsible for insuring that the chosen profile matches their battery pack. To maintain safe operations, the unit automatically reduces its output power if the temperature rises above set thresholds, or if the AC input voltage is too low. The charger will also reduce output power if it detects that the battery pack is damaged. If power is interrupted, and then returns, the charger will start and continue to operate without hazard to the user, or damage to the batteries. This is a Class A product complying with United States Federal Communications Commission, Code of Federal Regulations; 47CFR part 15. In a domestic environment, this product may cause radio interference, in which case the user may be required to take adequate measures. Visit www.YouTube.com/DeltaQTechnologies for instructional videos. 3 Delta-Q IC650 Charger Manual Charger Error & Fault Codes Code Description Solution E-0-0-1 E-0-2-1 Battery high voltage Possible causes: wrong battery voltage for charger, other charger also attached, resistive battery. Possible solutions: Check the battery voltage and cable connections. Check battery size and condition. This error will automatically clear once the voltage is in range. E-0-0-2 E-0-2-2 Battery low voltage Possible causes: battery disconnected, battery overdischarged. Possible solutions: Check the battery voltage and cable connections. Check battery size and condition. This error will automatically clear once the voltage is in range. E-0-0-3 Charge timeout caused by battery pack not reaching required voltage within safe time limit. (charge profile dependent) Possible causes: Charger output reduced due to high temperatures, poor battery health, very deeply discharged battery and /or poorly connected battery. Possible solutions: Operate at lower ambient temperature. Replace battery pack. Check DC connections. This error will clear once the charger is reset by cycling DC or AC. E-0-0-4 Battery could not meet minimum voltage (charge profile dependent) Possible causes: Check for shorted or damaged cells. Possible solutions: Replace battery pack. Check DC connections. This error will automatically clear once the charger is reset by cycling DC or AC. E-0-0-7 Battery amp hour limit exceeded Possible causes: Poor battery health, very deeply discharged battery, poorly connected battery, and / or high parasitic loads on battery while charging. Possible solutions: Replace battery pack. Check DC connections. Disconnect parasitic loads. This error will automatically clear once the charger is reset by cycling DC or AC. E-0-0-8 Battery temperature is out of range Possible battery temperature sensor error. Check temperature sensor and connections. Reset charger. This error will clear once the condition has been corrected. E-0-1-2 Reverse polarity error Battery is connected to the charger incorrectly. Check the battery connections. This error will clear once the condition has been corrected. E-0-1-6 E-0-1-8 E-0-2-6 USB operation failed (software) Software upgrade failure or script operation failure. Ensure the USB flash drive is properly formatted and reinsert the USB flash drive. E-0-1-7 USB operation failed (hardware) Remove and reinsert the USB drive. If condition persists, cycle AC and retry by reinserting the USB drive. E-0-2-3 High AC voltage error (>270VAC) Connect charger to an AC source that provides stable AC between 85 - 270 VAC / 45-65 Hz. This error will clear once the condition has been corrected. E-0-2-4 Charger failed to initialize The charger has failed to turn on properly. Disconnect AC input and battery for 30 seconds before retrying. E-0-2-5 Low AC voltage oscillation error AC source is unstable. Could be caused by undersized generator and /or severely undersized input cables. Connect charger to an AC source that provides stable AC between 85 - 270 VAC / 45-65 Hz. This error will clear once the condition has been corrected. F-0-0-1, F-0-0-2 F-0-0-3, F-0-0-4 F-0-0-6 Internal charger fault. Remove AC and battery for minimum 30 seconds and retry charger. If it fails again, please contact the manufacturer of your vehicle or machine. www.delta-q.com 4