1
MODx Content Management System : MODx User Guide
MODx Content Management System 1.0.3 - QuickStart Guide
Search here...
MODx User Guide
Go!
MODx Content Management System
Read Me First
User's Guide
User Guide
The MODx administrative
interface
About Resources
The Resource Browser
The File Manager
Uploading images
Navigating, creating, deleting
directories
File and directory best
practices
Glossary
How Do I
Create a new web page
Create a new container
Create a new web link
Un-publish a resource
Automatically publish on a future
date
Preview an unpublished resource
Delete a resource
Hide a resource from menu
listing
Insert an image
Link to a PDF or Word doc
Search for resources or contents
Customize the page link text in
navigation bars
Change the Resource URL
Move a resource ...
into a different container
above or below a resource
Frequently Asked Questions
Troubleshooting
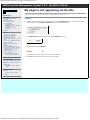
My page is displaying old content
My page is not appearing on the
site
Editing pages
Can't add content at bottom
of page.
Advanced Topics
Chunks
Viewing, creating, editing
Snippets
http://www.studioefx.com/modx-user-guide[6/25/2010 7:09:29 PM]
MODx Content Management System : Read Me First
MODx Content Management System 1.0.3 - QuickStart Guide
Search here...
Read Me First
Go!
Modx is an expandable and highly configurable content management framework. Because no two
Read Me First
User's Guide
The MODx administrative
interface
About Resources
The Resource Browser
The File Manager
Uploading images
Navigating, creating, deleting
directories
File and directory best
practices
MODx installations will be exactly alike from website to website, there are some important topics to
touch on before proceeding through this user's manual.
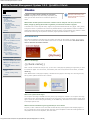
MODx Look and Feel
Administrators have the capability to change the MODx graphical theme based on personal preference. The
MODx control panel demonstrated in this manual uses a theme called MODxGreenEvo, which provides a
colorful interface with good contrast that is easy on the eyes. Your MODx control panel may have a different
theme. If you don't like the theme configured for your MODx site, ask your website administrator to change it!
Glossary
How Do I
Create a new web page
Create a new container
Create a new web link
Un-publish a resource
Automatically publish on a future
date
Preview an unpublished resource
Delete a resource
Hide a resource from menu
listing
Insert an image
Link to a PDF or Word doc
Search for resources or contents
Customize the page link text in
navigation bars
Change the Resource URL
Move a resource ...
into a different container
above or below a resource
Access controls and permissions
MODx provides exellent user and group management. The MODx site administrator has fine-grained control over
what a user or group can see and do from the control panel. Because you may be a MODx user not in the
capacity of an administrator, you may find yourself with limited access. Some of the help topics in this guide
may not apply to you. You may also find that some fields, tabs, or controls displayed in this manual may be
missing from your MODx control panel. These things are access controls at work. If you want more
administrative liberty with your MODx site, talk to your website administrator.
Browser Compatibilty
In theory, you can administer your MODx site from any modern web browser. In practice, however, the MODx
control panel does not work consistently across all browsers. If you find that MODx is not functioning normally,
throws error messages, or simply hangs, you may want to log-in to the MODx control panel from a fresh
installation of the Mozilla Firefox browser. Mozilla Firefox touts itself as "the world's best browser," and for good
reason. The MODx control panel tends to run best on it.
Frequently Asked Questions
Troubleshooting
My page is displaying old content
My page is not appearing on the
site
Editing pages
Can't add content at bottom
of page.
Advanced Topics
Chunks
Viewing, creating, editing
Snippets
http://www.studioefx.com/modx-user-guide/read-me-first[6/25/2010 7:09:32 PM]
MODx Content Management System : Introduction to the MODx Administrative Interface
MODx Content Management System 1.0.3 - QuickStart Guide
Search here...
Go!
Read Me First
User's Guide
Introduction to the MODx Administrative
Interface
The MODx administrative interface is the window that appears once you successfully log in.
The MODx administrative
interface
About Resources
The Resource Browser
The File Manager
Uploading images
Navigating, creating, deleting
directories
File and directory best
practices
Glossary
How Do I
Create a new web page
Create a new container
Create a new web link
Un-publish a resource
Automatically publish on a future
date
Preview an unpublished resource
Delete a resource
Hide a resource from menu
listing
Insert an image
Link to a PDF or Word doc
Search for resources or contents
Customize the page link text in
navigation bars
Change the Resource URL
Move a resource ...
into a different container
above or below a resource
Frequently Asked Questions
Troubleshooting
My page is displaying old content
My page is not appearing on the
site
Editing pages
Can't add content at bottom
of page.
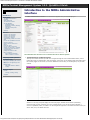
The administrative interface can be divided into three distinct panels:
1. The Administrative and Main Navigation
This top area contains the links you will use to navigate through the various administrative tasks, such as
loading site tools, site configuration, stats and logging, and so forth. It also displays basic information about
the currently logged in user. When you need to switch from task to task, you will navigate by way of these
controls.
Advanced Topics
Chunks
Viewing, creating, editing
Snippets
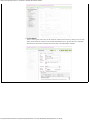
2. The Resource Browser
Similar to a site map, this panel displays all of the web pages, weblinks and containers (collectively,
resources) that you have created for your site. It stylizes items so you can tell at a glance whether a
resource is published, hidden, or deleted. You will navigate through items in the Resource Browser when you
wish to edit, move, and delete resources.
http://www.studioefx.com/modx-user-guide/users-guide/introduction-to-the-modx-administrative-interface[6/25/2010 7:09:35 PM]
MODx Content Management System : Introduction to the MODx Administrative Interface
3. Content Window
This is a multi-purpose content area. It will contain the contents of the resource in which you are currently
editing. It will contain the contents of any selected administrative task. In general, this area is populated
with data and controls when interacting with various parts of the administrative interface.
http://www.studioefx.com/modx-user-guide/users-guide/introduction-to-the-modx-administrative-interface[6/25/2010 7:09:35 PM]
MODx Content Management System : About Resources
MODx Content Management System 1.0.3 - QuickStart Guide
Search here...
About Resources
Go!
Generally speaking, a Resource is a MODx web page.
Read Me First
User's Guide
The MODx administrative
interface
About Resources
The Resource Browser
The File Manager
Uploading images
Navigating, creating, deleting
directories
File and directory best
practices
Glossary
How Do I
"Why not call a web page, a webpage? Why call it a Resource?"
Think of a web page, and you tend to think of something you navigate to in a web browser that displays
content.
A MODx web page is different. While on the surface it does basically the same thing - providing content for a
visitor to browse to - the similarity ends there.
A MODx web page, from administrative control, can not only be edited for content, it can be configured for
functionality. For example, it can be configured as a weblink to automatically redirect the user to a different
web page. It can be configured as a container (similar to a folder) for grouping related web pages. It can even
be a combination of these things.
Create a new web page
Create a new container
Create a new web link
Un-publish a resource
Automatically publish on a future
date
Preview an unpublished resource
Delete a resource
Hide a resource from menu
listing
Insert an image
Link to a PDF or Word doc
Search for resources or contents
Customize the page link text in
navigation bars
Change the Resource URL
Move a resource ...
into a different container
above or below a resource
Frequently Asked Questions
Troubleshooting
My page is displaying old content
My page is not appearing on the
site
Editing pages
Can't add content at bottom
of page.
Advanced Topics
Chunks
Viewing, creating, editing
Snippets
http://www.studioefx.com/modx-user-guide/users-guide/about-resources[6/25/2010 7:09:37 PM]
MODx Content Management System : The Resource Browser
MODx Content Management System 1.0.3 - QuickStart Guide
Search here...
The Resource Browser
Go!
Read Me First
User's Guide
The MODx administrative
interface
About Resources
The Resource Browser
The File Manager
Uploading images
Navigating, creating, deleting
directories
File and directory best
practices
Glossary
How Do I
Create a new web page
Create a new container
Create a new web link
Un-publish a resource
Automatically publish on a future
date
Preview an unpublished resource
Delete a resource
Hide a resource from menu
listing
Insert an image
Link to a PDF or Word doc
Search for resources or contents
Customize the page link text in
navigation bars
Change the Resource URL
Move a resource ...
into a different container
above or below a resource
Frequently Asked Questions
Troubleshooting
My page is displaying old content
My page is not appearing on the
site
Editing pages
Can't add content at bottom
of page.
Advanced Topics
Chunks
Viewing, creating, editing
The Resource Browser panel lists all of the Resources (web pages, weblinks, containers, etc.) you have
created for your site. Resources are conveniently organized and stylized, so you can tell at-a-glance what the
Resource is, where it's positioned in relation to all other links, and its current status. When you need to edit,
move or delete a Resource, you will select your Resource from this panel.
The Toolbar
At the top of the panel you will find the Resource Browser Toolbar.
This collection of buttons perform the following actions within the Resource Browser:
Expand Site Tree - This is a convenient way to quickly open all containers without having to click on each
container's expand [+] icon.
Snippets
Collapse Site Tree - Collapses all containers without having to click on each container's collapse [-] icon.
New Resource - Opens the Create Resource panel for you to begin work on a new Resource.
New Weblink - Opens the Create Resource panel, prepared with fields for configuring your new Resource
as a weblink.
Refresh Site Tree - Normally the site tree automatically refreshes on page updates, but a browser glitch
may interrupt the process. Click this button to force the site tree to refresh.
Sort the Site Tree - This button allows you to temporarily change the display arrangement of Resources by name, id, ascending, descending, etc. Sorting is completely passive, and does not alter the actual menu
arrangement in any way.
Purge Deleted Resources - Clicking this button will permanently remove items that have been flagged as
deleted (as indicated by their strikethru status).
http://www.studioefx.com/modx-user-guide/users-guide/the-resource-browser[6/25/2010 7:09:42 PM]
MODx Content Management System : The Resource Browser
The Site Root
Just beneath the toolbar is the Site Root, which is the starting point for the site's link structure.
The site root is assigned a name, which should be descriptive of the site as a whole - such as a company name
or service name. The name chosen is important, as it will appear on every page within the browser 'chrome' at
the top:
The Site Tree
The Site Tree lists all of the Resources available on the site in an orderly parent-child relationship.
The basic anatomy of an item in the Site Tree consists of three elements, from left to right:
1. A content icon. This icon represents the contents of the Resource. The icon is clickable in most browsers,
which will bring up a context menu for accessing commands.
2. A Resource name. Clicking on the name will open the Resource for editing.
3. The Resource ID. Each identifier is unique.
To help distinguish between the various types of Resources (web pages, weblinks, containers,
etc), items in the Site Tree have special icons and styling:
Web page - this Resource is a web page. When a visitor browses to this page, the page's content will be
displayed.
Weblink - this Resource is a weblink. When a visitor browses to this page, it will immediately redirect to a
different web page, as specified in the page parameters.
Container - this Resource is a container. It acts like a folder, and other Resources can be placed inside of
it. You would create sub-links by placing Resources inside containers. A Container can be empty, or it can
also display content just like a web page. To view the contents of the container, you would click on the [+]
icon.
You may occassionally see a Resource with a different type of content icon. By default, a Resource is
configured to display basic html markup as a web page. But a Resource is also capable of delivering a
variety of specialized content. You can configure a Resource to deliver a PDF document
RSS feeds
, a downloadable Excel file
, XML code for
, and other advanced types of content.
The appearance of Resources in the Site Tree are further stylized to inform you of the
Resource's status:
Resource is published - this item is published and viewable online.
Resource is un-published - this item cannot be viewed online. It is only available from the administration
interface for editing.
Resource is published, but not visible in menus - this item can be viewed online, but has been
configured to not be listed in any menu bars. You would find certain types of pages such as search results,
"document not found", and form responses hidden from menus, since you would not want a user to directly
navigate to these pages.
http://www.studioefx.com/modx-user-guide/users-guide/the-resource-browser[6/25/2010 7:09:42 PM]
MODx Content Management System : The Resource Browser
Resource has been deleted - Deleting a resource removes it from public view, but the item will remain in
the Resource Browser marked this way. This gives you the opportunity to un-delete it should you change
your mind.
http://www.studioefx.com/modx-user-guide/users-guide/the-resource-browser[6/25/2010 7:09:42 PM]
MODx Content Management System : The File Manager
MODx Content Management System 1.0.3 - QuickStart Guide
Search here...
The File Manager
Go!
Read Me First
User's Guide
The MODx administrative
interface
About Resources
The Resource Browser
The File Manager
Uploading images
Navigating, creating, deleting
directories
File and directory best
practices
Glossary
How Do I
Create a new web page
Create a new container
Create a new web link
Un-publish a resource
Automatically publish on a future
date
Preview an unpublished resource
Delete a resource
Hide a resource from menu
listing
Insert an image
Link to a PDF or Word doc
Search for resources or contents
Customize the page link text in
navigation bars
Change the Resource URL
Move a resource ...
into a different container
above or below a resource
Frequently Asked Questions
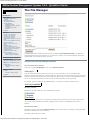
The MODx administrator interface provides you with an integrated file management utility. The MODx file
manager displays the files and directories on your web server, allowing you to browse directories, upload and
download files, view and edit documents, and more.
Troubleshooting
My page is displaying old content
My page is not appearing on the
site
Editing pages
Can't add content at bottom
of page.
Components of the File Manager interface
The current directory location
At the very top of the File Manager is your current directory location.
Advanced Topics
Chunks
Viewing, creating, editing
Snippets
Here, the single slash indicates that we are in the top, or root-level directory. As you navigate through
directories, the slash will change into a 'bread crumb' trail, starting from the top directory through to the current
directory, displaying each directory that is passed through along the way. This can provide helpful information if
you are in a deeply nested directory and aren't quite sure about the path you took to get there.
For example, if you are viewing the site's docs directory, you would see a directory location such as:
Directory controls
Beneath the directory location are a few useful directory controls.
By clicking on these controls you can navigate out of directories and create new ones. In many cases, though,
one or more of these controls will be hidden, indicating that the control is not applicable for the current
directory.
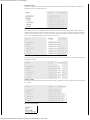
The directory listing
Beneath the directory controls is the directory listing for the current directory. This displays a listing of all files
and folders contained in the current directory.
The listing is divided into four columns.
http://www.studioefx.com/modx-user-guide/users-guide/the-file-manager[6/25/2010 7:09:45 PM]
MODx Content Management System : The File Manager
Filename column
This column displays the current directory's file and folder names. Folder names are clickable, allowing you to
navigate into them to change directories.
Modified column
Every time a folder or file is updated, the time and date in which it was saved is recorded as part of the file's
metadata. Having this information is helpful, for instance, if you are regularly re-uploading updated versions of
the same file, and want to make sure that the version on the server is the newest version. This column shows
you the file's modified date. Note that the time is 24-hour time.
File size column
This column lists the file size of files and folders. Note that the file size of folders does not take into account the
contents of the folder.
Options column
This column provides icons to interact with the file or folder, depending on the type of file and what permissions
are in place.
Directory information
http://www.studioefx.com/modx-user-guide/users-guide/the-file-manager[6/25/2010 7:09:45 PM]
MODx Content Management System : The File Manager
Beneath the directory listing is a small cluster of information about the currently visible directory. For this
example, we can see that there are two directories (squirrelmail and assets), four files (htaccess, index-ajax,
index and robots), the total size of the directory is 23.54 KB, and the directory is not writable - meaning you
can't alter the contents of it.
File upload
At the bottom of the file manager are the file upload controls.
To upload a file, you would click on Browse. A modal box will appear, allowing you to select a file from your
computer. Although you can only pick one file at a time from the popup modal box, you can continue to hit
Browse while adding additional files to your upload list.
If you do not see the file upload controls, this means that either the current directory is not writable, or you do
not have upload permissions. You will not be able to upload files. In place of the file upload controls, you will
see something like:
Where to find the File Manager
To open the File Manager, navigate to Elements -> Manage Files.
http://www.studioefx.com/modx-user-guide/users-guide/the-file-manager[6/25/2010 7:09:45 PM]
MODx Content Management System : Using the File Manager to upload images
MODx Content Management System 1.0.3 - QuickStart Guide
Search here...
Using the File Manager to upload images
Go!
The File Manager can be used to upload images to your web server.
Read Me First
User's Guide
The MODx administrative
interface
About Resources
The Resource Browser
The File Manager
Uploading images
Navigating, creating, deleting
directories
File and directory best
practices
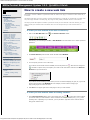
To upload images using the File Manager:
1. Navigate to Elements->Manage Files. The File
Manager panel will load.
An alternative method to upload
images is via the Rich Text Editor.
That method has the added benefit
of automatically creating
thumbnail previews to help you
pick the right image when editing
your document.
Glossary
How Do I
Create a new web page
Create a new container
Create a new web link
Un-publish a resource
Automatically publish on a future
date
Preview an unpublished resource
Delete a resource
Hide a resource from menu
listing
Insert an image
Link to a PDF or Word doc
Search for resources or contents
Customize the page link text in
navigation bars
Change the Resource URL
Move a resource ...
into a different container
above or below a resource
Frequently Asked Questions
Troubleshooting
My page is displaying old content
My page is not appearing on the
site
Editing pages
Can't add content at bottom
of page.
Advanced Topics
Chunks
Viewing, creating, editing
Snippets
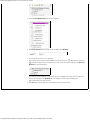
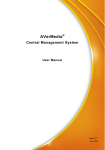
2. Locate the folder named assets — this is where all site files reside. Click on it to change directories.
Note: This is a sample directory listing. Your files and folders will appear different.
3. The assets folder will open, and you will see that it contains a directory listing very
similar to the image on the right.
Locate the folder named images. Click on it to change directories.
4. This images folder is the base location where all images reside. As a rule, you
should never upload images in any directory outside of images. Note: Your MODx
administrator may have set up a unique directory structure. Contact him/her for
information.
You can upload your images here if you wish, although it is recommended that you
organize and group your images into subfolders within images. For example, you
may have a subfolder called photos within images (assets/images/photos), or a
subfolder called backgrounds within images (assets/images/backgrounds)
5. Be sure you are in your preferred image directory before continuing.
6. Upload the image or images.
http://www.studioefx.com/modx-user-guide/users-guide/the-file-manager/using-the-file-manager-to-upload-images[6/25/2010 7:09:47 PM]
MODx Content Management System : Navigating, creating and deleting directories
MODx Content Management System 1.0.3 - QuickStart Guide
Search here...
Go!
Read Me First
User's Guide
The MODx administrative
interface
About Resources
The Resource Browser
The File Manager
Uploading images
Navigating, creating, deleting
directories
File and directory best
practices
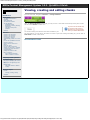
Navigating, creating and deleting
directories
Here are the methods for navigating, creating and deleting files.
To navigate into a folder and view its directory
1. Click on the folder name to open the folder. For this example, you might click on docs.
Glossary
How Do I
Create a new web page
Create a new container
Create a new web link
Un-publish a resource
Automatically publish on a future
date
Preview an unpublished resource
Delete a resource
Hide a resource from menu
listing
Insert an image
Link to a PDF or Word doc
Search for resources or contents
Customize the page link text in
navigation bars
Change the Resource URL
Move a resource ...
into a different container
above or below a resource
2. The page will reload. You are now in the docs folder looking at its directory listing.
3. Verify you are in the correct directory by looking at the directory path, listed at the top-left corner of
the File Manager panel.
To navigate out of the current directory
1. Locate the link named Up one level. This link can be found near the upper-left corner of the File
Browser. Click on this link.
Frequently Asked Questions
Troubleshooting
My page is displaying old content
My page is not appearing on the
site
Editing pages
Can't add content at bottom
of page.
Advanced Topics
Chunks
Viewing, creating, editing
2. The page will reload. You will move out of the current directory, up one level to the next highest
directory.
Alternatively, you could click on the To top level link, which will move you out of the current directory
straight to the top level directory. This is a convenience if you find that you are in a deeply nested
directory and you just want to get back to the top level.
Snippets
To create a new directory
1. Navigate to the directory where you would like your new directory to be created. Note: be sure to read
file system best practices first, to understand how site assets are organized in special directories.
2. Verify that the directory is writable. Look towards the bottom-left corner of the File Browser for a
small group of statistics text.
The Directory writable status should read Yes. If it reads no, you will not be able to create a directory
here.
3. Locate the link named New Directory. It is located near the upper-left corner of the File Browser.
Click on it.
4. A modal box will appear. Enter the new directory name (avoid using spaces and punctuation). Click
OK.
http://www.studioefx.com/modx-user-guide/users-guide/the-file-manager/navigating-creating-and-deleting-directories[6/25/2010 7:09:50 PM]
MODx Content Management System : Navigating, creating and deleting directories
5. The page will reload and your new folder will appear in the directory listing.
To delete a directory
1. If the directory is writable, you should be able to delete it. You can tell at a glance if a file can be
in the Options column of the directory listing. If this
deleted by the presence of a red delete button button is visible, clicking it will delete the folder. If this button is not visible, the folder cannot be
deleted.
http://www.studioefx.com/modx-user-guide/users-guide/the-file-manager/navigating-creating-and-deleting-directories[6/25/2010 7:09:50 PM]
MODx Content Management System : File and directory best practices
MODx Content Management System 1.0.3 - QuickStart Guide
Search here...
File and directory best practices
Go!
When u der. If this button is not visible, the folder cannot be deleted.
Read Me First
User's Guide
The MODx administrative
interface
About Resources
The Resource Browser
The File Manager
Uploading images
Navigating, creating, deleting
directories
File and directory best
practices
Glossary
How Do I
Create a new web page
Create a new container
Create a new web link
Un-publish a resource
Automatically publish on a future
date
Preview an unpublished resource
Delete a resource
Hide a resource from menu
listing
Insert an image
Link to a PDF or Word doc
Search for resources or contents
Customize the page link text in
navigation bars
Change the Resource URL
Move a resource ...
into a different container
above or below a resource
Frequently Asked Questions
Troubleshooting
My page is displaying old content
My page is not appearing on the
site
Editing pages
Can't add content at bottom
of page.
Advanced Topics
Chunks
Viewing, creating, editing
Snippets
http://www.studioefx.com/modx-user-guide/users-guide/the-file-manager/file-and-directory-best-practices[6/25/2010 7:09:55 PM]
MODx Content Management System : Glossary
MODx Content Management System 1.0.3 - QuickStart Guide
Search here...
Glossary
Go!
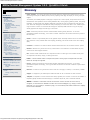
Cache, Caching - The process of caching (pronounced 'kash-ing') helps improve performance by saving
Read Me First
User's Guide
The MODx administrative
interface
About Resources
The Resource Browser
The File Manager
Uploading images
Navigating, creating, deleting
directories
File and directory best
practices
Glossary
How Do I
Create a new web page
Create a new container
Create a new web link
Un-publish a resource
Automatically publish on a future
date
Preview an unpublished resource
Delete a resource
Hide a resource from menu
listing
Insert an image
Link to a PDF or Word doc
Search for resources or contents
Customize the page link text in
navigation bars
Change the Resource URL
Move a resource ...
into a different container
above or below a resource
Frequently Asked Questions
Troubleshooting
My page is displaying old content
My page is not appearing on the
site
Editing pages
Can't add content at bottom
of page.
Advanced Topics
Chunks
Viewing, creating, editing
Snippets
and reusing the output of a MODx process, such as preparing a web page for display or running a complex
snippet.
To illustrate, when MODx prepares a web page in response to a visitor request, the process involves many
technical back-end operations such as making database calls, running scripts, gathering assets, and parsing
templates. To make things more efficient, MODx will go through the work of preparing the web page only
once. When the web page is assembled and ready for display, it is sent to the visitor--and-- MODx keeps a
copy for itself in a cache. The next time the web page is requested, MODx will have a copy of the page
already prepared and simply send the copy to the visitor.
Child - A child is any Resource which is contained within another (parent) Resource. To use more
generalized computer terminology, it is an item in a folder. A Resource can be both a child and a parent at
the same time.
Chunk - A Chunk is a pre-defined piece of raw (X)HTML and/or Javascript code that can be re-used later in
other resources. It may containt client-side scripting (Javascript), but cannot contain server-side scripting
(PHP).
Container - A container is a Resource which contains another Resource. This is another word for ‘parent.’
Element - ‘Element’ is a generic term for any content which is not a Resource. Content editors may only
access ‘Chunk’ and ‘Snippet’ elements.
File - A file is a block of data stored on a computer hard drive or other type of non-volatile memory that
can represent a document, image, or other type of asset.
Folder - A virtual container within a computer file system in which groups of computer files and other
folders can be kept and organized.
Parent - A parent is a Resource which contains another (child) Resource inside of it. To use more
generalized computer terminology, it is a type of folder. A Resource can be both a child and a parent at the
same time.
Resource - A Resource is a general term used to refer to a web page, a weblink, or a container, in MODx.
Snippet - A Snippet is a pre-defined piece of PHP code that can be re-used later in other resources.
Template - A template is a set of web resources which, together, form a theme or a skin for the website. A
template typically includes customized images, a customized layout file, and a customized CSS file.
Weblink - A weblink is a URL which is stored as a Resource so that it can later be used in menus,
navigation, or other Resources. Weblinks can either be to external webpages (e.g. Google) or internal
Resources (e.g. your company’s “Contact Us” page). It is not necessary that all URLs included in a webpage
be first saved as Weblinks!
http://www.studioefx.com/modx-user-guide/users-guide/glossary[6/25/2010 7:09:57 PM]
MODx Content Management System : How to create a new web page
MODx Content Management System 1.0.3 - QuickStart Guide
Search here...
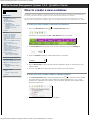
How to create a new web page
Go!
Recall that a resource in MODx is a general term that can mean a web page, a container for other resources, or
Read Me First
User's Guide
The MODx administrative
interface
About Resources
The Resource Browser
The File Manager
Uploading images
Navigating, creating, deleting
directories
File and directory best
practices
a web link. This section will show you how to create a resource that functions as a web page.
The steps you will take depend on whether you wish to create your new page in the root directory, or if you
want to create your page inside a container. Note: You can always move your new page after it is created.
To create your new page in the main root directory:
1. Click on the New Resource button in the Resource Browser toolbar.
Glossary
How Do I
Create a new web page
Create a new container
Create a new web link
Un-publish a resource
Automatically publish on a future
date
Preview an unpublished resource
Delete a resource
Hide a resource from menu
listing
Insert an image
Link to a PDF or Word doc
Search for resources or contents
Customize the page link text in
navigation bars
Change the Resource URL
Move a resource ...
into a different container
above or below a resource
Frequently Asked Questions
Troubleshooting
My page is displaying old content
My page is not appearing on the
site
Editing pages
Can't add content at bottom
of page.
Alternatively, you could navigate to Site -> New Resource in the main toolbar.
2. The Create Resource panel will appear, where you can enter the appropriate page details and content.
3. Click Save on the upper-right corner of the page to save your new page.
To create your new page within an existing container:
1. In the Resource Browser panel, click on the context menu icon
next to the name of the container
you wish to create your new page in. Note: Containers are easily identified by the [+] or [-] icons
preceding them.
Advanced Topics
Chunks
Viewing, creating, editing
Snippets
2. Click on Create Resource Here from the list of options.
3. The Create Resource panel will appear, where you can enter the appropriate page details and content.
4. Click Save on the upper-right corner of the page to save your new page.
http://www.studioefx.com/modx-user-guide/how-do-i/how-to-create-a-new-webpage[6/25/2010 7:10:00 PM]
MODx Content Management System : How to create a new web page
http://www.studioefx.com/modx-user-guide/how-do-i/how-to-create-a-new-webpage[6/25/2010 7:10:00 PM]
MODx Content Management System : How to create a new container
MODx Content Management System 1.0.3 - QuickStart Guide
Search here...
How to create a new container
Go!
Recall that a resource in MODx is a general term that can mean a web page, a container for other resources, or
Read Me First
User's Guide
The MODx administrative
interface
About Resources
The Resource Browser
The File Manager
Uploading images
Navigating, creating, deleting
directories
File and directory best
practices
a web link. This section will show you how to create a resource that functions as a container.
The steps you will take depend on whether you wish to create your new page in the root directory, or if you
want to create your page inside a container. Note: You can always move your new container after it is created.
To create your new container in the main root directory:
1. Click on the New Resource button in the Resource Browser toolbar.
Glossary
How Do I
Create a new web page
Create a new container
Create a new web link
Un-publish a resource
Automatically publish on a future
date
Preview an unpublished resource
Delete a resource
Hide a resource from menu
listing
Insert an image
Link to a PDF or Word doc
Search for resources or contents
Customize the page link text in
navigation bars
Change the Resource URL
Move a resource ...
into a different container
above or below a resource
Alternatively, you could navigate to Site -> New Resource in the main toolbar.
2. The Create Resource panel will load. In the top of the editor panel, click on the Settings tab.
3. Check the Container checkbox to configure this resource as a container.
Frequently Asked Questions
Troubleshooting
My page is displaying old content
My page is not appearing on the
site
Editing pages
Can't add content at bottom
of page.
Advanced Topics
4. Click the General tab to return to the main resource configuration, where you can specify your new
container details.
5. Be sure to click Save on the upper-right corner of the page to save your container.
Chunks
Viewing, creating, editing
Snippets
To create your new container within an existing container:
1. In the Resource Browser panel, click on the context menu icon
next to the name of the container
you wish to create your new page in. Note: Containers are easily identified by the [+] or [-] icons
preceding them. Depending on your browser, you may be able to right-click on the resource name to
bring up the context menu.
2. Click on Create Resource Here from the list of options.
http://www.studioefx.com/modx-user-guide/how-do-i/how-to-create-a-new-container[6/25/2010 7:10:02 PM]
MODx Content Management System : How to create a new container
3. The Create Resource panel will load. In the top of the editor panel, click on the Settings tab.
4. Check the Container checkbox to configure this resource as a container.
5. Click the General tab to return to the main resource configuration, where you can specify your new
container details.
6. Be sure to click Save on the upper-right corner of the page to save your container.
http://www.studioefx.com/modx-user-guide/how-do-i/how-to-create-a-new-container[6/25/2010 7:10:02 PM]
MODx Content Management System : How to create a new web link
MODx Content Management System 1.0.3 - QuickStart Guide
Search here...
How to create a new web link
Go!
Recall that a resource in MODx is a general term that can mean a web page, a container for other resources, or
Read Me First
User's Guide
The MODx administrative
interface
About Resources
The Resource Browser
The File Manager
Uploading images
Navigating, creating, deleting
directories
File and directory best
practices
Glossary
How Do I
Create a new web page
Create a new container
Create a new web link
Un-publish a resource
Automatically publish on a future
date
Preview an unpublished resource
Delete a resource
Hide a resource from menu
listing
Insert an image
Link to a PDF or Word doc
Search for resources or contents
Customize the page link text in
navigation bars
Change the Resource URL
Move a resource ...
into a different container
above or below a resource
a web link.
This section will show you how to create a resource that functions as a web link. A web link has no content of its
own, but simply redirects to another page, file, image or other publicly-available resource on the internet.
The steps you will take depend on whether you wish to create your new web link in the root directory, or if you
want to create your web link inside a container. Note: You can always move your new web link after it is
created.
To create your new web link in the main root directory:
1. Click on the New Web Link button in the Resource Browser toolbar.
Alternatively, you could navigate to Site -> New Weblink in the main toolbar. It's a matter of personal
preference.
2. The Create Resource panel will load. Locate the field marked Weblink:
Frequently Asked Questions
Troubleshooting
My page is displaying old content
My page is not appearing on the
site
Editing pages
Can't add content at bottom
of page.
Advanced Topics
3. You can specify your link in one of two ways:
If you wish to link to another resource in MODx, click on the picker icon
. When the icon changes to
, the field is in picker mode, and expects you to click on the name of the resource in the Resource
Browser that you wish to link to.
Chunks
Viewing, creating, editing
Snippets
If you wish to link to something on the internet, such as an external webpage, file, pdf, etc., type in the
full url in the text area of the Weblink field. For example, to create a link to Google, type
http://www.google.com in the text area.
4. Click Save on the upper-right corner of the page to save your new web link.
To create your new web link within an existing container:
1. In the Resource Browser panel, click on the context menu icon
next to the name of the container
you wish to create your new web link in. Note: Containers are easily identified by the [+] or [-] icons
preceding them. Depending on your browser, you may be able to right-click on the resource name to
bring up the context menu.
http://www.studioefx.com/modx-user-guide/how-do-i/how-to-create-a-new-web-link[6/25/2010 7:10:05 PM]
MODx Content Management System : How to create a new web link
2. Click on Create Weblink Here from the list of options.
3. The Create Resource panel will load. Locate the field marked Weblink:
4. You can specify your link in one of two ways:
If you wish to link to another resource in MODx, click on the picker icon
. When the icon changes to
, the field is in picker mode, and expects you to click on the name of the resource in the Resource
Browser that you wish to link to.
If you wish to link to something on the internet, such as a webpage, file, image, pdf, etc., type in the
full url in the text area of the Weblink field. For example, to create a link to Google, type
http://www.google.com in the text area.
5. Click Save on the upper-right corner of the page to save your new web link.
http://www.studioefx.com/modx-user-guide/how-do-i/how-to-create-a-new-web-link[6/25/2010 7:10:05 PM]
MODx Content Management System : How to un-publish a resource
MODx Content Management System 1.0.3 - QuickStart Guide
Search here...
How to un-publish a resource
Go!
Recall that a resource in MODx is a general term that can mean a web page, a container for other resources, or
Read Me First
User's Guide
The MODx administrative
interface
About Resources
The Resource Browser
The File Manager
Uploading images
Navigating, creating, deleting
directories
File and directory best
practices
Glossary
How Do I
Create a new web page
Create a new container
Create a new web link
Un-publish a resource
Automatically publish on a future
date
Preview an unpublished resource
Delete a resource
Hide a resource from menu
listing
Insert an image
Link to a PDF or Word doc
Search for resources or contents
Customize the page link text in
navigation bars
Change the Resource URL
Move a resource ...
into a different container
above or below a resource
a web link.
When un-publishing a resource, you are preventing the resource from being displayed on-site for public viewing.
Note: Even though a resource is un-published, you can still edit the document and preview it via the
administrator interface.
To quickly un-publish a resource:
1. In the Resource Browser panel, click on the context menu icon
next to the name of the resource
you wish to un-publish. Depending on your web browser, you may also be able to right-click on the
resource name to bring up the context menu.
2. Click on Un-publish Resource from the list of options.
Frequently Asked Questions
Troubleshooting
My page is displaying old content
My page is not appearing on the
site
Editing pages
Can't add content at bottom
of page.
Advanced Topics
Chunks
Viewing, creating, editing
Snippets
3. A modal box will appear, asking you to accept or cancel the change.
To unpublish a resource from the Resource Editor:
1. If you are in the Edit Resource panel currently editing the resource you wish to un-publish, click on the
Settings tab.
2. Locate the Published field. Un-check the field.
3. Click Save on the upper-right corner of the page.
http://www.studioefx.com/modx-user-guide/how-do-i/how-to-un-publish-a-resource[6/25/2010 7:10:07 PM]
MODx Content Management System : How to automatically publish a resource on a future date.
MODx Content Management System 1.0.3 - QuickStart Guide
Search here...
Go!
Read Me First
User's Guide
The MODx administrative
interface
About Resources
The Resource Browser
The File Manager
Uploading images
Navigating, creating, deleting
directories
File and directory best
practices
Glossary
How to automatically publish a resource on
a future date.
Recall that a resource in MODx is a general term that can mean a web page, a container for other resources, or
a web link.
This section will show you how to specify a date in the future to automatically publish a Resource.
To specify a date to automatically publish a resource:
1. You will need to have the Resource open for editing. If the Resource is currently not open, locate the
Resource's name in the Resource Browser panel and click on it.
How Do I
Create a new web page
Create a new container
Create a new web link
Un-publish a resource
Automatically publish on a future
date
Preview an unpublished resource
Delete a resource
Hide a resource from menu
listing
Insert an image
Link to a PDF or Word doc
Search for resources or contents
Customize the page link text in
navigation bars
Change the Resource URL
Move a resource ...
into a different container
above or below a resource
Frequently Asked Questions
2. The Edit Resource panel will load. Click on the Settings tab.
3. Locate the field named Published. Ensure that this field is NOT checked.
Troubleshooting
My page is displaying old content
My page is not appearing on the
site
Editing pages
Can't add content at bottom
of page.
Advanced Topics
Chunks
Viewing, creating, editing
4. Locate the field named Publish Date. Clicking on the field will bring up a date picker. Select the future
date in which you would like the resource to be published. When the date arrives, the resource will
automatically become available to the public. To clear the date, click on the
icon to the right of the
field. Note: If for any reason the date picker does not appear, you can manually enter a date according
to the format displayed beneath the field.
Snippets
5. To automatically un-publish your resource at a specific date in the future, locate the field named Unpublish Date. Select the future date in which you would like the resource to be un-published. When
this date arrives, the resource will no longer be clickable or visible.
6. Click Save on the upper-right corner of the page to save your changes.
http://www.studioefx.com/modx-user-guide/how-do-i/how-to-automatically-publish-a-resource-on-a-future-date[6/25/2010 7:10:11 PM]
MODx Content Management System : How to preview an unpublished resource
MODx Content Management System 1.0.3 - QuickStart Guide
Search here...
How to preview an unpublished resource
Go!
Recall that a resource in MODx is a general term that can mean a web page, a container for other resources, or
Read Me First
User's Guide
The MODx administrative
interface
About Resources
The Resource Browser
The File Manager
Uploading images
Navigating, creating, deleting
directories
File and directory best
practices
Glossary
a web link.
You don't have to publish a resource to preview it. Here's how to easily check your work without making the
resource live.
To preview an unpublished resource:
1. You will need to have the resource open for editing. If the resource is currently not open, locate the
resource's name in the Resource Browser panel and click on it.
How Do I
Create a new web page
Create a new container
Create a new web link
Un-publish a resource
Automatically publish on a future
date
Preview an unpublished resource
Delete a resource
Hide a resource from menu
listing
Insert an image
Link to a PDF or Word doc
Search for resources or contents
Customize the page link text in
navigation bars
Change the Resource URL
Move a resource ...
into a different container
above or below a resource
2. The Edit Resource panel will load. Locate the controls at the upper-right corner of the interface.
3. If you haven't saved your work yet, click on the option field and select Continue editing.
Frequently Asked Questions
Troubleshooting
My page is displaying old content
My page is not appearing on the
site
Editing pages
Can't add content at bottom
of page.
Advanced Topics
Chunks
Viewing, creating, editing
4. Click Save to save your current work.
5. When the page reloads, click Preview to see your work in progress.
Snippets
http://www.studioefx.com/modx-user-guide/how-do-i/how-to-preview-an-unpublished-resource[6/25/2010 7:10:13 PM]
MODx Content Management System : How to delete a resource
MODx Content Management System 1.0.3 - QuickStart Guide
Search here...
How to delete a resource
Go!
Recall that a resource in MODx is a general term that can mean a web page, a container for other resources, or
Read Me First
User's Guide
The MODx administrative
interface
About Resources
The Resource Browser
The File Manager
Uploading images
Navigating, creating, deleting
directories
File and directory best
practices
Glossary
a web link.
There are two ways to delete a Resource, either from the Resource Editor or from the Resource Browser.
To delete a Resource using the Resource Browser:
1. In the Resource Browser panel, click on the context menu icon
next to the name of the resource
you wish to delete. Depending on your web browser, you may also be able to right-click on the resource
name to bring up the context menu.
How Do I
Create a new web page
Create a new container
Create a new web link
Un-publish a resource
Automatically publish on a future
date
Preview an unpublished resource
Delete a resource
Hide a resource from menu
listing
Insert an image
Link to a PDF or Word doc
Search for resources or contents
Customize the page link text in
navigation bars
Change the Resource URL
Move a resource ...
into a different container
above or below a resource
2. Click on Delete Resource from the list of options.
Frequently Asked Questions
Troubleshooting
My page is displaying old content
My page is not appearing on the
site
Editing pages
Can't add content at bottom
of page.
Advanced Topics
Chunks
Viewing, creating, editing
Snippets
3. A modal box will appear, prompting you to accept or cancel.
4. In the Resource Browser, the Resource will appear with a strikethrough indicating it is now deleted.
To delete a Resource from within the Resource Editor:
1. If you are in the Edit Resource panel currently editing the resource you wish to delete, click on the
Delete button on the control bar at the top of the Edit Resource panel.
2. A modal box will appear, prompting you to accept or cancel.
3. In the Resource Browser, the Resource will appear with a strikethrough indicating it is now deleted.
http://www.studioefx.com/modx-user-guide/how-do-i/how-to-delete-a-resource[6/25/2010 7:10:15 PM]
MODx Content Management System : How to hide a resource from being listed in menus and site maps
MODx Content Management System 1.0.3 - QuickStart Guide
Search here...
Go!
Read Me First
User's Guide
How to hide a resource from being listed in
menus and site maps
Recall that a resource in MODx is a general term that can mean a web page, a container for other resources, or
The MODx administrative
interface
About Resources
The Resource Browser
The File Manager
Uploading images
Navigating, creating, deleting
directories
File and directory best
practices
a web link.
Glossary
have a 'Page not found' error page, a form response page, or a search landing page. While you want these
pages available, creating direct links to them in a menu would not make sense.
How Do I
Create a new web page
Create a new container
Create a new web link
Un-publish a resource
Automatically publish on a future
date
Preview an unpublished resource
Delete a resource
Hide a resource from menu
listing
Insert an image
Link to a PDF or Word doc
Search for resources or contents
Customize the page link text in
navigation bars
Change the Resource URL
Move a resource ...
into a different container
above or below a resource
Menus and site maps are automatically created by programmable menu-generating snippets in MODx. The main
navigation of your website, for example, is created by a menu generator that scans all of your site's Resources
and produces an ordered set of links for display and navigation.
You have the option to include or exclude Resources from being displayed in menus. This is a useful capability,
as there are some pages that you would normally not want to appear in any menus. For example, your site may
Note: Even though a Resource might be hidden from menus, the page is still 'live' and can be viewed if the user
directly types in the Resource's URL
To hide a Resource from menu and sitemap listings:
1. This action requires you to have the Resource open for editing. If you are already have the Edit
Resource panel visible, proceed to step 2.
Otherwise, in the Resource Browser, locate the Resource you wish to modify. Click on the name of the
Resource to open up the Edit Resource panel.
Frequently Asked Questions
Troubleshooting
My page is displaying old content
My page is not appearing on the
site
Editing pages
Can't add content at bottom
of page.
Advanced Topics
Chunks
Viewing, creating, editing
Snippets
2. Within the Edit Resource panel, locate the field named Show in menu. Un-check this field.
Note: If you are having trouble locating this field, it is normally located just above the Text Editor panel.
3. Click Save on the upper-right corner of the page.
http://www.studioefx.com/modx-user-guide/how-do-i/how-to-hide-a-resource-from-being-listed-in-menus-and-site-maps[6/25/2010 7:10:17 PM]
MODx Content Management System : How to insert an image
MODx Content Management System 1.0.3 - QuickStart Guide
Search here...
How to insert an image
Go!
Inserting an image into your document is an easy task. This guide assumes you already have your resource
Read Me First
(web page) open with the Edit Resource panel visible.
User's Guide
The MODx administrative
interface
About Resources
The Resource Browser
The File Manager
Uploading images
Navigating, creating, deleting
directories
File and directory best
practices
Glossary
How Do I
Create a new web page
Create a new container
Create a new web link
Un-publish a resource
Automatically publish on a future
date
Preview an unpublished resource
Delete a resource
Hide a resource from menu
listing
Insert an image
Link to a PDF or Word doc
Search for resources or contents
Customize the page link text in
navigation bars
Change the Resource URL
Move a resource ...
into a different container
above or below a resource
Frequently Asked Questions
Troubleshooting
My page is displaying old content
My page is not appearing on the
site
Editing pages
Can't add content at bottom
of page.
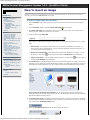
To insert an image using the Text Editor:
1. In the Text Editor content area, position the cursor on the area in which you would like the image to
appear.
2. In the Text Editor toolbars, locate the Insert/edit image icon and click it.
3. The Insert/edit image popup will appear. Note: If you do not see the popup, your browser may be
blocking pop-ups. Check your browser pop-up controls.
4. Locate the field named Image URL.
This is where you will specify the location of your image. You can specify the image URL in one of three
ways:
1. Manual entry - If the image is posted online, and you know the web address of the image, e.g.
http://www.my-site.com/myImage.jpg, you can enter that information directly in the text box. If
you use this option, proceed to step 10.
2. Browse for existing image - If the image has previously been uploaded to your server, you can
browse for it. Click on the
icon to the right of the field. A File Browser popup will appear.
3. Upload a new image - You can upload an image and link to it. Click on the
the field. A File Browser popup will appear.
icon to the right of
5. The File Browser is a graphical interface where you can upload and organize your images. The screen
shot below is just a sample of a typical File Browser's contents. Your File Browser will have a custom set
of directories and images specific to your site, so what you will see will be different from this example.
Advanced Topics
Chunks
Viewing, creating, editing
Snippets
If your image has previously been uploaded, you can navigate to the image by clicking on the
folder icons. When you reach the image, click on its icon. The File Browser will close, and the Image URL
field will be updated. Proceed to step 10.
6. To upload a new image, first navigate to the directory in which you want the new image to be placed.
You can navigate by clicking on the folder icons. If the directory you want does not exist, you can create
it by clicking on the Create New Folder button.
7. Locate the file upload controls towards the bottom of the File Browser.
http://www.studioefx.com/modx-user-guide/how-do-i/how-to-insert-an-image[6/25/2010 7:10:19 PM]
MODx Content Management System : How to insert an image
Click on the Browse button. Select the document from your local computer. Click the Upload button.
8. You will see a progress bar indicating the status of the upload. Once successfully uploaded, a thumbnail
of your image will appear in the File Browser.
9. Click on the image thumbnail to select it. The File Browser will close, and the Link URL field will
update with the image's location.
10. Locate the field named Image Description.
Enter a very brief description of the image.
This description will be used in place of the image on text-only browsers, or browsers with images
disabled. The image description may also be used by accessible browsers for people with disabilities. For
example, a specialized browser may 'speak' the image description for a visually-impaired user. Finally,
the image description is beneficial from an SEO (Search Engine Optimization) perspective, and is
considered valid content that will be indexed in search engine databases.
11. Optional: Locate the field named Title.
You can enter a brief image title.
The image title is similar to the image description, but less importance is placed on this value. The
image title's primary purpose is to provide additional information about the image. For example, when
the image is displayed, the title may appear when you place your mouse over the image - although this
effect varies from browser to browser. In general, you can safely ignore this value without adversely
affecting your webpage.
12. Click the Insert button.
The Insert/edit image pop-up will close, and your new image will appear in the Text Editor.
13. Be sure to click Save so you don't lose your updates.
http://www.studioefx.com/modx-user-guide/how-do-i/how-to-insert-an-image[6/25/2010 7:10:19 PM]
MODx Content Management System : How to link to a PDF or Word document
MODx Content Management System 1.0.3 - QuickStart Guide
Search here...
How to link to a PDF or Word document
Go!
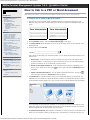
When editing your resource, you can use the Text Editor to create a link to a PDF or Word document.
Read Me First
User's Guide
The MODx administrative
interface
About Resources
The Resource Browser
The File Manager
Uploading images
Navigating, creating, deleting
directories
File and directory best
practices
To create a link to a PDF or Word document:
1. If the text for the link is already visible, highlight the text that you would like converted to a link.
Otherwise, type in the name of the link where you would like it to appear, then highlight it using your
mouse.
Glossary
How Do I
Create a new web page
Create a new container
Create a new web link
Un-publish a resource
Automatically publish on a future
date
Preview an unpublished resource
Delete a resource
Hide a resource from menu
listing
Insert an image
Link to a PDF or Word doc
Search for resources or contents
Customize the page link text in
navigation bars
Change the Resource URL
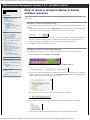
Move a resource ...
into a different container
above or below a resource
Frequently Asked Questions
Troubleshooting
My page is displaying old content
My page is not appearing on the
site
Editing pages
Can't add content at bottom
of page.
Advanced Topics
Chunks
Viewing, creating, editing
Snippets
2. In the Text Editor toolbars, locate the Insert/edit link
icon and click it.
3. The Insert/edit link popup will appear. If you do not see the popup, make sure your browser is not
blocking pop-ups.
4. Locate the field named Link URL.
This is where you will specify your document's location. You can specify the document's location in one
of three ways:
1. Manual entry - If the document is posted on a website, and you know the web address of the
document's location, e.g. http://www.my-site.com/document.pdf, you can enter that information
directly in the text box. If you use this option, proceed to step 9.
2. Browse for document and link to it - If the document has previously been uploaded to your
server, you can browse for it. Click on the
will appear.
icon to the right of the field. A File Browser popup
3. Upload a document and link to it - You can upload a document and link to it. Click on the
icon to the right of the field. A File Browser popup will appear.
5. The File Browser is a graphical interface where you can upload and organize your documents. The
image below is just a sample of a typical File Browser's contents. Your File Browser will have a custom
set of directories and files specific to your site, so what you will see will be different from this example.
If your document has previously been uploaded, you can navigate to the document by clicking on the
folder icons. When you reach the document, click on its icon. The File Browser will close, and the Link
URL field will update with the link's location. Proceed to step 9.
6. To upload a new document, first navigate to the directory in which you want the new document to be
placed. You can navigate by clicking on the folder icons. If the directory you want does not exist, you
http://www.studioefx.com/modx-user-guide/how-do-i/how-to-link-to-a-pdf-or-word-document[6/25/2010 7:10:22 PM]
MODx Content Management System : How to link to a PDF or Word document
can create it by clicking on the Create New Folder button.
7. Click on the Browse button. Select the document from your local computer. Click the Upload button.
8. The uploaded document will appear among the other folders and documents in the pop-up window.
Click on your uploaded document to select it. The File Browser will close, and the Link URL field will
update with the link's location.
9. Locate the field named Target.
This field specifies where the document will appear when displayed.
Open in this window / frame - The document will display in the main window, replacing the
website. The user will need to click the back button on his/her browser to return to the site. This is
not a recommended option.
Open in new window (_blank) - The document will load in a separate window, independent from
the main site. This is a recommended option.
Open in parent window / frame (_parent) - Do not select this option.
Open in top frame (replaces all frames) (_top) - Do not select this option.
10. Optional: You can specify a link title, which is an often helpful bit of information used by user-agents
for people with disabilities. For example, the link title you specify may be 'spoken' by an aural useragent for someone who is vision-impaired. In addition, the link title may appear as a 'tool-tip' in some
browsers when your mouse hovers over the link. It is not required. You can leave this field blank if
you wish.
To specify a link title, locate the field named Title.
Enter a brief title for your document.
11. Click the Insert button.
The Insert/edit link pop-up will close, and your new link will appear in the Text Editor.
12. Be sure to click Save so you don't lose your updates.
http://www.studioefx.com/modx-user-guide/how-do-i/how-to-link-to-a-pdf-or-word-document[6/25/2010 7:10:22 PM]
MODx Content Management System : How to search for a resource, or search for content inside a resource.
MODx Content Management System 1.0.3 - QuickStart Guide
Search here...
Go!
Read Me First
User's Guide
The MODx administrative
interface
About Resources
The Resource Browser
The File Manager
Uploading images
Navigating, creating, deleting
directories
File and directory best
practices
How to search for a resource, or search for
content inside a resource.
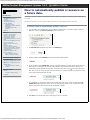
You can easily search for resources (webpages, weblinks, and containers), as well as keywords in page contents,
using the MODx search utility.
To perform a back-end site search:
1. Navigate to Site -> Search in the top administrative link bar.
Glossary
How Do I
Create a new web page
Create a new container
Create a new web link
Un-publish a resource
Automatically publish on a future
date
Preview an unpublished resource
Delete a resource
Hide a resource from menu
listing
Insert an image
Link to a PDF or Word doc
Search for resources or contents
Customize the page link text in
navigation bars
Change the Resource URL
Move a resource ...
into a different container
above or below a resource
2. The Search panel will appear.
Frequently Asked Questions
Troubleshooting
My page is displaying old content
My page is not appearing on the
site
Editing pages
Can't add content at bottom
of page.
Advanced Topics
Chunks
Viewing, creating, editing
Snippets
3. The search utility offers four types of search criteria:
1. Resource ID - You can specify a resource ID to search for a resource (webpage, weblink, or
container) that may exist in the site.
2. Title - The title is the copy that appears at the top of the browser window within the 'chrome'. It
may also appear within webpages as a main heading.
3. Long title - This field is not normally used, and will most likely not return any results.
4. Content - Enter keywords or a phrase to search for within all site pages.
When you have entered your search criteria, click Search.
4. The Search page will reload. If any pages matched your search criteria, they will be listed beneath the
search fields.
5. To view or edit a resource, click on the
icon to the left of the resource row.
http://www.studioefx.com/modx-user-guide/how-do-i/how-to-search-for-a-resource-or-search-for-content-inside-a-resource[6/25/2010 7:10:24 PM]
MODx Content Management System : How to search for a resource, or search for content inside a resource.
6. The icon to the right of the resource row indicates the resource's published status:
The resource is published.
The resource is a container, and is published.
(or no icon) The resource is not published.
http://www.studioefx.com/modx-user-guide/how-do-i/how-to-search-for-a-resource-or-search-for-content-inside-a-resource[6/25/2010 7:10:24 PM]
MODx Content Management System : How to change the name of the page's link as it appears in a navigation bar
MODx Content Management System 1.0.3 - QuickStart Guide
Search here...
Go!
Read Me First
User's Guide
The MODx administrative
interface
About Resources
The Resource Browser
The File Manager
Uploading images
Navigating, creating, deleting
directories
File and directory best
practices
Glossary
How Do I
Create a new web page
Create a new container
Create a new web link
Un-publish a resource
Automatically publish on a future
date
Preview an unpublished resource
Delete a resource
Hide a resource from menu
listing
Insert an image
Link to a PDF or Word doc
Search for resources or contents
Customize the page link text in
navigation bars
Change the Resource URL
Move a resource ...
into a different container
above or below a resource
Frequently Asked Questions
Troubleshooting
My page is displaying old content
My page is not appearing on the
site
Editing pages
Can't add content at bottom
of page.
Advanced Topics
Chunks
Viewing, creating, editing
Snippets
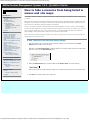
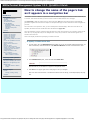
How to change the name of the page's link
as it appears in a navigation bar
Recall that a resource in MODx is a general term that can mean a web page, a container for other resources, or
a web link. This section will show you how to create a resource that functions as a web page.
The menu title is what the visitor sees as a link to the page only when the page is listed in automaticallygenerated navigational menus and site maps. An example of this type of menu would be the main navigation on
your site.
The menu title is not required. In fact, you can normally leave this field empty. When the menu title is not
specified, the text for the link will be taken from the Resource's page title.
There are instances, however, when the page title seems too long and you want to use a shorter version for the
menu bar. Or, the page title may be too ambiguous for a link, and you want to make the link appear more
concise in the menu bar.
Here is the simple procedure for specifying a custom menu title.
To specify a custom menu title
1. You will need to have the Edit Resource panel visible. If you are not currently editing the Resource you
wish to administer, locate the Resource in the Resource Browser and click on the Resource's name.
2. In the Edit Resource panel, locate the field named Menu title.
Enter the title as you would like it to appear in navigational menus.
3. Click Save on the upper-right corner of the page to save your changes.
Note: the name of the Resource in the Resource Browser will not change; it will always display the page
title.
http://www.studioefx.com/modx-user-guide/how-do-i/how-to-change-the-name-of-the-pages-link-as-it-appears-in-a-navigation-bar[6/25/2010 7:10:26 PM]
MODx Content Management System : How to change the Resource URL
MODx Content Management System 1.0.3 - QuickStart Guide
Search here...
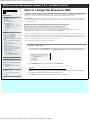
How to change the Resource URL
Go!
Recall that a resource in MODx is a general term that can mean a web page, a container for other resources, or
Read Me First
User's Guide
The MODx administrative
interface
About Resources
The Resource Browser
The File Manager
Uploading images
Navigating, creating, deleting
directories
File and directory best
practices
Glossary
How Do I
Create a new web page
Create a new container
Create a new web link
Un-publish a resource
Automatically publish on a future
date
Preview an unpublished resource
Delete a resource
Hide a resource from menu
listing
Insert an image
Link to a PDF or Word doc
Search for resources or contents
Customize the page link text in
navigation bars
Change the Resource URL
Move a resource ...
into a different container
above or below a resource
a web link. This section will show you how to create a resource that functions as a web page.
The URL alias is the name of the page a visitor would type in a web browser to access the Resource online. For
example, this URL alias is "how-to-change-the-resource-url" (you can verify this by looking at the address bar
in your web browser)
The URL alias is not required. In fact, you can normally leave this field empty. When the URL alias is not
specified, the Resource URL will be taken from the Resource's page title.
There are instances, however, when you would want to specify a unique URL alias. One example is if the title is
too long. A web browser can easily accept a long URL alias, but it may be difficult for people to write down or
remember. For example, our URL alias was left empty, so it defaulted to "how-to-change-the-resource-url". We
could have specified a different URL alias, such as "custom-urls".
Here is the simple procedure for specifying a URL alias.
To specify a URL alias
1. You will need to have the Edit Resource panel visible. If you are not currently editing the Resource you
wish to administer, locate the Resource in the Resource Browser and click on the Resource's name.
Frequently Asked Questions
Troubleshooting
My page is displaying old content
My page is not appearing on the
site
Editing pages
Can't add content at bottom
of page.
Advanced Topics
Chunks
Viewing, creating, editing
Snippets
2. In the Edit Resource panel, locate the field named URL alias.
Enter the URL as you would like it typed in a browser address bar. Note: only alphanumeric characters
and hyphens may be used. Invalid characters will be removed.
3. Click Save on the upper-right corner of the page to save your changes.
http://www.studioefx.com/modx-user-guide/how-do-i/how-to-change-the-resource-url[6/25/2010 7:10:29 PM]
MODx Content Management System : How to move a resource into a different container
MODx Content Management System 1.0.3 - QuickStart Guide
Search here...
Go!
Read Me First
User's Guide
The MODx administrative
interface
About Resources
The Resource Browser
The File Manager
Uploading images
Navigating, creating, deleting
directories
File and directory best
practices
Glossary
How to move a resource into a different
container
A container is any resource that is capable of containing other resources, similar to how a folder can contain
documents.
Use one of the following methods to move your resource into a different container:
Moving a resource using the Resource Browser:
1. In the Resource Browser panel, click on the context menu icon
next to the name of the resource
you wish to move.
How Do I
Create a new web page
Create a new container
Create a new web link
Un-publish a resource
Automatically publish on a future
date
Preview an unpublished resource
Delete a resource
Hide a resource from menu
listing
Insert an image
Link to a PDF or Word doc
Search for resources or contents
Customize the page link text in
navigation bars
Change the Resource URL
Move a resource ...
into a different container
above or below a resource
2. Click on Move Resource from the list of options.
Frequently Asked Questions
Troubleshooting
My page is displaying old content
My page is not appearing on the
site
Editing pages
Can't add content at bottom
of page.
Advanced Topics
Chunks
Viewing, creating, editing
Snippets
3. A new page will appear, prompting you to click on a container in the Resource Browser. If you click on a
resource that is not already designated as a container, it will automatically be converted into a
container.
Note: If your resource is already in a container and you wish to move it back out into the set of main
links, click on the root container name:
4. Click Save on the upper-right corner of the page.
Moving a resource from the Edit Resource Panel
Use this option if you are currently editing the resource that you wish to move:
1. In the Edit Resource Panel, locate the field titled Resource Parent:
2. Click on the icon
, which will change to
, indicating that the Editor is ready to accept a new
http://www.studioefx.com/modx-user-guide/how-do-i/move-a-resource/how-to-move-a-resource-into-a-different-container[6/25/2010 7:10:32 PM]
MODx Content Management System : How to move a resource into a different container
parent container. Note: Clicking on the icon once again will cancel the action.
3. In the Resource Browser, click on the name of a resource where you wish to move the resource
currently being edited. When a resource is clicked, the name of the resource will appear in this field, and
the icon will return back to normal. Repeat steps 2 and 3 if you selected the wrong resource.
Note: If the resource your are currently editing is already in a container and you wish to move it back
out into the set of main links, click on the root container name:
4. Be sure to click Save on the upper-right corner of the page.
http://www.studioefx.com/modx-user-guide/how-do-i/move-a-resource/how-to-move-a-resource-into-a-different-container[6/25/2010 7:10:32 PM]
MODx Content Management System : How to move a resource above or below another resource
MODx Content Management System 1.0.3 - QuickStart Guide
Search here...
Go!
Read Me First
User's Guide
The MODx administrative
interface
About Resources
The Resource Browser
The File Manager
Uploading images
Navigating, creating, deleting
directories
File and directory best
practices
Glossary
How to move a resource above or below
another resource
Use one of these options to arrange your resources above and below other resources in your own custom
arrangement.
Arranging a resource using Menu Index
If you are currently editing the resource that you wish to arrange (with the Edit Resource panel open), use
this option:
1. In the Resource Browser panel, locate the Menu Index field. This field displays a number representing
a display order, where 0 is the top item, 1 would be the second to top, and so forth.
How Do I
Create a new web page
Create a new container
Create a new web link
Un-publish a resource
Automatically publish on a future
date
Preview an unpublished resource
Delete a resource
Hide a resource from menu
listing
Insert an image
Link to a PDF or Word doc
Search for resources or contents
Customize the page link text in
navigation bars
Change the Resource URL
Move a resource ...
into a different container
above or below a resource
2. You can either type in the display order number, or use the arrow buttons to increment and decrement
the number. When the resource is saved, it will be positioned according to the number entered. For
example, if the number 4 is specified, the resource will be displayed fourth from the top.
3. Click Save on the upper-right corner of the page.
Arranging resources using Document Manager
Document Manager is a suite of tools, one of which provides an easy to use menu item sorting tool:
1. In the main tab bar, click on Modules -> Doc Manager.
Frequently Asked Questions
Troubleshooting
My page is displaying old content
My page is not appearing on the
site
Editing pages
Can't add content at bottom
of page.
2. When the Document Manager section appears, click on the Sort Menu Items tab.
Advanced Topics
Chunks
Viewing, creating, editing
Snippets
3. You will need to specify the container which contains the resources you would like to sort. To specify the
container, simply click on the container name in the Resource Browser. Note: You can easily identify
containers, as they are always preceded by a [+] or [-] sign.
Note: If you wish to arrange the top-level main pages, click on the site name:
4. Click on Go in the tool panel. The page will reload, and a set of links will appear. For example:
5. Using your mouse, click and drag these items until you have the arrangement you want.
http://www.studioefx.com/modx-user-guide/how-do-i/move-a-resource/how-to-move-a-resource-above-or-below-another-resource[6/25/2010 7:10:34 PM]
MODx Content Management System : How to move a resource above or below another resource
6. Click Save to commit the arrangement.
7. The page will reload, indicating the status of the update. Click Close Doc Manager twice to exit the
utility.
http://www.studioefx.com/modx-user-guide/how-do-i/move-a-resource/how-to-move-a-resource-above-or-below-another-resource[6/25/2010 7:10:34 PM]
[[FirstChildRedirect]
http://www.studioefx.com/modx-user-guide/troubleshooting[6/25/2010 7:10:35 PM]
MODx Content Management System : My page is displaying old content, even though I updated it
MODx Content Management System 1.0.3 - QuickStart Guide
Search here...
Go!
Read Me First
User's Guide
The MODx administrative
interface
About Resources
The Resource Browser
The File Manager
Uploading images
Navigating, creating, deleting
directories
File and directory best
practices
Glossary
How Do I
Create a new web page
Create a new container
Create a new web link
Un-publish a resource
Automatically publish on a future
date
Preview an unpublished resource
Delete a resource
Hide a resource from menu
listing
Insert an image
Link to a PDF or Word doc
Search for resources or contents
Customize the page link text in
navigation bars
Change the Resource URL
Move a resource ...
into a different container
above or below a resource
My page is displaying old content, even
though I updated it
This can be the result of either your browser caching the old page, or the page being delivered by MODx is an
older, cached version.
1. To clear your browser's cache:
Refer to the help section of your browser. Sometimes this action is referred to clearing your history, or
clearing files.
2. To clear the MODx cache:
Navigate to Site -> Clear Cache. This will remove all cached pages from MODx. Note that this is always a
safe operation, and will never harm your site.
Frequently Asked Questions
Troubleshooting
My page is displaying old content
My page is not appearing on the
site
Editing pages
Can't add content at bottom
of page.
Advanced Topics
Chunks
Viewing, creating, editing
Snippets
http://www.studioefx.com/modx-user-guide/troubleshooting/my-page-is-displaying-old-content-even-though-i-updated-it[6/25/2010 7:10:38 PM]
MODx Content Management System : My page is not appearing on the site
MODx Content Management System 1.0.3 - QuickStart Guide
Search here...
My page is not appearing on the site
Go!
When you try to view your page on the site, you get a 'page not found' error.
Read Me First
User's Guide
The MODx administrative
interface
About Resources
The Resource Browser
The File Manager
Uploading images
Navigating, creating, deleting
directories
File and directory best
practices
Solution:
1. You will need to have the Resource (webpage) open and the Edit Resource panel visible. If it is not open,
locate the Resource in the Resource Browser. Click on the Resource's name.
Glossary
How Do I
Create a new web page
Create a new container
Create a new web link
Un-publish a resource
Automatically publish on a future
date
Preview an unpublished resource
Delete a resource
Hide a resource from menu
listing
Insert an image
Link to a PDF or Word doc
Search for resources or contents
Customize the page link text in
navigation bars
Change the Resource URL
Move a resource ...
into a different container
above or below a resource
Frequently Asked Questions
2. In the Edit Resource panel, locate the tab named Settings. Click on it.
3. Locate the field named Published.
This field must be checked in order for your page to be visible.
4. Click Save on the upper-right corner to save your changes.
Troubleshooting
My page is displaying old content
My page is not appearing on the
site
Editing pages
Can't add content at bottom
of page.
Advanced Topics
Chunks
Viewing, creating, editing
Snippets
http://www.studioefx.com/modx-user-guide/troubleshooting/my-page-is-not-appearing-on-the-site[6/25/2010 7:10:40 PM]
MODx Content Management System : I can't add content at the bottom of my page.
MODx Content Management System 1.0.3 - QuickStart Guide
Search here...
Go!
Read Me First
User's Guide
The MODx administrative
interface
About Resources
The Resource Browser
The File Manager
Uploading images
Navigating, creating, deleting
directories
File and directory best
practices
I can't add content at the bottom of my
page.
While working with the text editor, you may notice from time to time that the cursor cannot be positioned at the
bottom of the text editor to add more content. Or, trying to add more content at the bottom of the page
corrupts the layout.
Solution:
1. In the text editor toolbars, locate the
html icon. Click on it. A pop-up will appear containing code.
Glossary
How Do I
Create a new web page
Create a new container
Create a new web link
Un-publish a resource
Automatically publish on a future
date
Preview an unpublished resource
Delete a resource
Hide a resource from menu
listing
Insert an image
Link to a PDF or Word doc
Search for resources or contents
Customize the page link text in
navigation bars
Change the Resource URL
Move a resource ...
into a different container
above or below a resource
Frequently Asked Questions
Troubleshooting
My page is displaying old content
My page is not appearing on the
site
Editing pages
Can't add content at bottom
of page.
Advanced Topics
Chunks
Viewing, creating, editing
2. Scroll to the bottom of the window, and position your cursor at the end of all the content.
3. Type the characters <br> three times, just as it appears in the image above. The tag is br (for 'line
break'), surrounded by < (less-than) and > (greater-than) characters. What you are doing is adding
three line breaks using html code, instead of using the graphical editor.
4. Click the Update button, and the pop-up will close. You should now see some extra space at the
bottom of the text editor, where you can continue adding content to your page.
If this solution fails, substitute line break tags <br> with paragraph tags <p> </p> in step 3. Text
Editor configurations vary from site to site, and some tags may work over others.
Snippets
http://www.studioefx.com/modx-user-guide/troubleshooting/editing-pages/i-cant-add-content-at-the-bottom-of-my-page[6/25/2010 7:10:42 PM]
MODx Content Management System : Chunks
MODx Content Management System 1.0.3 - QuickStart Guide
Search here...
Chunks
Go!
A chunk is a small, simple container for text-based
Read Me First
User's Guide
content. Paragraphs of text, html markup, stylesheets, and
other types of static content can be created and placed in a
Static content refers to basic text
that may be sent directly to the
browser. Chunks will not process
server-side code.
The MODx administrative
interface
About Resources
The Resource Browser
The File Manager
Uploading images
Navigating, creating, deleting
directories
File and directory best
practices
chunk.
Glossary
certain pages within the site. Since the disclaimer text will not change, it can be written once, placed in a chunk,
and then the chunk's tag can be placed on whichever pages require the disclaimer to appear.
How Do I
Create a new web page
Create a new container
Create a new web link
Un-publish a resource
Automatically publish on a future
date
Preview an unpublished resource
Delete a resource
Hide a resource from menu
listing
Insert an image
Link to a PDF or Word doc
Search for resources or contents
Customize the page link text in
navigation bars
Change the Resource URL
Move a resource ...
into a different container
above or below a resource
What makes chunks special is that their contents can be 'dumped' onto any resource in
MODx, simply by placing the chunk's tag where you want the contents to appear.
To illustrate how a chunk might be useful, imagine a large fitness website that has many pages: video, photos,
a blog and so forth. To protect the site owner from potential lawsuits, a legal disclaimer needs to be visible on
How chunks work
All chunks are assigned a name when they are created. The name can be anything you prefer, but it must be
unique. You cannot have two chunks with the same name. The reason for this is because the chunk name is
used to reference the chunk's contents.
Frequently Asked Questions
Troubleshooting
My page is displaying old content
My page is not appearing on the
site
Editing pages
Can't add content at bottom
of page.
Advanced Topics
Chunks
Viewing, creating, editing
Snippets
What is a chunk tag?
{{chunk-name}}
When a chunk is created and ready for use, you can use it in web pages by specifying its tag whever you want
its contents to appear. The chunk name, surrounded by twin sets of curly braces as shown above, is a MODx
chunk tag.
When MODx fetches a web page for display, it will first scan the page for chunk tags. If a chunk tag is found,
the tag will be replaced with the chunk's contents.
Where can I place chunk tags?
You can place chunk tags in all MODx resources; that is, any web page or container. You can place chunk tags
within other chunks. Advanced MODx components such as snippets, plugins and modules will also accept chunk
tags. A chunk can even be called programatically (via the MODx API), which makes it even more versatile from
a developer's point of view.
What would be considered a good opportunity to use a chunk?
Any time you have a block of text or other static content that may need to appear across multiple pages in a
site, you should use a chunk. Chunks are also commonly used as templates to define the visual appearance of
many MODx add-ons such as Wayfinder, Ditto and Search.
http://www.studioefx.com/modx-user-guide/advanced-topics/chunks[6/25/2010 7:10:44 PM]
MODx Content Management System : Chunks
http://www.studioefx.com/modx-user-guide/advanced-topics/chunks[6/25/2010 7:10:44 PM]
MODx Content Management System : Viewing, creating and editing chunks
MODx Content Management System 1.0.3 - QuickStart Guide
Search here...
Viewing, creating and editing chunks
Go!
From the main links, navigate to Elements -> Manage Elements.
Read Me First
User's Guide
The MODx administrative
interface
About Resources
The Resource Browser
The File Manager
Uploading images
Navigating, creating, deleting
directories
File and directory best
practices
Glossary
How Do I
Create a new web page
Create a new container
Create a new web link
Un-publish a resource
Automatically publish on a future
date
Preview an unpublished resource
Delete a resource
Hide a resource from menu
listing
Insert an image
Link to a PDF or Word doc
Search for resources or contents
Customize the page link text in
navigation bars
Change the Resource URL
Move a resource ...
into a different container
above or below a resource
When the Manage Elements panel loads, you may see one or more tabs across the top of the panel. Locate
the tab named Chunks and click on it. If you don't see the Chunks tab,
you don't have the necessary
permissions to manage Chunks.
Talk to your MODx administrator.
You will see a listing of chunks that have been created for your
site. From this list, you can click on the name of a chunk to open it for viewing and editing. Or, you can click on
New Chunk to create a new chunk.
How Chunks are used
Frequently Asked Questions
Troubleshooting
My page is displaying old content
My page is not appearing on the
site
Editing pages
Can't add content at bottom
of page.
Advanced Topics
Chunks
Viewing, creating, editing
Snippets
http://www.studioefx.com/modx-user-guide/advanced-topics/chunks/viewing-creating-and-editing-chunks[6/25/2010 7:10:47 PM]
MODx Content Management System : Snippets
MODx Content Management System 1.0.3 - QuickStart Guide
Search here...
Snippets
Go!
A snippet is a MODx component that adds functionality to your website.
Read Me First
User's Guide
The MODx administrative
interface
About Resources
The Resource Browser
The File Manager
Uploading images
Navigating, creating, deleting
directories
File and directory best
practices
Glossary
How Do I
Create a new web page
Create a new container
Create a new web link
Un-publish a resource
Automatically publish on a future
date
Preview an unpublished resource
Delete a resource
Hide a resource from menu
listing
Insert an image
Link to a PDF or Word doc
Search for resources or contents
Customize the page link text in
navigation bars
Change the Resource URL
Move a resource ...
into a different container
above or below a resource
Snippets are used for everything from automatically generating page links (the Wayfinder snippet), to
processing site searches (the AjaxSearch snippet), to any type of user-created functionality such as displaying
the current date or counting the number of hits on a web page.
The term snippet is somewhat of a misnomer. Although a snippet can be as small and simple as a few lines of
code, it can also be as large and complex as a complete web application.
How snippets work
A snippet and its code will sit idle until you tell it to run. You control when a snippet runs by placing a snippet
tag in a MODx web page.
When MODx prepares a web page for display, it will scan the
page for any snippet tags you may have placed. If a snippet
tag is found, MODx will look up the snippet and run it. If the
snippet returns any value, the snippet tag will be replaced with
the snippet's output.
Some snippets won't display
anything. A snippet that checks if
you're logged in or not, or perhaps
a snippet that logs page hits,
would be examples of snippets
that run silently.
What is a snippet tag?
The triggering mechanism for running a snippet is the snippet tag. Frequently Asked Questions
Troubleshooting
My page is displaying old content
My page is not appearing on the
site
Editing pages
Can't add content at bottom
of page.
Advanced Topics
Chunks
Viewing, creating, editing
Snippets
[[snippet-name]]
When a snippet is created and ready for use, you can use it in web pages by specifying a [[snippet-tag]] where
you want it to run. The snippet name, surrounded by twin sets of square brackets, is a snippet tag.
Why are there two types of snippet tags?
Snippet tags can also be represented as [!snippet-name!].
Bracket-bracket wrappers [[ ... ]] is a cached snippet tag. If the output of the snippet is the same every time,
for example, if it always returns the value of the mathematical constant PI, you should use this type of snippet
tag.
Bracket-exclamation wrappers [! ... !] is an uncached snippet tag. If the snippet output changes, for example, if
it returns a random number each time, you should use this type of snippet tag.
Click here to learn more about caching.
Where can I place snippet tags?
You can place snippet tags in all MODx resources; that is, any web page or container. You can place snippet tags
within chunks. A snippet can be called within other snippets programatically (via the MODx API), which makes it
even more versatile from a developer's point of view.
http://www.studioefx.com/modx-user-guide/advanced-topics/snippets[6/25/2010 7:10:49 PM]