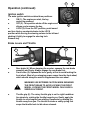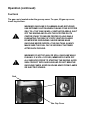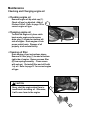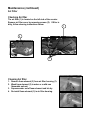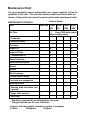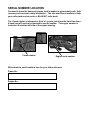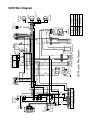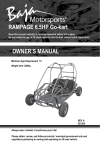
1
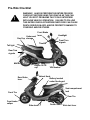
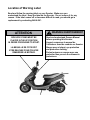
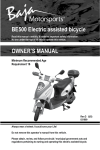
SC50 SCOOTER
Read this manual carefully. It contains important safety information.
No one under the age of 16 should operate this scooter.
OWNER’S MANUAL
Minimum Recommended Age
Requirement 16
Rev. G
030609
Always wear a helmet; It could save your Life!
Do not remove this operator’s manual from this vehicle.
Please obtain, review, and follow provincial / municipal government acts and regulations
pertaining to owning and operating this scooter.
Congratulations on your purchase of the BAJA INC. SC50-2
Scooter.
Your Scooter is warranted to be free of manufacturing defects in the
material and workmanship for a period of 90 days from the date of
purchase. During the warranty period BAJA INC. will at its option,
repair, provide replacement parts or replace your BAJA INC. 50cc
Scooter at no charge. This warranty does not cover normal wear
items or damage caused by neglect or misuse of the product.
Engine Warranty – 90 days
Frame Warranty – 90 days
Warranty is void if:
Frame is bent or broken due to abuse
Wheels are bent or broken
Fender bent or broken due to abuse
Any sign of impact, accident, jumping, spin-outs or roll over.
BAJA INC. is not liable for any damage claim or liability claim
person or otherwise resulting from the operation of this product in
any way.
Should you experience a problem with your vehicle, please call the Baja
INC. customer service line toll free at 1-888-863-2252 between the hours of
7am and 5pm Monday through Friday MST (Mountain Standard Time). MDT
(Mountain Daylight Time) during daylight saving time. You will be instructed
how to proceed.
A COPY OF THE SALES RECEIPT IS REQUIRED.
!
WARNING
This manual should be considered as a permanent part of the
vehicle and should remain with the vehicle when resold or
otherwise transferred to a new user or operator. The manual
contains important safety information and instructions which
should be read carefully before operating the vehicle. All
operators should obtain, review, and follow provincial and
municipal government acts and regulations pertaining to owning
and operating an off-road vehicle. Children under the age of 16
should never operate this vehicle.
!
WARNING
It is the operators responsibility to know and obey all applicable
local, state and federal laws at all times while operating this
vehicle including but not limited to traffic safety, vehicle
registration, emissions, and noise
!
WARNING
The exhaust from this product contains chemicals known to
the State of California to cause cancer, birth defects or other
reproductive harm. CALIFORNIA PROPOSITION 65
Table of Contents
IMPORTANT.........................................................................................................
GENERAL PRECAUTIONS/WARNINGS.............................................................
NHTSA SAFETY NOTICE.....................................................................................
PRE RIDE CHECK LIST.......................................................................................
LOCATION OF WARNING LABEL.......................................................................
FUEL AND OIL......................................................................................................
OPERATION.........................................................................................................
STARTING THE ENGINE..............................................................................
DRIVING SAFELY.........................................................................................
SHUTTING OFF THE ENGINE.....................................................................
STOPPING THE VEHICLE...........................................................................
PARKING......................................................................................................
BREAKING IN...............................................................................................
IGNITION SWITCH.......................................................................................
BRAKE LEVERS AND THROTTLE..............................................................
RIGHT BRAKE/SWITCH ASSEMBLY..........................................................
KICK STARTER............................................................................................
LEFT BRAKE/SWITCH ASSEMBLY............................................................
INSTRUMENT PANEL..................................................................................
SEAT LOCK..................................................................................................
FUEL TANK...................................................................................................
MAINTENANCE....................................................................................................
CHECKING AND CHANGING ENGINE OIL................................................
CLEANING OIL FILTER..............................................................................
CHANGING TRANSMISSION OIL................................................................
SPARK PLUG.............................................................................................
AIR FILTER...................................................................................................
BRAKES.......................................................................................................
IDLE SPEED ADJUSTMENT/FUEL HOSE INSP.........................................
TIRES............................................................................................................
BATTERY.....................................................................................................
TRANSPORTING..................................................................................................
STORAGE PROCEDURE.....................................................................................
MAINTENANCE CHART......................................................................................
TROUBLESHOOTING..........................................................................................
SPECIFICATIONS.................................................................................................
SERIAL NUMBER LOCATION.............................................................................
EMISSION CONTROL SYSTEM WARRANTY.....................................................
2
3
8
9
10
13
14
14
15
16
16
16
16
17
17
18
19
19
20
20
21
22
22
22
23
23
24
25
26
27
28
32
33
34
35
37
38
39
Important
Please read this manual and follow all instructions carefully. To emphasize the
special information, the symbol and the words WARNING or CAUTION have
some special meanings. Pay great attention to the messages.
WARNING
Indicates a potential hazard that could result in death or injury.
! CAUTION
Indicates a potential hazard that could result in vehicle damage.
NOTE: Indicating special information which is to make maintenance easier or
instructions clearer.
WARNING and CAUTION are arranged like this:
WARNING-or-CAUTION
The first part will identify a POTENTIAL HAZARD.
The second part will describe WHAT COULD HAPPEN if you ignore
the WARNING or CAUTION.
The third part will describe HOW TO AVOID THE HAZARD.
This user’s manual contains important safety and maintenance information. Read
it carefully before riding. Failing to follow the warnings contained in this manual
could result in INJURY or DEATH.
It is important that this manual remain with the vehicle when you transfer it to
another user or owner.
All information, illustrations, photographs and specifications contained in
this manual are based on the latest product information available at the time
of publication. Due to improvements or other changes, there will be some
discrepancies in this manual. We reserve the right to make product changes at
any time, without notice and without incurring any obligation to make the same or
similar changes to the vehicle previously built or sold.
General Precautions
!
WARNING! FAILURE TO FOLLOW THESE
INSTRUCTIONS CAN RESULT IN SEVERE INJURY OR
DEATH.
!
CAUTION: FAILURE TO FOLLOW THESE INSTRUCTIONS
CAN ALSO RESULT IN DAMAGE TO THE VEHICLE AND/OR
OTHER PROPERTY.
●
Read and follow all instructions in this Owner’s/Operator’s Manual,
any accompanying supplements, and the Engine Owner’s Manual
before attempting to operate this vehicle. Do not discard this
Owner’s Manual, safety video, or any other material or
documentation included with this vehicle.
●
Exhaust fumes are toxic. California Proposition 65 warning:
Gasoline engine exhaust from this vehicle contains chemicals known
to the State of California to cause cancer, birth defects, or other
reproductive harm. The engine exhaust contains carbon
monoxide, which is tasteless, odorless, poisonous gas. Never
operate this vehicle indoors or in an enclosed area with adequate ventilation.
●
This vehicle may have been supplied to you completely assembled. To prevent possible injury or death, read and follow the assembly instructions to make sure the vehicle was assembled properly.
●
Always perform the daily pre-ride inspection specified in this manual before operating this vehicle.
●
Modifying the vehicle and/or removing original equipment and/or safety decals could make this vehicle unsafe for operation.
●
Replace any safety decals that become unreadable or detached from the vehicle. Decals provide critical warnings about potential hazards or safety requirements.
●
Never use this vehicle for stunt riding, spin outs, donuts, racing , or any form of competition.
Additional Warnings
Protective Clothing/Equipment
●
Most accident fatalities are due to preventable head injuries. Always wear a properly fitting motorcycle type helmet approved by the
agencies such as the Department of Transportation (DOT), Safety Helmet Council of America (SHCA), or Snell Memorial Foundation (SNELL).
●
Always wear face shields or goggles, boots, gloves and other
appropriate protective clothing.
●
Long hair, loose clothes, or jewelry can get caught in moving parts below and behind the seat or your surrounding environment. Remove or tie back anything loose that can reach below and behind the seat before riding.
Moving Parts
●
Never place hands, feet, any body parts or clothing near the engine, wheels, chain and other rotating parts of the vehicle while riding or running the engine.
●
Use extreme caution when performing required maintenance while the engine is running.
●
Keep guards and pads in place at all times. Prevent accidental
contact by any person whenever the vehicle is running.
●
The guards over the brake, clutch, torque-converter, axle and drive sprockets also help prevent mud and debris from contacting those components.
Traffic Safety
●
ALWAYS FOLLOW THE ENTIRE PRE-RIDE CHECKLIST PRIOR TO STARTING OR RIDING THE SCOOTER.
●
Your safety while riding this vehicle depends entirely on your ability
to exercise proper judgement. You must be of sufficient age,
understanding, mental capacity, and physical capability to safely operate this vehicle.
Additional Warnings (continued)
Traffic Safety (continued)
●
Always obtain mature, supervised instruction and sufficient practice in an decongested area before operating this vehicle on any public
thoroughfare.
●
Excessive vehicle speed is a leading cause of accidents, which can cause death or serious harm to you, other people, and/or property. Always obey all applicable traffic safety laws while operating this vehicle, being sure to account for current weather and traffic
conditions and slow down if necessary. DRIVE TO ARRIVE!
●
Use extreme caution when riding on wet, slippery, rough or slopped terrain. There is an increased risk of loss of control, which can result in injury, death, and/or property damage.
●
Always slow down when turning. High-speed turning can cause loss
of control and/or possible death, injury, and/or property damage. Turning on a slope increases the risk of rollover. Practice turning in a safe area away from traffic until you are confident in your ability to control the vehicle at all times.
●
Operating this vehicle at an unsafe speed, especially while turning, can cause death, injury, and/or property damage.
●
Never use this vehicle to perform any type of racing, stunt riding, jumps, spin-outs, donuts, or other maneuvers, You could kill or injure yourself or others and/or cause property damage.
●
Never operate vehicle while under the influence of alcohol, drugs or medication of any kind. Such operation is dangerous to yourself and/or others and may be illegal in your area.
●
Check the tire pressure before operating the vehicle using a properly calibrated tire air pressure gauge.
●
Stop the vehicle and shut off the engine immediately if the vehicle makes unusual noises or vibrations. Check the vehicle for damage. Excessive noise or vibration is a sign of loose or worn parts.
●
Do not use this vehicle on rental tracks of any kind.
Additional Warnings (continued)
Engine/Motor Safety
●
Keep the engine/motor free of dirt and debris, especially in the throttle linkage area.
●
Never start the engine/motor without checking to see that the throttle control is in the idle position and that the parking brake is set.
●
Never start the engine/motor unless you are properly seated with your hands firmly on the controls.
●
Never tamper with, alter, or change the vehicle’s engine/motor
settings. The engine/motor governor is factory set and protects the engine/motor from damage. Excessive engine/motor speed is potentially dangerous to the operator, bystanders, and the engine/
motor itself.
●
All guards must be in place prior to starting the engine.
●
Operating the vehicle in conditions where water, mud, snow, dirt, sand or other debris can get into the throttle cable conduit and/or the throttle mechanism can cause the cable or throttle mechanism to bind, which may lead to throttle sticking, loss of control, and
possible death, injury, and/or property damage.
Fasteners
●
Make sure that all screws, nuts, and bolts are properly tightened. Never over-tighten hardware that is designed to move, such as front wheels, spindles, A-arm pivots, etc. Restricting moving parts can cause a loss of control and possible injury or death.
●
Always replace torque-type locknuts with new locknuts of the same type after removing the old locknuts.
Additional Warnings (continued)
Fueling
●
Check the fuel supply before each use. Never fill the fuel tank while the engine is running or hot. Always allow at least 1in. of expansion space at the top of the fuel tank. There should not be any fuel in the filler neck. Replace the fuel cap tightly after refueling to prevent a fuel spillage, fire, or explosion hazard.
●
Always use an original gas cap or an approved OEM replacement. Never fill fuel tank while the vehicle is inside a building. Gasoline vapors can cause injury or death and can pose a fire or explosion risk.
●
Move the vehicle at least 10 ft. before starting the engine.
●
Use extreme caution when starting the engine. Hot engine, muffler, or drive components can cause serious burns on contact.
Maintenance
●
Do not modify the vehicle from the manufacturer’s original design and configuration.
●
Never wash or operate the vehicle in freezing temperatures. Water can freeze in the throttle cable conduit and/or on the throttle
mechanism, possibly resulting in throttle sticking, which can cause the engine to continue to run and result in loss of control.
●
Assembly, maintenance, and/or repair of this vehicle should only be performed by designated dealers or authorized small-engine repair centers for engine repairs to ensure quality work and safe vehicle condition.
●
Always disconnect the spark plug wire (gasoline vehicles) or shut off the batteries (electric vehicles) before commencing any work in the engine vicinity or where there is a possibility that the vehicle could move unexpectedly. Keep the spark plug cable away form the spark plug to avoid accidental starting.
●
Avoid contacting the muffler, cylinder head, or any potentially hot area on or around the engine when working on, around, or restarting the engine.
Additional Warnings (continued)
Maintenance (continued)
●
Store this vehicle in a place where gasoline fumes cannot reach an open flame, spark, or other source of ignition. Drain the fuel tank in a cool well-ventilated area prior to any long-term storage. Never store this vehicle in a close proximity to appliances such as water heaters or furnaces.
●
Engine, exhausts, and other components can become extremely hot during operation. Use caution when near hot components.
●
Never adjust, repair, or clean the vehicle while it is in motion.
NHTSA Safety Notice
If you believe that your vehicle has a defect which could cause serious injury
or death, you should immediately contact the National Highway Traffic Safety
Administration (NHTSA) in addition to notifying BAJA INC.
If NHTSA receives similar complaints, it may open an investigation and if it
finds that a safety defect exists in a group of vehicles, it may order a recall
and remedy campaign.
However, NHTSA cannot become involved in any individual problems between
you, your dealer or BAJA INC.
To contact NHTSA you may call the Auto Safety Hotline toll-free within the
United States on 1-800-424-9393 or write to: NHTSA, 400 Seventh Street SW,
Washington, DC 20590.
Pre-Ride Checklist
WARNING! ALWAYS PERFORM THE ENTIRE PRE-RIDE
CHECKLIST BEFORE USING THE VEHICLE AS THIS CAN
HELP YOU SPOT PROBLEMS THAT COULD INTERFERE
WITH SAVE VEHICLE OPERATION. FAILURE TO FOLLOW
THIS ENTIRE CHECKLIST BEFORE EVERY RIDE CAN CAUSE
DEATH, SERIOUS INJURY, AND/OR PROPERTY DAMAGE TO
YOURSELF AND/OR OTHERS
!
Under seat
Gas Cap storage
Front Brake
lever
Throttle
Tail light
Headlight
Front Turn
signals
Rear Turn
signals
Muffler
Engine Oil fill
cap
VIN Number
Helmet Hook
Battery located
under floorboard
Rear Brake
lever
Seat compartment
lock
Front Tire
Rear Tire
Front brake
caliper
Side stand
Center stand Kick start lever
Location of Warning Label
Read and follow the warning label on your Scooter. Make sure you
understand the label. Keep the label on the Scooter. Do not remove it for any
reason. If the label comes off or becomes difficult to read, you should get a
replacement by contacting BAJA INC.
ATTENTION
SIDE KICK STAND MUST BE
PLACED IN THE UP POSITION
IN ORDER FOR ENGINE TO START.
LA BEQUILLE DE COTE DOIT
ETRE RELEVEE POUR POUVOIR
DEMARRER LE MOTEUR.
! WARNING/ AVERTISSEMENT
Read and understand Owners Manual
before operating this Scooter.
Lisez et comprenez le manuel de
l’utilisateur avant de conduire ce Scooter.
Always wear a helmet, eye protection
and protective clothing.
Portez toujours un casque avec une
protection des yeux et des vêtements
protecteurs.
Pre-Ride Checklist (continued)
Before Starting the Engine/Motor
1. Engine oil level
a) Check for leaks
b) Tighten filler cap securely.
c) Add oil if required.
2. Fuel level
a) Add fuel as necessary.
b) Do not overfill (no fuel in the filler neck).
c) Do not mix oil with gas.
d) Replace cap tightly.
e) Do not refuel a hot engine. Allow engine to cool before adding fuel.
3. Warning decals
a) Make sure all warning decals are legible and securely attached.
b) Replace as necessary.
4. Tires
a) Ensure that both tires have at least 1/8 in. tread depth at center.
b) Both tires must be inflated to the pressure indicated on the tire sidewalls.
c) Replace the tires id tread height is less then 1/8 in. at the center of tires.
5. Drive chain
a) Check condition and tension.
b) Lubricate and adjust tension as necessary.
6. Throttle
a) Check for smooth operation. Make sure the throttle “snaps” back to idle.
b) Check for frayed cable or damaged cable housing. Replace
damaged cable.
c) Check for mud, debris and ice in the throttle cable/mechanism. Clean out any contamination.
Pre-Ride Checklist (continued)
Before Starting the Engine/Motor
7. Fasteners
a) Check that all axle nuts and lug nuts are secure.
b) Check for missing fasteners. Replace as necessary.
c) Check that all other fasteners are secure. Tighten as necessary.
8. Steering
a) Make sure steering turns freely.
b) Check for proper “toe-in” of wheels.
c) Lubricate/adjust as necessary. See the Maintenance section.
9. Frame/chassis
Check for bent/damaged frame/chassis components. Replace as necessary.
10. Battery (if equipped)
Check the clamp bar and connections are tight and corrosion-free. Clean/tighten as necessary.
11. Lights (if equipped)
Check for proper operation. Replace bulbs as necessary.
FUEL AND OIL
FUEL
The proper fuel is very important for the engine. Ensure that there is no
dust, dirt, or water which has mixed in the fuel. Please use regular unleaded
gasoline
ENGINE OIL
Your scooter has a four-stroke engine. Please use oil as described in the
chart below. By using the prescribe oil, you will realize the best lubrication for
the engine.
20W-50
5W-40 15W-50
MACHINE
OIL
10W-40 10W-50
10W-30
TEMP.
°C
-30
-20
-10
0
10
20
30
40
°F
-22
-4
14
32
50
68
86
104
! CAUTION
Never start the engine when there is insufficient lubricating
oil. Otherwise, it will cause harm to the engine.
Use the chart to select a viscosity rating based on the temperature range in
your area.
Operation
Starting the Engine
2
1
WARNING! ALWAYS RETRACT THE CENTER STAND (1) PRIOR TO STARTING THE VEHICLE.
ATTENTION! SIDE KICK STAND (2) MUST BE PLACED IN THE UP POSITION IN ORDER FOR ENGINE TO START.
!
!
DO NOT apply throttle while starting scooter. Applying throttle while starting
scooter will disengage the automatic choke. The scooter will not start.
NOTE: Starting scooter the first time will take longer because fuel needs to
reach the carburetor.
1. Make sure scooter has fuel
2. Check oil level, add oil if needed.
3. Lift up side kick stand. NOTE: Engine will “turn over” but will not start if
side kick stand is in the “DOWN” position.
4. Turn ignition key to “ON” position.
5. Turn handlebar switch to “ON” position.
6. Pull in left hand brake lever. NOTE: Engine will not start if left hand brake
lever is not pulled in.
7. Push electric start button. NOTE: Do not apply throttle while starting
scooter.
CAUTION: DO NOT RUN THE STARTER FOR MORE THAN 5
SECONDS AT A TIME. ALWAYS ALLOW AT LEAST 10 SECONDS
BETWEEN STARTING ATTEMPTS.
Operation (continued)
Driving Safely
WARNING! FOLLOW ALL OF THE WARNINGS IN THIS OPERATOR’S MANUAL AT ALL TIMES WHILE OPERATING THE SCOOTER. IT IS YOUR RESPONSIBILITY TO KNOW AND OBEY ALL APPLICABLE LOCAL, STATE, AND
FEDERAL LAWS.
WARNING! NEVER OVERLOAD THE VEHICLE. THE
CARRYING CAPACITY IS 300 POUNDS.
!
!
After starting the engine, squeeze the rear (left) brake lever and the rear hand
hold, then gently push the scooter forward off the center stand.
Straddle the seat while keeping one foot on the ground fro stability. Slowly
turn the throttle to begin driving. Place your foot on the floorboard as the
scooter begins moving.
Never attach any articles to the handlebar. Stow any cargo on the luggage
rack or in the under-seat storage box. Do not carry cargo weighing more than
10 pounds on the luggage rack. Always hold the rear hand hold when lifting
the scooter.
!
WARNING! ALWAYS WEAR A DOT-APPROVED HELMET, EYE PROTECTION, AND SHOES WHEN RIDING YOUR VEHICLE.
!
WARNING! NEVER DRIVE THE SCOOTER WITH THE SIDE STAND EXTENDED.
Operation (continued)
Shutting off the engine
Always shut off the engine by turning the ignition switch to OFF.
Stopping the vehicle
!
WARNING! WET, OIL, OR SANDY ROADS REDUCE
BRAKING EFFECTIVENESS. HARD BRAKING ON THESE SURFACES COULD LEAD TO LOSS OF CONTROL AND A SERIOUS ACCIDENT. ALWAYS REDUCE SPEED AS
GRADUALLY AS POSSIBLE.
When braking, always engage the rear brake first to retain maximum control
of the scooter. Most of your shipping power comes from the front wheel.
Parking
Always leave the key in the lock position when parking the vehicle to help
prevent theft. Park on smooth hard surfaces, being sure to use the center
stand whenever possible.
Breaking in
●
●
●
●
●
●
Following this break-in procedure ensures that your scooter is
functioning properly and maximizes engine life.
Never drive this vehicle over 25mph during the first 250 miles of operation. Excessive speed could result in engine failure.
Always use fresh 89 octane gasoline. Avoid gasoline that contains alcohol, which can damage rubber gaskets and engine seals.
Check and adjust the brakes, throttle cable, tire pressure, and
fasteners weekly before riding. This is in addition to the pre-ride inspection.
Schedule regular maintenance with your authorized Baja
Motorsports service center.
Never add oil to the gasoline; your scooter uses a 4-stroke engine with an internal lubricating system.
2
1
Operation (continued)
Ignition switch
The main ignition switch contains three positions:
●
ON (1): The engine can start, the key
cannot be removed.
●
OFF (2): This position shuts off the engine and
allows you to remove the key.
●
LOCK (3): From the OFF position, push inward
and turn the key counterclockwise to the LOCK
position while turning the steering column to the left and
shaking it lightly to engage the steering lock.
Remove key.
3
Brake Levers and Throttle
5
4
6
●
Rear brake (4): When stopping the scooter, squeeze the rear brake smoothly and firmly. Always engage the rear brake first.
●
Front brake (5): Squeeze the lever gently at first to avoid locking the front wheel. Most of you stopping power comes from the front wheel, which should always be used to supplement the rear wheel.
WARNING! USE EXTREME CAUTION WHEN ENGAGING THE FRONT BRAKE TO AVOID LOCKING THE FRONT WHEEL. LOCKING THE FRONT WHEEL CAN CAUSE A SERIOUS ACCIDENT.
!
●
Throttle grip (6): The rotary throttle grip is on the right handlebar.
Accelerate by rotating the throttle towards you. Gently apply the throttle to avoid engine from stalling. Decelerate by rotating the
throttle away from you. The throttle includes a safety spring that
snaps the throttle back to idle when released.
Operation (continued)
Right brake/
switch assembly
• On/Off Safety stop Switch (1)
The On/Off safety stop switch
needs to be at “on” position
before scooter will start.
The safety stop switch is
available in case of an
emergency.
ON
OFF
1
2
• Electric starter switch (2)
The electric starter switch is located directly under On/Off
safety stop switch. In order for scooter to start, the key will
need to be turned to “on” position as well as the safety stop
switch. Depress the electric starter switch to start the engine.
Never run the starter for more than 5 seconds at a time. Allow
at least 10 seconds between each starting attempt.
Operation (continued)
Kick starter
Use the kick starter to start the engine if the battery is drained. Once started,
leave the engine running until the battery recharges sufficiently to restart the
scooter.
Kick starter
Left brake/switch assembly
● High/low beam light switch (1): To activate the high beam, move the
switch to position (2). For low beam, use position (3).
● Turn signal switch (4): Slide the switch plate left for a left signal and
right for a right signal. Press the center of the switch to cancel the turn signal.
● Horn (5): Press the bottom button to sound the horn.
1
3
2
4
5
Operation (continued)
Instrumental panel
● Speedometer (1): Indicates
the current driving speed in both
km/h and mph.
3
1
● High beam indication lamp (2):
Illuminates when high beam is
selected.
● Turn signal lamp (3): Indicates
that the turn signal is activated.
● Fuel indicator (4): Indicates
the fuel level.
4
2
5
● Odometer (5): Indicates the total distance the vehicle has traveled, in km.
Seat lock
● To open: Insert the key just below
the seat on the left side of the vehicle.
Press the seat down slightly while turning
the key clockwise to release the latch.
Lift the seat.
● To close: Press down the seat until
locked, then remove the key. Never leave
the key in the lock.
Seat lock
Operation (continued)
Fuel tank
The gas cap is located under the gas cap cover. To open, lift gas cap cover,
insert key and turn.
WARNING! GASOLINE IS FLAMMABLE AND EXPLOSIVE. USE EXTREME CAUTION WHEN FUELING YOUR SCOOTER ONLY FILL THE TANK IN WELL-VENTILATED AREAS. SHUT OFF THE ENGINE AND PLACE THE SCOOTER ON ITS
CENTER STAND TO ENSURE PROPER FILLING WHILE ELIMINATING THE RISK OF STATIC IGNITION CAUSED
BY IMPROPER GROUNDING. NEVER SMOKE NEAR
GASOLINE NEVER OVERFILL THE GAS TANK. ALWAYS MAKE SURE THE FUEL CAP IS SECURELY FASTENED AFTER EACH FUELING.
WARNING! DO NOT SPLASH OR SPILL GASOLINE WHILE FUELING. IF A SPILL OCCURS, IMMEDIATELY WIPE OFF ALL SURFACES PRIOR TO STARTING THE ENGINE. AVOID SKIN CONTACT WITH GASOLINE AND DO NOT BREATHE
GASOLINE FUMES. KEEP GASOLINE AWAY FROM FLAMES OR ELECTRIC SPARKS.
!
!
Seat
Gas Cap Cover
Maintenance
Checking and Changing engine oil
• Checking engine oil
Remove engine oil dip stick cap (1).
Check oil level on dipstick. Add oil
if below 3/4 full. Refer to page 12 for 1
correct engine oil type.
• Changing engine oil
To drain old engine oil, place catch
basin under engine and unscrew
drain plug (1) located on bottom left
side of engine. Drain engine oil into
proper catch basin. Dispose of oil
properly at oil reclaim facility.
• Cleaning oil filter
Drain engine oil per instructions above.
Remove oil filter plug (1) located at bottom
right side of engine. Remove screen filter
(2) from spring assembly. Clean screen
with solvent. Re-install filter and refill with
1 qt. oil. Refer to page 12 for correct engine
oil type.
! CAUTION
Never start the engine when there is
insufficient lubricating oil. Otherwise,
it will cause harm to the engine.
1
2
Maintenance (continued)
Changing Transmission oil
The transmission oil was filled at the factory before
shipment, Drain and refill transmission oil every
5000km (3100 miles)
• Draining transmission oil
Drain transmission oil by removing drain screw (1)
located on bottom of transmission (2) . Drain oil
into a catch basin and dispose of properly at oil
reclaim facility
2
3
• Adding Transmission oil
Add transmission oil by removing transmission
oil fill cap (3) located on the side of transmission
(2) . Add .12L (4oz) 80W-90 gear oil
1
Spark Plug
Check-up of Spark Plug
1. Remove the cap of spark plug and screw out using plug
wrench.
2. Clean spark plug all around or replace it if it is
corroded or there is too much deposit on it.
3. Regulate the gap of the spark plug to
0.6-0.7mm (.024” - .028”)
3. The spark plug of the designated type should
be used. The applicable type of spark plug:
DR7HSA (NGK), A7RTC (TORCH)
0.6~0.7mm
(.024” - .028”)
Maintenance (continued)
Air Filter
Checking Air filter
The air filter (1) is located on the left side of the scooter.
Remove air filter cover by removing screws (2). If filter is
dirty, follow cleaning instructions below.
3
2
Cleaning Air filter
1. Remove foam element (3) from air filter housing (1).
2. Wash foam element (3) in water or a mild non
flammable solvent.
3. Squeeze water out of foam element and let dry.
4. Re-install foam element (3) in air filter housing.
1
Maintenance (continued)
Brakes
Front Hydraulic Disk brake inspection
5
3
2
1
4
4
1.
2.
3.
Inspect front disk brake caliper (1) for leakage. If brake fluid leaks, the safety
of riding could be affected.
Inspect the brake shoes (2) for cracks, and the joint for leakage.
Check the brake fluid level through the sight hole (3) under plastic cowling.
Remove plastic cowling (4). If level is at or below the LOWER mark, inspect
brake pads for wear and hydraulic system for leaks.
4. To add brake fluid, unscrew the 2 screws (5) on top of the brake fluid reservoir
located under top plastic cowling. Add DOT3 or DOT4 brake fluid. Do not mix
brake fluid types.
Adjustment of Rear Brake
1
1. To make rear brake adjustment,
turn rear adjusting nut (1)
clockwise to increase and
counter clockwise to reduce
tension on the brake cable.
2. Brake shoes should be replaced
by a qualified service technician
once worn.
Maintenance (continued)
Idle Speed Adjustment
To adjust the idle speed properly, you need a tachometer. If you do not have one,
ask your authorized service to perform this adjustment.
Engine Idle
adjustment
Screw
To adjust the idle speed:
1. Start the engine and warm it up.
2. Turn the engine idle screw in or out so that the engine idle speed is at
1450~1550 r/min.
! WARNING
Improper adjustment of the idle speed could be hazardous.
An idle speed that is too high could cause the scooter to move forward
when you start the engine. This may cause an accident.
Excessive engine wear may also result if idle speed is adjusted improperly
or when the engine is not fully warmed up.
Adjust the idle to the correct speed. Make sure the engine is fully warm
before adjusting the engine idle speed.
Fuel Hose
Inspect the fuel hose for damage and fuel leakage. If any defects are found, the
fuel hose must be replaced.
Fuel hose
Maintenance (continued)
Tires
The scooter is equipped with tires of the size and type listed below:
Front
Size
3.0 mm (0.12 in)
Rear
3.50 x 10 3.50 x 10
Tire Tread Condition
! WARNING
Operating this scooter with improper tires, or even improper tire air
pressure could be hazardous.
If you use improper tires or improper tire air pressure, you may lose
control of the scooter.
Always use the size and type tires specified. Always maintain proper tire
air pressure as described in this section.
! WARNING
Using worm tires could be hazardous.
The traction of the vehicle will be decreased. This
increases your risk of having an accident.
Replace the front and rear tires when the depth on the
treat is 3.0 mm (0.12 in.) or less.
Tire Air Pressure
Check the air pressure in tires before riding, Improper air pressure would effect
handling, steering response, traction, tire life and rider comfort. Be sure that the
tires are inflated to the pressures shown below. Tire pressure should only be
measured or adjusted when the tires are cold.
Recommended pressure
Front
33-36 psi
Rear
33-36 psi
Maintenance (continued)
Battery (gas scooter)
Your scooter uses a sealed, maintenance free lead acid battery rated 12V3AH. The
battery is located underneath the floorboard.
● Charging new batteries: Fill the battery with the acid in the pre-packed bottles
and allow to rest for 30 minutes prior to sealing the battery. After sealing, charge
the battery using a low current charge (0.5V-1A for 6 hours.)
● Recharging batteries: For best results, charge the battery at a low current (see
above). You can fast charge the battery at 2A for up to 1 hour. You may use a
trickle charger (<0.5A) to keep the battery charged if you use your scooter
infrequently or for short trips. You can attach a trickle charger for up to one week.
! WARNING
BATTERY ACID IS EXTREMELY CORROSIVE. ALWAYS WEAR GLOVES
AND EYE PROTECTION WHEN HANDLING ACID. IF YOUR SKIN OR
EYE CONTACT THE ACID, IMMEDIATELY FLUSH WITH WATER FOR
AT LEAST 15 MINUTES. IF SWALLOWED, DO NOT INDUCE VOMITING;
CALL YOUR POISON CONTROL CENTER.
Maintenance (continued)
Battery
WARNING
The following procedure is very dangerous and should be performed
with utmost care and attention. Wear protective eye wear, rubber
gloves, and have water available should electrolyte come in contact
with skin or eyes. KEEP ALL CHILDREN AWAY FROM THE AREA
WHILE THIS PROCEDURE IS BEING PERFORMED.
POISON – CAUSES SEVERE BURNS
Contains sulfuric acid.
Avoid contact with skin, eyes, or clothing
To prevent accidents, rinse empty container with water.
ANTIDOTE:
External – flush with water
Internal – Call physician immediately. Drink large quantities of water
or milk.
Follow with milk of magnesia, beaten eggs or vegetable.
Eyes – Flush with water for 15 minutes and get prompt medical
attention.
KEEP OUT OF REACH OF CHILDREN.
Maintenance (continued)
Battery
Note: The following page is for vehicles with battery’s containing separate
electrolyte pack. Most battery’s will come with the electrolyte already sealed into
the battery.
Preparing the battery:
·
Place battery on level surface. Remove sealing tape
from top. (see figure 20)
·
Take the electrolyte container out of the plastic bag.
·
Place electrolyte container upside down with the
sealed silver mouths of the electrolyte bottles in
line with the six filler holes of the battery. (see
figure 21)
·
Push the container down strongly enough to break
the silver seals.
·
As electrolyte starts flowing into battery, air
bubbles will come up from the mouths of the plastic
electrolyte bottles.
·
Leave bottles upside down in battery holes until
electrolyte is completely drained.
·
Never leave children unattended around battery.
·
If air bubbles cease to float to the top of the
electrolyte bottles, tap lightly on top.
·
DO NOT remove container from battery while it is
draining.
·
Never cut or pierce electrolyte container.
·
After all the electrolyte has drained from the bottles
into the battery, pull plastic electrolyte bottles
gently out of the battery.
·
Discard empty electrolyte bottles in a waste area
that is inaccessible to children and animals.
·
After filling let battery stand for at least 30 minutes
before charging. This allows the electrolyte to
penetrate plates for optimum performance and
ensures longer battery life.
·
After 30 minutes the battery is ready for its initial
charge. Place cap strip loosely over the filling holes
as shown in the picture. (see figure 22)
Figure 20
Figure 21
Figure 22
Maintenance (continued)
Battery
How to Initially Charge the battery:
1. Connect the red positive (+) cable to the red
positive (+) pole of the battery.
(see figure 23)
2. Connect the black negative (-) cable to the
black negative (-) pole of the battery. (see
figure 24)
Figure 23
Note: The red positive (+) cable has a larger
diameter than the black negative (-) cable.
3. Charging rate: Charge battery @ 0.7 Amps for
5 ~ 10 hours.
•
After charging is complete, press down
firmly with both hands to seat the caps.
(Do not pound or hammer.) The battery is
now sealed. (see figure 25)
•
Locate battery compartment on scooter.
The battery compartment is located
under the floorboard. (see figure 26)
•
Attach red positive (+) cable to positive
(+) terminal on battery. Then attach
black negative (-) cable to negative (-)
terminal on battery.
Figure 24
Figure 25
WARNING
NEVER REMOVE THE STRIP OF CAPS
NOR ADD ANY WATER OR ELECTROLYTE.
Figure 26
Transporting
It is best to transport the scooter in the normal position.
1
Before transporting the scooter drain the fuel from the carburetor as follows:
1. Drain fuel from carburetor into an empty container by loosening the
carburetor drain screw (1). The carburetor drain screw is located at the
bottom of the engine .
2. When the fuel has been drained, retighten the drain screw.
WARNING
Draining fuel from the carburetor could be hazardous.
Fuel could catch fire if you do not handle it properly.
When draining fuel from the carburetor, be sure to shut the engine off.
Do not smoke, and never drain or refuel in an area where there are open
flames or sparks. Do not spill the fuel or you may create a fire hazard.
Dispose of the drained fuel properly.
! CAUTION
Failing to secure the Scooter properly could be hazardous.
Failing to secure the vehicle properly may result in an accident or
damage to the vehicle.
When transporting the Scooter, tie down the vehicle securely with
straps, rope, or some other suitable means. Use extra tie downs
when you transport the vehicle in the standing position.
Storage Procedure
If you do not use your scooter for a long time, it will need special service requiring
appropriate materials, equipment and skill. For this reason, we recommend that
you trust this maintenance work to your authorized service center. If you wish to
service the machine for storage yourself, follow the general guidelines below:
VEHICLE
Place the vehicle on level ground and wash the entire vehicle.
FUEL
Drain the fuel from the fuel tank by a hand pump. Drain the fuel from the
carburetor by releasing the carburetor drain screw.
WARNING
Draining the fuel could be hazardous.
Fuel could catch fire if you do not handle it properly.
When draining the fuel from the fuel tank, be sure to shut the engine off.
Do not smoke, and never drain fuel in an area where there are open flames
or sparks. Keep pets and children away from the fuel, and dispose of the
drained fuel properly.
TIRES
Inflate tires to the normal pressure.
EXTERNAL
1. Spray all vinyl and rubber parts with rubber protection.
2. Spray unpainted metal surfaces with rust preventative.
3. Coat painted and plastic surfaces with car wax.
PROCEDURE FOR RETURNING TO SERVICE
1. Clean the entire vehicle.
2. Make sure that the vehicle is properly lubricated.
3. Perform the INSPECTION BEFORE RIDING as listed in this manual.
4. Start the vehicle as outlined in this manual.
Maintenance Chart
It is very important to inspect and maintain your scooter regularly. Follow the
guidelines in the chart. The intervals between periodic services in miles are
shown. At the end of each interval be sure to perform the maintenance listed.
Interval (miles)
MAINTENANCE SCHEDULE
Item
Each use Initial Initial
150
500
Air Filter
I
Every 1000 miles (more
often in dusty areas)
* Carburetor
* Exhaust system
I
Fuel hose
Engine Oil
Initial Every
1000 1000
I
I
I
I
I
I
I
R
R
Engine Oil filter
C
C
**Transmission oil
R
Brake Fluid level
I
I
I
I
I
Brake Hose and joints
I
I
I
I
I
Brakes
I
I
I
I
I
Wheels
I
I
Wheel bearings
I
* Brake caliper linings
I
I
I
Front and rear suspension
Steering system
I
I
I
I
I
* Steering shaft lubrication (use
Li grease)
Fittings and Fasteners
* Valve Gap
I
I
L
I
T
T
T
I
* Should be completed by an authorized service center
** Change Transmission oil every 3100 miles
I=Inspect and clean, adjust, lubricate or replace, if necessary.
C=Clean
R=Replace
T=Tighten
T
I
Troubleshooting
This troubleshooting guide is provided to help you to find the cause of some
common complaints.
COMPLAINT: Engine is hard to start or does not start at all. Something is
probably wrong with the fuel system or ignition system.
! CAUTION
Failing to troubleshoot a problem correctly would damage your
Scooter.
Improper repairs or adjustments may damage the vehicle. Such
damage may not be covered under warranty. If you are not sure about
the proper action, consult your authorized service center or BAJA
INC. about the problem.
Fuel Supplying Check
1. Make sure there is adequate fuel in the fuel tank.
2. Check that the ignition switch is in the “RUN “ position.
3. Make sure there is enough fuel reaching the carburetor from the fuel tank.
WARNING
Draining fuel from the carburetor could be hazardous.
Fuel could catch fire if you do not handle it properly.
When draining the carburetor, be sure to shut the engine off. Do not
smoke, and never drain or refuel in an area where there are open
flames or sparks. Do not spill the fuel or you may create a fire hazard.
Dispose of drained fuel properly.
a. Loosen the drain screw which is located under the carburetor. Drain the fuel
from the carburetor into a container.
b. Tighten the drain screw.
c. Run the engine for a few seconds. Shut off engine.
d. Loosen the drain screw and check that the carburetor is filled back up with
fuel.
e. If fuel is reaching the carburetor, the ignition system should be checked next.
Trouble shooting (Continued)
Ignition System Check
1. Remove the spark plug and reattach it to the spark plug lead.
2. Turn ignition key to the “RUN” position. Slide the engine stop switch
to the “Run” position. Push the electric button “START “(grey button).
If the ignition system is operating properly, a blue spark should jump
across the spark plug gap. If there is no spark, take your machine to your
service center.
WARNING
Performing the spark test improperly could be hazardous.
You could get a high voltage electrical shock if you are not familiar with
this procedure.
Do not perform this check if you are not familiar with the procedure.
Do not point the spark plug near the spark plug hole during this test.
Do not do this test if you have a heart condition or wear a pacemaker.
Do not perform this test is any near any open fuel containers for near
fuel which has spilled on the ground, on the engine, or any part of the
Scooter.
COMPLAINT: Engine stalls
1. Make sure there is enough fuel in the fuel tank.
2. Check to see that the spark plug is not fouled. Remove the spark plug
and clean it. Replace it, if necessary.
3. Make sure the fuel valve is not clogged, and the fuel tank is not clogged,
either.
4. Check the idle speed. If necessary, adjust it using a tachometer. The
correct idle speed is 1400~1600 r/min.
5. Make sure the air filter is clean.
Specifications
Description
Data
Description
Data
Engine type
4 Stroke/Air
cooled
Horsepower
(HP)
3.74Hp
Overall length
1740mm (68.5in)
Displacement
49.5cc
Overall width
610mm (24.02in)
Starter
Electric with
supplement kick start
Overall height
1120mm (44.09in) Brake
Front: Hydraulic disc
Rear: Drum
Dead weight
77kg
(169.8 lbs)
Rear wheel
3.00-10
33-36 Psi
Payload
136.1Kg
(300 lbs)
Front wheel
3.00-10
33-36 Psi
Suspension
Hydraulic compound spring
Spark plug
CR7HSA (NGK),
A7RTC (TORCH)
Gap 0.6mm-0.7mm
(0.024in-0.028in)
Passengers
2
Ignition means
CDI
Transmission
Transmission oil
CVT
0.12L (4oz.)
80W90
Battery
12V-3AH/ YTX7A-BS
Clutch
Auto, centrifugal
Headlight
12V 35W/35W
Capacity of
gasoline
5.4L (1.4gal)
Brake/Tail light
12V 10W/3W
Oil capacity
1L (1qt)
Speedometer
12V 1.7W
Lubrication
method
Pressure, splash
Turn signal
12V 8W
Bore and stroke
39x41.4mm
Front lamp
12V 3W
SERIAL NUMBER LOCATION
You need to know the frame and engine serial numbers to get warranty work, theft
recovery and consumer safety information. You also need these numbers to help
your authorized service center or BAJA INC. order parts.
The Frame number is stamped on front of scooter just above the front floor base.
A small cap will need to be removed to see the number. The engine number is
located on the bottom left side of the engine housing.
Frame number
Engine serial number
Write down the serial numbers here for your future reference
Frame No.:
Engine No.:
W/BL
Horn
Lb
O
Left brake
switch
OFF
ON
Left switch assembly
Horn
switch
OFF
Turning
switch
L
High/low
beam switch
LOW
R/G
ON
R
OFF
O Lb Gr B
G
HI
G
Y/W
Speedometer
light
BL Y W
Left front
turn light B
Gas
Indicator
Headlight
Right front
turn light
Br
B G/Y
G
B
Y/W
W/BL
Y
RG
W
Gas sensor Regulator
Y/W G W/BL
G B/Y
R
CDI
B/W
G
Battery
12V 3Ah
+
-
Ignition coil
SC50 Scooter Wire Diagram
Starting
Motor
M
Starting
relay
G Y/R
B
Flash
B G/Y G Gr
OFF OFF
G/Y
Y/R
ON ON
Brake
switch
LOCK
Kill
Start
switch switch
OFF
ON
Right switch assembly
Fuse
Key switch
G
YW
O
G/Y
R - Red
Y - Yellow
O - Orange
W - White
Gr - Grey
Br
YG
License plate
light
Taillight
Left rear
turn light
G
Lb
Right rear
turn light
G - Green
Lb - Light blue
B - Black
BL - Blue
Br - Brown
Hi/Low
beam relay
Magnetor
W/R
B/R
Alarm
SC50 Wire Diagram
BAJA INC. – EMISSION CONTROL SYSTEM WARRANTY
YOUR WARRANTY RIGHTS AND OBLIGATIONS
The emission control system warranty period for this vehicle begins on the date the vehicle is delivered
to the first purchaser other than an authorized dealer, or the date it is first used as a demonstrator,
lease, or company vehicle, whichever comes first and continues for 60 months after that date, or
6,000km, whichever comes first, provided there has been no abuse, neglect or improper maintenance
of your vehicle. Where a warrantable condition exists, the Distributor will repair your vehicle at no cost
to you, including diagnosis, parts and labor. If an emission-related part on your vehicle is defective, the
part will be repaired or replaced by the Distributor. This is your emission control defects warranty.
OWNER’S WARRANTY RESPONSIBILITIES
As the vehicle owner, you are responsible for the performance of the required maintenance. You
should maintain a record of all maintenance performed on your vehicle and retain all receipts covering
maintenance on your vehicle. You may not be denied a warranty claim solely because of your failure to
ensure the performance of all scheduled maintenance or lack of maintenance records or receipts. You
are responsible for presenting your vehicle to an authorized dealer as soon as a problem exists. The
warranty repairs should be completed in a reasonable amount of time, not to exceed 30 days.
As the vehicle owner, you should be aware that you may be denied your warranty coverage if your
vehicle or a part has failed due to abuse, neglect, improper maintenance, or unapproved modifications.
WARRANTY COVERAGE
The Distributor warrants that each new 2008 and later vehicle:
•
is designed, built, and equipped so as to conform at the time of initial retail purchase with
all applicable regulations of the United States Environmental Protection Agency; and
•
is free from defects in material and workmanship which cause such vehicle to fail to confirm
with applicable regulations of the United States Environmental Protection Agency for the periods specified above.
Your emission control system warranty covers components whose failure would increase an engine’s
emission, including electronic controls, fuel injection system, carburetor, the ignition system, catalytic
converter, or any other system utilized in this vehicle to control emission if it is originally equipped.
Also included may be hoses, connectors and other emission-related assemblies. Replacing or repairing other components (including parts, labor, and other costs) not covered by this emission control
system warranty or the standard warranty is the responsibility of the owner.
Coverage of repairs under this warranty applies only when repairs are completed at an authorized
dealer or repair facility. The Distributor will not cover repairs performed outside of an authorized dealer
or repair facility, except in an emergency situation. The use of replacement parts not equivalent to
the original parts may impair the effectiveness of your vehicle’s emission control system. If such a
replacement part is used and an authorized dealer determines it is defective or causes a failure of a
warranted part, your claim for repair to bring your vehicle into compliance with applicable standards
may be denied.
If an emergency situation exists when a warranted part or a dealer is not reasonably available to the
owner, repairs may be performed at any available service establishment, or by the owner, using any
replacement part. The Distributor shall reimburse the owner for the expenses, including diagnostic
charges, not to exceed the Distributor’s suggested retail price for all warranted parts replaced and
labor charges based on the Distributor’s recommend time allowance for the warranty repair and the
geographically appropriate hourly labor rate. The owner may reasonably be required to keep receipts
and failed parts in order to receive compensation.
This Emission Control System Warranty is in addition to the standard Limited Warranty.
EXCLUSIONS AND LIMITATIONS
This warranty does not cover the following:
•
Failures or malfunctions of the emission control systems caused by abuse, alteration, accident, misuse, the use of leaded gasoline.
•
Replacement of expendable maintenance items unless they are original equipment defective
in material or workmanship under normal use, and the first required replacement interval for the item
has not been reached. Expendable maintenance items include but not limited to spark plugs, filters,
coolant, lubricants, gaskets, hoses, and belts.
•
Replacements of parts and other services and adjustments for required maintenance.
•
Any vehicle equipped with an odometer or hour meter where the reading is altered so that
actual mileage cannot be readily determined.
•
Repairs or replacements as a result of:
o
Accident
o
Misuse
o
Use of replacement parts or accessories not conforming to the original specifications which
adversely affect performance
•
Physical damage, corrosion, or defects caused by fire, explosions or similar causes beyond
the control of the Distributor.
•
Failures not caused by a defect in material or workmanship.
Use of the vehicle in any type of competitive racing or related events immediately and completely voids
this and all other warranties.
LIMITED LIABILITY
The liability of the Distributor under this Emission Control System Warranty is limited solely to the
remedying of defects in material workmanship by an authorized dealer at its place of business during
customary business hours. This warranty does not cover inconvenience or loss of use of the vehicle
or transportation of the vehicle to/from the authorized dealer. The Distributor is not liable to any person
for incidental, consequential or special damages of any description, whether arising out of express or
implied warranty or any other contract, negligence or other tort or otherwise.
No express emission control system warranty is given by the Distributor except as specifically set forth
herein. Any emission control system warranty implied by law, including any warranty of merchantability or fitness for a particular purpose is limited to the express emission control system warranty
terms stated in this warranty. The foregoing statements of warranty are exclusive and in lieu of all
other remedies. All express warranties not stated in this warranty are disclaimed. Some states do not
allow limitations on how long an implied warranty lasts, so the above limitations may not apply if it is
inconsistent with the controlling state law.
No dealer is authorized to modify this Emission Control System Warranty. If you have any questions
regarding your warranty rights and responsibilities, you should contact BAJA INC. (888) 863-2252
Baja INC.
P.O. Box 61150
Phoenix, AZ. 85082
Tel: 602-443-9180
Toll Free: 866-250-7155