1
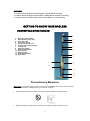
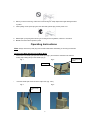
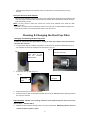
Bagless Convertible Stick Vacuum
Instruction Manual
Model AFV 801
1
IMPORTANT SAFETY INSTRUCTIONS
When using your BAGLESS CONVERTIBLE STICK VACUUM basic safety precautions should
always be observed, including the following:
Read all instructions before using your BAGLESS CONVERTIBLE STICK VACUUM
WARNING - To reduce the risk of fire, electric shock, or injury:
1. Use the system only for its intended use.
2. To protect against a risk of electric shock, do not immerse any part of the system in
water or other liquids.
3. Never yank cord to disconnect from outlet; instead, grasp plug and pull to
disconnect.
4. Do not allow cord to touch hot surfaces.
5. Do not run appliance over cord.
6. Do not operate the system with a damaged cord or plug, or if the appliance or any
other part of the system has been dropped or damaged. To avoid the risk of electric
shock, do not disassemble or attempt to repair the BAGLESS CONVERTIBLE STICK
VACUUM. Return the unit for examination and repair. Incorrect re-assembly or repair
can cause a risk of electrical shock or injury to persons when the BAGLESS
CONVERTIBLE STICK VACUUM is used.
7. Close supervision is necessary for any appliance being used by or near children. Do
not leave the system unattended while connected.
8. Keep hair, loose clothing, fingers and all parts of body away from opening and
moving parts.
9. Do not use to pick up flammable or combustible liquids such as gasoline or use in
areas where they may be present.
10. Do not pick up anything that is burning or smoking such as cigarettes, matches or
hot ashes.
11. Use extra care when cleaning on stairs.
12. Do not use the vacuum without the dust cup filter in place.
13. This appliance is intended only for household use. Follow all user instructions in this
manual.
14. Do not leave the BAGLESS CONVERTIBLE STICK VACUUM plugged in when
un-attended. Unplug the electrical cord when not in use and before servicing.
15. Do not allow to be used as a toy. Close attention is necessary when used by or
near children, pets or plants.
16. Use only as described in this manual. Use only manufacturer’s recommended
accessories.
17. Do not pull cord, use cord as a handle, close a door on cord, or pull cord around
sharp edges or corners. Do not run vacuum cleaner over cord. Keep cord away
from heated surfaces.
18. Turn off all controls as applicable before unplugging from electrical outlet.
19. Do not unplug by pulling on cord. To unplug, grasp the plug, not the cord.
20. Do not handle plug or vacuum with wet hands or operate without shoes.
21. Do not put any objects into openings. Do not use with any opening blocked. Keep
free of dust, lint, hair and anything else that may reduce air flow.
22. Store your appliance indoors in a cool, dry area.
23. Keep your work area well lit.
24. Do not immerse the vacuum into water or other liquids.
25. Keep end of hose, wands and other openings away from your face and body.
26. Use only on dry surfaces.
27. Using improper voltage may result in damage to the motor and possible injury to
the user. Correct voltage is listed on rating label.
28. This appliance is provided with double insulation. Use only identical replacement
parts. See instructions for Servicing of Double-Insulated Appliances.
For Household Use Only
SAVE THESE INSTRUCTIONS
2
WARNING:
- To reduce the risk of injury from moving parts – Unplug before servicing.
- To reduce the risk of injury of electric shock – Unplug before cleaning or servicing.
- To reduce the risk of electric shock – Do not use outdoors or on wet surfaces.
GETTING TO KNOW YOUR BAGLESS
CONVERTIBLE STICK VACUUM
1
1.
2.
3.
4.
5.
6.
7.
8.
9.
10.
11.
12.
13.
Extension Tube Handle
Quick Release Cord Hook
Extension Tube
Flat suction nozzle
Flat suction nozzle rack
Power Cord (not shown fully)
Locking Clip
Hand Vac Handle
On/Off Power Switch
Dust cup lock
Dust Cup Filter
Dust Cup Container
Floor Brush
2
3
4
5
6
7
.
9
8
10
11
12
13
Precautionary Measures
Important: If the suction opening in the unit or the hose is blocked, switch off the vacuum cleaner
and remove the blocking substance before you start the unit again.
1.
Do not operate the vacuum cleaner too close to heaters, radiators or cigarette butts.
2.
Before inserting the power plug into the wall outlet, make sure that your hands are dry.
3
3.
Before you start vacuuming, make sure to remove large or sharp objects that might damage the dust
cup filter.
4.
When pulling out the power plug from the wall outlet, pull the plug not the power cord.
5.
Do not pick up anything that is burning or smoking such as cigarettes, matches or hot ashes.
6.
Do not use without dust cup filter in place
Operating Instructions
Note: Always remove the power plug from the wall outlet before assembling or removing accessories.
Inserting the Metal Handle Into the Main Body
•
On the hand vac handle, pull open the handle port (Fig.1) and insert the extension tube until the
locking clip is sitting firmly on the handle. (Fig.2)
Fig. 1
Fig. 2
Locking clip
•
Push the handle port closed so that it snaps shut. (Fig. 3 & 4)
Fig. 3
Fig. 4
Push handle port
so that it snaps
shut.
4
Push firmly into
handle
Attaching the Crevice Tool and the Floor Brush to the Main Body
•
Push the crevice tool or floor brush into the suction hole opening. (Fig. 5)
Fig. 5
The following are recommendations for accessory usage:
Crevice Tool
For radiators, crevices, corners, base-boards and between cushions.
Floor Brush
For all kinds of flooring, including carpeted and tiled floors.
Winding & Unwinding the Power Cord
This vacuum cleaner is equipped with a convenient cord storage feature. This unit also has a quick
release cord hook
•
Wind power cord around the quick release cord hook and the cord winding hook. (Fig. 6) To
unwind the power cord, simply twist the quick release cord hook to the left or right.
Quick Release
cord Hook
Cord Winding
Hook
Operating Instructions
Caution: The suction hole opening must be open and free of any obstructions at all times. Otherwise,
the motor will overheat and could become damaged.
Power switch
• The On/Off power switch has two different positions. (Fig. 7)
• Push the "I" side to turn the vacuum ON.
• Push the "O" side to turn the vacuum OFF.
OFF
position
On
position
Using the Unit as an Upright
•
•
Fig. 7
Insert the extension tube into the hand vac.
Choose the appropriate accessory (crevice tool or floor brush) and attach it to suction hole opening
on the hand vac
Note: You may choose not to attach the crevice tool or floor brush when operating as an upright.
•
Press the “1” position on the On/Off power switch turn the unit on. When finished using the unit,
press the “0” position on the On/Off power switch to turn the unit off.
5
•
When finished using the unit, wind the power cord around the cord winding hooks for easy
storage.
Using the Unit as a Hand Vacuum
•
Disconnect the extension tube from the hand vac by releasing the handle port from the locking clip
and removing the extension tube from the hand vac handle. Once the extension tube is removed,
snap the handle port shut.
Note: You may choose to leave the crevice tool or floor brush attached to the hand vac when
operating as such.
• Press the “1” position on the On/Off power switch to turn the unit on. When finished using the unit,
press the “0” position on the On/Off power switch to turn the unit off.
Cleaning & Changing the Dust Cup Filter
Changing and Cleaning the Dust Cup Filter
In order to achieve the best performance, empty the dust cup container and clean the dust
cup filter after each use.
1. To remove the dust cup container, press down on the dust cup container release button (Fig. 8)
and separate the dust cup container from the main unit. (Fig. 9)
Fig. 9
Fig. 8
Separate the dust cup container
from the main body.
Press down on the
dust cup container
release button
2.
Pull out the dust cup filter. (Fig. 10)
Fig. 10
Dust cup
container
Dust cup
filter
3.
Empty the dust from the dust cup container.
4.
Rinse the dust cup filter in cold water, and then let it air dry for 24 hours before replacing it back in
the dust cup container.
Important Note: DO NOT use a washing machine to clean the dust cup filter. Do not use a hair
dryer to dry it.
5.
AIR DRY ONLY.
Replace the dust cup filter carefully into the dust cup compartment. NEVER operate the stick vac
without the dust cup filter in place.
6
6.
Attach the dust cup container to the main body of the unit.
Note: It is recommended that the dust cup filter be replaced every three (3) months (depending on usage)
to ensure peak performance of the unit.
Troubleshooting
TROUBLESHOOTING GUIDE
PROBLEM
VACUUM WILL NOT OPERATE
VACUUM WILL NOT PICK-UP
OR SUCTION POWER IS
WEAK
DUST ESCAPING FROM
VACUUM
POSSIBLE REASON
POSSIBLE SOLUTION
1. No power in electrical outlet
supplying transformer.
1. Check fuse or breaker.
Replace fuse/reset breaker.
1. Dust cup container is full.
2. Dust cup filter needs
cleaning or replacement.
3. Unit needs recharging.
1. Empty dust cup container
2. Remove dust cup filter and
check for object(s) in air duct
and remove. Clean or replace
dust cup filter.
3. Charge unit.
1. Dust cup container is full.
2. Dust cup filter is not
installed correctly.
3. Puncture/hole is dust cup
filter.
1. Empty dust cup container.
2. Review dust cup filter
installation instructions.
3. Replace dust cup filter.
Ordering Replacement Dust Cup Filters
Please Note:
The Dust Cup Filter is washable. It should, however, be replaced every three (3) months (depending
on usage) to ensure peak performance of your vacuum.
Important:
Make sure that ALL filters are completely dry before re-installing back in the vacuum.
1. This appliance is not intended for use by persons (including
children) with reduced physical, sensory or mental capabilities, or lack
of experience and knowledge, unless they have been given
supervision or instruction concerning use of the appliance by a
person responsible for their safety.
2. Children should be supervised to ensure that they do not play with
the appliance.
Warranty Information
The manufacturer provides warranty in accordance with the legislation of the customer's own
country of residence, with a minimum of 1 year, starting from the date on which the appliance is
sold to the end user.
7
The warranty only covers defects in material or workmanship.
The repairs under warranty may only be carried out by an authorized service centre. When making
a claim under the warranty, the original bill of purchase (with purchase date) must be submitted.
The warranty will not apply in cases of:
- Normal wear and tear
- Incorrect use, e.g. overloading of the appliance, use of non-approved accessories
- Use of force, damage caused by external influences
- Damage caused by non-observance of the user manual, e.g. connection to an unsuitable mains
supply or non-compliance with the installation instructions
- Partially or completely dismantled appliances
8