1
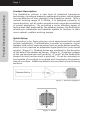
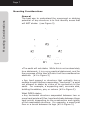
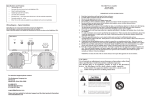
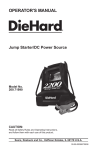
Thank you for your purchase of the ButtKicker®, the
most powerful, musically accurate and long lasting
low frequency audio driver available today.
This User’s Guide is designed to help you install and
use the ButtKicker in order to receive the most
possible enjoyment.
If after following these instructions you are not
THRILLED with the ButtKicker please contact us. Call,
email or fax us. We will do everything possible to
make sure you are completely satisfied.
INSTALL
•
SHAKE
•
ENJOY!
Contents
Product Description ......................................................... 1
Quick Setup ................................................................... 1
Integration into Your Sound System ................................... 2
Power ................................................................. 2
Low End Roll Off ................................................... 2
Source Material .................................................... 3
Source Hookup to Amplifier .............................................. 4
Surround Sound System ....................................... 4
Stereo System ..................................................... 4
No “Preamp Output” ............................................. 4
Signal Levels ....................................................... 5
Physical Mounting and Placement ...................................... 6
Mounting Considerations .................................................. 7
General ............................................................... 7
Floating Wood Floors ............................................ 9
Chairs and Couches ............................................. 10
How Many Isolators Will You Need ......................... 11
Vertical vs. Horizontal .......................................... 12
Drummers ..................................................................... 13
Thermal Protection ......................................................... 15
Warranty ....................................................................... 15
Specifications ................................................................ 16
Contact Information ....................................................... 16
Product Description/Quick Setup
Page 1
Product Description
The ButtKicker utilizes a new type of patented transducer
technology, including a magnetic suspension system, which allows
the reproduction of very powerful, low frequency sound. With a
natural working range of 5-200Hz, it is designed primarily to
move structure, not air, and to provide a much more direct method
of sound perception. By providing a more effective sense of
feeling than that produced by the speaker system, the ButtKicker
allows your subwoofer and speaker system to function in their
more natural, audible working ranges.
Quick Setup
This section is for those who are more experienced with sound
system installation. The ButtKicker is similar to a passive, 4 ohm
speaker load, which requires power from an audio power amplifier,
which in turn requires an adequate signal feed from your sound
system, (Figure 1). Shaking forces are produced in the direction
of the axis of the shaker as shown, (Figure 2). A positive voltage
at the red terminal wire will produce a “push” by the ButtKicker
toward its feet (red terminal is positive). It can be mounted on
the topside of a surface or inverted and mounted to the bottom
side of a surface. Additional details are provided in the following
sections.
Figure 1. System Integration
Figure 2. Shake
Page 2
Integration into Your Sound System
Low End Roll Off
When choosing a power amplifier for the ButtKicker,
please be aware of the low frequency response of the
amplifier. Many manufacturers roll off, or cut frequencies
below 20 Hz, usually because anything below 20 Hz has
been considered unusable and damaging for speaker
systems. Therefore, amplifier manufacturers often
include additional circuitry to reduce or eliminate those
damaging “unusable” signals before they are amplified
and sent to the speaker. This roll off of low frequencies
(also called a “Hi Pass Filter”) is not best for the
ButtKicker, although a shallow roll off can be tolerated
(i.e. –1.5 dB to –3 dB at 10 Hz). A full cut at 20 Hz and
below is not acceptable because it will severely limit some
of the remarkable qualities of the ButtKicker for use as a
home theater shaker. You should find frequency response
listed among the amplifier manufacturer’s specifications.
On the other hand, if you are a musician using the
ButtKicker for low frequency monitoring, your main
interest may be in the low audible frequency information.
So filtering out the confusing, infrasonic signals that can
be generated on stage could be a very important aspect
to your work.
Integration into Your Sound System
Power
The ButtKicker is a passive load and therefore requires
its own, dedicated audio power amplifier. Minimum
required power is 400 watts. We recommend 600 - 1000
watts depending upon your specific application. The
use of 12-gauge cable between the amplifier and
ButtKicker is important, particularly if long cable runs
are required. For shorter runs, 16-gauge wire would be
minimum; 12-gauge is recommended. 10-gauge wire is
recommended for lengths over 25 feet.
Integration into Your Sound System
Page 3
Source Material
The ButtKicker responds to a broad range of bass
frequencies, including those far below what we hear, or
way down into the feeling range of sound. Today’s digital
sound sources are capable of carrying signals down to 5
Hz, but it is the producers who determine the content of
a sound track. Therefore, the level and range of bass
contained within any given sound track will vary. Even
though a video may show the launch of a rocket, the
audio track will contain only what the producers chose
to include in the audio track. The ButtKicker simply
responds with great fidelity to the existing low frequency
content, much as a speaker responds to the signal given it.
Page 4
Source Hookup to Amplifier
Stereo System
Yes, the ButtKicker also works well in a regular, two
channel, stereo system. In a two channel stereo system,
the low frequency signals are very seldom only on the
left or right channel, so a connection to either left or
right channel preamp output would produce satisfying
results. (Figure 3-B)
Figure 3.
No “Preamp Output”
If no “Preamp Output” exists on your receiver/preamp,
then the only available signal source would be a “record”
output in the tape monitor section. While this would
supply a signal for the ButtKicker, it is less useful because
it is not controlled by the master volume control.
Source Hookup to Amplifier
Surround Sound System
One signal source for the ButtKicker is the “Subwoofer”
output of your surround receiver/processor. This output
is controlled by the volume control. If a subwoofer is
also a part of the sound system and connected to this
signal output, then a “Y” cable maybe needed to split
the signal two ways. (Figure 3-C.)
Source Hookup to Amplifier
Page 5
Signal Levels
The amplifier you use to power the ButtKicker will require
a specific input signal level from your system’s control
center (receiver/processor/preamp) in order to deliver
full power output to the ButtKicker. The level of input
signal required will vary from model to model. There
are two standard levels prevailing today. One standard
level is 0.15 volt (common in “consumer” equipment)
and the other is 1.5 volt (more common in higher power
and “professional” equipment). The signal levels reaching
the power amp must be able to drive the amplifier to its
full power level. If connecting a consumer preamp/
processor to a professional amplifier, then a device will
be needed to boost the signal level to the level necessary
for the power amplifier. Insufficient signal levels from
the system control center will not drive the power
amplifier to full output power. Please refer to the user
manuals of your equipment for specific operating levels.
Figure 4 shows a proper system level setup. Please note
that if your preamp has nominal output levels of 1.5
volts, then no level conversion is necessary; the preamp
should drive the amplifier directly.
Figure 4.
Signal Levels
Page 6
Physical Mounting and Placement
You probably at some time have become aware of something or
someone by seeing a shadow it cast within your view (its affect
on your environment) rather than seeing the item itself. Have
you ever “sensed” someone enter the room without them making
a sound? You were unconsciously aware of a change in the
room’s sound characteristics associated by your mind with the
addition of another person. Your brain and body have “perceived”
this many times before, whether you are consciously aware of it
or not. Your body also knows more about its surroundings via
the sense of feel than you probably realize. The field of
entertainment has come great distances to capture your senses
of hearing and seeing, and the next major sense to “capture” is
your sense of feeling.
Our bodies feel sound through both air (momentary changes in
air pressure) and structure (i.e. the ground or floor on which we
stand). The speaker system supplies the air vibrations and
pressure changes we hear and feel in the air. The ButtKicker
Shaker, when properly applied, will supply the structural
vibrations.
Physical Mounting and Placement
Some consideration regarding the human sense of feeling:
Our brain is constantly making perceptions of our surroundings:
indoors or outdoors, size, shape and material of a room, etc.
Your brain and body have been doing this with all of your senses
since the day you were born, confirming and associating what it
hears with what it sees, feels, tastes and smells.
Page 7
Mounting Considerations
Mounting Considerations
General
The best way to understand the movement or shaking
potential of any structure is to first identify areas that
will NOT shake: (see Figure 5)
Figure 5
• The earth will not shake. While this is not an absolutely
true statement, it is a very practical statement, and for
the purposes of this User’s Guide it will be considered an
absolute. (#1 in Figure 5)
• Any hard support or structure that vertically ties a
surface to earth defines a secondary “hard point”; a point
not allowed to shake by virtue of its connection to the
earth. For example, a supporting wall, concrete slab,
building foundation, pier, or column (#2 in Figure 5).
What DOES shake:
• Any horizontal structure suspended between two or
more hard points will flex, bend and shake between those
hard points, depending on the construction and rigidity
of the suspended structure. For example, a wood joist
floor or a couch between its legs (#3 in Figure 5).
Page 8
Example 2
A room, similar in size to the room of Example 1, but
this construction is different in that the floor has
additional support underneath, made up of a pier or
foundational wall that runs under the floor about 5
feet from one of the room’s walls. The floor is now
supported at an additional point, which effectively
divides the floor into two suspended sections
measuring 12’ by 5’, and 12’ by 9’. This effect would
be similar to placing a finger on a guitar string, holding
the string against a fret. This floor will vibrate in a
different manner than that of Example 1. The 12’ by
5’ section will not allow as much bending of the floor’s
materials between its supports (hard points) and
would therefore exhibit less low frequency shaking
than the 12’ by 9’ section. (For example, a higher
note on a guitar string)
As an additional note, if the wider section of this floor
were shaken with the ButtKicker, the narrower section
would still exhibit some “sympathetic” and less
pronounced vibrations because of its connection to
the wider section of the floor.
Example 3
A room with a concrete slab floor, lying directly on
the earth. This floor will be practically impossible to
shake. In your main listening area, your favorite
couch is the best option. The feet at the ends of the
couch are pressed and held firm against the concrete
slab by its weight and are therefore unmoving hard
points of the couch. The horizontal length of the
couch between the feet is suspended and will bend
Mounting Considerations
Example 1
A room with a suspended, joist floor measuring 12’
by 14’. The floor is only supported around the edges
(at the walls) by a foundation, and is capable of
bending and vibrating in the area between its
supported hard points. This is similar to a guitar
string that can vibrate between its supporting hard
points at each end of the string. This floor would be
best shaken by a ButtKicker mounted to the floor in
the center area of the room away from the dampening
action of the walls.
Mounting Considerations
Page 9
and shake but only to the degree allowed by its
materials and construction. As it sets, the furniture
may respond to midrange frequencies, but not
respond properly at the desired low frequencies.
Please see following sections for more information
regarding furniture installation.
Floating Wood Floors
The surface below you is your physical connection to
your environment. A suspended, joist floor is an ideal
mounting surface for the ButtKicker. Best results are
obtained by installing two 2" x 6" boards between two
floor joists. (See Figure 6). Place them near the center
of the room, or near the seating area of the audience,
avoiding any supports and bracing that would not allow
the floor to move. Then mount the ButtKicker to the
two 2" x 6" boards.
An alternative method is shown in Figure 7. Here, a 2"
x 6" (or wider) board is attached broadside across the
bottom edge of three joists.
Figure 6
Figure 7
Page 10
Three primary reasons for shaking furniture rather than the floor
are:
1. It is not possible to move the floor. If your floor is a
concrete slab, and therefore resting totally on the earth,
it will not move. Shaking your entertainment room
furniture is the next viable alternative.
2. You choose not to move the floor. If you live in an
apartment building with neighbors below you, you will
want to enjoy the low frequency shaking of the ButtKicker
without disturbing their privacy.
3. Portability. Musicians have made the ButtKicker a
part of their portable setups for low frequency monitoring
(i.e. bass players, drummers, etc.). A ButtKicker
mounted to a small properly built platform allows the
user to use many types of furniture and still maintain a
broad range of low frequency fidelity and response.
For full low frequency response in any configuration, the furniture
on which you sit must be allowed to move with or without the
floor. The ButtKicker may be enjoyed by either installing it directly
onto your furniture or by adding a properly built platform under
the furniture with a forward extension for resting your feet.
Most furniture will not provide adequate low frequency response
while resting directly on an unmoving floor. Therefore, some
kind of “cushion” isolator needs to be placed between the furniture
feet and the floor to isolate the furniture from the floor allowing
the furniture to vibrate. With some kind of rubber cushion
between the furniture feet and the floor, the furniture is allowed
to move without the floor moving. The density and shape of this
cushion material are dependent on the mass of the furniture
and occupants supported by the material. One simple solution
is to use Kinetics brand rubber isolators to isolate the furniture
from the floor.
Mounting Considerations
Chairs and Couches
IMPORTANT: Only when properly installed will your couch or
chair adequately respond to the ButtKicker with excellent low
frequency reproduction and without excessive midrange
vibrations.
Mounting Considerations
Page 11
Another effective alternative is to build a simple platform, large
enough for the furniture it will be under, and the user’s feet.
Isolate the platform from the floor with rubber isolators (again,
we recommend Kinetics). The ButtKicker may be mounted on
top of the platform, either under the couch or chair (remove
dust covers) or behind the couch or chair.
Figure 8. Kinetics Rubber Isolator
How to Determine How Many Isolators You Will Need
Kinetics isolators come in different weight capacities. All their
isolators are designed to be partially compressed in application
and therefore, numerous models are made with varying weight
specifications. This specification (RDA-55, RDB-120, RDB-220,
RDB-375) indicates the amount of weight (in lbs.) that each
isolator is designed to support (per isolator) for greatest efficiency.
Calculate the total weight to be carried by the isolator, including
platform, chairs and people. Divide this weight by the total
number of isolator feet to be used (i.e. a minimum of 3, a usual
number of 4, more only when necessary). This will give you the
weight per isolator. Pick the isolator model closest to your
calculated weight.
More information on Kinetics isolators may be obtained at our
website, www.thebuttkicker.com or at Kinetics’ site,
www.kineticsnoise.com .
Page 12
Mounting Considerations
Vertical vs. Horizontal
The ButtKicker was designed for optimal performance in the
vertical orientation, but will function at any angle. If installed in
the horizontal axis, some additional internal friction will result in
some distortion, best characterized as similar to “crossover”
distortion in an amplifier. Some customers, though, have utilized
the ButtKicker in the horizontal orientation with satisfactory
results. Movement sensation is very different in the two axis,
and one should have specific sensations in mind requiring
horizontal motion. Please note: horizontal orientation will not
damage the ButtKicker.
Page 13
Drummers
Drummers
The following are considerations when using the
ButtKicker with your kit:
ButtKicker Mounting
When mounted directly to the throne seat, the
ButtKicker will, of course, deliver the most direct kick,
but some thrones’ seats are too small for direct
mounting of the ButtKicker. A small platform isolated
from the floor with rubber feet can be constructed on
which the ButtKicker is mounted and the throne is
set. The ButtKicker2 is smaller making installation
easier.
Signal Source
Kick drumhead tuning determines to a large factor
what signal is sent to the ButtKicker (loose vs. tight;
low vs. high, etc.). You do not need to change your
playing habits or drum tuning in order to take
advantage of the ButtKicker.
Microphone
A tap off the kick drum mic signal used by the sound
system can be taken for the ButtKicker shaker system
feed.
Pickups
A popular pickup used seems to be the V-drum pickup.
Let us know of others. The pickup’s position on the
head is a large factor on both the level and frequency
content of the output signal.
Mixer
A pre-fader auxiliary send can be used to send a signal
to the ButtKicker. This allows a mix of whatever drum
mics you want to feel, though most other drums may
have little usable program content within the
ButtKicker’s range.
Page 14
Signal Processing
No signal processing is necessary to energize the
ButtKicker, but some circumstances may warrant extra
measures.
Gate
If the signal contains a lot of “garbage” between beats
from other picked up stage noises; you may want to
gate the signal.
Troubleshooting
Missing a beat…especially on the hard beats? See “Signal
Processing, Hi-Pass”.
Drummers
Hi-Pass
Your kick drum signal could easily include infrasonic
(below the hearing range) signals that are not relevant
to your need and could cause excessive excursion
within the ButtKicker. This is not damaging, but it
could result in lack of control, and the possible missing
of complete beats. These infrasonic signals are
influenced by head tuning, other sound sources in
close proximity, etc. Eliminate the infrasonic signals
by passing them through a Hi-Pass filter.
Thermal Protection/Warranty
Page 15
Thermal Protection
The ButtKicker is basically an electric motor, and as with any
type of electric motor, if it is driven too hard (too much power,
for too long of a period), it will become overheated. For this
reason, each ButtKicker contains a thermal switch. This switch
will automatically disconnect the ButtKicker from the amplifier if
the internal temperature of the shaker reaches a preset limit.
This should happen only rarely, and only when the unit is
overdriven. In most situations, the level of “shake” that is
produced by the ButtKicker, until it overheats, will be far more
than needed. This is also related to the “flexibility” and size of
the surface you are endeavoring to shake. However, if tripped,
the thermal switch will automatically reset after the unit has
cooled sufficiently. Then the ButtKicker will resume normal
operation. Cooling off time can be 5 - 20 minutes, depending on
ventilation. While in thermal protection mode, the ButtKicker
may feel quite warm to the touch, but the cutoff point has been
set to avoid damage.
Warranty
Guitammer Company products are warranted against defects in
materials and workmanship for a period of two (2) years from
date of purchase by the original end-user. Items returned for
repair under warranty will be repaired or replaced at the sole
discretion of The Guitammer Company without charge for
materials or labor, providing such items are returned for
inspection, transportation prepaid, to The Guitammer Company
or an authorized service center. All repaired or replaced items
will be returned freight collect. Warranties do no apply to products
that have been subjected to abuse, accident, modifications,
improper handling or installation, or repairs made by anyone
other than The Guitammer Company or an authorized service
center. The Guitammer Company shall be the final authority in
the determination of all warranty service claims.
Page 16
5.375” h x 5.5” w
5 – 200 Hz
11 lbs. / 5 kg.
4 ohms, inductive
400 watts min. / 1500 watts max.
Red terminal is “Hot”
150 F. (70 C.)
Contact Information
The Guitammer Company Inc.
PO Box 82
Westerville, OH 43086
[email protected]
Voice: 888-676-2828
Fax:
815-346-9532
Please visit our website www.thebuttkicker.com for additional
technical information, specifications and FAQs.
Specifications/Contact Information
Specifications.
Dimensions:
Frequency Response:
Weight:
Nominal Impedance:
Power Handling:
Wiring polarity:
Thermal Limit (internal):
smaller, better, more responsive.