1
Developing ICT in a Developing
Country
the implementation of a digital library system
&
improving the ICT knowledge of the local
community of the Kitui District
Redmar Atsma
Date
16 June 2006
Developing ICT in a Developing
Country
the implementation of a digital library system
&
improving the ICT knowledge of the local
community of the Kitui District
Redmar Atsma
Date
16 June 2006
ICT Coaches
Coordination Kenya
Ron Creutzburg
Joep Swagemakers
Mutinda Munguti
Eric Ndiku
Coach Noordelijke Hogeschool
Leeuwarden
Coordination Netherlands
Henk Haring
Frans Tournier
Mark Ros
Organizations
Ex-change, Hilversum (the Netherlands)
SASOL, Kitui (Kenya)
Preface
It all started at the end of December 2005 that I came in contact with a Dutch
organization, called Ex-change, who gives Dutch students an opportunity to do
an internship in a developing country. I was looking for a graduation internship for
my study Information Technology at that time and the organization could still use
some ICT students for an internship in Kenya, starting in February 2006. After a
short and busy period of making preparations and organizing things I was on the
go to Kitui, Kenya on the 16th of February.
During my stay in Kenya, from February to June 2006, I’ve worked on two ICT
projects, which are described in this document. This document is a complete
report about my internship. Besides this document some separate documents
are made for the SASOL Foundation, which is the organization I’ve worked for
during my internship. These documents are subsets from this document in which
only the, for SASOL, necessary parts are included.
My time in Kenya was one I’ll never forget: good moments, frustrating moments,
moments that were too hot to work, moments that it was impossible to work
because the electricity had dropped again, moments I wished Internet was
accessible from anyplace in the world, moments that I was thinking myself why I
was trying to work on ICT here in an area with so many other troubles… but
finally it was definitely worth to do the internship and therefore I would like to
thank the organizations who made the internship possible: Ex-Change from
Hilversum, the Netherlands and SASOL Foundation from Kitui, Kenya for which
the internship is actually carried out. I would also like to thank the Noordelijke
Hogeschool Leeuwarden who allowed me to undertake this, maybe somewhat
uncommon, internship, my housemates who stayed with me in the student house
in Kitui where we had a great time, anyone who provided me with documents for
the Information Hub library, of course my family who supported me in
undertaking this internship and anyone else who I forgot to mention here.
Redmar Atsma
June 2006
III
Summary
This report describes a graduation internship as part of the study Information
Technology at the Noordelijke Hogeschool Leeuwarden, located in Leeuwarden,
the Netherlands. The internship is carried out in order of the SASOL Foundation,
located in Kitui, Kenya and Ex-change, located in Hilversum, the Netherlands.
Ex-change is a Dutch partner organization of SASOL and gives students from the
Netherlands the opportunity to do an internship in a developing country.
During the internship, as described in this report, two projects have been worked
on: the Information Hub Project and the School Project. The Information Hub
Project was the main project of the internship.
Information Hub Project
The main goal of the Information Hub Project is to realize some kind of digital
library, accessible like a website, which can be accessed by both SASOL’s
employees and the local community of the Kitui district. The Information Hub
Project is part of the planned Information Center, which is a long-term project of
SASOL with as main objective to improve the knowledge of the community of the
Kitui district by spreading and sharing information.
Setting up a pilot version of the Information Hub was the goal of this project
during the internship. The pilot version, accessible from one central computer,
has to be used by the local employees of SASOL for setting up an experimental
version of the project and to make the employees known how to work with the
Information Hub.
The pilot version of the Information Hub has been realized successfully. A digital
library is set up using a specialized software system for setting up digital libraries:
the Greenstone Digital Library Software. The Information Hub already contains a
lot of information but will continuously grow as new information will be added on
a regular base. The Information Hub is installed on a server system and is
currently accessible from one client system. On a really short-term, a local
network will be realized at the SASOL office, which enables all of the computers
to have access to the Information Hub. In the mean time, end-users can also
acquire a CD-ROM which installs a static (possibly not actual anymore) version
of the Information Hub on their computer.
Besides a functioning pilot implementation of the Information Hub a lot of
attention has been made on documentation. User guides and admin guides are
made in which respectively the use and maintenance of the Information Hub are
described. A report about the implementation of the Information Hub together
with recommendations for next ICT teams has been made too.
All of the products realized during this pilot implementation project should form a
stable basis for the future Information Hub.
IV
School Project
SASOL is working on the School Project for quite a few years now. Main goal of
the School Project is to improve basic computer knowledge at schools located in
the Kitui district. SASOL tries to accomplish this by supplying schools with
computers and educating the teachers and students at the schools.
Although the initiative of the School Project is very good, SASOL was not
completely satisfied with the way the School Project was doing as it appeared
that there was no continuality in the project; schools visited by SASOL for
teaching had to start over and over again with learning from the beginning. The
main cause of this was that there was too much pressure on teaching students
and not on teaching teachers. As a result, schools were not able to give
computer lessons to their students on their own and as SASOL is not and could
not visit the schools very frequently, most schools were not using or hardly using
their computer systems.
During the internship, two schools were visited after which a complete
reorganization has been made on the School Project structure. The new
structure contains much stricter rules for the schools if they want to participate in
the School Project. Main rule of the new structure is that schools acquire an ICT
teacher or select one of their teachers as an ICT teacher. SASOL will periodically
check if the schools are working according to the new school structure’s contract.
V
Samenvatting
Dit rapport beschrijft een afstudeerstage als onderdeel van de opleiding
Informatica aan de Noordelijke Hogeschool Leeuwarden. De stage is uitgevoerd
in opdracht van de SASOL Foundation, gevestigd in Kitui, Kenia en Ex-change,
gevestigd in Hilversum. Ex-change is een Nederlandse partnerorganisatie van
SASOL en geeft Nederlandse studenten de mogelijkheid om een stage in een
ontwikkelingsland te ondernemen.
Gedurende de in dit verslag beschreven stage is aan twee projecten gewerkt: het
Informatie Hub Project en het School Project. Het Informatie Hub Project was het
hoofdproject van de stage.
Informatie Hub Project
Het hoofddoel van het Informatie Hub Project is het realiseren van een digitale
bibliotheek, toegankelijk als een website bij zowel de medewerkers van SASOL
als de locale bevolking van het Kitui district. De Informatie Hub is een onderdeel
van het geplande Informatie Centrum, een project van SASOL gepland op de
lange termijn en met als belangrijkste doel kennisverbetering van de lokale
bevolking van het Kitui district door middel van het verspreiden van informatie.
Het opzetten van een pilot versie van de Informatie Hub was het doel van dit
project gedurende deze stage. De pilot versie, toegankelijk vanaf een centrale
computer, zal gebruikt worden door de werknemers van SASOL zodat een
testversie van het project wordt opgezet en de werknemers bekend kunnen
worden gemaakt met het gebruik van de Informatie Hub.
De pilot versie van de Informatie Hub is succesvol gerealiseerd. Een digitale
bibliotheek is opgezet met behulp van specifieke software voor het opzetten van
digitale bibliotheken: de Greenstone Digital Library Software. De Informatie Hub
bevat momenteel al veel informatie maar zal continu blijven groeien doordat er
regelmatig nieuwe informatie aan toegevoegd zal worden. De Informatie Hub is
geïnstalleerd op een server systeem en is momenteel toegankelijk vanaf één
client systeem. Op zeer korte termijn zal er binnen het SASOL kantoor een lokaal
netwerk gerealiseerd worden, waardoor het mogelijk wordt dat alle computers in
het kantoor toegang hebben tot de Informatie Hub. In de tussentijd kunnen
eindgebruikers een CD-ROM bemachtigen welke een statische (mogelijk niet
meer actuele) versie van de Informatie Hub op de computer installeert.
Naast een werkende pilot implementatie van de Informatie Hub is er veel
aandacht besteed aan het maken van documentatie. Gebruikers- en
beheershandleidingen zijn gemaakt waar respectievelijk het gebruik en het
onderhoud van de Informatie Hub in staat beschreven. Ook is er een verslag
over de implementatie van de Informatie Hub samen met aanbevelingen voor
volgende ICT teams gemaakt.
VI
Alle, gedurende dit project, gerealiseerde producten zullen een stabiele basis
moeten geven voor de toekomst van de Informatie Hub.
School Project
SASOL werkt nu sinds een paar jaar aan het School Project. Het belangrijkste
doel van het School Project is het verbeteren van de basis computervaardigheden op de scholen in het Kitui district. SASOL levert de scholen
hiervoor computers en geeft docenten en studenten van de school les in de
basisvaardigheden van het computer gebruik.
Hoewel het idee van het School Project erg goed is, was SASOL tot nu toe nog
niet helemaal tevreden over het School Project aangezien er weinig continuïteit
in het project zat; scholen die werden bezocht door SASOL moesten keer op
keer opnieuw bij het begin beginnen voor wat betreft lesgeven. De voornaamste
oorzak hiervan was dat er teveel aandacht werd besteed aan het lesgeven van
studenten in plaats van aan de leraren. Het gevolg hiervan was dat de scholen
niet in staat waren om zelfstandig computerles te geven aan de studenten.
Omdat SASOL niet instaat is om alle scholen frequent te zoeken werden de
computersystemen op de meeste scholen niet of nauwelijks gebruikt.
Gedurende deze stage zijn twee scholen bezocht. Aan de hand van dit bezoek is
een complete aanpassing gemaakt aan de structuur van het School Project. De
nieuwe structuur bevat strengere regels waar de scholen zich aan moeten
houden willen ze deelnemen aan het School Project. De belangrijkste regel van
deze nieuwe structuur is dat de scholen een ICT leraar aanstellen of één van de
huidige leraren van de school aanstellen als ICT leraar. SASOL zal periodiek
controleren of te scholen zich houden aan de nieuwe structuur, zoals
omschreven in het ‘school structure contract’.
VII
Table of Contents
Preface ______________________________________________________________ III
Summary ____________________________________________________________ IV
Samenvatting _________________________________________________________ VI
Table of Contents ____________________________________________________VIII
1.
Introduction_______________________________________________________ 1
2.
Involved Organizations _____________________________________________ 1
3.
2.1.
SASOL Foundation___________________________________________________ 1
2.2.
Ex-change___________________________________________________________ 2
2.3.
Noordelijke Hogeschool Leeuwarden ____________________________________ 2
Information Hub (Project 1) _________________________________________ 2
3.1.
Information Center ___________________________________________________ 2
3.2.
Information Hub _____________________________________________________ 3
3.2.1.
Pilot Version _____________________________________________________________ 3
3.3.
Requirements for the Information Hub __________________________________ 4
3.4.
Type of Documents ___________________________________________________ 6
3.5.
Standard Software or Custom-Made Software ____________________________ 6
3.6.
Greenstone Digital Library Software ____________________________________ 8
3.7.
Problems and Limitations _____________________________________________ 9
3.8.
Information Hub Infrastructure ________________________________________ 9
3.8.1.
3.8.2.
3.9.
Information Hub Server_____________________________________________________ 9
Information Hub Clients ___________________________________________________ 10
Organization of the Information Hub Web Interface ______________________ 10
3.9.1.
3.9.2.
3.9.3.
3.9.4.
3.9.5.
Home Page______________________________________________________________ 11
Search Page _____________________________________________________________ 11
Category Page ___________________________________________________________ 11
Title Page_______________________________________________________________ 11
Software Page ___________________________________________________________ 11
3.10.
Look Back Upon the Information Hub Project ___________________________ 11
3.11.
Evaluation of the Planned Requirements ________________________________ 14
3.12.
Evaluation of the Greenstone Software__________________________________ 15
3.13.
Recommendations to Next ICT Teams __________________________________ 17
3.13.1.
3.13.2.
3.13.3.
3.13.4.
3.13.5.
3.13.6.
3.13.7.
Maintaining Consistency ________________________________________________ 17
Digital Communication System ___________________________________________ 18
Obtain Greenstone Source Code ___________________________________________ 18
Evaluating, Improving and Extending ______________________________________ 18
New Server System_____________________________________________________ 19
Internet Connectivity ___________________________________________________ 19
Extension / Improvement of Documentation and Guides ________________________ 19
VIII
3.13.8.
3.13.9.
3.13.10.
3.13.11.
3.13.12.
3.13.13.
3.13.14.
4.
Education of the ICT Employees __________________________________________ 19
Network _____________________________________________________________ 20
Backup ______________________________________________________________ 20
Power Supply _________________________________________________________ 20
Second Hand Hardware _________________________________________________ 21
Information Hub Promotion ______________________________________________ 21
General ______________________________________________________________ 21
School Project (Project 2)___________________________________________ 21
4.1.
Educational System__________________________________________________ 22
4.2.
Gerar Springs Academy, Mutitu _______________________________________ 23
4.2.1.
4.2.2.
4.2.3.
4.2.4.
4.2.5.
4.3.
4.3.1.
4.3.2.
4.3.3.
4.3.4.
4.3.5.
Introduction _____________________________________________________________ 23
Environment ____________________________________________________________ 24
Teaching _______________________________________________________________ 24
Computer Systems________________________________________________________ 25
Recommendations ________________________________________________________ 25
Mulango youth Polytechnic ___________________________________________ 25
Introduction _____________________________________________________________ 25
Environment ____________________________________________________________ 26
Teaching _______________________________________________________________ 26
Computer Systems________________________________________________________ 26
Recommendations ________________________________________________________ 26
4.4.
General Recommendations ___________________________________________ 27
5.
Recommendations to SASOL__________________________________________ 29
5.1.
5.2.
5.3.
6.
Information Hub Project ___________________________________________________ 29
School Project ___________________________________________________________ 30
General ________________________________________________________________ 30
Recommendations to Ex-change _______________________________________ 30
7.
Personal Conclusion _______________________________________________ 31
8.
Bibliography _____________________________________________________ 33
9.
List of Appendices_________________________________________________ 34
IX
1.
Introduction
During this internship, two projects have been worked on: the School Project and
the Information Hub Project.
During the first weeks, two schools have been visited as part of the School
Project. The school project, although started at first, is described after the
Information Hub Project as the Information Hub Project was the main project of
the internship.
Before describing the projects, the involved organizations are described first in
Chapter 2. Chapter 3 then describes the implementation of the Information Hub,
together with recommendations for future ICT teams on how to improve and/or
extend the Information Hub. Chapter 4 describes the School Project; a small
report with a description about the current situation of two visited schools can be
found here and also recommendations for next ICT teams are given.
Chapter 5 gives some general recommendations on the field of ICT to SASOL,
chapter 6 does the same but then for Ex-change. After that, the report concludes
with a personal conclusion found in chapter 7.
The report is also accompanied with a large set of appendices. The contents of
the appendices can be found under chapter 9.
2.
Involved Organizations
Three organizations are involved in this internship:
• SASOL Foundation
• Ex-change
• Noordelijke Hogeschool Leeuwarden
2.1.
SASOL Foundation
The SASOL Foundation, located in Kitui town, Kenya, and active in the entire
Kitui district, has been founded in 1992. SASOL stands for Sahelian Solutions
and operates in arid and semi-arid areas (Sahelian is an Arabic word for arid and
semi-arid). SASOL is an NGO (Non Government Organization) and was initially
involved in the process of food distribution during the food shortage in Kenya and
Somalia back in 1992.
Quickly, SASOL moved to water management; the creation of sand dams and
water points was the basic mission of SASOL during that time and this is still the
core task SASOL is dealing with nowadays. But, during the last few years,
SASOL broadens the field it is working on; improvements on the field of energy,
ICT and agriculture do now belong to SASOL’s mission plan as well.
The goal of SASOL is to assist in the development of the arid and semi-arid
areas. The philosophy of SASOL in this is that the local community has to
develop the area by themselves. Therefore, education and the exchange of
information are part of SASOLs’ philosophy. At the moment, it happens too often
1
that developing organizations uses their own knowledge to solve specific
problems in a developing country. This manner is sufficient enough to solve the
problem but not to keep the situation up as the knowledge is gone at the time the
organization has finished work. SASOL tries to establish a long-term solution by
educating the local community as a proper education is one of the foundations
for the development of a country.
2.2.
Ex-change
Ex-change, located in Hilversum, the Netherlands, is a partner organization of
SASOL. The philosophy of Ex-change is, just like that of SASOL, to educate the
community of a developing country. Ex-change tries to accomplish this by
sharing the knowledge of Dutch students with the knowledge of students from a
developing country (the ex-change of knowledge).
Ex-change gives Dutch students the opportunity to take their internship in a
developing country. The actual internship takes place at one of Ex-change’s
partner organizations, like SASOL is in Kenya. Other partner organizations are
located in Ghana and Malawi.
Ex-change supports their partner organizations by coordinating the projects from
the Netherlands and supporting them financially with money acquired from
sponsorships and gifts.
2.3.
Noordelijke Hogeschool Leeuwarden
The Noordelijke Hogeschool Leeuwarden is a University for professional
education located in Leeuwarden, the Netherlands. The internship described in
this report is carried out for the division of Information Technology.
Information Technology is far from developed in a country like Kenya and
therefore an internship in such a country will completely differ with an internship
in the Netherlands. But, as the University always encourages their students to
gain international experience during their study and a lot of other factors play a
factor during an internship like this, the University supports the idea of the
internship.
3.
Information Hub (Project 1)
The Information Hub will be part of the future Information Center of SASOL. A
short description about the Information Center will be given first.
3.1.
Information Center
SASOL has plans to setup an Information Center in which both the employees of
SASOL and the local community can gather and share information. The
availability of reliable information is very import for a country in development as
knowledge is the foundation for development. People like farmers, health
employees, constructors of water dams etc. should have access to the
2
Information Center to acquire the knowledge they need to know to perform or
improve their work.
The Information Center is planned to be realized within the coming 5 years.
Because this project is planned for the long-term the exact detail are still a little
bit vague. Though, some parts which are needed for the future Information
Center are already known and the implementation of these can be started right
now.
3.2.
Information Hub
The Information Hub will be one of the major parts which will be needed for the
Information Center. The Information Hub has to be the ICT infrastructure of the
Information Center.
Spreading information is the main goal of the Information Center and ICT is an
indispensable means for this. Therefore, a reliable ICT infrastructure is an
important factor that has to be implemented.
3.2.1.
Pilot Version
The Information Hub will be implemented far before the Information Center is a
fact. The plan is to first start with what is called a pilot version of the Information
Hub. The pilot version of the Information Hub is intended only for the employees
working at SASOL to support them in their work by providing them with important
documents with useful information. Actually, the pilot version is just a digital
library of informational documents.
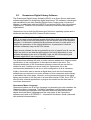
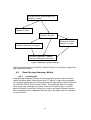
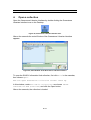
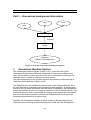
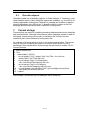
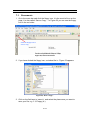
Information Center
Physical
Library
Education (on
different
disciplines)
Information Hub
Digital Library
(Setup using the
Greenstone software as a
pilot of the Information Hub)
CMS
Internet
Connectivity
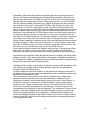
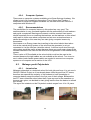
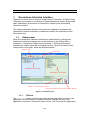
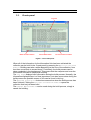
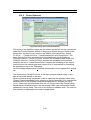
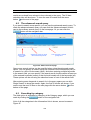
Figure 1. Information Center overview
Figure 1 gives a very rough overview of what the Information Center should look
like in a few years. As can be seen in the figure, the Information Center will be
formed by several different components. Most of these components are only
planned very globally, but the part indicated in red is already considered and
prepared in a more detailed way, and that is what the project described in this
3
document goes about: setting up a Digital Library as part of the future Information
Center.
It has to be mentioned that the term Information Hub and Digital Library are
currently used as one and the same. When looking at the Information Center
overview in the figure above one can see that these terms are actually two
different concepts. But, within the SASOL office, the term Information Hub is
more commonly used than the term Digital Library. This, together with the fact
that the Digital Library will be the only component for the pilot version of the
Information Hub and that it will be the core component of the Information Hub
hereafter, makes that both terms for the pilot version will be used for what
represents the red component in the figure above: the Digital Library.
3.3.
Requirements for the Information Hub
A complete research1 about the requirements of the Information Hub is already
done by a previous student. The research exposed that the following
requirements for the Information Hub are needed:
1.
2.
3.
4.
5.
6.
7.
8.
Digital library
Search function, also by means of categorization
Reference to hard copy sources
Multi-user system
Internet connection
Discussion Forum
Authorization
Printing function
The next sections summarize these requirements. The complete analysis made
before the start of the project can be found in APPENDIX A – Information Hub
Analysis.
Digital Library
The Digital Library is the major component of the Information Hub. Digital
documents, in the form of Word or PDF documents, have to be accessible from a
centralized location. The documents which are placed in the Digital Library
should support the employees of SASOL in their work and can be like:
•
•
•
•
•
•
•
1
Old students reports
General reports
Planning schemes
Work plans
Relevant articles
Digital books
Course material
De Informatie Hub, Meryem Touzani, 12 jan 2006
4
•
Project documentation
Search function
The Digital Library should be searchable, both by searching on keywords and by
browsing trough categories. Searching trough the categories allows the end-user
to lookup multiple documents about a specific category. Categories can be like:
•
•
•
•
•
•
Agriculture
Energy
Hydrology
ICT
Lab Technology
Pump Technology
Categories can always be added and removed from the Digital Library,
depending on the documents supplied. Categories can also contain
subcategories to further specify a category.
Reference to hard copy sources
Hard copy documents will be part of the Information Center and should be
referenced from the Information Hub. A summary about the content of a hard
copy document should be placed on the Information Hub, together with the
physical location in the Information Center where the document can be found.
Multi-user system
The Information Hub should be accessible by multiple users at the same time
and should be setup according a client-server structure, so that it can be
accessed over an internal network or the Internet.
Internet connection
The Information Hub should be connected to the Internet. At first, it is not realistic
to use the Internet connection for making the Information Hub accessible from
the Internet, as local hosting at the SASOL office is impossible with the low
budget and the primitive ICT environment.
The Internet connection should purely be used for looking up information and for
improving the connectivity and consequently the communication with the
Netherlands.
Discussion forum
A discussion forum should be setup to let the different teams from the
Netherlands communicate with each other during the preparation phase of their
internship. The weight of this point seems to be of less importance at the moment
as Ex-change, the Dutch partner organization of SASOL, recently setup an own
discussion forum which can be accessed from the Internet.
Authorization
5
One or more system administrator(s) has to be assigned for maintaining the
Information Hub. Only an administrator should be able to add new information to
the Information Hub to preserve consistency.
Printing function
There should be a possibility to print the information that can be found on the
Information Hub. This point is a little bit problematic as printing is very expensive
for an NGO working with a small budget.
3.4.
Type of Documents
Most of the documents that will be placed in the Digital Library of the Information
Hub are PDF documents. Documents supplied in the Microsoft Word format will
be converted to PDF format before they are placed in the Digital Library as the
PDF format is more user-friendly to read.
Besides PDF documents, other documents can be found in the Digital Library.
Images, Excel spreadsheets, but also executables for different tools, like Adobe
Acrobat, Excel viewers, etc., will be placed in the Digital Library.
3.5.
Standard Software or Custom-Made Software
A decision had to be made if either standard software or custom-made software
is the best solution to be used for the Information Hub. When setting up a similar
system in a developed country, instead of in a developing country like Kenya, the
choice would most likely be to use custom-made software. Custom-made
software can be developed exactly the way the customer wants and can
therefore fulfill the specific requirements, no more and no less. Besides this,
setting up a digital library system for the Information Hub would not be a very
complex project and hence it can be done with a relative small budget and within
a limited amount of time.
But, the circumstances in a developing country are completely different than they
are in a developed country. There is no ICT infrastructure at all, or at least it is
very limited, what makes software development hardly impossible. The lack of
the right tools but mainly the lack of an Internet connection is the major factor in
this.
It is right that one can say to develop custom-made software for the Information
Hub back in the Netherlands and to ship the software to Kenya as soon as it is
finished. If the budget is available and the communication between SASOL and
the Netherlands is fine this can certainly be a solution. Unfortunately, as SASOL
is an NGO, the budget is very small and the communication between SASOL and
the Netherlands is problematic as well. Developing a digital library system can be
done as an internship project from the Netherlands by a student to keep the
costs low, but finally the system has to be implemented at the SASOL office in
Kitui, Kenya. It is not unlikely that, after implementing the system, changes have
to be made to the system because bugs arise, the requirements of the end-users
are not fully implemented or end-users get new ideas to be implemented. These
factors, in combination with the limited communication means and primitive
6
situation to deal with, can make the creation of the system a sloping and endless
process.
When choosing standard software the development of the system is more or less
the responsibility of a team of software developers who can focus entirely on the
development of a stable software program. The implementation and
customization of the already available software can be done locally at the SASOL
office which should not be too problematic if the minimum requirements, like
proper hardware, are available and the software is shipped with thorough
documentation.
The drawback of using standard software is that it is normally written for general
purposes; it has to be used for as much goals as possible which makes the
usability of the software sometimes more complex than necessary because the
software contains a lot of features and ways for customizing the software, much
more in fact than is needed for one specific goal. Due to the fact that a digital
library is not a very complicated system this should not be a very big issue; a
digital library is just a collection of digital documents and there are not many
different ways to represent these. After that, customizing the digital library is for
an NGO like SASOL not the point with the highest priority. In fact this point has a
very low priority. The most important point of the system is to supply end-users
with the right information.
Compared to custom made software, maintaining the system may be a little bit
more difficult when using standard software, as the software is built for general
use and a lot of extra functionality (and complexity) may be available for the
maintainer. But this can be compensated by making thorough documentation for
the system specific to the organization and specific to the way it should be used
inside the organization.
Another factor to consider is the durability of the software to be used. Custommade software, when developed with a low budget (e.g. during an internship
project), can be very difficult to maintain (as seen from the software engineering
viewpoint). For example, suppose that the system is running for a few months
and then an important bug shows up in the software, which is developed during
an internship project. The developer is most likely not being able to fix the bug
anymore as the internship is already over. When fortunate there is a subsequent
student on an ICT internship that can look at the problem, but even then it is
likely that serious bugs cannot be fixed or necessary extensions cannot be made
to the software. When working with standard software, a team of software
developers can take care of bug fixes and extensions which ensures the
continuality of the software and at the same time that of the Information Hub.
These points, together with the research about the Information Hub showed
Greenstone to be the best solution for the Information Hub.
7
3.6.
Greenstone Digital Library Software
The Greenstone Digital Library Software (GDLS) is an Open Source web based
software application for distributing digital documents. The software is developed
and maintained by the New Zealand Digital Library Project at the University of
Waikato, in relationship with the UNESCO and several NGO’s (Non Government
Organization). Therefore, the software is commonly used within development
organizations.
Greenstone runs on both the Windows and Unix/Linux operating system and is
distributed according the GNU General Public License.
GNU General Public License (GPL)
GPL is an open source software license which claims that and end-user of the
software is free to look into and modify or use the source code of the software
program. It is allowed to redistribute the software and even to make profit on it
without the permission of the original distributor. A prerequisite is that the
software constantly stays on the GPL license.
Open source software can be very powerful as a lot of people from all over the
world can work on one and the same project. Not being dependent on one
software developer gives a lot of flexibility; bugs can be solved quickly and
software applications can completely be customized.
The Greenstone software will work on most common webservers. However some
modifications to the configuration of the webserver have to be done. The
Windows distribution of the Greenstone software comes with an own built-in
webserver and, if setting up a server solely for Greenstone, this is the
recommended webserver to use as no extra configuration at all is necessary.
Initially, clients who want to access a digital library built with the Greenstone
software are not required to run extra software on their computers as the library
is accessible like a web page. However, as the documents stored in the digital
library are provided to the end-user in a form different than HTML, like in PDF or
Word format, external applications or plugins are needed on the client side to
view these documents.
Greenstone Macro Language
Greenstone makes use of an own language for generating the user interface: the
Greenstone Macro Language. The Macro Language is an abstraction above
HTML and eases modifying the user interface. More and also the technical
details about the Macro Language and the other parts of the Greenstone
software can found in APPENDIX C – Information Hub Admin Guide (advanced,
with technical documentation).
8
3.7.
Problems and Limitations
Problems in realizing the Information Hub will mainly be caused by the limited
ICT infrastructure, but also the small budget and limited hardware available for
the Information Hub plays a factor. The lack of a reliable Internet connection
slows down the realization of the project dramatically as it limits the information
feed, which is a must for software engineering nowadays due to the complexity of
the profession. But also for downloading specific software components, required
for the Information Hub, is a reliable Internet connection indispensable.
Looking up information is possible on a very limited scale; the only Internet
connection available in the neighborhood of the SASOL office is at the post office
in town. Unfortunately, the Internet speed is very slow, which makes it difficult to
find the proper information.
Downloading software is completely impossible as the post office does not allow
their customers to use floppy disks or USB sticks to be connected to the Internet
computers. The most nearby place for downloading software is Nairobi.
3.8.
Information Hub Infrastructure
Currently, a server and a client system are being used for the Information Hub.
The benefit of the Information Hub will show up only when all of the computers
inside the SASOL office have access to the Information Hub server.
Unfortunately, at the time of writing, no network devices are available. Network
devices are expensive to buy in Kenya and are only sold in Nairobi. Due to the
high price and the limited availability of these devices, buying them (second)
hand in the Netherlands would maybe be a better solution. Chapter 3.13.12,
Second Hand Hardware, discusses this subject in more detail.
As a temporarily solution, the Information Hub will be placed on a CD-ROM and
spread trough the SASOL office. A drawback now is that the contents are static;
no new information can be placed on the Information Hub CD-ROM version
without making new CD-ROM copies. But, working this way, the Information Hub
is at least more accessible than working with only one single client system. Still,
the most up-to-date version of the Information Hub is always accessible from the
single client system at the SASOL office.
3.8.1.
Information Hub Server
The system used as Information Hub server is a Pentium III 866MHz with 128MB
of memory and a hard drive capacity of 20GB. The system is a little bit low-end
compared to the functionality it is used for, especially when looking at the hard
drive capacity as a lot of documents will be stored in the library and the used disk
space will increase very quickly. For the initial pilot version however, the systems
can be used without too much problems as the pilot version will be used only on
a small scale. As soon as the pilot version is a success plans can be made for
the purchase of a new, more powerful system.
9
The Information Hub server is located in the ICT room of the SASOL office as
this is the place with the most power supplies. The ICT room is also centrally
placed inside the office which makes it a suitable place in the office when client
systems, located elsewhere in the office, have to be connected to the server
system.
Server system specifications:
Processor
P3 866MHz
Memory
128MB
OS
WinXP
Hard drive
20GB
IP-address
192.168.0.1
Workgroup
SASOL
Computer name Lion
3.8.2.
Information Hub Clients
Clients can be added to the Information Hub without too much effort; the
Information Hub software (Greenstone) can be accessed like a web page and
therefore the only requirement for the client systems is that they are equipped
with a network interface card and up-to-date browsing software.
One client system is placed at the ICT room to prevent that the Information Hub
server is used for both server and client. It is important to keep the server as a
server system only to minimize the chances of troubles with this system.
Client system specifications:
Processor
Celeron 633MHz
Memory
128MB
OS
WinXP
Hard drive
10GB
IP-address
192.168.0.2
Workgroup
SASOL
Computer name Client1
3.9.
Organization of the Information Hub Web Interface
The organization of the Information Hub web interface is plain and simple. The
interface consists of five main components:
•
•
•
•
•
Home Page
Search Page
Category Page
Title Page
Software Page
10
3.9.1.
Home Page
The Home Page is the page the end-user enters on when opening the
Information Hub on the client-side. The Home Page gives a short description
about the Information Hub and contains a search module in which simple
searches can be made. More advanced searches can be made on the Search
Page.
3.9.2.
Search Page
The search page allows the end-user to make more advanced searches. The
end-user can choose what to search for, e.g. text from the contents of the
documents or for titles of the documents. Also options like to search for all of the
keywords entered (AND) or to search for some of them (OR) can be specified
here.
3.9.3.
Category Page
The Category Page allows the end-user to browse trough the different categories
of the Digital Library.
3.9.4.
Title Page
The Title Page displays all of the documents from the digital library, ordered
alphabetically and in a structured way (documents are filtered per character).
3.9.5.
Software Page
The Software Page contains useful software applications and tools, like Adobe
Acrobat that are available for download.
3.10. Look Back Upon the Information Hub Project
When looking back at the realization of the Information Hub, a lot of work has
been done, now and then with some frustrations but the final result is at least
positive.
It all began with acquiring the right software to be used for the Information Hub.
The Greenstone research report recommended to use the Greenstone software
for the Information Hub, as this software meets the requirements of SASOL. The
Greenstone software can be downloaded from the Internet but, as downloading
the software in Kitui town is impossible, the software had to be downloaded from
Nairobi (where SASOL has a contact person on ICT), placed on CD-ROM and
sent to Kitui town. At first, this seemed to be the fastest solution, but after all it
took almost two weeks before the software arrived. First, there was a problem
with downloading the software, so an alternative software application (Fedora)
was downloaded and sent. Unfortunately, the software didn’t work at all because
the files on the CD-ROM were corrupted. Besides this, it was more logical to use
the Greenstone software as a complete research had been done about the
Information Hub and this software appeared to be the most appropriate one to be
used.
11
Fortunately, after a few days and some phone calls with the contact person in
Nairobi, the Greenstone software was downloaded successfully. Now the only
step left was sending the CD-ROM from Nairobi to Kitui town. This looks like an
easy task but this is where the African culture plays his part. The first CD-ROM,
with the Fedora software, was taken by a SASOL employee who was traveling
from Nairobi to Kitui town. The second CD-ROM, with Greenstone, had to be
sent by post, but the ICT contact person was very busy at that time and every
day he forgot to send the CD-ROM. Almost everyday phone calls with the contact
person in Nairobi were made to ask if the CD-ROM already had been sent and
everyday it was said that the CD-ROM will be send out tonight and should arrive
the next day. But, as Africans are normally not very strict on appointments, the
next day no CD-ROM had arrived. This situation lasted for more than a week and
in the mean time some side work has been done: installing computers for the
School Project, repairing computers at the office, and making some reports about
the School Project. Finally, during a call with the ICT contact person it was said
that the CD-ROM was sent per courier and that it would arrive the next day. This
time it was for true, because the next day the CD-ROM arrived!
It took really a long time before the software finally arrived. A learning point from
this is that it is better to not rely too much on other people here; traveling to
Nairobi by and acquiring the software from there yourself would be much faster.
Now that the right software finally arrived the process of learning the Greenstone
software started. It took around one week to thoroughly understand the basics of
the Greenstone software. Reading the documentation and experimenting with the
software was the major task during this week.
Hereafter a first concept of what will form the pilot version of the Information Hub
was created; just a plain simple website interface that gives the possibility to
browse through the Digital Library.
A small uneasiness about the creation of the hierarchical category structure for
the Digital Library was found what later appeared to be an outdated problem and
caused some unnecessary work.
The reason that it at first was not clear that the problem was outdated was
caused by the fact that the most recent documentation, shipped with the
Greenstone software, was still describing a previous version of the software. In
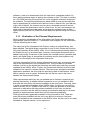
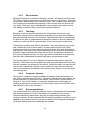
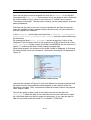
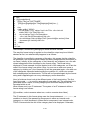
the earlier versions of Greenstone, the way categories were created was by
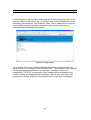
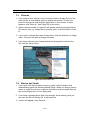
using a text file. Figure 2 shows a part of what such a text file could look like.
Every line in this text file represents a (sub)category. The first string of a line
corresponds to the identifier of the (sub)category. The subsequent number is the
position of the (sub)category in the hierarchical category structure and the last
string is the display name of the (sub)category. When a file was added to the
library, a metatag (described in the Admin Guides) could then be used to refer to
a specific identifier; the file was then being added at the accompanying position
in the category structure.
12
"Water & Water Management" 1 "Water & Water Management"
"Hydrology" 2 "Hydrology"
"Agriculture" 3 "Agriculture"
"Healthcare" 4 "Healthcare"
"Energy" 5 "Energy"
"ICT" 6 "ICT"
"ICT_TEAM44ICT" 6.1 "Team 44 ICT"
Figure 2 - content of categories.txt
Editing text files is not a user-friendly task and therefore the decision was made
to create a small Java application that forms a graphical user interface for editing
this text file.
The small application was in the middle of development when it became clear, by
accident, that the new version of the Greenstone software had an alternative
(also in a graphical way) for creating the categories. Therefore, the just created
Java application was now useless. Fortunately, it was just a small application so
it didn’t grab too much time of the project.
After this, the work could continue on setting up a basic version of the
Information Hub. At the same time the default layout of the Greenstone software
was completely modified; a new SASOL logo has been created, new buttons
were made, the organization of the web interface layout has been changed and
some minor changes to the functionality have been made.
When the basic pilot version was realized, the first user guides and some
checklists that describe how to maintain the Information Hub and how to add new
files were made. Using these guides, SASOL’s ICT employee had been taught
about the Information Hub. The teaching process was mostly just a ‘learn by
doing’ process; most of the time, when new files were added to the Information
Hub, the ICT worker at SASOL did it by herself using the guides so that she
became known how to work with the Information Hub.
The final phase of setting up the pilot version of the Information Hub consisted of
working on the smaller points for improving the Information Hub and continuing
with writing guides and other documentation. It has also been tried to realize a
local network at the SASOL office so that all of the computer systems could have
access to the Information Hub. Unfortunately, this point did not succeed. It
appeared that the cost of newly bought network devices is very high, even higher
than in the Netherlands. Therefore, it would maybe be a better idea to buy
second hand devices from the Netherlands and let them ship to Kitui.
As a temporarily solution, to give multiple systems at the SASOL office access to
the Information Hub, multiple CD-ROMs has been created, at which a copy of the
Information Hub is found. This way, the Information Hub can be spread trough
the office.
Copying a collection on CD-ROM can be done using a functionality of the
Greenstone software. But, this functionality is not part of the default Greenstone
13
software; it has to be downloaded from the Internet as a separate module. So,
there was the problem again of getting the software to Kitui. This time no waiting
on a CD-ROM send by post anymore but a visit to Nairobi instead to download
the software. The required download was about 20MB in size and normally this
can be downloaded in a relative short period of time in Nairobi. But, just that day
of the visit to Nairobi, the Internet was very slow; download speeds of around
2kB/sec caused the download to last for a few hours. So, as a consequence an
extra night in Nairobi has to be made, but at least the software came to Kitui
relative quickly and the CD-ROMs could be made and spread trough the SASOL
office!
3.11. Evaluation of the Planned Requirements
When comparing the situation of the Information Hub Project with the planned
requirements (see APPENDIX A – Information Hub Analysis) for the Information
Hub the following can be said:
The major part of the Information Hub Project, setting up a digital library, has
been reached. The digital library component is now in such a state that it can be
fully used internally at the SASOL office. A lot of documents are already added to
the Digital Library in a structured way; however, more digital documents will be
added continuously. Extension of the system with multiple clients is possible and
easily; the digital library is accessible as a website and so client systems only
have to be connected to the Information Hub server.
Using the Information Hub for storing references to hard-copy sources was also
one of the requirements of the Information Hub. This point has not yet been
realized, just due to the simple fact that there are hardly any hard-copy sources
available at the SASOL office. Further, the Greenstone software is not the ideal
software to be used for a system like this. There are more specialized software
applications available, the ones that are also being used in real libraries, which
can be used for such a system. Software like this can be used in the future,
besides the Greenstone software.
Other requirements which are not yet reached are an Internet connection and
printing functionality. A reliable Internet connection is not yet available in Kitui
town and will most likely not become available in the near future. Currently, there
is a dial-up connection available at the SASOL office, but this one can only be
used for e-mail. An ICT student of the next ICT team has planned to do a small
research on alternative dial-up providers available in Kitui town, so that an
Internet connection can be used for looking up information and that it is at least
possible to download some small files from the Internet sporadically.
Printing functionality appeared unrealistic for the Information Hub. There are
some old printers available but the ink is very difficult to acquire. One laser
printer is available at the secretariat of the SASOL office, but this one is not really
intended for frequent use as it is too expensive.
14
The implementation of a discussion forum had a low priority and it was already
unlikely to implement a discussion forum for the pilot version of the Information
Hub. Though, in the future a discussion forum, or some kind of messaging
system, can be implemented as part of the Information Hub. Chapter 3.13.2,
Digital Communication System, gives more details about how this could possibly
be implemented.
At the start of the project some documentation that has to be made was planned
as well. Most of the time was spend on the creation of the user and
administration documentation and the Information Hub final report, which is a
subset of this report. During the realization of the project it became clear that a
lot of attention has to be spent on the creation of proper documentation, not only
for maintaining the Information Hub but also for the end-users who will use the
Information Hub in the future. The final report will contain a lot of information
about the current situation of the Information Hub, together with
recommendations about what has to be done and what can be improved on the
Information Hub. An evaluation report is now integrated with this final report
because both reports are more or less related.
A document about the backup possibilities was also planned, but it appeared
quickly that the purchase of proper backup facilities will be difficult, mainly
because of the high costs but also because the availability of proper backup
devices, like tape drives, are difficult to acquire.
The plan for now is to temporarily backup the contents of the Information Hub to
a computer connected to the server system over the network. A checklist, which
describes the backup procedures, has been made for this and can be found in
the advanced Admin Guide. The best way, to improve the backup facility in the
future is to buy the devices in the Netherlands, maybe second hand, and ship
them to Kenya. Chapter 3.13.12, Second Hand Hardware describes this solution
in more detail.
3.12. Evaluation of the Greenstone Software
Documentation
The Greenstone software is shipped with some basic documentation. These
documents are most useful: the ‘Greenstone Digital Library Developer’s Guide’,
‘Greenstone Digital Library User’s Guide’ and the ‘Greenstone Digital Library
Inside Greenstone Collections Guide’. The documents can be useful to start with
when learning the basic parts of Greenstone. A drawback of the documentation
is that it stays at the basics more or less. The developers guide contains a more
advanced part about the Greenstone Runtime Environment, which can be useful
for modifying the source code.
What is missing in the documentation is some kind of API (Application
Programming Interface) description which describes Greenstone’s Macro
Language in more detail.
15
Also, a lot of documentation is not up-to-date anymore as the software version of
the Greenstone software is newer than the version described in the
documentation. Normally, this shouldn’t be a very big problem as most of the
functionality stays the same, but on some points, as experienced during this
project, things are changed in such a way that up-to-date documentation is
indispensable.
Layout modification
The Greenstone macro language is used for modifying the layout of a
Greenstone Library. In the beginning it takes some time to understand the
functionality of the macro language, but reading the accompanied documentation
together with examining the existing macro files is a good way to become familiar
with it. Despite the fact that the macro language makes it very easy to modify the
major part of the layout it can be a little bit tough to work with now and then,
especially when some of the less general layout parts have to be modified. The
macros, created using the macro language, are spread trough several files and
because every macro represents a specific part of the layout it can be difficult
sometimes to find where such a specific layout part can be found. Especially
about the less commonly used macros, but even about general macros, no or
less documentation can be found. This is a real drawback when fully customizing
a collection’s interface.
General maintenance
The general maintenance (like adding/removing files, changing descriptions etc.)
of a Greenstone collection is done using an application called the ‘Greenstone
Librarian Interface’. Behind the scenes, the complete Greenstone collection is
generated using a large amount of Perl scripts. The Librarian Interface eliminates
these scripts to the maintainer which makes maintaining a Greenstone collection
much easier and less error-prone.
Conclusion
Generally said, the Greenstone software is a powerful piece of software for
maintaining large amounts of information. For an end-user it is, thanks to the
powerful way of indexing document keywords and the categorization function,
easy to find information. Extension of a library set up using the Greenstone
software shouldn’t be an issue; a small library of a few hundred megabytes can
easily grow out to a very large library containing gigabytes of information,
provided that a consequent way of maintenance is being used.
The consequent maintenance is maybe one of the weaker points of the
Greenstone software. Of course, working with large digital libraries always
requires a very consequent way of working but in Greenstone it could have been
easier on some points. E.g. the way categories are assigned to imported files
makes it sometimes a little bit difficult for the maintainer to oversee to which
category a file belongs because, behind the scenes (in the Librarian Interface, it
is not possible to lookup the files belonging to a specific category. The maintainer
has to maintain the imported files in a separate folder structure, for which it is the
16
best to let this folder structure match with the actual category structure of the
library, so that a file in a specific category (as seen from the end-user’s point of
view) is easier to find back behind the scenes (as seen from the maintainer’s
point of view).
That the imported files are completely separated from the actual library contents
is also a drawback oneself: the files are stored on the server twice and it requires
the consequent work approach as described above. After all, when taking the
consequent way of working in mind, maintenance of the information is relatively
easy.
The pros and cons of the Greenstone software summarized:
Positive
-
Powerful search indexes
Scalable
Macro language eases layout management
Relative ease of maintenance (when working consistent)
Negative
- High amount of consistency is required
- Import directory is separated from actual library. As a result files are
stored twice and an extra consequent way of maintenance is required
- Specific macros are not always easy to find, mainly caused due to the
limited documentation found about the macro language.
- Documentation is too global
3.13. Recommendations to Next ICT Teams
The pilot version of the Information Hub is a fact; the system is up and running
and can be used as a digital library.
Though, as the Information Hub Project is part of a long-term plan and especially
because the project is still in a pilot phase, a lot of work can be done to improve
the system.
3.13.1. Maintaining Consistency
First of all it is very important that a lot of maintenance will be done on the
Information Hub. Maintaining large amounts of information is not an easy task; it
is very easy to mess things up when not maintained correctly. It would be a good
practice to browse once or twice a week trough some random categories of the
digital library to check that the documents are placed under the right category,
the right titles and descriptions are given etc. Also, for the end-users it should be
made clear that they mention inconsistencies of the digital library immediately to
the ICT staff. An internal digital communication system would be very useful to
support in this.
17
3.13.2. Digital Communication System
It would be good to equip the Information Hub with a digital communication
system. This can be in the form of a digital forum at which the SASOL employees
can leave messages, but at least it is important that the employees can address
the ICT staff so that they can immediately make note of any inconsistency, a
request for the placement of a document, or anything else an end-user would like
to mention the ICT staff of. Some kind of internal mailing system should be
realized for this.
3.13.3. Obtain Greenstone Source Code
To fully customize the Greenstone software, it is necessary that the source code
of the Greenstone Runtime System becomes available at the SASOL office. Most
of the customization of the layout can be done outside of the source code but
especially for customizing the functionality of the software, the source code is
needed.
The source code of the Librarian Interface has to be obtained as well. The digital
library is maintained using the Librarian Interface and can be completely
customized to the conventions used for the Information Hub by making very
simple modifications to the source code. E.g. as a convention, assigning a
category metadata to a document has to be done completely in uppercase. This
has to do with the sorting mechanism of the categories as sorting happens case
sensitive. Currently, the administrator has to take care that the category is filled
uppercase but this can be solved by modifying the source code in a way that all
of the entered characters are converted to uppercase automatically.
The source code of the Greenstone Runtime System is written in the C++
language (using the Standard Template Library), so a C++ compiler, or even a
complete IDE for developing C++ applications is necessary as well.
The source code for the Librarian Interface is written in the Java language, so
Java development tools are needed as well.
3.13.4. Evaluating, Improving and Extending
Evaluation of the Information Hub is very important to make the project a
success. At the moment the Information Hub is still in a very early stadium and
as soon as the system will be launched for official use at the SASOL office, a lot
of evaluation on the functionality of the Information Hub has to be done. Weak
points of the Information Hub will become clear as soon as the end-users start
working with the system and also new ideas or changes for the Information Hub
will be made by the end-users. Therefore, it is important to carefully listen to the
wishes and complains of the end-users. Problematic points should be evaluated
and solved as soon as possible.
After the Information Hub is in use for two months, an evaluation report should be
made in which the feedback of the end-users together with the problematic points
and general points for improvement are reported. Hereafter, evaluation reports
should be made on a regular base.
18
Based on the evaluation reports, the Information Hub should be improved and
extended.
Take in mind that the Greenstone software, although very powerful, is
specialized software. The Greenstone software is intended for creating digital
libraries and even though it can be used for other goals it is not practical to do so
as it gives less flexibility. When extending the Information Hub further than the
Digital Library component, a choice had to be made if this can be done by using
the Greenstone software or that alternative software, or maybe even custommade software, has to be used.
3.13.5. New Server System
The system currently used as the Information Hub server is in fact not powerful
enough to act as a server, especially the hard drive capacity is a big concern.
The system is sufficient as long as the Information Hub is still a pilot, but a new
powerful system is really necessary in the near future. Unfortunately, a new
system doesn’t fit in the budget of SASOL most likely, so a new hard-drive with a
large capacity will be satisfactory at least.
3.13.6. Internet Connectivity
A connection to the Internet would be very useful for the Information Hub. At the
time of writing only dial-up connections are available in Kitui town and it is not
very likely that high speed Internet will become available in the near future.
As soon as high speed Internet becomes available research has to be done
about making the Information Hub accessible from the Internet. Most likely, it is
way too expensive and also not possible due to the limited ICT infrastructure to
host the ICT hub locally at the SASOL office. It would therefore be more likely to
use an external hosting provider for this.
3.13.7. Extension / Improvement of Documentation and Guides
Proper and up-top-date information is important. The current documentation
should therefore be improved on the points that are not completely clear yet.
When changes are made to the Information Hub, the documentation has to be
renewed immediately.
3.13.8. Education of the ICT Employees
It is also important that SASOL’s ICT employees know how to maintain the
Information Hub. The advanced maintenance, as described in the advanced
admin guide (Advanced maintenance of the Information Hub), is not necessary to
be done by the local employees, as the advanced maintenance is not very
frequent and can be done completely by ICT students from the Netherlands.
Though, maintaining the consistency and adding and removing information, as
described in the basic admin guide (Basic maintenance of the Information Hub)
has to be done by SASOL’s ICT employees completely in the future. Therefore,
19
next ICT teams should pay a lot of attention on the training of SASOL’s ICT
employees. This can be done by extensively making use of documentation but
also by giving practical training courses.
3.13.9. Network
The Information Hub will be much more useful when all of the computers inside
the SASOL office do have access to it. A small local network has to be setup for
this. As network devices are expensive and not easily available in Kenya, buying
them, possibly second hand (see 3.13.12, Second Hand Hardware) from the
Netherlands would be a better solution). Taking some tools, used for creating a
network, like cables, RJ-45 connectors, RJ-45 crimping tool for attaching the
connectors to the cables, etc. is also useful. Most of the systems at the SASOL
office are already equipped with a network interface card and some extra cards
can be found at the office. So the need of taking these is not necessary.
APPENDIX E – Network Cost Overview gives a rough overview of the expected
cost when buying the network devices in Nairobi.
Wireless Network
Besides setting up a network using wires, the realization of a wireless network
should definitely be considered. Costs are still higher than using a wired network
but buying the needed devices second hand could be reasonable.
The availability of a wireless network would really be convenient as it will not be
an easy task to lay cables throughout the SASOL office. In addition, laptops
could access the network all trough the SASOL office and the student house next
to the office could possibly have access to the network as well.
3.13.10. Backup
New information will be added to the Information Hub on a regular base, so it is
important that backups are made on a regular base as well. The best solution
would be to use a tape drive for the backup procedure but using a DVD burner
could also be a solution. Again, for the backup procedure, second hand hardware
bought from the Netherlands could also be used.
As backup is an important point but no means are yet available to comply a
proper backup procedure, a limited way of making backups is described in
APPENDIX D of the Advanced Admin Guide: Advanced maintenance of the
Information Hub.
3.13.11. Power Supply
Currently, a serious lack of power sockets exists at the ICT room of the SASOL
office. In fact, there is no power socket at all; the computers are supplied with
power by using a power extension cable. Due to the fast increase of electrical
devices in the ICT room, it is very important to improve the electrical
infrastructure in this room.
20
3.13.12. Second Hand Hardware
Extra computer and network devices are necessary for the Information Hub
Project. On a restricted scale, good quality devices can be found in Nairobi but
costs are rather high (prices are equal to those found in Europe). It would be
better to buy small devices, like switches, access points, etc. second hand in the
Netherlands; a new team that travels to Kitui can carry these devices as they
travel from the Netherlands to Kitui.
3.13.13. Information Hub Promotion
To make the Information Hub a success, it is important that it gets a lot of
attention. The employees and students working at SASOL should be noticed of
the existence of the Information Hub. They should be stimulated to provide the
ICT team with documents that could potentially be placed on the Information Hub
and they should make the team aware of any inconsistency found on the
Information Hub.
The Information Hub Project should be an interactive project, administered
by the ICT team but powered by the whole SASOL team!
3.13.14. General
To conclude, a general recommendation about the Information Hub can be given.
It is clear that a lot of work has to be done on the Information Hub. The idea is to
make the current form of the Information Hub part of a larger system. What now
is named ‘The Information Hub’ should be called something like ‘The Digital
Library of the Information Hub’ in the future; the digital library should be part of a
larger system with databases, forums, news etc. like the idea of a content
management system. The Greenstone software is not suitable to be used for a
system like this as it is too specific; the software is only intended to be used for
setting up a digital library. The digital library part should be linked from the
Information Hub system in the future.
4.
School Project (Project 2)
Nowadays, basic computer knowledge is very important. Almost everyone
looking for a job needs to have some basic understanding of how to work with a
computer. And not only for work one needs to know how to handle a computer,
just in general is it very useful when one can work with a computer. Just look at
the possibilities of the Internet, which are countless. But without the basic
knowledge of a computer it is not possible to make use of the Internet. In the
western world, almost everyone does have some basic computer knowledge,
especially the younger generation. Schools do have computer lessons in their
school program and almost every household owns a computer. However, in a
developing country like Kenya, things are completely different. Computers are
too expensive for most of the people here and most of the schools do not have
21
the availability of computers. As a result, too much people do not have the
change to acquire basic computer knowledge, which can really be a problem as
they are staying behind with the rest of the world. Therefore, SASOL started the
School Project. With the School Project, SASOL tries to give the younger
generation a chance to get known with computers. SASOL provides the schools
with computers and is responsible for teaching the teachers and students the
basics of computers.
The School Project started a few years ago. However, SASOL is not completely
satisfied with the way the School Project is carried out at the moment, mainly
because there is no good improvement in the level of computer knowledge at the
schools visited.
To improve this project, some recommendations are made, based on two visits to
schools and the general way the School Project is carried out.
This chapter will first describe some general information about the educational
system in Kenya. Next, some general information about the visits to the school is
given together with a recommendation per school. The chapter will conclude with
a general recommendation for improvement of the School Project. A new
structure for the School Project is planned, based on these recommendations.
The new structure is described in appendix APPENDIX F – New School
Structure
4.1.
Educational System
The educational system in Kenya is more or less comparable with that of the
Netherlands. The first official school one will start is the Primary School, which
lasts for 8 years. Children enter the school at the age of 6 and are normally
finished when they reach the age of 14. After Primary School one can go to
either a Polytechnic School (2 years) or a Secondary School (4 years). The
Secondary School has a higher level of education than the Polytechnic School,
which is more practically oriented. Normally, when not being qualified for
Secondary School, the alternative is to go to a Polytechnic School. A Polytechnic
School has less options for subsequent education; the ones that end-up at a
Polytechnic are normally very poor and do not have the performance for doing a
study on a higher level. Only after several years, when numerous certificates are
earned one has the option to pass to University, but this path is very rare to
follow.
When finished with Secondary School, either a Higher Level Polytechnic School
or College can be done or one can go directly to a University, which depends on
the qualifications met at Secondary School). At the University, one can go for
their Bachelor and/or Master degree. When not qualified for a University at
Secondary School one can go to University after finishing Higher Level
Polytechnic School or College.
22
Primary School (starts at age of 6)
Duration: 8 years
Polytechnic School
Duration: 2 years
Secondary School
Duration: 4 years
Higher Level
Polytechnic School
Duration: 3 years
College
Duration: differs per curriculum
University (Bachelor / Master)
Duration: differs per curriculum
Figure 3. Educational system in Kenya
The schools participating in SASOL’s School Project are all Primary, Polytechnic
and Secondary schools.
4.2.
Gerar Springs Academy, Mutitu
4.2.1.
Introduction
Gerar Springs Academy (Primary School) was a pilot project, both in that the
school has never been visited by previous ICT teams, so there was completely
no computer knowledge yet, but also because this was the first Primary School to
be visited by SASOL for the School Project. The pupils who had to be taught
were very young, starting from 6 years to around 14 years of age, so maybe
some of the pupils could be a little bit too young to be taught computer lessons.
But, as described later, it appeared that the age of the pupils was not a problem
for most of them.
23
4.2.2.
Environment
Gerar Springs Academy is located in Mutitu, around 75 kilometers on the east of
Kitui town. The facilities in Mutitu were very primitive; no electricity, no gas and
also much more dry and hot than Kitui Town. Despite this, the building of the
Primary School was very good. The building was also very new, only half a year
old, and the computer room was the best room in the building; it was the only
room with a concrete floor instead of a sand floor, as in the rest of the building.
There were even a lot of power sockets in the wall so they considered the use of
computers very well while building the school. Unfortunately, the generator to
supply the power sockets was not yet connected to the central wiring system of
the school, so the sockets could not be used yet to connect the computers. The
energy students, who traveled with us to support us couldn’t fix the problem right
at the place because they didn’t have the right tools with them to pull the wires
through the walls. As a temporarily solution we had to connect the generator
directly to the computers.
4.2.3.
Teaching
We only gave the upper classes theory lessons because it would be too difficult
for the lower classes. For almost all of the pupils it was the very first time to work
with the computer. Most of them had never seen a computer before and
therefore some were a little bit afraid to touch the mouse or the power button of
the computer, but after a few minutes they were not even slightly afraid anymore:
very enthusiastic and they didn’t want to stop ‘playing’ with the computer.
Because of their enthusiasm most of the pupils were learning very fast. Only the
very young ones were having some difficulties sometimes because they were a
little bit too young to understand what they were doing, but they really liked the
more simple things like painting.
The handling of the mouse was in the beginning the most difficult for the pupils
but by learning them to paint on the computer they learned how to handle the
mouse quickly.
We also taught the teachers, in almost the same way as teaching the pupils, as
most of the teachers also had never worked with a computer before. Just like the
pupils the teachers were also very enthusiastic about working with the computer.
Almost every free moment they had they wanted to work with the computer and
that is really a positive point for the introduction of computer lessons in the future,
taught by the teachers themselves.
24
4.2.4.
Computer Systems
There were no computer systems available yet at Gerar Springs Academy. We
piloted a total of 4 computers to the school. Two of them were Pentium 1
computers on which we installed Windows 98, the other two were Pentium 2
computers with Windows XP.
4.2.5.
Recommendations
The possibilities for computer lessons in this school are very good. The
accommodation is very good and together with the enthusiasm of both teachers
and pupils a consistent learning environment could be created. Next teams
should especially focus on teaching the teachers, as the teachers on this school
really want to learn more about computers and as soon as teachers have a
decent knowledge on this area they can start giving computer lessons by
themselves.
Next teams or an Energy team also traveling to the school should also take a
look at the central wiring system of the school as the generator is not yet
connected to it at the time we visited the school. A device to pull wires through
wiring pipes would be useful at least because there are some empty pipes at the
moment intended to be used for the wires from the generator to the central wiring
system.
There is also a UPS available at the school which could not be used at the
moment because the right cables are not available at the school. Two ‘euro-toeuro’ cables (male-female power cable) are needed to connect two computer
systems or a computer and a monitor to the UPS.
4.3.
Mulango youth Polytechnic
4.3.1.
Introduction
Mulango polytechnic is a technical school for both girls and boys. It is not new in
SASOL’s School Project so it has already been visited by previous ICT teams;
therefore we expected the majority of the students to have knowledge in
computer basics except the ones in the first year of their college. Because the
last ICT team visited the school about half a year ago and in the meantime no
lessons were given, we decided to start giving lessons from the basics to refresh
their minds.
The age of the students on the Polytechnic school ranges from 14 to 19 years.
25
4.3.2.
Environment
Mulango Polytechnic is located in Mulango, around 7 kilometers from Kitui town.
The town is supplied with power from Kitui town and so is the school. Therefore
no generator was needed for the computer room. The computer room was good;
a lot of space was available and because of the concrete floor the air was not
very dusty. There was even a blackboard in the computer room which can be
very handy to combine theory lessons with practical lessons.
4.3.3.
Teaching
Because of the fact that the students at the Polytechnic school were very
practically minded and their educational level was not very high we decided to
start with practical lessons to the students. Teaching them theory was probably
too difficult for them to understand and therefore a waste of time but when they
continue to catch up with the practical part, theory can be given in the future.
Teaching the students was difficult sometimes. They were learning very slowly
and it looked like most of them weren’t as smart as the pupils of the Gerar
primary school which we had visited the previous week. Also their enthusiasm
was different; they were much quieter and therefore it was difficult sometimes to
estimate if they understand the things we told them. Sometimes it looked like
their level of English was also not very high and this could also be a reason for
that they didn’t understand everything right away we explained to them.
The last two days of our visit to Mulango Polytechnic was used to teach the
teachers. There was only one teacher who was very enthusiastic about working
with the computer: the principal of the school. Unlike the others, he was also the
only one who visited the computer room regularly to ‘play’ with the computer.
Just like the students, the teachers were learning very slowly, only the principal
was learning fast.
4.3.4.
Computer Systems
There were 2 computers already available at Mulango Polytechnic before our
visit. Both computers were Pentium 1 computers with Windows 98 installed. We
did an extension 2 3 computers to the school: one Pentium 2 system and one
Pentium 3. One of the Pentium 1 computers already at the school was not
working at the time we arrived there, so we brought it back to the SASOL office
and replaced it with a new Pentium 1.
4.3.5.
Recommendations
The accommodation for computer lessons is good. Unfortunately the knowledge
and learning capacity of most of the teachers is probably too low to start
computer lessons by themselves. Only the principal could potentially give
computer lessons, but as compared with the school population one person is not
capable to give decent lessons, and also to acquire more computer knowledge
by himself, people with more knowledge are needed.
26
The principal told us that they were planning to hire a computer teacher for giving
computer lessons once a week. It would be very positive if they realize this plan
but it is doubtful if they really organize these computer lessons on the very short
term. The next teams should take a look at the progress of this plan because
computer lessons are very important for the students at this school; during the
next visit to this school it is very unlikely that the students remember a lot about
the lessons we gave them. If it appears that, at the next visit, no progress has
been made on hiring a computer teacher, the importance of this should be
clarified.
4.4.
General Recommendations
After visiting two schools for teaching computer lessons, a general conclusion
and a recommendation to the next ICT teams can be made to improve the
situation on the School Project in general.
During both our visits we emphasized our work on teaching students. There is
nothing wrong with teaching students computer lessons but if there is really a
need for continuing progress in improving ICT knowledge things have to be
changed. First of all teaching the teachers must become much more important.
Currently it seems to be that teaching the teachers is more or less done besides
teaching students, only if there is some time left. In fact, exactly the opposite is
needed: teach the teachers and if there is some time left it can be used to teach
the students to learn them some new things which can make them more
enthusiastic about working with the computer.
The reason why it is so important that teachers acquire the knowledge is that the
students need to be continuously in touch with working on a computer and not
only when the school is visited by an ICT team. This is only possible when there
is at least one computer teacher/instructor available at the school. The computer
teacher has to instruct the students on a regular basis so that progress can be
made and more advanced lessons can be given. If no progress is made on the
level of computer education at the schools it is completely useless to give
computer lessons. We instructed students at a school already visited by a
previous ICT team and almost none of them remembered anything from the
previous lessons because it was too long ago, and so we had to start from the
beginning again. If the teachers will not be instructed, or no plans are made to
offer regular computer courses at their school no progress can be made. And
starting over and over again with teaching them the basics doesn’t make any
sense.
There are different ways to improve the current state of the school projects. The
easiest and most straightforward method is to just swap the roles: start with
teaching the teachers and if time remains end with teaching students. But
teaching teachers once in a few months only isn’t enough. There definitely needs
to be some hard-copy course material so that teachers, or even motivated
students, can learn more about computers in their own time and at their own
speed. Mostly, when teaching for one week, a lot of material is covered in a small
27
amount of time. Especially for people with less computer knowledge things can
then become very overwhelmingly and therefore at the end of the week they may
know what is possible with the computer but don’t know anymore how to handle
it. The result is that they loose their interest because no one is available to help,
they stop working with the computer, loose the knowledge they managed to
acquire and have to start over completely from the beginning when the next ICT
team arrives. A hard-copy book can support the teachers by improving and
maintaining their computer knowledge but it can also be used as a reference for
themselves when teaching the students.
It appears to be that there is a syllabus, available at diverse bookstores in the
country, for giving computer lessons at Secondary Schools. Next ICT teams
should definitely try to get a copy of this syllabus, not only for the Secondary
Schools they plan to visit, but also for the Primary or Polytechnic schools
because the syllabus could also be handy for self study by the teachers.
Instead of only doing teaching at the schools maybe it is better to start up some
kind of collaboration with the teachers; teachers are in fact the persons who have
to teach their students and the ICT teams only need to support them with it.
When the teachers are engaged in the teaching part the ICT teams will have
more time for the organizational part.
Schools who do not have qualified personnel to be considered teaching their
students computer lessons should look for external personnel who could visit the
schools on a very regular base for teaching computer lessons. This will cost the
schools extra money, but maybe this has to be considered to be part of the
budget that SASOL has reserved for the ICT projects, because a computer room
without a well educated computer instructor has no value over a school without
computers.
When teams are planning to visit a school a lot of course material has to be
prepared. There is already some course material available about the basics of
the computer; this is very useful but is only the theoretical part of the course
material. Besides theory, practical exercises or some kind of tutorials which can
be used by the teachers or students to start working right away on the computer
are also needed. Practical material is in this case much more valuable than
theoretical material because the readers can directly try and see what they are
reading about. Especially for the people who have never worked with, or even
have never heard of a computer, a lot of theory can be much to abstract in the
beginning.
A lot of preparation has to be done on the creation of this material but it can even
be done from the Netherlands, and not only by ICT students but even students
who are doing a pedagogical study can support in this because they have a
much better look on how to write proper teaching material.
28
More strict rules for supplying schools with computers could also be considered
to improve the school projects. E.g. a requirement could be that teachers have to
follow specific courses on a regular basis given by people from SASOL. When
schools do not show enough interest in following computer courses they could
not participate in the school projects offered by SASOL; schools have to do some
effort to acquire the computers.
Another very important point for the school projects is documentation. There is
hardly any documentation available about the previously visited schools. In fact,
about every school visited, some kind of dossier should be made of with
information about the school, level of knowledge of the teachers and students,
things done by previous teams etc. This way it will be much easier for next teams
to see the progress of the school and what they can continue with when they
plan to visit the school. Also a much clearer view of the school is made and as a
result the plans and lessons for a school can be adapted to the needs of it.
The dossier could even contain recommendations or guidelines for the teachers
they have to accomplish during a specific period. During a next visit the team
members could report the points fulfilled and the points that need more attention.
Points for improvement:
•
•
•
•
•
5.
Teaching of teachers
Creation of more course material, especially practical material
Acquiring of ICT syllabus
Dossier about every school visited
Optionally, more strict rules for supplying schools with computers
Recommendations to SASOL
5.1.
Information Hub Project
To guarantee the continuity of the Information Hub Project, it is important that the
next ICT teams are assigned to maintain the Information Hub. It is not directly
necessary that an ICT team or a member of an ICT team is set on a fulltime base
on the Information Hub Project but at least once or twice a week, a team member
should spend his or her time on the Information Hub to check for the consistency
of the information and to add, remove, or change the information on the
Information Hub. But, besides maintenance, some full-time or part-time projects
(in combination with another project, e.g. the School Project) could be setup to
extend and/or improve the Information Hub using the recommendations as
described in chapter 3.13, Recommendations to Next ICT Teams.
The (Dutch) student teams, working for SASOL should also be encouraged to
provide their reports to the ICT-team, so that they can add the reports the
Information Hub; the subsequent student teams are then able to lookup the
information of their predecessors.
29
5.2.
School Project
Currently, the School Project is in a phase of reorganization. During the last four
months (speaking of June 2006), a lot of changes have been made on the way
the School Project is carried out. It can be expected that not all of the planned
changes will be realized the way they were planned and therefore it is important
to evaluate which of the restructured points are doing well and which not. What is
trying to be said with this is that the plans for the new School Project are made
but it is not fully tested yet; the value of the new structure can only be measured
when they are actually applied to the participating schools. So, things like the
contract and the checklist for the yearly audit are very likely to be modified (or
better said updated), after testing them on a few schools.
5.3.
General
With the start of the Information Hub Project, together with the restructuring of
the School Project, some things have been changed on the field of ICT at the
SASOL office. The new School Project structure allows less time and less people
to be active on visiting the schools. The extra time can and has to be used on
coordinating the Information Hub Project and the administrative part of the
School Project. It is important that these points get a lot of attention to prevent
that the Information Hub Project fails and that the School Project falls back to the
old situation.
Computer Desks
Another point to mention is the condition of the computer desks used in the ICT
room. The desks are so weak that they have to be squeezed between a wall and
a box, otherwise they will collapse. If possible, new desk should be placed here
as soon as possible.
6.
Recommendations to Ex-change
Communication with SASOL is the major difficulty Ex-change is currently dealing
with. It happens too often that a team is assigned a project but at the time they
arrive in Kitui it appears that they have to work on something (completely)
different. Due to the limited communication means (telephone, email/internet
etc.) but also by the completely different culture proper communication is not
easy at all. On the field of ICT, Ex-change is working with specialized contact
persons in the Netherlands, which is good, because the contact persons can
completely coordinate the ICT projects. SASOL does also have an ICT contact
person. It would be good if both contact persons (Ex-change’s and SASOL’s) get
in good contact with each other so that the communication can be improved.
Coordination is an important point to guarantee the continuality of the projects
and should not be the responsibility of the students too much.
30
7.
Personal Conclusion
My internship in Kenya was one great experience and completely different
compared to an internship in the Netherlands. As ICT is far from developed in
Kenya it was not an easy task to start ICT projects here but it was definitely a
challenge.
The School Project was the first project of my internship and it was very nice to
do, especially to get in contact with the teachers and the students of the schools.
It is also really motivating if you see how enthusiastic they are when visiting their
school. Though, it was good that it was not the only project to work on as I think
that things can be a little bit monotonous after visiting a few schools, especially
when you are a little bit impatient concerned to teaching, as I normally am.
I’ve also enjoyed the second and major project of my internship: the Information
Hub Project. Although on the technical part not the most complex project, it was
definitely not an easy project. All of the indirect factors that play a role in setting
up the Information Hub, like limited means, cultural differences, working for
people with limited or no computer knowledge made the project slowly to
progress compared to when you’ll do a similar project in the Netherlands. On
some moments things were really frustrating. The lack of Internet was for me the
biggest struggle to deal with during this project. When working on a software
system it is normally very common to use the Internet to download software or
looking up information. As Nairobi was the nearest place to download software it
took a long time before the required software arrived in Kitui. When no Internet
connection is available it becomes really clear how helpful the Internet can be.
It was also not easy to deal with the African culture on one side and the western
culture on the other side; working completely between Africans at the SASOL
office and having responsibilities to the organizations in the Netherlands at the
same time are not easy to match.
Fortunately, the project was not only frustrating; most of the time I’ve enjoyed
working on the project and especially when, after the frustrating moments, things
are getting better and you’ll see that at the end of the project the people are
really happy with the work done, you are satisfied with it twice as much.
Sometimes I wished that I had more time on the project to complete also some
other parts of the Information Hub. I made some recommendations for next ICT
teams about what can be done to improve or extend the Information Hub and it
would have been nice to see these parts implemented as well, but there was just
too less time to start working on it.
In general, when looking back, it can be said that I’ve learned a lot during my
stay in Kenya. Especially on the cultural part, how the people are living here and
that a lot of things are not as self-evident as we find them in our western world
(e.g. electricity, water, food, Internet etc.). Despite the limited resources people
have, everyone was looking happy all the time. When having a frustrating
moment you’ll only have to walk over the streets for a few minutes and you’ll be
in a complete different mood after a few minutes; people start talking to you,
31
shaking hands, laughing at you… In fact, it is indescribable what you’ll see here
when walking trough the streets; a complete different world in which I shall not be
able to live for the rest of my live, but for a short period like 4 months it was
undoubtedly, and without regret, a great and unforgettable experience!
32
8.
Bibliography
De Informatie Hub
January 2006
Meryem Touzani
Greenstone Developer’s Guide
March 2004
David Bainbridge, Dana McKay, Ian H. Witten
Greenstone User’s Guide
March 2005
Ian H. Witten, Stefan Boddie, John Thompson
Inside Greenstone Collections
June 2003;
Ian H. Witten, David Bainbridge, Stefan Boddie, Kathy J. Don, John R. McPherson
Common Gateway Interface
Download date: May 2006
http://en.wikipedia.org/wiki/Common_Gateway_Interface
How CGI Scripting Works
Download date: May 2006
http://computer.howstuffworks.com/cgi.htm
33
9.
List of Appendices
APPENDIX A – Information Hub Analysis _______________________________________________ A-1
APPENDIX B – Information Hub Admin Guide (basic) _____________________________________ B-1
APPENDIX C – Information Hub Admin Guide (advanced, with technical documentation)__________ C-1
APPENDIX D – Information Hub User Guide _____________________________________________ D-1
APPENDIX E – Network Cost Overview _________________________________________________ E-1
APPENDIX F – New School Structure ___________________________________________________ F-1
34
APPENDIX A – Information Hub Analysis
APPENDIX A – Information Hub Analysis
The Digital Library software: Greenstone
The software which will be used for the Information Hub is the Greenstone Digital
Library Software. Greenstone is an Open Source web application developed by
the New Zealand Digital Library Project at the University of Waikato in
relationship with the UNESCO and several NGO’s (Non Government
Organization). Therefore, the software is commonly used within development
organizations.
Why Greenstone
The Information Hub Research report2 revealed the specific needs of the
Information Hub, which are described later on in this chapter. Accordingly to
these needs a choice had to be made about using available standard software or
the creation of custom-made software.
Custom-made software has some advantages over standard software: it is
specifically written for the customer and only has those functions the customer
requests making it no more complex than necessary. However, this option is not
very likely for this project. Creating software is an expensive job and very time
consuming. Because the ICT personnel working at the SASOL office is not
skilled enough for developing software and there is no budget for hiring an
external software developing company for the creation of the software the only
option would be that the software is being created by ICT students who are on an
internship. The situation at the SASOL office itself is not good enough for
Software Development. The right tools are not available and the lack of Internet
makes the creation of software a difficult process. Therefore the software could
be developed from the Netherlands. Unfortunately, as soon as the software has
to be implemented problems may arise. A software product has to be thoroughly
tested, also by the end-users, before it is ready to use. The communication
between SASOL and the Netherlands would be very hard and every change
which has to be made on the software has to be done from the Netherlands. Due
to the bad communication between SASOL and the Netherlands the finalization
of the project can be slowed down enormously. With the students going on their
internship only for a short period of time it can even destroy the project at the end
completely, with a lot of work but no Information Hub at all as a result.
The use of standard software for the Information Hub will therefore be more
appropriate. There are a lot of freely available applications which can be used for
the Information Hub. Popular applications which are frequently used by
companies to spread information to their employees are Content Management
Systems (CMS), of which there are dozens available for free. As the only need
for the Information Hub is storing information, and a CMS provides normally
much more than only that, such a system would be much too complex for
2
De Informatie Hub, Meryem Touzani, 12 jan 2006
A-1
APPENDIX A – Information Hub Analysis
SASOL; the complexity of the Information Hub should be as minimal as possible
to keep the functionality uncomplicated and retain to the original goal of the
Information Hub.
The Information Hub research describes three different digital library software
systems: Koha3, Greenstone4 and Dspace5. Accordingly to the requirements of
the Information Hub (described in the next section) Greenstone appeared to be
the most appropriate application for the Information Hub.
A pilot version of the Information Hub will be set up at first. During the pilot phase
two milestones have to be reached:
First Milestone
The first mile stone we'll try to work to is a very early stadium of what should be
the Information Hub. The basic software which is needed for the Information Hub
should be up and running and in fact the elementary subjects of the Information
Hub should be working which is adding information to the Information Hub as a
supervisor and getting information from the Information Hub as user. Things like
a user-friendly system, stability and reliability are not yet very important right
now. The most important part of this milestone is the basic functionality of the
Information hub.
Second Milestone
The second milestone should be a fully functioning version of a local Information
Hub implementation. The local implementation of the Information Hub is intended
for use inside the SASOL office. While Internet becomes available the project
can be extended to outside the office. But at the second milestone, the
Information Hub should be in such a state that an extension of the Information
Hub could be done easily. Keywords for this milestone are: functionality, stability,
reliability, scalability and user-friendly.
Layout
Besides a good functioning Information Hub an attractive layout is also essential.
Because people with less computer knowledge have to work with the Information
Hub the interface should be self-explanatory. A simple and clear layout has to be
used to accomplish this.
Documentation
Besides creating a working system it is important that a lot of documentation will
be created. Next ICT teams will have to continue the work on the Information
Hub and they need to know what has happened with the Information Hub in the
past, what the current situation is and on which points improvements should be
3
http://www.koha.org/
http://www.greenstone.org
5
http://www.dspace.org/
4
A-2
APPENDIX A – Information Hub Analysis
made. Also, the people of SASOL itself need to know how to work with the
Information Hub.
The following documentation reports will be created for the Information Hub:
1.
2.
3.
4.
5.
Evaluation report
Backup possibilities
User documentation
Administrator documentation
Information Hub final report
Evaluation report
An evaluation report will be created when the first milestone (see also: chapter
3.1 First Milestone) has been reached. The evaluation report will contain the
following subjects:
• Pro’s / con’s of Greenstone software
• Current situation of the Information Hub (what’s done so far)
• Difficulties faced during first phase of Information Hub
• Things to improve on the information hub
Backup possibilities
It is important that there will come decent backup facilities for the Information
Hub as there will be placed a lot of valuable information on it. Reliable backup
facilities are costly and, especially with the small budget SASOL is working with,
it is not very obvious that expensive, high quality, material can be bought.
Therefore, the right decision has to be made between price and quality.
Before deciding what kind of backup facilities will be used for the Information Hub
a small research has to be done. The research will look at the facilities that can
be used for the Information Hub and concludes with the best option. Also the
backup method has to be decided in the research; how often should a backup be
made, what files should be backed up etc.
User documentation
A user documentation manual has to be created that the end-users can read to
make themselves known finding information on the Information Hub.
A user guide is shipped already with the Greenstone software, but this document
is too complex and describes very globally how to work with Greenstone. For the
end-users of the Information Hub this one is most likely too difficult to
understand. The user documentation to be created has to be specifically for the
Information Hub.
Admin manual
Just as the user guide a developer’s guide is shipped with the Greenstone
software which describes how to modify and maintain the Greenstone software.
But also this guide is too global to be used for the Information Hub. An
understandable admin manual has to be created which can be used by the users
A-3
APPENDIX A – Information Hub Analysis
who maintain the Information Hub. The manual should describe how to add
information, but should also contain technical information about the Greenstone
software. The manual is intended for both users with less computer knowledge,
who simply want to add information, and for users with a more advanced
knowledge about computers, who want to change technical parts of the
Information Hub.
Final report
When the pilot version of the Information Hub is running a final report will be
created which will contain a description about the current situation of the
Information Hub and what has been done in the past on the Information Hub.
Difficulties, things to improve, recommendations for the next ICT teams who are
going to work with the Information Hub will be described in this document.
Requirements for the Information Hub
The Information Hub research report exposed that the following requirements for
the Information Hub are needed:
1.
2.
3.
4.
5.
6.
7.
8.
Digital library H
Search function, also by means of categorization H
Reference to hard copy sources L
Multi-user system M
Internet connection M
Discussion Forum L
Authorization H
Printing function M
The priority of a point is indicated at the end of each point:
H = High Priority
M = Medium Priority
L = Low Priority
The priorities were not mentioned in the research report, but are based on the
current situation at SASOL.
The description of these points and how they will be implemented in the pilot
version of the Information Hub are described below.
Digital library
A lot of information (in the form of Word or PDF documents) is currently available
at the different computers inside the SASOL office. Lots of valuable information
on these computers is not, or rarely, being used by the employees or students
who work at SASOL because the information is too difficult to access. By using
the Information Hub as a digital library system, the information can be centralized
and filtered. Filtering the information is important because not all of the
information is appropriate to be placed on the Information Hub. If the information
A-4
APPENDIX A – Information Hub Analysis
will not give an added value to the Information Hub, e.g. because of similar
information that is already available or the information does not fit in the field
SASOL is working, it should not be placed.
The kind of information for the digital library to be placed on the Information Hub
will be divers and can be like:
•
•
•
•
•
•
•
•
Old students reports
General reports
Planning schemes
Work plans
Relevant articles
Digital books
Course material
Project documentation
The digital library is the base subject of the Information Hub and has therefore a
high (the highest) priority.
Search function
As the Information Hub will contain a lot of information there needs to be a
reliable search function. By default the Greenstone software provides a powerful
function to search on specific keywords through the contents of the library.
Searching on keywords can be very handy to lookup lots of information but it is
not enough if an end-user doesn’t know what kind of information is available at
the Information Hub. Therefore, another important part of the Information Hub will
be the ‘categorization’ of the information: every document added to the
Information Hub will be placed in a specific category, so that an end-user can find
all of the information belonging to a specific category. The categories will be
structured into different disciplines. The categories to start off with during the pilot
implementation of the Information Hub will be as follows:
•
•
•
•
•
•
•
•
Water / water management
Hydrology
Agriculture
Healthcare
Energy
ICT
Lab Technique
Education
It must be possible to easily add new categories or to add sub-categories to the
existing categories by a system administrator. Unfortunately, the Greenstone
software doesn’t provide a user-friendly way of adding new categories. The
different categories inside the Greenstone library are managed through a plain
text file, like displayed in the Figure below. Managing (add/change/delete) the
categories this way is very prone to errors. Therefore, a small application will be
A-5
APPENDIX A – Information Hub Analysis
developed, called the ‘Greenstone Category Editor’ to edit this text file by means
of a GUI driven application. The application will be written in the Java language.
"Water & Water Management" 1 "Water & Water Management"
"Hydrology" 2 "Hydrology"
"Agriculture" 3 "Agriculture"
"Healthcare" 4 "Healthcare"
"Energy" 5 "Energy"
"ICT" 6 "ICT"
"ICT_TEAM44ICT" 6.1 "Team 44 ICT"
Figure 4. - content of categories.txt
The categories text file:
A category stored in a text file contains 3 elements: an identifier, a position and a display name.
The identifier is used internally in Greenstone to refer to the category, the position indicates the
position within the category hierarchy, e.g. identifier ICT_TEAM44ICT is a subcategory of the ICT
category. Finally, the display name is how the category is displayed to the end-user.
The digital library would be useless without a good search function. Therefore,
this point has a high priority as well.
Reference to hard copy sources
Hard-Copy documents should also be referenced from the Information Hub. The
reference to the hard-copy document should be integrated within the digital
documents so that end-users can lookup the reference the same way as they
look up the digital documents. Hard-copy references should contain
comprehensive information (summary, author, year of publication etc.) about the
hard-copy document together with the location where to find the hard-copy
document. All of the hard-copy information should be placed in an HTML
document.
Preferably, all of the hard-copy documents will be stored in one central location;
the reference could then for example point to the bookshelf where the books can
be found.
Currently, there are not much hard-copy documents available inside the SASOL
office, so this point has low priority at the moment and will most likely be
implemented as the pilot version of the Information Hub is (nearly) finished.
Multi-user system
The Information Hub should be accessible by multiple users at the same time.
On the software-side this will not be a problem; the software is by default suitable
for a multi-user environment because it works with a web interface and is
therefore accessible as an Internet site. However, on the hardware-side, some
problems may arise. First of all, the SASOL office is not very large, so space for
the placement of the computer systems is limited. Second, SASOL is a Non
Government Organization and therefore the financial budget for computer
systems and network devices is also limited.
A-6
APPENDIX A – Information Hub Analysis
During the first phase of the pilot version only one system will be used for the
Information Hub. This system will be used as the main Information Hub computer
(server). The Greenstone software is provided with his own web server on which
the library software, in this case the Information Hub, can be ‘hosted’. This way,
clients can access the Information Hub through an Internet browser and do not
require anything extra to be setup.
There are currently 3 extra computers available which can be used as client
systems but they are not going to be used initially because every installation step
can be done server-side, thus on the Information Hub server. When the server
system is running and the Information Hub can be used for internally use more
computer systems can be added to the Information Hub, simply by making
network connections between the computers.
Because it is very simple and basically transparent (if it works on one server
system it will work on multiple client system as well) to make the Information
System a multi-user system, this point has a medium priority.
Internet connection
A computer system without an Internet connection is almost unimaginable
nowadays, and so is it for the Information Hub. The ideal situation would be that
the Information Hub is accessible over the Internet so that employees or students
from SASOL can also find information on the Information Hub from outside the
SASOL office. It would also be very handy for students in the Netherlands, before
they leave to Kenya. Students’ reports and other documents of SASOL can be
viewed in advance, which will improve in their preparation phase.
Unfortunately, there is no Internet connection available at the SASOL office and it
is not likely that a reliable Internet connection will come in a short period because
the whole town lacks of a reliable Internet connection.
Because an Internet connection is very important this point should have high
priority. At the same time an Internet connection is not available at the SASOL
office, so nothing can be done with it. Therefore, to not completely ignore the
Internet part, this point is given medium priority.
Discussion forum
A discussion forum is especially intended for the Dutch students, to let different
teams of the same discipline communicate with each other. Most likely, the
discussion forum will not be implemented in the Information Hub anymore
because there is already a discussion forum available at the Internet site of the
Dutch partner organization Ex-change6. At least a reference to this forum can be
placed on the Information Hub. Consequently, the discussion forum is given a
low priority.
6
www.ex-changer.nl
A-7
APPENDIX A – Information Hub Analysis
Authorization
The information has to be constantly provided with new information. It is very
important that the content of the Information Hub remains consistent, so a
system-administrator or a group of system-administrators has to be assigned to
keep the information consistent and up-to-date. The system-administrator should
also take a look at the quality of documents to be placed on the Information Hub;
the information should give an added value to the Information Hub and the
documents have to be formatted in a clear and readable way.
Because information of different disciplines will be placed on the Information Hub
the most preferable situation is that there will be a system-administrator for every
discipline, or at least one system-administrator per two or three disciplines.
Authorization is not only needed for maintaining the Information Hub. Also for
accessing the Information Hub some kind of authorization is necessary; some
documents should only be accessible for people of a specific discipline.
Authorization has a high priority because it is necessary to keep the information
consistent.
Printing function
It would be convenient if a printing function becomes available for the Information
Hub, so that (parts of) reports, articles or other digitally stored information can be
printed and taken away from the SASOL office.
On the other hand, because of the low financial budget, it will be not very
common to print a lot of information. Because of this, a printing function is given
medium priority.
Type of documents
A choice has to be made about the type of documents to be placed on the
Information Hub. There are at the moment a lot of documents in PDF or Word
format available at the computers of SASOL. The Greenstone software provides
different options to make these kinds of documents available to the end-users of
the Information Hub. It is possible to add a PDF or Word document to the
Information Hub just without modification. This way an end-user can open the
files from the Information Hub by clicking it on the screen and the file is opened
with the appropriate software application (e.g. Adobe Acrobat Reader or
Microsoft Word. The benefit of this method is that the currently available
documents can be added to the Information Hub just right away without any
modifications. A drawback of this method is that extra software is needed on the
computer of the end-user to view the documents. Besides this the documents are
not really integrated in the Greenstone software; Greenstone has no idea what
the contents of the documents are, unless specified by the user who adds the
documents, and therefore it is difficult for the end-user to search through the
contents of the Information Hub. Greenstone provides plugins to solve this
problem: a Word plugin and a PDF plugin. These plugins can extract text and
other information, like the author of the document, title, creation date etc, from
the documents and place them in an HTML file. This way the contents of the
A-8
APPENDIX A – Information Hub Analysis
documents and other information about the document can be indexed by the
Greenstone software so that searching through the contents of the Information
Hub will be possible. Besides this, the plugins makes it also possible that the
documents are fully integrated in the Greenstone software: no extra software is
needed by the end-users to view the documents because the documents are
readable completely in HTML now. The navigation options through an HTML
document are also more flexible than through a PDF or Word document. It is
easier to split up an HTML document in separate sections and make hyperlinks
in the document to jump to the different sections of the document. Though, as
Word and PDF documents are becoming more and more versatile nowadays,
with the integration of HTML like functionality, such as clickable hyperlinks to
jump to different sections of the document, the last factor is becoming of less
importance.
A very big drawback of converting the PDF or Word documents to HTML is that,
unless you thoroughly modify the original document, it is very likely that the
document will end up in one big mesh which is very unfriendly for the end-users
to read. The cause of this is that the layout, used in the original documents, is
very difficult to translate to HTML; tables, alignments, pictures, they are all
formatted in a way specific to the format of the document. As HTML is not very
flexible, difficulties arise to convert the versatility of different document formats to
HTML. Pure text is converted without problems, but as most of the documents
use more advanced layouts problems can be expected during the conversion
process.
The question now is to either use the plugins to convert the documents to HTML,
with the prerequisite that the original documents are carefully modified in a way
which made an acceptable conversion to HTML possible, or to simply put the
original documents on the Information Hub without the use of the plugins. The
best way is to choose a solution in-between these two options: make use of the
plugins for extracting text for indexing purposes but provide the end-user with the
original PDF or Word documents. The end-user only needs some extra software
on his computer to view these documents, but this should not be a very big
problem as the software is standard available on almost every computer, and if
not the software has to be installed only once. When the documents have to be
converted to an acceptable HTML document a lot of preparation has to be done
on the original document to make conversion feasible. Besides this, modification
is only possible on Word documents, as most of the PDF documents are readonly and therefore cannot be modified. Modification of the documents will also be
very difficult in an environment where the computer knowledge is not very high.
Advanced knowledge about text editing software is necessary to prepare the
documents in such a way that they are ready to convert to HTML. As a result, it
will be very likely that the people who will maintain the information on the
Information Hub lose their interest in adding new information and consequently a
lot of information will not be placed at all.
A-9
APPENDIX A – Information Hub Analysis
Available hardware
The best system available at the SASOL Office for the Information Hub is a
Pentium III 866 MHz computer with 128 MB of memory and a hard drive capacity
of 20GB. The system is powerful enough to be used as server; the only concern
is the size of the hard drive. As a lot of information will be placed on the
Information Hub, the 20GB will be consumed very quickly. However, for the pilot
version it must be enough; the main goal of the pilot version is to make the
employees known with the information hub and to test for points of improvement.
As soon as the Information Hub will be more integrated in the work process at
the SASOL office and more information has to be placed, an extension of the
hard drive capacity is definitely needed.
Client systems do not have to be very powerful as most of the work is done
server-side. The only need for the client systems is that they have a network card
and up-to-date browsing software. Most of the systems at the SASOL office are
supplied with a network card so they can be used for the Information Hub
directly. The only necessity is that network cables and network devices become
available at the office as they are not available yet.
A-10
APPENDIX B – Information Hub Admin Guide (basic)
APPENDIX B – Information Hub Admin Guide (basic)
B-1
APPENDIX B – Information Hub Admin Guide (basic)
Admin Guide
Basic maintenance of the Information Hub
Version 1.0
June 2006
Redmar Atsma
B-2
APPENDIX B – Information Hub Admin Guide (basic)
Preface
This admin guide describes the basic knowledge required for maintaining the
SASOL Information Hub. The document is divided in two parts. The first part
gives some basic information about the Greenstone Librarian Interface, the tool
which is used for maintaining the Information Hub. Part 2, the Practical Parts,
contains some practical topics about the maintenance of the Information Hub. It
is important that administrators read both parts completely to maintain the
Information Hub accordingly to the conventions of SASOL.
More advanced topics about the SASOL Information Hub can be found in
another other admin guide: ‘Advanced Maintenance of the Information Hub
(Technical Documentation)’. It is necessary to refer to this guide when extensions
or modifications to the Information Hub have to be made. Note that basic
programming language and knowledge about HTML is a prerequisite before
reading this guide.
B-3
APPENDIX B – Information Hub Admin Guide (basic)
Table of Contents
Preface _____________________________________________________________ B-3
Table of Contents ____________________________________________________ B-4
Part 1 - Basics of the Greenstone Librarian Interface ______________________ B-5
1.
Greenstone Librarian Interface_____________________________________ B-6
1.1.
1.1.1.
1.1.2.
1.1.3.
1.1.4.
1.1.5.
1.1.6.
Gather panel ______________________________________________________ B-6
Title bar _______________________________________________________________ B-6
Gather tab _____________________________________________________________ B-7
Workspace structure _____________________________________________________ B-7
Collection structure ______________________________________________________ B-7
Create a new folder button_________________________________________________ B-7
Delete selected files and folders button _______________________________________ B-8
1.2.
Enrich panel ______________________________________________________ B-8
1.3.
Create panel_______________________________________________________ B-9
Part 2 - Practical Parts _______________________________________________ B-10
2.
Adding documents to the Information Hub __________________________ B-11
2.1.
Importing a document to the Librarian Interface _______________________ B-11
2.2.
Enriching the imported document with metadata _______________________ B-14
3.
Creating/removing folder categories________________________________ B-18
4.
Open a collection ________________________________________________ B-23
5.
Starting the Greenstone Server ____________________________________ B-25
APPENDIX A – Add new files checklist _________________________________ B-27
B-4
APPENDIX B – Information Hub Admin Guide (basic)
Part 1 - Basics of the Greenstone Librarian Interface
B-5
APPENDIX B – Information Hub Admin Guide (basic)
1.
Greenstone Librarian Interface
Greenstone can be used to produce Digital Library Collections. A Digital Library
Collection can be seen as a collection of digital documents, videos, images and
audio. Maintaining a document in Greenstone is done by the Greenstone
Librarian Interface.
This chapter describes the basic theory which is needed to understand the
Greenstone Librarian Interface to extend and maintain the information of the
Information Hub.
1.1.
Gather panel
When the Greenstone Librarian Interface has been started, by clicking the
Greenstone Librarian Interface icon on the desktop (or by clicking Start Programs Greenstone Digital Library Software Greenstone Librarian
Interface) the Gather panel will be displayed at first. Figure 5 shows the main
components of this panel, which are described below.
Gather tab
Title bar
Workspace structure
Collection structure
Create a new folder button
Delete selected files and folder button
Figure 5. The Gather panel
1.1.1.
Title bar
The Title bar gives, just like every other window application, the title of the
application. In the Greenstone Librarian Interface, besides the title of the
application, some more information can be found. First the mode the application
B-6
APPENDIX B – Information Hub Admin Guide (basic)
is running in is noted here. In Figure 5, the application is running in Expert mode.
Expert mode means that the complete functionality of the application can be
used. Other modes are less advanced and do restrict some parts of the
application to prevent the chance of making changes accidentally.
Besides the mode, the Title bar shows which collection is currently being
loaded for editing. As in Figure 5, can be found, the SASOL Information Hub
(sasolinf) collection has been loaded.
1.1.2.
Gather tab
The Gather tab is some kind of button which can be used to return to the
Gather panel if another panel than the Gather panel is active.
1.1.3.
Workspace structure
The Workspace structure displays the contents of the local computer. Like
in Windows Explorer, a user can browse trough the contents by means of a
folder structure. The two most important folders in the Workspace structure
are the Local Filespace and the Home Folder. Local Filespace can be compared
with My Computer in Windows. You can use this folder to access any file on the
computer. The Home Folder is just as what it is named: the home folder of the
user working at the computer and can, for example, be used for quickly
accessing the My Documents folder.
The remaining two folders are less commonly used. Documents in Greenstone
Collections contain all of the collection files used in the different collections of
Greenstone and Downloaded Files contain files downloaded from the Internet by
the Greenstone Librarian Interface, which can be used to place in a collection
later on.
1.1.4.
Collection structure
The Collection structure displays the contents of the active collection.
The structure looks like that of the Workspace structure but is limited to the
contents of the active collection. Adding files to the active collection can be done
by simply dragging a file from the Workspace structure to the Collection
structure. When dragging a file from the Workspace structure to the
Collection structure a copy of the file is made. This means that, if the file
is deleted from the collection, it will not be deleted from the workspace (or local
computer). This way, the files in the Collection structure are completely
separated from the files in the Workspace structure.
1.1.5.
Create a new folder button
The Create a new folder button is used to create a new folder inside the
Collection structure or to create a new subfolder within another folder of
the Collection structure.
As an alternative, the right mouse button can be used. Clicking on a folder with
the right mouse button shows a popup menu from which a new folder can be
created. The folder will be created inside the selected folder. For creating a root
B-7
APPENDIX B – Information Hub Admin Guide (basic)
folder (a folder without a parent folder, like ENERGY, or LAB TECHNOLOGY in
Figure 5), an empty area of the Collection structure should be clicked
with the right mouse button.
1.1.6.
Delete selected files and folders button
The Delete selected files and folders button is used to delete the
selected files and/or (sub)folders inside the Collection structure.
1.2.
Enrich panel
A document can be enriched with Metadata in the Enrich panel. The Enrich panel
can be accessed by pressing the Enrich tab.
Metadata can be seen as data about data, or, within the Greenstone software,
extra information about a file in a collection. When an end-user looks up a
document on the Information Hub some extra information about the document,
like the title of the document and a short description about the document is given.
This information is stored as data in Metatags, which forms the Metadata.
Metadata
Collection structure
Figure 6. The Enrich panel
Taking a look at the Enrich panel, the Collection structure can be found
again on the left. A file can be selected in the Collection structure for
which the Metadata has to be filled. The Metadata can be filled at the area on the
right, where an input field for every Metatag element is found.
Note that the tabs for the different panels are also visible on this panel; the same
can be said about the Title bar. These parts of the application are always
visible, no matter which panel (Gather, Enrich etc.) is active.
B-8
APPENDIX B – Information Hub Admin Guide (basic)
1.3.
Create panel
Log area
Build Collection button
Cancel Build button
Preview Collection button
Figure 7. The Create panel
When all of the information for the Information Hub has been collected the
collection can be build in the Create panel by pressing the Build Collection
button. Building can take a while depending on the size of the collection; from
less than one minute to several hours. Fortunately, the build process can be
done completely in the background. This means that the computer and even the
Information Hub can be used while building.
The log area displays build information during the build process. Normally, the
information displayed here is of less importance, but when errors arise during the
build process the possible reason of this can be found in this log.
The Preview Collection button becomes active when the build process has
been finished. Clicking the Preview Collection button opens the
collection that has just been build.
The Cancel Build button can be used during the build process, simply to
cancel the building.
B-9
APPENDIX B – Information Hub Admin Guide (basic)
Part 2 - Practical Parts
B-10
APPENDIX B – Information Hub Admin Guide (basic)
2.
Adding documents to the Information Hub
2.1.
Importing a document to the Librarian Interface
Make the Greenstone Librarian Interface Window visible by clicking the
Greenstone Librarian Interface icon on the taskbar (refer to chapter 5 Starting the
Greenstone Server for more details about starting and activating the Greenstone
Librarian Interface).
Be aware that there are two Greenstone Librarian Interface icons on the taskbar;
try both if not sure which one to take. The Window will look like the one displayed
in Figure 8.
Figure 8. Greenstone Librarian Interface Window
Make sure that the SASOL Information Hub (sasolinf) collection is loaded. To
verify this, check the blue title bar at the top of the Window which should contain:
Collection: SASOL Information Hub (sasolinf).
Figure 9. Title bar indicating that the SASOL Information Hub collection is loaded
If another collection than the SASOL Information Hub collection is loaded follow
the instructions as described in chapter ‘4 Open a collection’ to open the right
collection.
At startup, the Greenstone Librarian Interface shows two folder structures:
Workspace (left) and Collection (right). The one on the left is showing the
contents of the computer and the one on the right shows the contents of the
SASOL Information Hub collection.
B-11
APPENDIX B – Information Hub Admin Guide (basic)
Now, we are going to add an example file from the Workspace to our SASOL
Information Hub collection. The example file we are going to add is located in
the folder ‘toAdd’ on the C-drive of the computer (‘C:\toAdd’) and is named
‘Greenstone tutorial.pdf’. The document contains, as the name implies, a tutorial
about Greenstone.
Note that the file used in this text is just an example file and that we can add
every file available on the computer exactly the same way, only the location to
find the original file is different.
In our Workspace, some folders are listed, like Documents in Greenstone
Collectons, Local Filespace, Home Folder and some other folders may
be listed here.
By opening the folder Local Filespace we can access the C-drive of the
computer. First we have to click on the small plus sign on the left-side of the
Local Filespace folder to open this folder. Consequently we can open the Cdrive (‘C:\’) and next the folder ‘toAdd’ exactly the same way.
When done properly, the contents of the folder ‘toAdd’ is displayed. In this case
the folder contains only one document: ‘Greenstone tutorial.pdf’ as displayed in
Figure 10.
Figure 10. The folder ‘toAdd’ opened
Note that the contents of Figure 10 may look different on another computer and
the steps to reach the original document depend on the location where the
document is located. Thus, a document located at another location may require
other steps to reach.
Now we are going to take a look at the folder structure on the right: the
Collection, where the files of our collection can be found. We have to open
the (sub)folder where we want to place our document. In our case we want to
add our document under the folder ICT, subfolder TUTORIALS.
B-12
APPENDIX B – Information Hub Admin Guide (basic)
To make our subfolder visible we are going to open the ICT category, again with
the plus sign and then we open the subfolder TUTORIALS, as shown in Figure
11.
If the folder where we want to place our file is not yet available we need to create
this folder in our collection. If you do not know how to create a new folder take a
look at chapter ‘3 Creating/removing folder categories‘.
Figure 11. The subcategory TUTORIALS opened
Now we are going to drag the original document from our Workspace to the
appropriate folder in our Collection. So, in this example, we are going the
drag the file ‘Greenstone tutorial.pdf’ from the Workspace to the TUTORIALS
folder of our collection, as shown in Figure 12.
drag
Figure 12. Drag a file to TUTORIALS folder in the collection
When done properly, the original file is now displayed inside the Collection, like in
Figure 13.
B-13
APPENDIX B – Information Hub Admin Guide (basic)
When the file is not visible after dragging, the destination folder is possibly not
yet expanded. To do this press the plus sign on the left-side of the destination
folder. If this doesn’t work, the file is most likely not dragged to the right location.
Check to see if the file is dragged to another location by accident and then drag
the file to the appropriate location.
Figure 13. 'Greenstone tutorial.pdf' placed in the TUTORIALS folder
2.2.
Enriching the imported document with metadata
Now that we have imported our document to the Information Hub, the next step is
to enrich the document with extra information, also called metadata, to make it
easier to find the document later on.
Metadata can be added in the Enrich panel. To reach this panel, click the
Enrich tab, as shown in Figure 14.
Figure 14. The Enrich tab
In the Enrich panel, the Collection structure can be found again, this time
on the left side. We have to find our just added document again in this structure
and select it by clicking it once.
B-14
APPENDIX B – Information Hub Admin Guide (basic)
Figure 15. The Enrich panel, with our document selected
We have to give some information about the just added document. On the right
side of the panel we find some input fields where we can fill the metadata for our
selected document.
Before filling the input fields recheck that the document we want to fill the
information for is selected in the Collection structure.
The sf.Title field represents the Title of the document and will be displayed in
the Information Hub as the document title. In our case we are going to give the
title ‘Greenstone tutorial’ (without the quotes).
The sf.Category field is used to specify in which category the document in the
Information Hub is placed. Our example document will be placed in the category
ICT then subcategory TUTORIALS. In the sf.Category field we specify this
as:
ICT|TUTORIALS
Note the vertical line | between the ICT category and the TUTORIALS
subcategory.
Make sure that everything written down in the sf.Category field is written in
upper-case. This is necessary because the Greenstone software sorts
case-sensitive.
B-15
APPENDIX B – Information Hub Admin Guide (basic)
Tip
There is a very convenient alternative for filling the sf.Category field but
this one is only possible when the category is already available on the
Information Hub:
Clicking the sf.Category input field shows the Existing values for
sf.Category panel in the lower right corner of the Enrich panel. This panel
shows the complete category structure of the Information Hub. The category
the new file has to be added can be clicked from here; the sf.Category
field will be filled automatically.
Though, when a complete new category has to be assigned to the
Information Hub, the sf.Category field has to be filled by hand.
Tip
A document can be assigned to multiple categories. After filling the
sf.Category field, when pressing the <Enter> button on the keyboard, a
new sf.Category field can be filled.
As a convenience, the first category should correspond with the folder
structure of the Collection structure.
The sf.Description field has to be filled with a short description about the
contents of the document. We will give the following description to the document
(again without the quotes):
‘A tutorial about Greenstone which describes the working of the Greenstone
software.’
Finally, the panel should look like this:
Figure 16. The Enrich panel filled with data
B-16
APPENDIX B – Information Hub Admin Guide (basic)
All the information is collected now and we are ready to produce the updated
Information Hub collection. We need to go to the Create panel by clicking the
Create tab.
In the Create panel we press the Build Collection button to produce the
updated collection. It will take some time to build. When the build process is
finished you can press the Preview Collection button to preview the
updated collection.
Figure 17. Build panel when the build process is finished
B-17
APPENDIX B – Information Hub Admin Guide (basic)
3.
Creating/removing folder categories
The Greenstone software offers the ability to categorize all of the information that
is placed on the Information Hub. As a lot of information will be placed on the
Information Hub it is vital to make use of this functionality to provide the end-user
with the information in an organized way.
To get a good overview of what happens on the Information Hub to the end-user
and what happens behind the scenes of the Information Hub (how are the
documents organized to the Information Hub administrator) it is convenient to
organize the documents behind the scenes corresponding to the categories they
belong to. This may sound a little bit confusing so therefore we will take a closer
look at how the documents are organized behind the scenes, compared to how
they are provided to the end-users.
First, we are going to take a look at how the documents of the Information Hub
are organized to an end-user. When an end-user browses trough the categories
of the Information Hub he or she will, at first, start with some main categories, like
the categories as displayed in Figure 18. The categories are placed in, what is
called, a hierarchical list. This means that a category may contain one or more
subcategories. An end-user can expand the contents of a category by clicking on
it, as shown in Figure 19.
Figure 18. Main categories
Figure 19. The contents of category ENERGY, subcategory JATROPHA displayed
For an administrator, the things are a little bit different. An administrator normally
works in the Librarian Interface to maintain the contents of the Information Hub.
The organization of the documents in categories is done by means of Metatags
(Information about the documents). In the Enrich panel of the Librarian Interface
B-18
APPENDIX B – Information Hub Admin Guide (basic)
(under the Enrich tab) the metatag sf.Category can be filled for a specific
document. If a document belongs to the category ENERGY, subcategory
JATROPHA, like the documents in Figure 19, the administrator gives the
sf.Category metatag the value ENERGY|JATROPHA, like in Figure 20.
Figure 20. A file under category ENERGY, subcategory JATROPHA, now in the Librarian
Interface
In the Collection overview, visible under both the Gather tab and the Enrich tab,
all of the documents of the Information Hub are organized. The documents can
be placed in folders to give more structure to the administrator. The best way for
the Information Hub is to produce the same folder structure as the category
structure is to the end-user. This way it will be much easier for an administrator to
find the documents back, later on.
So a document, belonging to the category ENERGY|JATROPHA can be placed
in the folder ENERGY, but it is clearer to place the document in a folder
JATROPHA within the folder ENERGY, like the document selected in Figure 20.
Thus, the Collection folder structure has nothing to do at all with the category of
the document but, by organizing the documents the same way as the category
structure, finding the documents back later on will be much more easy.
The following steps are required for adding a new folder to the Collection
structure.
Creating a new folder in the Collection overview is easy. First make sure that the
Gather panel is active (under the Gather tab). By right clicking an empty area in
the Collection structure a popup menu will appear:
B-19
APPENDIX B – Information Hub Admin Guide (basic)
Choosing New folder gives a small Window in which the name of the folder
has to be given. The best way is to type the folder name completely in uppercase
as the categories are also completely in uppercase. The reason for this is that, in
the Greenstone software, the categories are sorted case sensitive. When mixing
uppercase with lowercase characters, the sorting of the categories can be mixed
up.
Subfolders can be created in almost the same way. By right clicking the parent
folder, in which the subfolder has to be placed, another popup menu will appear:
Again, we choose the option New folder.
Deleting a folder works similar: right click the (sub)folder and then choose the
Delete option from the popup menu.
The next example shows the steps needed to add a new folder and consequently
the addition of a subfolder in the newly created folder.
Example:
Suppose we have a document that we want to categorize under the category
ICT, subcategory TUTORIALS. As we want the category structure to correspond
with the Collection’s folder structure we are going to add a new folder called ICT
with a subfolder TUTORIALS to our Collection overview.
The Greenstone Librarian Interface has to be opened and the Gather panel
should be activated. In the Collection structure we have to click with the right
mouse button on an empty area so that a popup menu with two options appears,
like in Figure 21
When we choose the New folder option in the popup menu a new Window
appears. For a new main folder, like ICT, the Destination Folder field in this
window should contain the text ‘import’. For a new subfolder, the Destination
Folder field should correspond with the name of the parent folder, like we will
see later on when we create the TUTORIALS subcategory.
B-20
APPENDIX B – Information Hub Admin Guide (basic)
Figure 21. Create a new folder
Figure 22, the new folder will be named ‘ICT’
In the Folder Name input field we type the name of the new folder in this case we
type the name ‘ICT’, without the quotes, as shown in Figure 22.
After pressing the OK button the just created folder appears in the Collection
structure. When we right click the ICT folder another popup menu will appear
where we choose the option New folder again to create a subfolder of ICT.
Figure 23, create a subfolder of ICT
B-21
APPENDIX B – Information Hub Admin Guide (basic)
Again, a Window appears in which we have to give a name for the folder. Check
that the Destination Folder field contains the name of the parent folder,
ICT, in this case. Then, in the Folder Name field we type ‘TUTORIALS’, again
without the quotes and completely uppercase.
Now we have created the subfolder TUTORIALS, inside the parent folder ICT.
Documents of the category ICT, subcategory TUTORIALS (ICT|TUTORIALS in
Greenstone language) can be placed in the TUTORIALS subfolder to correspond
their category.
B-22
APPENDIX B – Information Hub Admin Guide (basic)
4.
Open a collection
Open the Greenstone Librarian Interface by double clicking the Greenstone
Librarian Interface icon on the Desktop.
Figure 24, Greenstone Librarian Interface Icon
After a few seconds the main Window of the Greenstone Librarian Interface
appears.
Figure 25, main Window of the Greenstone Librarian Interface
To open the SASOL Information Hub collection, first click File in the menubar,
then choose Open…
Now the Open Greenstone Collection window comes up.
In this window, under Available Collections we choose SASOL
Information Hub (sasolinf) and click the Open button.
After a few seconds, the collection is loaded.
B-23
APPENDIX B – Information Hub Admin Guide (basic)
Figure 26. Open Greenstone Collection window
B-24
APPENDIX B – Information Hub Admin Guide (basic)
5.
Starting the Greenstone Server
Normally, when the Information Hub server systems starts, the Greenstone
software will start automatically and the server is up and running.
When loaded correctly, three icons should be visible in the Windows taskbar, as
displayed in Figure 27.
Figure 27. The Greenstone icons in the taskbar
Only one icon in the taskbar, the one with the CD (the middle one in the figure
above), indicates that the Greenstone Server is loaded. The other two icons are
for the Greenstone Librarian Interface and are in fact not necessary for the server
to work.
The reason why the Greenstone Librarian Interface is loaded together with the
Greenstone Server is to prevent some serious errors during the rebuild of the
library. It is necessary that, when new files are added to the Information Hub, the
Information Hub is still accessible. When the Greenstone Librarian Interface is
being loaded so that new files can be added, the Greenstone Server is loaded
automatically, but not when the Greenstone Server is already active.
When building is finished the Greenstone Librarian Interface needs to restart the
Greenstone Server, but it appears that this occasionally doesn’t work properly if
the Greenstone Server is not loaded together with the Librarian Interface. An
error message is shown and hereafter the Information Hub isn’t accessible at all.
To make the Information Hub accessible again the rebuild has to be started
completely from the beginning. This can be a problem as the rebuild can take for
hours and so the Information Hub isn’t accessible for hours.
Therefore, it is better to just start the Greenstone Librarian Interface; everything
needed is loaded then and serious problems during the rebuild are excluded.
If the Greenstone Librarian Interface is not yet loaded, it can be started manually
by clicking the Greenstone Librarian Interface icon on the Desktop.
Figure 28. The Greenstone Librarian Interface Icon
To stop the Greenstone Server, click the Greenstone Server icon on the taskbar
(the one with the CD icon), to make the Greenstone Server Window visible, then
point File and then Exit.
B-25
APPENDIX B – Information Hub Admin Guide (basic)
Figure 29. Greenstone Server Window
The Librarian Interface can be stopped exactly the same way: click the
Greenstone Librarian Interface icon on the taskbar to make it visible, point File
and then Exit.
Be aware that there are two Greenstone Librarian Interface icons on the taskbar:
one will open a DOS box and the other one will open the Greenstone Librarian
Interface Window. Always take the last one that looks like the one displayed in
Figure 30.
Figure 30. Greenstone Librarian Interface Window
B-26
APPENDIX B – Information Hub Admin Guide (basic)
APPENDIX A – Add new files checklist
Checklist for adding files
to the Information Hub
B-27
APPENDIX C – Information Hub Admin Guide (advanced, with technical documentation)
APPENDIX C – Information Hub Admin Guide (advanced,
with technical documentation)
C-1
APPENDIX C – Information Hub Admin Guide (advanced, with technical documentation)
Admin Guide
Advanced maintenance of the Information Hub
(Technical Documentation)
Version 1.0
June 2006
Redmar Atsma
C-2
APPENDIX C – Information Hub Admin Guide (advanced, with technical documentation)
Preface
This document describes the technical parts of the Greenstone Digital Library
Software and the SASOL Information Hub. The document is divided into two
parts; the first part gives some technical background information about the
Greenstone Digital Library Software, the second part describes the technical
details about the implementation of the SASOL Information Hub in particular and
is required for advanced maintenance of the Information Hub.
More in-depth information about parts of the Greenstone Digital Library Software
not implemented in the SASOL Information Hub can be found in the
documentation accompanied with the Greenstone Digital Library Software.
C-3
APPENDIX C – Information Hub Admin Guide (advanced, with technical documentation)
Table of Contents
Preface _____________________________________________________________ C-3
Table of Contents ____________________________________________________ C-4
Part 1 – Greenstone background information _____________________________ C-6
1.
Greenstone Runtime System _______________________________________ C-6
2.
Database________________________________________________________ C-7
3.
Plugins _________________________________________________________ C-7
4.
Metadata _______________________________________________________ C-7
5.
Macro language__________________________________________________ C-8
5.1.
6.
Classifiers______________________________________________________ C-10
6.1.
7.
Packages__________________________________________________________ C-9
Classifier objects __________________________________________________ C-11
Format strings __________________________________________________ C-11
Part 2 – Advanced maintenance of the Information Hub ___________________ C-12
8.
Introduction____________________________________________________ C-12
9.
Directory structure ______________________________________________ C-12
10. Greenstone Librarian Interface____________________________________ C-12
10.1.
Download panel ___________________________________________________ C-14
10.2.
Gather panel _____________________________________________________ C-14
10.3.
Enrich panel _____________________________________________________ C-15
10.4.
Design panel______________________________________________________ C-16
10.4.1.
10.4.2.
10.4.3.
10.4.4.
10.4.5.
10.4.6.
10.5.
General ____________________________________________________________ C-16
Document Plugins____________________________________________________ C-17
Search Indexes ______________________________________________________ C-18
Browsing Classifiers __________________________________________________ C-19
Format Features _____________________________________________________ C-20
Metadata Sets _______________________________________________________ C-23
Create panel______________________________________________________ C-24
11. The SASOL.dm macro file ________________________________________ C-24
11.1.
Package Global ___________________________________________________ C-25
11.2.
Package Style _____________________________________________________ C-26
11.3.
Package About____________________________________________________ C-27
11.4.
Further learning __________________________________________________ C-28
C-4
APPENDIX C – Information Hub Admin Guide (advanced, with technical documentation)
12. Information Hub Style sheet ______________________________________ C-29
12.1.
Further learning __________________________________________________ C-30
13. Metadata set ___________________________________________________ C-30
14. Plugin modifications _____________________________________________ C-30
APPENDIX A – The CGI mechanism __________________________________ C-33
APPENDIX B – SASOL.dm macro file _________________________________ C-34
APPENDIX C – Greenstone argument information _______________________ C-36
APPENDIX D – Backup procedure ____________________________________ C-42
APPENDIX E – Information Hub conventions ___________________________ C-43
C-5
APPENDIX C – Information Hub Admin Guide (advanced, with technical documentation)
Part 1 – Greenstone background information
User
User
User
Receptionist
Protocol
Collection
Server
Collection
(SASOL Informatie Hub)
Figure 31. Structure of the Greenstone Runtime System
1.
Greenstone Runtime System
The Greenstone Runtime System, written in C++, forms the core of the
Greenstone Digital Library Software (shortened to Greenstone software from
now). As the system is open source and the use of inheritance is common, it is
relatively easy to extend or modify the runtime system.
The main components of the Runtime System are formed by a Receptionist, a
Collection Server and the Collection itself.
The Receptionist is the interface for the end-user to the Library collection. All of
the user interaction is passed to the Receptionist who handles it. A request from
a user to look up some information from the library is handled by the Receptionist
at first after which it is send, by means of a protocol, to the Collection Server. The
Collection Server in turn is responsible for looking up the appropriate information
from the Collection and passes it back to the Receptionist who will layout the
information and presents it to the end-user.
Normally, the Greenstone software is setup using one Receptionist and one
Collection Server running at the same computer. In this case the Receptionist
C-6
APPENDIX C – Information Hub Admin Guide (advanced, with technical documentation)
and Collection server form one component, called the Library, to which requests
can be passed and from which responses are received. Clients can access the
Library using the CGI mechanism. APPENDIX A – The CGI mechanism gives
more details about the CGI mechanism.
Greenstone can also be implemented according the CORBA scheme. Using
CORBA, the Receptionist and the Collection Server, or separate modules of
these, can run on different servers, on different platforms, communicating with
each other trough a network or Internet connection.
2.
Database
The Greenstone software uses a database to store the digital documents that are
placed in the library. GDBM (GNU DataBase Manager) is used as the database
management program while MG (Managing Gigabytes) is used for searching and
making the search indexes.
As the Greenstone Runtime System is relatively easy to modify, changing to
another database system, like SQL, can be done with less effort.
3.
Plugins
When building a collection, the documents to add are first parsed by a plugin.
Plugins, written in the Perl language, are used to extract metadata (see next
section) from the documents.
Different plugins are used to process different types of files. There Word plugins
to process Microsoft Word documents, PDF plugins to process PDF files, image
plugins to process images and so on. Documents containing text are converted
to either HTML or Text format so that the contents of the document (text) can be
indexed for searching.
After this, another plugin converts the document to the Greenstone Archive
Format. The Greenstone Archive Format is an XML-style document that contains
all of the information (in the form of metadata) and the contents of the imported
document.
4.
Metadata
Metadata gives information about a document in the digital library. Information
like the Title of a document, the author, a description, they can all be stored in
metadata to give more information about the document. Later on, the data stored
as metadata can be used for searching, e.g. to search for a specific title, or to
search for documents from one specific author. But the metadata is also used for
displaying information about the document on the web-page interface. When an
end-user browses trough the documents of the digital library some information
about the documents, like title, a short description, author etc., is given. All of this
information is stored in metadata.
Metadata for a document can be entered manually but, during the build process,
metadata is also assigned to a document automatically. Normally, when a plugin
C-7
APPENDIX C – Information Hub Admin Guide (advanced, with technical documentation)
parses a document, metadata is extracted from the original document. E.g. when
extracting a PDF document it is relatively easy to extract the title and the author
of the document as these are normally both stored in a PDF document. The
extracted metadata can be used later on for displaying information about the
document, but as the extracted metadata is not very reliable (depends on the
original file format of the document and the layout settings of the document) it is
more trustworthy to use the manually entered metadata for this.
5.
Macro language
The Greenstone software works with an own macro language which is used for
lay outing HTML pages generated by the Greenstone Runtime System. The
macro language can be seen as an abstraction above HTML. The language is
similar to HTML but gives a developer more flexibility in customizing the layout of
the user interface of a Greenstones collection. A macro is like a procedure or
function of a common programming language but only with HTML code or
references to other macros in the body of the procedure or function.
An example of a macro is given below.
1 _htmlhead_ [c=sasolinf] {
2 <html>
3 <head>
4 <title>SASOL Information Hub</title>
5 <link rel="stylesheet" href="_httpprefix_/collect/sasolinf/css/style.css"
6 type="text/css"/>
7 _globalscripts_
8 </head>
9 <body>
10 }
Code example 1. The _pagebanner_ macro
The example given in Code example 1 displays a macro which contains the first
lines of HTML code of an HTML page. The first line in the example displays the
macro name, which is _htmlhead_ (macros always start and end with an
underscore), followed by an argument. The argument, [c=sasolinf] specifies the
collection (sasolinf) to which this macro belongs to. The body contains normal
HTML code together with a call to another macro, called _globalscripts_, which
contains some JavaScript.
The power of macros is that it gives a lot of flexibility in modifying the layout of a
collection without accidentally modifying the layout of another collection. By
specifying, with an argument, to which collection the macro belongs to, the HTML
code is applied only to that collection. Alternative arguments can be given as
well, like the language of the collection so that separate macros can be written
for different languages, or an argument to specify that the macro only has to be
C-8
APPENDIX C – Information Hub Admin Guide (advanced, with technical documentation)
applied if viewed in text-only mode. Another advantage is that it minimizes the
amount of code to work on when modifying the layout: a macro contains only a
limited part of an HTML page (e.g. only a header, or a page content) and also by
referring to other macros within a macro, large amount of code can be ‘replaced’
by only one macro name.
As one can expect, the macro language does not only have positive sides; a
drawback of the macro language is that some of the macros are deeply coded
inside the Greenstone Runtime System which makes it hard sometimes to modify
the functionality of a specific macro. Most of the layout macros are coded in plain
text files, very similar to HTML files, which are easy to modify. But not all of the
macros are accessible as easy as those macros. Mainly the macros that have
less or nothing to do with the layout (e.g. like the behavior of a hyperlink) are
coded inside the Greenstone Runtime System or in one of the other scripts used
for generating the HTML page, which makes modifying the macro only possible
by modifying the source code which is less convenient than modifying a relatively
small macro file.
Normally, a collection uses an own macro file in which its layout is specified. The
macro file can be kept relatively small as only the Macro code of the modified
part of the layout has to be placed in the file. The layout that has not being
changed is specified in the default macro files shipped with the Greenstone
software.
5.1.
Packages
Packages are used for grouping macros with an equal role. The table displayed
below gives an overview of the different packages together with their roles. The
table is derived from the website of the Washington Research Library Consortium
(http://www.wrlc.org/dcpc/UserInterface/interface.htm)
Package Name File Name
package Global base.dm
english.dm
Package Style
Package
document
Package query
Package
preferences
Package help
Roles
Contains macros that work for all
display screens, if the
[c=collection name] is not
specified.
style.dm
Controls the display style for all
pages, if the [c=collection name]
is not specified.
english.dm
Contains macros for the
document.dm document display.
query.dm
Contains macros for the Search
english.dm
page display.
pref.dm
Contains macros for the
english.dm
Preferences page display.
help.dm
Contains macros for the Help
english.dm
page display.
C-9
APPENDIX C – Information Hub Admin Guide (advanced, with technical documentation)
Package about
about.dm
english.dm
Package browse browse.dm
english.dm
Contains macros for the About
page display.
Contains macros for the dynamic
browsing interface.
Table 1. Overview of available packages
Packages are spread over multiple files. At first this might look confusing as
looking up macros with an equal role may require multiple files to be searched,
and sometimes it is a little bit confusing indeed. But a benefit of this structure is
that only a small part of a package has to be placed in a file that belongs
exclusively to one collection.
Chapter 11, The SASOL.dm macro file, describes this file, applied for the SASOL
Information Hub.
6.
Classifiers
Classifiers are used for generating collection’s browsing indexes and are
normally linked to a button on the navigation bar. For example, the SASOL
Information Hub contains a button ‘Categories’. The linked classifier is displayed
below.
1 classify Hierarchy -metadata sf.Category -sort sf.Title -buttonname
2 "<img src=_httpprefix_/collect/sasolinf/images/categories.gif border=0
3 width=86 height=25 alt=Categories>" -documents_last
Code example 2. Classifier for generating category page
A classifier specifies what the browsing index should contain and how to display
the index.
The classifier shown in Code example 2 is specified to create a hierarchical list
(‘Hierarchy’ represents one of the available classifier objects, described later), of
which the hierarchy nodes (categories and subcategories) are named using the
sf.Category metadata tag of a document; e.g. when for a specific document the
value ‘ICT’ is filled for the sf.Category metatag, the category ICT will be created
in the category overview.
Furthermore, it is indicated that the list’s leaf nodes (the actual documents) are
sorted on document title, the assigned button name refers to some HTML code
that displays a GIF image. The last classifier options specifies that first the
category nodes are displayed and then the leaf nodes (documents).
Classifiers can be specified in the collection’s configuration file, but normally it is
done using the Greenstone Librarian Interface.
C-10
APPENDIX C – Information Hub Admin Guide (advanced, with technical documentation)
6.1.
Classifier objects
Classifiers make use of classifier objects. In Code example 2, ‘Hierarchy’ is the
used classifier object. Other classifiers objects are available, e.g. the AZList for
creating Alphabetic ordered lists, DataList for creating lists ordered on datefor
creating Alphabetic lists (AZList) etc. A classifier object is written in the Perl
language and executed at the time a collection is being build.
7.
Format strings
Format strings are used for formatting browsing indexes produces by classifiers
and search queries. Although Greenstone’s macro language syntax is used for
formatting, format strings are not part of the Macro file, but are, just like
classifiers, part of the collection’s configuration file.
An example of a format string is given in the code example below. The format
string is used for formatting the output of a search query which is a list of
documents. More details about format strings can be found in chapter 10.4.5,
Format Features
1 format SearchVList
2 "<hr>
3 <table width=\"100%\">
4
<tr><td width=\"10%\" valign=\"top\"><b>Title: </b></td><td
5
width=\"90%\">[sf.Title]</td></tr>
6
<tr><td valign=\"top\"><b>Description:
7
</b></td><td>[sf.Description]</td></tr>
8
<tr><td valign=\"top\"><b>Category:
9
</b></td><td>[sf.Category]</td></tr><br>
10 <tr><td> </td><td align=\"left\">[ex.srclink][ex.srcicon]View
11
document [ex./srclink]</td></tr>
12 </table>"
Code example 3. Format string for formatting the search results list.
C-11
APPENDIX C – Information Hub Admin Guide (advanced, with technical documentation)
Part 2 – Advanced maintenance of the Information Hub
8.
Introduction
Maintaining the SASOL Information Hub is mainly done using the Greenstone
Librarian Interface and by modifying the SASOL.dm macro file and the
Information Hub style sheet (style.css). The Librarian Interface is used for
modifying the functionality of the Information Hub and doing some small
adjustments on the layout (by modifying Format strings). The SASOL.dm macro
file and the style sheet are used for modifying the layout.
9.
Directory structure
This chapter describes the directories that are important to know about when
maintaining the Information Hub.
First, two variables will be defined here which will be used throughout this
chapter: one to refer to the Greenstone home directory and the other one refers
to the home directory of the SASOL Information Hub collection:
GREENSTONE_HOME
COLLECTION_HOME
Greenstone root directory (where Greenstone
software has been installed)
GREENSTONE_HOME/collect/sasolinf
The major directories are listed below:
Directory
GREENSTONE_HOME/collect
GREENSTONE_HOME/etc
GREENSTONE_HOME/images
GREENSTONE_HOME/macros
GREENSTONE_HOME/perllib
COLLECTION_HOME/archives
COLLECTION_HOME/css
COLLECTION_HOME/etc
COLLECTION_HOME/images
COLLECTION_HOME/import
Contents
installed collections
Greenstone configuration file
default images and style sheets
macro files
perl scripts (plugins, classifier objects)
the actual documents in the library
collection style sheet
collection configuration file
collection images
imported documents
10. Greenstone Librarian Interface
The Greenstone Librarian Interface can be started by either clicking the
Greenstone Librarian Interface icon on the desktop or by pressing Start Programs Greenstone Digital Library Software Greenstone Librarian
Interface.
C-12
APPENDIX C – Information Hub Admin Guide (advanced, with technical documentation)
Depending on the mode the Greenstone Librarian Interface is running in, it is
possible that not all of the functionality of the application is available. To make
sure that all of the functionality is available, the application has to be in ‘Expert
mode’, which can be set using preferences menu, accessible by pointing File Preferences…
Figure 32. Application mode is set to 'Expert'
Before working on the SASOL Information Hub, make sure that the right
collection is opened. If the Information Hub collection is opened, the title bar of
the Librarian Interface should contain: ‘Collection: SASOL Information Hub
(sasolinf)’.
If the Information Hub collection is not yet opened it can be done by pointing File
Open… The Information Hub collection can be opened in the next appearing
window.
The Greenstone Librarian Interface application contains five different panels:
• Download panel
• Gather panel
• Enrich panel
• Design panel
• Create panel
C-13
APPENDIX C – Information Hub Admin Guide (advanced, with technical documentation)
10.1. Download panel
Figure 33. Download panel
The Download panel is used for downloading resources from the Internet. An
Internet connection is currently not available at the SASOL office. Therefore, this
panel has no sense to be used while maintaining the Information Hub.
10.2. Gather panel
Figure 34. Gather panel
The Workspace structure on the left and the Collection structure on the right are
the major parts of the Gather panel, in which the files for the collection can be
collected.
The Workspace structure displays the contents of the local computer; the
Collection structure displays the contents of the Information Hub. A file can be
dragged from the Workspace structure to the Collection structure to copy it to the
C-14
APPENDIX C – Information Hub Admin Guide (advanced, with technical documentation)
Information Hub. As can be seen in Figure 34, the folder structure of the
Collection structure corresponds with the category structure of the Information
Hub. In reality, this folder structure has nothing to do with the category structure
at all, but it is very important that both structures are equivalent as this makes the
retrieval of documents much easier afterwards.
However, it is possible that a file is assigned more than one category. In this
case, the file should be placed in the folder corresponding with the main category
of the file, which is the first ‘sf.Category’ metatag, as described in the next
section about the Enrich panel’. Files displayed at the ‘Title page’ of the
Information Hub do always display the category that the documents belong to.
When a file belongs to multiple categories, only the main category will be shown.
New folders can be created in the Collection by clicking with the right mouse
button in the Collection structure. When clicking an empty area in the Collection
structure a new root folder can be created. A new subfolder can be created by
clicking the parent folder with the right mouse button.
Deleting a file or folder can be done by clicking the file/folder with the right mouse
button and then choose Delete.
10.3. Enrich panel
Figure 35. Enrich panel
The Enrich panel is used to fill the metadata for a specific file. To fill the
metadata, first a file has to be selected from the Collection structure on the left
side of the panel, the metadata can then be filled in the area on the right side of
the panel. The metadata elements sf.Title and sf.Description are displayable
metadata elements; the values for these elements are displayed to the end-user
when he or she browses trough the contents of the Information Hub.
The metadata element sf.Category is used to specify the category the file
belongs to. As can been seen in Figure 35, the category corresponds to the
C-15
APPENDIX C – Information Hub Admin Guide (advanced, with technical documentation)
location of the file in the Collection structure. The ‘|’ symbol (vertical line) is used
to separate a parent category from a child category.
The last metadata element, sf.Software, is used to indicate that the file is not an
informative document, but a software application. For informative documents, this
metadata element should be kept empty, but for a Software application, this
element should be filled with the character ‘Y’ (from yes). A software application
will be added to the ‘Software page’ of the Information Hub.
10.4. Design panel
The functionality and part of the layout of the SASOL Information Hub can be
customized using the Design panel. The left side of the panel contains the
different sections for which customizations can be made. For the SASOL
Information Hub, not all of these sections are, or need to be, customized.
Therefore, only the sections which are relevant to the SASOL Information Hub
will be discussed, which are:
•
•
•
•
•
•
General
Document Plugins
Search Indexes
Browsing Classifiers
Format Features
Metadata Sets
Most of the settings of the Design panel are stored in the collection’s
configuration file:
COLLECTION_HOME/etc/collect.cfg
10.4.1. General
Figure 36. Design panel (General)
C-16
APPENDIX C – Information Hub Admin Guide (advanced, with technical documentation)
Under general, some information about the Information Hub collection can be
given. The logo which is used for the SASOL Information Hub (displayed at the
top of each page of the web interface) is displayed here as well.
10.4.2. Document Plugins
Figure 37. Design panel (Document Plugins)
Document Plugins specifies the plugins that are used by the Information Hub
collection for importing documents. The order of the plugin list is important as the
import process traverses from top to bottom trough the plugin list and the first
suitable plugin will be used for the document to be imported.
The UnknownPlug is listed as last in the plugin list. If no suitable plugin could be
found for an imported document, it will be imported as an unknown file. No
information will be extracted from an unknown file during the import process. This
means that textual content will not be taken for indexing.
A plugin can be configured by selecting the plugin and then pressing the
Configure Plugin button.
C-17
APPENDIX C – Information Hub Admin Guide (advanced, with technical documentation)
Important note
Although an Excel plugin exists, all Excel documents are imported using an
UnknownPlug plugin, configured in such a way that the documents are assigned
an Excel icon. The reason that the Excel plugin is not used is that there seems
to be a problem with this plugin; some Excel documents are not imported
properly with this plugin and are consequently not added to the collection at all.
Another UnknownPlug plugin can be found in the list, which is used for any other
file for which a plugin could not be found.
More ‘specific’ UnknownPlug plugins can be added to the list. Unfortunately, the
Librarian Interface doesn’t support the addition of multiple UnknownPlug plugins.
Therefore, it has to be done manually by editing the Information Hub collection
configuration file (COLLECTION_HOME/etc/collect.cfg)
10.4.3. Search Indexes
Figure 38. Design panel (Search Indexes)
The behavior of the collection’s search module can be set under Search Indexes.
Three indexes are specified for the SASOL Information Hub, which correspond
with the three ‘Search for’ options of the dropdown box that an end-user can
choose from on the Advanced search page.
The first index (also the Default Index), displayed in the Assigned Indexes area is
specified to index the contents of the metatags sf.Category, sf.Description and
sf.Title and the contents of the document (text). This index is used when a search
is made from the Homepage of the Information Hub web interface or when the
end-user chooses the search for text option by choosing ‘text’(= Index Name)
from the dropdown menu on the Advanced search page.
C-18
APPENDIX C – Information Hub Admin Guide (advanced, with technical documentation)
Two other search indexes are available for the Information Hub: ‘titles’, which can
be used for searching trough the document titles of the Information Hub and
‘filenames’, to search trough the original filenames of the documents.
All of the indexes are built at ‘document level’. As the SASOL Information Hub
does not contain any HTML documents (only external files, like PDF, JPG, Excel
etc.) the index level is not important. Collections containing HTML documents
can use this feature to create indexes for the separate sections or paragraphs of
a document, so that a search result can further specify which part of the
document contains the searched keyword.
10.4.4. Browsing Classifiers
Figure 39. Design panel (Browsing Classifiers)
Classifiers are specified under the Browsing Classifiers section of the Design
panel.
The SASOL Information Hub uses three classifiers, which are linked to the
buttons Categories, Titles and Software on the navigation bar of the Information
Hub web interface.
The first classifier in the lists specifies the classifier linked to the Categories
button. The different parts of this classifier are already explained in chapter 6,
Classifiers: create a hierarchical list on metatag sf.Category, sort on title, use the
specified image as button image, and show the leaf nodes after the category
nodes.
The second (Titles) and third (Software) classifier work in a similar way. A
difference is that the second classifer uses an AZList for generating an
alphabetic list of the titles (using the sf.Title metatag), the third classifier uses a
GenericList, which is just a plain list titles.
There are some more classifier types with different functionality to choose from
the dropdown list at the bottom of the panel.
C-19
APPENDIX C – Information Hub Admin Guide (advanced, with technical documentation)
10.4.5. Format Features
Figure 40. Design panel (Format Features)
The layout of the classifier output and the search results lists can be customized
under the Format Features section. A large list of format strings is found under
this section, but only five are used for the SASOL Information Hub: ‘format
CL1VList’ … ‘Format CL3VList’, ‘format SearchVList’ and ‘format HList’. The
three ‘Format CLxVList’ are referring to the classifiers from the Browsing
Classifiers section. ‘Format CL1VList’ contains the formatting used for the first
classifier in the list; ‘Format CL2Vlist’ contains the formatting for the second
classifier and so on. 'format SearchVList’ contains the formatting of the search
results lists on the search page and ‘format HList’ is responsible for formatting
the alphabet on top of the Titles page.
An HList always represents a horizontal list whereas a VList represents a vertical
list.
The format string ‘format CL1VList’ is the most complex format string, so let’s
take a look at the details of this one.
When the format string is selected, it can be seen that the selected value in the
Choose Feature dropdown box is referring to the first classifier (CL1) and that the
selected value in the Affected Component dropdown box contains the value
‘VList’. These two values together form the ‘CL1VList’ part of the Format string.
Below the two dropdown boxes, the associated HTML code (mixed with format
statements) can be found. The code in this textbox is editable code. The code for
this classifier is displayed in the code example below.
C-20
APPENDIX C – Information Hub Admin Guide (advanced, with technical documentation)
1 <td>
2 {if}{[numleafdocs],
3 {if}{[ex.Title] ne "SOFTWARE",
4
[link][icon][highlight][ex.Title][/highlight][/link]<br>, },
5
6 <hr>
7 <table width="100%">
8
<tr><td width="10%" valign="top"><b>Title: </b></td><td
9
width="90%">[sf.Title]</td></tr>
10
<tr><td valign="top"><b>Description:
11
</b></td><td>[sf.Description]</td></tr>
12
<tr><td> </td><td align="left">[ex.srclink][ex.srcicon] View
13
document [ex./srclink]</td></tr>
14 </table>
15 }
16 </td>
Code example 4. Format string belonging to 'format CL1VList' classifier
The way this format string is applied on the classifier output may be a little bit
abstract at first, but what actually happens is as follows:
The classifier is specified to generate a Hierarchy, this means that the classifier
will generate a list containing both nodes and leafs (categories and documents in
our case). Initially, all the categories of the Hierarchy are collapsed, so a list with
closed categories will be formatted by the format string. The format string
displayed in Code example 4 will be applied to all of the categories, so in fact the
code in the format string runs within a loop. As soon as an end-user opens a
category by clicking on it, the Hierarchy list will be generated again, now with one
of the categories expanded and showing the contents of it, which can contain
both subcategories and documents. The list will be formatted again by the format
string and is applied again on every subcategory and/or document.
Now, let’s take a closer look at the different parts of the format string. The first
line of the code, <td> is used for generating a new table cell. The complete list is
generated within a table, so every category and document displayed will be
formatted within a cell.
What follows next is an IF-statement. The syntax of an IF-statement within a
format string is as follows:
{if}{condition, code to execute when true, code to execute when false}
The IF-statement in this format string uses the format statement [numleafdocs] as
condition to check if the passed list component is either an internal node
(category) or a leaf (document). When the list component is an internal node,
TRUE is returned and the title of the category has to be displayed. Otherwise,
C-21
APPENDIX C – Information Hub Admin Guide (advanced, with technical documentation)
when the component is a leaf, the condition returns with FALSE and the title with
some accompanied information has to be displayed.
The code for displaying the category starts at line 3, with another IF-statement.
This second IF-statement checks if title of the category is not equel (ne) to
“SOFTWARE”. If so, the category title is displayed, otherwise nothing about this
category is displayed.
Displaying the category title happens on line 4. Some format statements are
given used in this line:
[link]...[/link]
[icon]
[highlight]...[/highlight]
represents a URL. Everything between belongs to the
URL.
in this case, the category icon (the blue dot).
everything in between will be displayed in bold, when
this category is active (pressed by the end-user).
The metadata element [ex.Title] is found in between these statements. This
metadata element represents the title of the category. Finally a line brake <br> is
given so that the next category is displayed on a new line.
No statements are given if the condition returns FALSE, as nothing has to be
displayed in this case.
Line 6 continues with the code when [numleafdocs] condition, in line 2 had
returned with FALSE, thus when the component to be formatted is a leaf (or
document in our case).
The code contains some basic HTML statements, which are not all described
here, as this is outside the scope of the document. The basic idea is that a table
is created in which the information about the document is displayed. The title
[sf.Title], a description about the document [sf.Description] and a link (icon
and text) to open the document [ex.srclink][ex.srcicon] View document
[ex./srclink] are the main parts of the table. Finally the first IF-statement is
closed with a curly bracket and the cell, opened on line 1 is closed again on line
16 (</td>).
Extra Addition
In Code example 4, it can be seen that the title of a category is displayed using
the metadata element [ex.Title]. The classifier, responsible for the creation of
the category structure, determines the category titles using the [sf.Category]
metadata elements specified for the documents of the Information Hub
collection. So, the [sf.Category] metadata element should not be confused with
the generated [ex.Title] metadata element used for the category title.
The format strings used for the remaining classifiers, the SearchVList and the
HList are formatted in a way very similar to the format string as described above
and are therefore the details are omitted in this document.
C-22
APPENDIX C – Information Hub Admin Guide (advanced, with technical documentation)
To add a new format string to the format features list, or a feature, or an affected
component, or both options have to be chosen after which the button Add Format
can be chosen. When the feature or affected component or the combination is
already added the button stays disabled.
When editing the code of a format string, the changes can be saved by pressing
the Replace Format button. The remaining two buttons are used for removing a
selected format string from the list (Remove Format) and inserting a format string
variable, which can be selected from the Variables dropdown box.
10.4.6. Metadata Sets
Figure 41. Design panel (Metadata Sets)
The last section, Metadata Sets, is rarely used as most of the modifications
related to metadata sets is done using the Greenstone Editor for Metadata Sets.
The only thing left that can be done here is the addition or removal of a metadata
set, which is rare as the collection will normally always use the same set.
C-23
APPENDIX C – Information Hub Admin Guide (advanced, with technical documentation)
10.5. Create panel
Figure 42. Create panel
The create panel is normally only used for building the SASOL Information Hub
collection; nothing special has to be done here. By pressing the Build Collection
button, the collection is going to be built. The build process can take a very long
time; the larger the collection, the longer the build process takes but during the
build process the Information Hub is still accessible.
11. The SASOL.dm macro file
The SASOL.dm macro file is responsible for the layout of the different
components of the Information Hub web interface. This chapter will describe the
different macros that can be found in this file (see chapter 5, Macro language for
an explanation about the syntax of the macro language). It is possible that the
macros found in the most recent SASOL.dm file do not entirely correspond
anymore with the macros described in this chapter, or that new macro’s are
added to this file. The macros are documented in the SASOL.dm file itself as
well, so for the most up-to-date documentation it is the best to refer to the
SASOL.dm file itself.
The SASOL.dm macro file can be found under the ‘/macros’ directory of the
Greenstone home directory: GREENSTONE_HOME/macros.
Three packages (see chapter 5.1, Packages) can be found in the SASOL.dm file:
• Package Global
• Package Style
• Package About
The packages will be described in the next sections. Note that, for keeping the
code clear, the source documentation is not being displayed in the code
C-24
APPENDIX C – Information Hub Admin Guide (advanced, with technical documentation)
examples shown in these sections. The complete source code, included with
documentation can be found in APPENDIX B – SASOL.dm macro file.
All of the macros in the SASOL.dm macro file are using the argument c=sasolinf
to indicate that the macro is specifically for the SASOL Information Hub
collection.
11.1. Package Global
1
2
3
4
5
6
7
8
9
10
11
12
package Global
_pagewidth_ [c=sasolinf] {100%}
_httpiconbshelf_ [c=sasolinf] {_httpprefix_/collect/sasolinf/images/dot.gif}
_httpiconless_ [c=sasolinf]{_httpprefix_/collect/sasolinf/images/previous.jpg}
_httpiconmore_ [c=sasolinf] {_httpprefix_/collect/sasolinf/images/next.jpg}
_labelSearch_ [c=sasolinf] {
<img src=_httpprefix_/collect/sasolinf/images/search.gif border=0 width=86
height=25 alt=Search>
}
Code example 5. Package Global
In the code example above, the package starts with an identification of its
package name at line 1: package Global.
The statement on line 3 simply sets the page width on 100%, so that the web
interface is spread over the full width of the screen.
Line 5, 6 and 7 define some new icons: an icon to be displayed in the hierarchical
category structure ( ) to indicate a category node and two navigation buttons
and
) to display the previous and next list of documents, when a
(
(sub)category contains more than 20 documents or more than 20 documents are
found for a search result.
The macro _labelSearch_ on line 9 defines the image used for the Search button
on the navigation bar.
C-25
APPENDIX C – Information Hub Admin Guide (advanced, with technical documentation)
11.2. Package Style
1
2
3
4
5
6
7
8
9
10
11
12
13
14
15
16
17
18
19
20
21
22
23
24
25
26
27
28
29
30
31
32
33
34
35
package Style
_htmlhead_ [c=sasolinf] {
<html>
<head>
<title>SASOL Information Hub</title>
<link rel="stylesheet" href="_httpprefix_/collect/sasolinf/css/style.css"
type="text/css"/>
_globalscripts_
</head>
<body>
}
_optnavigationbar_ [c=sasolinf] {}
_pagebanner_ [c=sasolinf] {
<center>
<table width=_pagewidth_ cellspacing=0 cellpadding=0 border=0>
<tr>
<td background="_httpprefix_/collect/sasolinf/images/padding.jpg"
valign=top colspan=3 align=left border=0>_imagecollection_
</td>
</tr>
<tr class="linerow">
<td class="navigationlinks" colspan=3 align=center border=0>
<span class="navlink"><a href="_httppageabout_"><img
src="_httpprefix_/collect/sasolinf/images/home.gif" border=0 width=86
height=25 alt="Home"</a>
</span><span style="margin-left: 2px;"></span>_navigationbar_
</td>
</tr>
</table>
</center>
}
Code example 6. Package Style
Again, the code starts with identifying the package name on line 1: package
Style. The _htmlhead_ macro on line 3 is used to specify the header of the HTML
files used for the web interface. Things like the Title of the page, references to
external style sheets but also some Javascripts can be specified here.
On line 14, an empty macro can be found. This macro, _optnavigationbar_ is
overridden empty to prevent that the navigation bar is displayed on the default
location. Instead of referring to this macro, the macro _navigationbar_ has to be
used at the location were the navigation bar is to be displayed. In the code
example above, the _navigationbar_ macro is referred at line 29, in the body of
the _pagebanner_ macro. This macro is responsible for generating the page
header (logo and navigation bar), as displayed in Figure 43. The logo is
displayed by calling by the _imagecollection_ macro.
As can bee seen in the code, the home button is not being generated by the
_navigationbar_ macro but inserted by hand.
C-26
APPENDIX C – Information Hub Admin Guide (advanced, with technical documentation)
Figure 43. Page header of the Information Hub
11.3. Package About
Package about (Code example 7), starting with the identification package about
on line 1, contains the macro code for the about page which, in the case of the
Information Hub, is used for the Home page.
The macro starting on line 3, _aboutqueryform_, represents the Search form on
the upper part of the Home page.
Some input types are given for this Search form. These input types are used as
CGI arguments for the Greenstone Runtime System, running server-side. The
exact meaning of the arguments can be found on the Greenstone Administration
page, accessible by entering the root of the local host (http://127.0.0.1/), then
choose Administration Page, then arguments (under Technical information). The
same table with arguments can also be found at APPENDIX C – Greenstone
argument information.
Next, on line 26, the _content_ macro is found which does nothing more than
invoking the _aboutqueryform_ macro, described earlier, and the _textabout_
macro defined at line 31, containing a textual description that is displayed at the
home page.
1
2
3
4
5
6
7
8
9
10
11
12
13
14
15
16
17
18
19
20
21
22
23
24
25
26
27
28
29
30
31
32
package about
_aboutqueryform_ [c=sasolinf] {
<form name=QueryForm method=get action="_gwcgi_">
<p>
<input type=hidden name="a" value="q">
<input type=hidden name="r" value="1">
<input type=hidden name="hs" value="1">
<input type=hidden name="h" value="dss">
<input type=hidden name="t" value="1">
<input type=hidden name="e" value="_decodedcompressedoptions_">
<table cellspacing="0">
<tr>
<td>Search now: </td>
<td><input type="text" name="q" value="" size="50"><input type="submit"
value="Search"></td>
<td align="right"> <a href=_httpquery_>Advanced search</a></td>
</tr>
</table>
</p>
</form>
}
_content_ [c=sasolinf] {
_aboutqueryform_
<p>_textabout_</p>
}
_textabout_ [c=sasolinf] {
<div class="section">
C-27
APPENDIX C – Information Hub Admin Guide (advanced, with technical documentation)
33
34
35
36
37
38
39
40
41
42
43
44
45
46
47
48
49
50
51
<h3>Welcome to the SASOL Information Hub</h3>
<table width=700>
<td><tr>
<p>You have just opened the SASOL Information Hub. The Information Hub is a
digital library system on which you can find all kinds of information in a
quick and simple way.</p>
<p>Above here you can type a search query or you can click on 'Advanced
search' to search more specific. It is also possible to browse through the
categories and subcategories of the Information Hub. To do this, you have to
click on the 'Category' button in the navigation bar above.</p>
<p>If you have information, digital or physic, that is suitable for the
Information Hub, you can inform the ICT team. They can place the information
on the SASOL Information Hub. It is of great meaning to extend and improve
the information on the Information Hub. All information is welcome, and you
can help to make the Information Hub a success!</p>
</tr></td>
</table>
</div>
}
Code example 7. Package About
11.4. Further learning
The Greenstone Macro language can be a bit painful to learn at first, especially
due the fact that less information about the available macros can be found in the
Greenstone documentation. The best way to get used with the macro language is
by looking through the already available macro files. There is one macro file
available with very comprehensive documentation and explanations about its
structure. The file, named Garish.dm, can be found under the same directory as
the SASOL.dm macro file: GREENSTONE_HOME/macros.
C-28
APPENDIX C – Information Hub Admin Guide (advanced, with technical documentation)
12. Information Hub Style sheet
1
2
3
4
5
6
7
8
9
10
11
12
13
14
15
16
17
18
19
20
21
22
23
24
25
26
27
28
29
30
31
32
33
34
35
36
37
38
39
40
41
42
43
body {
font-family: Verdana, Arial, Helvetica, sans-serif;
background-color: #FFFFFF;
color: #000099;
scrollbar-face-color: #C9E7F2;
scrollbar-arrow-color: #000099;
}
h1, h2, h3, h4 {
font-family: sans-serif, arial, helvetica;
color: green;
}
a:link {
text-decoration: none;
color: #0033FF
}
a:visited {
text-decoration: none;
color: #0033FF
}
.linerow {
background-image: url("/collect/sasolinf/images/line.jpg");
height: 25px;
border: 0px;
padding: 0px;
}
img.icon { border: 0; }
span.navlink {
height: 25px;
padding: 0px 10px 0px 0px;
border: 0px;
}
span.navlink_sel {
height: 25px;
padding: 0px 10px 0px 0px;
border: 0px;
}
Code example 8. Information Hub Stylesheet
A small style sheet is used for the SASOL Information Hub. The style sheet,
named ‘style.css’ and found under the ‘/css’ file of the collection’s homedirectory
(COLLECTION_HOME/css), is being referred from the SASOL.dm macro file. The next
section will briefly describe the different parts of the style sheet.
Line 1 starts with a style where the layout of the <body> element is defined; fonttype, background color, font-color and a different scrollbar are defined here.
Next, at line 9, the Header style is defined; the font-type and font-color are set
here. Currently, only the ‘Welcome to…’ title at the Home page makes use of this
style.
C-29
APPENDIX C – Information Hub Admin Guide (advanced, with technical documentation)
At line 14 to line 22, styles about hyperlinks are defined. Hyperlinks are mainly
used in the category structure. No underline is displayed for hyperlinks and the
colors for non visited and visited hyperlinks are the same.
The linerow style, at line 24, represents the row in which the navigation bar is
positioned. A background image for this row is set, together with some general
row settings.
Line 31 disables borders around images.
Styles for the navigation bar itself are set in the styles from row 33 to 43.
Actually, two different styles are defined for the navigation bar. The first style is
applied on a button in the navigation bar which is not active (not pressed) and the
second style is applied on a button in the navigation bar which is active
(pressed). For the SASOL Information Hub, both styles are exactly the same, so
there is now difference between a pressed and a non pressed button.
12.1. Further learning
The default style sheet shipped with the Greenstone software, named ‘style.css’
and found under GREENSTONE_HOME/images contains much more styles that can
potentially be applied to the SASOL Information Hub.
13. Metadata set
A new metadata set is created for the Information Hub, called the ‘SASOL
Foundation Metadata Set’.
The metadata set contains the following metatags:
Title
Category
represents the title of the document
Indicates to which category (e.g. water, energy, ict etc.) the
document belongs to
Description a description about the document
Software
Set if the document (or better said file) is not an
informative document but an application instead
14. Plugin modifications
A few minor changes to some plugins (Perl scripts) have been made. The
changes apply on the way how documents are opened within the Information
Hub. The plugins to which the changes have been made are used for importing
documents to the Information Hub. One of the responsibilities of these plugins is
to generate a hyperlink to the documents. By default, these hyperlinks were
generated in such a way that the documents are opened in the same browser
window as that of the Information Hub. The documents that can be found on the
Information Hub are opened using an external application (e.g. Acrobat Reader)
and most of the users close the opened documents by pressing the window close
C-30
APPENDIX C – Information Hub Admin Guide (advanced, with technical documentation)
button, thus closing the Information Hub window at the same time. The
modifications to the plugins change the generated hyperlink type to one that will
open the documents in a new browser window.
The change to the plugins are described below. The plugin Perl scripts can be
found under the directory GREENSTONE_HOME/perllib/plugins.
ConvertToPlug.pm
Line number:
457
Old code:
my $doclink =
"<a href=\"_httpcollection_/index/assoc/[archivedir]/doc.$doc_ext\">";
New code:
my $doclink =
"<a href=\"_httpcollection_/index/assoc/[archivedir]/doc.$doc_ext\"
target=\"_blank\">";
Reason for change:
To open documents in a new browser window.
ImagePlug.pm
Line number:
201
Old code:
$doc_obj->add_metadata
($section, "srclink",
"<a href=\"_httpcollection_/index/assoc/[assocfilepath]/[Image]\">");
New code:
$doc_obj->add_metadata
($section, "srclink",
"<a href=\"_httpcollection_/index/assoc/[assocfilepath]/[Image]\"
target=\"_blank\">");
Reason for change:
To open images in a new browser window (this code is not used yet, as
ImageMagic is not yet installed and images are handled as Unknown files. May be
changed back later on).
C-31
APPENDIX C – Information Hub Admin Guide (advanced, with technical documentation)
UnknownPlug.pm
Line number:
153
Old code:
$doc_obj->add_metadata ($section, "srclink",
"<a href=\"_httpcollection_/index/assoc/[assocfilepath]/[$assoc_field]\">");
New code:
$doc_obj->add_metadata ($section, "srclink",
"<a href=\"_httpcollection_/index/assoc/[assocfilepath]/[$assoc_field]\"
target=\"_blank\">");
Reason for change:
To open unknown files in a new browser window. For downloadable files, like
executables, opening in a new window doesn't matter, but e.g. for unknown image
formats it does
C-32
APPENDIX C – Information Hub Admin Guide (advanced, with technical documentation)
APPENDIX A – The CGI mechanism
The CGI (Comman Gateway Interface) mechanism is used for the creation of
dynamic generated web pages. The idea is similar to what languages like PHP
and ASP and JSP do but the concept is different; CGI is not a programming
language but just a protocol for interfacing external (binary) applications to a
webserver. Clients can request the execution of the application by including the
filename of the external application in the URL of the website. Optionally,
arguments can be passed with the URL for interactivity with the external
application.
As soon as the request arrives at the webserver the external application is
located and executed. The output of the application’s execution (STDOUT) is
sent to the webserver who will pass it to the requested client on his turn.
A difference of CGI with languages like PHP, ASP etc. is that, using CGI, the
application is completely separated from the webserver. Using CGI, the external
application is often written in a language like C or PERL, but for example a
language like PHP is just a programming language on itself and the language
interpreter is normally integrated in the webserver.
It is said that the CGI mechanism can be a little bit tricky sometimes as for every
client request a new process has to be started. As a lot of overhead is required
for starting and stopping the external application it is possible to overload the
server as a lot of client requests are made at the same time. Partly this is true,
especially when using interpreted languages, like Perl, as a lot of overhead is
needed for starting the external interpreters and consequently for the interpreting
of the program scripts itself. But, when using a compiled language, like C, things
are safer, as the overhead that is needed for starting and stopping the external
application is minimal.
C-33
APPENDIX C – Information Hub Admin Guide (advanced, with technical documentation)
APPENDIX B – SASOL.dm macro file
##############################################################################
package Global
##############################################################################
_pagewidth_ [c=sasolinf] {100%}
## iconbshelf = icon used for displaying categories, iconmore = icon used for
## displaying the next 20 documents in document overview, iconless = icon used
## for displaying previous 20 documents.
_httpiconbshelf_ [c=sasolinf] {_httpprefix_/collect/sasolinf/images/dot.gif}
_httpiconmore_ [c=sasolinf] {_httpprefix_/collect/sasolinf/images/next.jpg}
_httpiconless_ [c=sasolinf] {_httpprefix_/collect/sasolinf/images/previous.jpg}
## Search button in the navigationbar
_labelSearch_ [c=sasolinf] {<img
src=_httpprefix_/collect/sasolinf/images/search.gif border=0 width=86 height=25
alt=Search>}
##############################################################################
package Style
##############################################################################
## htmlhead is used by the default _header_ macros. It prints out the
## beginning of an html file, including the header. We can override it here
## so that all pages will use our custom style sheet. Includes some javascript
## functions for rollover of images.
_htmlhead_ [c=sasolinf] {
<html>
<head>
<title>SASOL Information Hub</title>
<link rel="stylesheet" href="_httpprefix_/collect/sasolinf/css/style.css"
type="text/css"/>
_globalscripts_
</head>
<body>
}
## Overriden empty to prevent the navigation bar to be displayed on the standard
## location. _navigationbar_ has to be specified instead on the location where
## the navigation bar has to be placed.
_optnavigationbar_ [c=sasolinf] {}
## The pagebanner specifies the logo of the Information Hub (_imagecollection_)
## and the contents of the navigation bar
_pagebanner_ [c=sasolinf] {
<center>
<table width=_pagewidth_ cellspacing=0 cellpadding=0 border=0>
<tr>
<td background="_httpprefix_/collect/sasolinf/images/padding.jpg" valign=top
colspan=3 align=left border=0>_imagecollection_</td>
</tr>
<tr class="linerow">
<td class="navigationlinks" colspan=3 align=center border=0>
<span class="navlink"><a href="_httppageabout_"><img
src="_httpprefix_/collect/sasolinf/images/home.gif" border=0 width=86
height=25 alt="Home"</a>
</span><span style="margin-left: 2px;"></span>_navigationbar_</td>
</tr>
</table>
</center>
}
##############################################################################
package about
##############################################################################
C-34
APPENDIX C – Information Hub Admin Guide (advanced, with technical documentation)
## The search field that can be found on the Home page (= about page) of the
Information Hub
_aboutqueryform_ [c=sasolinf] {
<form name=QueryForm method=get action="_gwcgi_">
<p>
<input type=hidden name="a" value="q">
<input type=hidden name="r" value="1">
<input type=hidden name="hs" value="1">
<!-The next two lines of code are just to reset the selection menus from the
advanced search page. The basic search module and the advanced search module
are in fact just one and the same and therefore the options set for an
advanced search are stored for the basic search as well.
Therefore, to prevent mixing up of the things, for the basic search the two
options that can be given in the advanced search are set to 'text search' and
'OR' search in the two lines below.
-->
<!-- dirty solution for
basic search: attribute "h", with value "dss" means text search
-->
<input type=hidden name="h" value="dss">
<!-- dirty solution for basic search: attribute "t", with value "1" means OR
search
-->
<input type=hidden name="t" value="1">
<input type=hidden name="e" value="_decodedcompressedoptions_">
<table cellspacing="0">
<tr>
<td>Search now: </td>
<td><input type="text" name="q" value="" size="50"><input type="submit"
value="Search"></td>
<td align="right"> <a href=_httpquery_>Advanced search</a></td>
</tr>
</table>
</p>
</form>
}
## Contains the content of the about page
_content_ [c=sasolinf] {
_aboutqueryform_
<p>_textabout_</p>
}
_textabout_ [c=sasolinf] {
<div class="section">
<h3>Welcome to the SASOL Information Hub</h3>
<table width=700>
<td><tr>
<p>You have just opened the SASOL Information Hub. The Information Hub is a
digital library system on which you can find all kinds of information in a
quick and simple way.</p>
<p>Above here you can type a search query or you can click on 'Advanced
search' to search more specific. It is also possible to browse through the
categories and subcategories of the Information Hub. To do this, you have
to click on the 'Category' button in the navigation bar above.</p>
<p>If you have information, digital or physic, that is suitable for the
Information Hub, you can inform the ICT team. They can place the
information on the SASOL Information Hub. It is of great meaning to extend
and improve the information on the Information Hub. All information is
welcome, and you can help to make the Information Hub a success!</p>
</tr></td>
</table>
</div>
}
C-35
APPENDIX C – Information Hub Admin Guide (advanced, with technical documentation)
APPENDIX C – Greenstone argument information
short name
long name multiple multiple default
char? value?
a
action
yes
no
p
b
query mode no
no
0
bc1aboutdesc
collector
yes
no
specific
bc1cfgchanged collector
no
no
0
specific
bc1clone
collector
no
no
0
specific
bc1clonechanged collector
no
no
0
specific
bc1clonecol
collector
yes
no
specific
bc1contactemail collector
yes
no
specific
bc1dirname
collector
yes
no
specific
bc1dodelete
collector
no
no
0
specific
bc1econf
collector
no
no
0
specific
bc1esrce
collector
no
no
0
specific
bc1fromsrce
collector
no
no
0
specific
bc1fullname
collector
yes
no
specific
bc1infochanged collector
no
no
0
specific
bc1input
collector
yes
yes
specific
bc1inputnum
collector
yes
no
3
specific
bc1inputtype
collector
yes
yes
specific
bc1tmp
collector
yes
no
specific
bcp
change
yes
no
C-36
default saved current value
status args
config must
"status"
weak must
"0"
weak mustnot ""
weak
mustnot "0"
weak
mustnot "0"
weak
mustnot "0"
weak
mustnot ""
weak
mustnot ""
weak
must
weak
mustnot "0"
weak
must
"0"
weak
must
"0"
weak
mustnot "0"
weak
mustnot ""
weak
mustnot "0"
weak
mustnot ""
weak
mustnot "3"
weak
mustnot ""
weak
must
weak
mustnot ""
""
""
APPENDIX C – Information Hub Admin Guide (advanced, with technical documentation)
beu
bp
c
cc
ccp
ccs
cfgfile
cl
cm
cmd
cq2
ct
d
de
debc
dm
ds
dsbc
e
password
submit button
edit user
submit button
set
preferences
button
collection
collections to
search
cross
collection
page
cross
collection
searching
configuration
file contents
classification
OID
confirm an
action
config
command
combine
queries
collection
type
document
OID
end date
end date bc
date
metadata
start date
start date bc
compressed
arguments
yes
no
weak
mustnot ""
yes
no
weak
mustnot ""
yes
yes
no
yes
good
weak
must
must
""
""
no
no
0
weak
must
"0"
no
no
0
weak
must
"0"
yes
no
weak
mustnot ""
yes
no
none
can
yes
no
weak
mustnot ""
yes
no
weak
mustnot ""
yes
no
weak
must
""
no
no
weak
must
"0"
yes
no
none
can
yes
no
yes
no
no
no
0
weak
weak
weak
must
must
must
yes
no
yes
no
no
no
0
weak
weak
good
must
""
must
"0"
mustnot "status-0-00--00-0-0-0prompt-10--4------0-1l--1en-50---20select---
C-37
0
""
"0"
""
APPENDIX C – Information Hub Admin Guide (advanced, with technical documentation)
el
er
f
fc
fqa
fqc
fqf
fqk
fqn
fqs
fqv
g
gc
gp
gt
h
h2
hd
hl
hp
href
external link
preference
the
compressed
args of the
refer page
frame
include
search bar
form query
advanced
query
form query
combines
form query
fields
form query
casefolds
form query
num fields
form query
stems
form query
values
granularity
expand
contents
go to page
expand text
main index
main index
for second
query
history
display
highlighting
on/off
html page
URL of
external link
yes
no
prompt weak
yes
no
weak
mustnot ""
no
no
no
no
0
1
weak
weak
mustnot "0"
must
"1"
no
no
0
weak
must
"0"
yes
no
weak
must
""
yes
no
weak
must
""
yes
no
weak
must
""
yes
no
weak
must
"4"
yes
no
weak
must
""
yes
no
weak
must
""
yes
no
no
no
weak
weak
must
can
""
"0"
yes
no
yes
yes
no
no
no
no
none
weak
weak
weak
mustnot
can
"0"
must
""
must
""
yes
no
0
weak
must
"0"
no
no
1
weak
must
"1"
yes
yes
no
no
weak
none
mustnot ""
can
C-38
4
0
0
must
00031-001-10utfZz-8-00"
"prompt"
APPENDIX C – Information Hub Admin Guide (advanced, with technical documentation)
hs
ifl
il
j
j2
k
ky
l
m
n
n2
nl
nw
o
p
pc
pfd
pfe
pfl
pld
ple
pll
ppnum
pptext
pr
pw
pxml
history save no
i'm feeling
no
lucky
internal link no
preference
sub collection yes
index
sub collection yes
index for
second query
casefolding no
user time key yes
interface
yes
language
maximum
yes
number of
documents
language
yes
index
language
yes
index for
second query
new language no
new encoding yes
hits per page yes
page
yes
phind
yes
classifier
phind first_d yes
phind first_e yes
phind first_l yes
phind last_d yes
phind last_e yes
phind last_l yes
phind phrase yes
number
phind phrase yes
text
protocol
yes
password
yes
phind XML
no
no
no
0
weak
weak
mustnot "0"
mustnot ""
no
l
weak
must
"l"
no
weak
must
""
no
weak
must
""
no
no
no
1
en
weak must
weak must
config must
"1"
""
"en"
no
50
weak
must
"50"
no
weak
must
""
no
weak
must
""
none
none
weak
config
weak
mustnot ""
mustnot
must
"20"
must
"argumentinfo"
mustnot ""
weak
weak
weak
weak
weak
weak
weak
mustnot "0"
mustnot "0"
mustnot "0"
mustnot "10"
mustnot "10"
mustnot "10"
mustnot "0"
no
weak
mustnot ""
no
no
no
none
weak
weak
can
mustnot ""
mustnot "0"
no
no
no
no
no
no
no
no
no
no
no
no
C-39
0
20
home
0
0
0
10
10
10
0
0
APPENDIX C – Information Hub Admin Guide (advanced, with technical documentation)
q
q2
qb
qf
qt
qto
r
rd
rl
s
st
t
u
ua
uan
ug
uma
umc
umnpw1
umnpw2
mode
query string yes
query string yes
for second
query
query box
no
type
query form
no
type
query type
no
query type
no
options
start results yes
from
include
no
relevant
documents
is relative link no
stemming
no
show tips
yes
search type no
static page
no
whether a
yes
user has
been
authenticated
whether user yes
authentication
is needed
user groups yes
user
yes
management
action
user
yes
management
comment
user
yes
management
new
password 1
user
yes
management
no
no
weak
weak
must
must
""
""
no
0
weak
must
"0"
no
0
weak
must
"0"
no
no
0
3
weak
weak
must
must
"0"
"3"
no
1
weak
must
"1"
no
0
weak
must
"0"
no
no
no
no
no
no
0
0
1
1
0
none
weak
weak
weak
weak
weak
mustnot
must
"0"
must
"1"
must
"1"
mustnot "0"
mustnot ""
no
weak
mustnot ""
no
no
weak
listusers weak
no
weak
mustnot ""
no
weak
mustnot ""
no
weak
mustnot ""
C-40
mustnot ""
mustnot "listusers"
APPENDIX C – Information Hub Admin Guide (advanced, with technical documentation)
umpw
umug
umun
umus
un
us
v
w
x
xx
z
new
password 2
user
management
password
user
management
groups
user
management
user name
user
management
account
status
user name
user account
status
version
encoding
detached
page
detach all doc
pages
gsdl uid
yes
no
weak
mustnot ""
yes
no
weak
mustnot ""
yes
no
weak
mustnot ""
yes
no
weak
mustnot ""
yes
yes
no
no
invalid
weak
weak
must
""
mustnot "invalid"
no
yes
no
no
no
no
0
utf-8
0
weak must
config must
weak must
"0"
"utf-8"
"0"
no
no
0
weak
must
"0"
yes
no
none
mustnot
C-41
APPENDIX C – Information Hub Admin Guide (advanced, with technical documentation)
APPENDIX D – Backup procedure
Backups have to be created on a regular basis. During the pilot phase of the
Information Hub, it is a little bit difficult to schedule a periodic backup procedure
(e.g. once a week) as new information is not yet added regularly and the backup
facilities are limited.
Therefore, during the pilot phase of the Information Hub, it makes no sense to
describe a strict backup procedure. The maintainers should be responsible to
make backups now and then, for example when a lot of new information is
added. What is important for now is that it is clear what exactly needs to be
saved for backup and restored during backup recovery. These points are
described below.
The only place backups can be stored at the moment is the Information Hub
client system, directly connected to the server.
Creating a backup
Creating a backup of the contents of the digital library is easy as only one folder
has to be copied.
The folder to be copied is called sasolinf and can be found under
GREENSTONE_HOME/collect/
The collection folder contains a lot of data and therefore it is a good idea to
compress the folder to a zip archive called infhub_date.zip where date
represents the date at which the backup has been made, e.g.:
infhub_08jun2006.zip. The folder can be copied to the c:\backup folder on the
client system.
Restoring a backup
For restoring a backup, the collection folder, saved as described above, has to
be extracted to the Greenstone collection folder: GREENSTONE_HOME/collect/.
Besides the collection folder, the following extra files have to be restored.
File
location
sasol.dm
main.cfg
ConvertToPlug.pm
ImagePlug.pm
UnknownPlug.pm
GREENSTONE_HOME/macros
GREENSTONE_HOME/etc
GREENSTONE_HOME/perllib/plugins
GREENSTONE_HOME/perllib/plugins
GREENSTONE_HOME/perllib/plugins
These files can be found inside the backup folder of the client system and/or on
the SASOL Information Hub files CD-ROM.
Make sure that, anytime a change has been made to a (configuration) file, a
backup of this file is made!!
C-42
APPENDIX C – Information Hub Admin Guide (advanced, with technical documentation)
APPENDIX E – Information Hub conventions
•
The folder of a file in the import directory should correspond with the
category in the Information Hub.
So, a file placed in the category ICT, subcategory books should be placed
in the import directory (Collection structure of the Librarian Interface)
under the directory Books, which is a subdirectory of ICT:
ICT –––
| Books
When a file is assigned to multiple categories, the folder should
correspond with the first assigned category (which is the first sf.Category
metatag).
•
Word en Powerpoint files should be converted to the PDF file format
before being added to the library.
•
Files that have to be added to the Information Hub should be placed in the
c:\toAdd folder of the server system first. After they are added to the
Information Hub they should be removed again.
•
Files to add should be handed in with a clear title and description. Also the
category where the file should be placed should be noted.
•
The Information Hub server should be used as a server only. So no other
task, like text editing, should be done on this system. Only for
maintenance someone should have access to the system.
•
Once a week, the contents of the Information Hub should be checked for
consistency.
•
When the category of a file changes, the location of the file in the
Collection structure should be changed as well, so that the changed
category corresponds the location of the file in the Collection structure.
•
Files with very long filenames may result to errors during build time. The
file is not being added to the library as a result.
C-43
APPENDIX D – Information Hub User Guide
APPENDIX D – Information Hub User Guide
D-1
APPENDIX D – Information Hub User Guide
SASOL Information Hub
User Guide
Version 1.0
May 2006
Toosje Geerts
Redmar Atsma
D-2
APPENDIX D – Information Hub User Guide
Preface
This manual is written for the employees of SASOL and the students who do
their internship for SASOL. The manual explains in a simple and clear way the
usage of the Information Hub.
The usage of the Information Hub is very easy and should be self-explanatory.
Though, this user manual can be used as a reference or to find more information
about a specific component of the Information Hub.
The Information Hub is an initiative of the SASOL foundation and Ex-change, a
Dutch NGO that cooperates with the SASOL Foundation.
The end users of the Information Hub can help making the Information Hub
project a success. If you got information, either hardcopy or softcopy, that
is suitable for the Information Hub, please contact an ICT-student or one of
the ICT administrators. All relevant information is welcome and can help to
extend and improve the Information Hub.
D-3
APPENDIX D – Information Hub User Guide
Table of Contents
Preface _____________________________________________________________ D-3
Table of Contents ____________________________________________________ D-4
1.
The use of the Information Hub ____________________________________ D-5
2.
Information of the Information Hub_________________________________ D-5
2.1.
Categories ________________________________________________________ D-5
2.2.
Sorts of information ________________________________________________ D-6
3.
How to start the Information Hub __________________________________ D-7
4.
Searching on the Information Hub __________________________________ D-7
4.1.
The ordinary search query___________________________________________ D-7
4.2.
The advanced search query __________________________________________ D-8
4.3.
Searching by category_______________________________________________ D-8
4.4.
Searching by title__________________________________________________ D-10
5.
Opening a file___________________________________________________ D-11
6.
Software _______________________________________________________ D-12
7.
Saving a file from the Information Hub _____________________________ D-12
7.1.
Documents _______________________________________________________ D-13
7.2.
Excel sheets ______________________________________________________ D-14
7.3.
Pictures__________________________________________________________ D-15
7.4.
Movies and Audio _________________________________________________ D-15
D-4
APPENDIX D – Information Hub User Guide
1.
The use of the Information Hub
The Kitui-district has a shortness of information and knowledge. Nowadays Kitui
develops more and more and catches up with the rest of Kenya. For that reason
the need of information is getting bigger and bigger. There is information
available at ministries, companies and organizations. But in many cases
information is not accessible for the people who need the information. Things get
done twice, take more time, get done less efficient or are not done at all. The
shortness of information directly harms the development of Kitui-district.
Through the years, al lot of information is collected by SASOL and the students.
The Information Hub is one point were the information can be stored. The hub
makes information easier accessible for people who work at SASOL, so they can
extend their knowledge.
2.
Information of the Information Hub
The next sections give an overview of what can be found on the Information Hub.
2.1. Categories
Lab technology
How to improve your drinking water quality?
Agriculture
How can I get more yields of my land and my livestock?
Hydrologic
Everything about water, water management and stand storage dams.
Pump technology
How can I get my own affordable pump?
Energy technology
How can I use durable energy sources?
Electricity
Which options do I have when I want to use electricity?
ICT
How can I use the computer more efficient?
Rural Development
How can you improve the circumstances in rural areas?
Administration
Year reports and results of SASOL foundation
Ex-change
Planning-schemes and information about Ex-change for students
Most of these categories have subcategories, and these subcategories have
other subcategories.
D-5
APPENDIX D – Information Hub User Guide
2.2. Sorts of information
•
•
•
•
•
•
•
•
•
•
•
•
Reports of Ex-change students
Reports of Kenyan students
Reports of other organizations
Manuals
E-books
Books
Results
Recommendations
Maps
Checklists
Articles
Pictures
D-6
APPENDIX D – Information Hub User Guide
3.
How to start the Information Hub
1. If not already started, start the Information Hub by clicking the SASOL
Information Hub icon on the desktop.
Figure 44. SASOL Information Hub icon
2. The homepage of the Information Hub will be seen when successfully
started:
You can type a search query
here
Figure 45. Information Hub homepage
Now we can start to search for information.
4.
Searching on the Information Hub
There are four different ways of searching for information on the Information Hub.
• The ordinary search query
• The advanced search query
• Searching by category
• Searching by title
4.1. The ordinary search query
This option is used mostly; you only have to fill in the query space on top of the
homepage of the Information Hub. The hub will search for matching files. The
D-7
APPENDIX D – Information Hub User Guide
results are ordered from relevant to less relevant to the query. The 20 best
matching titles will be shown. To view the next 20 match click the arrow
button
at the end of the page.
4.2. The advanced search query
If you want to search more specific, you can use the advanced search query. To
reach the advanced search query you can click the ‘Advanced search’ button
next to the ordinary search query on the homepage. Or you can click the
button on the navigation bar.
Search for
Text or title
search?
Search for some or all of
the entered keywords
You can type a search
query here
Figure 46. Advanced search page
Some more search options can be specified when using the advanced search
option. You can specify to search trough the contents of the documents (text) or
to search for a title of a document (titles). And when entering multiple keywords
in the search field, you can specify if the search result should contain at least one
of the entered keywords (some) or that it should contain all of the keywords (all).
These options can be set using the selection boxes in front of the search field.
After entering some keywords to search for in the query space you can click
‘Begin Search’ to show the results. Again, the first 20 results are shown; if you
want to see the next 20 files on the next page click the arrow button
at the
bottom of the page.
4.3. Searching by category
The third option is searching by category at the Category page, which you can
reach by clicking the
button on the navigation bar.
A list of all the categories in the Information Hub is shown, as can be seen in
Figure 47.
D-8
APPENDIX D – Information Hub User Guide
In our example we want to know something about filtering drinking water, so we
click the category ‘lab technology’. In the next page, all the subcategories of lab
technology are displayed. One of them is ‘filters’, this is exactly the one that we
were looking for so we open this subcategory and we will find all sorts of
information about filtering drinking water.
Figure 47. Category page
For example, if we want to know something about filtering drinking water, we
have to click on the category ‘LAB TECHNOLOGY’. The contents of this category
will be displayed consequently. In our example, we need to choose the
subcategory ‘FILTERS’, the contents of this category will be displayed which
consists of both subcategories and documents. We can now open one of the
documents or further descent in the categories list by clicking a subcategory.
D-9
APPENDIX D – Information Hub User Guide
Figure 48. The contents of category LAB TECHNOLOGY, subcategory FILTERS displayed
Note that the active (sub)category is displayed in bold. When clicking again on
the subcategory ‘FILTERS’ it will collapse the subcategory again and the
contents of the ‘LAB TECHNOLOGY’ category are displayed again. So in Figure
48, the category ‘FILTERS’ is currently active, the category contains some
subcategories (‘FILTER STUDIES’,’ HEALTH TRAINING MANUAL’,
‘PICTURES’) and documents (Colloidal Silver, Costing filter, etc.).
4.4. Searching by title
It is also possible to search by title, by clicking the
button on the
navigation bar and click on it. Initially, titles starting with the character ‘A’ are
displayed. To show the titles starting with another character, click the
corresponding character from the character list, just below the blue navigation
bar.
D-10
APPENDIX D – Information Hub User Guide
Figure 49. Titles page
5.
Opening a file
After you have found a file you’ll like to view, you have to open it by clicking on
‘View document’.
Most of the documents will open in Acrobat Reader (ask the ICT team for a guide
about Acrobat Reader), calculation sheets open in Excel, music and video files
open in Windows Media Payer and the pictures are opened in an Internet
browser. So as you can see all the files do need different software programs.
Click ‘View document’ to open
the document
Figure 50. opening a document
D-11
APPENDIX D – Information Hub User Guide
If you open an Excel document, a window like Figure 51 will appear. Click ‘Open’
if you want to view the file. If you want to store the file on an external storage
device click ‘Save’. For more saving instructions see chapter 7 Saving a file from
the Information Hub.
Figure 51. Opening a Excel document
If you want to close the document and continue searching on the Information
Hub, you can click the cross
6.
in the upper right corner of the screen.
Software
If you click the
button on navigation bar, you will go to a page were you
can download software applications and tools. E.g. if you don’t have Adobe
Acrobat reader on installed on your computer, you can download the software
from here and install it on your computer. Ask someone of the ICT team if you’re
not sure how to install software on your computer.
7.
Saving a file from the Information Hub
Sometimes it is useful to take a file from the Information Hub and store it
somewhere else, or to get a hardcopy of it. It is possible to save a file on a floppy
disk or memory stick. The Information Hub contains four different files types:
documents, Excel sheets, pictures and movies, they all need their own saving
instructions.
D-12
APPENDIX D – Information Hub User Guide
7.1. Documents
1. Go to the menu bar and click the floppy icon, it is the most left icon on the
page; it is also called ‘Save a Copy…’ In Figure 52 you can see the floppy
icon in the red circle.
Click the floppy icon to
save a copy
Figure 52, Save a Document
2. If you have clicked the floppy icon, a window like in Figure 53 appears.
Figure 53, Save a Copy...
3. Click on the field next to ‘save in’, and select the place were you want to
save your file, e.g. 3 ½ Floppy (A:).
D-13
APPENDIX D – Information Hub User Guide
4. Sometimes it is necessary to change the name of the file you want to
save, if you want to change the name click the field next to ‘Object name’.
Now you are able to change the name of the file.
5. After selecting the location were you want to save the document and
optionally changed the name, click the ‘Save’ button. Now you have saved
the document.
If you want a hardcopy of a document you can go to one of the copy shops in
town. There they can print a copy for you from your floppy disk or memory
stick.
7.2. Excel sheets
1. Saving an Excel sheet is almost similar as saving an Acrobat Reader
document. First you click ‘file’ in the menu bar, a menu appears, click
‘Save As…’ See Figure 54.
Figure 54, saving a excel sheet
2. You get a Save window, similar to Figure 53.
3. Select the storage device you want to use e.g. floppy disk or memory
stick, in the field next to ‘Save in’.
4. If you want to give your file another name click the field next ‘Object
name’, you can change the name of the file now.
5. After you have selected your storage device and changed the name of the
file, click the ‘Save’ button. Now your sheet is saved on the storage device
you want.
D-14
APPENDIX D – Information Hub User Guide
7.3. Pictures
1. If you want to save a picture on your memory stick or floppy disk you first
open the file. A new window opens to display the picture. Go with your
pointer to the picture and click the right button of your mouse. A menu
appears, click ‘Save as’. See Figure 55 for the menu.
2. Again a window similar to Figure 53 will appear, select the storage device
you want to use, e.g. floppy disk or memory stick, in the field next to ‘Save
in’.
3. If you want to change the name of the picture, click the field next to ‘Object
name’. Now you are able to change the name.
4. If you have selected your storage device and changed the name of the
file, click the ‘Save’ button.
Figure 55, Save Picture As..,
7.4. Movies and Audio
1. If you open a file that contains a movie or audio, the Information Hub
automatically opens the Windows Media Player. When you want to save a
movie or audio file you have to hold in mind that movie and audio files are
big, and probably won’t fit on a floppy disk.
2. If you have a storage device that is big enough, like a memory stick you
can save the file by clicking ‘file’ in the menu bar.
3. A menu will appear, click ‘Save as…’
D-15
APPENDIX D – Information Hub User Guide
4. Again a window similar to Figure 53 will appear, click the field next to
‘Save in’ and select the storage device, e.g. your memory stick.
5. After you have selected the storage device, you can change the name of
the file by clicking the field next to ‘Object name’; after you have clicked
you can change the name of the file.
6. After changing the name, click the ‘Save’ button. The movie or audio file is
saved now.
D-16
APPENDIX E – Network Cost Overview
APPENDIX E – Network Cost Overview
Nairobi offers some good shops where high-quality network devices can be
found. Prices are, compared to Europe, rather high.
The scheme below gives an overview of the average cost of network devices in
Nairobi, both in Kenyan Shilling (KSH) and in Euro. At the time of writing, 1 euro
is worth around 90 Kenyan Shillings.
component
UTP cable cat. 5.0
Connector UTP cat 5.0
RJ-45 crimping tool
Switch 8-port
Switch 16-port
NIC
Price in KSH
15/m
15/piece
1500
4000
6500
550
Price in Euro
0.17
0.17
16,45,70,6,-
At least one 16-port switch is required in the ICT room of SASOL. An extra 8-port
switch is required in the second SASOL office building. Network Interface Cards
(NICs) are not necessary to buy at the moment as most of the systems are
already equipped with one and also some separate NICs can be found in the
office. The price of cables/connectors is, compared to the rest of the cost,
extremely low. The two switches are the main investments; together it can be
expected to cost more than 10.000 (110 euros), which is high.
E-1
APPENDIX F – New School Structure
APPENDIX F – New School Structure
The ICT school project will involve the following steps:
1. Evaluation of the school
2. Certification of the school
3. Signing of contract of involvement
School can be included
in school project
4. Hiring of ICT teacher
5. Installation of computers
6. ICT training at school
7. Monthly audit +
reported recommendations
8. Action is taken based on audit
1. The first step when a new school desires to participate in the
school project is to evaluate the school. During the evaluation
phase a research will be done to see if the school can be a
potential candidate for the school project. In this phase it is not
necessary that the school already accomplishes all of the
conditions as stated in the school projects’ contract; if it is likely
F-1
APPENDIX F – New School Structure
that the school can fulfill the conditions in the near future the
school can be hold as a potential candidate, till the conditions
are met.
2. As soon as the school meets the contract’s conditions the school
can be certificated as an ‘ICT school project candidate’
3. After signing the contact the candidate accept the conditions
stated in the contract. The candidate is now officially included in
the school project as a participant.
4. Accordingly to the contract the school should now hire an ICT
teacher, if not already done, or if there is no teacher already
available at the school.
If there is a teacher available at the school with basic ICT
knowledge this person can be trained as an ICT-teacher by
Sasol, under the condition that this person can be scheduled at
the school as a full-time ICT teacher.
5. When the ICT teacher is present at the school a start can be
made with the installation of the computers.
6. Now that the school is equipped with a decent computer room
the school’s students can be trained in ICT lessons.
7. Every month an audit will take place. During this monthly audit a
checklist has to be filled to check if the school fulfills the
requirements of the Contract of involvement. The checklist has
to be stored in the Information Center of Sasol, both in hardcopy format and digitally on the Information Hub.
8. Depending on the outcomes of the monthly audit appropriate
actions will be taken to improve or to maintain the ICT situation
at the specific school.
Step 6 till 8 is a continuing process.
Course content
Secondary schools should be taught according KNEC (Kenya National
Examination Council). KNEC is the national examining body which is
responsible for setting national examinations for primary and
secondary schools and tertiary colleges. ICT examinations are
available for secondary schools and colleges, but not for primary and
polytechnic schools. Therefore, these schools should be taught using
F-2
APPENDIX F – New School Structure
the course material of SASOL-Exchange. The course material will be
created by the students in the project in collaboration with the ICT
teachers of the participating schools.
F-3
APPENDIX F – New School Structure
SASOL-EXCHANGE,
KITUI SCHOOLS ICT PROJECT,
P.O. BOX 85,
KITUI.
SASOL-Ex-change School ICT Project yearly audit
1. Is there an ICT-teacher available at the school?
О Yes
О No
Comments:
___________________________________________________
___________________________________________________
___________________________________________________
2. Is the school teaching ICT lessons to their students as part of
their regular course program?
О Yes
О No
Comments:
___________________________________________________
___________________________________________________
___________________________________________________
3. For Secondary schools only: is the school being taught according
KNEC?
О Yes
О No
Comments:
___________________________________________________
___________________________________________________
___________________________________________________
F-4
APPENDIX F – New School Structure
4. Is the school giving ICT assessments to their students on a
regular basis?
О Yes
О No
Comments:
___________________________________________________
___________________________________________________
___________________________________________________
5. What is the level of the student’s ICT knowledge currently?
Basics of the computer
О Poor
О Average
О Good
О Very Good
Windows
О Poor
О Average
О Good
О Very Good
Word
О Poor
О Average
О Good
О Very Good
Excel
О Poor
О Average
О Good
О Very Good
Powerpoint
О Poor
О Average
О Good
О Very Good
Access
О Poor
О Average
О Good
О Very Good
Basics of Programming
О Poor
О Average
О Good
О Very Good
6. What is the condition of the computer systems
О Poor
О Average
О Good
О Very Good
7. Are there systems or components which have to be replaced?
О Yes,
Kind of (Tower/Monitor/Component etc.):
F-5
APPENDIX F – New School Structure
_________________________________________________
Serial Number (if available):
_________________________________________________
О No
8. Is a computer extension necessary at the school?
О Yes, amount of extra computer systems needed:
______________
О No
9. Feedback of ICT teacher. Difficulties, improvements or anything
else the ICT teachers wants to inform about the school project
can be noted here:
___________________________________________________
___________________________________________________
___________________________________________________
___________________________________________________
___________________________________________________
___________________________________________________
Every audit report has to be placed on the Information Hub, digitgally!
F-6
APPENDIX F – New School Structure
SASOL-EXCHANGE,
KITUI SCHOOLS ICT PROJECT,
P.O. BOX 85,
KITUI.
SASOL-Ex-change School ICT Project Contract of Involvement
1. Any school that wishes to participate in the ICT project MUST fulfill the following
conditions:
• A fulltime ICT teacher should be hired
• Other teachers should be given substantial ICT training
Option: If there is a teacher available at the school with enough time he/she
can also be the ICT contact person and teacher
• A well equipped computer room should be available
• There should be a stable power supply for the computer room
• The computer room should be secure
• The school should accept a monthly audit of the project
2. If the school does not accept the contract or does not fulfill the requirements of
the contract SASOL-Ex-change will NOT include the school in the project.
3. In a school where the project is ongoing the recommendations of the monthly
audit will have to be acted upon as immediately as possible.
4. SASOL-Ex-change reserves the right to withdraw from any school which fails to
implement the conditions of this contact or repeatedly fails to act on the
recommendations of the monthly audit.
The management of this school has carefully read and understood this contact and
wishes to be included in the project. We as a school will be bound by the conditions
set out in this contact and will uphold them at all times.
SCHOOL REPRESENTATIVE
NAME:
DESIGNATION:
SIGNATURE:
DATE:
SASOL EXCHANGE IT PROJECT REPRESENTATIVE
NAME:
DESIGNATION:
SIGNATURE:
DATE:
F-7