1
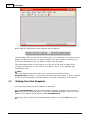
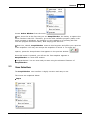
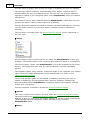
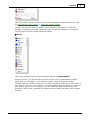
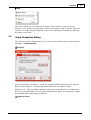
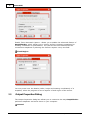
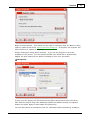
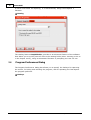
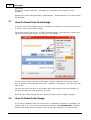
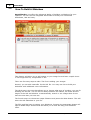
SnapVideo Pro
User's Manual
Copyright © 2007 SnapVideoPro.com
I
SnapVideoPro
Table of Contents
2
Introduction
1 Welcome
................................................................................................................................... 2
2 What Is...................................................................................................................................
SnapVideoPro?
3
3 System...................................................................................................................................
Requirements
3
4 Why WiseSnap?
................................................................................................................................... 3
5 Contact................................................................................................................................... 4
4
Features
1 Overview
................................................................................................................................... 4
2 Making...................................................................................................................................
Your First Snapshot
5
3 User Interface
................................................................................................................................... 6
4 Input ...................................................................................................................................
Properties Dialog
10
5 Output
...................................................................................................................................
Properties Dialog
11
6 Program
...................................................................................................................................
Preferences Dialog
13
7 How To
...................................................................................................................................
Insert Text On An Image
15
8 How To
...................................................................................................................................
Draw On An Image
15
9 How To
...................................................................................................................................
Build A Slideshow
17
18
Troubleshooting
1 Troubleshooting
................................................................................................................................... 18
19
Index
Copyright © 2007 SnapVideoPro.com
Introduction
1
1.1
2
Introduction
Welcome
Welcome to SnapVideoPro , the truely easy to use screen capture software that
brings your snapshots to life!
SnapVideoPro has been designed to be as easy to use as possible. With
SnapVideoPro , taking snapshots of your desktop or any portion of it is now, indeed,
a snap! While keeping simplicity in mind, we also tried to make SnapVideoPro as
easy to use in building professional presentations for your documents as possible!
Therefore, now SnapVideoPro has the ability to apply photo retouching effects to
your snapshot, to add text to it, to draw on it and much more! Not to mention that
you can now save snapshots one by one by using the built-in auto-snapshot feature,
and save your snapshots in several graphics formats, including JPG! You can now
resize your snapshots using up to 7 built-in professional resizing filters!
Further more, SnapVideoPro includes a fully multi-document interface (MDI), that
allows you to quickly switch between your snapshots and edit them as you like! And
using the built-in XP-look alike, your visual experience will now become more
pleasant and easy to work with!
Features include:
Ability to capture any portion of the screen
Work with multiple images at once
Apply professional photo retouching effects to your snapshots
Adding images and text to your snapshots
Resizing snapshots using up to 7 advanced filters
Configurable, system-wide hotkeys for most common actions
Save snapshots to multiple image formats
Capture a mouse-defined region of the desktop
Capture desktop objects like menus, windows, listboxes, editfields, etc.
Directly print snapshots
Easily create slideshows by using the autocapture feature
Autohide the program on capture
Beep whenever capture starts and whenever finishes
Undo last operation support
Windows XP look-alike, even on non-XP systems
Complete help manual
Would you like to see a few reasons why you should choose SnapVideoPro ?
Click here
© 2003-2005 DC Software Group
3
SecureMail
Copyright © 2007 SnapVideoPro.com
All Rights Reserved.
1.2
What Is SnapVideoPro?
SnapVideoPro is a screen-capture software, capable of capturing your entire
desktop, a portion of it or the active window of the desktop.
But there's more! SnapVideoPro can now open bitmap images and can save to JPG,
BMP and TIFF formats, can apply several photo retouching effects to your image, can
add text to it, can draw on it and more! Further more, SnapVideoPro can build
slideshows for you from the snapshots you take, making it perfect for building
desktop presentations!!
And that's not all! SnapVideoPro allows you to work with a virtually unlimited
number of snapshots at once! Yes, that is true! You can now perform multiple
snapshots in the same program, and all your documents will be easily accessible
from the SnapVideoPro user interface!
1.3
System Requirements
SnapVideoPro has the following minimum requirements:
Windows 98, ME, NT 4.0, 2000, XP Home Edition, XP Professional or later versions
of these
3 MB of free hard-disk space + swap file space
Important Note:
Although the program runs in Windows 95, this version is no longer officially
supported.
1.4
Why WiseSnap?
Here are a few reasons why you should choose SnapVideoPro :
Save time
Don't use complex, expensive graphics editing software for taking just a quick
snapshot!!! SnapVideoPro offers many functions that will allow you to create a
professional printout of your desktop!
Save money
Stop wasting money on software that does not do what you want or does it only
partially! With SnapVideoPro, capturing and building a professional image is now
easier than ever!
Concentrate on the important thing
© 2003-2005 DC Software Group
Introduction
4
Start efficiently organizing your work and don't worry about building professional
snapshots any more! SnapVideoPro can now do this automatically for you!
Enhanced functionality
SnapVideoPro is so much more than just a screen capture software! You can now
apply several photo retouching effects to your image, customize it as you wish by
drawing on it, placing text on it, and much more!
Order your copy now
If this is what you have been looking for, you can now purchase a registration key
for SnapVideoPro, become a registered user and benefit of all these great features
in just a couple of days! Visit our website or contact us for additional details on
purchasing registration keys.
Feedback is always welcome
We hope that you will enjoy using SnapVideoPro . We are permanently updating
our software, therefore please let us know about any comments, suggestions or
improvements you may have.
1.5
Contact
You may contact us at:
http://www.SnapVideoPro.com
2
2.1
Features
Overview
SnapVideoPro captures your desktop at anytime, from anywhere in Windows, by
simply pressing the hotkey associated with it. This hotkey is permanently visible in
the program's status bar, in the second panel.
SnapVideoPro 's working area is visible immediatly after starting the program.
© 2003-2005 DC Software Group
5
SecureMail
Notice that the status bar of the program has two panels:
The first panel tells you the current image size, in our case 483 x 311 pixels and its
quality (24 bits per pixel in our case), as well as the size it takes in memory (the
size can be calculated easily as width x height x bits per pixel).
The second panel tells you the hotkey you can use at any time to capture the
currently selected item. In our case, this is Shift + Ctrl + P. Try pressing this
combination now!
Hint:
The second status bar panel offers you a quick hint of all the functions
SnapVideoPro provides. Try hovering the mouse over any button or menu and you
will see a short description of that button's or menu's functionality in this panel!
2.2
Making Your First Snapshot
Let's start by making our first snapshot in Windows.
Open SnapVideoPro , and also start another software program (can be a word
processor such as Microsoft Word, or any other software program). Now let's try to
capture the contents of this window inside SnapVideoPro .
The first step is choosing our desired capture option. Go to the File menu and
© 2003-2005 DC Software Group
Features
6
choose Active Window from the menu.
Next, since this is the first time you use SnapVideoPro , the hotkey to capture the
active window is Alt+F12. Therefore, go to the other software program (make it the
active program in Windows, by choosing it in the taskbar or by pressing Alt+Tab
until the program becomes visible). Now simply press Alt+F12.
Wow! Yes, indeed, SnapVideoPro reacts to this keypress and offers you a preview
of the snapshot! You may now accept this snapshot or cancel it. To accept the
capture, press the Accept button that appears in the preview window.
Once this button is pressed, you will see the first snapshot appears in
SnapVideoPro in a new child window.
Congratulations! You are now ready to start using the advanced features of
SnapVideoPro !
2.3
User Interface
The SnapVideoPro user interface is highly intuitive and easy to use.
The menus are explained below:
Input
© 2003-2005 DC Software Group
7
SecureMail
Use this menu to quickly open or save an image or snapshot (the first two options).
The next five options (Desktop, Active Window, Fixed Region, Area and Object)
actually define the way your capture occurs. You can click any of these options to
highlight it. Based on the configured option here, SnapVideoPro does your capture
and saves it.
The Hotkey Is Active option specifies whether SnapVideoPro reacts when the user
presses the capture hotkey (which is Alt+F12 by default).
Use the Show Last Capture command to show the last performed capture. This way
you can quickly restore your previous capture, without having to complete it
manually.
The Properties command opens the Input Properties window which is discussed in
the next topic.
Output
Use the Output menu to specify where you would like SnapVideoPro to save your
snapshot. The default option is File, meaning each capture is saved to an image file.
The second option, Printer, tells SnapVideoPro to send the snapshot to the printer,
directly. This means that each time you take a snapshot, it will be immediatly
printed.
The Clipboard option, when selected, places the image on the clipboard. The Catalog
option saves the image automatically to the catalog folder you define in the
Output Properties window .
The Preview Window option can be enabled or disabled, permitting the user to
enable or disable the preview window before taking a snapshot. Disabling the
preview window makes SnapVideoPro immediatly acquire the snapshot, without
further user confirmation.
Use the Properties command to access the Output Properties window .
Options
This menu contains three options. The first
The second opens the Program Preferences
settings as they are now (input and output
These settings will be automatically loaded
SnapVideoPro starts.
opens the integrated slideshow builder .
dialog box , while the third saves all the
options, as well as program preferences).
and applied the next time
Image
© 2003-2005 DC Software Group
Features
8
This menu allows a quick access to some of the program's advanced features, such
as inserting text on an image or editing an image by hand .
You can also use this menu to undo the last operation performed or resize the
snapshot. Choosing the Resize option will open the Resize dialog box, from where
you can select how the image should be resized.
Effects
This menu provides access to the advanced features of SnapVideoPro .
Using this menu, you will be able to quickly access a list of professional graphics
filters that you can apply to your captured image. The are numerous effects
available that will certainly improve your image retouching experience. Each effect is
very easy to use: once you choose it, a window appears with the ability to customize
that effect's options. In our example, it is the Add Color Noise effect. Notice the
scrollbar is set to 64%, meaning this effect should be applied to 64% of the image's
contents.
© 2003-2005 DC Software Group
9
SecureMail
A quick preview is available in the small window. Once you are satisfied with the
effect obtained, click the Apply button to apply the effect to the image. You may also
click Cancel and this will not apply the effect.
Hint:
If you discover you have applied an effect the wrong way (or you applied the wrong
effect), you may always undo the last operation performed using the Image -> Undo
Last Operation command.
Window
This window provides access to all the open child windows of SnapVideoPro . You
will be able to tile the window horizontally or vertically, cascade them, arrange them
all or minimize them all. You may also close the current window or all of them at
once.
To switch between available snapshots, simply click on the window number (if
visible) and that window will be brought in view.
© 2003-2005 DC Software Group
Features
10
Help
This menu allows you to access the program's help contents (opens this help
manual), or to quickly find information about the program (how to quickly capture a
window). You may also find program version and copyright information by pressing
the About menu item.
2.4
Input Properties Dialog
The Input Properties dialog allows you to choose from several input options that are
available in SnapVideoPro .
General
Hide SnapVideoPro on capture - Hides the program before performing any capture
Beep on start capture - The program beeps whenever the capture starts
Refresh Time - sets the default desktop refresh time (the default is 20 milliseconds this is the recommended value for giving Windows the ability to successfully repaint
the desktop before performing a capture).
Capture Timer
© 2003-2005 DC Software Group
11
SecureMail
Enable Timer-Activated Capture - allows you to enable the advanced feature of
SnapVideoPro , which allows you to quickly perform continous snapshots for
building a slideshow or presentation. You can set the time bewteen the two
consecutive snapshots by altering the Perform capture every text field.
Fixed Region
You may enter here the details (widht, height and starting coordinates) of a
snapshot, when the program is set to capture a fixed region of the screen.
2.5
Output Properties Dialog
The Output Properties dialog box allows you to customize the way SnapVideoPro
performs snapshots and saves them on your computer.
General
© 2003-2005 DC Software Group
Features
12
Beep on finish capture - this option can be used in conjuction with the Beep on start
capture option found in the Input Properties dialog box . If checked, the program will
beep whenever a capture is finished.
Always show print dialog before printing - if you set the program to send the
snapshot to the printer, you can choose whether you would like to permanently
display the print dialog screen before choosing to print your document.
Image File
In here you can specify the file format the program should use to save the file to
disk. Each file format may have additional options accessible through the Options
button and which apply to that image file format only.
You can also choose to prompt the user for a filename before performing a capture,
© 2003-2005 DC Software Group
13
SecureMail
to use a fixed name for capturing, or to automatically assign the snapshot a
filename.
Catalog
The catalog feature SnapVideoPro provides is an advanced feature of the software
that allows you to quickly save all files to the catalog folder (when choosing to do so
in the Output menu), using an automatic filename or prompting the user for one.
2.6
Program Preferences Dialog
The Program Preferences dialog box allows you to specify the hotkeys for capturing
the screen, for hiding and unhiding the program, and for repeating the last capture
the program performs.
Hotkeys
© 2003-2005 DC Software Group
Features
14
You must use different hotkeys for the three actions the program supports.
Program Options
Always save settings on exit - automatically saves the settings when the program
exits
Use tray icon - when the program is minimized, a tray icon may be used to keep the
program visible.
Auto-save capture - immediatly saves a capture after it has been performed
Write date and time on capture - writes the current date and time on the capture
© 2003-2005 DC Software Group
15
SecureMail
performed
Prompt for capture comment - prompts for a comment to be inserted on the
snapshot
Audible alert when hiding/unhiding SnapVideoPro - beeps whenever you hide/unhide
the program
2.7
How To Insert Text On An Image
If you did your first snapshot and you would like to know how to easily insert text on
it, you've come to the perfect place!
To quickly insert a text on the currently selected image, just choose the Insert Text
option from the Image menu. You will get to this dialog:
In here you can enter the text to be shown, choose a different font to use for the
text or specify format options (bold, italic, underline or strikeout). The text color can
also be set.
You can also move the text on the image! Click and hold the left mouse button on
the text and drag the text anywhere you like.
Once you are ready placing the text, press the Apply button to apply changes.
2.8
How To Draw On An Image
If you have a snapshot that you would like to completely customize by drawing your
custom text on it, you can use the advanced features that SnapVideoPro provides.
Choose Edit Image from the Image menu in the main program. You will see this
© 2003-2005 DC Software Group
Features
16
window:
In here you have various editing tools that you may use to customize your snapshot.
These are available in the Drawing Tools tab. Simply hover the mouse over any
button to see a brief description of that button's functionality and click it to select
that drawing tool in the window.
For instance, to draw a quick line on the snapshot, you click the Line button. Next,
move the move on the picture and start drawing the line! It's as simple as that!
Hint:
You can check the Draw arrows checkbox to draw arrows instead of lines.
You can choose the line width and color from the Colours tab. Just choose a color
from those available in the current palette and start drawing. You can also edit the
width and the height of the image from the properties tab on the left.
Each time you change the pixel format of the image (e.g. you switch from 24 bit to 8
bit), you will notice that the color palette automatically adjusts itself to match the
new palette.
© 2003-2005 DC Software Group
17
2.9
SecureMail
How To Build A Slideshow
SnapVideoPro now offers the advanced ability of building a slideshow for your
captures. You can use the integrated AVI builder to build your customized
slideshows, fast and easy.
This feature will allow you to add images to your image list and later compile them
in one single AVI file, compressed or not.
There are five easy steps to take. The first is adding your images.
Second, you can add a wavefile for the AVI file. You may use this to build your
slideshow with additional voice information.
The third step is the one that allows you to choose what type of renderer you use for
building the AVI file. You can set the delay between the frames, the width and the
height of the AVI and whether to automatically stretch or not images that do not
have the size that you have set.
The fourth step is to choose an output filename and press the Write button. This will
write the AVI slideshow to your file.
The fifth and final step is testing your slideshow. Pressing the appropiate button will
open a Media Player window that will allow you to view the way your slideshow
looks.
© 2003-2005 DC Software Group
Troubleshooting
3
3.1
18
Troubleshooting
Troubleshooting
The program tells me one or more hotkeys is unavailable. What should I
do?
If you receive this message, it seems another program that is running on your
system that has already reserved the hotkey. Try opening the
Program Preferences dialog box and choosing another hotkey for that specific item.
The program tells me there is insufficient memory whenever I try to apply
a certain effect. What is wrong?
To work with extensive graphics, you will need to have a large amount of RAM. The
recommended size is 256MB for working with multiple open documents at once.
© 2003-2005 DC Software Group
19
SnapVideoPro
Index
-CContact
4
-EE-mail
4
-MMaking Your First Snapshot
5
-OOverview
4
-UUser Interface
6
-WWelcome
2
Copyright © 2007 SnapVideoPro.com