1
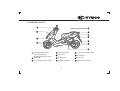
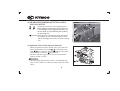
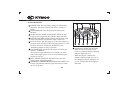
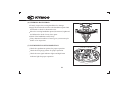
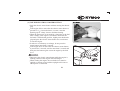
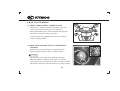
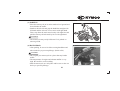
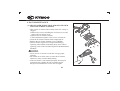
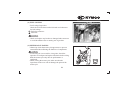
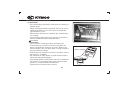
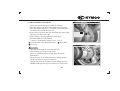
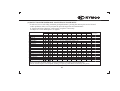
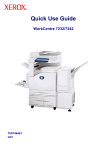
OWNER'S MANUAL
KWANG YANG MOTOR CO.,LTD.
B&W 150/125
Dear KYMCO Motorcycle Users:
Thank you for purchasing this KYMCO Bet & Win 125/150 scooter and
welcome to the family of KYMCO scooter riders. To enjoy safer and more
pleasant riding, become thoroughly familiar with this owner manual before
you ride the scooter. Your safety depends not only on your own alertness and
familiarity with the scooter, but also on the scooter's mechanical condition.
A pre-ride inspection before every outing and regular maintenance are
essential. The quality of each KYMCO motorcycle is guaranteed.
Note: 1. The information and specifications stated in this manual are for
reference only and subject to change without notice.
2. When starting the engine, the battery must be installed to facilitate
starting and increase the engine performance.
TABLE OF CONTENTS
1.PRECAUTIONS FOR A SAFE RIDING
2.ASSEMBLY PARTS
3.OPERATION INSTRUCTIONS
IGNITION SWITCH/STEERING HANDLEBAR LOCK
ELECTRIC STARTER BUTTON. HEADLIGHT/HAZARD SWITCH
HEADLIGHT DIMMER SWITCH/PASSING SIGNAL SWITCH
HORN BUTTON/TURN SIGNAL SWITCH
SEAT LOCK/STORAGE COMPARTMENT. HELMET BUCKLE
INSTRUMENTS
REAR CUSHION
4.PRE-RIDE INSPECTION
ADVANCE INSPECTION. ENGINE OIL LEVEL INSPECTION/REFILLING
BRAKE INSPECTION. TIRE INSPECTION
FUEL LEVEL INSPECTION/REFILLING
STEERING HANDLEBAR. INSTRUMENT LIGHTS INSPECTION
BRAKE FLUID LEVEL / COOLING SYSTEM INSPECTION
5.ENGINE STARTING METHODS
1
3
6
6
7
8
9
10
11
12
12
13
15
16
17
20
TABLE OF CONTENTS
USE THE ELECTRIC STARTER BUTTON
START WITH THE KICK LEVER
6.NORMAL RIDING METHOD
7.PRECAUTIONS FOR RIDING
SPEED CONTROL
8.HOW TO STOP RIDING
9.EASY MAINTENANCE
21
22
23
25
25
28
30
AIR CLEANER INSPECTION AND AIR CLEANER CLEANING&REPLACEMENT 30
32
BATTERY
33
FUSE CHANGE
34
ENGINE OIL CHANGE
35
TRANSMISSION GEAR OIL
36
SPARK PLUG INSPECTION
40
10.IMPORTANT NOTICES
41
POLLUTION-FREE PERIODIC MAINTENANCE SCHEDULE
42
SPECIFICATIONS
1.PRECAUTIONS FOR A SAFE RIDING
(1) CLOTHES
To relax and wear comfortable clothes are the main
points for a safe riding.
To ensure a safe riding, observe traffic laws, keep a cool
mind, relax and be careful.
Wear helmet and fasten it tightly.
Have the clothes well-arranged. Fasten shirt cuffs and
keep them from hooking the brake lever.
Wear low-heeled shoes for a safe riding.
When riding, use both hands to grasp the handlebar. It
is very dangerous to hold the handlebar with one hand.
CAUTION:
A motorcycle rider should not wear loose or too long
clothes to avoid danger.
During riding or 10 minutes after the motorcycle is
stopped, do not touch the exhaust muffler to avoid
scalding.
When parking the motorcycle, keep it away from dry
lawn or inflammables to avoid danger.
1
(2) RIDING METHOD
The safety of two-wheel vehicles is influenced by sitting
position. The rider should sit on the central part of the
seat cushion. If the rider sits on the rear part of the seat,
the load of front wheel will decrease. As a result, the
handlebar will swing and cause danger to the rider.
When making a turn, it will be easier for the rider to
steer the motorcycle by leaning the body inward slightly.
The motorcycle will lose its balance if the rider fails to
keep his body leaning inward.
When riding on a damaged or macadam road. Slow
down the speed and hold the handlebar tightly.
(3) CARRYING GOODS
Keep a good sitting posture to operate the motorcycle
properly.
The feel of the handlebar will be different when carrying
goods on the motorcycle. Overloading may cause the
handlebar to swing. Avoid riding with overload.
Max. loading capacity of the storage compartment is 10kg.
2
2. ASSEMBLY PARTS
Passing Signal Switch
Turn Signal Switch
Headlight Dimmer Switch
Headlight
L. Front Turn Signal Light
Frame Serial No.
Seat Lock
L. Rear Turn Signal Light
Air Cleaner
Rear Carrier
Kick Lever
Taillight/Stoplight
Engine Serial number
3
Storage Compartment
Exhaust Muffler
Battery
Taillight/Stoplight
Oil Dipstick
R. Rear Turn
Signal Light
Headlight Switch
Electric Starter Button
Radiator
4
Ignition Switch
Fuel Filler
R. Front Turn
Signal Light
Vehicle Identification Serial Number
Location of Engine Serial Number
Location of Frame Serial Number
5
3. OPERATION INSTRUCTIONS
(1) IGNITION SWITCH/STEERING
HANDLEBAR LOCK
ON :At this position, power is connected to start the
engine. The key cannot be taken out.
OFF :At this position, power is cut off and the engine
stops. The key can be taken out.
LOCK :At this position, the steering handlebar is locked.
The key can be taken out
Locking Method
To lock the handlebar, turn the steering handlebar all the way
to the left and then press and turn the ignition switch key to
the "LOCK" Position.
Unlocking Method
Turn the key to "OFF" and the lock is released
automatically.
CAUTION:
After locking, turn the handlebar gently to make sure
that it is locked.
Do not turn the ignition switch to "LOCK" during riding,
or the handlebar will be out of control and cause accidents.
Don't park your motorcycle at a place to hinder the traffic.
6
(2) ELECTRIC STARTER BUTTON
To start the engine, first turn on the ignition switch and
then press the electric starter button. At this time, be sure
to fully apply the front or rear brake lever (pedal) in order
to connect the power.
CAUTION:
During engine running, do not push the electric starter
button to avoid engine damage.
Turn the headlight switch and turn signal switch "OFF"
before using the electric starter button.
Release the electric starter button immediately after the
engine is started.
(3) HEADLIGHT/HAZARD SWITCH
At this position, the position light, headlight, instrument
lights and taillight turn off together.
At this position, the position light, instrument lights
and taillight light turn on.
At this position, the position light, headlight, instrument
lights and taillight light turn on.
At this position, the front and rear right and left turn
signal lights flash together.
OFF At this position, the front and rear right and left turn
signal lights go out together.
7
(4) HEADLIGHT DIMMER SWITCH/ PASSING
SIGNAL SWITCH
Switch to this position for using high beam.
When riding in a downtown area of if there is
a car coming from the opposite direction, use
the low beam to avoid affecting the visibility
of oncoming cars.
PASSING When passing, continuously press and release
the dimmer switch at the PASSING position
and the headlight will wink to warn the coming
cars.
(5) HORN BUTTON/TURN SIGNAL SWITCH
When the ignition switch is turned "ON", press the horn
button and the horn will sound.
For turning to the
right.
For turning to the left. Push the turn signal
switch button to release it. Horn Button.
The horn and turn signal switch do not work when the
ignition switch is "OFF".
CAUTION:
The turn signal light will not release automatically. Be
sure to reset it after use; otherwise it may affect the traffic
safety.
8
(6) SEAT LOCK/STORAGE COMPARTMENT
To open the seat, insert the ignition switch key into the
seat lock and turn it right. Lift up the seat.
Max. loading capacity of the storage compartment is 10kg.
To close the seat, put down the seat and press it down to
make it lock automatically. Then slightly pull up the seat
cushion to make sure that it is locked.
CAUTION:
Never put the key under the seat cushion and lock the seat.
(7) HELMET BUCKLE
1.Open the seat lock and lift up the seat.
2.Put the helmet retaining ring into the helmet buckle.
3.Put down the seat and it will lock automatically.
Take out the helmet in the reserve order of the above steps.
CAUTION:
When riding, wear the helmet and do not retain it on the
motorcycle to avoid damage of coated parts.
9
(8) INSTRUMENTS
ODOMETER: The total riding mileage is indicated by
kilometer. The figure in black and white is an unit of
100m.
SPEEDOMETER: The riding speed is indicated by
km/hour.
TURN SIGNAL INDICATOR LIGHT: When the turn
signal switch is operated, this indicator light will flash.
HIGH BEAM INDICATOR LIGHT: This indicator light
comes on when the long distance light is turned on.
FUEL GAUGE: The fuel gauge is to show the volume of
gasoline in the fuel tank. If the fuel gauge pointer is at the
red area, the fuel is insufficient. Refill 92# or 95#
nonleaded gasoline as early as possible.
TACHOMETER: It indicates the engine revolution per
minute x 1000RPM.
The red area in the tachometer is to remind you of the
limit of the engine rpm in order to avoid shortening the
engine service life.
ELECTRONIC DISPLAY: It displays time and date
which can be abjusted manually.
STORAGE COMPARTMENT INDICATOR LIGHT: The
storage compartment indicator light will come on when
the seat is opened.
10
H
8
6
4
2 0
60
10
40
20
0
80
100
00000 5 120
140
C
E
F
CHARGING INDICATOR LIGHT:
When the ignition switch is ON,
power is connected and the charging
indicator light comes on.
When the engine is started, the
charging indicator light goes out. If
the charging indicator light does not
go out, it means that the charging is
abnormal.
TEMPERATURE GAUGE: It indicates the temperature of
engine cooling water.
During riding, the temperature gauge needle should always
move under the red mark. If the needle points the red mark,
check the coolant level in the eye hole.
OIL CHANGE INDICATOR LIGHT: The indicator light
will tell you the time of oil change. Usually, the display is
in green color and it will turn red when oil change is
required. Although the display color is still green upon the
first change of a riding of 300km, it is necessary to insert
the key into the release hole to release it.
(9) REAR CUSHION
To suit scooter behaviour to load condition rear cushion
could be adjusted in spring preload.
Using the special tool in tool kit change the preload.
It is possible to adjust rear cushion in three positions:
position "soft"
position "medium"
position "hard"
When you adjust rear cushion, the spring preload of rear
cushions on either side must be the same.
11
Release Hole
4. PRE-RIDE INSPECTION
(1) ADVANCE INSPECTION
Get into a good habit of inspection before riding. For the
sake of safety and to prevent vehicle damage and traffic
accidents, the pre-ride inspection is absolutely required.
CAUTION:
Be sure to perform inspection and maintenance for your
new motorcycle after it is purchased for one month or
ridden for 300km.
(2) ENGINE OIL LEVEL INSPECTION/REFILLING
Place the motorcycle on its main stand. Take out the oil
dipstick and wipe it clean.
Directly insert the oil dipstick into the engine oil.
(Don't screw it in.)
Take out the oil dipstick and check the oil level. If it is
close to the lower limit, add engine oil to the upper limit.
CAUTION:
The temperature of engine and exhaust muffler is very
high. When checking the oil level, be careful to avoid
scalding.
12
(3) BRAKE INSPECTION
Ride the motorcycle at low speed on a dry road and
respectively apply the front and rear brakes to check the
brake performance.
The brake lever should have proper free play.
"Free play" means the distance from the position of loose
brake to the position of fully applied brake.
(4) TIRE INSPECTION
1. Tire Pressure Check
Check if the tire pressure is normal when the tire is in
contact with level ground.
If there is any abnormal condition, check the tire pressure
with a tire pressure gauge.
30
20
10
Measure the tire pressure under room temperature.
13
40
50 60
70
80
90
100
2. CRACKS & DAMAGE
Check the tire-contact area for crack or damage.
3. ABNORMAL WEAR
Check the tire-contact area for abnormal wear.
4. FOREIGN OBJECTS OF METAL PIECE & GRAVEL
Check the tires and tire-contact area for imbedded objects
of metal piece and gravel.
5. DEPTH OF TIRE GROOVE
If the tire is worn to the wear limit indication mark,
replace it with a new one.
NORMAL PRESSURE(1 Rider / 2 Riders )
Front Wheel
1.75/1.75 kg/cm
Rear Wheel
2.00/2.25 kg/cm
CAUTION:
Abnormal tire pressure, crack, damage and abnormal wear
will cause unsteady handlebar and result in tire break.
If the tire has cracks or is worn to the wear limit indication
mark, replace it with a new one.
14
(5) FUEL LEVEL INSPECTION/REFILLING
Check if the fuel is sufficient.
If the fuel gauge pointer is at "E" (red line), refill #92 or
#95 nonleaded gasoline as soon as possible.
Refilling Method
1.Insert the ignition switch key into the fuel tank cap lock
and turn it right to unlock the cap.
2.When refilling, the gasoline level should not exceed the
reference plate.
3.When closing the cap, press down the fuel tank cap and
the cap will lock automatically.
4.When refilling, do not add other additives to avoid
engine breakdown.
Unlock
Lock
CAUTION:
Be sure to stop the engine before refilling.
The gasoline level shall not exceed the reference plate;
otherwise the fuel will penetrate out.
When refilling, do not add other additives to avoid engine
breakdown.
15
KYMC
O
(6) STEERING HANDLEBAR
Visually inspect the steering handlebar for damage.
Apply the front brake and move the handlebar upward and
downward to check for abnormal noise.
Move the steering handlebar upward, downward, rightward
and leftward to check for any loose parts.
Check if the handlebar rotates freely.
If any abnormal condition is found, go to your motorcycle
dealer or for inspection.
(7) INSTRUMENT LIGHTS INSPECTION
Check the speedometer pointer for proper operation.
Check the fuel gauge pointer for proper operation.
Check the turn signal indicator lights and high beam
6
8
40
4
indicator light for proper operation.
2 0
16
60
10
20
0
80
H
100
00000 5 120
140
C
E
F
(8) BRAKE FLUID LEVEL INSPECTION
1.Keep the handlebar straight and check the front/rear brake
reservoir for brake fluid level which should be kept between
the upper and lower limits.
2.Check the brake shoes for wear when the fluid level is close
to the lower limit.
3.If the wear of brake shoes do not exceed the specified limit,
it means that there are fluid leaks. In this case, contact our
distributors or service stations for inspection and repair.
Eye Hole
Upper Limit
Lower Limit
(9) COOLING SYSTEM INSPECTION
1.Place the motorcycle on its main stand on level ground.
2.Check if the coolant level of the reserve tank is between the
upper and lower level lines. If necessary, remove the
reserve tank cap and fill to the upper level line with distilled
water.
3.If the coolant level is too low, it means that there are
abnormal conditions.
Inspect the radiator and hoses for coolant leaks.
4.Use only distilled water to refill the reserve tank in order
to ensure good performance of the cooling system.
Upper Level
Lower Level
17
(10) HORN/LIGHTS INSPECTION
Turn the ignition switch "ON" and press the horn button to
check if it sounds.
Headlight/Taillight Inspection:
Start the engine and turn on the headlight switch to check
if the headlight and taillight are good and check the light
shells for dirt and damage.
Stoplight Inspection:
Apply the front and rear brake levers respectively to check
if the stoplight is good. And also check the stoplight shell
for dirt and damage.
Turn Signal Light Inspection:
Operate the turn signal switch to make sure that the
right/left front and rear turn signal lights can flash and click.
Also check the light shells for dirt and damage.
Headlight
Taillight/ Stoplight
Turn signal light
Horn button
CAUTION:
Replace any dirty or damaged lights with new ones to
avoid danger during riding.
18
L
19
OI
(11) FRONT/REAR SHOCK ABSORBER INSPECTION
Check the condition of the front/rear shock absorbers by
pressing down on the handlebar and seat several times.
(12) BRAKE PERFORMANCE INSPECTION
Fully apply the front and rear brake levers and move the
motorcycle forward to see if the braking effect is good.
(13) REARVIEW MIRROR ANGLE CHECK
Sit on the motorcycle uprightly and make a viewing test
of the rearview mirror angle.
(14) LICENSE PLATE CHECK
Check the license plate for dirt and damage, then tighten it.
(15) REFLECTOR CHECK
Check the reflector for dirt and damage.
(16) PREVIOUS ABNORMAL PARTS INSPECTION
Make sure that the previous abnormal parts are repaired.
(17) LUBRICATION POINT CHECK
Visually check if all motorcycle lubrication points are
lubricated properly.
5. ENGINE STARTING METHODS
(1) TURN THE IGNITION SWITCH "ON"
Unlock the steering handlebar.
Turn the ignition switch "on"
CAUTION:
Check the gasoline volume and engine oil level before
starting the engine.
Be sure to erect the main stand while starting the engine.
(2) LOCK THE REAR WHEEL
Apply the rear brake lever to connect the power for
starting.
CAUTION:
In order to prevent the motorcycle from rushing out at high
speed, make sure to lock the rear wheel.
If the rear brake lever free play is incorrect, the motorcycle
will not stop properly. This is very dangerous.
20
(3) USE THE ELECTRIC STARTER BUTTON
Push the electric starter button without rotating the throttle
grip.
If the engine fails to start after the electric starter button is
pressed for 3 4 seconds when it is warm, rotate the
throttle grip for 1/8 1/4 turn to facilitate starting.
When the motorcycle is not used for a long time or the fuel
tank is empty, if the engine is still hard to start after the
fuel tank is refilled with gasoline, slightly turn the throttle
grip and press the electric starter button for several times
to start the engine.
In order to avoid battery overcharge, do not press the
starter button more than 5 seconds.
If the engine does not start after the electric starter button
is pressed for 5 seconds, wait for more than 5 seconds and
then press the button again or start the engine by the kick
lever.
CAUTION:
Don't press the electric starter button while the engine is
running; otherwise the engine will be damaged.
When starting the engine, the rear brake lever must be
applied to connect power and the stoplight will come on
when power is connected.
21
(4) START WITH THE KICK LEVER
1.Place the motorcycle on its main stand on level ground.
2.Depress the kick lever with force.
When the engine is cold and does not start after the kick
lever is depressed for 3 4 times, rotate the throttle grip
for 1/8
1/4 turn to facilitate starting.
Warm up the engine for a little while (about 2 3 minutes)
after cold start.
After the engine is started, do not accelerate suddenly and
keep riding at low speed to prolong the engine service life.
CAUTION:
After the engine is started, the kick lever must be returned
to its original position.
The exhaust contains poisonous carbon monoxide which
is harmful to the human body. Never run the engine in a
closed area.
Turn off all light switches before starting the motorcycle.
22
1/8
1/4
Turn
6. NORMAL RIDING METHOD
(1) STARTING THE ENGINE
Start the engine by referring to the starting methods
specified in Section 5.
CAUTION:
Keep your finger away from the button immediately after
the engine is started to avoid engine damage.
The rear brake lever should be kept at the braking position
before riding.
(2) REBOUND THE MAIN STAND
Keep the rear brake lever at braking position and push the
motorcycle forward, then the main stand will rebound
automatically.
CAUTION:
After starting the engine and before moving, do not turn
the throttle grip to increase the engine rpm.
23
(3) CORRECT SITTING POSITION
Ride astride on the motorcycle from the left side and
sit upright. Touch the ground with left foot to avoid
slipping.
CAUTION:
The rider must wear helmet, gloves and goggles.
Do not wear any clothes which will affect riding safety.
(4) ROTATE THE THROTTLE GRIP
Release the rear brake lever and slowly rotate the throttle
grip, then the motorcycle will move smoothly.
CAUTION:
After the rear wheel brake lever is released, do not rotate
the throttle grip suddenly to prevent the motorcycle from
rushing out.
During riding, do not accelerate or decelerate rapidly and
suddenly to save fuel and prolong the motorcycle service
life.
24
7. PRECAUTIONS FOR RIDING
(1) CORRECT RIDING
Before moving, turn on the turn signal light and make sure
traffic is clear behind the motorcycle.
Do not rush into the car lanes and always keep the
motorcycle to the right to avoid danger.
CAUTION:
Moderate riding will prolong the engine service life. The
clutch linings are worn more quickly when often ridden at
low speed.
(2) SPEED CONTROL
The speed is controlled by the throttle grip.
ROTATE The speed will become faster. Don't be hasty
and accelerate slowly.
When riding on an ascending road, rotate the
throttle grip gradually to increase the horse
power.
RESTORE The speed will become slower. Restore the
throttle grip quickly.
CAUTION:
Apply the brake while restoring the throttle grip. This will
shorten the time required to slow down.
25
(3) PROPER RIDING WILL PROLONG THE SERVICE
LIFE OF THE ENGINE
For a new motorcycle, keep the speed below 60km per
hour within the first 1000km of riding.
Avoid sudden acceleration and long-time riding at high
speed.
In hot weather, the engine overheats easily if left to idle
for long periods. In this case, stop the engine.
CAUTION:
Moderate riding will prolong the engine service life.
(4) APPLY BOTH FRONT AND REAR BRAKES
WHEN BRAKING
First restore the throttle grip to the closed position and
then pull the brake levers tight.
The best way to brake the motorcycle is to pull the brake
levers "slowly" at the very beginning, then pull them tight.
CAUTION:
Apply single brake lever will cause the motorcycle to slip.
During riding, never brake the motorcycle suddenly.
It may cause the motorcycle to slip and could be very
dangerous.
26
6
8
60
10
40
4
2 0
20
0
80
H
100
00000 5 120
140
C
E
F
(5) DO NOT MAKE SUDDENT STOPS OR SHARP TURNS
Sudden stops and sharp turns are the main causes for
slipping and could be very dangerous.
When riding in the rain, the road is very slippery.
Stopping suddenly will cause the motorcycle to slip.
Be careful to avoid danger.
(6) BE MORE CAREFUL WHEN RIDING IN THE RAIN
A longer braking distance is required when riding in the
rain versus in dry weather. Be sure to slow down and
brake slowly as early as possible.
When riding on a descending road, restore the throttle grip
to closed position and slow down by making intermittent
braking.
CAUTION:
A longer braking distance is required in rainy days. Be
sure to slow down and brake the motorcycle slowly as
early as possible.
27
8. HOW TO STOP RIDING
(1) WHEN APPROACHING A PARKING SPOT
Watch out for vehicles coming from behind or the side
and slowly stop the motorcycle to the right side.
Restore the throttle grip to closed position and apply the
front and rear brakes as early as possible.
At this moment, the stoplight will come on to warn the
vehicles coming behind.
(2) WHILE THE MOTORCYCLE IS COMPLETELY
STOPPED
Return the turn signal switch to its original position.
Turn the ignition switch "OFF" to stop the engine.
CAUTION:
During riding, never operate the ignition switch key.
When the ignition switch is turned "OFF", the electric
system does not work which may result in a traffic accident.
Operate the switch key after the motorcycle is fully stopped.
28
(3) PARKING
Place the motorcycle on its main stand on level ground and
do not hinder the traffic.
Stand on the left side and grip the handlebar straight with
left hand and the side rod or rear carrier with right hand.
Then, step down the main stand evenly with right foot and
pull the motorcycle backward by force with right hand.
CAUTION:
The motorcycle may easily fall down if it is parked on
uneven ground.
(4) HANDLEBAR
After parking, be sure to lock the steering handlebar and
take out the key to prevent pilferage. (Refer to P6.)
CAUTION:
Do not park your motorcycle in a place that may hinder
traffic.
The temperature of engine and exhaust muffler is very
high. Be careful to avoid scalding.
Park the motorcycle at a safe place and be sure to take out
the key to prevent pilferage.
29
9. EASY MAINTENANCE
(1) AIR CLEANER INSPECTION AND AIR CLEANER
CLEANING & REPLACEMENT
Take out the air cleaner and visually check if it is dirty or
clogged.
1.Remove the screws attaching the air cleaner cover and
remove the air cleaner cover.
2.Remove the air cleaner element.
3.The installation sequence is the reverse of removal.
Clean the air cleaner element with compressed air.
Replace the air cleaner element at every 5000km.
The air cleaner requires more frequent cleaning or
replacing when ridden in unusually dusty areas. When
replacing, refer to P41 Periodic Inspection & Maintenance
Schedule.
CAUTION:
Never use oil or solvent to wash the wet type paper
element.
Be careful not to allow water to enter the air cleaner;
otherwise, it may result in hard starting.
If the air cleaner is not installed properly, dust may be
sucked into the cylinder directly to reduce engine
horsepower and affect the service life of engine.
30
(2) FUEL SYSTEM
Fuel Leakage Inspection
Check the fuel line between the fuel tank and carburetor
for fuel leakage.
Fuel tube connector
Fuel tank
CAUTION:
Check and replace any broken or damaged tube connector
to avoid breakdown due to running out of gasoline.
(3) EXTERNAL CLEANING
Often wipe clean the motorcycle appearance to prevent
accumulated dust affecting the function of components.
CAUTION:
If a motorcycle is not used for a long time, check the
operation of each part and replace lubricants before riding.
Ride the motorcycle only after its performance is
confirmed.
When waxing the motorcycle, make sure that the
ingredients of the wax will not damage the paint of the
motorcycle.
31
(4) BATTERY
This model adopts the battery which needs no refilling of
distilled water.
When cleaning the terminal terminals, remove the screws
attaching the battery cover on the floor board and then
open the battery cover.
When battery terminals are corroded, take out the battery
for cleaning.
After cleaning, apply a thin coat of grease or Vaseline to
battery terminals and then install the battery.
Battery
CAUTION:
Never open the closed-type battery electrolyte cap.
If the motorcycle will not be used for a long time, the
battery will discharge electricity by itself. Remove the
battery and put it in a cool place after it is fully charged to
prevent electricity leakage.
If the motorcycle will not be used for a long time, remove
the negative (-) terminal.
Do not smoke or allow flames or sparks near the battery
while removing and installing it.
Turn off the ignition switch before removal or installation.
The negative (-) terminal shall be removed first and the
positive (+) terminal shall be installed first.
Tighten the loose terminal nuts securely.
32
Battery Charger
(5) FUSE CHANGE
Turn off the main switch and check if the fuse is burned
out.
When the fuse is burned out, replace with a specified fuse.
Check for the cause of breakdown before replacing.
Specification
Battery Fuse : 20A
Reserve Fuse :15A
Headlight Fuse : 15A
Radiator Fan Fuse : 10A
All Electric Power Fuse :15A
CAUTION:
Be careful not to excessively expand the fuse clip during
removal.
After a new fuse is installed, check the fuse clip for
looseness which is the main cause of trouble.
Never use fuse of unspecified capacity, it may cause wire
overheating and burning out.
When replacing electric appliances (lights, instruments),
be sure to use the recommended genuine parts.
When washing the motorcycle, avoid flushing it.
If the cause can not be found, contact our distributor or
service station for inspection.
33
Replacement
(6) ENGINE OIL CHANGE
1.Place the motorcycle on its main stand on level ground.
2.Remove the oil dipstick.
3.Remove the drain bolt to drain the oil.
4.Refill fresh engine oil for 0.9 liter. Firmly tighten the oil
dipstick.
5.Warm up the engine and check the oil level again after the
engine is stopped for 20~30 seconds.
Specified Oil: SAE 15W40
Capacity/Exchanging Capacity:1.1L/0.9L
CAUTION:
When changing the engine oil, also clean the oil strainer
and reinstall it.
Use the specified engine oil.
Change engine oil at first 300km and then change it at
every 2000km.
Engine oil will deteriorate easily and require more frequent
change if the motorcycle is often ridden in dusty and cold
areas or ridden for short distance.
Do not mix engine oil of different classes or viscosities. It
may cause damage to the engine.
34
Drain Screw
Oil Strainer
(7) TRANSMISSION GEAR OIL
Check the transmission gear oil tank for leakage.
1.Place the motorcycle on its main stand on level ground.
After the engine stops for 2~3 minutes, remove the gear
oil check bolt to check the oil level.
2.If the oil level is lower than the check bolt hole lower edge,
add gear oil to the lower edge.
3.After refilling, securely tighten the check bolt.
Recommended Gear Oil: SAE90
Capacity / Exchanging Capacity: 0.2 L / 0.18 L
Gear Oil Filler Oil (Check Bolt Hole)
Drain Bolt
Oil Level
CAUTION:
Add gear oil through the oil check bolt hole.
After refilling, use a rag to wipe clean.
Excess or insufficient gear oil will affect the engine
performance.
Never use gear oil of different brand or inferior quality
which may result in engine breakdown.
Change gear oil at first 300km and then change at every
5000km. Add specified gear oil whenever it is necessary.
35
(8) SPARK PLUG INSPECTION
Check the spark plug side electrodes for wear.
Fouling deposits on spark plug electrodes and a big gap
may result in weak spark.
Spark Plug Removal:
1.Remove the spark plug with a spark plug remover.
2.The installation sequence is the reverse of removal.
Spark Plug Cleaning:
1.It is better to remove spark plug deposits with a spark plug
cleaner.
2.If a spark plug cleaner is not available, clean with a wire
brush.
The side electrode gap is 0.7mm.
Specified Spark Plug: NGK DPR7EA-9
Decarbonizing
Cracks, Damage
Gap, Wear,
Fouling Deposits
CAUTION:
Clean the spark plug at every 2000km and replace it with a
new one at every 5000km or when the center electrode is
burned out.
First screw in the spark plug with fingers and then tighten
with a spark plug wrench.
Use of an unspecified spark plug may damage the engine.
36
(9) BRAKE FLUID LEVEL INSPECTION /REFILLING
Remove the 2 screws from the brake fluid tank and take
off the cover.
Add recommended brake fluid DOT 3 into the tank until
the fluid level reaches the upper limit and then put on the
cover and tighten the screws.
Recommended Brake Fluid: DOT 3
CAUTION:
Do not mix brake fluid of different brands. It may cause
brake failure and is very dangerous. When refilling brake
fluid, use towels to cover and protect the painted and
coated surfaces. (Replace at 10000km or every year.)
(10) RUBBER COVER INSPECTION FOR WIRE AND
CABLE
The cable cores are protected by the rubber cover outside
the connector. Check the rubber cover frequently for
proper installation.
When washing the motorcycle, do not flush the rubber
cover directly or brush it. Use a wet rag to wipe off dirt
and dust.
Rubber Cover
Check Points
37
Screw
(11) COOLANT REFILLING
1. Place the motorcycle on its main stand on level ground.
2. Remove the reserve tank cap and fill to the upper level line
with distilled water.
If the coolant level is too low, it means that there are
abnormal conditions.
Coolant concentrate specified density:30%(cold area 50%)
Density & Freezing Point:
25% : -12 ℃
40% : -24 ℃
30% : -15 ℃
50% : -35 ℃
Total coolant capacity : 1165cc.
Reserve tank cap
Reserve tank eye hole
CAUTION:
Use distilled water to make coolant mixture.
Be careful not to use coolant of inferior quality which may
shorten the radiator service life.
Replace the coolant once a year or at every 10000 km under
normal use.
38
(12) COOLANT REPLACEMENT
Coolant Draining
1. Remove the front cover.
2. Press down the reserve tank cap and turn it counterclockwise
to remove it.
3. Remove the drain bolt to drain the coolant. Tilt the
motorcycle to the right and the coolant will drain more easily.
Coolant Filling
1. Install the drain bolt.
2. First fill the reserve tank with coolant to the upper level line.
3. Install and securely tighten the reserve tank cap.
4. Start the engine and allow the cooling fan to run for at least
2 times. Then, stop the engine.(The engine must be cool
before removing the reserve tank cap, or severe scalding
may result.)
5. Remove the reserve tank cap and add coolant up to the
proper level if necessary. Then, reinstall the reserve tank cap.
6. Wait for 2 ~ 3 hours until the engine is cold. Check the
coolant level in the reserve tank and fill to the upper level
line if the level is under the lower level line.
39
Water Pump
Drain Bolt
CAUTION:
When removing the reserve tank cap,
be more careful because the coolant is
under pressure and severe scalding
could result. Wait until the temperature
is lowered. Then, cover the reserve
tank cap with a towel and remove
it slowly.
Avoid spilling coolant on painted
surfaces. If this happens, immediately
flush with fresh water.
10. IMPORTANT NOTICES
(1) WHEN THE ENGINE FAILS TO START OR STOPS
DURING RIDING
Is there enough gasoline?
If the fuel gauge pointer is at the red line, refill #92 or #95
nonleaded gasoline.
Have you started the engine using the correct methods?
Are there any other faulty parts?
(2) IN CASE OF BREAKDOWN
OCMYK
For any trouble occurred during riding, go to a KYMCO
distributor or service station for inspection.
CAUTION:
For the sake of safety and to prevent vehicle damage and
save your precious time, the pre-ride inspection is
absolutely required. Please read this User's Manual
carefully and get into a good habit of inspection before
riding.
40
(3) POLLUTION-FREE PERIODIC MAINTENANCE SCHEDULE
In order to have a safe riding, maintain good performance, prolong the motorcycle service life and
reduce pollution, make sure to perform the periodic inspection and maintenance.
I: Inspect and clean, lubricate, refill, repair or replace if necessary.
A: Adjust C: Clean R: Replace T: Tighten
Item
Engine Oil
Engine Oil Strainer
Gear Oil
Cooling Water
Spark Plug
Valve Clearance
Carburetor
Drive Belt
Drive Chain
Air Cleaner
Battery Electrolyte
Fuel Filter Screen
Brake System
Clutch Lever Free Play
Bolts & Nuts
Tire Pressure
Motor Oil Strainer
Engine Oil Pump
2Stroke 4Stroke
300
R
C
R
Regular Service Mileage (KM)
5000 7000
3000
9000
1000
R
R
C
R
R
R
C
R
R
11000
R
C
R
13000
R
Replace at every 10000 km or once a year it at every 5000 km.
Clean ( C ) at every 2000km and replace ( R ) .
A
A
T
A
I
A
I
I
A
R
I
A
I
I
I
I
A
I
I
I
A
T
I
I
I
A
I
I
A
R
I
R
I
A
A
I
I
A
R
I
I
A
I
I
I
A
T
I
I
A
I
I
I
A
I
I
I
I
I
I
A
I
I
I
The above items are applicable to different models. Perform suitable items for each model.
When exceeding the listed mileage, perform maintenance according to the listed intervals.
The air cleaner requires more frequent cleaning or replacing when ridden in unusually dusty areas.
41
Daily Preride
Inspection
(4) SPECIFICATIONS
( Bet & Win 125 )
Engine Type
OHC water cooled
4-cycle
Overall Length
1940 mm
Displacement
124.6 cc
52.4x57.8 mm
Overall Width
Overall Height
Dry Weight
750 mm
1145 mm
138 kg
Wheel Base
Spark Plug
1390 mm
NGK DPR7EA-9
Bore x Stroke
Compression Ratio
Max. Output
Max. Torque
1.0/6500 kg.m/rpm
Tire Size
FR:120/70-12 56J
RR:130/70-12 59J
Fuel Type
#92 or 95 nonleaded
gasoline
Non-stage transmission
Dry Multi-Disc Clutch
Oil Tank Capacity
Fuel Tank Capacity
Engine Oil Type
1.1 liter
10 liter
Transmission Type
Clutch
Ignition
10.6 : 1
7.55/7500 kw/rpm
C.D.I.
Starting System
Starting motor and
kick starter
Idle Speed
1600 rpm
Gear Oil Type
Capacity/Change
Battery
42
SAE 15W40
SAE 90 0.2 L/0.18 L
12V8AH
( Bet & Win 150 )
Engine Type
OHC water cooled
4-cycle
Overall Length
1940 mm
Displacement
149.5 cc
57.4x57.8 mm
Overall Width
Overall Height
Dry Weight
750 mm
1145 mm
138 kg
Wheel Base
Spark Plug
1390 mm
NGK DPR7EA-9
Fuel Type
#92 or 95 nonleaded
gasoline
Oil Tank Capacity
Fuel Tank Capacity
Engine Oil Type
1.1 liter
10 liter
Bore x Stroke
Compression Ratio
Max. Output
Max. Torque
Tire Size
Transmission Type
Clutch
Ignition
10.6 : 1
9.06/7500 kw/rpm
1.2/6500 kg.m/rpm
FR:120/70-12 56J
RR:130/70-12 59J
Non-stage transmission
Dry Multi-Disc Clutch
C.D.I.
Starting System
Starting motor and
kick starter
Idle Speed
1600 rpm
Gear Oil Type
Capacity/Change
Battery
43
SAE 15W40
SAE 90 0.2 L/0.18 L
12V8AH