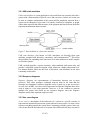
1
2010:070 CIV MASTER'S THESIS Pilot Project for Model Based Testing using Conformiq Qtronic Robin Sving Peter Öman Luleå University of Technology MSc Programmes in Engineering Arena, Media, Music and Technology Department of Computer Science and Electrical Engineering Division of Media Technology 2010:070 CIV - ISSN: 1402-1617 - ISRN: LTU-EX--10/070--SE Abstract Software testing measures quality in software systems and the time for testing is heavily affected by the system complexity. Even small changes to a complex system may require large amounts of time and effort to verify quality, so in order to enable faster testing, test automation can be favourable to manual testing. One technique for test automation is model based testing (MBT). MBT is a technique based on black box testing, which uses models of a system, called design models, at a high abstraction level to generate test cases. This abstraction is achieved by creating the models without examining the implementation of the system. This thesis explores the possibility of applying MBT at a large telecom company, using the Conformiq™ Qtronic™ testing tool, and analyses difficulties during the process. Due to the system documentation not being on a level of detail appropriate for creating a design model from, the model was instead created from a development model. The model was used to generate test cases automatically. Using a custom “scripting backend”, Qtronic was able to render these test cases into executable scripts. Mismatches in both the languages and structures of the Qtronic toolset and the telecom company's system required some makeshift solutions. This thesis shows that it is possible to use MBT efficiently for software testing; MBT grants more comprehensive test cases, reduced test generation time, and requires less complexity than manual testing. Sammanfattning Mjukvarutestning utvärderar kvalitet i ett mjukvarusystem och testningstider påverkas starkt av systemets komplexitet. Även vid små systemuppdateringar kan det krävas enorm tid och ansträngning för att kontrollera kvaliteten, så för att snabba upp testningsprocessen kan automatiserad testning vara fördelaktigt jämfört med manuell testning. En bra teknik för testautomatisering är modellbaserad testning (MBT). MBT är en ”black-box”-testningsteknik, som använder sig av systemmodeller på en hög abstraktionsnivå, så kallade designmodeller, för att generera testfall. Abstraktionen åstadkoms genom att modellerna skapas från systemdokumentation i stället för systemimplementation. Denna rapport undersöker möjligheten att anpassa MBT till ett stort telekom-företag genom att använda testningsverktyget Qtronic™ från företaget Conformiq™, samt analyserar svårigheterna för denna process. På grund av att systemdokumentationen inte låg på en passande nivå för att skapa designmodellen ifrån, skapades istället modellen från en utvecklingsmodell. Modellen kunde sedan användas för att automatiskt generera en svit med testfall. Med hjälp av ett anpassat ”scripting backend” kunde Qtronic rendera dessa testfall till körbara script. På grund av språk- och stukturskillnader mellan Qtronic och de program som används på telekomföretaget krävdes ett antal skräddarsydda speciallösningar. Denna rapport visar att det är möjligt att använda MBT effektivt för mjukvarutestning; det ger mer uttömmande testfall, reducerar tidsåtgången för testfallsgenerering, samtidigt som det är mindre komplext än att arbeta manuellt. Acknowledgements The authors of this report would like to thank the following people at the large telecom company where the thesis was done (in alphabetical order): Lars Hennert, Roger Holmberg, Christofer Janstål, Leif Jonsson, Sergey Lysak, Fredrik Weimer and many more. From the universities: Uppsala University – Justin Pearson Luleå Technical University – Josef Hallberg Also, from Conformiq™: Athanasios Karapantelakis and Michael Lidén Table of Contents 1 Introduction............................................................................................. 1 1.1 Background ......................................................................... 1 1.2 Problem definition ................................................................ 1 1.3 Goals ................................................................................... 2 1.4 Limitations ........................................................................... 2 2 Technical background ............................................................................ 3 2.1 Mobile Telecommunication Network .................................... 3 2.1.1 Radio Access Network ................................................. 3 2.1.2 RBS Systems ............................................................... 4 2.1.3 Blocks and signals ....................................................... 5 2.2 Development of large systems............................................. 5 2.2.1 Development framework .............................................. 5 2.2.2 Model based development ........................................... 6 2.2.3 Using Development Tools ............................................ 6 2.2.4 Development at the LTC .............................................. 6 2.3 Quality assurance of large systems ..................................... 7 2.3.1 Scope of testing ........................................................... 7 2.3.2 Testing Process ........................................................... 9 2.3.3 Coverage ................................................................... 10 2.3.4 Current testing at the LTC .......................................... 12 3 Model based testing ............................................................................. 13 3.1 Understanding model based testing .................................. 13 3.1.1 History ....................................................................... 13 3.1.2 Approaches................................................................ 13 3.1.3 Abstraction ................................................................. 14 3.2 Unified Modelling Language .............................................. 14 3.2.1 UML state machines .................................................. 15 3.2.2 Sequence diagrams ................................................... 15 3.2.3 Use case diagram ...................................................... 15 3.2.4 Class diagram ............................................................ 16 3.3 The MBT process .............................................................. 16 3.3.1 Creating a model........................................................ 16 3.3.2 Generate tests cases ................................................. 17 3.3.3 Make the tests executable ......................................... 18 3.3.4 Analyse the executed tests ........................................ 19 3.4 Changes between MBT and manual testing ...................... 19 3.4.1 Increased test coverage ............................................. 19 3.4.2 Test automation ......................................................... 20 3.4.3 MBT experiences ....................................................... 20 4 Conformiq™ Qtronic™ ......................................................................... 22 4.1 The Qtronic suite ............................................................... 22 4.1.1 Qtronic Computational Server .................................... 22 4.1.2 Client ......................................................................... 23 4.1.3 Conformiq Modeler .................................................... 24 4.2 Models in Qtronic............................................................... 24 4.2.1 Textual notation ......................................................... 25 4.2.2 Graphical notation ...................................................... 26 4.2.3 Test case control using QML functions ...................... 29 4.3 Usability............................................................................. 31 4.3.1 Testing limitations ...................................................... 31 4.3.2 Test configuration ...................................................... 31 4.3.3 Testing approaches ................................................... 32 4.4 Qtronic scripting backend .................................................. 33 4.4.1 Using a bundled scripter ............................................ 33 4.4.2 Creating a new scripter .............................................. 33 4.4.3 Scripting with Qtronic functions .................................. 34 5 Methodology ......................................................................................... 37 5.1 Before starting a pilot project ............................................. 37 5.1.1 Working with simple models ....................................... 37 5.1.2 Working with big models ............................................ 37 5.2 Working on a pilot project .................................................. 39 5.2.1 How to choose a pilot project ..................................... 39 5.2.2 Before starting to model ............................................. 39 5.3 Backend structuring ........................................................... 40 5.3.1 Scripting to Goat ........................................................ 40 5.3.2 Step-by-step scripting ................................................ 41 6 Implementation ..................................................................................... 42 6.1 Model ................................................................................ 42 6.1.1 Choice of functionality ................................................ 42 6.1.2 Identify relevant ports and signals .............................. 43 6.1.3 Identifying scenarios .................................................. 44 6.1.4 Modelling the scenarios ............................................. 46 6.2 Scripting backend .............................................................. 46 6.2.1 Implementing Scripting Backend Configurations ........ 46 6.2.2 Implementation of ScriptBackend methods ................ 47 6.3 Problems ........................................................................... 50 6.3.1 Model difficulties ........................................................ 50 6.3.2 Scripter limitations ...................................................... 51 6.3.3 Goat issues ................................................................ 52 6.3.4 Error handling and Qtronic Algorithmic Options.......... 53 7 Results .................................................................................................. 54 7.1 The pilot project ................................................................. 54 7.1.1 The QML model ......................................................... 54 7.1.2 The Goat script backend ............................................ 54 7.2 Test suite ........................................................................... 57 7.2.1 Test execution............................................................ 57 7.2.2 System faults ............................................................. 57 7.3 Time .................................................................................. 57 7.3.1 Qtronic education ....................................................... 57 7.3.2 Approximate total time spent ...................................... 58 7.4 Lessons learned ................................................................ 59 8 Discussion ............................................................................................ 60 8.1 Analysis ............................................................................. 60 8.1.1 A working proof-of-concept ........................................ 60 8.1.2 Testing the SUT ......................................................... 60 8.1.3 Qtronic test case selection ......................................... 61 8.2 Conclusions ....................................................................... 61 8.2.1 Speed ........................................................................ 61 8.2.2 Simplicity.................................................................... 61 8.2.3 Flexibility .................................................................... 62 8.3 Future work ....................................................................... 62 8.3.1 Recommendation for the LTC .................................... 62 8.3.2 Recommendations for Conformiq ............................... 63 References ............................................................................................... 66 Appendix I - Table of Abbreviations ........................................................ A Appendix II - Table of Terminology ......................................................... B Appendix III - Qtronic Client..................................................................... C Appendix IV - Conformiq Modeler ........................................................... D Appendix V - Project plan ........................................................................ E List of Tables Table # Table contents Section Table 1 Test coverage from white box testing 2.3.3 Table 2 Test coverage added by using MBT 3.4.1 Table 3 The five states of a graphical state machine 4.2.2 Table 4 The seven functions that make up the structure of a scripting backend 4.4.3 Table 5 Step-by-step structure for model creation 5.2.2 Table 6 Step-by-step structure for scripter creation 5.3.2 Table 7 Pilot project ports and their corresponding signals 6.1.2 Table 8 Grouping of possible responses received during a system reconfiguration 6.1.3 Table 9 Table of Abbreviation Appendix I Table 10 Table of Terminology Appendix II Table 11 Project plan for pilot project thesis Appendix V 1 Introduction 1.1 Background Within software development, testing is an integral part. Currently, testing is often done by manually finding and designing single test cases and then writing test scripts for these cases. This process is both time consuming and error prone[3][5]. In order to develop large and complex software systems, developers need to work at a higher abstraction level than today. Shorter lead times and the need for high maintainability are two of the key drivers for the evolution of the software development process. To leverage the increased complexity, model based development has started to get a hold in the industry[3], and there are lots of different tools for this type of development currently in use. The next generation testing tools use a testing method called model based testing (MBT) to raise the level of abstraction for the developer. By using a higher abstraction level when testing a system, productivity can be increased and inconsistencies eliminated while providing optimisations for the whole system. 1.2 Problem definition This thesis will be carried out at a Large Telecom Company, hereafter referred to as LTC. It will focus on an evaluation of the next generation MBT tools from Conformiq™ seen from the perspective of a user of their services. The thesis will also demonstrate the required changes the LTC needs to adopt, in order to transition to MBT from traditional testing methods. Qtronic is a tool from Conformiq used for automated test case generation and is driven by design models. This means that Qtronic can generate tests for an implemented system, referred to as the system under test (SUT), automatically when given a model of the SUT as input. The design model is a description of the intended behaviour, i.e. the functionality, of the system on a high level of abstraction, which means that the SUT is tested on its expected behaviour, and not its implemented code. Qtronic can automatically render test cases into a number of scripting languages, using so called scripting backends, which work as a translation tool between test cases and executable test scripts. It is bundled with backends for some standardised script languages, as well as tools to create new backends. The LTC uses Goat, a proprietary scripting language, which requires that a Goat backend is created. The thisis includes tool analysis and platform integration where usability, productivity and suitability of the Qtronic suite play a vital part. 1 (67) 1.3 Goals There are three main goals of the thesis: Create a model of a system based on a requirements specification provided by the test environment used by the LTC. This model should be a proof-of-concept that an abstract design model can be used as input for Qtronic. Develop a scripting backend for Qtronic. Provide an evaluation of Conformiq™ Qtronic. The evaluation should analyse its suitability for the LTC environment. 1.4 Limitations These are the limitations for the thesis: The design model will only work as a proof-of-concept that a system can be correctly represented in Qtronic. It will not be a full representation of the system. The evaluation of Qtronic will not be a test of the program itself. Instead it will be a focus on how well Qtronic performs in the LTC environment. The evaluation will be done on a Linux SUSE operating system using a Qtronic plug-in to the development tool Eclipse. No other Qtronic environments shall be evaluated. The models will be created manually. No program for automatic generation of the models will be used or developed. 2 (67) 2 Technical background This section will cover the background needed to understand how mobile telecommunication networks (MTCN) work, how to support creation of systems of immense sizes, and the principles of assuring quality during its development. 2.1 Mobile Telecommunication Network The core network is a network of connected nodes and links and is the basis for wirebased communication. It can be accessed by wireless communication from outside of the wired network using the MTCN. This infrastructure serves as the backbone for allowing mobile devices worldwide to connect to each other. 2.1.1 Radio Access Network The MTCN consists of a number of Radio Access Networks (RAN). RAN is a collective name for all networks using a certain standard for mobile communication. There are a number of these standards, including the most common GSM and UMTS (3G) standards. The reason multiple standards are used is because the newer generations of mobile phones require different techniques and higher bandwidth to be able to support new features. For example, when the second generation GSM network was created there were no requirements for high data rates since the only information that would be sent was voice and text (and later also web site data, using WAP). A newer mobile system needs much higher data rates to support more recent services, such as conference calling, web browsing, video and other multimedia streaming. Different types of standard MTCNs use different techniques and terminologies in their structures. This thesis focuses mainly on WCDMA networks, one of the commonly used standards in 3G networks, and the subsequent sections are specific for the WCDMA RAN architecture. Radio Network Controller The Radio Network Controllers (RNC) are nodes within a RAN that are used to facilitate communication between the RAN and the core network. Among other things an RNC handles the traffic load distribution and quality assurance as well as communicating updates and settings changes to its connected Radio Base Stations (RBS). 3 (67) Figure 1. The WCDMA consists of RNCs and RBSs. Radio Base Station The RBS serves as the entry points to the RAN for the User Equipment (UE) and is the node responsible for handling the radio transmission to and from the UE. UE can represent virtually any device communicating wirelessly using a recognisable standard. Commonly used devices are mobile phones, laptops with modems or PDAs. 2.1.2 RBS Systems An RBS can come in hundreds of different configurations and sizes. Determining factors can be the number of UE it is meant to control or the range of the signals it sends. The RBS systems are divided into several subsystems, i.e. smaller systems for handling different functionalities within the RBS. The subsystems can communicate with each other through something called OSE-signals. This thesis will be carried out in the Channel Control (CHC) subsystem, where different types of channels like common channels and dedicated channels are managed. 4 (67) 2.1.3 Blocks and signals Each subsystem is divided into software blocks. All of the blocks in the RBSs have multiple signals sent constantly, trying to interact with the rest of the system. A signal in CHC can, for example, be setup or reconfiguration requests for a channel, confirm and reject signals, or indication signals. Signals can be very simple, containing only an integer, or even a void (a signal with no values), or very complex, with data structures within data structures. Some structures can have more than 200 parameter fields. 2.2 Development of large systems When developing small systems, it is often quite simple to keep track of the different parts that make up the system and the programming can be performed in a less structured way. With increased complexity of large scale systems a more structured way of working becomes necessary. Companies with many employees working on the same system may find that a structured development process helps to avoid mistakes and problems. 2.2.1 Development framework A software development framework contains principles for structuring and planning, as well as approaches to coding a system. There are several different software development approaches, each having advantages and disadvantages. The LTC uses a software development framework similar to Rational Unified Process (RUP), which was developed by IBM Rational Software in 1998[1][2]. It is based on Rationals’ Six Best Practices: Develop iteratively Manage requirements Use component based development Model visually Control changes with version handling tools Verify quality by continuous testing This approach had some radical ideas when it arrived, for example that complex systems should be modelled as a number of interconnected, smaller subsystems. This idea is known as component based development or, more informally, “divide and conquer”. 5 (67) 2.2.2 Model based development RUP also implements the dynamic view, describing how all the blocks communicate with each other using sequences and state charts. This is known as a model based structure. It models the behaviour of a system, representing the different system components and transitions in model diagrams, while ignoring the internal functionality of the components. There are many types of models than can describe the behaviour of a system. The most common are based on Unified Modeling Language (UML) state machines (see section 3.2.1). 2.2.3 Using Development Tools In order to simplify using a development framework there are a large number of tools adapted for use within a framework. These tools perform a wide variety of tasks. There are tools for version handling, project management, coding, for graphically visualising models and for testing. A tool may serve a specific purpose, for example ClearCase or Subversion for version handling, while other programs like Eclipse or Microsoft Visual Studio may be used for multiple functionalities. Many large software developing companies will not just use one tool to cover all of their needs. For example, the LTC uses ClearCase for version handling and Rational RoseRT, a proprietary software suite, for model based development, graphical visualisation, coding and compilation. 2.2.4 Development at the LTC As mentioned earlier the LTC uses a development framework similar to RUP, which means that they adhere to many of the six best practices. They rely heavily on version handling using ClearCase, and do extensive quality assurance on their code. It also means that their development is component-based and that the system is modelled visually in a set of different UML diagrams. In Rational RoseRT (see section 2.2.3), the components are called capsules and can contain UML state diagrams and C++ code. Successively, the state machines together with the C++-code are used to generate executable machine code to create the actual system. Capsules can contain other capsules, and the complexity of the system means that several layers can be used for a single functionality. Capsules communicate with each other using a set of standardised signals, which can be of different complexity. The structures of the signals that are sent between the capsules are not necessarily the same as those sent between subsystems (see section 2.1.2). 6 (67) 2.3 Quality assurance of large systems While creating a large software system one has to make sure that the reliability of the product is guaranteed. In order to find system errors and correct them a number of rigorous tests upon the system is needed. In other words, testing is a process of validating that the software performs as expected. Even though the underlying purpose of a software test is the same, tests can be performed in a number of ways. 2.3.1 Scope of testing When creating tests for a system, the extent of the tests can be determined by three main factors [3][4]: scale, characteristics and the amount of internal knowledge. Figure 2. The extent of tests determined by scale, characteristics, and system knowledge. 7 (67) Scale The scale of the test determines on what level in the system the test is being performed. The smallest part of the system is referred to as a unit. This can be a single method or class within the system. Since units are small, and often very simple the unit tests are often done by the programmers themselves during the implementation process. If a faulty unit is implemented, the time and effort to find its fault will increase with each level, which is why unit testing is important. The next level on the scale hierarchy is the component, which consists of several units. The tests carried out on the component level consist of testing each component separately. At this level it is less likely that the testing is made by the programmer. The reason behind this is the increased amount of time required to do more thorough tests due to the magnitude and complexity of the components. The third level of the scale is integration testing. This is the testing of integration between two or more components communicating with each other. At this level it will not be possible to locate a fault within a component, which means that all components should have been tested thoroughly. This is time demanding and should, just like component testing, be done by dedicated testers. The final testing level is system testing, which is performed on the entire system. This test makes sure that all integrations between the subsystems are working as intended. The system should at this point be free of any major errors, since an error at this level would require a lot more effort to find, diagnose and repair. Characteristics The characteristics of the tests determine the types of errors the tester is looking for. If a test is meant to find erroneous behaviour of the system functions when the provided input is correct the characteristics of the tests are called functional or behavioural testing. This type of test is done to find errors in the code or design of the system under test (SUT). If a test on the other hand is meant to analyse error-handling, due to faulty input values, broken hardware or network failure, the characteristics is called robustness testing. This type of testing ignores whether the coding is correct or not and instead focuses on how the SUT handles unforeseen events. In many systems performance is just as important as function. When put under heavy stress a system should not only continue working as intended, but also ensure that computations are performed within reasonable time. This is tested by simulating an environment which causes heavy load (like multiple users or intense calculations). This type of testing is known as stress testing. The final characteristics of testing is the usability testing. This is done to test the ease of use of the user interface, for example by observing users to see if they might be confused or make mistakes while using the software. 8 (67) Internal information (The box approach) The final principle of testing describes the amount of internal information of an SUT. There are three levels to describe this: the black box, the white box and the grey box. When testing using a black box approach nothing is known of the internal design of the SUT. The only information available is the system requirements, i.e. the possible input values and expected output values. Figure 3. In black box testing, nothing is known of the internals of the system. The opposite of the black box approach is the white box approach, where the internal design of the system is described in full extent. The effect of this is that a test can be more thorough than in a black box test; the tester can create a test where all functions and all units are accessed at least once before finishing or a test where all boolean conditions are tried out with both true and false. The grey box testing is a mix between the black box and white box approach. This approach describes parts of the internal design and functionality. Most tests are derived from a black box approach. Even software developers who want to create tests from their own system will, even though they are aware of the internal structure, think of the system as a black box. They only care whether the received output corresponds correctly to the given input. 2.3.2 Testing Process The process of testing a system can be done in many different ways, but in most cases, regardless of which is used, there is a certain methodology that will be applied. Finding test cases The first step is to find test cases that cover the system requirements. A test case is defined by a context, a scenario and some fail/pass criteria[3]. A set of test cases can be grouped together in a test suite. 9 (67) Figure 4.Example of a test case for a unit test. The image above shows in a simplified form a unit test case where a function (context) is called with a certain value (scenario) and returns something that is either the expected result or something different (pass/fail criteria) . Run test cases The second step is to execute the test cases on the system. This is usually done using an interface where the test cases can either be tested manually one by one or automatically, for example by using a test script in a scripting language. Common scripting languages include TCL, TTCN-3, and normal programming languages like Java[5]. Script based testing is a good way to reduce testing time since the execution can be automated. A test script will contain one or more test cases, and usually a way of reaching the state where the test cases can be tested. For example, in order to get the system to the point where a reconfiguration of settings can be tested, the system first has to be initialised correctly[3]. Analyse the test results The final step of the testing process is to make an analysis to ensure that the actual results are the same as the expected results. For cases where the results differ the cause has to be determined. It might have been the test case that was incorrect, either because of incorrect data transmission or reception, or an internal fault in the SUT. 2.3.3 Coverage Test coverage is a collective term for the types of coverage (see Table 1) that can be tested on a system by a given test case or test suite. The different types of coverage depend mainly on whether the tests are white box or black box[13]. White box test coverage One example of white box test coverage is code coverage, which describes the degree to which the code of the SUT is tested by a test suite, as a percentage of the entire code. Since the code needs to be known for this type of coverage it can only be used 10 (67) for white box testing. There are different ways of evaluating coverage of the code based on different coverage criteria. Other types of white box specific test coverage are covered in Table 1. Table 1. Test coverage with white box testing Coverage name Coverage criteria Method coverage The proportion of functions executed in the program. Statement coverage The proportion of lines executed from the source code. Decision coverage/ Branch coverage The proportion of control structures in the source code (such as if-statements) that covers evaluation both to true and false. Condition coverage/ Predicate coverage The proportion of boolean sub-expressions evaluated both to true and false. Path coverage The proportion of different routes through a given part of the code that have been executed. Entry/exit coverage The proportion of possible call and return values of a function covered. Black box test coverage If black box testing is used there is no possibility to analyse the code coverage of a test suite since there is no knowledge of the code. However, there are other ways of evaluating the test coverage from criteria, based on the system specification of valid and invalid input values and their expected responses[15]. An example of black box test coverage is the boundary value coverage, which is the proportion of values close to the edge between valid and invalid ranges of input values exercised in the test suite. These values are often locations of errors and therefore need to be tested rigorously. Another important black box testing method is model based testing (see chapter 3). Selecting an appropriate test coverage As mentioned previously, there is a lot to cover in order to assure complete system quality. A test suite with full coverage assurance might, in a large system, be so vast that it could take a very long time to find all the test cases and make sure they are complete. To save time one could instead choose to use an incomplete coverage where the tests only cover the more important cases. The question of finding a good balance becomes one of knowledge and experience. For example, knowing what the test cases should cover, whether created test cases are necessary, and how to assure that no test cases are duplicates of other test cases. 11 (67) 2.3.4 Current testing at the LTC Goat script testing The current testing process at the LTC for testing the software blocks is one where test cases are manually derived and written into test scripts in a script language called Goat in order to automate the test execution in a simulated test environment (harness) called SimCello. Each test case is used in combination with other test cases so that the setup time can be reduced. The LTC systems are big, with large, complex signals and lots of setup and reconfigurations to execute every test case. A test will therefore take a long time to run, and complete SUT coverage will in many cases be impossible. Figure 5. Current testing process at the LTC. The documentation used to derive test cases mainly consists of information on updates and new features. The changes that are made in the SUT to accommodate new functionality might cause the test scripts to become outdated, therefore the LTC uses regression testing for whenever software functionality has been updated. Regression testing Regression testing is not widely used[11]. The reason for this is the absence of a welldefined and implemented policy for this type of testing combined with the fact that development organisations find regression testing complicated and difficult to maintain[11]. It is however very important and useful for large systems, since it is a good way to verify that changes in the source code made to implement new functionality haven't created errors for existing functionality. Even if changes are made in areas seemingly unrelated to a function a fault could be created. These faults can be found by reusing scripts with test suites based on previous versions of the SUT and monitor whether they result in a fault on the new version. 12 (67) 3 Model based testing 3.1 Understanding model based testing As software systems become more complex, software testing at a higher abstraction level is not only a recommendation but is becoming more of a requirement. It is a way of working that can shorten the testing process and reduce possible errors caused by a tester. Model based testing (MBT) is a process which is gaining in popularity within software development. It is a black box testing method in which test cases are derived in part or in whole from an abstract design model. While not necessary, it allows for automation of the test case generation, and represents a totally new way of working compared to traditional testing. 3.1.1 History MBT has its roots in hardware testing of telephone switches[6]. It has been used for software testing since the mid-1970s, and has since then grown very slowly. However, in modern times, as product cycles shorten and applications become more complex, MBT has recently gained popularity among big software companies[8]. Because of the increased popularity, many software tools have been developed to design test models and automatically generate executable test cases based on these models. 3.1.2 Approaches There are several ways of using MBT depending on the desired result[3]. Generating all unique combinations of input using a list of possible input data. Generating executable test scripts from an environmental model. Generating executable test scripts from a model describing the behaviour of the system, which include expected output response. Generating test scripts from existing abstract test cases. This thesis will focus on the generation of executable test scripts from a behavioural model. This is the most challenging way of using MBT, since it requires a design model which must describe the system well enough to allow the test case generator to correctly predict all expected responses for any given input. The design model can either be expressed textually or as a combination of text and graphics, and it will be created on a high level of abstraction. 13 (67) 3.1.3 Abstraction Abstraction is one of the most important features of MBT. Figure 6 illustrates the concept of an abstract model, versus a real world implementation (described from a system model). Figure 6. Comparison of a real implementation apple and an abstract model apple. The purpose of abstraction is to reduce the information content, typically in order to only retain the information which is relevant for a particular purpose. It can be used to make a less complex representation of a real system. In addition test case generation time can be shortened. Abstraction simplifies model design by allowing the tester to concentrate on interactions between the SUT and the environment, instead of describing internal implementation details. Abstraction of a system under test can be done in a many ways, and the most common is to use the desired behaviour of the SUT. 3.2 Unified Modelling Language There are a number of ways to model a system; the most common is to use Unified Modelling Language (UML), a standardised general-purpose modelling language defined by the Object Management Group (OMG)[2][12]. UML includes 14 different types of diagrams, seven of which describe structural information, such as class diagrams or component diagrams, and seven describing the behaviour of a system, such as use case diagrams or state machines. It also defines a set of graphical and textual notation techniques that can be used to represent these 14 types. Only a limited number of these are relevant to MBT and the following sections will cover some of these types. 14 (67) 3.2.1 UML state machines Finite state machine is a term applicable to any model that can accurately describe a system with a finite number of specific states and transitions. In this case a state can be seen as a unique configuration of the system and the transitions represent how a system can be changed to a new state. It is usually visualised in a diagram, or graph, where nodes represent the different states of the program and lines between the nodes represent the transitions between states. Figure 7. Door modelled as a finite state machine. UML state machines, also known as UML statecharts, are basically finite state machines extended with hierarchy, concurrency and communication[10]. This offers the possibility for expanding states into lower-level state machines to model complex or real-time systems. UML can both describe a system accurately, when combined with action code, and provide a simplified system description, when written on a higher abstraction level. For abstract models, which are the focus of this thesis, state machines are the most commonly used models. 3.2.2 Sequence diagrams Sequence diagrams are representations of interactions between two or more processes. They show messages exchanged between them in the order that the messages are transmitted. Sequence diagrams can be a good way to get an overview of a test case. In MBT, test cases can be represented as sequence diagrams that can be used as input to a test script generator. However, it is not common to generate multiple test scripts only based on one sequence diagram, since the sequence diagrams usually only represent single test cases. 3.2.3 Use case diagram A use case is a description of the behaviour of a system in a specific scenario. It represents the interaction between the system and one or more actors. An actor can be anyone or anything outside the system that is interacting with the system. Since use cases do not describe the behaviour of a system with sufficient detail, they may not be 15 (67) used to create test cases. While several use cases can be used to represent a state diagram[7] this would generally be done manually and automated test case generation using MBT from use cases only is not very common[9]. A use case diagram is a graphical overview of the dependencies between different use cases in a system. It consists of actors, use cases and dependencies between use cases. The dependencies between use cases represent the internal relationships of use cases. For example, a use case may be an extension of another use case, or a use case may execute another use case. These types of diagrams cannot be used for test case generation in MBT, since they only visualise relationships between different use cases. 3.2.4 Class diagram The class diagram describes the structure of a system, leaving out all information about the behaviour. It represents the classes a system consists of, and the data fields and methods of these classes. Class diagrams are commonly used as a reference, when developing a system, but because of the lack of behavioural information these types of diagrams cannot be used directly as input for MBT. They can, however, give a good overview while working model based. 3.3 The MBT process There are some differences between different types of testing. When testing a new system with MBT there are steps that are similar to the steps taken in non-MBT approaches, and some steps that are completely replaced. Of course, most notable is that test cases are derived, often automatically, from a model of the SUT. 3.3.1 Creating a model When working with MBT one of the first tasks is to design the model. As specified earlier a model is an abstract representation of the SUT, and as an abstract model it should be small and simplified. Its focus should be on the functionality of the SUT and not the actual implementation. The first thing to take into account is how much detail will be omitted from the system in the abstract model and how much of the system can be reused for the model creation. If the SUT could be reused to 100 percent, the model creation would be very quick. However, too much detail will only serve to entangle the functionality with the implementation. The implications of reusing the full system would be that any erroneous code found within the SUT would be reproduced in the model, and those errors would therefore not be found when testing[3]. It is very important to take this into consideration when modelling; the model should be as independent from the implementation as possible. 16 (67) The most independent model would be the one created without any knowledge about the implementation. The creation of such a model will of course take longer time to create as it needs to be built from scratch. This independence would, however, make sure that as long as no errors are made in the model most errors will be found in the SUT. Instead of looking at the SUT, the documentation that describes the behaviour is used to make the model. Figure 8. The model should be based on documentation (comment) and not the code. Figure 8 illustrates a mismatch between the desired functionality and the implementation. By using the documentation when creating test cases such errors are more likely to be found. There are several types of documentation that can be used for this purpose. 3.3.2 Generate tests cases MBT does not, contrary to popular belief, mean that the test case generation must be automated. It can in fact help with manual testing as well, where a manual tester thinks of the SUT as an abstract system when writing the test cases. While this is not necessarily difficult, it usually requires some amount of education and practice[3]. When using manual testing it is even possible to use MBT principles in order to create test cases without building a model. The problem is that these test cases are not as comprehensive as they would be if they were created automatically. If the test cases should be automatically generated a software tool is required. The tool will require a design model, as well as instructions for what the generated test cases should cover. These instructions are provided by the tester by supplying coverage criteria (see sections 2.3.3 and 3.4.1). After a test suite has been either manually written or automatically generated the resulting test cases will be analysed to see how much of the requested coverage criteria that has been covered. This can be done using a traceability matrix (see Figure 9), a matrix tracing every coverage request to a test suite. It will for example analyse if a test case accessed a specific function, or covered condition branches with 17 (67) true or false. Automated generation tools usually provide a coverage report, a document that shows what percentages of the coverage criteria were covered. Figure 9. Traceability matrix for 9 test cases, covering five criteria. 3.3.3 Make the tests executable After test generation, each generated test case contains instructions for interactions between a test environment and the model of the SUT. These instructions are not usable for testing against the real system until they have been converted into executable test cases, i.e. a set of test cases in a format the SUT understands. This is done by taking the abstract test cases that were created from the abstract model and adding the details that were removed during the abstraction. There are three ways to accomplish this: an adaptor, a transformation tool, or a mix between these two. Using abstract test cases is a beneficial way to work, and one of the largest benefits is that if a new test harness is implemented, all of the old test suites can still be used since all that needs changing is the adaptor or templates for the transformation tool. Adaptor An adaptor is a piece of software that wrap around the SUT in order to manage its low-level interaction details, thus allowing it to use abstract test cases as input to interact with the SUT[3]. The adaptor is responsible for four things. Setting up the SUT so it is ready to start a new test case. Accepting abstract test cases and translating these to SUT interactions. Receiving the test results and returning them in the same abstract format as when called. Shutting down the SUT at the end of a test case, or a test suite. 18 (67) Transformation tool The second way of creating executable test cases is to use a transformation tool, which uses a template to map the abstract test cases to low-level SUT test cases, and then renders them. Typically this is done by translating a test case into a script language. The transformation tool can have knowledge on how the abstract test cases signals should look without requiring any real connection to the SUT. Mix The third way to create executable test cases is to simply use both methods. A transformation tool outputs the abstract test cases into an abstract test script which is then the input to an adaptor that in turn translates this into test cases for the SUT. 3.3.4 Analyse the executed tests Now all that remains is to execute the tests and save the results for analysis. Since the test suite is based on the expected behaviour of the SUT, a failed test case means that the implementation differs from what the modelled behaviour is. This could either mean that the code in the system contains errors or that the design model being used is incorrect, which is why the failure needs to be analysed. There are two reasons why the model could be the one containing the fault. Either the model was created with a flaw, or the model was created from a documentation specification with a flaw. A faulty model is fairly common when dealing with a first version of a model, but later iterations can be expected to take up about half of the testing failures found during execution, meaning that it finds just as many faults in the SUT[3]. If the reason for the failure was in the model, it needs to be corrected and the rest of the test cases scrapped in favour of an entirely new test suite. However, if the analysis precludes an error in the model this means that a fault within the SUT has been found. 3.4 Changes between MBT and manual testing The high level of abstraction is one of the main differences between MBT and manual testing and can be an advantage when deriving test cases. Another big gain with MBT is also that it is claimed to be a fun way to work[17], however, MBT require changes in both the work process and the mentality of the testers[6]. 3.4.1 Increased test coverage The available coverage criteria for MBT are described in section 2.3.3. The exception to this is that in a model based approach this is no longer coverage of the code in the SUT, but instead of the abstract model representing the system. This means that even though a test suite has full coverage of the abstract model, this does not represent a full coverage of the actual system. 19 (67) There are also some additional coverage criteria specific for MBT which include coverage of the different states and transitions of the model. Table 2. Test coverage added with MBT Coverage Type Description State coverage The proportion of states of the model covered by the test suite. A typical option is that all states should have been covered at least once. Transition coverage The proportion of transitions of the model covered by the test suite. Dynamic coverage The proportion of paths covered in the model, i.e. what set of combinations of transitions and states are covered. This coverage is seldom used within manual testing because of the huge amount of combinations possible. 3.4.2 Test automation For a complex system there can be a large number of paths and transitions, and thus it will require a large number of test cases to assure the reliability of the system. One of the advantages of MBT is the potential to generate an optimal test suite for the system based on a number of coverage criteria, or heuristics (see sections 2.3.3 and 3.4.1). In MBT, the SUT is commonly modelled as a state machine consisting of states and transitions. Provided the model is deterministic, it can then be analysed by a test case generator to find test cases by searching for all executable paths. The test case generator is a software tool that will explore a given black box model in a white box approach, and be guided to appropriate test cases by using the coverage criteria supplied by the tester. 3.4.3 MBT experiences A lot of companies, including other units of the LTC, have introduced MBT and reported great success[17]. Common finds made during pilot projects and following projects have been generally positive. MBT is appropriate for systems that are well documented, state rich and support automated execution of test cases[6]. With these conditions an average time gain can be approximated to least 30% for non-pilot projects; 20% for initial creation and 90% for functionality updates[17]. Higher gains can be reached with high reusability. Not only will the reusability make sure that functionality changes are tested quicker, but the design model can also serve as a point of reference that can be shared and reused by everyone involved[6]. 20 (67) A tester who is used to working manually will need some education in order to work with MBT, both to learn the tools that are going to be used, and to learn how to think model based. It can take some time to adapt to working this way, and some testers are not suited for this type of testing process at all[17]. Large systems may have some difficulties with state space explosions, where models begin to grow in number of states. This is especially common in early projects, like pilot projects, before experience can be used to avoid such problems. State space explosion will lead to higher test case generation times, make it harder to maintain the model, and more difficult to get an overview of the test coverage criteria. The way to avoid this is to keep a high level of abstraction from the beginning[6]. 21 (67) 4 Conformiq™ Qtronic™ 4.1 The Qtronic suite As model based testing (MBT) is becoming a popular concept within system testing, MBT tools are evolving in both functionality and usability. More features are constantly added in order to make the usage of these tools more efficient, as well as expanding the scope of their functionality from model design to automated test generation. Conformiq™ Qtronic™ is a commercial software suite, which uses an MBT approach to automatically generate test cases for system testing. The suite comes bundled with the Qtronic Client, Qtronic Computation Server and Conformiq Modeler. Conformiq offers a Qtronic education, consisting of 10-22 45-minute lectures, divided over 2-10 days, in order to get to know MBT and the Qtronic suite. The time to get a good understanding of Qtronic is highly dependent on previous experience of the individual. Most of the following information is taken from the Conformiq Qtronic User Manual[15] and other related documentation[14][16]. 4.1.1 Qtronic Computational Server Qtronic Computation Server (QCS) is the software that performs the computations required to create the test suites. It runs as a background process, and can run either locally or on a remote dedicated server. The server can only be accessed by the Qtronic Client which loads the models onto the server and requests test case computations based on settings specified in the client. QCS analyses the models loaded from the client in a white box approach. However, since these models are black box representations of the SUT, it generates tests from the perspective of a user. It will use the models to calculate appropriate input and output values without knowing anything of the system's internal structure. The standard behaviour of the QCS is to choose input values to cover as many requirements as possible while keeping the test cases as short as possible. This is done by calculating the cost of each test case as the square of the number of messages in it, and then choosing a test suite with minimal cost that still covers all test goals. The reason for this is to ensure that the test suite is quite small, while at the same time keeping individual test cases relatively short to simplify test execution and debugging. 22 (67) 4.1.2 Client The Qtronic Client is the user interface of the Qtronic suite, and can be used on several operating systems as either standalone software or as an Eclipse plug-in, which requires an existing Eclipse installation. There is no difference in the functionality of these versions. This thesis will focus on the Eclipse plug-in in a SUSE Linux-environment. The client allows the users to specify requirements of the test suite that should be generated, loads models onto the QCS and presents the generated test cases to the users. To do this the Qtronic Perspective, which presents the user interface in a set of views, needs to be activated in the Eclipse environment. These views (see Appendix III – Qtronic Client for an image of some of these views) can be grouped together, depending on their purpose. Global The Project Explorer shows all projects in the workspace. Each project consists of model files, test design configurations and test generation options. The model files can be of two different types, either a text-file representing the model in QML-code (see section 4.2.1) or the graphical part of the model in XMI-format (see section 4.2.2). The Console shows short messages to the user, with information about, for example, the progress of test case generation or rendering. Per model The Model File Editor is a standard text editor where the user can create and modify the textual parts of the QML models. The Model Browser shows the model files, both the graphical and the textual files. After a suite has been generated this view can also show the path of a specific test case. Per design configuration The Coverage Editor (see Figure 14 and section 4.3.2) makes it possible for a user to specify the coverage criteria of the test case generation. It will show the percentage of coverage after a test suite has been generated. The Test Case List shows all generated test cases. In this view test cases can be renamed or deleted. The list also contains test cases that are outdated, i.e. generated from a previous version of the model and do not match the current model. These test cases are signified by being highlighted in red colour. 23 (67) The Traceability Matrix (see Figure 9) is a table that shows the coverage goals covered in the different test cases. Each coverage goal can be found in many test cases, and each test case can cover many coverage goals. The Model Profiler is used for optimising and debugging the Qtronic models as it can pinpoint problematic constructs in the model i.e. the model parts that cause Qtronic to spend most time. Per test case The Test Case view shows the interaction between the test environment and the state machines for a selected test case, as a sequence diagram. The Execution Trace shows the execution path of a selected test case. The Test Step view also shows the interaction between the test environment and the state machines, but with more detailed information about the contents of the signals. 4.1.3 Conformiq Modeler The Conformiq Modeler (CM) is a light-weight modelling tool that can be used to create graphical models that can be imported into Qtronic views (see Appendix IV – Qtronic Modeler). It has all the basic functionality needed to create the graphical models but it is very limited. Even though the CM comes bundled in the Qtronic suite the documentation also mentions the possibility to use third party modelling tools, due to the basic features of the CM. Examples of Qtronic-compatible tools are Sparx Systems Enterprise Architect, Rational’s RSA-RTE and IBM/Telelogic Rhapsody. A model file contains one or more state machines, which can be edited in the main window of the CM. On top of that area is the toolbar, where components used when building a graphical state machine can be selected. These components will be described further in section 4.2.2. The CM also contains an element tree list showing all the existing components in the selected state machine. 4.2 Models in Qtronic The models used by Qtronic are expressed in the Qtronic Modeling Language (QML). The language is essentially a superset of the Java language with functions implemented to simplify model based architecture. The model can either be expressed completely in QML, or partially, where the textual notation is combined with a UML state machine diagram for graphical representation. The graphical structure contains state machines, transition signals and ports for communication with the environment. 24 (67) 4.2.1 Textual notation Just like Java, QML consists of variables and expressions, all strictly typed and known before the compilation. The types are divided into the same three groups that Java has: primitives, references and values, where a primitive is a collection of the numerical types and booleans, the reference types are types for referencing classes, and values are types that can be used for holding other types. Records QML also contains the user-defined records, which similarly to classes can contain methods and variables. These records are pivotal to the model creation in QML as they are the only way to represent the signals that can be sent between ports in a model or as external communication with the environment. While a record has similarities to a class, for example that it can extend another record, it differs on some points. Most notable is not requiring a new in the instantiation and being immutable by the Java call this. Ports A port is a gateway for the state machines to communicate with other state machines (internal ports) or with the environment (external ports). Depending on the nature of the port, whether its use is internal or external, a port may be created in one of two ways. If the port is internal its creation is defined as a new CQPort in the main function, and can then be used as reference when creating classes or state machines. It can then represent a signal sent from one state to another. External ports are created in the system block. Figure 10. Internal CQPorts are used within the tested system models, but not when communicating with the test environment (Tester). 25 (67) System block If the port represents a gateway for communication outside of the model domain it must be defined in the system block. The signals are bound to specific ports, and each port can either be Inbound or Outbound, determining whether a signal should be sent or received when the model is loaded onto the QCS. A signal can be bound to several different ports, and each port can contain one or more signals. State machines The main part of a model is the state machine (see section 3.2.1). While it is possible to represent a model as a single state machine and making it a part of the mainfunction, a state machine is usually represented as a class inheriting from the abstract class StateMachine defined by Qtronic. A state machine is executed on an individual thread, which means it can be run simultaneously with other state machines. Each class extending the StateMachine class must implement the method run within the main execution logic of the state machine. The purpose of threads is to be able to model system components that are executing simultaneously. If, for example, a program needs to simulate a server and a client, both of these must run at the same time in order to be useful. 4.2.2 Graphical notation In order to simplify the creation process a model can be extended with a graphical representation using a combination of QML and UML. The graphical component is only an optional complement to the textual notation, and can never be used separately. For Qtronic to understand that a graphical notation is connected to a project the UML state machine must have the same name as a class from the text file. This will make Qtronic interpret the state machine as an extension of the class. States The different states in the state machines each represent a different configuration of the SUT, for example, information on what signals that can be sent or received at this time. Each state can have an internal state machine that is run consecutively when the state is entered. Table 3 describes the five different types of states in the graphical notation of state machines in Qtronic. 26 (67) Table 3. The five states of a graphical state machine STATE SYMBOL DESCRIPTION Initial state The initial state is the starting point of the graphical model, and is a requisite for a graphical state machine to work. Only one initial state can exist per state machine. Basic state Basic states can have QML action code that executes when the state machine enters this particular state. The keywords entry and exit are special functions containing action code that will be performed once a state is entered or exited respectively. Basic state containing sub state This state has all the functionality of a basic state, but it also contains an internal state machine, which starts running in a new thread when the state is entered. Junction Junctions have no names and can not contain any code. They are used for grouping and splitting multiple transitions (see below). Final state The final state is the state where the state machine terminates. There can be any number of final states in a state machine, or no final states at all. A final state in a sub state leads to the internal state machine terminating. Transitions There also needs to be a way to represent the transitions between the states. This is done graphically by connecting a unidirectional arrow from a source state to a destination state. A transition can have triggers, guards, and actions in an optional string attached to it. Figure 11. A unidirectional transition arrow. Transition Strings The transition string is used for two reasons. The first is in order to determine whether or not a transition path should be taken. To determine this, the triggers and 27 (67) guards are used. The second is to perform a certain action when the transition is traversed. A trigger is used to represent what signal should be matched in order for the state machine to traverse the transition path. Since the signals may be bound to multiple ports the string can be preceded by the name of a port, separated by a colon (:) character. Figure 12. A transition string determines when to change to a new state, and what to do when that happens. The guard is the other factor that can determine if a path is traversed, and is an expression representing a condition. It can constrict a path from being taken even if a trigger has been activated, and can be used to ensure deterministic transitions, something that Qtronic requires from a model. A way to assure that a state machine always has a transition to take is through the use of an else guard, denoted as [else], which will fire if no other transitions can be traversed. If a transition trigger is activated and its guard yields true the code in the action will be executed. The action is initiated by the / character. This signal from the trigger is stored in a variable called msg so it can be accessed by the action code. None of these three parts are mandatory and a transition can instead be used with an empty transition string. If a path carries neither triggers nor guards the path will automatically be taken every time. Notes A very important part of programming is the ability to comment on the work, and Qtronic supports this by adding a note component in the graphical model. The comment can contain text and has no impact on the model. It can be bound to another component with a note connector. Figure 13. A note is used for comments. 28 (67) 4.2.3 Test case control using QML functions While the records, ports, system blocks and state machines are used in order to create the models, QML also contains a number of predefined functions used to ensure a better test suite from a model. requirement A requirement is a function that adds a coverage goal to a model. The requirement is called with a unique string as argument, which, when read by Qtronic, adds a new test goal to the coverage editor. The string can be expressed in a hierarchical manner using a / character. For example, "Signal rejected/timeout" and "Signal rejected/bad values" are two events that both represent a rejected signal, but due to two different reasons. This hierarchy can be found in the Coverage Editor. Figure 14. Coverage Editor showing requirement hierarchy. assert An assert is a function which checks that a supplied condition is true. They will often be placed in a model at locations where the supplied argument logically never should be anything but true. Its main function is to check if fallacies exist in the model. For example, if a function always is supposed to be called with the integer argument intA less than two, the assert call in the function might look like this: Figure 15. The function lowInteger with assert. 29 (67) If this function would be called with an integer greater or equal to two this would result in a run-time error. A special case of assert is when it is called with the boolean value false. It will work as usual and supply Qtronic with an error message, but will do so every time it is accessed. These false assert are therefore very useful to place in areas of code that logically never should be able to be accessed. require The require function is basically an assert call with the exception that it is much stricter. This strictness forces the require function to not just check, but rather, if possible, guarantee that a supplied condition is true. When a require is supplied with a false argument, it will try to make changes to the argument in order to make it seem like the require was always called with a true. This is of course impossible if the argument is determined beforehand, but will be done if the argument is non-deterministic. This concept might be hard to grasp at first glance. Figure 16. A change is possible if the argument is not determined beforehand. Figure 17. A change is not possible if the argument is determined beforehand. Just like assert, require has a special case when called with the value false, or when a conversion of an argument is impossible. These will not generate a test case, but instead create a backtracking point to help debugging. after The keyword after is used in order to simulate a timer in a model. It is used in the transition strings instead of triggers and guards, but still allows action code to be executed. It will trigger if no other transitions are traversed within the specified time. The timer starts to count when a state with an outgoing after transition is entered, even if the state contains a hierarchy, and will not be reset until the state has been left. When traversing an after transition, Qtronic will treat this as a simulation of time passed, represented by a time index in the test case, and can be used to test timeouts of a system. 30 (67) Ending conditions and finalised runs In some situations it might be convenient to make sure that the test cases generated from a model do not end in an unexpected state. This can be assured using the incomplete and complete functions. When an incomplete is added to a model it flags that no test cases should end their run until there has been a call for a complete. If there are no states where a test case should be allowed to end there is also an option within Qtronic properties for ensuring that Only Finalized Runs can be part of the test suite. This requires a completed run-through or a final state in a graphical model in order to work. 4.3 Usability Working with Qtronic would change the way of working, since it would take away much of the manual process, and there are still some limitations on when it is appropriate to use MBT and Qtronic. 4.3.1 Testing limitations Qtronic has been proven to be especially suitable for functional testing, and might be used in testing levels such as component testing, integration testing, system testing. It is also well suited for robustness testing. There are of course some testing areas where it is not suitable to use Qtronic. For example, it is very difficult to create test cases for stress testing in Qtronic since it has no real connection to the SUT and cannot execute its cases by itself. While performance testing technically would be possible to do, Qtronic reduces its test cases to cover all criteria in the smallest number of cases possible and it would therefore be very difficult to make a performance testing suite. Also, User Interface testing is not a suitable area of use for Qtronic, since this should be done manually with a user interacting with the system and then evaluating the interface. 4.3.2 Test configuration In order to allow a user to specify different coverage settings, the Qtronic Client provides design configurations (DC) which can be edited in the Coverage Editor view. 31 (67) A DC is added to a new project automatically, and it allows the user to specify different coverage criteria (see sections 2.3.3 and 3.4.1). It is divided into four hierarchical coverage groups. State chart coverage allows for specification of coverage of the different states and transitions in the model, as well as possible combinations of transitions. Coverage of conditional branching contains options for detailed coverage of boolean expressions and boundary value analysis. The control flow coverage specifies detailed coverage settings of statements and methods in the model. The dynamic coverage allows a user to set coverage of combinations of paths over transitions, states and conditions. When the keyword requirement is added to a model, it will also be included in the DC. This means that the user can specify the coverage of requirements individually for each test suite; however, the most common setting is that the test suite should cover all requirements of the SUT. After a test suite has been generated the coverage editor shows the coverage percentage of each test coverage criterion in a grouped hierarchy. It is also possible to navigate deeper into each group to see exactly which coverage criteria are fulfilled and which are not. Each project can have one or more DCs, all of them with different settings for the required coverage. For example, a user may want to generate one test suite that covers the basic requirements of the system, and another test suite for analysing the system in more detail. 4.3.3 Testing approaches There are two approaches to MBT that determine the behaviour of the testing called online and offline testing. Online testing With online testing the testing tool can use the model to directly test a running system. This is done by creating an adaptor, which translates the model signals and executes them on the SUT. Of course this approach also allows for the normal creation of test scripts, which can be tested separately. As of version 2.1.1 Qtronic has no support for this feature, hence this thesis will not cover online testing of the SUT. 32 (67) Offline testing Offline testing is the regular script based testing process, where Qtronic will generate test scripts from the test cases, so that they can be independently executed on the SUT. Figure 18. Qtronic will take the roll of both finding and scripting test cases. 4.4 Qtronic scripting backend No matter which testing approach is used, when a test suite has been generated the tests can be transformed to a number of scripting languages using the Qtronic scripting backends. The scripting backend works as a sort of interpreter, which allows Qtronic to translate the abstract test cases into executable scripts using a provided backend as a dictionary. Since the models are abstract, and not bound to any specific testing environment or language, they can be used, without any changes, by any scripter. 4.4.1 Using a bundled scripter As of version 2.1.1 there are five scripting backends that come bundled with Qtronic. By using these it is possible to export the test suite into HTML-code, TTCN-3, QualityCenter, Perl and TCL. While some of these are standard test script languages that are executable in many real system testing environments, the HTML-output is just an aid to visualise the generated test cases and the used Qtronic settings in an easy-to-understand and easy-to-navigate HTML-document. Scripters can be added to a project, but are bound to one specific test suite, determined by a DC. Multiple scripters can be bound to one test suite, and different DCs can use the same scripters. 4.4.2 Creating a new scripter If a testing environment does not support one of the standard test script languages Qtronic supports the creation of other scripting backends and Conformiq also provides education on how to create them. The scripting backends consists of two parts. The first is an XML-file that can be used for configuration settings. The XMLcode will be interpreted by Qtronic in order for a user to specify certain options before starting the rendering. 33 (67) Figure 19. XML-file from example scripter. Examples of settings can be the location of the output file, whether the output should contain comments or not, or whether integers should be converted to doubles. The second part of the scripting backend is Java code which is used to create the intended scripting syntax. This code consists of a class which extends the abstract class ScriptBackend, and when Qtronic renders its test cases it will call on this code. The execution is done through a number of functions specified in the class ScriptBackend. This class can also use a Qtronic-defined API (see section 4.4.3 QML ValueVisitor) in order to access signals, records of signals and members of records, of the generated test cases. The process of creating a new scripting backend is described further in the Methodology and Implementation chapters. 4.4.3 Scripting with Qtronic functions Predefined functions There are a few functions to simplify backend creation, which represent different structural parts of a test suite. The first five of the functions mentioned in Table 4 are used in order to make the executable script file run. 34 (67) Table 4. The seven functions that make up the structure of a scripting backend Function name Description beginScript Is called in the beginning of the test suite. Can be used to output headers, import calls, global functions etc, and creating the output file. beginCase Is called in the beginning of each test case. testStep Is called for each test step, i.e. for every signal sent or received. endCase Is called at the end of each test case. endScript Is called in the end of the script. Can close the output file. checkpointInfo Is called to indicate that the given model-driven coverage goal has been covered. internalCommunicationsInfo Is called to indicate a single internal communication step. There are also functions that are used for data gathering such as checkpoint coverage, case dependencies and case probabilities, but these are not necessary in a basic scripter and will not affect the test execution at all. The last two in Table 4 are such functions. They can be used for documentation of the test cases and to gain extra information on how the test scripts are mapped to model-driven coverage. The QML ValueVisitor To analyse the data types and render the data in each record, the interface QMLValueVisitor may be useful. It is supplied in the Qtronic suite scripting tools, and defined in the documentation as an aid for visiting each record and all the fields within them. The QMLValueVisitor specifies six overloaded methods called visit, which takes a QMLValue as argument. A QMLValue can be of one of the following types: QMLArray QMLBoolean QMLNumber QMLRecord QMLString QMLOptional 35 (67) These are all very similar to their Java and C++ equivalents, except for the type QMLRecord which is a special case (see section 4.2.1). Depending on the argument, one of the six methods will be executed. More information on how to use the predefined functions and the QMLValueVisitor can be found in section 6.2.2. 36 (67) 5 Methodology 5.1 Before starting a pilot project Information retrieved from the Conformiq Qtronic documentation and other related documentation can be used to gain insight into modelling from a theoretical perspective. However, in order to implement a pilot project both theoretical and practical experiences are required. The best way to gain practical knowledge is to practice modelling; starting with simpler models, and working up to more complex ones. 5.1.1 Working with simple models The main reason to work with simple models is to get acquainted with QML and the Qtronic-specific language notations. Two very important lessons to learn are to recognise how the keyword requirement change the model coverage and the keywords require and assert can help to transform signals and locate faults. It is also good to practice iterative modelling at this stage. Adding a new path to a final state will result in new test cases, or it may result in an error in the model. If a test case generation is done often, any errors will be easier to find and fix. A recommendation is to practice writing models only with the textual notation as well as combinations of text and UML statecharts in order to learn both modelling combinations. Which of these is easiest to work with is a matter of personal preference, although graphical modelling may grant a better overview and understanding during modelling, especially when moving on to bigger models. 5.1.2 Working with big models A scenario is a use case with some added detail, representing a structure for an interaction with an SUT. Constructing large models takes time, and something to consider is the number of scenarios needed to model a chosen functionality, since the first large models should not be too advanced. When creating larger models it is good to remember that large systems often communicate with external systems, and since these should not be modelled, the external communication has to be represented in some other way. This is done by adding the external communication ports in the system block and letting Qtronic assume the role of the systems supposedly attached to them. These ports are then used to send a response signal back to the system when the system asks for a response. 37 (67) A large Qtronic example model In this example the SUT is a system which can add a book to a database, but since adding data requires a data allocation the tests needs to both cover whether resources are available for an allocation or not. Figure 20. The external signals, as seen from the outside of a black box. These signals are written in the textual part of the model inside of the system block. By doing this Qtronic can emulate the external environment, which in this case is the resource allocation block. Figure 21. The system block defines the various signals and their ports. This is one of the most important aspects of MBT, since it will allow modelling of several systems working in unison, and a wide variety of scenarios. Hence, the first test models should be chosen with few external ports, but not with zero ports. 38 (67) 5.2 Working on a pilot project After having gained a satisfactory knowledge of modelling, it is time to start working on a pilot project. The project should be complex enough to prove or disprove that adaptation to model based testing is possible. 5.2.1 How to choose a pilot project Software testing assumes that there is some system which requires testing, but when making a pilot project already tested systems can be chosen as well. This allows for a wide variety of choices for the pilot. There are a few factors to determine what system functionality should be tested. Complexity Choosing the functionality to model also affects the difficulty level that the model will have. There are risks both with having models that are too small and too large. If a simple pilot is chosen, there is a risk that no abstraction can be made, thus defeating one of the bigger advantages of MBT, or that the pilot won't be able to function as a proof-of-concept model. On the other hand, an ambitious pilot may result in a too complex model, which will increase creation time. It will typically result in a high number of input parameter combinations, and impose a risk of state space explosion, which might increase test case generation times. If the complexity of a functionality seems too great, a good way to reduce the complexity is to try to separate the functionality into smaller bits (this will be covered in section 6.1.1). Execution Using a tool for transforming abstract test cases into executable test scripts (see section 3.3.3) has proven to be difficult. Because such tools do not have a real connection to the SUT the setup and teardown of the system may have to be done manually. If the SUT setup takes a long time the best option might be to choose a functionality which can be tested several times in a row, for example a system reconfiguration. If this is not possible, the system setup could be modelled, since this would not require any preconditions for running test scripts. 5.2.2 Before starting to model Before initialising the pilot project modelling phase, there are some things that should be considered. Mainly how to make sure the model is useful and how to ensure that the modelling process is thought out and structured. 39 (67) Model independence A system can be modelled based on different specifications (see section 3.3.1). The strategy for creating a model is to model as independent as possible from the actual implementation. This will assure that no errors in the SUT implementation code are reproduced in the test model as this might lead to incorrect test cases. Step-by-step modelling Table 5 shows a step-by-step description for model creation. This was created by reading documentation and looking at example models available with the Qtronic suite. Table 5. Step-by-step structure for model creation Step # Description 1 Analyse the functionality of the SUT to get an understanding of it. 2 List hierarchy of scenarios that should be tested. 3 List relevant ports and signals of the scenarios. 4 Choose a single scenario. 5 Remove signal data irrelevant in this scenario. 6 Model the scenario. 7 Repeat 4-7, starting with closely related scenarios, until all scenarios have been integrated into the model. Analyse the model All iterations of the model creation process can introduce several errors into a model. A good way to make sure that the model correctly describes the expected behaviour, the model along with the most recently generated test cases should be analysed. Finding faults is not an easy process at any state, but it is easier to find them early on, than when the model is large and complex. 5.3 Backend structuring When a model has been used to create abstract test cases they need to be transformed into executable Goat script. The best way to assure a smooth creation process is to structure the work before starting. 5.3.1 Scripting to Goat If the scripting backend is only meant for a pilot project, it will not need to work for more than the pilot model. Creating a functional scripter is not as hard as one might 40 (67) think; the documentation contains a lot of information on how to use various helpful functionalities and Conformiq provides numerous examples for this as well. Goat is a proprietary language, and has no previously created backend, so this needs to be learned as well. Since the language was created with simplicity in mind it does not have a very steep learning curve and should therefore not need to take long. 5.3.2 Step-by-step scripting Before starting the scripting backend creation, a structure for what is assumed to be the best way of working should be made. This should take into consideration an analysis of existing backends, the provided example backend and the available documentation. This useful information was the basis for the step-by-step scripting backend creation structure, which consisted of 7 steps (see Table 6), for this project. Table 6. Step-by-step structure for scripter creation Step # Description 1 Check existing backends to see which existing functions can be used and/or reused. 2 Use an existing scripting backend, and modify it to see what happens. 3 Write a backend with text output representing the Goat code to make sure that everything is placed and called correctly. Write documentation for the functions. 4 Replace textual parts with Goat syntax. 5 Add needed options to configuration.xmi. 6 Fix syntax, indentations and add comments. 7 See if test cases generated to Goat via the scripter can run on the system. To create the scripting backend the predefined functions (see section 4.4.3) must be used. These inherited functions are required in order to make the backend run, but the rest of the functions, used for checkpoint coverage, case dependencies and case probabilities, are optional. The value visitor should be used in order to recursively traverse a signal in a test case, and simplify syntax management and possible indentation of the script. 41 (67) 6 Implementation 6.1 Model This thesis included doing a pilot project to construct a model. It was important that the modelled functionality was simple to understand, fairly easy to create and would not take too long to test, while still being able to function as a proof-of-concept. 6.1.1 Choice of functionality Together with the LTC supervisor we chose the functionality channel reconfiguration for this pilot project. It is represented by a request signal that can either setup or reconfigure a channel in the system. This request will be analysed and exchanged with various other parts of the system, until it finally responds with either a reject or confirm signal. This functionality theoretically allows execution of several tests in a row, especially when a rejection is received. There are two channel types the reconfiguration signal can configure: the downlink and the uplink. For this proof-of-concept model, the uplink was disabled and would not be tested. This meant that only half of the functionality needed to be tested, which allowed for higher abstraction in both the signals and the model. The original request signal, called ChannelReconfigurationReq, was the largest signal in the pilot project scope, containing more than 50 data variables in nested structures, but after excluding all static variables and irrelevant information, the new signal had less than 20 data variables. A few preconditions that were used when executing the test cases: Initiate and set the SUT to a given configuration, where the downlink is active and the uplink is inactive. Setup only one cell, so that cId (cell ID) is zero for all test cases except where a requirement determines otherwise. Reset the SUT between test cases, when necessary. A restart of the system was not always required; if a request had been rejected, this would not affect the system configuration. However, since the model was based on the SUTs specifications at a given time, when a confirm signal was received from the SUT those specifications might have changed, and a reset may have been be needed. 42 (67) 6.1.2 Identify relevant ports and signals After the initial ChannelReconfigurationReq signal has been sent to the port named NbapControl, a number of signals need to be exchanged between various parts of the system (see Figure 22 and section 5.1.2) before a final response can be acquired. In the test generation phase, Qtronic assumes the role of the environment and calculates responses to the external communication from the SUT. When testing, this role is taken by the harness. Figure 22. The ports that were used in the pilot model. Through each of these ports at least one signal can be sent or received. The signals can be of the types request, confirm, reject, indication or forward. Almost all requests are mapped to corresponding confirm and reject signals in opposite direction on the same port, while the forward and indication signals merely indicate within the system that a certain event has occurred. Table 7. Pilot project ports and their corresponding signals Port name NbapControl DeviceControl ResourceAllocation Direction Signal name In ChannelReconfigurationReq Out ChannelReconfigurationCfm ChannelReconfigurationRej In reconfigCfm reconfigRej releaseCfm releaseRej Out reconfigReq releaseReq In freeCfm configReq reconfigCfm reconfigRej 43 (67) Out freeReq configRej configCfm reconfigReq In releaseFwd Out reconfigInd releaseInd In releaseFwd Out releaseInd MgmtInterface Out deletedInd TestDriver Out RELEASE_IND DschControl EdchControl All of these signals had to be linked to their respective ports in the system block in the Qtronic model. With planning, most of these signals could be added when the modelling started, but some, like the RELEASE_IND-signal, which is an OSE-signal (see section 2.1.2), was a little harder to see beforehand. 6.1.3 Identifying scenarios Because of the complexity of the initial request signal (see section 6.1.1) and the number of signals in the environment (see section 6.1.2), the number of possible scenarios was very large as well. The possible scenarios were divided into four main groups (see Table 8). Each response could occur through several scenarios and test cases. For example, there were more than ten ways to get a rejection merely because of faulty reconfiguration values (Group 2). Table 8. Grouping of possible responses received during a system reconfiguration Group # Response Group 1 Reject after at least a rejection is received from an interface. Group 2 Reject after at least one faulty system reconfiguration value was used as input. Group 3 Confirm, since current system configuration is used as reconfiguration input. Group 4 Confirm after receiving confirm on all interfaces. 44 (67) Example scenario One example of a scenario is how the SUT handles a correct reconfiguration request, where a reconfiguration of a channel is theoretically possible, but where the device that channel refers to rejects the update. NbapControl, ResourceAllocation and DeviceControl are all ports connected to the test environment, to allow Goat scripts to decide which signals to send into the SUT and which signals to receive. Figure 23. Sequence diagram describing the interactions between the SUT and the environment. The SUT receives a ChannelReconfigurationReq and sends a reconfigReq signal to the resource allocation. The ResourceAllocation then sends a reconfigCfm signal to report that the reconfiguration is possible. Since ResourceAllocation does not keep track of which device the Channel ID is referring to it sends a configuration request to the SUT, telling it to send a request for a device update to DeviceControl. The DeviceControl rejects the reconfiguration request, and when the SUT gets a reject it sends a reject message to ResourceAllocation to tell it that no changes should be made, and a reject to NbapControl as a response to the initial request signal. 45 (67) 6.1.4 Modelling the scenarios Once all scenarios had been found the modelling could begin. One scenario at a time was chosen and modelled. Usually, the simplest ones are the first to be modelled. In this pilot faulty input values were the most straightforward, while still representing about half of the scenarios. These were easy to model as well, since all they required was a single state with several error-checking transitions attached. Figure 24. Checking for bad input values using the function isReqDataConflicting. When modelling the remaining scenarios it was easier to model those that did not require multiple signal exchanges. For example, scenarios that were easy to model included those that gave a response directly after a ChannelReconfigurationReq signal, for example Group 3 (see Table 8), which made them more appropriate to model before the others. 6.2 Scripting backend The scripting backend was implemented in two versions. The initial version handled all data types correctly, but did not allow modelling of the signals to be made at a satisfactory level of abstraction (due to limited understanding of the Goat language, see section 6.3.4). This led to the development of a second version. 6.2.1 Implementing Scripting Backend Configurations The implementation of the XML-configuration file was done in small incremental steps. To enable the reading of the input of these additional configuration parameters the Qtronic function setConfigurationOption was implemented in the scripting backend (see section 6.2.2). Some of the options were added during the programming of the first scripting backend version. Other parts were added later, when it was noticed that it would have been good to be able to control the output better. 46 (67) For example, a setting called separate files added the option to render each test case into separate script files. The main file would then only contain execution calls for all the other files, which made it easy to execute single test cases. 6.2.2 Implementation of ScriptBackend methods The implementation of the scripter was done by extending the abstract class ScriptBackend provided by the Qtronic API (see section 4.4.2). The implementation of the methods defined in ScriptBackend was in most cases quite simple, usually consisting of only printing a short statement into an output file. In both versions of the scripter, most of the functions were implemented in the same way. Below is a description of what was implemented in each method. setConfigurationOption Reads all the configuration options from the XML-file, and saves them in global variables that can be used later by the scripter. beginScript Opens a PrintWriter that will output the test cases to an output file. Outputs a header. Prints the Goat exec-statements, which executes a Goat script file, for all files defined in the configuration (if test cases are rendered to a single file). beginCase Outputs a comment that a new test case has begun if test cases are rendered to a single file. Instantiates a PrintWriter for each test case, and prints a header and exec-statements for all files defined in the configuration and adds an exec-statement in the main test suite for this test case file. This is only done if the separate files option is used (see section 6.2.1). testStep Outputs a short comment for each test step, i.e. for signals sent or received. Makes a call to the ValueVisitor (see below) with the signal as argument. Outputs a method call to the signal file. 47 (67) endCase Outputs a comment that a test case is finished. Closes instantiated PrintWriters for the test case, if existing. endScript Outputs a comment that a test suite is finished. Closes instantiated PrintWriters for the test suite. There are also a number of other functions defined in the abstract class ScriptBackend, but these did not have to be implemented in order for the scripter to work. They are most useful for printing comments and keeping track of internal communications within the system but they have no influence on the final executable test script. QMLValueVisitor The most crucial part of the scripter was to be able to iteratively traverse all values of every record, in order to render the output in the correct syntax and order. To do this the functions in the interface QMLValueVisitor (see section 4.4.3) were implemented. A good praxis for rendering records is to let the method visit(QMLRecord) explore each field in the record, extract the values of them, and use the visit function on all of these values recursively. The same implementation technique was also used for the method visit(QMLArray), since arrays also consist of nested data types. All recursive calls in the records will end with one of the basic types as argument. Before the last call to the visit function with a basic type as argument, the scripter prints a short Goat statement to set a variable to a certain value. All types that are part of an array will be part of the same set-statement (see Figure 25). 48 (67) Figure 25. ValueVisitor works differently for arrays than for other types. The implementations of visit functions for basic types such as QMLBoolean, QMLNumber and QMLString were in most cases simple, since their sole task was to render output in a proper syntax. Figure 26 shows the code for two visit functions from the scripting backend. Figure 26. mOut represents the PrintWriter for the output file and the visit function simply decides what value it should print to the file. 49 (67) 6.3 Problems This section describes problems that were encountered during the implementation of the pilot project. It also contains information on how those problems were solved. 6.3.1 Model difficulties There were other problems while modelling the pilot. Most of these had to do with mismatches between QML and the language used in RoseRT (C++), and between QML and the LTC scripting language Goat. Arrays In the implementation, arrays with dynamic size are represented by a data class containing two data fields. One of the fields is a pointer to the array content, and the other is an integer representing the length of the array. To model these arrays, the decision was to try and model them as Java arrays (QMLArrays), since pointers are not supported in Java. The integer field was still present, but the pointer field was instead replaced by an array of the same size as the value of the integer. Another problem was how to fill the array with a potentially varying number of predefined elements, depending on the value of the integer. To solve this problem a helper function was implemented, which uses a for-loop to add values to the array, depending on the size of the integer field. This worked fine for getting the desired result, but despite only having one such loop in the final model it still increased the time it took for Qtronic to generate the test cases. Inbound and outbound ports The representation of inbound or outbound port differs between Qtronic and RoseRT. In Qtronic, ports are declared as either inbound or outbound and different signals can go through each port. In RoseRT, however, the ports are bidirectional (signals can traverse in both directions) and instead it is the signals that are declared as inbound or outbound. This led to a small problem when naming the ports in the model, since a bidirectional port in RoseRT could not be represented as two different ports with the same name in Qtronic. To solve this, ports were given a suffix at the end of the name. These suffixes can be changed in the scripter configuration file, and the default values are _in or _out respectively. Default values At the beginning of the modelling project, there were some questions on how Qtronic determines values that are not affecting the outcome of the model in more than just one test case. For example, in some test cases the model was tested with a variable X 50 (67) equal to 0. For all other test cases, when the value did not matter, the variable was set to a Qtronic-determined, fitting value. This meant that it was sometimes set to a value that caused a segmentation fault when performing the test execution on the SUT. Qtronic has an undocumented function defaultvalue, which sets a variable to a default value when it is not explicitly set to something else by the model. However, this function is not yet working as of the latest Qtronic version[15]. The solution was instead to force a value for the variable by using the require statement whenever this value should not be set to 0. Unsigned chars The problem with Qtronic-determined fittings was even greater when the model was run with an unsigned char (or unsigned short) variable. Unsigned types are not supported by Java, which meant that these types had to be represented by signed types instead. When Qtronic tried to find a fitting default value, the choice often became something along the lines of 31267, and since an unsigned char in C is within the range of 0-255, this is not a good number for a system using C. To force Qtronic to choose a valid number, the require statement was used here as well, in order to define a valid range of such types. 6.3.2 Scripter limitations While writing the Goat scripter for Qtronic, some problems occurred because of further limitations of the Qtronic data types. For example, the SUT is created in C++ language, and since the scripter is written in Java, there are some data types that are not supported. The preferred solution would have been to define new data types for the scripter that the models can use, but so far there is no way to do this. Pointers Since Java does not support pointers, they had to be treated as a special case both while modelling and by the scripter. The solution was to represent pointers as records with a special name convention. The scripter configuration file allows the user to specify the prefix that should be used for representing a record as a pointer. The predefined value is ptr_, which means that if a record name in the model starts with ptr_ it will be interpreted as a pointer. Goat also supports a data type called SmartPointer, which was solved with a prefix in the same manner as the regular pointer. The predefined value of the prefix for a smart pointer is sptr_. Enums Enumerations are frequently used in the signals sent to and from the SUT, but it is currently not supported in QML. However, this was not a very difficult problem to 51 (67) solve since enumerations are basically integers, and in Goat enums can be sent and received as integer values. So to represent an enumeration value in a QML-model, the value of the enum was replaced by an integer corresponding to that value. 6.3.3 Goat issues The goal was to create a scripter that could generate code which would call on a function with the signal parameter values as arguments. This function would in turn fill in missing values (static values) and then make a Goat send or receive call with the signal. However, we realised that Goat has no way to define functions that can use arguments, and therefore this approach was impossible. The first version of the scripter rendered the signals directly with send and receive statements, which required the entire signal to be part of the model. This led to a low level of abstraction on the modelled signals. The solution became apparent after gaining some more knowledge on Goat. Variables in Goat scripts are global, which means that a variable in one Goat script can be accessed by another Goat script running at the same time. Thus, the scripter could instead generate code that both defined the signal parameters in variables in a main Goat script file and then execute another script file containing the signal structure. Figure 27. The scripter generates the file on the left, which executes the right file. The signal files contain a single send or receive statement for a signal, where the signal values are the global variables that are set in the main script file. This way the abstraction level of the signals can be very high, and all static values of signal parameters can be defined in specific signal files. This was implemented in version two of the scripter. 52 (67) 6.3.4 Error handling and Qtronic Algorithmic Options The generation of test cases was a bit problematic from time to time. While generating test cases the error handling in Qtronic often resulted more in confusion than in assistance. Some errors are found and reported to the user, while other errors just led to Qtronic working endlessly trying to generate the test cases, not realising that there was an error in the model or in a setting to begin with. Another problem lied in understanding how the client settings affected the outcome of the test case generation. For example, there is a lookahead depth option, corresponding to some number of external input events to the system that Qtronic should evaluate (see Figure 28). There is no good default value for this, which meant that a trial-and-error approach had to be used to see what value would be good for a certain model. Nor is there a way to see what the values mean, since all that is shown in the settings is a colour scale. Maximum delay was also troublesome to find a good value for. It defines the time interval during which it is allowed to deliver a message. This is highly dependent on the functionality modelled, but recommended interval is somewhere between 3 to 10 seconds. Figure 28. Trial-and-error needed to determine appropriate lookahead depth. 53 (67) 7 Results 7.1 The pilot project Two of the main goals for this thesis were to develop a scripting backend for Qtronic and to create a model describing a smaller functionality of a system, which can work as a proof-of-concept that MBT can or cannot be used at the LTC. 7.1.1 The QML model The resulting model of the pilot project is a state machine that describes the behaviour of a channel reconfiguration in the Channel Control (CHC) subsystem. It consists of two QML source code files and one graphical state machine. QML source code One file contains definitions of the relevant abstract signals and ports, while the other contains the class definition and functions that are called from the graphical model. The functions defined in the second file are of three different types: Functions that use the require keyword to set a variable of an incoming signal to a specific value. Functions that create response signals that will be sent from the system. Functions that control guard statements and return boolean values. Graphical state machine The graphical model has been divided into three different state diagrams. The first part is the top-level state machine, consisting of nine states and transitions between them. Two of these states have nested state machines which are executed when the top-level state is entered. These state machines were nested to make the graphical model easier to comprehend. 7.1.2 The Goat script backend The pilot project resulted in two different versions of the Goat scripting backend. Both of these are working as expected, but result in different structures of the output files. They each consist of about 600 lines of Java code, and an XML-file containing the settings for the scripters. First version The first version of the scripter requires complete signals to be modelled; either using static values for some of the signal fields or letting Qtronic decide appropriate values. The scripter uses the information from the model to output the send or receive 54 (67) statements of the signal directly in the main file, with correct Goat syntax and all values filled in. Figure 29. Output from the first version. All variables from ReconfigReq, even if they are static, must be modelled. Second version The second version of the scripter allows the signals to be modelled on a higher level of abstraction than the first, thereby making the modelling easier. The scripter uses the information from the model to output statements that set global Goat variables to the values calculated by Qtronic. When all values of one certain signal have been set, the scripter prints a statement to execute an existing Goat script file containing the send or receive statement of that signal. This file in turn uses the global variables from the main file (see section 6.3.3). Figure 30. Output from the second version. Only two variables from ReconfigReq must be modelled, and the rest are already written in the signal file. 55 (67) Configuration file The scripter allows the user to change some configuration options (see Figure 31). The final version of the scripter contains the following configuration options: Output folder of the generated test scripts. Test suite name. Location of predefined signal files. Script files that should be executed before running the test suite. Pointer prefix with default value ptr_. SmartPointer prefix with default value sptr_. Inbound port suffix with default value _in. Outbound port suffix with default value _out. Setting to determine if test cases should be rendered to separate files or to a single file. Setting to determine if the console should output debug-information from the scripter while rendering the test cases. Figure 31. View of configurations options as presented in the client. The current configurations are those used for the pilot project. 56 (67) 7.2 Test suite The model was provided as input to Qtronic, which successfully generated a test suite based on provided coverage criteria. The test suite consisted of 21 test cases that collectively covered all of the requirements introduced in the model. Some requirements were covered in multiple test cases. The largest test case had eleven external signals sent to or from the SUT. The type of tests that were included in the test suite came from a combination of regular functionality tests, faulty input values as well as handling of faulty environment, using timeout tests. 7.2.1 Test execution One of the reasons for choosing the channel reconfiguration functionality was to make sure that when executing the test cases, several cases could be executed in sequence, without restarting the SUT. The result of this choice was that of the 21 test cases that were generated, only three required a system restart between executions. The reason these test cases needed a restart was that a reconfiguration had been completed and the system specification therefore had changed compared to the model. Without counting the approximately ten minutes required for setup of the SUT to a state where the test executions could be run, the time to test the whole test suite was less than two minutes, and can be considered quite short. The total time for executing the entire test suite, with the necessary system restarts, was around 45 minutes. 7.2.2 System faults Using the developed scripting backend it was possible to render test scripts that could be executed in the test environment. However, the test cases generated from the proof-of-concept model did not manage to find any errors in the system. This is basically because the model was based on the SUT implementation, and the SUT had been tested rigorously for a very long time. 7.3 Time The MBT process introduces a new way of working and thinking for testers. This means that there will be a learning overhead, should the LTC decide to adopt this approach. However, Conformiq offers training in Qtronic, QML and MBT. 7.3.1 Qtronic education The time to get a good understanding of Qtronic depends on previous knowledge. Based on our experiences, besides the education, it takes about one week of 57 (67) individual work of reading about, exploring and using the program in order to start modelling efficiently. Getting a deeper understanding, i.e. ability to create more advanced models or a scripting backend, takes longer time. This is due to many predefined functions and requirements that should be used for such advanced work. 7.3.2 Approximate total time spent Results from other projects[17] show that around 20% can be saved in time for creating test cases for a new functionality, and around 90% for modifications of an existing functionality. The pie chart in Figure 32 shows how time was divided for different tasks in this pilot project, including the time it took to learn modelling in QML and how to create scripting backends for Qtronic. Figure 32. The time spent on different parts of the pilot project. The pie chart shows that the modelling took up almost half of the time, while the scripter, despite being implemented in two versions, took only one third. Since the scripter is already created, and the education will not be necessary, a similar project would only require approximately half of the time for this project. 58 (67) 7.4 Lessons learned In addition to the results mentioned in section 7.1, the pilot project also resulted in a list of general guidelines to keep in mind when working with Conformiq Qtronic and MBT in general. Modelling Model in small increments and generate test cases often to find errors and time consuming functions in the model earlier. Don't try to model several scenarios at once. Keep it simple between iterations to locate errors faster. Specify interfaces and signals (records) first, then describe the behaviour. Use the requirement keyword frequently in the model. Requirement coverage is the best way to assure correct functionality. Use the require keyword to set or limit variables, and the assert keyword to find errors. Use the complete and incomplete keywords to control the test cases, or check the Only finalized runs option in the preferences. Avoid using the Modeler as a coding tool; call on functions from the Modeler, but write the functions in the textual parts. Test case generation Keep in mind that long generation times are often necessary when dealing with complex models, and do not always point to a badly designed model. Keep old test cases before regenerating a new test suite to reduce generation time (provided that the new test suite matches part of, or the whole of, the previous test suite). Scripting Use the built-in functions and the ValueVisitor. They are efficient and help keep the implementation of the scripter simple. Don't do everything at once. Start with general text output before syntax to avoid unnecessary mistakes. 59 (67) 8 Discussion 8.1 Analysis In order to draw a conclusion on whether MBT can be efficient, or even useful, the results from the pilot project need to be analysed. 8.1.1 A working proof-of-concept If the model could not find any faults in the SUT (see section 7.2.2), how can it be claimed that it was a working proof-of-concept? An important feature of MBT is that it can be used to automatically generate comprehensive test cases from an abstract model of the SUT, while still being easy and fast to work with. The pilot project showed that it was possible to make a model from a functionality of the SUT and use Qtronic to generate test cases and test scripts from that model. The test coverage settings made sure that the resulting test suite was more comprehensive and complex than previous test suites. Because of the design of the model, there were some paths in the state machine that could not be traversed. However, analysis showed that the sequence of those events would never occur in reality, and would therefore not need to be tested. The pilot also showed that the abstraction was successful in achieving a better overview while modelling. It also sped up the modelling process, an efficiency that was noticed when the second version of the scripter was created. With the new and more abstract scripter, there were a few changes that needed to be made in the model as well. Since the model for the previous scripter was practically finished, the new model was very easy and fast to create. 8.1.2 Testing the SUT All the generated script files followed Goat syntax and were fairly easy to understand. The signal files that were executed from the generated scripts were in most cases small, so even though they had to be written manually they did not take much time to write. As mentioned earlier the test suite did not find any error in the SUT, since the SUT had been tested rigorously for a long time. One way to make sure that the model really can be used to find faults is to make changes to the implementation in the SUT and see if the test cases generated from the design model results in any errors. 60 (67) 8.1.3 Qtronic test case selection As mentioned previously Conformiq Qtronic tries to cover as many requirements as possible while keeping each test case as short as possible (see section 4.1.1). This algorithm for choosing test suites is a good way for Qtronic to simplify the test execution and debugging of test suites, but can in some cases make it difficult to model certain functionalities, particularly those that require other functionalities to run first. One such example was a confirm signal that should be received if the variables of a request signal were the same as those currently set up. One would then need to model the system so that it would test the system with a specific signal, and after receiving a confirm, send the same initial request signal again. 8.2 Conclusions The conclusion from this thesis is that MBT using Qtronic can be used to test software at the LTC, and is a good way of doing this. There are three reasons as to why this is: speed, simplicity and flexibility. 8.2.1 Speed Since the system is modelled at a high level of abstraction, and therefore a lot of information can be omitted, models can be created very fast. The fact that models can be reused can speed up the modelling process even further, and is one of biggest benefits of MBT. The reuse of models can significantly reduce the time spent on modelling, both when a functionality is updated and when a similar functionality on another system should be modelled. When the models have been created, the generation of test cases can be automated. This is a faster way of producing test cases than manually finding them, while still allowing a wide variety of test coverage. This allows for generation of exhaustive test suites in a short amount of time. The rendering of test cases into executable test scripts is automated as well, and was in our case almost instant. 8.2.2 Simplicity Because models can be represented graphically it is quite easy to learn how to use MBT, even for someone who is not used to software testing. It allows for a good, simple overview of the system. In Qtronic, the graphical model can also be used in order to follow the path that was traversed in order to generate a specific test case, and is therefore useful for debugging. The language used for modelling - QML - is Java-based, which means that a lot of people will already be familiar with many of the expressions that are used. QMLspecific things like records, system blocks and the various keywords are not difficult to learn how to use. 61 (67) Different Qtronic views provides a lot of useful features, not only for modelling and debugging, but also for reviewing the generated test cases and the test suite coverage. We found that the user interface granted a good overview of these features. It also helped to find the information needed to locate errors, for example when a test execution failed due to a fault in the model. 8.2.3 Flexibility MBT allows for great flexibility since the models are created on a high level of abstraction, and independent from the test execution environment. If, for example, a new script language would be introduced for the test case execution, a new scripting backend needs to be created in order to render the test cases. This means that no changes to either the model or the existing test cases need to be made. One single model can be used to generate several test suites for different testing purposes of a system, since multiple design configurations (DC) can be used for each project. The DCs mean that the model does not have to be adapted for different test purposes. This approach can be used, for example, to generate one small test suite that only covers a few basic requirements, and one incredibly large test suite, that covers every state with all combinations of transitions. Regression is both an integral part of the current testing process at the LTC, and one of the most efficient ways to test software, and thus it would be useful not to lose this feature. Not only does MBT support regression testing, but Qtronic is also very useful in this area. In fact, while the old test scripts can still be reused for updated system functionalities, a tester can also determine exactly which parts of the updated functionality that needs more testing and a DC can be created specifically for this. 8.3 Future work We have a number of proposals for future work, both for the LTC and for the company Conformiq. 8.3.1 Recommendation for the LTC If the LTC would start using MBT, there are a few practical questions that would need to be answered. Model documentation It would be useful if high level Qtronic models could be used as reference models, which can then be used both when implementing the real system and in combination with documentation when creating a design model to generate test cases from. A study investigating this possibility could be done. 62 (67) Construct a new scripting backend The scripting backend used for this thesis is quite simple, so a new scripter would also have to be developed. This should be done by someone who has more knowledge of both the system and the extent of how the Goat scripting language can be used. The scripting backend would also need to enforce some rules on the models, i.e. standardized handling of special data types, like pointers or multidimensional arrays. In that case a manual for how models should be created must be written. Other modelling tools Conformiq Modeler, while easy to learn and to work with, has a very basic functionality. Therefore it might be desirable to also consider other modelling tools compatible with Qtronic. Evaluate other MBT tools The Qtronic suite was in our opinion a good tool for MBT. However, since we have no comparison with any other such tools, we can not say that it is the best tool available on the market. It may therefore be wise for the LTC to evaluate other tools as well, to find out if there are any better MBT alternatives. 8.3.2 Recommendations for Conformiq There are some issues that are in need of improvement from Conformiq, as well as some features that would be useful for a continued use by the LTC. Working to find and eradicate bugs Conformiq is a company that is actively trying to adapt its products to the needs of their clients. During this pilot project newer versions of the suite were released to attend to complaints about bugs that we found. Having a less common operating system (SUSE Linux), some bugs existed only in our version of the suite, but these were still taken care of quite fast. One of the biggest issues we had in our pilot was that the program would crash every time we tried to copy text. This bug was fixed in the latest update of the client. However, there are still copying issues from the incompatibilities between the modeller and the client. This bug prevents copied text from being rendered correctly in the client. A more active approach to finding bugs could be taken by Conformiq. The Conformiq Modeler The modeller is the biggest flaw of the Qtronic suite, and Conformiq are obviously aware of this. It is not a main concern for the company, and they are themselves recommending the use of other modelling tools. Despite this, customers will try to use the modeller, as it is the supplied tool, especially if they are only doing a pilot project. There is a risk that it may work as a deterrent for these users, and at least some work could be put into it. 63 (67) The first main issue relates to improper visual placement of the transition strings of transitions, which has a negative impact on the readability of the model. As it works right now, the transition strings jump around when fiddling with the transitions and often end up in places where the text becomes illegible, for example behind states or mixed up in other strings. This should be an easy fix, no matter how you do it. All it really requires is a button in the corner of the text field, so that when you mark the field you can see, and drag, the button. The other issue is that the Linux version of the modeller is very slow. Even when first starting a new state machine there will be lagging whenever a state is moved or a text is written. This might require a tougher solution, but might still be a very sensible thing to do. Zoom A remarkable feature is that the Conformiq Modeler has unlimited zoom, both in and out. This means that the zoom can allow for a close-up of specific letters in a text, or can reduce the size of the model so it is no longer rendered to the screen. This is a very weird feature, and there is not much reason for it. As a contrast to this, the Model Browser view in the client offers no possibility to zoom when looking at the graphical model. This is unfortunate, because the Model Browser allows for the visual tracking of the path traversed by a chosen test case. This would be a useful feature for future versions of the client. Debugging The debugging in Qtronic has some problems with relaying useful information to the user. When a test case is generated, information is reported through the console, but this is mainly useful to see if a model worked, since a fault in the model will not necessarily be reported correctly. Instead, the console will serve to confuse even further, as it would report the faults in the wrong positions. One example was when an unsupported Java type was used in the model. An added enum in a function definition lead to an error in an unrelated function, in some other part of the code. The type is not supported in QML, but the keyword still interprets as something other than an unsupported type (the totally bogus type NotAnExistingQMLType gave a correct error report in the console). Another debugging problem was when a transition string in the graphical model only had action code. The assumption was that, since action code is written in a unique way (ending with a semicolon), one would just need to write the code as usual. When generating, the debug console instead reported a system deadlock. It took some time to find out that this deadlock occurred merely because the action code was not initiated with a / character. Future releases of the client should try to improve the debugging feature. 64 (67) Server bug One bug was encountered a few times when trying to generate test cases, which read “Failed to construct Qtronic computation slaves. Test generation aborted”. We don’t know why we got it, but it has to do with the server failing to start execution threads. This bug could not be recreated, and might be workstation specific, but for future releases, information on this could be available in the manual. QML data types There are some suggestions for improvements that would be useful for the LTC in particular (see section 6.3). Most of these are linked to the language and structure of the Qtronic suite. While enum gave its own set of issues with the debugger, it would also be good if it actually was supported. In fact, a very useful feature would be the ability to define your own customized data types, and to be able to render these in the scripting backend. Directions of ports Another feature would be to allow the use of both uni- and bidirectional ports, or at the very least, implement a simple way to resolve such an issue in the future. We would wish that the solution would not have to be an added suffix to the port names just to make a difference to ports that should have the same name. Default values There is also the undocumented function defaultvalue. As mentioned, this function is not yet working as of the latest Qtronic version. It is a good feature, and its implementation would be good. The reports from Conformiq suggest that the defaultvalue keyword will be available in the 2.2 release of the tool. The public beta rollout of 2.2 to one part of the LTC started shortly after this thesis was finished. 65 (67) References Literature [1] Kruchten, Philippe (2001). The Rational Unified Process: An Introduction (2nd revision) Addison Wesley, Boston, USA [2] Strand, Lotta (2001). UML & RUP : Att lyckas med oo-projekt Docendo AB, Sundbyberg, Sverige [3] Utting, Mark & Legeard, Bruno (2006). Practical Model-Based Testing : A Tools Approach Morgan Kaufmann Publishers Inc., San Francisco, USA Articles [4] Neto, Arilo Claudio Dias, Subramanyan, Rajesh, Vieira, Marlon & Travassos, Guilherme Horta (2007). Characterisation of Model-based Software Testing Approaches Available: http://www.cos.ufrj.br/uploadfiles/1188491168.pdf [5] Blackburn, Mark, Busser, Robert & Nauman, Aaron, Systems and Software Consortium, Inc, formerly Software Productivity Consortium (2004). Why ModelBased Test Automation is Different and What You Should Know to Get Started Available: http://www.psqtconference.com/2004east/tracks/Tuesday/PSTT_2004_blackburn.pdf [6] El-Far Ibrahim K. & Whittaker, James A. (2001). Model-Based Software Testing [7] Fröhlich, Peter & Link, Johannes (2000). Automated Test Case Generation from Dynamic Models [8] Robinson, Harry. Obstacles and opportunities for model-based testing in an industrial software environment (2009-08-29) Available: http://www.harryrobinson.net/obstaclesandopportunities.pdf [9] Kassel, Neil W. (2006). An approach to automate test case generation from structured use cases. Diss. Clemson University, Clemson, SC, USA [10] Liuying, Li & Zhichang, Qi (1999). Test selection from UML Statecharts. Dept. of Computer Science, Changsha Inst. of Technology, Hunan 66 (67) Homepages [11] Kolawa, Adam. Regression Testing (2009-11-24) Available: http://www.wrox.com/WileyCDA/Section/id-291252.html [12] Introduction to OMG's Unified modelling Language™ (UML®) (2009-12-03) Available: http://www.omg.org/gettingstarted/what_is_uml.htm [13] Wikipedia article on Box Testing (2009-12-03) Available: http://en.wikipedia.org/wiki/Software_testing#The_box_approach Conformiq material [14] Conformiq Qtronic Evaluation Guide (2009) Available: http://www.conformiq.com/downloads/Qtronic2xEvaluationGuide.pdf [15] Conformiq Qtronic User Manual (2009) Available: http://www.conformiq.com/downloads/Qtronic2xManual.pdf [16] End-to-End Testing Automation in TTCN-3 environment using Conformiq Qtronic™ and Elvior MessageMagic - Case study: Automated Testing of X-Lite SIP Softphone (2009) Available: http://www.conformiq.com/downloads/End-to-End-TestingAutomation.pdf Internal documentation [17] Model Based Testing - CPP IoV Experiences 091009 - Internal document from LTC Workshop on MBT (2009-10-09) 67 (67) Appendix I - Table of Abbreviations Abbreviations Meaning CHC Channel Control DC Design Configuration LTC Large Telecom Company MBT Model Based Testing MTCN Mobile Telecommunication Network QML Qtronic Modeling Language. UML + Extended Java, proprietary language of Conformiq RAN Radio Access Network RBS Radio Base Stations RNC Radio Network Controllers RUP Rational Unified Process SUT System Under Test. The system where the tests will be executed. UML Unified Modeling Language WCDMA Wideband Code Division Multiple Access XML eXtended Modeling Language Appendix II - Table of Terminology Terminology Meaning Channel Control System responsible for, among other things, channel reconfigurations Coverage criteria Description for enabling coverage evaluation by a test case Design configuration Provides a project with specific coverage setting. Multiple DCs can be used for one model Design model Model based on functionality, i.e. intended behaviour of a system Goat The script language used for testing by the LTC Implementation model System description using modelling language and action code requirement QML keyword to add new coverage to a model Scripting backend Tool used to automatically render test suites to test scripts Sequence diagram UML diagram type for describing interaction between processes State Specific configuration of a system State machine Model for describing a system in a combination of states and transitions Test Case Test to analyse a system based on expected response to given input Test design configuration See Design configuration Test Harness Adaptor tool used to evaluate system by running test scripts Test Script Test suite written in a script language to simplify automated test execution Test Suite Collection of test cases Traceability matrix Matrix tracing every coverage by a test suite Transition Paths connecting states possibly containing triggers, guards and actions Use case Description of the behaviour of a system in a specific scenario Use case diagram Overview of the dependencies between different use cases in a system ValueVisitor Class that allows backends to recursively visit all fields in a record Appendix III - Qtronic Client Appendix IV - Conformiq Modeler Appendix V - Project plan Start Finish 2009-08-17 Task Project start 2009-08-18 2009-08-30 Studying relevant material 2009-08-25 2009-08-25 Basic Qtronic education 2009-08-25 2009-08-30 Write basic outline of the report 2009-09-01 2009-09-01 Advanced Qtronic education 2009-09-01 2009-10-01 Construct a Scripting-backend 2009-10-01 2009-10-14 Learn to create simple models in RoseRT and simple models that can be used by Qtronic 2009-10-01 2009-11-01 Write draft of introduction and background chapters for the report 2009-10-14 2009-11-14 Create model of pilot object 2009-11-14 2009-12-07 Testing the result from the model, and remake the model or scripter if errors are found 2009-12-07 2009-12-14 Test results and analysis completed 2009-11-01 2009-12-18 Make first draft of the report 2009-12-18 2010-01-22 Make second draft of the report 2010-01-22 2010-02-28 Third draft of report 2010-02-15 2010-02-15 Presentation at the company 2010-02-28 Project end