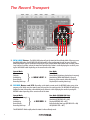
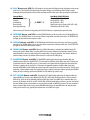
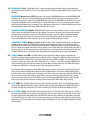
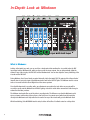
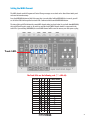
1
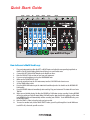
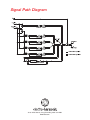
User Reference Manual
T ha n k y o u fo r p urc ha sin g t h e Elect ro H arm o ni x 2880 Su pe r Mu lt i-t ra ck
L o op er. Ple as e r ea d t his m a nu a l i n o rde r
t o f a mili ari ze y o u rsel f wit h t his u n iq ue
in st ru me n t’s la y o ut . It wa s w rit ten to be
a ref eren ce g uid e t ha t y o u ca n k ee p
clo se b y . Th e s ou n d is wo n d erf ul b ut th e
k ey is y ou r crea t iv ity . Th e 2880 wi ll t a k e
y o ur m us ic t o n ew crea t iv e he igh t s.
TABLE OF CONTENTS
Copyright
2005 Electro-Harmonix. All rights reserved. 2880 and
Electro-Harmonix and logo are trademarks of New
Sensor/Electro Harmonix. Product and company names
used within the manual are trademarks of their
respective companies.
2880 Manual Version 1.1
PRECAUTIONS FOR SAFE USE
2
A LITTLE HISTORY AND INTRODUCTION
3
QUICK START GUIDE
4
THE RECORD TRANSPORT
7
TRACKS, TRACK SELECTION AND TRANSPORT
9
ANALOG CONTROL AND I/O
11
DIGITAL I/O AND POWER
12
MEMORY CARD AND USB
12
IN-DEPTH LOOK AT RECORDING TRACKS
14
IN-DEPTH LOOK AT OVERDUBBING TRACKS
17
IN-DEPTH LOOK AT MIXDOWN
19
MIDI AND MIDI SYNC
21
USER NOTES & TIPS
22
SIGNAL PATH DIAGRAM
27
Precautions For Safe Use
Please read the manual carefully, as it was written to help you understand the capabilities and system requirements
of your new instrument. Carefully review the safety precautions as they not only ensure long and trouble-free life of
your 2880, but also ensure your own long and trouble-free life. Instead of neatly tossing it to the side once it comes
out of the box, keep your manual in a convenient place for quick reference.
The following instructions, on this page, are WARNINGS that must be followed:
1. Fluids and moisture: Do not operate this or any electrical instrument, in an area where it could be exposed to
moisture. This is an instrument, do not place drinks or fluids on top of it.
2. Placement and ventilation: The 2880 is a tabletop or floor instrument and thus may be placed on the stage or
tabletop setup. Placement must be balanced and even, while still leaving an unobstructed space for proper ventilation.
Proper ventilation ensures long life and far less stress on the instrument. Again, keep all fluids away from the storage
location. All bracket mountings must be able to bear the weight of the 2880 as its minimum rating.
3. Cleaning: Extreme care must be taken when cleaning the exterior. The exterior may be wiped down with a damp
sponge and an extremely mild detergent. Damp means slightly moist and not wet or saturated. Keep away from
ALL critical components as if you were dusting priceless china. UNPLUG THE INSTRUMENT before any cleaning.
4. Heat: The unit should be situated away from heat sources, or other equipment that produces significant heat.
5. Power Sources: When the unit will be unused for extended periods, disconnect the AC Adapter power supply
from the outlet. Be careful that the power cord is out of the way and specifically away from traveled areas. When
connecting or disconnecting the cable, grasp the plug firmly and push or pull. Do not pull from the cable. Make
sure that your hands are dry.
WARNING: Use only the 9VDC/500mA AC adapter supplied with the 2880. Do not use any other AC adapters. Using
other AC adapters, even those made by Electro-Harmonix, could cause harm to the unit, the adapter or you. The 2880
does not use batteries.
6. Service Situations: Situations that must be immediately addressed if encountered:
a. Damage to the AC Adapter or power cord. Immediately shutdown and disconnect the power cable.
b. Water, any fluids or material (any amount) has fallen into the interior of the 2880.
c. Exposure to natural elements such as rain.
d. Sudden impact of the instrument, such as dropping or a hard external impact.
e. Sudden and noticeable differences in performance and consistency.
f.
Functional change where a marked difference in operation is noticed.
Note: All electrical failures must be handled by an authorized service technician. Do not attempt user service.
A qualified technician will handle it swiftly, accurately and correctly.
For your safety and proper repair, call: Electro-Harmonix: 718-937-8300.
Ask to speak with a service representative and you will be instructed on how to proceed.
You must call in order to receive service.
2
2880 Super Multi-Track Looper
A Little History
In 1983, Electro-Harmonix released what would become
a legendary and more importantly, revolutionary, musical
instrument…The 16 Second Delay. Aside from being
the first looper ever invented, it helped change the way music
was created while presenting individual musicians with a way to
manipulate their creations instantly. The concept of looping, as
we know it today, was an entirely new dimension in musical
expression in 1983 and the 16 Second Delay was an
instant hit.
In 2004, the music public demanded the 16 Second’s re-release, and it once again became an all-time classic.
Electro-Harmonix is now proud to present the 2880 Super Multi-track Looper. The new definition
in complex expression for performance and the studio. This powerful and interactive instrument follows a traditional
recording layout, so it will feel instantly familiar. However, there are significant differences that go well beyond the
recording world. In fact, at the very least it is a multitrack recorder. When viewed as a whole, it is a multifaceted performance instrument with significant advantages in both live performance and as a personal recording instrument.
Introduction
The uniqueness of the 2880 is the ability to layer multiple
tracks and manipulate them. A special mix down track allows
you to create a spatial stereo pair while freeing up previous
tracks to add more instruments. Very complex interactive tracks
can be completed quickly with the ability to sound unique and
totally original. This is a very spontaneous instrument.
The Electro-Harmonix 2880 records at the industry
CD standard of 44.1 kHz /16 bit uncompressed digital audio.
What you record is what you get, without the degradation or
artifacts that compressed audio usually presents.
Building upon the original concept of the 16 Second Delay, while taking into consideration the demand for
more complex possibilities, the 2880 is more of everything. True world standard audio fidelity, as much
creative time as any musician would need, and an ease of use that is instantly familiar.
The 2880 uses world-class audio converters, while offering uniformity in syncing and integration with any user’s current
equipment. The storage is on flash cards that range from 128 megabyte to 2 gigabyte. All files may be downloaded
to your computer and retrieved when needed.
3
Quick Start Guide
How to Record a Multi-Track Loop:
1.
2.
3.
4.
5.
6.
7.
8.
9.
10.
11.
12.
Plug your instrument into either the LEFT or RIGHT Inputs and adjust the corresponding Input Knob so
that the Clip LED (Light Emitting Diode) barely lights up on your loudest notes.
Connect the LEFT and/or RIGHT Outputs to an amplifier or mixer.
Raise the DRY OUT Fader so that you can hear your instrument.
If you are using Headphones, turn up the HEADPHONE knob.
Make sure the QUANTIZE LED is off.
If you do not want to hear the CLIX metronome, turn the CLIX LEVEL knob down to zero.
Set the TEMPO slider to 50%.
Press the NEW LOOP button to put the 2880 into Record-Ready mode. You should see the RECORD LED
blink rapidly.
Press the RECORD button to immediately start recording. Play your instrument. The 2880 will record onto
TRACK 1.
When you are finished playing, hit either the RECORD or PLAY button to stop recording. Pressing RECORD
will stop recording and stop the 2880. Hitting PLAY will loop the 2880 back to the beginning, put the 2880
into OVERDUB mode and automatically continue recording onto TRACK 2. To exit OVERDUB mode, press
the RECORD button.
Raise the TRACK 1 Fader to hear the track you just recorded.
To record on another track, hit the TRACK SELECT button, you will cycle through the 4 tracks. Whichever
track LED is lit, is the track you will record on.
4
How to Overdub onto a Track:
1. You can continuously overdub onto any one of the tracks.
2. Record a New Loop onto TRACK 1, as done above in the How to Record a Multi-Track Loop section.
3. Press the TRACK SELECT button until TRACK 1 is lit.
4. Move the TRACK 1 Fader to 100%. When in Overdub mode, the track's volume slider acts like a Feedback
control on a delay pedal. For example, if the TRACK 1 slider is set to 50%, each time the loop cycles, the volume
of the previously recorded audio on TRACK 1 will be halved.
5. Hit the RECORD button, both the RECORD and PLAY LEDs will light up. This means you are in Overdub mode.
Since the TRACK 1 LED is lit, you are overdubbing onto TRACK 1.
How to Record 2 Tracks Simultaneously (aka Stereo):
1.
2.
3.
4.
5.
Press the STEREO MODE button. Its LED will light and you will notice that a pair of TRACK LEDS will light, either
1 & 2 or 3 & 4.
After inserting your instrument(s) into the LEFT and RIGHT Input jacks, adjust the INPUT Level knobs so that the
CLIP LEDs barely light.
Press the NEW LOOP button to put the 2880 into Record Ready mode. The RECORD LED will blink rapidly.
Press the RECORD button to begin recording immediately.
To stop recording, hit either the RECORD or PLAY buttons. Hitting RECORD will stop record and playback.
Hitting PLAY will cycle the loop to its beginning and begin Overdubbing onto Tracks 3 & 4 automatically, the
loop continues playing.
How to Record a Quantized Loop:
1. Press the QUANTIZE button to turn on Quantize mode. Its corresponding LED will light up.
2. Turn the CLIX LEVEL knob up so that you will be able to hear the metronome Clix.
3. Press the NEW LOOP Button. The RECORD LED will blink rapidly.
4. At this point you will hear the metronome beating at the tempo set by the TEMPO Slider. You can adjust the
tempo by moving the tempo slider up or down. Up will give you a faster tempo; down will be a slower tempo.
5. Hit the RECORD button. The 2880 will not immediately begin recording but instead will give you a 4-Beat countin. On the 5th beat, after the count-in, the 2880 will begin recording. This is beat 1 of the loop. Upon hitting the
RECORD button, the Clix metronome will reset to beat 1.
6. For a Mono recording, TRACK 1 LED will blink rapidly during the 4-Beat count-in. When making a Stereo
recording, both the TRACK 1 and 2 LEDs will blink rapidly during the 4-Beat counting.
7. Once the TRACK 1 LED goes solid, the 2880 is recording.
8. To stop recording, hit either the RECORD or PLAY buttons. Press RECORD or PLAY within the first 2 beats of the
current bar and the 2880 will truncate the loop length to the end of the previous bar. Press RECORD or PLAY
during the 3rd or 4th beats of the current bar and the 2880 will finish recording the current bar then stop
recording. For example if you want to record a 2 bar loop, you can press the PLAY button during the 3rd and
4th beat of the second bar or within the first 2 beats of the third bar. The QUANTIZE LED will blink rapidly until
it finishes recording the loop.
How to Mixdown Your Tracks:
1.
5
At anytime, you can mix your 4-Tracks down to one stereo Mixdown track. For now let's start with the 2880 in
Idle (stopped) mode. If the 2880 is Playing or Overdubbing a loop, hit the PLAY button to stop it.
2. Hit the Mixdown button once and its LED will light solid. You are now in Mixdown mode.
3. Assuming the Mixdown Track has not been previously recorded, move its volume slider to its top position.
You can continually Overdub any of the 4 tracks onto the Mixdown track; the Mixdown Fader acts like a
Feedback control.
4. Hit the PLAY button. Your loop will play back. Move the Volume and Pan controls of the 4 tracks to your
preferred settings. You can adjust the Volume and Pan controls as much as you like when recording the
Mixdown track.
5. When you are ready to record the Mixdown track, hit the RECORD button. You will immediately begin recording
your mix onto the Mixdown track.
6. To stop recording the Mixdown track, hit either the PLAY or RECORD buttons.
7. The Dry Input signal will not be recorded to the Mixdown track, only audio that was previously recorded on the
4 tracks.
How to Backup your Audio Files to a Computer:
1. Make sure both your computer and the 2880 are powered up.
2. Connect the 2880 to your computer with a standard USB cable.
3. As long as your computer is running Windows XP, ME, MAC OS X or 9.2, the computer will automatically
recognize the Compact Flash card inside the 2880 and treat it like a Removable Disk.
4. Open up the Compact Flash card's window, you will see 6 files: TEMPO.TXT, TRACK1.WAV,
TRACK2.WAV…TRACKM.WAV. You can copy any or all of these files to your hard drive. It is recommended that
you copy all 6 files and store them together in a folder on your hard drive.
5. To disconnect the 2880 from the computer, follow the proper ejection procedure for the computer you are using:
a. For Windows, go to the “Safely Remove Hardware” icon down in the lower right corner of the screen.
Select the USB Mass Storage Device and hit the STOP button. Alternatively in XP, setup the 2880’s CF Card
for “Optimize For Quick Removal.”
b. For MAC OS, go to the Finder, drag the Compact Flash Card icon to the Trash.
How to Restore your Audio Files from a Computer:
1. Make sure both your computer and the 2880 are powered up.
2. Connect the 2880 to your computer with a standard USB cable.
3. As long as your computer is running Windows XP, ME, Mac OS X or 9.2, the computer will automatically
recognize the Compact Flash card inside the 2880 and treat it like a Removable Disk.
4. Locate the 6 files you want to restore to the 2880 on your hard drive.
5. Copy the files to the 2880’s Compact Flash card, directly to its root folder (meaning do not place the files into a
folder on the Compact Flash card if you want the 2880 to play them).
6. Play the 2880, the audio files should be restored.
7. To disconnect the 2880 from the computer, follow the proper ejection procedure for the computer you are using:
a. For Windows, go to the “Safely Remove Hardware” icon down in the lower right corner of the screen.
Select the USB Mass Storage Device and hit the STOP button.
b. For MAC OS, go to the Finder, drag the Compact Flash Card icon to the Trash.
6
The Record Transport
8
7
1
2
4
3
6
5
1. NEW LOOP Button: The NEW LOOP button will put the 2880 into Record-Ready Mode. When you press
the NEW LOOP button, the RECORD LED will blink rapidly, telling you the 2880 is ready to record. Press the
NEW LOOP button again to exit Record-Ready Mode. If you press the NEW LOOP button while recording a New
Loop it will end recording and put the 2880 into Playback mode. Below is a table displaying the results of pressing the NEW LOOP button depending on the current mode of the 2880:
Current Mode
Idle
Playback
Overdubbing
Record-Ready
Recording New Loop
}
+ NEW LOOP =
New Mode
Record-Ready
Record-Ready (Continues playing loop in memory)
Overdubbing (NEW LOOP Button is ignored)
Reverts to previous mode before Record-Ready
Playback (End recording New Loop)
2. RECORD Button and LED: Depending on the 2880's current mode, the RECORD button serves a few
purposes, all of which cause the 2880 to enter/exit some kind of recording mode. The RECORD LED will light up
anytime the 2880 is Recording or Overdubbing audio. Below is a table displaying the results of pressing the
RECORD button depending on the current mode of the 2880:
Current Mode
Idle (If Loop in Storage)
Playback
Overdubbing
Record-Ready
Recording New Loop
}
+ RECORD =
New Mode (RECORD LED State)
Overdubbing (RECORD LED = ON)
Overdubbing (RECORD LED = ON)
Playback (RECORD LED = OFF)
Begin Recording New Loop (RECORD LED = ON)
Idle (RECORD LED = OFF)
The RECORD LED blinks rapidly when the 2880 is in Record-Ready mode.
7
3. PLAY Button and LED: The PLAY button is used to enter/exit Playback mode depending on the current
mode it is in. The PLAY LED will light anytime the 2880 is Playing or Overdubbing audio. Below is a table
displaying the Record/Playback modes and the resultant mode the 2880 enters after pressing the PLAY button:
Current Mode
Idle (If Loop in Storage)
Playback
Overdubbing
Record-Ready
Recording New Loop
}
+ PLAY =
New Mode (PLAY LED State)
Playback (PLAY LED = ON)
Idle (PLAY LED = OFF)
Idle (PLAY LED = OFF)
Playback of Loop in Storage (PLAY LED = ON)
Overdubbing (PLAY LED = ON)
When a loop cycles back to the beginning, the PLAY LED blinks once, signifying the start of the loop.
4. REVERSE Button and LED: Press the REVERSE button and the loop will reverse its Playback/Record
direction. The REVERSE button can be used at all times except when recording a New Loop. The REVERSE LED
will light up when the Reverse function is active.
5. OCTAVE Button and LED: The OCTAVE button will lower the pitch and tempo of the loop by exactly
one octave. The OCTAVE button can be used at all times except when recording a New Loop. The OCTAVE LED
will light up when the Octave function is active.
6. PUNCH IN Button and LED: When the PUNCH IN function is activated, Overdubbing Mode will
change into Punch In Mode. When recording with Punch In active, whatever was previously recorded on the
active track will be erased, no matter where the volume fader is set to for that track. The Punch In function is
useful for fixing bad notes or mistakes. When Punch In is active its LED will light up.
7. QUANTIZE Button and LED: The QUANTIZE button toggles between Non-Quantize (NQ) and
Quantize modes. When the QUANTIZE LED is lit, the 2880 is in Quantize mode. When you record a New Loop
in Quantize mode, the 2880 will give you a 4 beat count-in and extend the loop length to the nearest full bar;
the loop is quantized to the nearest bar. This means the 2880 will continue recording a New Loop (after
pressing the RECORD or PLAY buttons to end the loop) until it reaches the end of the current bar. All bars are 4
beats long. In Non-Quantize mode, the length of the loop is defined by the time between pressing the RECORD
button (to begin recording) and then the RECORD or PLAY buttons (to end the loop).
8. EXT. CLOCK Button and LED: Pressing the EXT. CLOCK button will enable the 2880 to follow the
external MIDI Sync it receives at its MIDI IN jack. The EXT. CLOCK LED will light up when in Ext. Clock mode.
While in Ext. Clock mode, the 2880 will wait for the MIDI Sync signal. If no MIDI Sync is available when you
press the PLAY button, the PLAY and EXT. CLOCK LEDs will blink rapidly telling you there is no sync. You will see
the same blinking if you try to Overdub or record a New Loop with no MIDI Sync present. The one exception is
when recording a New Loop, if you press the RECORD button twice, the 2880 will look to its internal tempo
setting and record the loop, ignoring the fact that there is no MIDI Sync signal.
8
Tracks, Track Selection and Mixdown
16
15
11
12
9
9.
10
13 14
DRY OUT Fader and Pan Pot: The DRY OUT Fader and Pan Pot give you the ability to monitor your
instrument when recording or to play along with a loop you have already recorded. Adjust the output volume of your
instrument using the DRY OUT Fader. Use the Pan Pot to direct the Left and Right Inputs to the Left and Right Outputs.
When Pan is set to the CCW position, the Left Input is monitored at the Left Output and the Right Input is monitored at
the Right Output. When Pan is set to the CW position, the Left Input is monitored at the Right Output and the Right
Input is monitored at the Left Output. When Pan is set to the middle, both Inputs are mixed to both Outputs. The
setting of the DRY OUT Fader and the Pan Pot have no influence on the signal that is recorded.
10. RECORD Tracks: There are 4 tracks available for you to record your instruments onto. You can record at most
2 tracks simultaneously. Each of the 4 tracks contain a pan pot and a level fader. This allows you to balance your
volumes as well as locate your tracks within the stereo spectrum. Each track also contains an activation LED above the
track number. When the LED is lit, that particular track is activated for recording. When you hit the RECORD button
from the Idle state, the active track will be recorded or overdubbed onto.
The tracks are available in mono or stereo pairs (1 & 2 or 3 & 4). The recording levels are set with the INPUT knobs.
TRACK Faders: The 4 track faders serve a dual purpose: during Playback they are the volume control for each
track, during Overdubbing they act like a Feedback control from a delay effect. So when you are Overdubbing, the
level of the previously recorded audio on the active track is multiplied by the position of the track's fader. If the fader
is set to 100%, the previously recorded audio will remain at the volume it was recorded at. If the fader is set anywhere
below 100%, with each pass of the loop, the volume of the previously recorded audio will attenuate according to the
setting of the fader. Using this function, it is possible to use the 2880 as a very long delay pedal.
11. TRACK SELECT Button: This button is used to select the active track. Pressing the TRACK SELECT button will
cycle through the 4 tracks.
12. STEREO MODE Button and LED: This button toggles the 2880 in/out of Stereo Mode. When the STEREO
MODE LED is lit, you are in Stereo Mode, when it is off, you are in Mono Mode. When Stereo Mode is activated, the
stereo pairs (1 & 2 or 3 & 4) will be recorded simultaneously. The LEFT Input will always be sent to Tracks 1 or 3. The
RIGHT Input goes to Tracks 2 or 4.
9
13. MIXDOWN Track: The Mixdown Track is a stereo track that records the audio from the 4 Recording tracks
through their Pan Pots and Faders. There are two different modes of Mixdown: Normal Mixdown and Constant Tempo
Mixdown.
MIXDOWN Button and LED: If the 2880 is idle, press the MIXDOWN button once and the MIXDOWN LED
will light up solid. You are in the normal Mixdown mode. Normal Mixdown is the mode to use when you want to
make a stereo mix of the 4 tracks. Press the MIXDOWN button again and the MIXDOWN LED will blink. You are in the
Constant Tempo Mixdown mode. Constant Tempo is a special mode that you can use to put flanging, pitch-bending
effects onto your Mixdown track, see below for more information on both modes. To exit either Mixdown mode, press
the Mixdown button while in idle mode, until the Mixdown LED turns off.
NORMAL MIXDOWN Mode: MIXDOWN LED lit solid. In this mode the 2880 is set up to produce a clean mix
of the 4 tracks. Press the RECORD button to begin mixdown. You can move the track faders and pan pots during the
mixdown and the audio will be recorded onto the Mixdown track just as you hear it when recording the Mixdown
track. The Mixdown Fader will act like a Feedback control during Overdubbing, just like the track faders. You can
record onto the Mixdown track as many times as you like, keeping what was previously recorded.
CONSTANT TEMPO Mode: MIXDOWN LED blinks rapidly. In this mode the Mixdown track is recorded at a
constant speed or tempo but the TEMPO Slider will allow you to vary the speed of the 4 Recorded tracks. As the
Mixdown track is recorded, speed variations you perform with the TEMPO Slider will be recorded onto the Mixdown
track. This allows you to make subtle effects such as flanging or more drastic effects like radically bending the pitch of
an instrument. You can also engage the Reverse function to reverse a track that was recorded forwards. In some cases
of drastic TEMPO Slider use, the tracks you are mixing will become delayed with respect to their original timing.
14. TEMPO Slider and LED: The TEMPO Slider sets the tempo for the 2880 at all times except when the
EXT.CLOCK is activated (then the 2880 looks to the MIDI IN jack for its tempo). The TEMPO normally ranges from 60
BPM to 240 BPM. If the OCTAVE LED is lit, the tempo will range from 30 BPM to 120 BPM. The tempo gets faster as
the slider is pushed up. The total range of the Tempo slider is +/- 1 Octave + 1 step. When moving the TEMPO Slider,
it will increment the Pitch and Tempo in semitone (1/2) steps. After recording a New Loop, the TEMPO LED lights up
solid when the TEMPO Slider is set to the original tempo the loop was recorded at.
Pitch Changing and Bending with the Tempo Slider: After you have recorded a New Loop, on subsequent tracks you
record, you can move the TEMPO Slider and/or press the OCTAVE button to record notes at different pitches when
played back at the loop's original speed. For example, record Track 1 with some guitar chords. Move the TEMPO Slider
up one octave and record some single low notes with the same guitar. When you play both tracks back at normal
speed you will have guitar and bass tracks. While recording, try moving the TEMPO Slider, when you play the loop
back at a set tempo, the notes will bend according to how you moved the TEMPO Slider when recording.
15. CLIX LEDs: The CLIX LEDs blink on the beat, at the same tempo the 2880 is set to. The left LED lights briefly on
every beat, the right LED blinks only on beat 1. When the 2880 is using its internal tempo, the TEMPO Slider will set
the tempo the LEDs blink at. When the EXT. CLOCK is activated, the CLIX LEDs will blink at the MIDI Sync tempo.
16. CLIX LEVEL Knob: The CLIX LEVEL knob adjusts the volume of the Clix metronome. When you are recording a
New Loop, this knob will vary the volume for the metronome from 0 to 100%. After you record a New Loop and you
are either Playing back or Overdubbing, the CLIX LEVEL knob acts more like a switch for the metronome. If you have
the CLIX LEVEL knob set to above 75%, you will hear the metronome, otherwise it is silent. When the 2880 is idle, the
metronome is off. The metronome beat is output through the Headphone jack and the Left/Right Output jacks but will
not be recorded.
10
B
A
C
A. Analog Control and I/O
LEFT and RIGHT INPUT Jacks: Plug your instruments into these Hi-Impedance audio input jacks. In
mono mode, either input can be recorded onto any of the 4 tracks. In Stereo Mode, the Left Input will record to
either Tracks 1 or 3, the Right Input will record to either Tracks 2 or 4. The Input Impedance presented at each of the
INPUT Jacks is 470 kOhms.
INPUT L and R Knobs: These knobs adjust the amplitude of the signal before it goes into the A/D Converter.
The L knob adjusts the signal level of the LEFT Input and the R knob adjusts the level of the RIGHT Input. The INPUT
knobs should be adjusted to the point where maximum level causes the CLIP LEDs to barely blink or not light up at
all. The trick to achieving the best quality digital audio is to record the hottest possible signal without clipping the
A/D converter. You do not want to record a signal that is too low in volume or a signal that clips very often (unless
that is the sound you are going for). When recording in mono, both the Left and Right Inputs are summed together
and recorded onto the active track. To minimize hiss when recording in mono mode, it is best to turn down the
unused Input knob.
CLIP L and R LEDs: These LEDs light up when the audio signal clips the A/D Converter. In other words, the
signal’s amplitude is greater than what the A/D Converter can properly handle. The L LED lights when the LEFT
Input clips, the R LED when the RIGHT Input clips.
AUX IN Jack: This stereo input is mixed with the stereo output of the D/A Converter in the analog domain and
is output through all three output jacks. You could use this input to connect a CD Player, iPod, Mixer, Drum Machine
or Sampler. The 2880 does not record audio from the AUX IN Jack. The Input Impedance presented at the AUX IN
Jack is 6.8 kOhms, so it is best suited for Line Inputs. You will need to use the output volume of your device to mix it
properly with the 2880 output.
LEFT and RIGHT OUTPUT Jacks: Your main output from the 2880. Plug these outputs into your amplifier,
11
mixer, computer, tape recorder or any other suitable device. The Output Impedance at each OUTPUT Jack is 400 Ohms.
HEADPHONE OUTPUT Jack: Plug your preferred headphones into the Stereo Headphone jack,
labeled
. Each channel of the HEADPHONE Output jack can deliver 0.1W into 16 ohms.
HEADPHONES VOLUME Knob: The knob labeled
adjusts the output volume for the Headphones.
The Headphones Volume knob is an analog knob after the D/A Converter, it has no bearing on the level of the
recorded or played back audio that is saved on the card.
B. Digital I/O and Power
FOOTSWITCH Jack: Using a standard 1/4" guitar cable, connect this jack to the 2880’s remote Foot Controller
(sold separately). The Foot Controller allows foot access to the following functions: NEW LOOP, RECORD, PLAY,
TRACK SELECT, REVERSE and OCTAVE. With the Foot Controller, the 2880 becomes a live/solo looper where you can
make loops on the fly, in time with your band, while playing your instrument.
MIDI IN Jack: Standard 5-pin DIN MIDI cables connect to this jack. When the EXT. CLOCK function is on, the
2880 can sync to MIDI Clock through the MIDI IN jack. You can use a drum machine, sequencer, beat box or any
device that outputs MIDI Clock as the MIDI Clock master; the 2880 will slave to the external device.
MIDI OUT Jack: Standard 5-pin DIN MIDI cables connect to this jack. When the EXT.CLOCK function is off, the
2880 constantly generates MIDI Clock and outputs it through the MIDI OUT jack. Using the MIDI OUT Jack, the 2880
is the MIDI Clock master; you can slave another device, such as a drum machine, sequencer or beat box, to the 2880.
The 2880 also uses the MIDI OUT jack as a MIDI Thru, passing whatever commands the MIDI IN jack receives back
out to the MIDI OUT jack. When EXT. CLOCK Mode is activated, the MIDI OUT jack will pass the MIDI Clock signal it
receives through the MIDI IN jack back out of the MIDI OUT jack.
9VDC/500mA Power Jack: Plug the supplied 9VDC/500mA AC Adapter into this jack. The barrel connector
dimensions required for the Power Jack are 5.5 x 2.5 mm. Use only the supplied AC Adapter or you may damage the
unit, injure yourself or a band mate.
C. Memory Card and USB
The 2880 records 16 bit audio at a sampling rate of 44.1 kHz. One significant advantage is that all audio is uncompressed
and is not processed into a less professional format. What you hear is what you recorded and it is presented at CD quality.
Compact Flash Memory Card
All recorded audio is stored on removable Compact Flash (CF) memory cards. The CF Card slot is located on the
right side of the 2880.
The 2880 comes supplied with a 1GB card which allows for a maximum loop length of 31 minutes. Just as the
original 16 Second Delay stood for the maximum amount of storage, the name 2880 stands for the number of
seconds that can be recorded with a 256MB card, 2880 seconds or 48 track-minutes of full bandwidth recording.
Using a 2GB flash memory card, you can record over 372 track-minutes of full bandwidth audio. The real name
could be the 22,670.
The CF card can easily be removed when you record a loop, song or project that you do not want to overwrite
immediately. You may then reinsert a new CF card and continue working.
12
Please Note: Only one loop, song or project can be on a CF card at a time, even if it is only 1 second in length.
When you begin recording a New Loop, it erases the previous loop that you had on the card; you cannot retrieve
old loops once overwritten.
2880 Requirements for the Compact Flash Card:
Minimum Card Size = 128MB
Maximum Card Size = 2GB
Card Speed = 40x or greater is recommended
Approximate Maximum Loop Length for each standard Compact Flash card size:
128MB = 4 minutes
256MB = 8 minutes
512MB = 16 minutes
1GB = 31 minutes
2GB = 62 minutes
Cards will have to be formatted to the FAT16 file system. Most store bought cards are formatted for FAT16. If you
need to format a CF Card, attach the 2880 to a Windows PC via the USB port, and choose “FAT,” under the File
System pull-down menu.
The 2880 will not Record or Playback without a proper CF Card inserted into the 2880’s card slot.
USB Port
The 2880 is fitted with a USB Port, which allows you to move your files to and from your computer using a standard
USB cable. The USB Port is located on the right side of the 2880, next to the CF card slot.
When you connect your 2880 to a computer, through the USB connector, it will display the Compact Flash card
inside the 2880 as an external hard drive. You may then copy files to and from the CF card. The 2880 is automatically
recognized by PCs running Windows XP or ME or Macs running OS X or OS 9.2.
The 2880 records all audio files as wave files (.wav), which can then be read by most if not all computers. Any
audio program that accepts wave files as a viable format can play or edit the 2880 audio files. Every PC and most
Macs can play wave files. The biggest plus is the ability to insert your manipulated file into your favorite software
program. A sound designer’s dream.
Your computer can backup and restore loops, songs and projects to the CF card inside the 2880. When backing up
the contents of the CF card, it is recommended you copy all 6 files from the CF card and place them together into
their own folder. When restoring the loop, copy all 6 files back to the root directory of the CF Card (not into a folder
on the CF card).
When copying files to the CF Card, it is important to include the Tempo.txt file. This file gives the 2880 information
on the original tempo setting of the audio files.
Please refer to the “How to Backup...” and “...Restore your Audio Files from a Computer” sections of the Quick Start
guide, earlier in this manual, for more information on connecting the 2880 to a computer through USB.
13
In-Depth Look at Recording Tracks
Readying the 2880 to Record a NEW LOOP:
Plug your instrument into either the LEFT or RIGHT INPUT jacks, or both if recording two separate instruments or if
recording in stereo.
To monitor your recording, connect the LEFT and/or RIGHT OUTPUT jacks to a mixer or amp or plug headphones
into the HEADPHONE jack.
Play your instrument(s) and adjust the INPUT Level knobs so that the CLIP LED does not light or just barely lights
on your loudest notes. The trick to achieving the best quality digital audio is to record the hottest possible signal
without clipping the A/D converter. You do not want to record a signal that is too low in volume or a signal that clips
very often (unless that is the sound you are going for).
If recording only one input, turn the Input knob down fully for the unused channel, this reduces hiss.
Use the DRY OUT slider and PAN knob to adjust what you hear when monitoring.
The DRY OUT Pan Pot can be used to mix the Left and Right Inputs to both outputs or to separate the Inputs to
monitor on different outputs. In the CCW position, the Left Input is sent out the Left Output jack, the Right Input is
sent out the Right Output jack. In the CW position, output monitoring is reversed: Left In goes to Right Out and Right
In goes to Left Out. When the DRY OUT Pan Pot is set to the center, the Left & Right Inputs will be mixed together in
both Outputs.
If using Headphones, you also have a separate volume control just for the Headphones.
The setting of the DRY OUT Fader and PAN Pot will not effect what is actually recorded. Only the INPUT Level knobs
have any bearing on what is recorded.
14
NON-QUANTIZE vs. QUANTIZE Loop Recording:
In Non-Quantize Mode: the loop length is set by the user. The time between pressing the RECORD and PLAY
buttons determines the length of the loop for all of the tracks. You could also press RECORD or NEW LOOP to end
the loop. The 2880 will begin recording the loop immediately upon hitting the RECORD button.
In Quantize Mode: the loop length is determined by the number of bars you wish to record and the setting of the
TEMPO slider. Upon pressing the RECORD button, the 2880 will reset its Clix metronome to beat 1; then you will
hear a 4-Beat count-in. The 2880 will start recording after the 4-beat count-in; on the 5th beat you hear. Pressing the
PLAY, RECORD or NEW LOOP buttons will end the loop. The 2880 will truncate the loop’s length to the end of the
previous bar if the aforementioned buttons are pressed within the first 2 beats of the current bar. When the
aforementioned buttons are pressed after the 2nd beat, the 2880 will continue recording to the end of the current
bar and then end the loop. You can record as many bars as the Compact Flash card will allow or as few as 1 bar.
A bar is 4-beats long.
The metronome’s tempo can be adjusted using the TEMPO Slider. It is best to adjust the tempo while in RecordReady mode, before pressing the RECORD button.
You can change from Non-Quantize to Quantize mode at any time by pressing the QUANTIZE button. When the
QUANTIZE LED is lit, you are in Quantize mode.
The most appropriate times to press the QUANTIZE button are either just before pressing the NEW LOOP button or
while the 2880 is in Record Ready mode.
Pressing the QUANTIZE button while in the process of recording a new loop will enable you to end the loop according
to the rules of the Quantize mode you just entered. For example, you start a loop in Quantize mode so that you can
have the 4-beat count-in but you want to end the loop in the middle of a bar. You can press the QUANTIZE button
while recording the loop; when you hit the PLAY button to end the loop, it will end immediately, without finishing
out the bar you are recording or truncating the bar.
The QUANTIZE button will have no effect once you have recorded a New Loop and established the loop length.
Stereo Mode:
Press the STEREO MODE button to Toggle between Mono and Stereo modes. Stereo mode is active when the
STEREO MODE LED is lit.
In Mono mode, one Track Select LED is lit at a time. In Stereo Mode, the tracks will be selected in pairs, so either
the LEDs for TRACKS 1 & 2 will be lit or TRACKS 3 & 4.
You may press the STEREO MODE button at any time. It is most appropriate to hit the STEREO MODE button just
before recording, either a New Loop or tracks for an already established loop.
You can start a loop by recording mono instruments onto the tracks and then at any time, switch to stereo mode
and begin recording stereo instruments onto the track pairs or vice versa.
15
Recording a New Loop:
When you are ready to record a loop, press the NEW LOOP button. This will put the 2880 into Record Ready mode.
You will see the RECORD LED blinking rapidly.
To exit out of Record-Ready mode, press the NEW LOOP button again.
Choose between Quantize or Non-Quantize mode.
Press the RECORD button to commence recording.
While in the process of recording a new loop, the following buttons will be inactive: REVERSE, OCTAVE, EXT. CLOCK
and MIXDOWN.
Moving the TEMPO slider while in the process of recording a New Loop will not change the pitch of the recording,
although it does change the pitch after you have recorded the initial loop.
Ending a New Loop:
To end a New Loop press either the PLAY, RECORD or NEW LOOP buttons. Each of the three buttons will put the
2880 into a different mode upon completing the loop.
By pressing the PLAY button: the 2880 will automatically enter OVERDUB mode, the loop will cycle back to its
beginning and you will hear what you just recorded on Track 1. Both the RECORD and PLAY LEDs light up. When
pressing PLAY, the active track will jump to Track 2, so that you can immediately start recording onto Track 2.
By pressing the RECORD button: the 2880 will go into idle mode and stop Record and Playback. Track 1 will remain
the active track. The audio you recorded on Track 1 is in memory; you need to press PLAY to hear it.
By pressing the NEW LOOP button: the 2880 will automatically enter Play mode, the loop will cycle back to its beginning
and you will hear what you just recorded on Track 1. The PLAY LED lights up. The active track will jump to Track 2.
Notes on Loop Length and Compact Flash Card:
The loop length is set automatically for all tracks when you record a New Loop on Track 1. This means the loop
length for the entire 2880 is set when you record your New Loop. It also means the loop length for all 5 tracks are
always identical to Track 1’s length. For example, if you are recording a New Loop and it turns out to be 10 seconds
long, the length of all 5 tracks will be 10 seconds. You cannot record a longer or shorter loop on say Track 3 as
compared to Track 1.
Approximate Maximum Loop Length vs. Compact Flash card size:
128MB = 4 minutes
256MB = 8 minutes
512MB = 16 minutes
1GB = 31 minutes
2GB = 62 minutes
Only one loop can be on the Compact Flash card at a time.
Once you begin recording a New Loop, all of the files for the previous loop will be overwritten and you cannot
retrieve them.
16
In-Depth Look at Overdubbing Tracks
Our Definition of Overdubbing:
Overdubbing is the recording of any track after the initial recording of a New Loop. Overdubbing can mean:
¥
Recording a new instrument for the first time on a track that has not been previously recorded.
¥
Layering notes or instruments on top of each other on one track. Using the track’s fader as a feedback control.
¥
When Overdubbing with the 2880, both the RECORD and PLAY LEDs will be lit solid.
Choosing a Track to Overdub:
After recording a New Loop, the 2880 may have automatically advanced to Track 2. If so, you may be already overdubbing onto Track 2, are both the RECORD and PLAY LEDs lit?
To choose a track to Overdub onto, press the TRACK SELECT button. Pressing the TRACK SELECT button will cycle
you through the 4 tracks.
As you press the TRACK SELECT button, the LEDs above the Track numbers will consecutively light up. The track that
is lit is the active track. Meaning you will or are currently Overdubbing onto the active track.
To Overdub in stereo, press the STEREO MODE button so that its LED lights up. You will now be able to Overdub
onto Tracks 1 & 2 or 3 & 4. Pressing the TRACK SELECT button will toggle you between these two track pairs.
17
Overdubbing:
Begin Overdubbing by pressing the RECORD button. Immediately you will see both the RECORD and PLAY LEDs
light up.
If the loop is playing back, pressing the RECORD button will put you into Overdub mode while in the middle of the
loop cycle.
Again you will be Overdubbing on the track that is currently active; the track(s) with its LED lit up.
Moving the active track’s fader to anything below 100% will attenuate the previously recorded audio on that track
each time the loop cycles. The track fader will act like a Feedback control on a delay effect. If you do not want to
attenuate or lose the audio already on the track, make sure the fader is set to 100%.
While Overdubbing you can move the TEMPO Slider to achieve slowed down or sped up sounding instruments. You
can also press the OCTAVE button, which will automatically drop the pitch and tempo of the loop exactly 1 octave.
The TEMPO slider changes the speed of the loop in semitone (1/2) step increments.
You can press the REVERSE button at anytime to reverse the playback direction of the loop. By doing this you can
easily record a backwards guitar line.
When using the OCTAVE and REVERSE buttons, activating either function will act on all 5 tracks of the loop, not just
the active track.
The TEMPO LED lights up when the TEMPO Slider is set to the same tempo that the original loop was recorded at. If
you move the TEMPO Slider you will see the TEMPO LED light up only when the TEMPO Slider is set to its original
setting. This is an easy way to get back to the original pitch and tempo of the loop.
Punch-In:
If the Punch-In function is activated while Overdubbing, whatever was recorded previously on the active track will
be erased.
Punch-In is useful for situations where you want to fix a bad note or simply erase one section of the loop.
While playing back you can push the active track’s fader up so that you can properly hear the track. Once you press
RECORD, the track will go silent. It is erasing and recording as the loop plays.
Steps for a common Punch-In:
1. Select the track you want to Punch-In.
2. Press the Punch-In button so that it is active.
3. Press the Play button to playback the loop.
4. When the punch-in section arrives, press the RECORD button.
The 2880 immediately begins erasing and recording onto the active track.
5. When the Punch-In section is finished, press RECORD or PLAY to stop recording.
18
In-Depth Look at Mixdown
What is Mixdown:
Looking at the 2880’s top panel, you can see it has a simple mixer that combines the 4 recorded tracks, the DRY
input signal and the Mixdown track, which are then sent to the stereo outputs. You can independently adjust the
volume of any of the 4 tracks, the DRY OUT and the Mixdown track. You can also adjust the stereo positioning of the
4 tracks and the DRY OUT.
During Mixdown, the 4 Record tracks are mixed internally, inside the 2880’s DSP. The output of the 4 Record tracks’
internal mixer is sent to the input of the Mixdown track as well as the OUTPUT jacks. The Mixdown track is a stereo
track so it records both the Left and Right sides of the stereo spectrum.
Since the Mixdown track is recording audio, any adjustments you make to the track faders or pan pots will be
recorded as audio onto the Mixdown track. What is getting recorded is not the fader movements but the change in
volume that the fader produces.
The Mixdown track works like any of the other 4 recording tracks. The differences are that the Mixdown track is
stereo not mono and therefore does not have a Pan Pot to turn. You cannot record audio from the Input jacks
directly to the Mixdown track. Only audio that is recorded on any of the 4 tracks will go to the Mixdown track.
While Overdubbing, if the MIXDOWN track is active, its fader will act like a Feedback control on a delay effect.
19
Performing a Mixdown:
While the 2880 is idle, press the MIXDOWN button once. You should see the MIXDOWN LED light up solid. When
the MIXDOWN LED is lit solid, the 2880 is ready for normal MIXDOWN.
At this point you can either press RECORD to jump right into Mixing Down or you can press PLAY to rehearse the
Mixdown. It is up to you. If you don’t like the first Mixdown, you can always try again.
Pressing PLAY while in Mixdown mode is exactly like pressing PLAY when any of the other tracks are active, you will
not do anything to change the audio already on any of the tracks. You are simply listening back to what you have.
When you are ready, either from the Idle or Playback modes, press the RECORD button. Immediately the Mixdown
track will begin recording the audio that your 4 tracks are outputting. You do not have to start the loop from the
beginning when mixing down, you can start in the middle.
Once you are finished with the Mixdown, press either RECORD or PLAY to stop recording.
After the Mixdown:
When you complete a Mixdown track, it is usually a good idea to listen and see if you like it. If you need to fix
something, try it again. If you re-do a Mixdown, it is usually a good idea to move the Mixdown fader down to 0.
You can overdub onto the Mixdown track as many times as you like, the MIXDOWN fader will act like a feedback
control on a delay effect. This means you could go record 4 more tracks and mix the new tracks down onto the
MIXDOWN track. Your mixdown track would end up with 8 mixed tracks.
Using external cables, you could bounce the Mixdown track back to one or two of the recorded tracks. If you do this
remember to bring down the DRY OUT slider.
You could enter the Constant Tempo Mixdown mode and produce some flanging or pitch bend effects. See below
for more info.
To exit Mixdown mode, press the Mixdown button until its LED shuts off or press the TRACK SELECT button to cycle
through the 4 tracks.
What is Constant Tempo (CT) Mixdown:
During the Normal Mixdown, the Mixdown track records at the same tempo that the 4 tracks playback. Meaning all
tracks are locked in at the same speed at all times, just like on a multi-track tape recorder. This speed is set by the
TEMPO slider or the external MIDI Clock. You can move the TEMPO slider while recording a normal Mixdown track,
but when you play it back, you will not hear any changes in pitch.
Constant Tempo Mixdown mode locks the Mixdown track in at the tempo or speed you recorded the initial loop but
allows you to change the speed of the 4 Recorded tracks, using the TEMPO slider. This enables you to produce a
Mixdown track with subtle effects like Flanging or more drastic effects like pitch bending.
When you put the 2880 into Constant Tempo Mixdown mode, the TEMPO Slider becomes a tempo change percentage
control. The range is from -1 octave to +1 octave, with 0% change in the middle. When you push the TEMPO slider
to the top, the 4 recorded tracks will double their tempo, when it is pushed down to the bottom, the 4 Recorded
tracks will halve their tempo.
20
If you press the REVERSE button during CT Mixdown, the 4 Recorded tracks will play backwards while the Mixdown
track records going forward. This enables you to reverse a track (on the Mixdown track) after you had recorded
it forwards.
Using Constant Tempo Mixdown:
While the 2880 is idle, press the MIXDOWN button until the MIXDOWN LED blinks rapidly.
You may also see the TEMPO LED blink rapidly. If you push the TEMPO slider to its middle position, the TEMPO LED
will go solid, meaning there is no change in tempo. Push the TEMPO slider up or down and you will see its LED
blink rapidly. When the TEMPEO LED blinks rapidly, the MIXDOWN track and 4 recorded tracks are at different tempos.
At this point you can press either the RECORD or PLAY buttons. Pressing RECORD jumps you right into Constant
Tempo Mixdown. Pressing PLAY lets you rehearse the Mixdown.
If you are rehearsing the CT Mixdown, you can press the RECORD button at anytime to overdub onto the
MIXDOWN track.
Keep in mind if you already have audio on the Mixdown track, you will want to raise the MIXDOWN fader so that
you do not lose the original audio.
While performing a CT Mixdown, move the TEMPO slider to hear the effects of the off-speed tracks.
To stop recording the CT Mixdown, press the PLAY button and the 2880 will go into Idle mode.
After Constant Tempo Mixdown:
To exit CT Mixdown mode, while the 2880 is Idle, press the MIXDOWN button until its LED shuts off.
Read the “After the Mixdown” section above for more ideas on what to do next.
MIDI and MIDI Sync
Outputting MIDI Start and Stop Commands:
Along with sending out MIDI Clock signal to the MIDI OUT jack, the 2880 also sends out MIDI Stop and Start commands.
When a loop begins playing, the 2880 sends out a MIDI Start command. So if the 2880 is idle and you press
either the PLAY or RECORD buttons, it will send out a MIDI Start command. The 2880 also sends out a MIDI Start
command when you press NEW LOOP to enter Record-Ready mode. When in Quantize mode, it sends another MIDI
Start command when you press RECORD to begin the 4-beat count-in.
When you stop a loop and the 2880 goes into idle mode, a MIDI Stop command is sent out. So if the 2880 is playing
a loop and you press either the PLAY or RECORD buttons to stop the loop, it will send out a MIDI Stop command.
21
Responding to MIDI Start, Stop and Song Position Pointer:
When EXT. CLOCK Mode is activated on the 2880, it will respond not only to MIDI Clock but also MIDI Start, Stop
and Song Position Pointer.
If you are using a Drum Machine or Sequencer that sends out MIDI Start and Stop, the 2880 will respond to these
commands. Press play on the drum machine and the 2880 will start playing its loop, press stop on the drum
machine and the 2880 stops.
When the 2880 is in Record-Ready mode, press the RECORD button and you will see both the EXT. CLOCK and
RECORD LEDs blinking rapidly. When the 2880 receives a MIDI Start command, it will begin recording the New
Loop. If you are in Record-Ready mode and have not pressed RECORD, when the 2880 receives a MIDI Start
command, it Plays the loop it has stored in memory.
The 2880 will also respond to Song Position Pointer (SPP). You can advance your sequencer or drum machine to
any measure you like, and the 2880 whether idle or playing a loop, will jump to the measure specified by the MIDI
master. If the specified measure is outside the loop’s length, the 2880 will wrap the loop around to the correct
position. For example, let’s say the 2880 has a 4 bar loop stored internally and you move your sequencer to the
beginning of measure 6 and press Play, the 2880 will start playing from the beginning of its 2nd bar.
The 2880 works best with MIDI masters that continuously send out their MIDI Clock. Some machines only send MIDI
clock when you start their sequencers, although the 2880 will work with these machines, it may be slightly behind
the master (in sync but behind). Also if you change the BPM tempo on the MIDI master and it does not continuously
send out MIDI Clock, the 2880 will require at least one bar to adjust to the new tempo.
User Notes & Tips
2880 as MIDI Clock Slave and Master
Below are a number of pointers to help you create loops when using the 2880 with MIDI Clock.
To summarize these tips: when the 2880 creates a loop as a MIDI Clock slave, it needs to work in Quantize mode in
order to create loop lengths that are exactly x number of bars in length. If you do not use the Quantize feature, the
loop’s length will be completely variable depending on when you started and stopped the recording of a new loop
and most likely will not sync up with the MIDI Clock master, even though the 2880’s tempo is in sync with the master.
1. If you are using the 2880 as a MIDI slave and want to produce loops of a set number of bars,
the best way to do this with the 2880 is to record your initial loop (or New Loop) with
Quantize set to ON. Follow this procedure:
a. Press the EXT. CLOCK button so that its LED is lit. You are now in Ext.
Clock mode.
b. Press the QUANTIZE button so that its associated LED is lit. You are now in
Quantize mode.
c. Press the NEW LOOP button. The Record LED should blink rapidly.
d. Press the RECORD button, now both the Record LED and the Ext. Clock
LED should be blinking rapidly. This means that the 2880 is waiting for a
MIDI Clock signal and a start command from the MIDI master. Once
received it will immediately begin recording.
22
e. Press play on the MIDI clock master, the 2880 will immediately begin
recording.
f. In Quantize mode the 2880 will create loop lengths to the nearest bar.
Each bar is 4 beats. So if you make a loop that is two bars long, it will be
8 beats. While the 2880 is recording the loop, if you want to create a 4 bar
loop, press the PLAY button while recording the 4th bar, after the 3rd
beat. At the end of the 4th bar the 2880 will stop recording and immediately begin playing/overdubbing the loop you just recorded. If you want to
just play the loop back and not overdub press the NEW LOOP button to
end the loop. If you want to simply end the loop and not playback at all
press the RECORD button to end the loop.
2. While in Quantize mode, if the MIDI Clock master is already playing when you hit the NEW
LOOP button, then the 2880 will either begin recording as soon as you hit its RECORD button
or it will first give a one bar count-in and then begin recording. To skip the one bar count-in
and start recording immediately, make sure to press the RECORD button on beat 1 of the
MIDI clock master’s beat 1. If you want the 4 beat count-in, press the RECORD button at any
point in the bar after beat 1. Alternatively, you can begin recording a New Loop with Quantize
off, so that it begins recording immediately upon pressing the RECORD button and then while
it is recording the New Loop, press the QUANTIZE button. When you press PLAY to end the
loop it will continue recording to the end of the bar.
3. If the loop length, in bars, is known prior to recording the loops, you can create a blank loop
before you start playing. For example if you create a 2 bar loop with Quantize On, then that
loop will always be exactly 2 bars no matter the tempo the 2880 is receiving or sending. You
can create the 2 bar loop without any MIDI being sent to the 2880, then later, turn on Ext.
Clock on the 2880 and give it MIDI Clock. The 2880 will record/play at the master’s tempo and
the loop will always be 2 bars. You could even make CF cards with different loops lengths, a
card for a 2 bar loop, a card for 4 bar loop, etc. If you don't want or need the audio that
recorded the last time you used the card, just overdub over the loop with Punch-In set to on.
4. When you are not using the Quantize mode, the following is true about the 2880:
a. The tempo sent out of the 2880’s MIDI Clock has nothing to do with the
loop length, it only has to do with the current setting of the TEMPO Slider.
b. When creating loops with the 2880, while the 2880 is a MIDI Clock slave,
if the loops are created with Quantize off, there is no guarantee that the
loops will be exactly x number of beats or bars in length unless the master
MIDI Clock device can send out Start and Stop commands for the 2880 to
begin and end recording and even then they may not be exact. It is best
to always record with Quantize set to On when using the 2880 with MIDI
Clock.
Using MIDI to Control:
Independent of the MIDI SYNC state, the 2880 now responds to Program and Control Change messages at all times.
You can control nearly every button, slider and knob on the 2880 via MIDI. The exceptions are the Input Sensitivity
knobs and the Headphone Level knob, these controls are fully analog and cannot be controlled via MIDI. Controlling
the 2880 via MIDI is the same as pushing the 2880's buttons and moving its sliders and rotary controls. The 2880
does not send Program and Control Change messages, it only can receive these messages.
23
Setting the MIDI Channel:
The MIDI channel on which Program and Control Change messages are received can be altered from 2880’s panel
and saved in internal memory.
Press the MIXDOWN button and hold it for more than 2 seconds. After holding MIXDOWN for 2 seconds, you will
see all of the LEDs blink except the four track LEDs. Continue to hold down the MIXDOWN button.
The state of the track LEDs indicates the current MIDI channel setting (see chart below). As you hold down MIXDOWN,
the track LEDs will begin to count up. Do not let go until the desired MIDI Channel number is represented in the
track LEDs. Upon releasing MIXDOWN, the current MIDI channel will be saved in memory even after power cycling.
Track LED
The Track LEDs use the following code (“.” = LED off):
Track LED 1
.
.
.
.
.
.
.
.
ON
ON
ON
ON
ON
ON
ON
ON
2
.
.
.
.
ON
ON
ON
ON
.
.
.
.
ON
ON
ON
ON
3
.
.
ON
ON
.
.
ON
ON
.
.
ON
ON
.
.
ON
ON
4
.
ON
.
ON
.
ON
.
ON
.
ON
.
ON
.
ON
.
ON
= MIDI channel
1
2
3
4
5
6
7
8
9
10
11
12
13
14
15
16
24
MIDI Control Change Messages:
The 2880 can respond to specific Control Change messages. The following lists all of the 2880 parameters and their
corresponding CC#.
CC#
9
20
21
22
23
24
25
26
27
28
29
30
31
102
103
104
105
106
107
108
109
110
111
112
124
125
Data Range
0 to 127
0 to 127
0 to 127
0 to 127
0 to 127
0 to 127
0 to 127
0 to 127
0 to 127
0 to 127
0 to 127
0 to 127
0 to 127
127
127
127
127
127
127
127
127
127
127
127
0
0
2880 Parameter
Clix level
Dry Out slider
Track 1 play/feedback slider
Track 2 play/feedback slider
Track 3 play/feedback slider
Track 4 play/feedback slider
Mix track play/feedback slider
Tempo slider
Dry Out pan
Track 1 pan
Track 2 pan
Track 3 pan
Track 4 pan
Push REC button
Push NEW button
Push PLAY button
Push TRACK SELECT button
Push EXT SYNC button
Push MIXDOWN button
Push STEREO button
Push REVERSE button
Push OCTAVE button
Push PUNCH-IN button
Push QUANTIZE button
Change to OMNI=OFF
Change to OMNI=ON
Please Note:
• There must be at least 300mS between each button push message.
• At power up the 2880 will always be in OMNI=OFF mode.This means that it will only obey Control Change
messages on the selected channel. The 2880 can however be switched to OMNI=ON mode by receipt of the
appropriate command on its selected channel. In OMNI=ON mode 2880 will respond to CONTROL CHANGE
MESSAGES (except OMNI=OFF) on any channel.
• Moving a fader or knob after receiving a CC message will overwrite the last CC message with the last fader or
knob movement.
MIDI Program Change Messages:
The 2880 also interprets certain Program Change messages as button pushes and mute/unmute commands. In
addition to accessing every button on the 2880 with Program Change, we have also added more functions not
present on the face of the 2880, such as mute/unmute of the tracks and direct selection of a track. A program
change message has one information byte, P0 (0 to 127), but this is usually presented to the user as being 1 to 128,
shown below as P1.
25
P0 or P1
80 81
81
82
82 83
83 84
84 85
85 86
86 87
87
88
88 89
89 90
90 91
91
92
92 93
93 94
94 95
95 96
96 97
97
98
98 99
99 100
100 101
101 102
102 103
103 104
104 105
105 106
106 107
107 108
108 109
109 110
110 111
2880 Parameter
Push PLAY button
Mute/unmute track 1’s play**
Mute/unmute track 2’s play**
Mute/unmute track 3’s play**
Mute/unmute track 4’s play**
Push REC button
Select track 1 for record (or 1 and 2 if stereo)
Select track 2 for record (or 1 and 2 if stereo)
Select track 3 for record (or 3 and 4 if stereo)
Select track 4 for record (or 3 and 4 if stereo)
Push NEW button
Push QUANTIZE button
Push REC button
Push PLAY button
Push REVERSE button
Push TRACK SELECT button
Push STEREO button
Push PUNCH-IN button
Push EXT SYNC button
Push OCTAVE button
Push PLAY button
Mute/unmute track 1’s play**
Mute/unmute track 2’s play**
Mute/unmute track 3’s play**
Mute/unmute track 4’s play**
Push REC button
Push MIXDOWN button
Mute/unmute mix track’s play**
Mute/unmute Dry Out**
Mute/unmute clix level**
Mute/unmute all play tracks***
** The single channel mute/unmute action works as follows: If the channel’s level is greater than zero when the
command is received then the channel will be muted. If the channel's level is zero when the command is
received then the level will be set either to that of 2880’s panel fader or to that of the last CC message (20..24),
depending on which was the last received.
*** When a mute/unmute all-play-tracks command is received all play tracks will be muted if ANY of them is greater
than zero. If ALL of them are zero then each will be set to fader or CC level.
MIDI Out (MIDI Thru):
2880 generally relays all received MIDI messages at its MIDI out connector. But in Internal sync mode it does not
relay the sequencer commands: STOP START CONT CLOCK.
26
Signal Path Diagram
32-33 47th Avenue, Long Island City, New York 11101
www.ehx.com