1
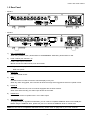
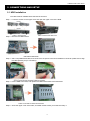
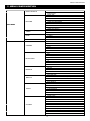
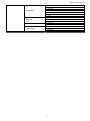
273Z
4CH MPEG4 DVR
Quick Guide
Please read instructions thoroughly before operation and retain it for future reference.
The image shown above may differ from the actual product appearance.
760A_761A_Quick_V0.9
FRONT AND REAR PANELS
1. FRONT AND REAR PANELS
1.1 Front Panel
1)
LED Indication
The following LEDs will be on when:
HDD: HDD is reading or recording
HDD Full: HDD is full.
ALARM: Once the alarm is triggered
TIMER: When timer recording is turned on
PLAY: Under playing status
REC: Under recording status
2)
MENU
Press this button to enter / exit the DVR menu mode.
In the sub-layer of the DVR menu, press this button to confirm the settings and go back to the upper layer.
3)
ENTER
Confirm the password entering.
4)
REC
Press this button to activate manual recording.
5)
LIST (Event List Search)
To quick search the recorded files by event list, press this button to show all types of the event lists.
Select one of the event list and press “ENTER” button to playback the selected file.
MANUAL: List the information of the manual-recorded files. The DVR will save one recorded file once any recording setting is changed
SYSTEM: List the information of the system-recorded files. The DVR system will save one recorded file every one hour.
MOTION: List the information of the motion-trigger-recorded files.
TIMER: List the information of the timer-recorded files.
6)
SLOW
Under the playback mode, press this button to slowly playback the recorded file (by 1/4 speed or 1/8 speed).
7)
ZOOM
In the live mode of the DVR, press this button to enlarge the image of the selected channel.
8)
/ -
Press “ ” button to show the 4 channel display modes.
Press “-” button to change the setting in the menu.
9)
SEQ /+
Press “SEQ” button to activate the call monitor function, and press again to quit.
Press ”+” button to change the setting in the menu.
10) Power
Press this button long enough to turn on/off your DVR.
Note: Under the recording mode, please stop recording before turning off your DVR.
11) 1 / 2 / 3 / 4
Press one of these buttons to show the channel display of CH1 ~ CH4 on the monitor.
1
FRONT AND REAR PANELS
12)
Press this button to play the recorded video.
13) Pause / Stop / Rew / FF
Under the playback mode:
Press one of these button to pause / stop / rewind / fast-forward the playback file.
14) Up / Down / Left / Right
Press one of these direction buttons to move the cursor up/down/left/right.
Under the DVR menu mode, these direction buttons can use for the following operation:
Up / Down: Make the selection / Change the settings
Left / Right: Make the selection
SLOW
15)
ZOOM
AUDIO
(Audio)
Press these two buttons at the same time to select live or playback sounds of the audio channels.
SEQ.
16)
P.T.Z
(PTZ)
Press these two buttons at the same time to enter / exit the PTZ control mode.
In the PTZ control mode → Zoom in: Press "+" button ; Zoom out: Press "-" button
Adjust PTZ angle: Press direction buttons to turn up/down/left/right
17) “MENU” + “ENTER” (Key lock)
Press these two buttons at the same time to lock keys on the DVR front panel.
2
FRONT AND REAR PANELS
1.2 Rear Panel
‧ Model 1
‧ Model 2
1)
75Ω / HI-IMPEDANCE
When using LOOP function, please switch to HI-IMPEDANCE. Otherwise, please switch to 75Ω.
2)
LOOP / INPUT (For channel 1~4)
LOOP: Video output connector.
INPUT: Connect to video sources, such as cameras.
Note: If you want to playback the video with audio, please connect an audio camera to INPUT 1 on the
DVR rear panel.
3)
MONITOR
Connect to MAIN monitor.
4)
CALL
Connect to CALL monitor to show the channel display one by one.
When any alarm is triggered, CALL monitor will show the image of the triggered channel for a period of time.
5)
AUDIO IN
Connect to audio sources, such as cameras equipped with the audio function.
When users start recording, the audio input will also be recorded.
6)
AUDIO OUT
Connect to a monitor or speaker with 1 mono audio output.
7)
USB (Model 2 only)
To quickly backup or upgrade firmware/OSD, you can insert a compatible USB flash drive into this USB port.
Before using the USB flash drive, please use your PC to format the USB flash drive as “FAT32” first.
Note: For the list of compatible USB flash drives, please refer to page 56 in your user manual.
3
FRONT AND REAR PANELS
8)
IR (Model 2 only)
Connect the IR receiver for remote control.
9)
EXTERNAL I/O
Insert the supplied 15PIN DSUB to this port for connecting external devices (external alarm, PTZ camera, etc).
For detailed I/O port PIN configuration, please refer to page 55 in your user manual.
10) LAN
Connect to Internet by LAN cable.
11) LINK ACT.
When your DVR is connected to the Internet, this LED will be on.
12) DC 19V
Connect to the supplied adapter.
4
CONNECTIONS AND SETUP
2. CONNECTIONS AND SETUP
2.1 HDD Installation
The HDD must be installed before the DVR is turned on.
Step 1: Loose the screws on the upper cover and open the upper cover of the DVR.
Step 2: Remove the HDD bracket.
Step 3: Get a compatible SATA HDD, and connect it to the power connector and data bus connector (make sure to align
the HDD precisely for pin connection).
Step 4: Put the HDD to the DVR, and replace the HDD bracket back to the DVR base.
Step 5: Close the upper cover of the DVR, and fasten all the screws you loosened in Step 1.
5
CONNECTIONS AND SETUP
2.2 Camera Connection
The cameras must be connected and power-supplied BEFORE the DVR is turned on. The DVR will automatically
detect the video system of the connected camera(s) (NTSC / PAL), and switch itself to the correct system.
Connect the camera with the indicated power supply, and connect the camera video output to the DVR video input
port with a coaxial cable or RCA lines with BNC connectors.
Note: For detailed DVR video input / output ports, please refer to “1.2 Rear Panel” at page 3.
For detailed camera operation, please refer to its own manual.
Note: If you want to make a video backup with audio, please connect audio camera to the CH1 which
support the audio function
2.3 Power Setup
This device should be operated only with the type of power source indicated on the manufacturer’s label. Connect
the indicated AC power cord to the power adapter, and plug into an electrical outlet. The power LED “
green. It takes approximately 10 to 15 seconds to boot the system.
” will be on as
2.4 Date and Time Setting
Before operating your DVR, please set the date and time on your DVR first.
Press the “MENU” button and enter the password to go to the menu list. The default admin password is 0000.
Move the cursor to “DATE” and you can set the date / time / daylight saving in the “DATE” menu list.
2.5 Password Setting
Press the “MENU” button and enter the password to go to the menu list. Then, move the cursor to “ADVANCE” to
enter the advanced setting menu.
In the “ADVANCE” menu, move the cursor to “SYSTEM”. Select “PASSWORD” and press the “ENTER” button to
enter the submenu to set the password (four digits). The default admin password is 0000.
ADVANCE
CAMERA
DETECTION
REMOTE
DISPLAY
ALERT
SYSTEM
NETWORK
BACKUP
HDD INFO
SYSTEM
RS485
2400
0
XXXX
RESET
HDD-MASTER-1
START
NEVER
ENGLISH
NTSC
1160-1012-1021-1014-M3-6C1B
SERIAL TYPE
BAUDRATE
HOST ID
PASSWORD
RESET DEFAULT
CLEAR HDD
UPGRADE
AUTO KEYLOCK
LANGUAGE
VIDEO FORMAT
VERSION
6
BASIC OPERATION
3. BASIC OPERATION
3.1 Live Page
In this live page of the DVR, you can see the following icons:
Icon Function
Icon Function
Icon Function
Key lock
Digital zoom mode
Alarm
Key unlock
Digital zoom unselected
Recording
Live audio channel
Timer recording
Motion
Playback audio channel
PTZ control mode
Audio channel unselected
Full screen sequence mode
3.2 Recording
When the recording and the pre-alarm function are activated, this device will overwrite 8GB data from the oldest
for continuous recording without notice.
1)
Continuous Recording Icon
When the DVR is properly connected with camera, you can see the icon “
2)
” (recording) on the monitor.
Motion Recording Icon
When the motion / alarm detection is activated, once motion or external alarm happens, you will see the icon
“
3)
” (motion) on the monitor.
Timer Recording Icon
When the timer record is activated, you will see the icon “
” (timer) on the monitor
Note: The audio source connected to the “Audio 1” will be recorded with the video of the “CH1”.
3.3 Playback
Press the “PLAY” button on the DVR control panel, and the device will playback the latest recorded video.
Note: There must be at least 8192 images of recorded data for playback to work properly. If not, the
device will stop playback. For example, if the IPS is set to 30, the recording time should be at least
205 seconds (8192 images / 40 IPS) for the playback to work properly.
1)
Fast Forward / Fast Rewind
You can increase the speed for fast forward and rewind on this device. In the playback mode:
Press “FF“ once to get 4X speed forward and press twice to get 8X speed, etc. And the maximum speed is 32X.
Press “REW“ once to get 4X speed rewind and press twice to get 8X speed, etc. And the maximum speed is 32X.
Note: During playback, the image size of the recording (CIF) will be shown on the screen.
7
BASIC OPERATION
2)
Pause / Image Jog
Press “PAUSE” button to pause the playback.
In the pause mode:
Press “►” button once to get one frame forward.
Press “◄” button once to get one frame rewind.
3)
Stop
Pressing “STOP” button under playback mode, the screen of this device will return to live monitoring mode.
4)
Slow Playback
Press “SLOW” button to get 1/4X speed playback and press twice to get 1/8X speed playback.
5)
Audio Playback
Use these two buttons to select the live or playback sound of the audio channels.
Icon “
” (blue) means: Live audio of the 1st audio channel / Icon “
” (yellow) means: Playback audio of the 1st audio channel
Note: If you want to make a video backup with audio, please connect audio camera to CH1 which
supports the audio function.
3.4 Key Lock and Unlock
1)
Key Lock On:
Press “MENU” + “ENTER” buttons at the same time on the DVR control panel to lock keys.
Or set the time-out after which the key lock function is activated (Never / 10 SEC / 30 SEC / 60 SEC). Please refer
to page 21 in your user manual.
2)
Key Lock Off:
Enter the DVR password to exit “Key Lock” mode.
Note: For the password setting, please refer to page 8 in your user manual.
4.5 Upgrade
‧ Firmware / Multilanguage OSD Upgrade
1)
Use USB flash drive to upgrade firmware or OSD:
Step 1. Format the USB memory device as FAT32 format first.
Step 2. Get the upgrade files from your distributor and save the upgrade files in your USB flash device (do not
change the file name).
Step 3. In the “SYSTEM” menu, move the cursor to “UPGRADE”, and press “ENTER” button.
Step 4. Select “YES”, and press “ENTER” button again to confirm upgrade.
2)
Use the supplied software AP to remotely upgrade firmware or OSD:
Step 1. Save the upgrade files at your PC (do not change the file name) and then login to the AP software.
Step 2. Press “
” (Miscellaneous Control) button to show the miscellaneous control panel. In the miscellaneous
control panel, press “
” (Tools) button on the miscellaneous control panel to enter the AP upgrade
window.
Step 3. Enter the user name, password, IP address and port number of the DVR.
Step 4. Press “Firmware” or “Language” tab as needed, and press “Add” to select the firmware or OSD files to
upgrade.
8
BASIC OPERATION
Step 5. Press “Update Firmware” or “Update Language” button to start the upgrade.
Note: For remote upgrade details, please refer to page 47 in your user manual.
4.6 Search
1)
Search by List
Press “LIST” button on the DVR control panel to show the list for all types of the recorded files. Choose the list
you want to view and press “ENTER” button to start playback.
2)
ALARM
List the information of the alarm-trigger-recorded files.
MANUAL
List the information of the manual-recorded files. The DVR will save one recorded file once
any recording setting is changed.
MOTION
List the information of the motion-trigger-recorded files.
SYSTEM
List the information of the system-recorded files. The DVR system will save one recorded
file every one hour.
TIMER
List the information of the timer-recorded files.
Quick Search by Time
Press the “MENU” button to enter the menu list, move the cursor to “QUICK SEARCH”, and press “ENTER”
button to enter the quick time search menu. You can search any specific events by time (Year / Month / Day / Hour
/ Min) and directly play the file you find.
3)
Search the Record Event by Log on the AP Software
Press “
” (Miscellaneous Control) button to show the miscellaneous control panel. In the miscellaneous control
panel, press “
” (Status List) button to enter the “Status List” page. In this page, you can see the list of three
different types of recording (User / Motion / Alarm) and press “Play” button to directly playback the file.
9
MENU CONFIGURATION
5. MENU CONFIGURATION
QUICK SEARCH
DATE
SEARCH HDD
IMAGE SIZE
QUALITY
MANUAL RECORD ENABLE
EVENT REOCRD ENABLE
RECORD
TIMER RECORD ENABLE
MULTIPLEX MODE
MAIN MENU
MANUAL RECORD IPS
EVENT RECORD IPS
TIMER RECORD IPS
TIMER
RECORD TIMER
DETECTION TIMER
DATE
DATE
FORMAT
DAYLIGHT SAVING
ADVANCE
ADVANCED MENU
TITLE
BRIG
CAMERA
CONT
SATU
HUE
COV.
TITLE
DET
AREA
DETECTION
LS
SS
TS
RE
ALARM
TITLE
DEVICE
REMOTE
ID
PROTOCOL
RATE
DE-INTERLACE
DISPLAY
FULL SCREEN DWELL DURATION (SEC)
CHANNEL TITLE
EVENT STATUS
DATE DISPLAY
EXT. ALERT
INT. BUZZER
ALERT
KEY BUZZER
VLOSS BUZZER
MOTION BUZZER
ALARM BUZZER
ALARM DURATION (SEC)
SERIAL TYPE
BAUDRATE
HOST ID
PASSWORD
RESET DEFAULT
SYSTEM
CLEAR HDD
UPGRADE
AUTO KEYLOCK (SEC)
LANGUAGE
VIDEO FORMAT
VERSION
10
MENU CONFIGURATION
NETWORK TYPE
IP
GATEWAY
NETWORK
NETMASK
PRIMARY DNS
SECONDARY DNS
PORT
START TIME
BACKUP
END TIME
AVAILABLE SIZE
HDD INFO
HDD NUM
HDD SIZE (GB)
EVENT
EVENT LOG
TIME
COMMENT
11